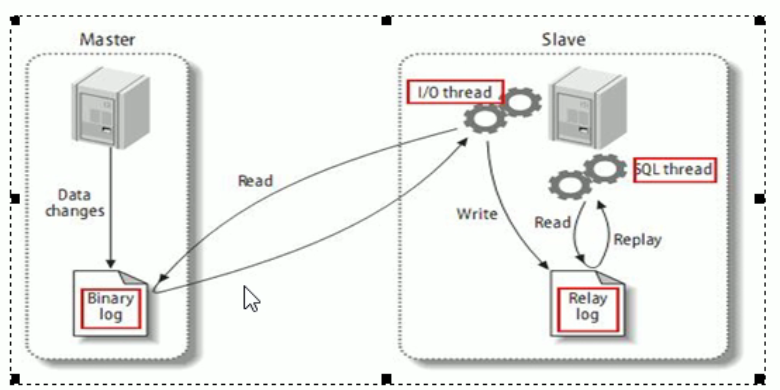
1、复制的基本原理
slave会从master读取binlog来进行数据同步
主从复制的三步骤
- master将改变记录到二进制日志(binary log)。这些记录过程叫做二进制日志事件(binary log events)
- slave将master的binary log events拷贝到它的中继日志(relay log)
- slave重做中继日志中的事件,将改变应用到自己的数据库中。MySQL复制是异步的且串行化的

2、复制的基本原则
- 每个slave只有一个master
- 每个slave只能有一个唯一的服务器ID
- 每个master可以有多个salve
3、复制最大问题
因为发生多次 IO, 存在延时问题4、一主一从常见配置
前提
mysql 版本一致,主从机在同一网段下
ping 测试
Linux 中 ping Windows
Windows 中 ping Linux[root@Heygo 桌面]# ping 10.206.207.131PING 10.206.207.131 (10.206.207.131) 56(84) bytes of data.64 bytes from 10.206.207.131: icmp_seq=1 ttl=128 time=1.27 ms64 bytes from 10.206.207.131: icmp_seq=2 ttl=128 time=0.421 ms64 bytes from 10.206.207.131: icmp_seq=3 ttl=128 time=1.12 ms64 bytes from 10.206.207.131: icmp_seq=4 ttl=128 time=0.515 ms
ping 192.168.152.129配置
主机修改 my.ini 配置文件(Windows)
主从都配置都在 [mysqld] 节点下,都是小写,以下是老师的配置文件
以下两条为必须配置
配置主机 id
server-id=1
启用二进制日志
log-bin=C:/Program Files (x86)/MySQL/MySQL Server 5.5/log-bin/mysqlbin
以下为非必须配置
启动错误日志
log-err=C:/Program Files (x86)/MySQL/MySQL Server 5.5/log-bin/mysqlerr
根目录
basedir=”C:/Program Files (x86)/MySQL/MySQL Server 5.5/“
临时目录
tmpdir=”C:/Program Files (x86)/MySQL/MySQL Server 5.5/“
数据目录
datadir=”C:/Program Files (x86)/MySQL/MySQL Server 5.5/Data/“
主机,读写都可以
read-only=0
设置不要复制的数据库
binlog-ignore-db=mysql
设置需要复制的数据
binlog-do-db=需要复制的主数据库名字从机修改 my.cnf 配置文件(Linux)
【默认开启】主从复制,不需要修改
【必须】从服务器唯一ID
server-id=2
【可选】启用二进制文件修改配置文件后的准备工作
因修改过配置文件,主机+从机都重启 mysql 服务
Windows
net stop mysql
net start mysql
Linux
service mysqld restart主机从机都关闭防火墙
Windows 手动关闭防火墙
关闭虚拟机 linux 防火墙
service iptables stop在 Windows 主机上简历账户并授权 slave
创建用户, 并赋予从机 REPLICATION 权限(从主机的数据库表中复制表)
GRANT REPLICATION SLAVE ON . TO ‘备份账号’@’从机器数据库 IP’ IDENTIFIED BY ‘账号密码’;
GRANT REPLICATION SLAVE ON . TO ‘Heygo’@’192.168.152.129’ IDENTIFIED BY ‘123456’;
刷新权限信息
flush privileges;
通过 select * from mysql.user where user=’Heygo’\G; 命令可查看:从机只有 Repl_slave_priv 权限为 Y,其余权限均为 Nmysql> select * from mysql.user where user='Heygo'\G;*************************** 1. row ***************************Host: %User: HeygoPassword: *6BB4837EB74329105EE4568DDA7DC67ED2CA2AD9Select_priv: NInsert_priv: NUpdate_priv: NDelete_priv: NCreate_priv: NDrop_priv: NReload_priv: NShutdown_priv: NProcess_priv: NFile_priv: NGrant_priv: NReferences_priv: NIndex_priv: NAlter_priv: NShow_db_priv: NSuper_priv: NCreate_tmp_table_priv: NLock_tables_priv: NExecute_priv: NRepl_slave_priv: YRepl_client_priv: NCreate_view_priv: NShow_view_priv: NCreate_routine_priv: NAlter_routine_priv: NCreate_user_priv: NEvent_priv: NTrigger_priv: NCreate_tablespace_priv: Nssl_type:ssl_cipher:x509_issuer:x509_subject:max_questions: 0max_updates: 0max_connections: 0max_user_connections: 0plugin:authentication_string: NULL
查询 master 的状态,将 File 和 Position 记录下来,在启动 Slave 时需要用到这两个参数
show master status;
mysql> show master status;+------------------+----------+--------------+------------------+| File | Position | Binlog_Do_DB | Binlog_Ignore_DB |+------------------+----------+--------------+------------------+| mysql-bin.000001 | 107 | mysql | |+------------------+----------+--------------+------------------+
在 Linux 从上验证是否能登陆主机的 MySQL
在从机上执行 mysql -h 10.206.207.131 -uHeygo -p 命令,发现无法连接主机的 MySQL 数据库
[root@Heygo 桌面]# mysql -h 10.206.207.131 -uHeygo -pEnter password:ERROR 1130 (HY000): Host 'windows10.microdone.cn' is not allowed to connect to this MySQL server
查阅资料发现:当你远程登录 MySQL 时,使用的账号要有特殊要求,如果要使用某个账号来远程登录,必须将账号的 host 属性值更改成 %。我敲,阳哥怎么就成功了呢?可以看到:我们在执行了 GRANT REPLICATION SLAVE ON . TO ‘Heygo’@’192.168.152.129’ IDENTIFIED BY ‘123456’; 命令之后,Heygo 账户的 host 属性为 192.168.152.129
mysql> select user,host,plugin from user;+-------+-----------------+--------+| user | host | plugin |+-------+-----------------+--------+| root | localhost | || root | 192.168.152.129 | || Heygo | 192.168.152.129 | |+-------+-----------------+--------+3 rows in set (0.00 sec)
于是我先使用 update user set host = ‘%’ where user = ‘Heygo’; 命令将 Heygo 账户的 host 字段设置为 %;然后使用 flush privileges; 命令刷新权限信息
mysql> update user set host = '%' where user = 'Heygo';Query OK, 1 row affected (0.00 sec)Rows matched: 1 Changed: 1 Warnings: 0mysql> flush privileges;Query OK, 0 rows affected (0.00 sec)mysql> select user,host,plugin from user;+-------+-----------------+--------+| user | host | plugin |+-------+-----------------+--------+| root | localhost | || root | 192.168.152.129 | || Heygo | % | |+-------+-----------------+--------+3 rows in set (0.00 sec)
在 Linux 从机上使用 mysql -h 10.206.207.131 -uHeygo -p 命令能够成功连接上主机上的 MySQL 数据库。我敲,谜一样
[root@Heygo 桌面]# mysql -h 10.206.207.131 -uHeygo -p
在 Linux 从机上配置需要复制的主机
从机进行认证
CHANGE MASTER TOMASTER_HOST='主机 IP',MASTER_USER='创建用户名',MASTER_PASSWORD='创建的密码',MASTER_LOG_FILE='File 名字',MASTER_LOG_POS=Position数字;CHANGE MASTER TOMASTER_HOST='10.206.207.131',MASTER_USER='Heygo',MASTER_PASSWORD='123456',MASTER_LOG_FILE='mysql-bin.000001',MASTER_LOG_POS=107;
启动从服务器复制功能
start slave;
查看从机复制功能是否启动成功:使用 show slave status\G; 命令查看
Slave_SQL_Running:Yes 和 Slave_IO_Running:Yes 说明从机连接主机成功(第一次测试没有成功,这是隔了半年之后的测试,因此某些数据会有出入)
mysql> show slave status\G;*************************** 1. row ***************************Slave_IO_State: Waiting for master to send eventMaster_Host: 10.206.207.131Master_User: HeygoMaster_Port: 3306Connect_Retry: 60Master_Log_File: mysql-bin.000052Read_Master_Log_Pos: 4274Relay_Log_File: mysqld-relay-bin.000063Relay_Log_Pos: 2998Relay_Master_Log_File: mysql-bin.000052Slave_IO_Running: YesSlave_SQL_Running: YesReplicate_Do_DB:Replicate_Ignore_DB:Replicate_Do_Table:Replicate_Ignore_Table:Replicate_Wild_Do_Table:Replicate_Wild_Ignore_Table:Last_Errno: 0Last_Error:Skip_Counter: 0Exec_Master_Log_Pos: 4274Relay_Log_Space: 4749Until_Condition: NoneUntil_Log_File:Until_Log_Pos: 0Master_SSL_Allowed: NoMaster_SSL_CA_File:Master_SSL_CA_Path:Master_SSL_Cert:Master_SSL_Cipher:Master_SSL_Key:Seconds_Behind_Master: 0Master_SSL_Verify_Server_Cert: NoLast_IO_Errno: 0Last_IO_Error:Last_SQL_Errno: 0Last_SQL_Error:Replicate_Ignore_Server_Ids:Master_Server_Id: 1Master_UUID:Master_Info_File: /var/lib/mysql/master.infoSQL_Delay: 0SQL_Remaining_Delay: NULLSlave_SQL_Running_State: Slave has read all relay log; waiting for the slave I/O thread to update itMaster_Retry_Count: 86400Master_Bind:Last_IO_Error_Timestamp:Last_SQL_Error_Timestamp:Master_SSL_Crl:Master_SSL_Crlpath:Retrieved_Gtid_Set:Executed_Gtid_Set:Auto_Position: 0
如何停止从服务复制功能
stop slave;

