dns基础知识
https://github.com/skyao/learning-dns
SRV
DNS SRV 是 DNS 记录中一种,用来查询指定服务的地址。与常见的A记录、CNAME 不同的是,SRV中除了记录服务器的地址,还记录了服务的端口,并且可以设置每个服务地址的优先级和权重。RFC-2782 给出DNS SRV的建议标准,它是在2000年的时候提出来的。
访问服务的时候,本地的服务从 DNS 服务器查询到一个地址列表,根据优先级和权重,从中选取一个地址作为本次请求的目标地址。
一个支持SRV的 LDAP client 通过查询域名,可以得知 LDAP 服务的 IP 地址和服务端口:
_ldap._tcp.example.com
这个域名的格式是 rfc-2782 中推荐的格式,_ldap表示LDAP服务,_tcp表示通过TCP协议访问LDAP服务。
SRV 的 DNS 类型代码为 33。SRV的记录格式为:
_Service._Proto.Name TTL Class SRV Priority Weight Port TargetService: 服务名称,前缀“_”是为防止与DNS Label(普通域名)冲突。Proto: 服务使用的通信协议,_TCP、_UDP、其它标准协议或者自定义的协议。Name: 提供服务的域名。TTL: 缓存有效时间。CLASS: 类别Priority: 该记录的优先级,数值越小表示优先级越高,范围0-65535。Weight: 该记录的权重,数值越高权重越高,范围0-65535。Port: 服务端口号,0-65535。Target: host 地址。
客户端查询到多条记录的时候,使用优先级最高的记录。对相同优先级的记录,按照权重选择,记录的权重越高,被选择的可能性越高。
选择的时候,将所有记录的权重值累加,得到一个选择区间[0,sum],每个记录在[0,sum]中占据一段连续的、长度为自身权重值区间。然后生成一个[0,sum]中的随机数,随机数落在的区间所属的记录就是被选择的记录。
注意事项
- 在使用DNS SRV的时候,要注意DNS Client是否按照预期的方式处理收到的SRV记录。当前DNS SRV只能够负责提供服务地址列表,对这个列表如何解读,完全取决于Client的实现。
- rfc-1035中规定,通过UDP协议传输DNS响应时,UDP报文的负载不能超过512字节,在添加 SRV 记录的时候,要特别注意。通过TCP传输时没有512字节的限制。
- 当一个服务地址有多个相同优先级的SRV记录的时候,Client会按照这些SRV的权重分配请求。下一次向服务发起的请求可能发送到了不同的地址。
- 在通过SRV记录的权重来分配请求的时候,使用的是本地缓存的DNS记录,所以不能实时地感知到服务的地址列表变化。除非将 TTL 设置的非常短暂,但这样将会频繁地查询DNS服务器。
Client查询服务地址的过程
rfc-2782中已经做了很好地介绍,这里就不表述了。配置举例
下面是DNS中 master file,可以看到有 example.com 域名提供了一个名为_foobar._tcp 的服务,这个服务有两个 SRV 记录,分别指向了 sys-box.example.com:1099 和 server.example.com:1099$ORIGIN example.com.@ SOA server.example.com. root.example.com. (2019030102 3600 3600 604800 86400 )NS server.example.com.NS ns1.ip-provider.net.NS ns2.ip-provider.net.;_foobar._tcp SRV 0 1 1099 slow-box.example.com.SRV 0 3 1099 fast-box.example.com.; if neither slow-box or fast-box is up, switch to; using the sys-box and the serverSRV 1 0 1099 sys-box.example.com.SRV 1 0 1099 server.example.com.server A 172.30.79.10slow-box A 10.30.79.11sys-box A 10.30.79.12fast-box A 10.30.79.13; NO other services are supported*._tcp SRV 0 0 0 .*._udp SRV 0 0 0 .
Debian系列
1. 安装
apt-get updateapt-get install bind9
2. 配置缓存转发
打开打开/etc/bind/named.conf.options,修改后如下:
acl goodclients {192.168.1.0/24;localhost;localnets;};options {directory "/var/cache/bind";// If there is a firewall between you and nameservers you want// to talk to, you may need to fix the firewall to allow multiple// ports to talk. See http://www.kb.cert.org/vuls/id/800113// If your ISP provided one or more IP addresses for stable// nameservers, you probably want to use them as forwarders.// Uncomment the following block, and insert the addresses replacing// the all-0's placeholder.// forwarders {// 0.0.0.0;// };//========================================================================// If BIND logs error messages about the root key being expired,// you will need to update your keys. See https://www.isc.org/bind-keys//========================================================================dnssec-validation auto;auth-nxdomain no; # conform to RFC1035listen-on-v6 { any; };//addedlisten-on { 192.168.1.110;};recursion yes ;allow-query { goodclients;};allow-transfer { none; }; # disable zone transfers by defaultforwarders {223.5.5.5; # alidns223.6.6.6; # alidns};forward only ;};
3. 配置local文件
named.conf.local 文件默认是空的。本文在配置文件中分别定义一条正向解析和一条反向解析。配置文件修改后类似如下:
//domain->ipzone "local.com" in {type master;file "/var/cache/bind/db.local.com";};//ip->domainzone "1.168.192.in-addr.arpa" in {type master;file "/var/cache/bind/reverse/db.1.168.192";};
4. 定义区域配置文件
配置文件定义后类似如下,分别是正向和反向两个解析记录。按照自己需求修改相应的区域和区域解析记录,IP等信息。
正向记录sudo vim /var/cache/bind/db.local.com
$TTL 604800@ IN SOA local.com. root.local.com. (2 ; Serial604800 ; Refresh86400 ; Retry2419200 ; Expire604000) ; Negative Cache TTL;; name servers@ IN NS ns.local.com.@ IN A 192.168.1.110;ns recordsns IN A 192.168.1.110;host recordswww IN A 192.168.1.110api IN A 192.168.1.100
反向记录sudo vim /var/cache/bind/db.1.168.192
$TTL 604800@ IN SOA local.com. root.local.com. (2 ; Serial Number604800 ; Refresh86400 ; Retry2419200 ; Expire86400 ); ; Minimum@ IN NS local.com.66 IN PTR www.local.com.66 IN PTR api.local.com.
5. 检查配置、重启
hejun@ubuntu:/var/cache/bind$named-checkconfhejun@ubuntu:/var/cache/bind$named-checkzone local.com /var/cache/bind/db.local.comzone local.com/IN: loaded serial 2OKhejun@ubuntu:/var/cache/bind$named-checkzone db.1.168.192 /var/cache/bind/db.1.168.192zone db.1.168.192/IN: loaded serial 2OK
分别检查了语法和区域配置文件,没有报错。重启bind服务。
sudo service bind9 restart
到这里DNS服务器的配置就完成了,可以使用dig命令测试。
6.配置路由器首选DNS
Ubuntu20.04为例
修改/etc/resolvconf/resolv.conf.d/head 文件
# Dynamic resolv.conf(5) file for glibc resolver(3) generated by resolvconf(8)# DO NOT EDIT THIS FILE BY HAND -- YOUR CHANGES WILL BE OVERWRITTEN# 127.0.0.53 is the systemd-resolved stub resolver.# run "systemd-resolve --status" to see details about the actual nameservers.# 添加自定义的dns地址即可,优先级从上到下nameserver 192.168.1.110
使配置生效
resolvconf -usysetmctl restart network # 或是NetworkManager,看具体情况
上面的更改不太对,应该修改/etc/systemd/resolved.conf
# Entries in this file show the compile time defaults.# You can change settings by editing this file.# Defaults can be restored by simply deleting this file.## See resolved.conf(5) for details[Resolve]DNS=192.168.0.159DNS=114.114.114.114FallbackDNS=1.1.1.1#Domains=#LLMNR=no#MulticastDNS=no#DNSSEC=no#DNSOverTLS=no#Cache=no-negative#DNSStubListener=yes#ReadEtcHosts=yes
重启systemd-resolve
systemd restart systemd-resolved.service
Redhat系列
Centos 下dns服务安装是 yum install bind
启动的服务是 system start named
yum -y install bind bind-utilssystemctl start named.service // 启动服务systemctl enable named // 设为开机启动
1.1. 查看named进程是否正常启动
ps -eaf|grep named // 检查进程ss -nult|grep :53 // 检查监听端口
如图:

1.2. 开放 TCP 和 UDP 的 53 端口
firewall-cmd --permanent --add-port=53/tcpfirewall-cmd --permanent --add-port=53/udpfirewall-cmd --reload // 重新加载防火墙配置,让配置生效
2.1. 修改主要文件 /etc/named.conf
修改前先备份: cp -p /etc/named.conf /etc/named.conf.bak // 参数-p表示备份文件与源文件的属性一致。
修改配置:vi /etc/named.conf , 配置内容如下:
options {listen-on port 53 { any; };listen-on-v6 port 53 { any; };directory "/var/named";dump-file "/var/named/data/cache_dump.db";statistics-file "/var/named/data/named_stats.txt";memstatistics-file "/var/named/data/named_mem_stats.txt";allow-query { any; };/* 本地没有找到,就去100.125.1.250上找*/forwarders { 100.125.1.250;};/*- If you are building an AUTHORITATIVE DNS server, do NOT enable recursion.- If you are building a RECURSIVE (caching) DNS server, you need to enablerecursion.- If your recursive DNS server has a public IP address, you MUST enable accesscontrol to limit queries to your legitimate users. Failing to do so willcause your server to become part of large scale DNS amplificationattacks. Implementing BCP38 within your network would greatlyreduce such attack surface*/recursion yes;dnssec-enable yes;dnssec-validation yes;/* Path to ISC DLV key */bindkeys-file "/etc/named.iscdlv.key";managed-keys-directory "/var/named/dynamic";pid-file "/run/named/named.pid";session-keyfile "/run/named/session.key";};
检查一波
named-checkconf // 检查named.conf是否有语法问题
2.2. 配置正向解析和反向解析
2.2.1. 修改/etc/named.rfc1912.zones
添加配置: vi /etc/named.rfc1912.zones , 配置内容如下:
zone "reading.zt" IN {type master;file "named.reading.zt";allow-update { none; };};zone "0.168.192.in-addr.arpa" {type master;file "named.192.168.0";allow-update { none; };};
2.2.2. 添加正向解析域
基于 name.localhost 模板,创建配置文件:cp -p /var/named/named.localhost /var/named/named.reading.zt
配置正向域名解析文件 named.reading.zt : vi /var/named/named.reading.zt ,配置内容如下:
reading.zt 表示域名可以自定义
$TTL 1D@ IN SOA @ rname.invalid. (0 ; serial1D ; refresh1H ; retry1W ; expire3H ) ; minimumNS @A 127.0.0.1AAAA ::1mirror A 192.168.0.233test A 192.168.0.232
表示mirror.reading.zt 解析到 192.168.0.233 mirror 后面可以添加TTL 值 一般是600
mirror 600 A 192.168.0.233
说明:
授权 named 用户 chown :named /var/named/named.reading.zt
检查区域文件是否正确 named-checkzone "reading.zt" "/var/named/named.reading.zt" ,如图:
reading.zt为域名可以自定义
2.2.3. 添加反向解析域
基于 name.localhost 模板,创建配置文件: cp -p /var/named/named.localhost /var/named/named.192.168.0
配置反向域名解析文件 named.192.168.0 : vi /var/named/named.192.168.0
$TTL 1D@ IN SOA @ rname.invalid. (0 ; serial1D ; refresh1H ; retry1W ; expire3H ) ; minimumNS @A 127.0.0.1AAAA ::1233 PTR mirror.reading.zt232 PTR test.reading.zt
233 表示192.168.0.233 解析到 mirror.reading.zt
当然也可以将文件名从 /var/named/named.192.168.0 改为 /var/named/named.192.168,并在文件中配置 0.232 PTR mirror.reading.zt 来实现相同的效果。
授权 named 用户 chown :named /var/named/named.192.168.0
检查区域文件是否正确 named-checkzone "0.168.192.in-addr.arpa" "/var/named/named.192.168.0" ,如图:

2.2.4. 重启 named 服务,让配置生效
重启 named 服务,让配置生效 systemctl restart named
3.1. 注册域名解析服务器到配置文件
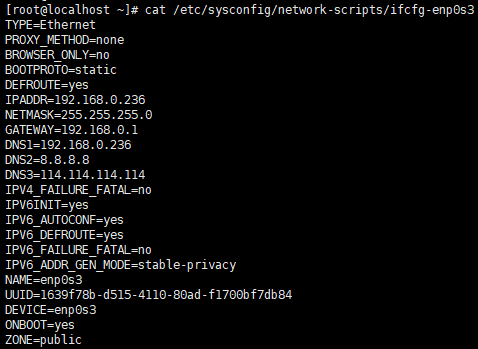
配置 ifcfg-xxxx vi /etc/sysconfig/network-scripts/ifcfg-enp0s3 , 具体内容如下:
TYPE=EthernetPROXY_METHOD=noneBROWSER_ONLY=noBOOTPROTO=staticDEFROUTE=yesIPADDR=192.168.0.236NETMASK=255.255.255.0GATEWAY=192.168.0.1DNS1=192.168.0.236 // 新增,本机就是域名解析服务器DNS2=8.8.8.8DNS3=114.114.114.114IPV4_FAILURE_FATAL=noIPV6INIT=yesIPV6_AUTOCONF=yesIPV6_DEFROUTE=yesIPV6_FAILURE_FATAL=noIPV6_ADDR_GEN_MODE=stable-privacyNAME=enp0s3UUID=1639f78b-d515-4110-80ad-f1700bf7db84DEVICE=enp0s3ONBOOT=yesZONE=public
如图:

重启网络服务,让配置生效 systemctl restart network.service
有些机器没有network 而是NetworkManger
此时可以用nmcli设置dns
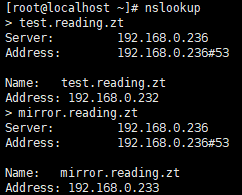
3.2. 使用 nslookup 测试
bind-utils 软件包本身提供了测试工具 nslookup
3.3.1. 正向域名解析测试
nslookup test.reading.zt , 或者,如下图:

3.3.2. 反向域名解析测试
nslookup 192.168.0.232 , 或者,如下图:


