一、ansible-tower 简介
1)公司中实现运维自动化的架构中主要用到 ansible,ansible 脚本在部署服务器指令行中显得不太直观。Ansible-Tower(之前叫做 awx)是将 ansible 的指令界面化,简明直观,简单易用。
2)Ansibke-tower 其实就是一个图形化的任务调度,复杂服务部署,IT 自动化的一个管理平台,属于发布配置管理系统,支持 Api 及界面操作,Django 编写。
3)Ansible-tower 可以通过界面从 github 拉取最新 playbook 实施服务部署,提高生产效率。当然它也提供一个 RESET API 和命令行的 CLI 以供 python 脚本调用
官方网站:https://www.ansible.com/products/tower
中文指南:http://www.ansible.com.cn/docs/tower.html
官方安装文档:http://docs.ansible.com/ansible-tower/latest/html/quickinstall/index.html
官方源地址:http://releases.ansible.com/ansible-tower/setup-bundle/
二、ansible-tower 安装及配置
[root@tower ~]# cd /opt/[root@tower opt]# wget https://releases.ansible.com/ansible-tower/setup-bundle/ansible-tower-setup-bundle-3.6.2-1.el7.tar.gz[root@tower opt]# tar xf ansible-tower-setup-bundle-3.6.2-1.el7.tar.gz[root@tower opt]# cd ansible-tower-setup-bundle-3.6.2-1/[root@tower ansible-tower-setup-bundle-3.6.2-1]# lsbackup.yml bundle group_vars install.yml inventory licenses README.md rekey.yml restore.yml roles setup.sh[root@tower ansible-tower-setup-bundle-3.6.2-1]# vim inventory[tower]localhost ansible_connection=local[database][all:vars]admin_password='tower' #tower登录密码pg_host=''pg_port=''pg_database='awx'pg_username='awx'pg_password='tower'pg_sslmode='prefer' # set to 'verify-full' for client-side enforced SSLrabbitmq_username=towerrabbitmq_password='tower'rabbitmq_cookie=cookiemonster# Isolated Tower nodes automatically generate an RSA key for authentication;# To disable this behavior, set this value to false# isolated_key_generation=true# SSL-related variables# If set, this will install a custom CA certificate to the system trust store.# custom_ca_cert=/path/to/ca.crt# Certificate and key to install in nginx for the web UI and API# web_server_ssl_cert=/path/to/tower.cert# web_server_ssl_key=/path/to/tower.key# Use SSL for RabbitMQ inter-node communication. Because RabbitMQ never# communicates outside the cluster, a private CA and certificates will be# created, and do not need to be supplied.# rabbitmq_use_ssl=False# Server-side SSL settings for PostgreSQL (when we are installing it).# postgres_use_ssl=False# postgres_ssl_cert=/path/to/pgsql.crt# postgres_ssl_key=/path/to/pgsql.key#开始安装[root@tower ansible-tower-setup-bundle-3.6.2-1]# ./setup.sh
访问主机
需要认证:
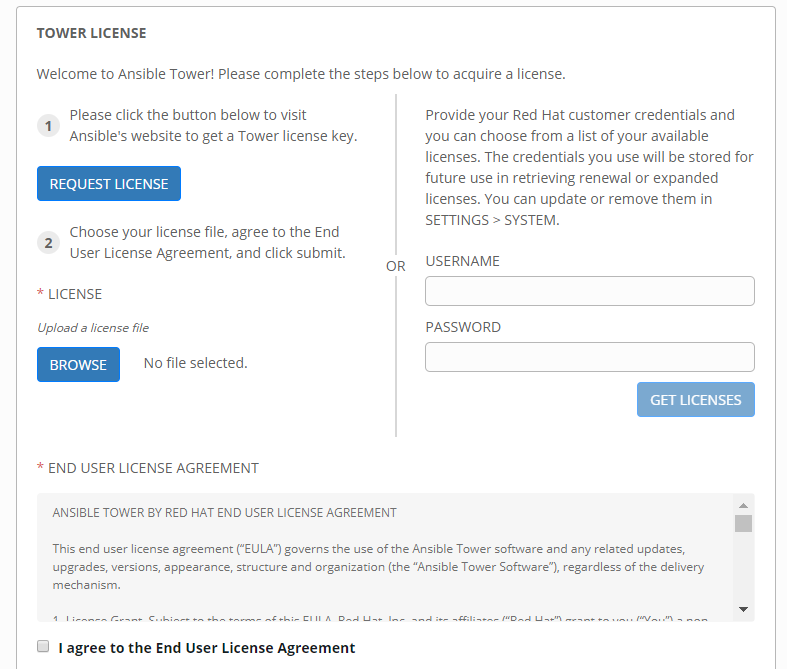
三、ansible-tower 破解
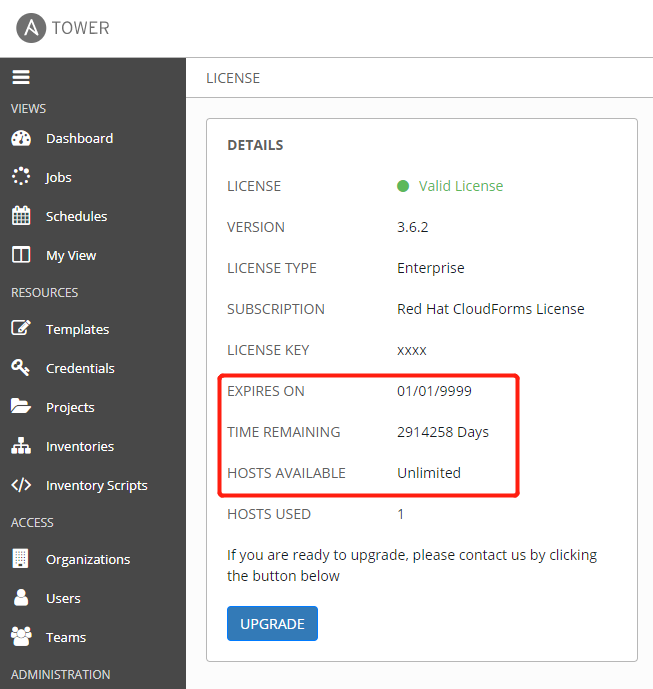
[root@tower ~]# cd /var/lib/awx/venv/awx/lib/python3.6/site-packages/tower_license[root@tower tower_license]# lltotal 8-rw-r--r-- 1 root root 7764 Dec 14 01:39 __init__.pycdrwxr-xr-x 2 root root 37 Jan 12 11:46 __pycache__#安装pip[root@tower tower_license]# wget https://bootstrap.pypa.io/get-pip.py[root@tower tower_license]# python get-pip.py[root@tower tower_license]# pip -Vpip 19.3.1 from /usr/lib/python2.7/site-packages/pip (python 2.7)[root@tower tower_license]# pip install uncompyle6#反汇编init.pyc[root@tower tower_license]# uncompyle6 __init__.pyc >__init__.py[root@tower tower_license]# lltotal 20-rw-r--r-- 1 root root 11502 Jan 12 12:04 __init__.py-rw-r--r-- 1 root root 7764 Dec 14 01:39 __init__.pycdrwxr-xr-x 2 root root 37 Jan 12 11:46 __pycache__#修改__init__.py文件def _check_cloudforms_subscription(self):return True #添加这一行if os.path.exists('/var/lib/awx/i18n.db'):return Trueelse:if os.path.isdir('/opt/rh/cfme-appliance'):if os.path.isdir('/opt/rh/cfme-gemset'):passtry:has_rpms = subprocess.call(['rpm', '--quiet', '-q', 'cfme', 'cfme-appliance', 'cfme-gemset'])if has_rpms == 0:return Trueexcept OSError:passreturn False....#修改"license_date=253370764800L" 为 "license_date=253370764800"def _generate_cloudforms_subscription(self):self._attrs.update(dict(company_name='Red Hat CloudForms License', instance_count=MAX_INSTANCES,license_date=253370764800, #修改license_key='xxxx',license_type='enterprise',subscription_name='Red Hat CloudForms License'))...#------------------------------------------------------------------#修改完重新编译一下[root@tower tower_license]# python -m py_compile __init__.py[root@tower tower_license]# python -O -m py_compile __init__.py[root@tower tower_license]# lltotal 36-rw-r--r-- 1 root root 11521 Jan 12 12:08 __init__.py-rw-r--r-- 1 root root 9181 Jan 12 12:08 __init__.pyc-rw-r--r-- 1 root root 9181 Jan 12 12:08 __init__.pyodrwxr-xr-x 2 root root 37 Jan 12 11:46 __pycache__#重启服务[root@tower tower_license]# ansible-tower-service restartRestarting TowerRedirecting to /bin/systemctl stop rh-postgresql10-postgresql.serviceRedirecting to /bin/systemctl stop rabbitmq-server.serviceRedirecting to /bin/systemctl stop nginx.serviceRedirecting to /bin/systemctl stop supervisord.serviceRedirecting to /bin/systemctl start rh-postgresql10-postgresql.serviceRedirecting to /bin/systemctl start rabbitmq-server.serviceRedirecting to /bin/systemctl start nginx.serviceRedirecting to /bin/systemctl start supervisord.service
访问https://10.0.0.203/#/license
四、运行测试项目
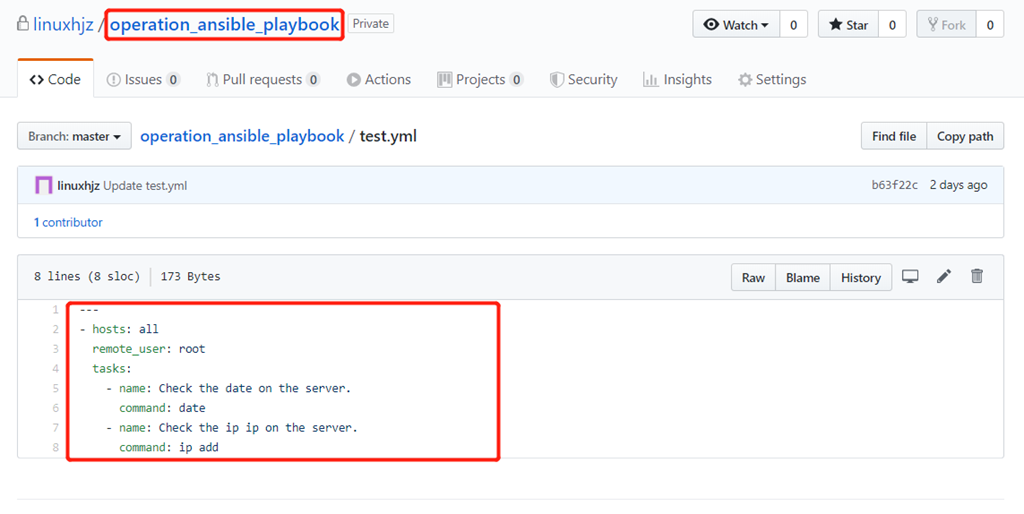
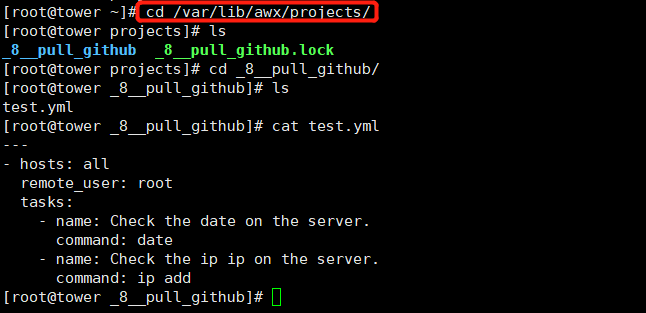
playbook 将在 github 上创建,Ansible Tower 拉取执行,Ansible Tower 的 playbook 默认存在 /var/lib/awx/projects/
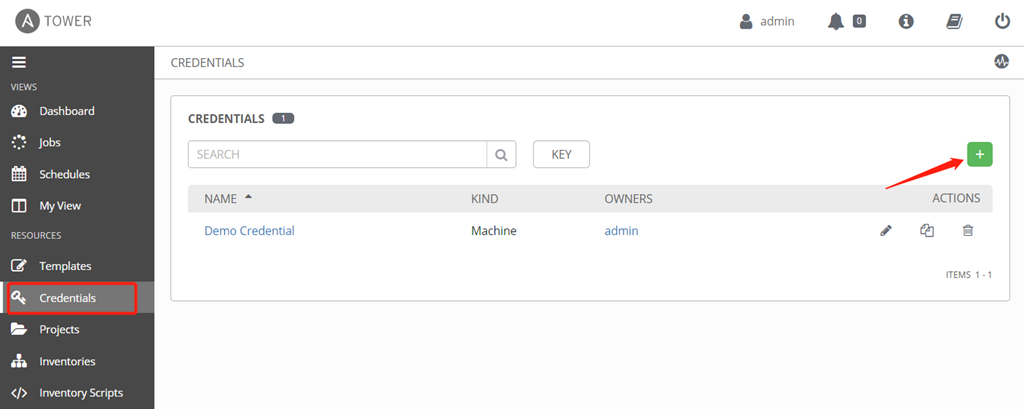
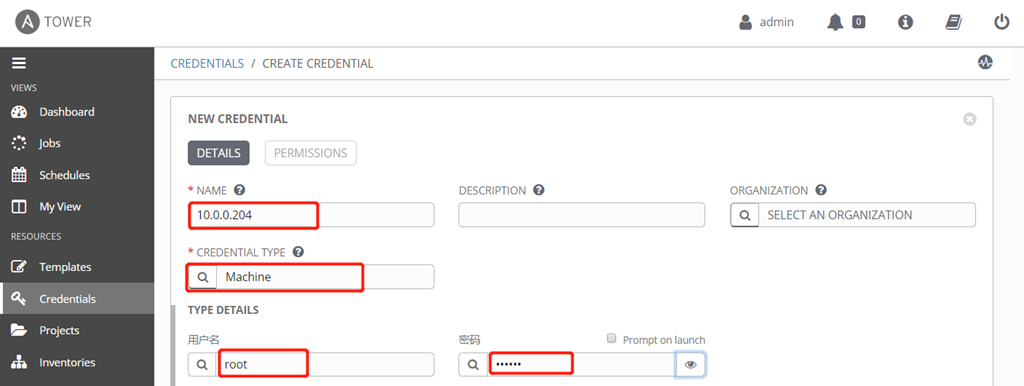
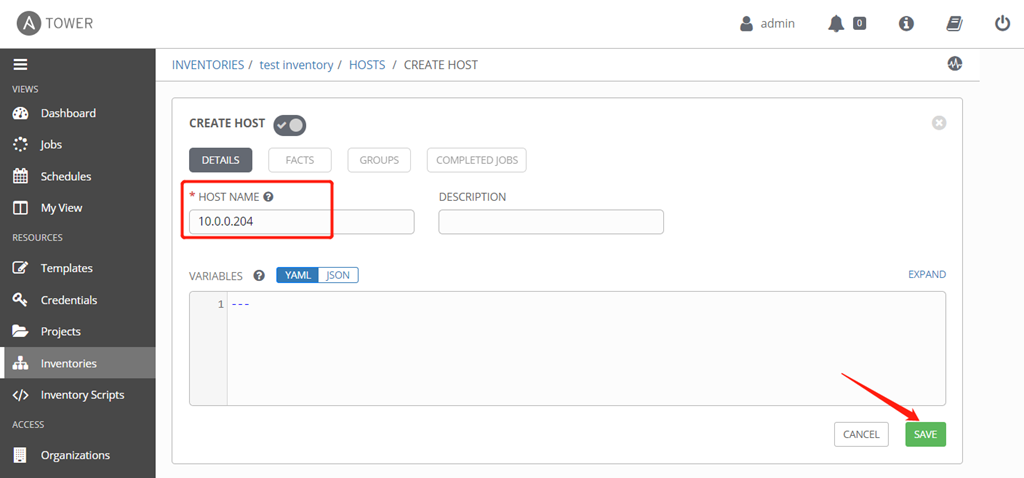
1)创建 host 登录凭据

2)在 github 中添加 playbook 项目
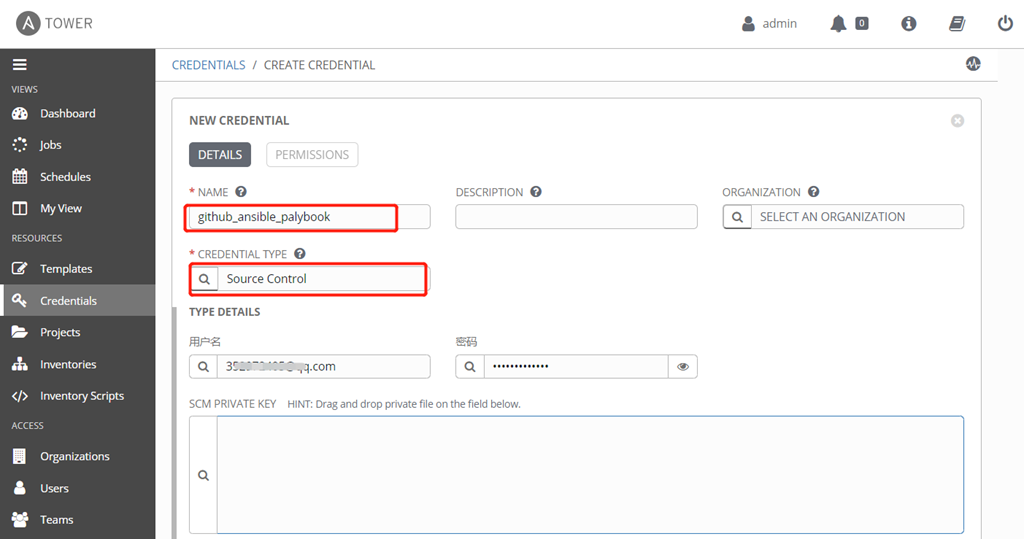
3)在 Ansible Tower 添加拉取 github 项目的凭据
4)创建 project
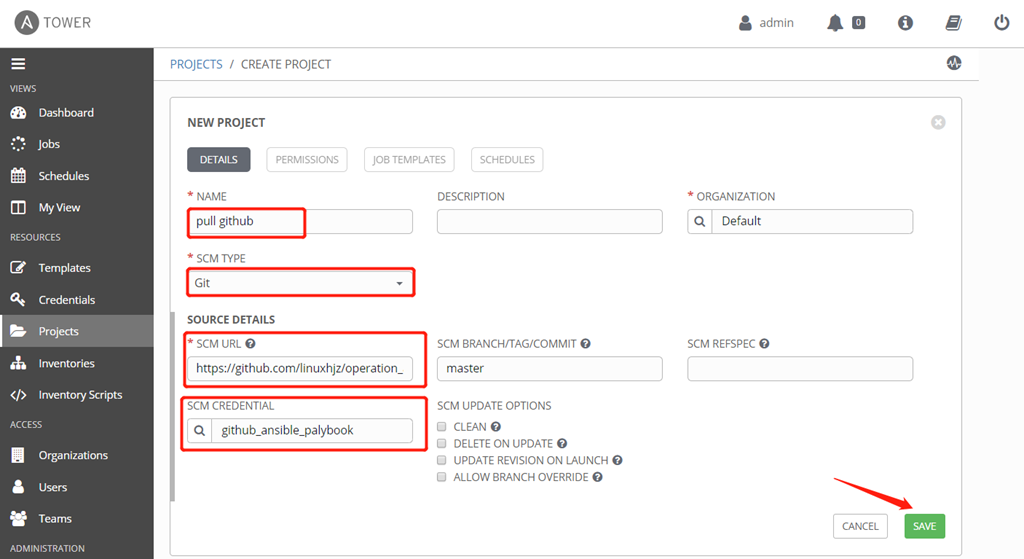
保存后 Ansilble Tower 会自动运行一次 Update,如果要手动运行,点击列表中的刷新按钮。当 github 上 yml 文件被更新或者新增后需要点击一下刷新按钮,否则 JOB 执行得还是原来的 yml
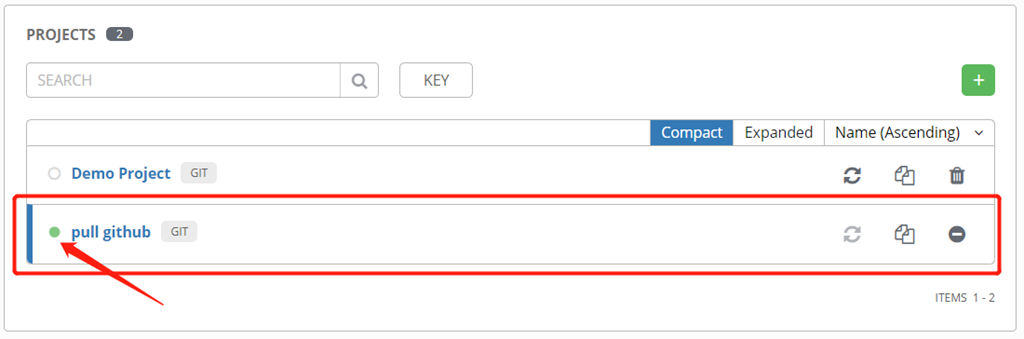
此时在 Ansible Tower 服务器的 / var/lib/awx/projects / 目录下已经有 git 拉下来的完整文件结构
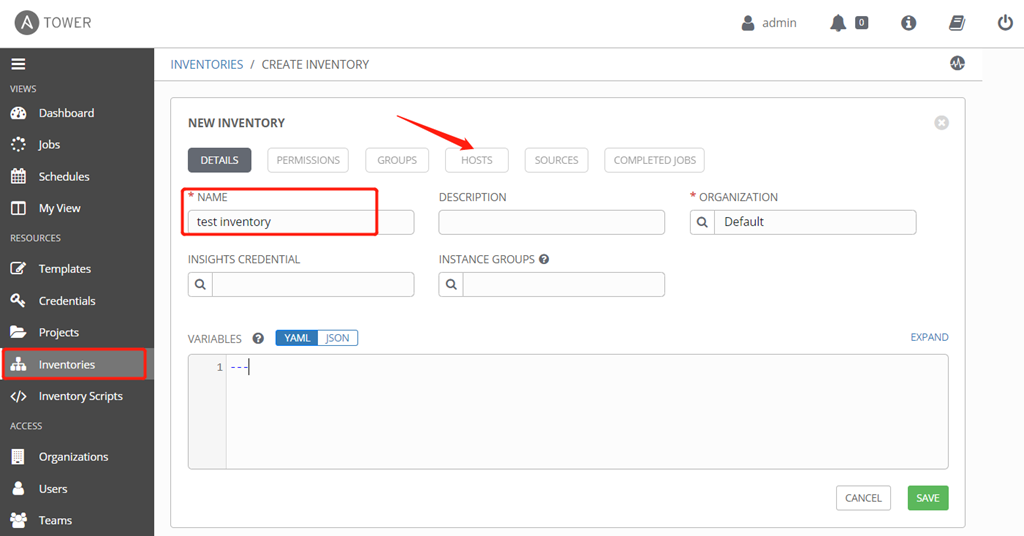
5)创建主机清单
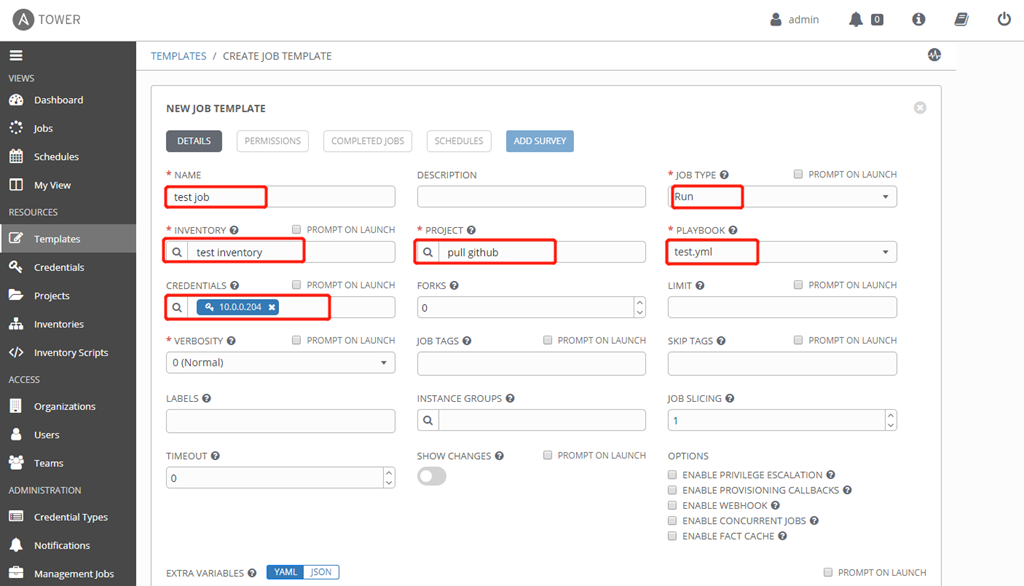
6)创建任务模板
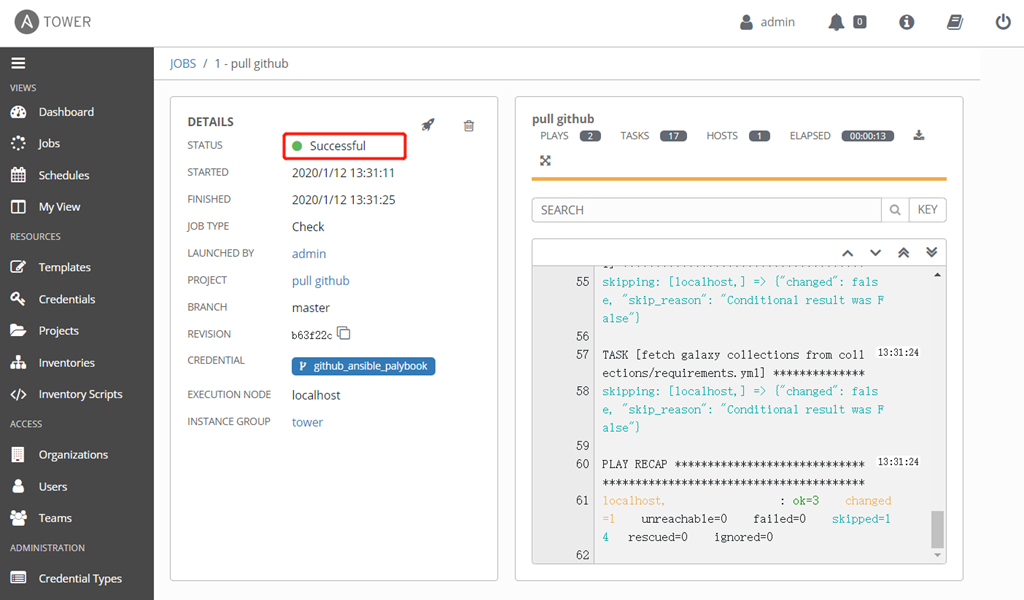
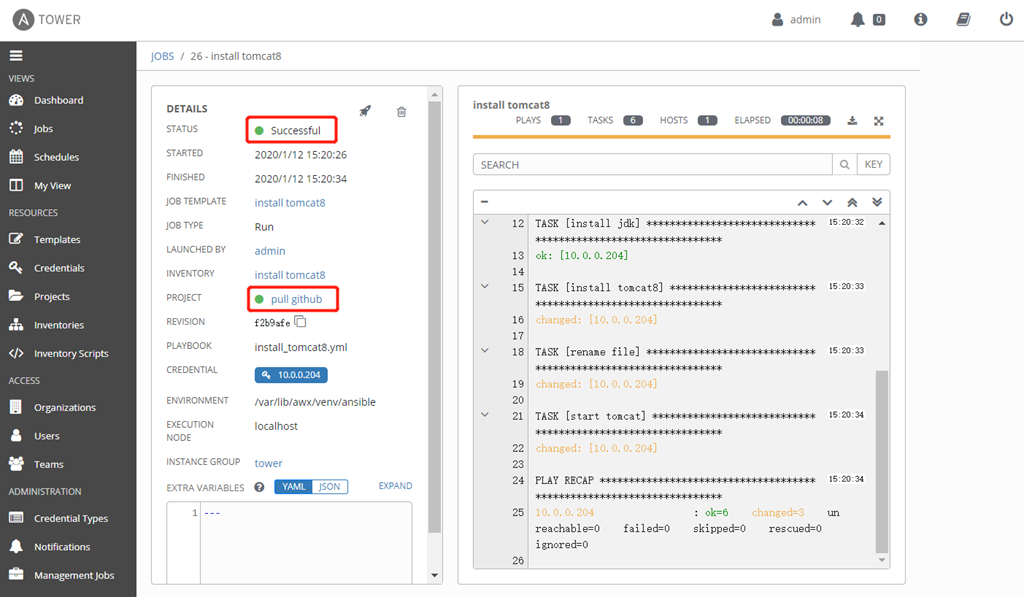
7)运行模板

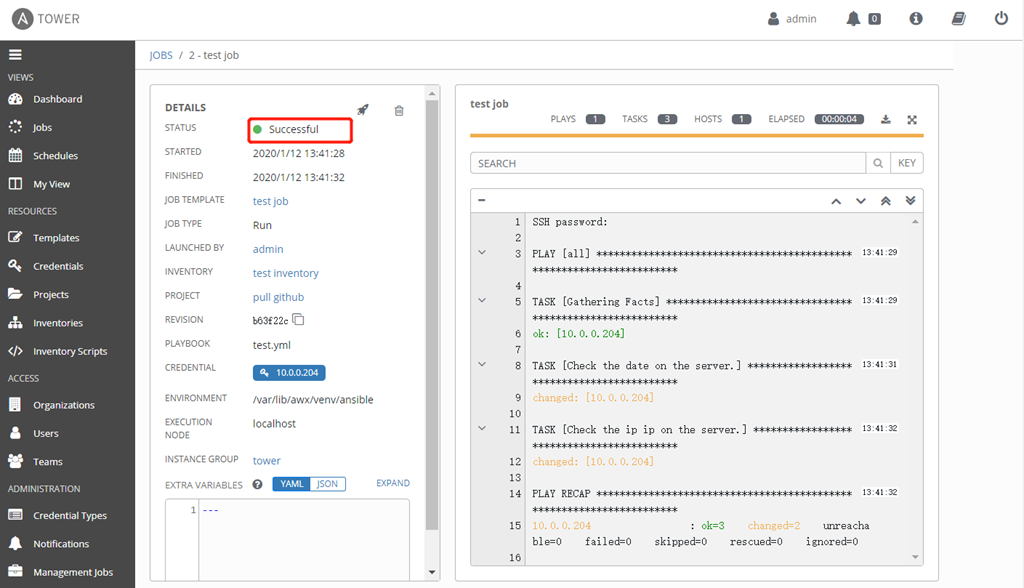
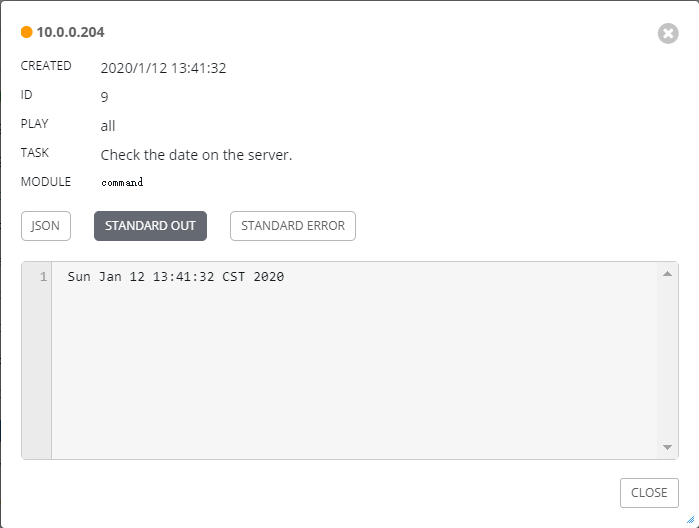
点击右侧日志中 change 几行可以看到详细信息
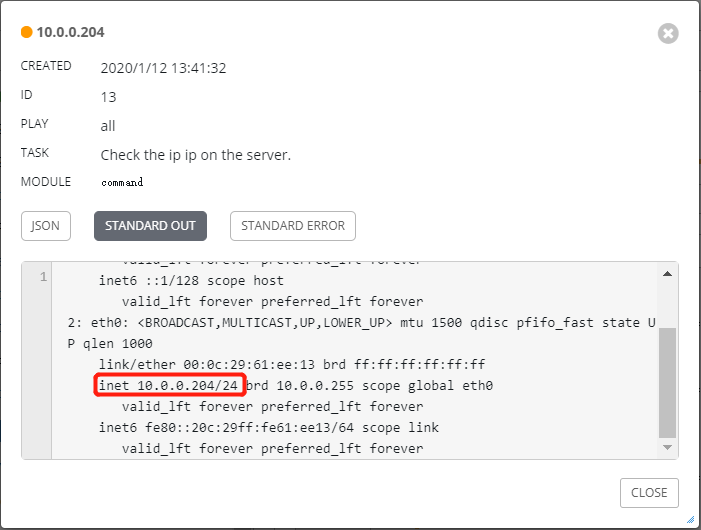
五、安装 tomcat8 测试
1)编写 playbook

---- hosts: allremote_user: roottasks:- name: "copy files to remote host"copy:src={{ item.src }}dest={{ item.dest }}with_items:- src: /usr/local/src/jdk-8u162-linux-x64.rpmdest: /usr/local/- src: /usr/local/src/apache-tomcat-8.0.38.tar.gzdest: /usr/local/- name: "install jdk"yum:name: /usr/local/jdk-8u162-linux-x64.rpmstate: present- name: "install tomcat8"shell: cd /usr/local/ && tar xf apache-tomcat-8.0.38.tar.gz- name: "rename file"shell: mv /usr/local/apache-tomcat-8.0.38 /usr/local/tomcat8- name: "start tomcat"shell: 'nohup /usr/local/tomcat8/bin/startup.sh &'
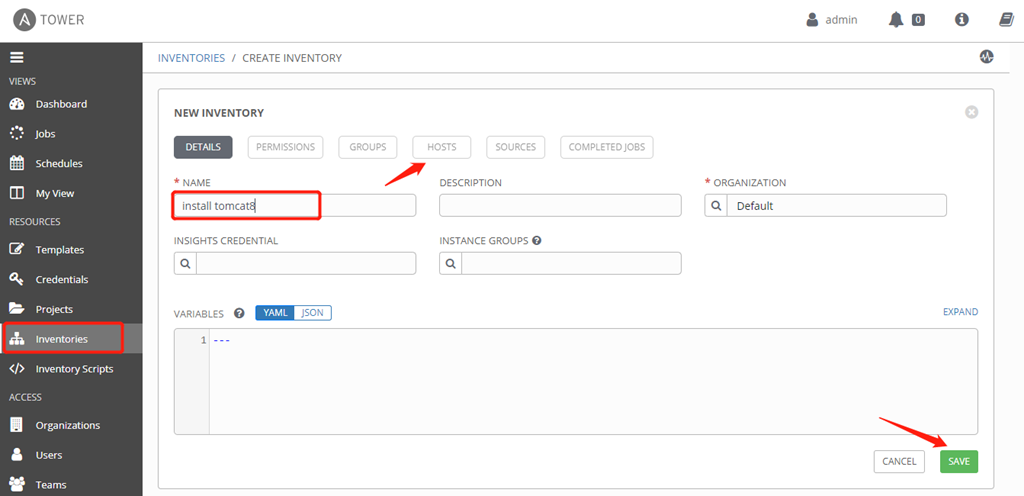
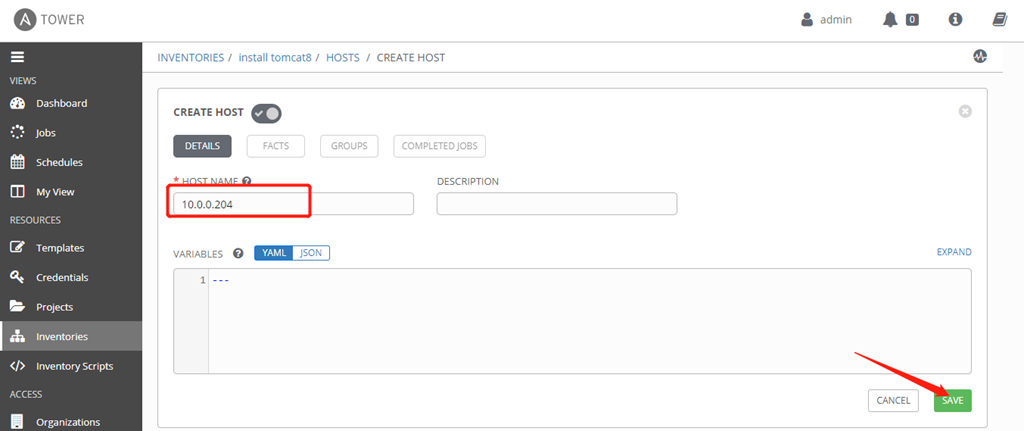
2)创建 inventory
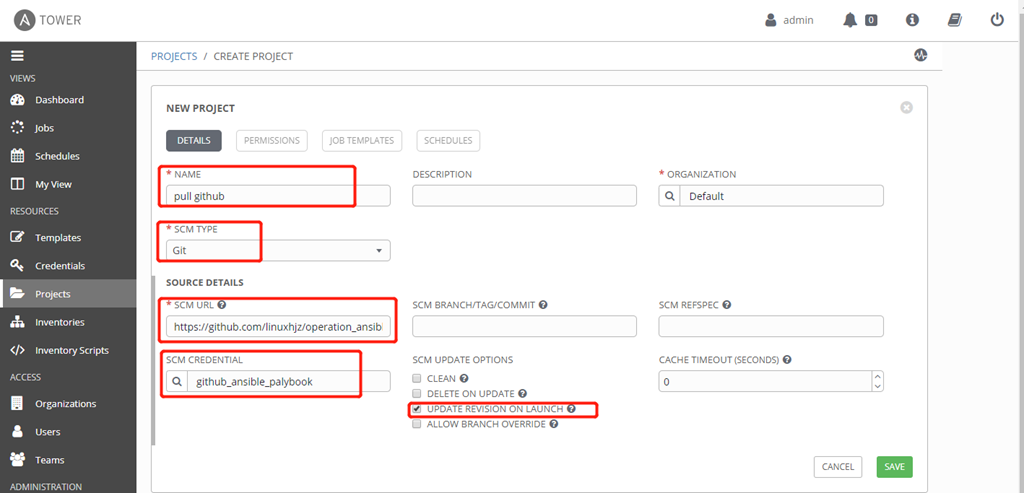
3)创建 project
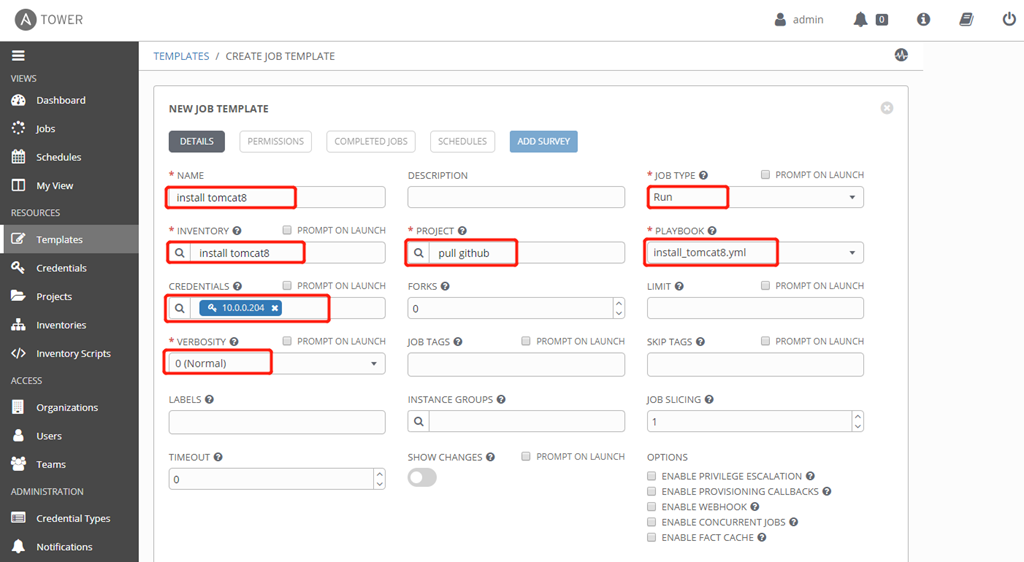
4)创建模板
5)运行模板
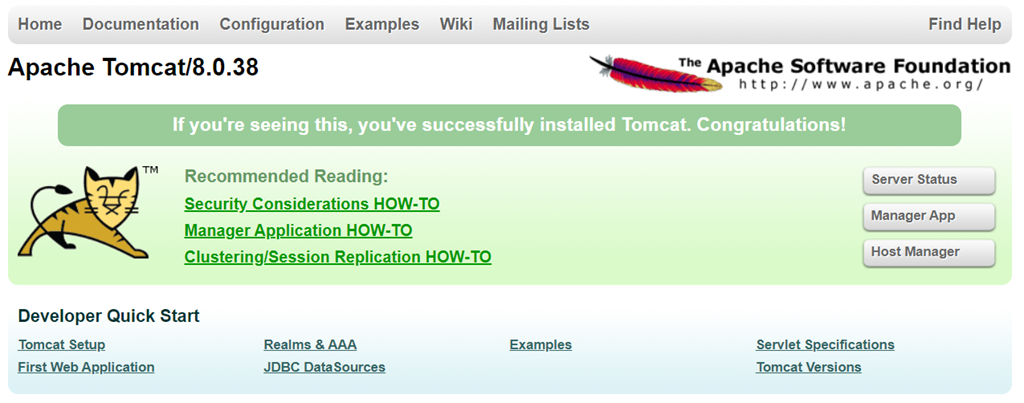
6)浏览器测试 tomcat

若有收获,就点个赞吧
0 人点赞
