1、Eureka服务注册与发现
1、Eureka基础知识
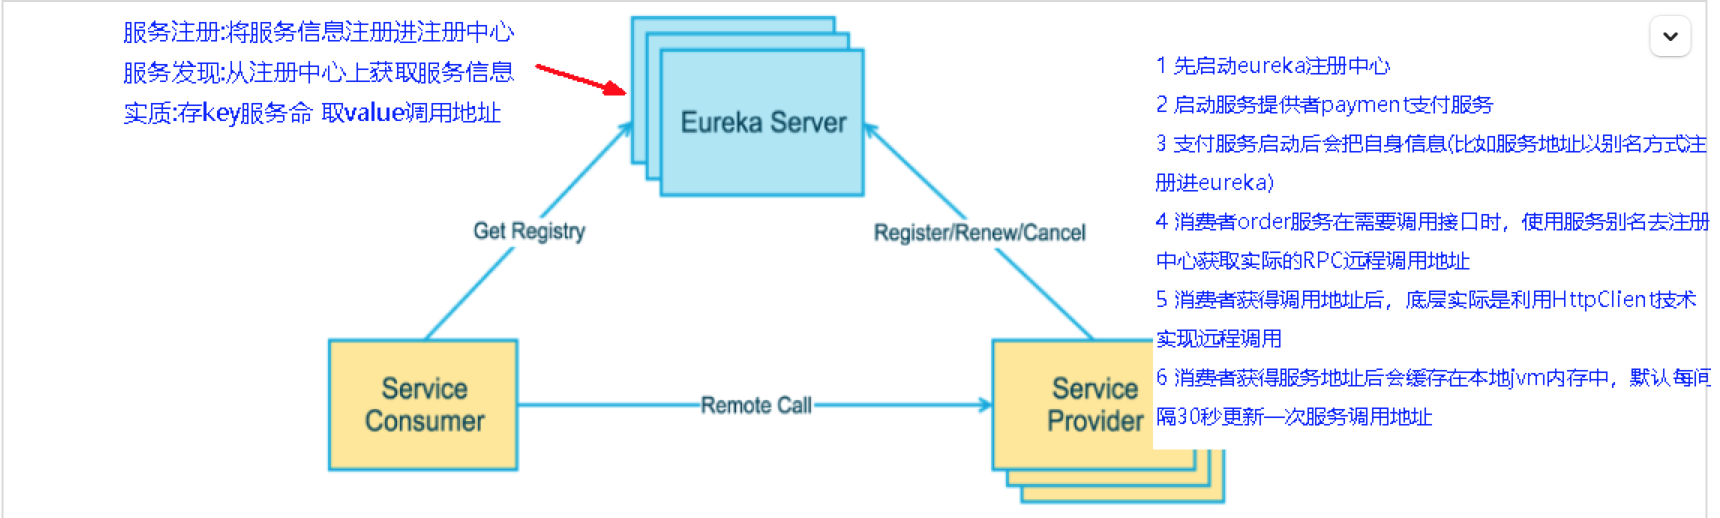
1、什么是服务治理
- Spring Cloud 封装了 Netflix 公司开发的 Eureka 模块来实现服务治理
在传统的rpc远程调用框架中,管理每个服务与服务之间依赖关系比较复杂,管理比较复杂,所以需要使用服务治理,管理服务于服务之间依赖关系,可以实现服务调用、负载均衡、容错等,实现服务发现与注册。
2、什么是服务注册与发现
Eureka采用了CS的设计架构,Eureka Server 作为服务注册功能的服务器,它是服务注册中心。而系统中的其他微服务,使用 Eureka的客户端连接到 Eureka Server并维持心跳连接。这样系统的维护人员就可以通过 Eureka Server 来监控系统中各个微服务是否正常运行。
- 在服务注册与发现中,有一个注册中心。当服务器启动的时候,会把当前自己服务器的信息比如服务地址通讯地址等以别名方式注册到注册中心上。另一方(消费者|服务提供者),以该别名的方式去注册中心上获取到实际的服务通讯地址,然后再实现本地RPC调用RPC远程调用框架核心设计思想:在于注册中心,因为使用注册中心管理每个服务与服务之间的一个依赖关系(服务治理概念)。在任何rpc远程框架中,都会有一个注册中心(存放服务地址相关信息(接口地址))
- 下左图是Eureka系统架构,右图是Dubbo的架构,请对比

3、Eureka包含两个组件
1、Eureka Server提供服务注册服务
各个微服务节点通过配置启动后,会在EurekaServer中进行注册,这样EurekaServer中的服务注册表中将会存储所有可用服务节点的信息,服务节点的信息可以在界面中直观看到。
2、EurekaClient通过注册中心进行访问
是一个Java客户端,用于简化Eureka Server的交互,客户端同时也具备一个内置的、使用轮询(round-robin)负载算法的负载均衡器。在应用启动后,将会向Eureka Server发送心跳(默认周期为30秒)。如果Eureka Server在多个心跳周期内没有接收到某个节点的心跳,EurekaServer将会从服务注册表中把这个服务节点移除(默认90秒)
2、单机Eureka构建步骤
1、IDEA生成eurekaServer端服务注册中心类似物业公司
1、建Module cloud-eureka-server7001
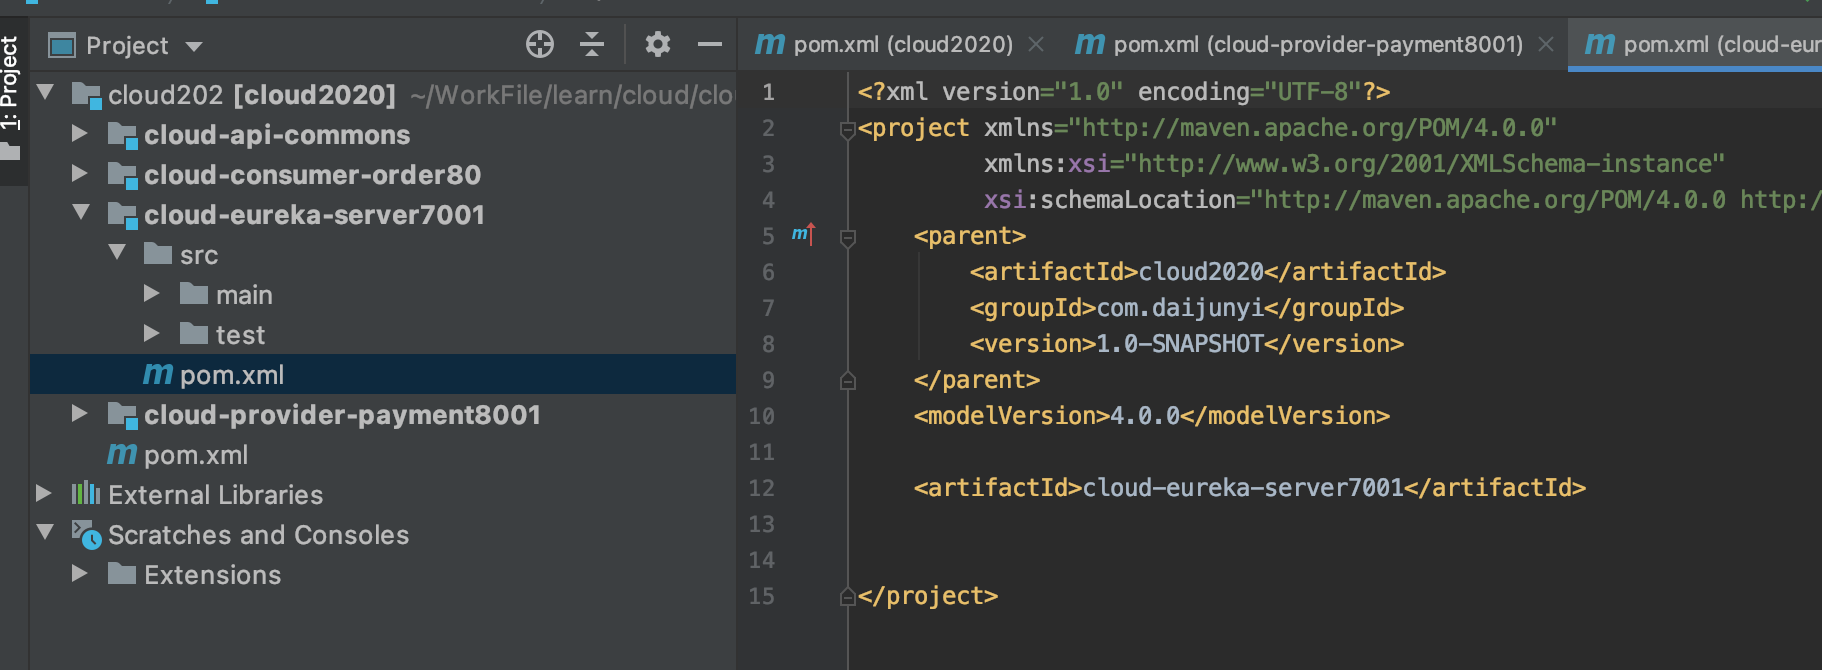
2、修改pom.xml
<?xml version="1.0" encoding="UTF-8"?><project xmlns="http://maven.apache.org/POM/4.0.0"xmlns:xsi="http://www.w3.org/2001/XMLSchema-instance"xsi:schemaLocation="http://maven.apache.org/POM/4.0.0 http://maven.apache.org/xsd/maven-4.0.0.xsd"><parent><artifactId>cloud2020</artifactId><groupId>com.daijunyi</groupId><version>1.0-SNAPSHOT</version></parent><modelVersion>4.0.0</modelVersion><artifactId>cloud-eureka-server7001</artifactId><dependencies><!--eureka-server--><dependency ><groupId >org.springframework.cloud</groupId ><artifactId >spring-cloud-starter-netflix-eureka-server</artifactId ></dependency ><!-- 引入自己定义的api通用包,可以使用Payment支付Entity --><dependency><groupId>com.atguigu.springcloud</groupId><artifactId>cloud-api-commons</artifactId><version>${project.version}</version></dependency><!--boot web actuator--><dependency><groupId>org.springframework.boot</groupId><artifactId>spring-boot-starter-web</artifactId></dependency><dependency><groupId>org.springframework.boot</groupId><artifactId>spring-boot-starter-actuator</artifactId></dependency><!--一般通用配置--><dependency><groupId>org.springframework.boot</groupId><artifactId>spring-boot-devtools</artifactId><scope>runtime</scope><optional>true</optional></dependency><dependency><groupId>org.projectlombok</groupId><artifactId>lombok</artifactId></dependency><dependency><groupId>org.springframework.boot</groupId><artifactId>spring-boot-starter-test</artifactId><scope>test</scope></dependency><dependency><groupId>junit</groupId><artifactId>junit</artifactId></dependency></dependencies></project>
- spring-cloud 升级到2.0之后 Eureka对比
3、写yaml配置文件 ```yaml server: port: 7001以前的老版本(当前使用2018) <dependency> <groupId>org.springframework.cloud</groupId> <artifactId>spring-cloud-starter-eureka</artifactId> </dependency> 现在新版本(当前使用2020.2) <dependency> <groupId>org.springframework.cloud</groupId> <artifactId>spring-cloud-starter-netflix-eureka-server</artifactId> </dependency>
eureka: instance: hostname: localhost #eureka服务端的实例名称 client:
#false表示不向注册中心注册自己。
register-with-eureka: false
#false表示自己端就是注册中心,我的职责就是维护服务实例,并不需要去检索服务
fetch-registry: false
service-url:
#设置与Eureka Server交互的地址查询服务和注册服务都需要依赖这个地址。
  defaultZone: http://${eureka.instance.hostname}:${server.port}/eureka/
<a name="Lpwzt"></a>
#### 4、主启动类
```java
package com.daijunyi;

import org.springframework.boot.SpringApplication;
import org.springframework.boot.autoconfigure.SpringBootApplication;
import org.springframework.cloud.netflix.eureka.server.EnableEurekaServer;

@SpringBootApplication
@EnableEurekaServer
public class EurekaServerMainApplication7001 {

    public static void main(String[] args) {
        SpringApplication.run(EurekaServerMainApplication7001.class);
    }
}
5、测试
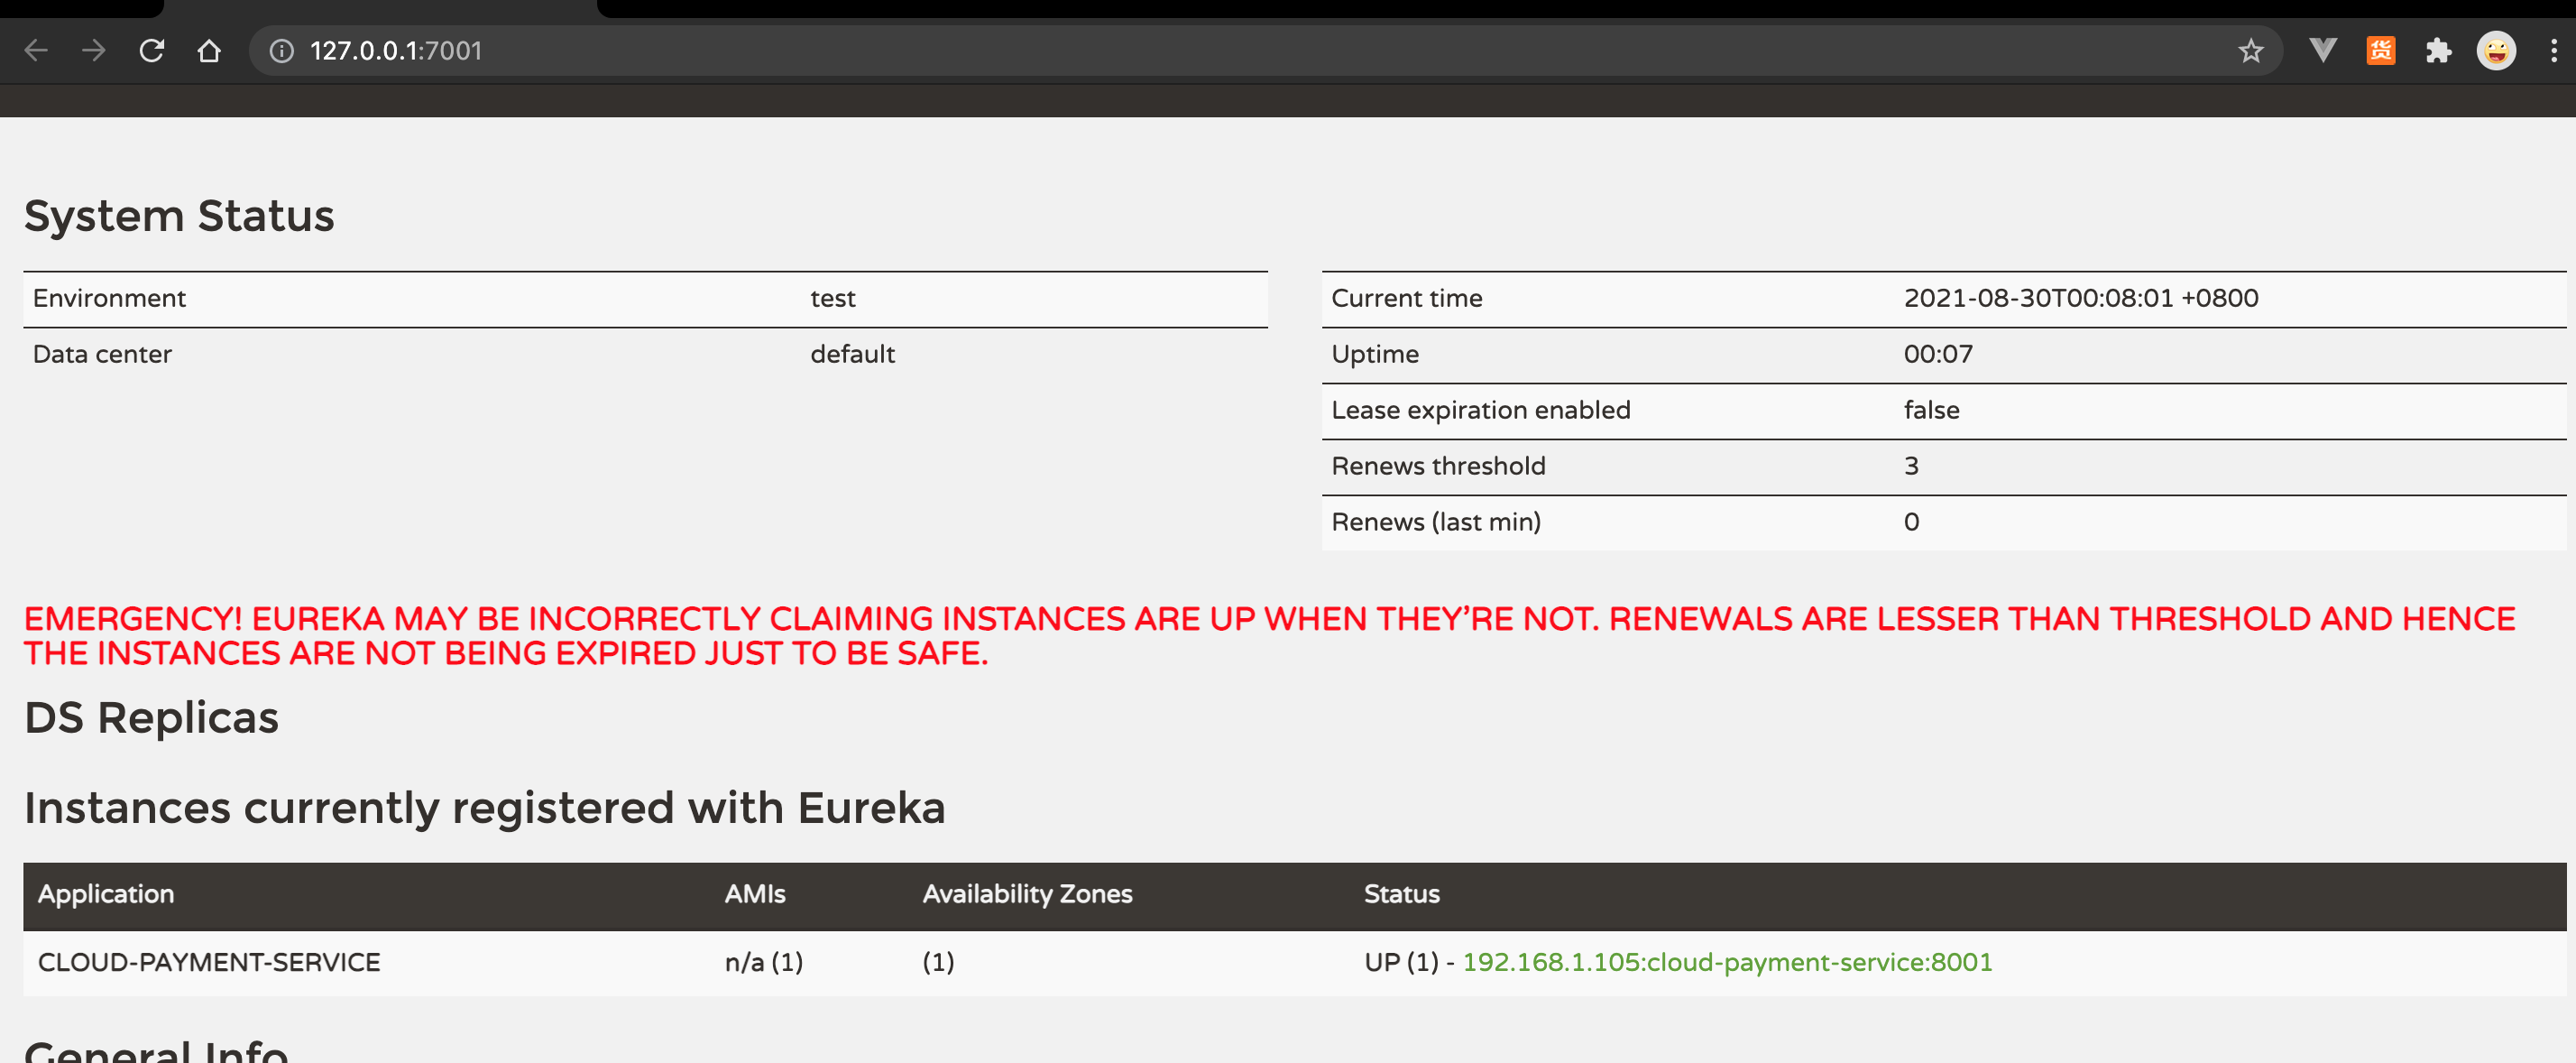
- 访问http://localhost:7001
- 看到页面就表示成功
-
2、EurekaClient端cloud-provider-payment8001
将注册进EurekaServer成为服务提供者provider,类似尚硅谷学校对外提供授课服务
1、修改pom.xml
添加 Eureka包
<!--eureka-client-->
<dependency >
<groupId >org.springframework.cloud</groupId >
<artifactId >spring-cloud-starter-netflix-eureka-client</artifactId >
</dependency >
2、yaml配置文件,添加Eureka配置
eureka:
client:
  #表示是否将自己注册进EurekaServer默认为true。
  register-with-eureka: true
  #是否从EurekaServer抓取已有的注册信息,默认为true。单节点无所谓,集群必须设置为true才能配合ribbon使用负载均衡
  fetchRegistry: true
  service-url:
    defaultZone:  http://localhost:7001/eureka
3、修改启动类
添加注解标识是EurekaClient
- @EnableEurekaClient 标识为客户端 ```java package com.daijunyi;

import org.springframework.boot.SpringApplication; import org.springframework.boot.autoconfigure.SpringBootApplication; import org.springframework.cloud.netflix.eureka.EnableEurekaClient;
@SpringBootApplication @EnableEurekaClient public class PaymentMain8001 { public static void main(String[] args) { SpringApplication.run(PaymentMain8001.class); } }
<a name="hwq1o"></a>
#### 4、查看注册是否成功
- 微服务注册名配置说明
- CLOUD-PAYMENT-SERVICE 和8001Yaml文件中的名称有保持一致。
```yaml
spring:
application:
name: cloud-payment-service
3、EurekaClient端cloud-consumer-order80
将注册进EurekaServer成为服务消费者consumer,类似来尚硅谷上课消费的各位同学
1、修改pom
<!--eureka-client-->
<dependency >
<groupId >org.springframework.cloud</groupId >
<artifactId >spring-cloud-starter-netflix-eureka-client</artifactId >
</dependency >
2、修改yaml
并且添加个名字,如果不添加以后注册进去就是UNKNOWN

eureka:
  client:
    #表示是否将自己注册进EurekaServer默认为true。
    register-with-eureka: true
    #是否从EurekaServer抓取已有的注册信息,默认为true。单节点无所谓,集群必须设置为true才能配合ribbon使用负载均衡
    fetchRegistry: true
    service-url:
      defaultZone:  http://localhost:7001/eureka

spring:
  application:
    name: cloud-consumer-order
3、修改主启动类
- 添加标识是EurekaClient的注解
@EnableEurekaClient
@SpringBootApplication @EnableEurekaClient public class MainConsumerOrderAppliction80 { public static void main(String[] args) { SpringApplication.run(MainConsumerOrderAppliction80.class); } }3、集群Eureka构建步骤
1、Eureka集群原理说明
1、问题:微服务RPC远程服务调用最核心的是什么
高可用,试想你的注册中心只有一个only one,它出故障了那就呵呵( ̄▽ ̄)”了,会导致整个为服务环境不可用,所以
解决办法:搭建Eureka注册中心集群 ,实现负载均衡+故障容错
2、EurekaServer集群环境构建步骤
1、参考cloud-eureka-server7001创建参考cloud-eureka-server7002
-
2、修改本机的hosts文件
/etc/hosts文件添加 映射 ```xml 127.0.0.1 localhost 127.0.0.1 www.eureka7001.com 127.0.0.1 www.eureka7002.com
<a name="jWuZ5"></a>
#### 3、修改yaml文件

- 7001的yaml文件
```yaml
server:
  port: 7001

eureka:
  instance:
    hostname: www.eureka7001.com #eureka服务端的实例名称
  client:
    #false表示不向注册中心注册自己。
    register-with-eureka: false
    #false表示自己端就是注册中心,我的职责就是维护服务实例,并不需要去检索服务
    fetch-registry: false
    service-url:
    #设置与Eureka Server交互的地址查询服务和注册服务都需要依赖这个地址。
      defaultZone: http://www.eureka7002.com:7002/eureka/
- 7002的yaml文件 ```yaml server: port: 7002
eureka: instance: hostname: www.eureka7002.com client:
#false表示不向注册中心注册自己。
register-with-eureka: false
#false表示自己端就是注册中心,我的职责就是维护服务实例,并不需要去检索服务
fetch-registry: false
service-url:
  #设置与Eureka Server交互的地址查询服务和注册服务都需要依赖这个地址。
  defaultZone: http://www.eureka7001.com:7001/eureka/
<a name="JY4bN"></a>
#### 4、配置7002的启动类
```java
package com.daijunyi;

import org.springframework.boot.SpringApplication;
import org.springframework.boot.autoconfigure.SpringBootApplication;
import org.springframework.cloud.netflix.eureka.server.EnableEurekaServer;

@SpringBootApplication
@EnableEurekaServer
public class EurekaServerMainApplication7002 {

    public static void main(String[] args) {
        SpringApplication.run(EurekaServerMainApplication7002.class);
    }
}
3、将支付服务8001微服务发布到上面2台Eureka集群配置中
eureka:
  client:
    #表示是否将自己注册进EurekaServer默认为true。
    register-with-eureka: true
    #是否从EurekaServer抓取已有的注册信息,默认为true。单节点无所谓,集群必须设置为true才能配合ribbon使用负载均衡
    fetchRegistry: true
    service-url:
      #      defaultZone:  http://localhost:7001/eureka
      # 集群版配置
      defaultZone: http://www.eureka7001.com:7001/eureka,http://www.eureka7002.com:7002/eureka
4、将订单服务80微服务发布到上面2台Eureka集群配置中
eureka:
  client:
    #表示是否将自己注册进EurekaServer默认为true。
    register-with-eureka: true
    #是否从EurekaServer抓取已有的注册信息,默认为true。单节点无所谓,集群必须设置为true才能配合ribbon使用负载均衡
    fetchRegistry: true
    service-url:
      #      defaultZone:  http://localhost:7001/eureka
      # 集群版配置
      defaultZone: http://www.eureka7001.com:7001/eureka,http://www.eureka7002.com:7002/eureka
5、测试启动顺序
- 启动两个eureka 再启动8001 再启动80
访问http://localhost/consumer/payment/get/1
6、支付服务提供者8001集群环境构建
参考cloud-provider-payment8001创建新建cloud-provider-payment8002
- pom文件复制8001
- 修改yam文件 ```yaml server: port: 8002
spring: application: name: cloud-payment-service datasource: type: com.alibaba.druid.pool.DruidDataSource # 当前数据源操作类型 driver-class-name: org.gjt.mm.mysql.Driver # mysql驱动包 com.mysql.jdbc.Driver url: jdbc:mysql://localhost:10004/learn?useUnicode=true&characterEncoding=utf-8&useSSL=false username: root password: 123456
eureka: client:
#表示是否将自己注册进EurekaServer默认为true。
register-with-eureka: true
#是否从EurekaServer抓取已有的注册信息,默认为true。单节点无所谓,集群必须设置为true才能配合ribbon使用负载均衡
fetchRegistry: true
service-url:
  #      defaultZone:  http://localhost:7001/eureka
  #      集群版配置
  defaultZone: http://www.eureka7001.com:7001/eureka,http://www.eureka7002.com:7002/eureka
mybatis: mapperLocations: classpath:mapper/*.xml type-aliases-package: com.daijunyi.entities # 所有Entity别名类所在包
- 复制业务类
- 修改8001和8002的controller
   - 添加打印端口号信息
```java
package com.daijunyi.controller;

import com.daijunyi.entities.CommonResult;
import com.daijunyi.entities.Payment;
import com.daijunyi.service.PaymentService;
import lombok.extern.slf4j.Slf4j;
import org.springframework.beans.factory.annotation.Value;
import org.springframework.web.bind.annotation.*;

import javax.annotation.Resource;

@RestController
@Slf4j
public class PaymentController {

    @Value("${server.port}")
    private String serverPort;

    @Resource
    private PaymentService paymentService;

    @PostMapping(value = "/payment/create")
    public CommonResult create(@RequestBody Payment payment) {
        int result = paymentService.create(payment);
        log.info("*****插入操作返回结果:" + result);
        System.out.println("1122");
        if (result > 0) {
            return new CommonResult(200, "插入数据库成功,serverPort:"+serverPort, result);
        } else {
            return new CommonResult(444, "插入数据库失败,serverPort:"+serverPort, null);
        }
    }

    @GetMapping(value = "/payment/get/{id}")
    public CommonResult<Payment> getPaymentById(@PathVariable("id") Long id) {
        Payment payment = paymentService.getPaymentById(id);
        log.info("*****查询结果:{}", payment);
        if (payment != null) {
            return new CommonResult(200, "查询成功,serverPort:"+serverPort, payment);
        } else {
            return new CommonResult(444, "没有对应记录,查询ID: " + id+",serverPort:"+serverPort, null);
        }
    }
}
7、负载均衡配置
- 修改80的controller里面的地址为payment提供的多实例地址 ```java package com.daijunyi.controller;
import com.daijunyi.entities.CommonResult; import com.daijunyi.entities.Payment; import lombok.extern.slf4j.Slf4j; import org.springframework.beans.factory.annotation.Autowired; import org.springframework.web.bind.annotation.*; import org.springframework.web.client.RestTemplate;
@RestController @Slf4j public class OrderController {
//    public static final String PAYMENT_URL = "http://localhost:8001";
public static final String PAYMENT_URL = "http://CLOUD-PAYMENT-SERVICE";

@Autowired
private RestTemplate restTemplate;

@PostMapping("/consumer/payment/create")
public CommonResult<Payment> create(@RequestBody Payment payment) {
    log.info(payment.toString());
    return restTemplate.postForObject(PAYMENT_URL + "/payment/create", payment, CommonResult.class);
}

@GetMapping("/consumer/payment/get/{id}")
public CommonResult<Payment> getPayment(@PathVariable Long id) {
    return restTemplate.getForObject(PAYMENT_URL + "/payment/get/" + id, CommonResult.class);
}
}
- 对RestTemplate开启均衡负载功能
   - 使用@LoadBalanced开启均衡负载(轮询机制)
```java
package com.daijunyi.config;

import org.springframework.cloud.client.loadbalancer.LoadBalanced;
import org.springframework.context.annotation.Bean;
import org.springframework.context.annotation.Configuration;
import org.springframework.web.client.RestTemplate;

@Configuration
public class ApplicationContextConfig {

    @Bean
    @LoadBalanced
    public RestTemplate restTemplate(){
        return new RestTemplate();
    }
}
Ribbon和Eureka整合后Consumer可以直接调用服务而不用再关心地址和端口号,且该服务还有负载功能了。
8、测试
4、actuator微服务信息完善
1、主机名称:服务名称修改
修改cloud-provider-payment8001的yaml
添加eureka.instance.instance-id: cloud-provider-payment:8001 ```yaml server: port: 8001


spring: application: name: cloud-payment-service datasource: type: com.alibaba.druid.pool.DruidDataSource # 当前数据源操作类型 driver-class-name: org.gjt.mm.mysql.Driver # mysql驱动包 com.mysql.jdbc.Driver url: jdbc:mysql://localhost:10004/learn?useUnicode=true&characterEncoding=utf-8&useSSL=false username: root password: 123456
eureka: client:
#表示是否将自己注册进EurekaServer默认为true。
register-with-eureka: true
#是否从EurekaServer抓取已有的注册信息,默认为true。单节点无所谓,集群必须设置为true才能配合ribbon使用负载均衡
fetchRegistry: true
service-url:
  #      defaultZone:  http://localhost:7001/eureka
  #      集群版配置
  defaultZone: http://www.eureka7001.com:7001/eureka,http://www.eureka7002.com:7002/eureka
instance: instance-id: cloud-provider-payment:8001 mybatis: mapperLocations: classpath:mapper/*.xml type-aliases-package: com.daijunyi.entities # 所有Entity别名类所在包
<a name="JPQ6r"></a>
#### 2、访问信息有IP信息提示

- 修改cloud-provider-payment8001
- 添加eureka.instance.prefer-ip-address: true
```yaml
server:
  port: 8001

spring:
  application:
    name: cloud-payment-service
  datasource:
    type: com.alibaba.druid.pool.DruidDataSource            # 当前数据源操作类型
    driver-class-name: org.gjt.mm.mysql.Driver         # mysql驱动包 com.mysql.jdbc.Driver
    url: jdbc:mysql://localhost:10004/learn?useUnicode=true&characterEncoding=utf-8&useSSL=false
    username: root
    password: 123456

eureka:
  client:
    #表示是否将自己注册进EurekaServer默认为true。
    register-with-eureka: true
    #是否从EurekaServer抓取已有的注册信息,默认为true。单节点无所谓,集群必须设置为true才能配合ribbon使用负载均衡
    fetchRegistry: true
    service-url:
      #      defaultZone:  http://localhost:7001/eureka
      #      集群版配置
      defaultZone: http://www.eureka7001.com:7001/eureka,http://www.eureka7002.com:7002/eureka
  instance:
    instance-id: cloud-provider-payment:8001
    prefer-ip-address: true
mybatis:
  mapperLocations: classpath:mapper/*.xml
  type-aliases-package: com.daijunyi.entities    # 所有Entity别名类所在包
5、服务发现Discovery
- 对于注册进eureka里面的微服务,可以通过服务发现来获得该服务的信息
- 修改cloud-provider-payment8001的Controller ```java package com.daijunyi.controller;
import com.daijunyi.entities.CommonResult; import com.daijunyi.entities.Payment; import com.daijunyi.service.PaymentService; import lombok.extern.slf4j.Slf4j; import org.springframework.beans.factory.annotation.Autowired; import org.springframework.beans.factory.annotation.Value; import org.springframework.cloud.client.ServiceInstance; import org.springframework.cloud.client.discovery.DiscoveryClient; import org.springframework.web.bind.annotation.*;
import javax.annotation.Resource; import java.util.List;
@RestController @Slf4j public class PaymentController {
@Resource
private DiscoveryClient discoveryClient;


@GetMapping("/payment/discovery")
public Object getDiscoveryClient() {
    List<String> services = discoveryClient.getServices();
    for (String item : services) {
        log.info("服务信息:" + item);
    }

    List<ServiceInstance> instances = discoveryClient.getInstances("cloud-payment-service");
    for (ServiceInstance instance : instances) {
        log.info("服务器名称:{},服务器端口号:{},服务器ip:{},服务器请求地址:{}", instance.getServiceId(), instance.getPort(), instance.getHost(), instance.getUri());
    }
    return discoveryClient;
}
}
- 主启动类添加
   - @EnableDiscoveryClient注解标识服务发现客户端
```java
@SpringBootApplication
@EnableEurekaClient
@EnableDiscoveryClient
public class PaymentMain8001 {
    public static void main(String[] args) {
        SpringApplication.run(PaymentMain8001.class);
    }
}
- 测试信息

 服务信息:cloud-consumer-order
 服务信息:cloud-payment-service
 服务器名称:CLOUD-PAYMENT-SERVICE,服务器端口号:8001,服务器ip:192.168.0.105,服务器请求地址:http://192.168.0.105:8001
 服务器名称:CLOUD-PAYMENT-SERVICE,服务器端口号:8002,服务器ip:192.168.0.105,服务器请求地址:http://192.168.0.105:8002
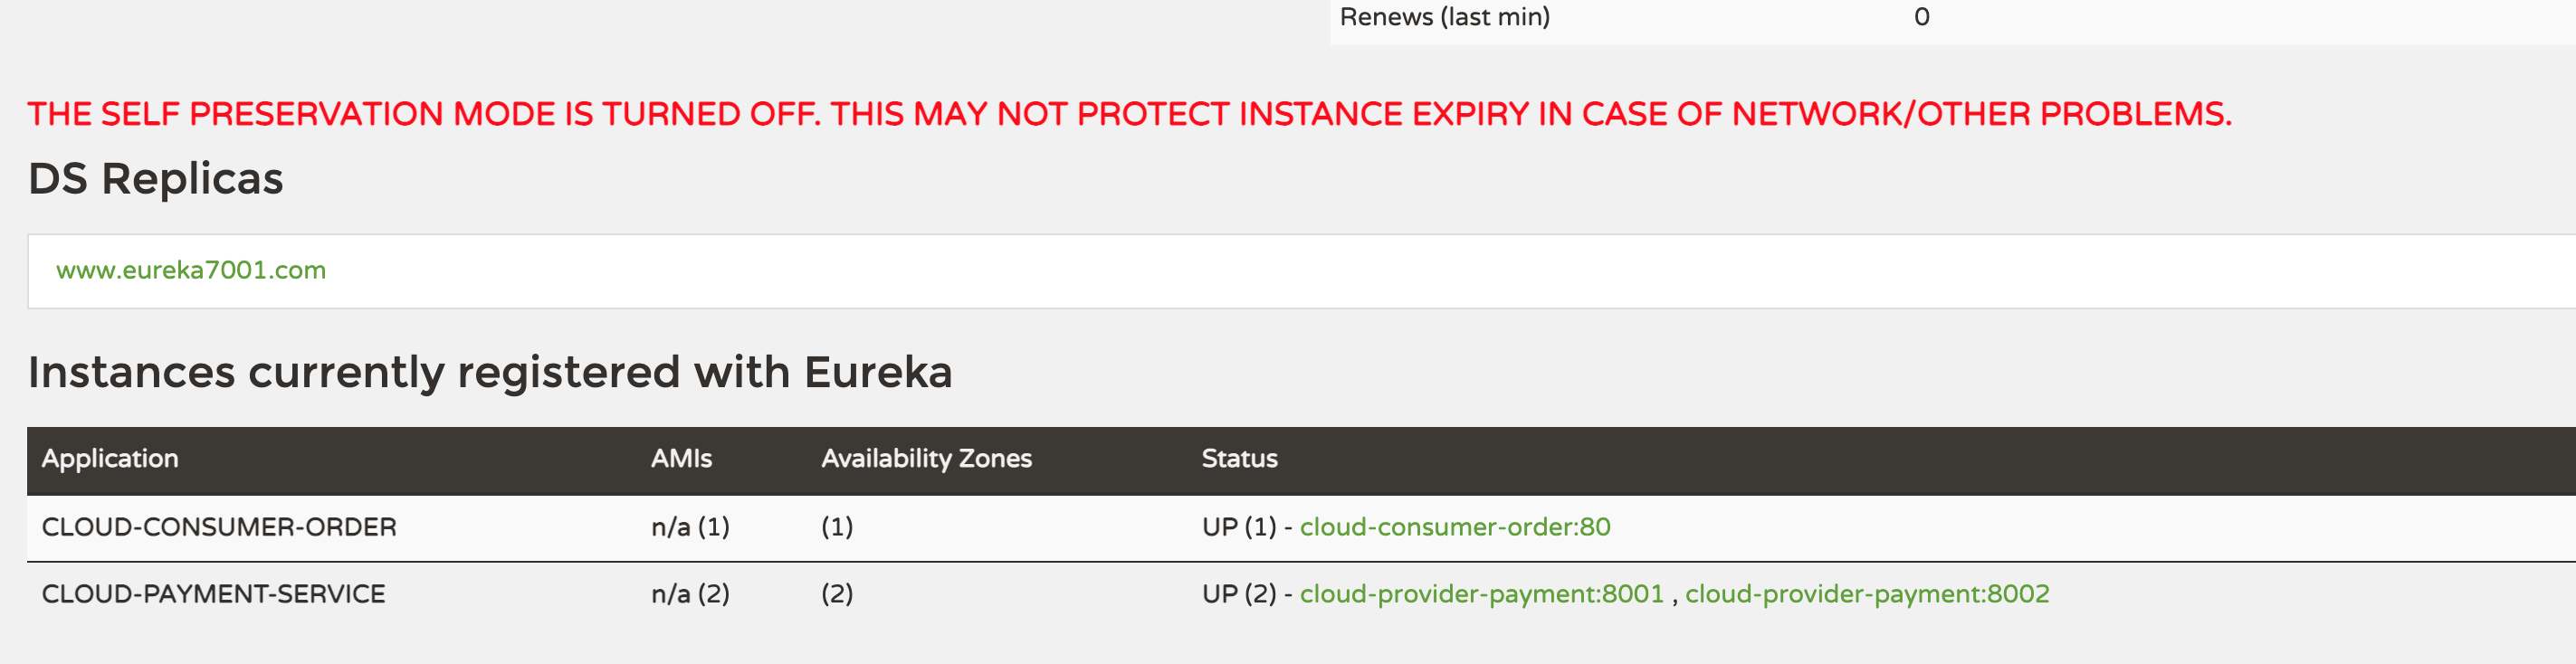
6、Eureka自我保护
1、概述
- 保护模式主要用于一组客户端和Eureka Server之间存在网络分区场景下的保护。一旦进入保护模式,
- Eureka Server将会尝试保护其服务注册表中的信息,不再删除服务注册表中的数据,也就是不会注销任何微服务。
- 如果在Eureka Server的首页看到以下这段提示,则说明Eureka进入了保护模式:
- EMERGENCY! EUREKA MAY BE INCORRECTLY CLAIMING INSTANCES ARE UP WHEN THEY’RE NOT.
- RENEWALS ARE LESSER THAN THRESHOLD AND HENCE THE INSTANCES ARE NOT BEING EXPIRED JUST TO BE SAFE

2、导致原因
- 为什么会产生Eureka自我保护机制?
为了防止EurekaClient可以正常运行,但是与 EurekaServer网络不通情况下,EurekaServer不会立刻将EurekaClient服务剔除
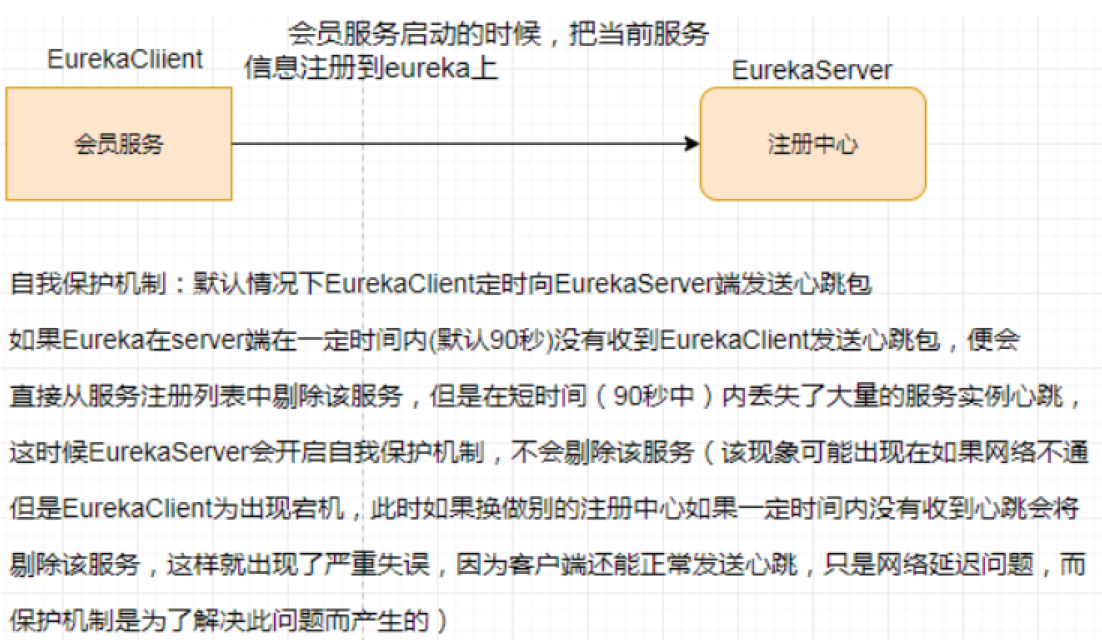
- 什么是自我保护模式?
默认情况下,如果EurekaServer在一定时间内没有接收到某个微服务实例的心跳,EurekaServer将会注销该实例(默认90秒)。但是当网络分区故障发生(延时、卡顿、拥挤)时,微服务与EurekaServer之间无法正常通信,以上行为可能变得非常危险了——因为微服务本身其实是健康的,此时本不应该注销这个微服务。Eureka通过“自我保护模式”来解决这个问题——当EurekaServer节点在短时间内丢失过多客户端时(可能发生了网络分区故障),那么这个节点就会进入自我保护模式。
在自我保护模式中,Eureka Server会保护服务注册表中的信息,不再注销任何服务实例。
它的设计哲学就是宁可保留错误的服务注册信息,也不盲目注销任何可能健康的服务实例。一句话讲解:好死不如赖活着
综上,自我保护模式是一种应对网络异常的安全保护措施。它的架构哲学是宁可同时保留所有微服务(健康的微服务和不健康的微服务都会保留)也不盲目注销任何健康的微服务。使用自我保护模式,可以让Eureka集群更加的健壮、稳定。
1、一句话:某时刻某一个微服务不可用了,Eureka不会立刻清理,依旧会对该微服务的信息进行保存
2、属于CAP里面的AP分支
3、怎么禁止自我保护
注册中心eureakeServer端7001
- 出厂默认,自我保护机制是开启的
- eureka.server.enable-self-preservation = false
- 配置
- 使用eureka.server.enable-self-preservation = false 可以禁用自我保护模式
eureka:
server:
enable-self-preservation: false
instance:
hostname: www.eureka7001.com #eureka服务端的实例名称
client:
#false表示不向注册中心注册自己。
register-with-eureka: false
#false表示自己端就是注册中心,我的职责就是维护服务实例,并不需要去检索服务
fetch-registry: false
service-url:
#设置与Eureka Server交互的地址查询服务和注册服务都需要依赖这个地址。
defaultZone: http://www.eureka7002.com:7002/eureka/
- 使用eureka.server.enable-self-preservation = false 可以禁用自我保护模式
- 出厂默认,自我保护机制是开启的
生产者客户端eureakeClient端8001和8002
- 默认
- eureka.instance.lease-renewal-interval-in-seconds=30
- eureka.instance.lease-expiration-duration-in-seconds=90
- 配置
- lease-renewal-interval-in-seconds: 1
- lease-expiration-duration-in-seconds: 2
instance:
instance-id: cloud-provider-payment:8001
prefer-ip-address: true
# 心跳检测与续约时间
# 开发时设置小些,保证服务关闭后注册中心能即使剔除服务

#Eureka 客户端向服务端发送心跳的时间间隔,单位为秒 ( 默认是 30 秒 )

lease-renewal-interval-in-seconds: 1

#Eureka 服务端在收到最后一次心跳后等待时间上限,单位为秒 ( 默认是 90 秒 ) ,超时将剔除服务

lease-expiration-duration-in-seconds:  2
- 默认
测试
- 只要关闭一个会立马关闭
2、Zookeeper服务注册与发现
1、Eureka停止更新了你怎么办
https://github.com/Netflix/eureka/wiki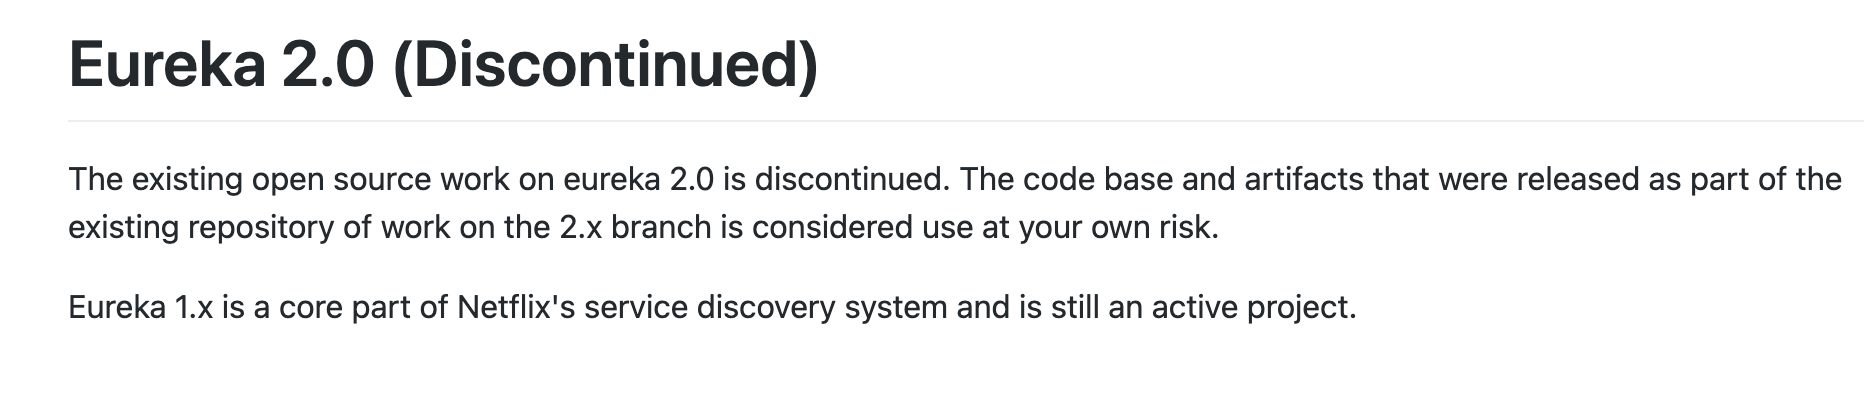
2、SpringCloud整合Zookeeper代替Eureka
1、注册中心Zookeeper
使用docker 运行zookeeper
docker run -it -p 2181:2181 --name zookeeper zookeeper:3.4.9进入zookeeper
docker exec -it zookeeper /bin/bash进入zookeeper客户端
/zookeeper-3.4.9/bin/zkCli.sh
[zk: localhost:2181(CONNECTED) 1] ls /
[zookeeper]
2、服务提供者
1、创建cloud-provider-payment8004
添加pom配置
<?xml version="1.0" encoding="UTF-8"?>
<project xmlns="http://maven.apache.org/POM/4.0.0"
       xmlns:xsi="http://www.w3.org/2001/XMLSchema-instance"
       xsi:schemaLocation="http://maven.apache.org/POM/4.0.0 http://maven.apache.org/xsd/maven-4.0.0.xsd">
  <parent>
      <artifactId>cloud2020</artifactId>
      <groupId>com.daijunyi</groupId>
      <version>1.0-SNAPSHOT</version>
  </parent>
  <modelVersion>4.0.0</modelVersion>

  <artifactId>cloud-provider-payment8004</artifactId>

  <dependencies>
      <!-- SpringBoot整合Web组件 -->
      <dependency>
          <groupId>org.springframework.boot</groupId>
          <artifactId>spring-boot-starter-web</artifactId>
      </dependency>
      <dependency><!-- 引入自己定义的api通用包,可以使用Payment支付Entity -->
          <groupId>com.daijunyi</groupId>
          <artifactId>cloud-api-commons</artifactId>
          <version>${project.version}</version>
      </dependency>
      <!-- SpringBoot整合zookeeper客户端 -->
      <dependency >
          <groupId >org.springframework.cloud</groupId >
          <artifactId >spring-cloud-starter-zookeeper-discovery</artifactId >
      </dependency >
      <dependency>
          <groupId>org.springframework.boot</groupId>
          <artifactId>spring-boot-devtools</artifactId>
          <scope>runtime</scope>
          <optional>true</optional>
      </dependency>
      <dependency>
          <groupId>org.projectlombok</groupId>
          <artifactId>lombok</artifactId>
          <optional>true</optional>
      </dependency>
      <dependency>
          <groupId>org.springframework.boot</groupId>
          <artifactId>spring-boot-starter-test</artifactId>
          <scope>test</scope>
      </dependency>
  </dependencies>
</project>
2、修改yaml文件
#8004表示注册到zookeeper服务器的支付服务提供者端口号
server:
port: 8004
#服务别名----注册zookeeper到注册中心名称
spring:
application:
  name: cloud-provider-payment
cloud:
  zookeeper:
    connect-string: localhost:2181
3、主启动类
```java package com.daijunyi;
import org.springframework.boot.SpringApplication; import org.springframework.boot.autoconfigure.SpringBootApplication; import org.springframework.cloud.client.discovery.EnableDiscoveryClient;
@SpringBootApplication @EnableDiscoveryClient //该注解用于向使用 consul 或者 zookeeper 作为注册中心时注册服务 public class PaymentMain8004 { public static void main(String[] args) { SpringApplication.run(PaymentMain8004.class,args); } }
<a name="cXiub"></a>
#### 4、添加controller代码
```java
import lombok.extern.slf4j.Slf4j;
import org.springframework.beans.factory.annotation.Value;
import org.springframework.web.bind.annotation.RequestMapping;
import org.springframework.web.bind.annotation.RestController;

import java.util.UUID;

@RestController
@Slf4j
public class PaymentController {

    @Value("${server.port}")
    private String serverPort;

    @RequestMapping(value = "/payment/zk")
    public String paymentzk()
    {
        return "springcloud with zookeeper: "+serverPort+"\t"+ UUID.randomUUID().toString();
    }
}
5、maven包版本冲突的问题解决

这是包版本的问题,因为我们的zookeeper的版本是3.4.9,而我们的代码中是3.5.3,版本冲突了,所以我们要引入3.4.9的版本
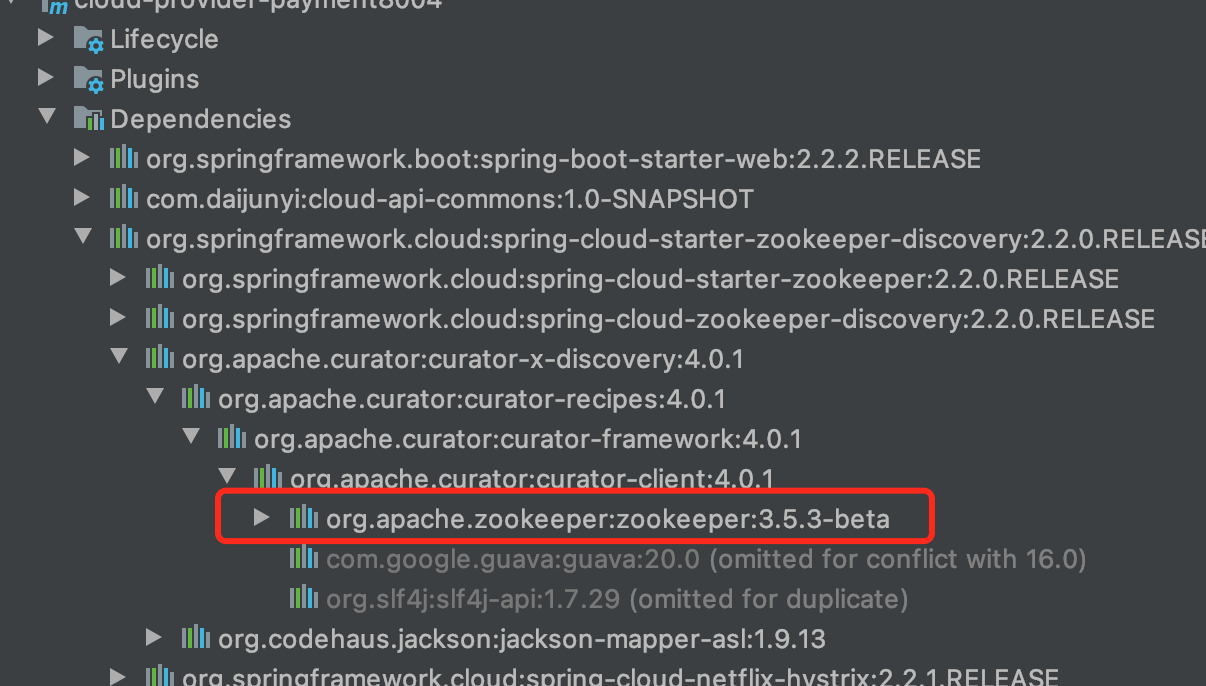
要先排除导入这个包再导入3.4.9的版本
<!-- SpringBoot整合zookeeper客户端 -->
<dependency >
  <groupId >org.springframework.cloud</groupId >
  <artifactId >spring-cloud-starter-zookeeper-discovery</artifactId >
  <exclusions>
    <exclusion>
      <groupId>org.apache.zookeeper</groupId>
      <artifactId>zookeeper</artifactId>
    </exclusion>
  </exclusions>
</dependency >
<dependency>
  <groupId>org.apache.zookeeper</groupId>
  <artifactId>zookeeper</artifactId>
  <version>3.4.9</version>
</dependency>
6、从zookeeper的zkCli中获取到的信息
- get /services/cloud-provider-payment/028c8171-de24-456d-b174-997930653ee3 获取相关信息 ```shell [zk: localhost:2181(CONNECTED) 2] ls / [services, zookeeper] [zk: localhost:2181(CONNECTED) 3] ls /services [cloud-provider-payment] [zk: localhost:2181(CONNECTED) 4] ls /services/cloud-provider-payment/028c8171-de24-456d-b174-997930653ee3 [] [zk: localhost:2181(CONNECTED) 5] get /services/cloud-provider-payment/028c8171-de24-456d-b174-997930653ee3 {“name”:”cloud-provider-payment”,”id”:”028c8171-de24-456d-b174-997930653ee3”,”address”:”192.168.0.105”,”port”:8004,”sslPort”:null,”payload”:{“@class”:”org.springframework.cloud.zookeeper.discovery.ZookeeperInstance”,”id”:”application-1”,”name”:”cloud-provider-payment”,”metadata”:{}},”registrationTimeUTC”:1630309222920,”serviceType”:”DYNAMIC”,”uriSpec”:{“parts”:[{“value”:”scheme”,”variable”:true},{“value”:”://“,”variable”:false},{“value”:”address”,”variable”:true},{“value”:”:”,”variable”:false},{“value”:”port”,”variable”:true}]}} cZxid = 0xa ctime = Mon Aug 30 07:40:23 GMT 2021 mZxid = 0xa mtime = Mon Aug 30 07:40:23 GMT 2021 pZxid = 0xa cversion = 0 dataVersion = 0 aclVersion = 0 ephemeralOwner = 0x17b95ee38930002 dataLength = 534 numChildren = 0
```json
{
  "name": "cloud-provider-payment",
  "id": "028c8171-de24-456d-b174-997930653ee3",
  "address": "192.168.0.105",
  "port": 8004,
  "sslPort": null,
  "payload": {
    "@class": "org.springframework.cloud.zookeeper.discovery.ZookeeperInstance",
    "id": "application-1",
    "name": "cloud-provider-payment",
    "metadata": {}
  },
  "registrationTimeUTC": 1630309222920,
  "serviceType": "DYNAMIC",
  "uriSpec": {
    "parts": [
      {
        "value": "scheme",
        "variable": true
      },
      {
        "value": "://",
        "variable": false
      },
      {
        "value": "address",
        "variable": true
      },
      {
        "value": ":",
        "variable": false
      },
      {
        "value": "port",
        "variable": true
      }
    ]
  }
}
3、服务消费者
1、创建cloud-consumerzk-order80
添加pom文件 ```xml <?xml version=”1.0” encoding=”UTF-8”?> <project xmlns=”http://maven.apache.org/POM/4.0.0“
   xmlns:xsi="http://www.w3.org/2001/XMLSchema-instance"
   xsi:schemaLocation="http://maven.apache.org/POM/4.0.0 http://maven.apache.org/xsd/maven-4.0.0.xsd">
<artifactId>cloud2020</artifactId> <groupId>com.daijunyi</groupId> <version>1.0-SNAPSHOT</version>4.0.0 cloud-consumerzk-order80 org.springframework.boot spring-boot-starter-web org.springframework.cloud spring-cloud-starter-zookeeper-discovery org.apache.zookeeper zookeeper org.apache.zookeeper zookeeper 3.4.9 org.springframework.boot spring-boot-devtools runtime true org.projectlombok lombok true org.springframework.boot spring-boot-starter-test test
<a name="llCHq"></a>
#### 2、添加yaml配置
```yaml
server:
  port: 80

spring:
  application:
    name: cloud-consumer-order
  cloud:
    zookeeper:
      connect-string: localhost:2181
3、主启动类
package com.daijunyi;

import org.springframework.boot.SpringApplication;
import org.springframework.boot.autoconfigure.SpringBootApplication;
import org.springframework.cloud.client.discovery.EnableDiscoveryClient;

@SpringBootApplication
@EnableDiscoveryClient
public class ConsumerZkMainApplication80 {
    public static void main(String[] args) {
        SpringApplication.run(ConsumerZkMainApplication80.class,args);
    }
}
4、配置类
package com.daijunyi.config;

import org.springframework.cloud.client.loadbalancer.LoadBalanced;
import org.springframework.context.annotation.Bean;
import org.springframework.context.annotation.Configuration;
import org.springframework.web.client.RestTemplate;

@Configuration
public class ApplicationContextConfig {

    @Bean
    @LoadBalanced
    public RestTemplate restTemplate(){
        return new RestTemplate();
    }
}
5、controller
package com.daijunyi.controller;

import org.springframework.web.bind.annotation.GetMapping;
import org.springframework.web.bind.annotation.RestController;
import org.springframework.web.client.RestTemplate;

import javax.annotation.Resource;

@RestController
public class PaymentController {

    private String serverUrl = "http://cloud-provider-payment";

    @Resource
    private RestTemplate restTemplate;

    @GetMapping("/consumer/payment/zk")
    public String paymentzk(){
        String forObject = restTemplate.getForObject(serverUrl + "/payment/zk", String.class);
        return forObject;
    }
}
6、测试
http://localhost/consumer/payment/zk
zookeeper的信息查看
[zk: localhost:2181(CONNECTED) 3] ls /
[services, zookeeper]
[zk: localhost:2181(CONNECTED) 4] ls /services
[cloud-provider-payment, cloud-consumer-order]
3、Zookeeper集群
配置方法一样,就是再开几个zookeeper注册中心,然后多配置个地址就行
spring:
  application:
    name: cloud-provider-payment
  cloud:
    zookeeper:
      connect-string: localhost:2181,localhost:2182

若有收获,就点个赞吧
0 人点赞
