- 1、SpringSecurity概述
- 1、概要
- 2、历史
- 3、产品对比
- 4、模块
- 1、核心 — spring-security-core.jar
- 2、远程—— spring-security-remoting.jar
- 3、网络— spring-security-web.jar
- 4、配置— spring-security-config.jar
- 5、LDAP — spring-security-ldap.jar
- 6、OAuth 2.0 核心 — spring-security-oauth2-core.jar
- 7、OAuth 2.0 客户端 — spring-security-oauth2-client.jar
- 8、OAuth 2.0 JOSE — spring-security-oauth2-jose.jar
- 9、OAuth 2.0 资源服务器 — spring-security-oauth2-resource-server.jar
- 10、ACL— spring-security-acl.jar
- 11、CAS— spring-security-cas.jar
- 12、OpenID — spring-security-openid.jar
- 2、Spring Security入门案例
- 3、spring Security基本原理
- 6、注解使用
1、SpringSecurity概述
1、概要
Spring Security 是一个功能强大且高度可定制的身份验证和访问控制框架。它是保护基于 Spring 的应用程序的事实上的标准。<br />Spring Security 是一个专注于为 Java 应用程序提供身份验证和授权的框架。与所有 Spring 项目一样,Spring Security 的真正强大之处在于它可以轻松扩展以满足自定义要求
1、特点
- 对身份验证和授权的全面且可扩展的支持
- 防止会话固定、点击劫持、跨站点请求伪造等攻击
-
2、用户认证
验证某个用户是否为系统中的合法主体,也就是说用户能否访问该系统。用户认证一般要求用户提供用户名和密码。系统通过检验用户名和密码来完成认证过程。通俗点说就是系统认为用户是否能登录
3、用户授权
验证某个用户是否有权限执行某个操作。在一个系统中不同用户所具有的权限是不同的。通俗点讲就是系统怕暖用户是否有权限去做某些事情
2、历史
Spring Security 开始于2003年年底,Spring的acegi安全系统,经过迭代,最终2007年改为Spring组合项目,更名为Spring Security
3、产品对比
1、Spring Security
优点:
- Spring技术栈和Spring 无缝整合
- 全面的权限控制
- 专门为Web开发而设计
- 旧版本不能脱离Web环境使用
- 新版本对整个框架进行了分层抽取,分成了核心模块和Web模块。单独引入核心模块就可以脱离Web环境
缺点:
优点
- 轻量级,Shiro主张的理念把复杂的事情变简单。针对对性能有更高要求的互联网应用有更好表现
- 通用性,不局限于Web环境,可以脱离Web环境使用
缺点:
- 在Web环境下一些特定的需求需要手动编写代码定制
3、总结:
在Spring Boot出现之前,SpringSecurity已经发展多年。但是使用的并不多,安全管理这个领域一直是Shiro的天下。相对于Shiro,在SSM中整合Spring Security都是比较麻烦的操作,所以Spring Security虽然功能比Shiro强大,但是使用反而没有Shiro多(虽然Shiro功能没有Spring Security多,但是对于大部分项目而言,Shiro也够用了)。
自从有了Spring Boot之后,Spring boot对于Spring Securty提供了自动化配置方案,一般来说,常见的安全管理技术栈的组合是这样的:
- 在Web环境下一些特定的需求需要手动编写代码定制
SSM+Shiro
- Spring Boot/Spring Cloud+Spring Security
以上只是一个推荐的组合而已,单纯从技术上来说,无论怎么组合,都是可以运行的。
4、模块
https://docs.spring.io/spring-security/reference/modules.html
1、核心 — spring-security-core.jar
该模块包含核心身份验证和访问控制类和接口、远程支持和基本供应 API。任何使用 Spring Security 的应用程序都需要它。它支持独立应用程序、远程客户端、方法(服务层)安全性和 JDBC 用户供应。它包含以下顶级包
org.springframework.security.core
- org.springframework.security.access
- org.springframework.security.authentication
org.springframework.security.provisioning
1、核心依赖
ehcache:如果使用基于Ehcache的用户缓存实现,则需要(可选)
- spring-aop:防范安全基于Spring AOP
- spring-beans:Spring 配置所需
- spring-expression:基于表达式的方法安全性是必需的(可选)
- spring-jdbc:如果使用数据库来存储用户数据,则需要(可选)
- spring-tx:如果使用数据库来存储用户数据,则需要(可选)
- aspectjrt:如果使用AspectJ支持,则需要(可选)
jsr250-api:如果您使用JSR-250方法安全注释(可选),则为必需。
2、远程—— spring-security-remoting.jar
该模块提供与 Spring Remoting 的集成。除非您正在编写使用 Spring Remoting 的远程客户端,否则您不需要它。主要包是
org.springframework.security.remoting.
3、网络— spring-security-web.jar
该模块包含过滤器和相关的网络安全基础设施代码。它包含任何具有 servlet API 依赖项的内容。如果您需要 Spring Security Web 身份验证服务和基于 URL 的访问控制,则需要它。主要包是
org.springframework.security.web.
1、核心依赖
spring-web:Spring Web支持类被广泛使用
- spring-jdbc:基于JDBC的持久记住我令牌存储库是必须的(可选)
spring-tx:记住我的持久令牌存储库实现需要(可选)。
4、配置— spring-security-config.jar
该模块包含安全命名空间解析代码和 Java 配置代码。如果您使用 Spring Security XML 命名空间进行配置或 Spring Security 的 Java 配置支持,则需要它。没有一个类旨在直接在应用程序中使用。主要包含
org.springframework.security.config.
5、LDAP — spring-security-ldap.jar
此模块提供 LDAP 身份验证和供应代码。如果您需要使用 LDAP 身份验证或管理 LDAP 用户条目,则需要它。顶级包是org.springframework.security.ldap.
6、OAuth 2.0 核心 — spring-security-oauth2-core.jar
spring-security-oauth2-core.jar包含为 OAuth 2.0 授权框架和 OpenID Connect Core 1.0 提供支持的核心类和接口。使用 OAuth 2.0 或 OpenID Connect Core 1.0 的应用程序需要它,例如客户端、资源服务器和授权服务器。顶级包是org.springframework.security.oauth2.core.
7、OAuth 2.0 客户端 — spring-security-oauth2-client.jar
spring-security-oauth2-client.jar包含 Spring Security 对 OAuth 2.0 授权框架和 OpenID Connect Core 1.0 的客户端支持。使用 OAuth 2.0 登录或 OAuth 客户端支持的应用程序需要它。顶级包是org.springframework.security.oauth2.client.
8、OAuth 2.0 JOSE — spring-security-oauth2-jose.jar
spring-security-oauth2-jose.jar包含 Spring Security 对 JOSE(Javascript 对象签名和加密)框架的支持。JOSE 框架旨在提供一种在各方之间安全地传输声明的方法。它由一系列规范构建而成:
JSON 网络令牌 (JWT)
- JSON 网络签名 (JWS)
- JSON 网络加密 (JWE)
-
9、OAuth 2.0 资源服务器 — spring-security-oauth2-resource-server.jar
spring-security-oauth2-resource-server.jar包含 Spring Security 对 OAuth 2.0 资源服务器的支持。它用于通过 OAuth 2.0 Bearer Tokens 保护 API。顶级包是org.springframework.security.oauth2.server.resource.
10、ACL— spring-security-acl.jar
该模块包含一个专门的域对象 ACL 实现。它用于将安全性应用于应用程序中的特定域对象实例。顶级包是org.springframework.security.acls
11、CAS— spring-security-cas.jar
该模块包含 Spring Security 的 CAS 客户端集成。如果要将 Spring Security Web 身份验证与 CAS 单点登录服务器一起使用,则应该使用它。顶级包是org.springframework.security.cas.
12、OpenID — spring-security-openid.jar
OpenID 1.0 和 2.0 协议已被弃用,鼓励用户迁移到 Spring-security-oauth2 支持的 OpenID Connect。
此模块包含 OpenID Web 身份验证支持。它用于针对外部 OpenID 服务器对用户进行身份验证。顶级包是org.springframework.security.openid. 它需要 OpenID4Java。
2、Spring Security入门案例
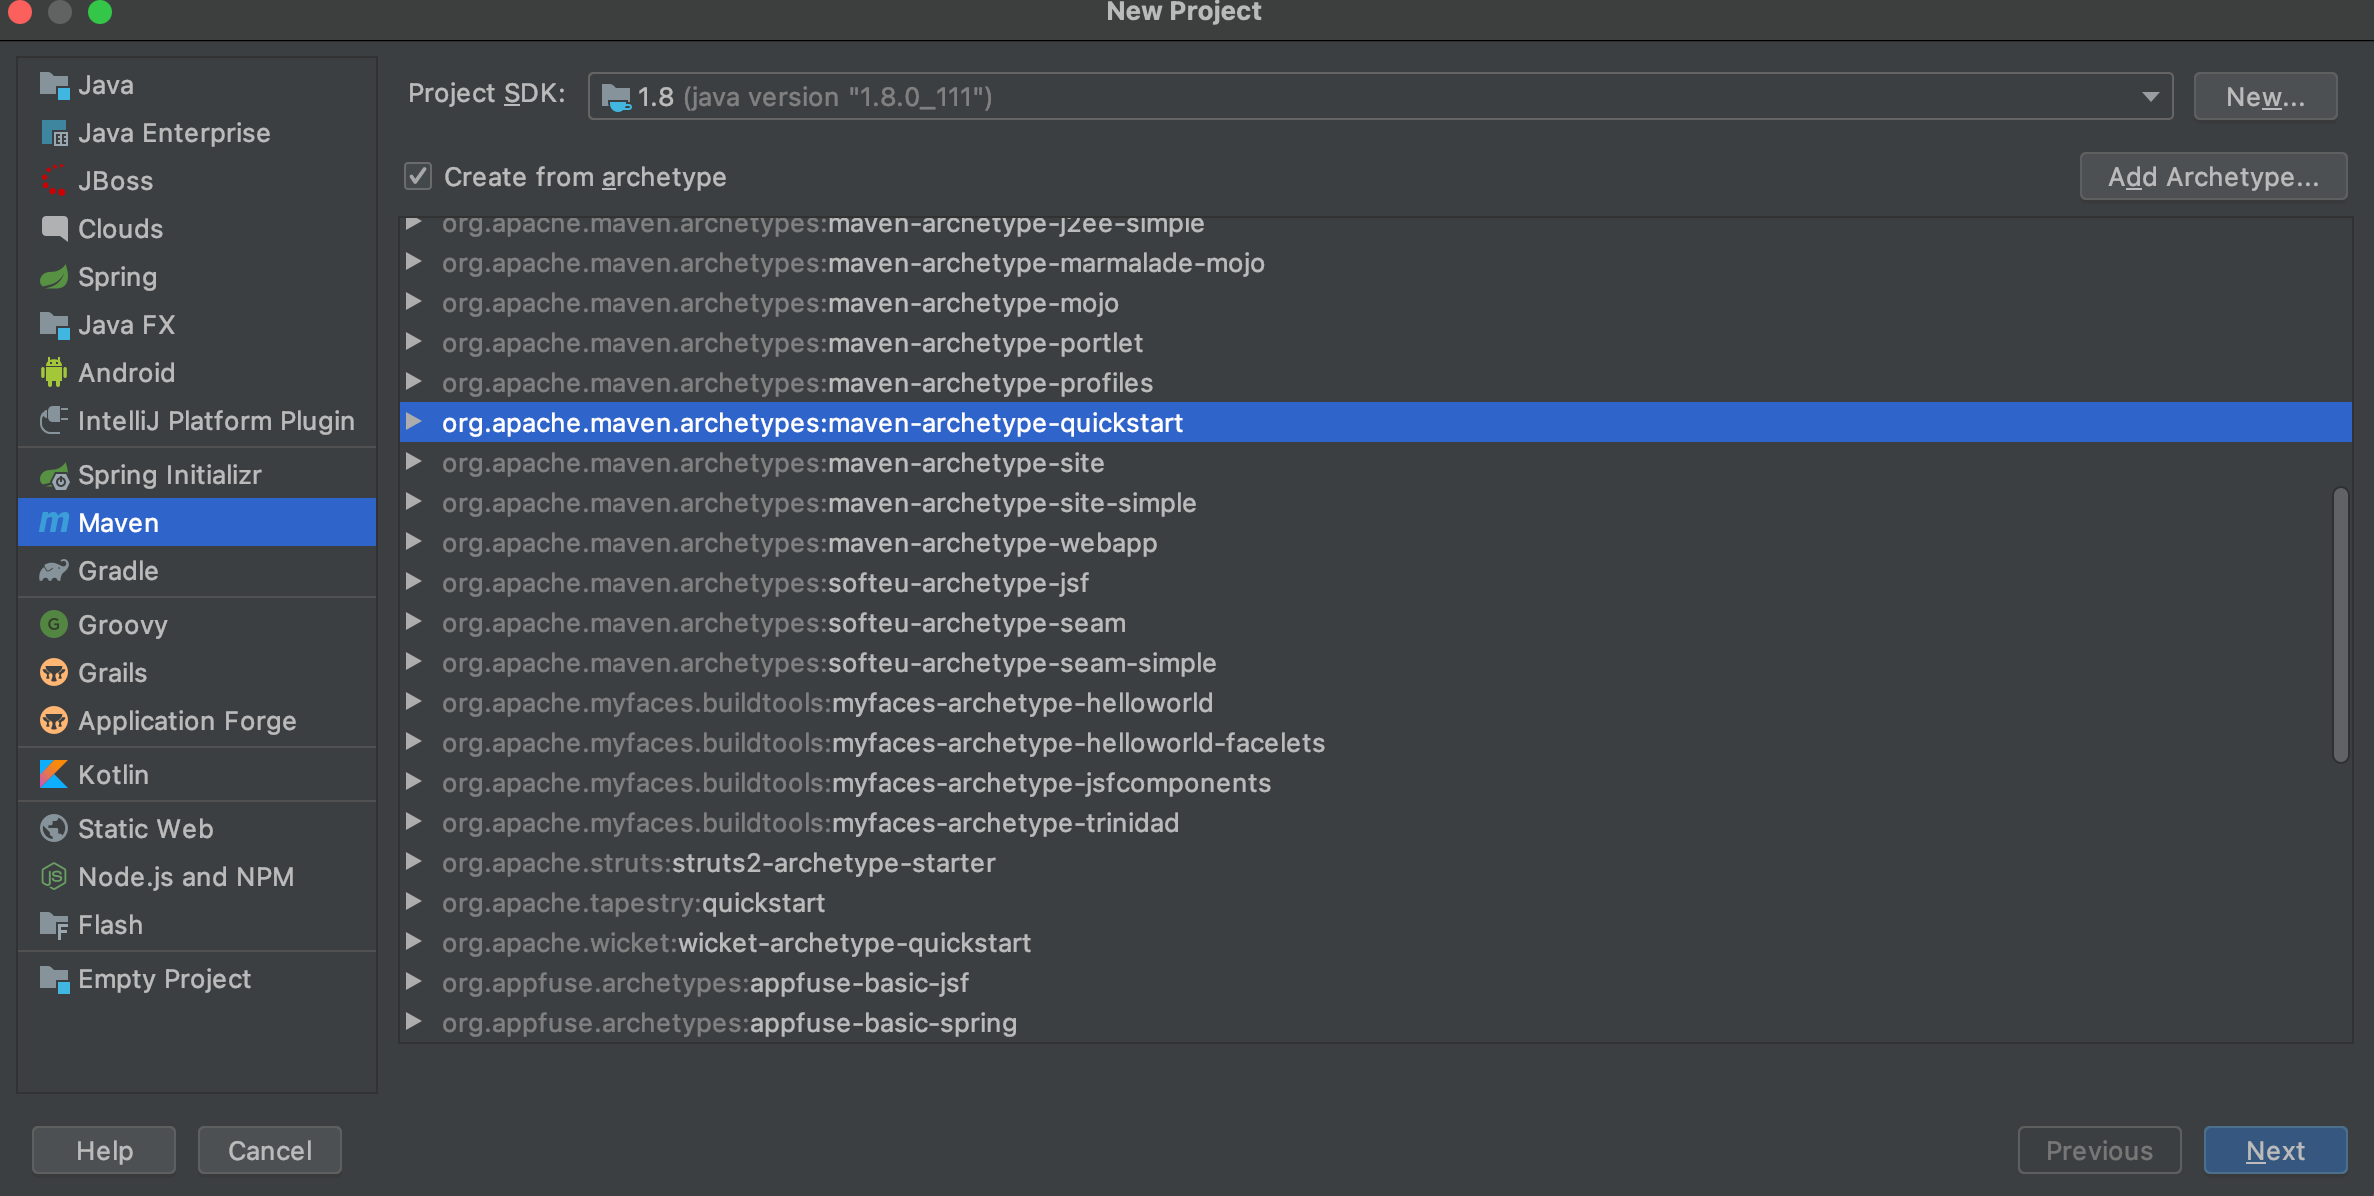
1、创建SpringBoot工程
- 通过maven快捷创建一个项目
- 通过maven-archetype-quickstart创建
2、编写pom.xml
- 去除多余的pom文件中的内容
- 编写新的依赖
- 主要是3个2个依赖一个是
- spring-boot-starter-web
- spring-boot-starter-security ```xml <?xml version=”1.0” encoding=”UTF-8”?>
<a name="hNQGL"></a>
## 3、编写主启动类

- 主启动类
- pom.xml
```java
package com.daijunyi;

import org.springframework.boot.SpringApplication;
import org.springframework.boot.autoconfigure.SpringBootApplication;

/**
 * @author djy
 * @createTime 2021/12/13 上午6:28
 * @description
 */
@SpringBootApplication
public class MainApplication {

    public static void main(String[] args) {
        SpringApplication.run(MainApplication.class,args);
    }
}
4、编写配置类
- SecurityConfig ```java package com.daijunyi.config;
import org.springframework.context.annotation.Configuration; import org.springframework.security.config.annotation.web.builders.HttpSecurity; import org.springframework.security.config.annotation.web.configuration.WebSecurityConfigurerAdapter;
/**
- @author djy
- @createTime 2021/12/13 上午7:26
- @description */ @Configuration public class SecurityConfig extends WebSecurityConfigurerAdapter {
@Override
protected void configure(HttpSecurity http) throws Exception {
    //表单登录
    http.formLogin()
            .and()
            //认证配置
            .authorizeRequests()
            //任何请求
            .anyRequest()
            //都需要身份验证
            .authenticated();
}
}
<a name="ImWOo"></a>
## 5、编写yaml

- application.yaml
```yaml
server:
  port: 8081
6、编写controller
- HelloController ```java package com.daijunyi.controller;
import org.springframework.web.bind.annotation.GetMapping; import org.springframework.web.bind.annotation.RequestMapping; import org.springframework.web.bind.annotation.RestController;
/**
- @author djy
- @createTime 2021/12/13 上午6:31
@description */ @RestController @RequestMapping(“/hello”) public class HelloController {
@GetMapping(“/security”) public String saySecurity(){
return "hello security";}
}
<a name="Ulfts"></a>
## 7、测试
- 启动[http://localhost:8081/hello/security](http://localhost:8081/hello/security)
- 自动跳入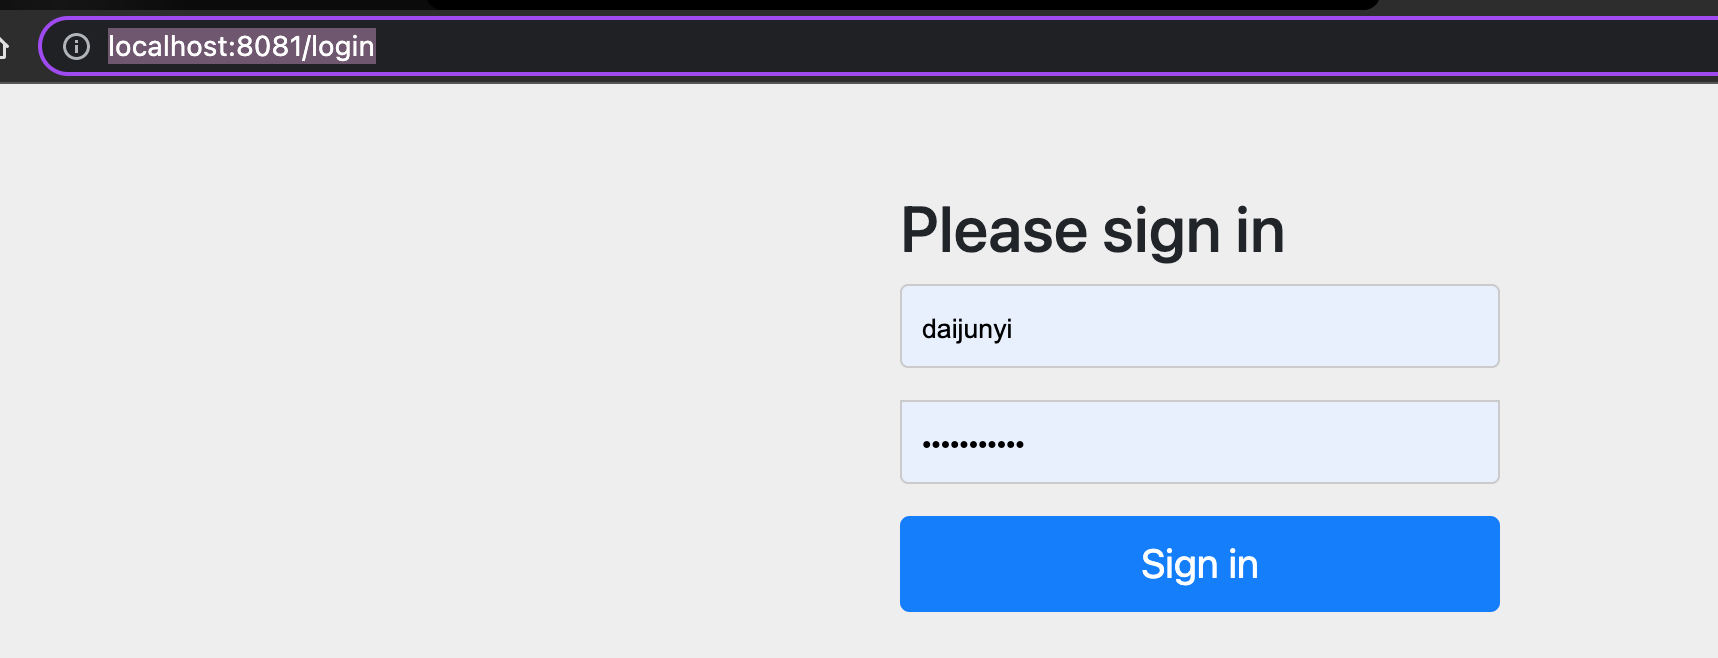
- 登录
- 用户名是user
- 密码是项目启动的时候控制台会自动打印一个密码
```shell
Using generated security password: ae1971d8-f1cd-47bf-b88d-786274babbf4
-
3、spring Security基本原理
Spring Security本质是一个过滤器链
ChannelProcessingFilter
- 使用https还是http的通过过滤器
- WebAsyncManagerIntegrationFilter
- 此过滤器使得WebAsync异步线程能够获取到当前认证信息
- SecurityContextPersistenceFilter
- 主要控制 SecurityContext 的在一次请求中的生命周期,请求结束时清空,防止内存泄漏
- HeaderWriterFilter
- 请求头过滤器
- CorsFilter
- 跨域过滤器
- CsrfFilter
- csrf过滤器
- LogoutFilter
- 登出过滤器
- OAuth2AuthorizationRequestRedirectFilter
- Oauth2请求鉴权重定向过滤器,需配合OAuth2.0的模块使用
- Saml2WebSsoAuthenticationRequestFilter
- Saml2单点认证过滤器 需配合Spring Security SAML模块使用
- X509AuthenticationFilter
- X.509证书认证过滤器
- AbstractPreAuthenticatedProcessingFilter
- 处理经过预先认证的身份验证请求的过滤器的基类
- CasAuthenticationFilter
- CAS 单点登录认证过滤器 。配合Spring Security CAS模块使用
- OAuth2LoginAuthenticationFilter
- OAuth2 登录认证过滤器
- Saml2WebSsoAuthenticationFilter
- SMAL 的 SSO 单点登录认证过滤器
- UsernamePasswordAuthenticationFilter
- 用户名密码认证过滤器
- OpenIDAuthenticationFilter
- OpenID认证过滤器
- DefaultLoginPageGeneratingFilter
- 默认登入页生成过滤器
- DefaultLogoutPageGeneratingFilter
- 默认登出页生成过滤器
- ConcurrentSessionFilter
- session管理,用于判断session是否过期
- DigestAuthenticationFilter
- 摘要认证过滤器
- BearerTokenAuthenticationFilter
- Bearer标准token认证过滤器
- BasicAuthenticationFilter
- Http Basic标准认证过滤器
- RequestCacheAwareFilter
- 请求缓存过滤器,主要作用是认证完成后恢复认证前的请求继续执行
- SecurityContextHolderAwareRequestFilter
- 对request包装的目的主要是实现servlet api的一些接口方法isUserInRole、getRemoteUser
- JaasApiIntegrationFilter
- Jaas认证过滤器
- RememberMeAuthenticationFilter
- RememberMe 认证过滤器
- AnonymousAuthenticationFilter
- 匿名认证过滤器
- OAuth2AuthorizationCodeGrantFilter
- OAuth2授权码过滤器
- SessionManagementFilter
- Session 管理器过滤器,内部维护了一个SessionAuthenticationStrategy 用于管理 Session
- ExceptionTranslationFilter
- 异常翻译过滤器
- FilterSecurityInterceptor
- 请求鉴权过滤器
SwitchUserFilter
-
2、FilterSecurityInterceptor
是一个方法级的权限过滤器,位于过滤器的最底部。
public void invoke(FilterInvocation fi) throws IOException, ServletException {
   if ((fi.getRequest() != null)
           && (fi.getRequest().getAttribute(FILTER_APPLIED) != null)
           && observeOncePerRequest) {
       // filter already applied to this request and user wants us to observe
       // once-per-request handling, so don't re-do security checking
       fi.getChain().doFilter(fi.getRequest(), fi.getResponse());
   }
   else {
       // first time this request being called, so perform security checking
       if (fi.getRequest() != null && observeOncePerRequest) {
           fi.getRequest().setAttribute(FILTER_APPLIED, Boolean.TRUE);
       }

       InterceptorStatusToken token = super.beforeInvocation(fi);

       try {
           fi.getChain().doFilter(fi.getRequest(), fi.getResponse());
       }
       finally {
           super.finallyInvocation(token);
       }

       super.afterInvocation(token, null);
   }
}
3、ExceptionTranslationFilter
-
异常过滤器
用来处理在认证授权过程中抛除的异常
  public void doFilter(ServletRequest req, ServletResponse res, FilterChain chain)
          throws IOException, ServletException {
      HttpServletRequest request = (HttpServletRequest) req;
      HttpServletResponse response = (HttpServletResponse) res;

      try {
          chain.doFilter(request, response);

          logger.debug("Chain processed normally");
      }
      catch (IOException ex) {
          throw ex;
      }
      catch (Exception ex) {
          // Try to extract a SpringSecurityException from the stacktrace
          Throwable[] causeChain = throwableAnalyzer.determineCauseChain(ex);
          RuntimeException ase = (AuthenticationException) throwableAnalyzer
                  .getFirstThrowableOfType(AuthenticationException.class, causeChain);

          if (ase == null) {
              ase = (AccessDeniedException) throwableAnalyzer.getFirstThrowableOfType(
                      AccessDeniedException.class, causeChain);
          }

          if (ase != null) {
              if (response.isCommitted()) {
                  throw new ServletException("Unable to handle the Spring Security Exception because the response is already committed.", ex);
              }
              handleSpringSecurityException(request, response, chain, ase);
          }
          else {
              // Rethrow ServletExceptions and RuntimeExceptions as-is
              if (ex instanceof ServletException) {
                  throw (ServletException) ex;
              }
              else if (ex instanceof RuntimeException) {
                  throw (RuntimeException) ex;
              }

              // Wrap other Exceptions. This shouldn't actually happen
              // as we've already covered all the possibilities for doFilter
              throw new RuntimeException(ex);
          }
      }
  }
4、UsernamePasswordAuthenticationFilter
对/login的post请求做拦截,校验表单中用户名和密码。
public Authentication attemptAuthentication(HttpServletRequest request,
          HttpServletResponse response) throws AuthenticationException {
      if (postOnly && !request.getMethod().equals("POST")) {
          throw new AuthenticationServiceException(
                  "Authentication method not supported: " + request.getMethod());
      }

      String username = obtainUsername(request);
      String password = obtainPassword(request);

      if (username == null) {
          username = "";
      }

      if (password == null) {
          password = "";
      }

      username = username.trim();

      UsernamePasswordAuthenticationToken authRequest = new UsernamePasswordAuthenticationToken(
              username, password);

      // Allow subclasses to set the "details" property
      setDetails(request, authRequest);

      return this.getAuthenticationManager().authenticate(authRequest);
  }
5、调用原理
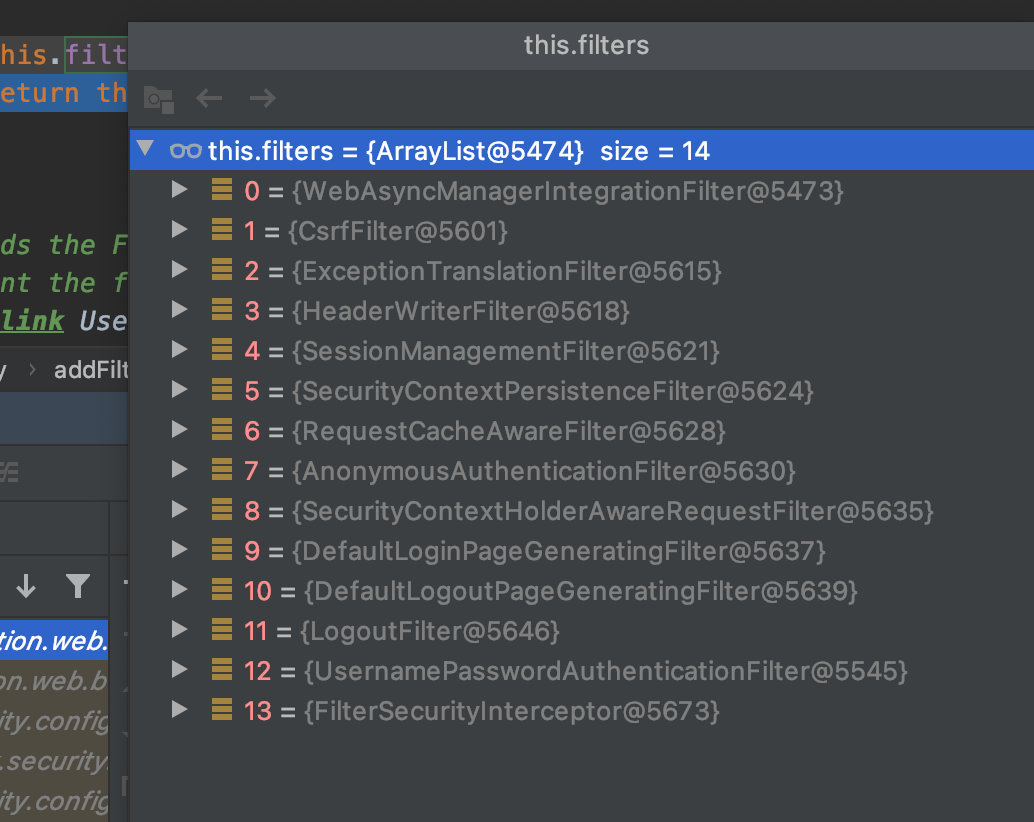
1、调用过程
1、所有的过滤器被添加在HttpSecurity类中
public HttpSecurity addFilter(Filter filter) { Class<? extends Filter> filterClass = filter.getClass(); if (!comparator.isRegistered(filterClass)) { throw new IllegalArgumentException( "The Filter class " + filterClass.getName() + " does not have a registered order and cannot be added without a specified order. Consider using addFilterBefore or addFilterAfter instead."); } this.filters.add(filter); return this; }- 总共14个过滤器
2、并且这些过滤器被重新封装在DefaultSecurityFilterChain中提供给DelegatingFilterProxy进行调用
@Override protected DefaultSecurityFilterChain performBuild() { filters.sort(comparator); return new DefaultSecurityFilterChain(requestMatcher, filters); }- 通过WebSecurityConfiguration配置DefaultSecurityFilterChain过滤链来调用performBuild()方法
@Bean(name = AbstractSecurityWebApplicationInitializer.DEFAULT_FILTER_NAME)
public Filter springSecurityFilterChain() throws Exception {
   boolean hasConfigurers = webSecurityConfigurers != null
           && !webSecurityConfigurers.isEmpty();
   if (!hasConfigurers) {
       WebSecurityConfigurerAdapter adapter = objectObjectPostProcessor
               .postProcess(new WebSecurityConfigurerAdapter() {
               });
       webSecurity.apply(adapter);
   }
   return webSecurity.build();
}
- 通过WebSecurityConfiguration配置DefaultSecurityFilterChain过滤链来调用performBuild()方法
3、通过DelegatingFilterProxy这个类开始调用过滤器链
@Override public void doFilter(ServletRequest request, ServletResponse response, FilterChain filterChain) throws ServletException, IOException { // Lazily initialize the delegate if necessary. Filter delegateToUse = this.delegate; if (delegateToUse == null) { synchronized (this.delegateMonitor) { delegateToUse = this.delegate; if (delegateToUse == null) { WebApplicationContext wac = findWebApplicationContext(); if (wac == null) { throw new IllegalStateException("No WebApplicationContext found: " + "no ContextLoaderListener or DispatcherServlet registered?"); } delegateToUse = initDelegate(wac); } this.delegate = delegateToUse; } } // Let the delegate perform the actual doFilter operation. invokeDelegate(delegateToUse, request, response, filterChain); }- initDelegate找到Proxy
protected Filter initDelegate(WebApplicationContext wac) throws ServletException {
   String targetBeanName = getTargetBeanName();
   Assert.state(targetBeanName != null, "No target bean name set");
   Filter delegate = wac.getBean(targetBeanName, Filter.class);
   if (isTargetFilterLifecycle()) {
       delegate.init(getFilterConfig());
   }
   return delegate;
}
2、原理中@Autowired在方法上的使用案例
- initDelegate找到Proxy
通过@Autowired注解让spring在启动的时候就扫码到这个方法,并执行,
@Value(“#{@….}”)的语法去获取某个对象
@Autowired(required = false)
  public void setFilterChainProxySecurityConfigurer(
          ObjectPostProcessor<Object> objectPostProcessor,
          @Value("#{@autowiredWebSecurityConfigurersIgnoreParents.getWebSecurityConfigurers()}") List<SecurityConfigurer<Filter, WebSecurity>> webSecurityConfigurers)
          throws Exception {
      ......
  }
autowiredWebSecurityConfigurersIgnoreParents方法
  @Bean
  public static AutowiredWebSecurityConfigurersIgnoreParents autowiredWebSecurityConfigurersIgnoreParents(
          ConfigurableListableBeanFactory beanFactory) {
      return new AutowiredWebSecurityConfigurersIgnoreParents(beanFactory);
  }
调用类里的getWebSecurityConfigurers方法
final class AutowiredWebSecurityConfigurersIgnoreParents {

  private final ConfigurableListableBeanFactory beanFactory;

  AutowiredWebSecurityConfigurersIgnoreParents(
          ConfigurableListableBeanFactory beanFactory) {
      Assert.notNull(beanFactory, "beanFactory cannot be null");
      this.beanFactory = beanFactory;
  }

  @SuppressWarnings({ "rawtypes", "unchecked" })
  public List<SecurityConfigurer<Filter, WebSecurity>> getWebSecurityConfigurers() {
      List<SecurityConfigurer<Filter, WebSecurity>> webSecurityConfigurers = new ArrayList<>();
      Map<String, WebSecurityConfigurer> beansOfType = beanFactory
              .getBeansOfType(WebSecurityConfigurer.class);
      for (Entry<String, WebSecurityConfigurer> entry : beansOfType.entrySet()) {
          webSecurityConfigurers.add(entry.getValue());
      }
      return webSecurityConfigurers;
  }
}
3、自己实现案例
在一个配置类中写了这么一段代码
  @Autowired()
  public void autowiredTest(@Value("#{@auto.getString()}") String name){
      System.out.println("我被执行了"+name);
  }

  @Bean
  public static AutoTest auto(){
      return new AutoTest();
  }
并且定义了一个final类 ```java package com.daijunyi.auto;
/**
- @author djy
- @createTime 2021/12/14 上午9:49
@description */ public final class AutoTest {
public String getString(){
return "hello world";} }
- 执行就会打印出:我被执行了hello world
<a name="aEdEs"></a>
## 6、两个重要的接口用数据库查用户名和密码
<a name="pPcX9"></a>
### 1、UserDetailService
当什么也没配置的时候,账号和密码是由Spring Security定义生成的。

- 实现自定义逻辑只需要,实现UserDetailService接口,并实现里面的loadUserByUsername(String username);就可以
```java
public interface UserDetailsService {
    UserDetails loadUserByUsername(String username) throws UsernameNotFoundException;
}
- 返回值是UserDetails

- org.springframework.security.core.userdetails.User 是UserDetails的一个实现类
方法参数username
- 是客户端表单传递过来的数据,默认情况下必须叫username
2、PasswordEncoder接口
public interface PasswordEncoder {
//对原始密码进行编码。一般来说,
//一个好的编码算法应用SHA-1或更大的哈希值与一个8字节或更大的随机生成的salt相结合
String encode(CharSequence rawPassword);
//验证从存储器获得的编码密码在编码后是否与提交的原始*密码匹配。
//如果密码匹配,则返回true;如果*密码不匹配,则返回false。
//存储的密码本身永远不会被解码
boolean matches(CharSequence rawPassword, String encodedPassword);
//如果为了更好的安全性,应再次对编码的密码进行编码,则返回true,
//否则返回false。默认实现始终返回false。
//@param encodedPassword编码密码以检查
//@如果为了更好的安全性需要再次编码编码密码,则返回true,*否则返回false
default boolean upgradeEncoding(String encodedPassword) {
   return false;
}
}
- 是客户端表单传递过来的数据,默认情况下必须叫username
org.springframework.security.crypto.bcrypt.BCryptPasswordEncoder
- 使用BCrypt强哈希函数的PasswordEncoder的实现。客户端可以选择提供一个“版本”($2a、$2b、$2y)和一个“强度”(也称为BCrypt中的日志轮次)以及一个SecureRandom实例。强度参数越大,需要做的工作就越多*(指数级)以散列密码。默认值为10
- 是对bcrypt强散列方法的具体实现,基于Hash算法实现的单向加密,可以通过strength控制加密强度,默认10
- 是官方推荐密码解析器,平时用这个
- 使用BCrypt强哈希函数的PasswordEncoder的实现。客户端可以选择提供一个“版本”($2a、$2b、$2y)和一个“强度”(也称为BCrypt中的日志轮次)以及一个SecureRandom实例。强度参数越大,需要做的工作就越多*(指数级)以散列密码。默认值为10
使用演示
@Test public void bCryptTest(){ BCryptPasswordEncoder bCryptPasswordEncoder = new BCryptPasswordEncoder(); String djy = bCryptPasswordEncoder.encode("djy"); System.out.println("加密后数据:"+djy); boolean isOk = bCryptPasswordEncoder.matches("djy", djy); System.out.println("密码是否匹配:"+isOk); }- 演示结果 ```shell 加密后数据:$2a$10$ZteV1CibdooWCoKN39kgyOtRIRgnLxEwPf7GURYM5d3QFeoNzXxN6 密码是否匹配:true
Process finished with exit code 0
<a name="ymgv1"></a>
# 4、配置密码的三种方式
<a name="tuR7v"></a>
## 1、配置文件配置

- 配置文件配置账号密码
- 这种方式一般是用不到的。
```yaml
spring:
  security:
    user:
      password: 123456
      name: daijunyi
2、编写配置类
配置BCryptPasswordEncoder加密方式 ```java @Configuration public class SecurityConfig extends WebSecurityConfigurerAdapter {
@Bean public PasswordEncoder passwordEncoder() {
return new BCryptPasswordEncoder();}
@Override protected void configure(AuthenticationManagerBuilder auth) throws Exception {
  auth.inMemoryAuthentication()
          .withUser("djy")
          .password(passwordEncoder().encode("123456"))
          .roles("admin");
} }
<a name="c4pt1"></a>
## 3、从数据库读取
<a name="hhYy8"></a>
### 1、修改pom
```xml
<?xml version="1.0" encoding="UTF-8"?>

<project xmlns="http://maven.apache.org/POM/4.0.0" xmlns:xsi="http://www.w3.org/2001/XMLSchema-instance"
         xsi:schemaLocation="http://maven.apache.org/POM/4.0.0 http://maven.apache.org/xsd/maven-4.0.0.xsd">
    <modelVersion>4.0.0</modelVersion>

    <groupId>com.daijunyi</groupId>
    <artifactId>security</artifactId>
    <version>1.0-SNAPSHOT</version>

    <name>security</name>

    <parent>
        <groupId>org.springframework.boot</groupId>
        <artifactId>spring-boot-starter-parent</artifactId>
        <version>2.2.1.RELEASE</version>
        <!--        不从本地仓库获取-->
        <relativePath></relativePath>
    </parent>

    <properties>
        <project.build.sourceEncoding>UTF-8</project.build.sourceEncoding>
        <maven.compiler.source>1.8</maven.compiler.source>
        <maven.compiler.target>1.8</maven.compiler.target>
    </properties>

    <dependencies>

        <dependency>
            <groupId>org.springframework.boot</groupId>
            <artifactId>spring-boot-starter-web</artifactId>
        </dependency>

        <dependency>
            <groupId>org.springframework.boot</groupId>
            <artifactId>spring-boot-starter-test</artifactId>
            <!--只在测试的时候用-->
            <scope>test</scope>
        </dependency>

        <dependency>
            <groupId>mysql</groupId>
            <artifactId>mysql-connector-java</artifactId>
            <version>8.0.27</version>
        </dependency>

        <dependency>
            <groupId>com.alibaba</groupId>
            <artifactId>druid-spring-boot-starter</artifactId>
            <version>1.2.8</version>
        </dependency>

        <dependency>
            <groupId>org.projectlombok</groupId>
            <artifactId>lombok</artifactId>
            <version>1.18.22</version>
            <scope>provided</scope>
        </dependency>

        <dependency>
            <groupId>org.mybatis.spring.boot</groupId>
            <artifactId>mybatis-spring-boot-starter</artifactId>
            <version>2.2.0</version>
        </dependency>

        <dependency>
            <groupId>org.springframework.boot</groupId>
            <artifactId>spring-boot-starter-security</artifactId>
        </dependency>

    </dependencies>

    <build>
        <resources> <!-- 资源文件的打包和过滤替换配置 -->
            <resource>
                <directory>src/main/java</directory>
                <includes>
                    <include>**/*.xml</include>
                    <include>**/*.yml</include>
                </includes>
                <filtering>false</filtering>
            </resource>
            <resource>
                <directory>src/main/resources</directory>
            </resource>
        </resources>
        <plugins>
            <plugin>
                <groupId>org.springframework.boot</groupId>
                <artifactId>spring-boot-maven-plugin</artifactId>
            </plugin>
        </plugins>
    </build>
</project>
2、修改yaml
server:
  port: 8083
spring:
  datasource:
    url: jdbc:mysql://192.168.33.10:3306/asto
    username: root
    password: 123456
    driver-class-name: com.mysql.cj.jdbc.Driver
    type: com.alibaba.druid.pool.DruidDataSource
3、pojo类
PartyVo ```java @Data public class PartyVo {
private Integer partyId;
private String nickName;
private String password; }
<a name="Ko5fV"></a>
### 4、mapper
<a name="stTtA"></a>
#### 1、mapper接口
```java
@Mapper
public interface PartyMapper {

    PartyVo getPartyByNickName(@Param("nickName") String nickName);

}
2、mapper.xml文件
<?xml version="1.0" encoding="UTF-8" ?>
<!DOCTYPE mapper
        PUBLIC "-//mybatis.org//DTD Mapper 3.0//EN"
        "http://mybatis.org/dtd/mybatis-3-mapper.dtd">
<mapper namespace="com.daijunyi.mapper.PartyMapper">

    <resultMap id="partyVoResultMap" type="com.daijunyi.pojo.vo.PartyVo">
        <id column="id" property="partyId"></id>
        <result column="nick_name" property="nickName"></result>
    </resultMap>

    <select id="getPartyByNickName" resultMap="partyVoResultMap">
        SELECT id,nick_name,password FROM party where del_flag = 0 AND nick_name = #{nickName}
    </select>

</mapper>
5、添加UserDetailsService的实现类
@Service
public class SecurityUserDetailsServiceImpl implements UserDetailsService {

    @Autowired
    private PartyMapper partyMapper;

    @Autowired
    private PasswordEncoder passwordEncoder;

    @Override
    public UserDetails loadUserByUsername(String username) throws UsernameNotFoundException {
        PartyVo party = partyMapper.getPartyByNickName(username);
        if (ObjectUtils.isEmpty(party)){
            throw new UsernameNotFoundException("账号密码错误");
        }

        return new User(party.getNickName(),passwordEncoder.encode(party.getPassword()), AuthorityUtils.commaSeparatedStringToAuthorityList("admin,"));
    }


}
3、配置SecurityConfig
- 配置加密方式 ```java package com.daijunyi.config;
import com.daijunyi.service.impl.SecurityUserDetailsServiceImpl; import org.springframework.beans.factory.annotation.Autowired; import org.springframework.context.annotation.Bean; import org.springframework.context.annotation.Configuration; import org.springframework.security.config.annotation.authentication.builders.AuthenticationManagerBuilder; import org.springframework.security.config.annotation.web.configuration.WebSecurityConfigurerAdapter; import org.springframework.security.core.userdetails.UserDetailsService; import org.springframework.security.crypto.bcrypt.BCryptPasswordEncoder; import org.springframework.security.crypto.password.PasswordEncoder;
/**
- @author djy
- @createTime 2021/12/13 上午7:26
@description */ @Configuration public class SecurityConfig extends WebSecurityConfigurerAdapter {
@Bean public PasswordEncoder passwordEncoder() {
return new BCryptPasswordEncoder();}
@Autowired private UserDetailsService userDetailsService;
@Override protected void configure(AuthenticationManagerBuilder auth) throws Exception {
auth.userDetailsService(userDetailsService).passwordEncoder(passwordEncoder());} }
<a name="p5X2y"></a>
# 5、权限相关与其他配置
```java
@Override
    protected void configure(HttpSecurity http) throws Exception {
        //退出
        http.logout().logoutUrl("/logout").
                logoutSuccessUrl("/test/hello").permitAll();

        //配置没有权限访问跳转自定义页面
        http.exceptionHandling().accessDeniedPage("/unauth.html");
        http.formLogin()   //自定义自己编写的登录页面
            .loginPage("/on.html")  //登录页面设置
            .loginProcessingUrl("/user/login")   //登录访问路径
            .defaultSuccessUrl("/success.html").permitAll()  //登录成功之后,跳转路径
                .failureUrl("/unauth.html")
            .and().authorizeRequests()
                .antMatchers("/","/test/hello","/user/login").permitAll() //设置哪些路径可以直接访问,不需要认证
                //当前登录用户,只有具有admins权限才可以访问这个路径
                //1 hasAuthority方法
               // .antMatchers("/test/index").hasAuthority("admins")
                //2 hasAnyAuthority方法
               // .antMatchers("/test/index").hasAnyAuthority("admins,manager")
                //3 hasRole方法   ROLE_sale
                .antMatchers("/test/index").hasRole("sale")

                .anyRequest().authenticated()
                .and().rememberMe().tokenRepository(persistentTokenRepository())
                .tokenValiditySeconds(60)//设置有效时长,单位秒
                .userDetailsService(userDetailsService);
               // .and().csrf().csrfTokenRepository(CookieCsrfTokenRepository.withHttpOnlyFalse());
          // .and().csrf().disable();  //关闭csrf防护
    }
1、接口权限相关设置
- hasAuthority(“admins”)
- 表示有admins角色权限
- hasAnyAuthority(“admins,manager”) 多个权限
- 表示有admins和manager权限,可以设置多个
hasRole(“sale”)/hasAnyRole(“sale,sale2”)�
- 设置拥有角色
- 源码添加了ROLE_
private static String hasRole(String role) {
   Assert.notNull(role, "role cannot be null");
   if (role.startsWith("ROLE_")) {
       throw new IllegalArgumentException(
               "role should not start with 'ROLE_' since it is automatically inserted. Got '"
                       + role + "'");
   }
   return "hasRole('ROLE_" + role + "')";
}
2、用户权限设置
通过AuthorityUtils.commaSeparatedStringToAuthorityList(“admin,ROLE_sale”)设置到UserDetail中
注意点如果是设置的是角色,就需要加上ROLE_前缀
  @Override
  public UserDetails loadUserByUsername(String username) throws UsernameNotFoundException {
      //调用usersMapper方法,根据用户名查询数据库
      QueryWrapper<Users> wrapper = new QueryWrapper();
      // where username=?
      wrapper.eq("username",username);
      Users users = usersMapper.selectOne(wrapper);
      //判断
      if(users == null) {//数据库没有用户名,认证失败
          throw  new UsernameNotFoundException("用户名不存在!");
      }
      List<GrantedAuthority> auths =
              AuthorityUtils.commaSeparatedStringToAuthorityList("admin,ROLE_sale");
      //从查询数据库返回users对象,得到用户名和密码,返回
      return new User(users.getUsername(),
              new BCryptPasswordEncoder().encode(users.getPassword()),auths);
  }
6、注解使用
1、注解@Secured
功能判断是否拥有某个角色,并且要加上前缀ROLE_
如果使用该注解需要先开启注解功能
- @EnableGlobalMethodSecurity(securedEnabled = true) ```java @Configuration @EnableGlobalMethodSecurity(securedEnabled = true) public class SecurityConfig extends WebSecurityConfigurerAdapter {
}
- 使用方法
   - 在controller请求中添加
```java
@RestController
@RequestMapping("/hello")
public class HelloController {

    @GetMapping("/security")
    @Secured({"ROLE_normal","ROLE_admins"})
    public String saySecurity(){
        return "hello security";
    }

}
2、注解@PreAuthorize
- 可以将登陆用户的roles/permissions参数传到方法中
也需要开启注解功能
@Configuration
@EnableGlobalMethodSecurity(prePostEnabled = true)
public class SecurityConfig extends WebSecurityConfigurerAdapter {

}
使用 ```java @RestController @RequestMapping(“/hello”) public class HelloController {
@GetMapping(“/security”) @PreAuthorize(“hasAnyAuthority(‘admins’)”) public String saySecurity(){
return "hello security";}
}
<a name="xnfQr"></a>
## 3、@PostAuthorize
也需要开启注解功能
```java
@Configuration
@EnableGlobalMethodSecurity(prePostEnabled = true)
public class SecurityConfig extends WebSecurityConfigurerAdapter {

}
在执行方法之后再进行权限验证,适合验证带有返回值的权限
@RequestMapping("/testPostAuthorize")
@ResponseBody
@PostAuthorize("hasAnyAuthority('menu:system')")
public String preAuthorize(){
  System.out.println("test--PostAuthorize");
  return "PostAuthorize";
}
4、@PostFilter
@PostFilter :权限验证之后对数据进行过滤留下用户名是admin1 的数据表达式中的 filterObject 引用的是方法返回值 List 中的某一个元素
@RequestMapping("getAll")
@PreAuthorize("hasRole('ROLE_管理员')")
@PostFilter("filterObject.username == 'admin1'")
@ResponseBody
public List<UserInfo> getAllUser(){
  ArrayList<UserInfo> list = new ArrayList<>();
  list.add(new UserInfo(1l,"admin1","6666"));
  list.add(new UserInfo(2l,"admin2","888"));
  return list;
}
5、@Prefilter
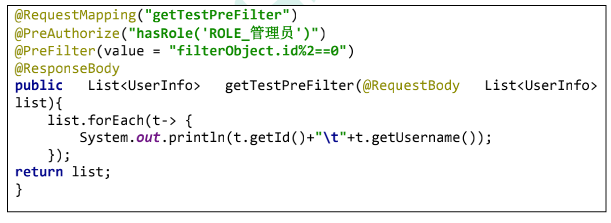
PreFilter:进入控制器之前对数据进行过滤
6、相关表达式
https://docs.spring.io/spring-security/site/docs/5.3.4.RELEASE/reference/html5/#el-access

若有收获,就点个赞吧
0 人点赞
