准备工作
硬件:
- 一款 ESP32 开发板
- USB 数据线 (A 转 Micro-B)
- 电脑(Windows、Linux 或 Mac OS)
软件:
您可以选择下载并手动安装以下软件:
- 设置 工具链,用于编译 ESP32 代码;
- 编译构建工具 —— CMake 和 Ninja 编译构建工具,用于编译 ESP32 应用程序;
- 获取 ESP-IDF 软件开发框架。该框架已经基本包含 ESP32 使用的 API(软件库和源代码)和运行 工具链 的脚本;
或者,您也可以通过以下集成开发环境 (IDE) 中的官方插件完成安装流程:
- Eclipse 插件 (安装)
- VS Code 插件 (安装)

官方教程
ESP 系列的开发环境包含 ESP-IDF、ESP-ADF(语音开发) 以及 ESP-MDF(MESH 组网开发)。
ESP-IDF 是什么?
ESP-IDF (Espressif IoT Development Framework)是乐鑫的物联网开发框架,是使用乐鑫 ESP 系列芯片进行物联网开发时,必要的基础代码库、示例程序、文档和工具的集合。目前已支持 Linux、MacOS 和 Windows 等主流开发平台。
ESP-IDF 编程指南:https://docs.espressif.com/projects/esp-idf/zh_CN/latest/esp32/get-started/index.html
GitHub :https://github.com/espressif/esp-idf/blob/8bc19ba/docs/zh_CN/get-started/index.rst
GitHub 里面 Branches 中 released 都是稳定版本,master 是最新版本。如果需要尝试或测试最新的特性,可以选择最新版本;如果需要稳定和量产的话,应该选择一个稳定版本。关于各个版本的说明,可参考:https://docs.espressif.com/projects/esp-idf/zh_CN/latest/esp32/versions.html#esp-idf
- V 4.0 版本视频教程:Windows 系统下 ESP-IDF 环境搭建; Mac OS 系统下 ESP-IDF 环境搭建
以上两条视频是实根据官方文档步骤进行环境搭建的视频录屏,根据操作步骤下载官方安装工具 esp-idf-tools-setup.exe,双击运行,即可自动完成代码库、编译工具链和依赖工具的下载和安装。
优点:步骤比较少,只要按照提示点击“下一步”即可。
缺点:部分下载资源默认来自国外的服务器,可能会因为网络原因导致下载和安装失败。在网络环境好的情况下,推荐使用该方法。
- Master 版本视频教程:利用码云 Gitee 完成 IDF Master 分支环境搭建!ESP32-S2适用
在国内的网络环境下,从码云 Gitee 下载代码仓库的速度比 GitHub 更快,但是由于子仓库依赖问题,需要运行一个脚本进行子仓库的重定向。
优点:快、快、快!
缺点:需要在 Windows 下使用命令行多步操作,更适合具有良好编程基础的用户。 - Master 版本视频教程:Windows 系统上运行 Linux,WSL+VScode 搭建环境
非常推荐,该方法首先使用 WSL 在 Windows 上搭建一个 Linux 环境,然后按照 Linux 操作步骤完成环境搭建即可,同时也可以结合方法二获得下载的加速,在之后的开发中,可以使用 VSCode 插件实现两个系统的互通。
优点:命令行的输入过程都在 Linux 子系统中进行,完全按照官方的文档复制粘贴即可,相比 Windows 的命令行工具问题更少,同时由于后期开发都在 Linux 上进行,可以获得原生开发的体验。 - Master 版本视频教程:ESP-IDF VS Code 插件快速操作指南
直接下载 VS Code,在 VS Code 操作界面中安装 ESP-IDF,并下载 Git、Python 等所需的工具链即可完成环境搭建。
优点:直接在 VS Code 中一站式操作,非常简便。
缺点:由于服务器在国外,可能遇到代码库或工具链下载失败的问题。IDF 的版本非常重要,安装环境前请务必在编程指南页面中切换至你要安装的版本,不同版本的指南,安装步骤会有不同。在 Linux 系统下,切换 IDF 版本非常方便。
ESP-ADF 是什么?
ESP-ADF (Espressif Audio Development Framework) 是乐鑫基于 ESP-IDF 的语音开发框架。
ESP-ADF 编程指南:https://docs.espressif.com/projects/esp-adf/zh_CN/latest/get-started/index.html
GitHub :https://github.com/espressif/esp-adf/blob/master/docs/zh_CN/get-started/index.rst
ADF 和 IDF 的版本如何匹配?
注意,目前 ADF 配合使用的是 V 3.3 的 IDF,使用其他版本的 IDF 可能在开发过程中出现问题,建议跟随下面的视频安装 3.3 稳定版本的 IDF:
Linux 系统下 ESP-ADF 语音开发框架环境搭建教程
ESP-MDF 是什么?
ESP-MDF (Espressif MESH Development Framework) 是基于 ESP-IDF 封装的 ESP-WIFI-MESH 开发构架。
ESP-MDF 编程指南:https://docs.espressif.com/projects/esp-mdf/zh_CN/latest/get-started/index.html
GitHub :https://github.com/espressif/esp-mdf/blob/master/docs/zh_CN/get-started/index.rst
MDF 环境搭建视频教程:
点击查看【bilibili】
WSL+VSCode
有了 WSL ,用户既能使用 Windows 桌面环境,又能使用更强大的 Linux 终端工具
WSL(Windows Subsystem for Linux):WSL 是运行在 Windows 上的 GNU/Linux 环境,Linux 程序无需修改即可在 Windows 上运行,包括大多数命令行工具、实用程序和应用程序,没有传统虚拟机或双引导设置的开销。
注意:只支持 Windows 10 Version 1903 或更高版本
WSL2 提升了文件系统性能
WSL2 升级了 WSL 的软件架构,支持在 Windows 上直接运行 ELF64 Linux 二进制文件。它的优点是提高了文件系统性能(2-5 倍提升),以及增加整个系统调用的兼容性。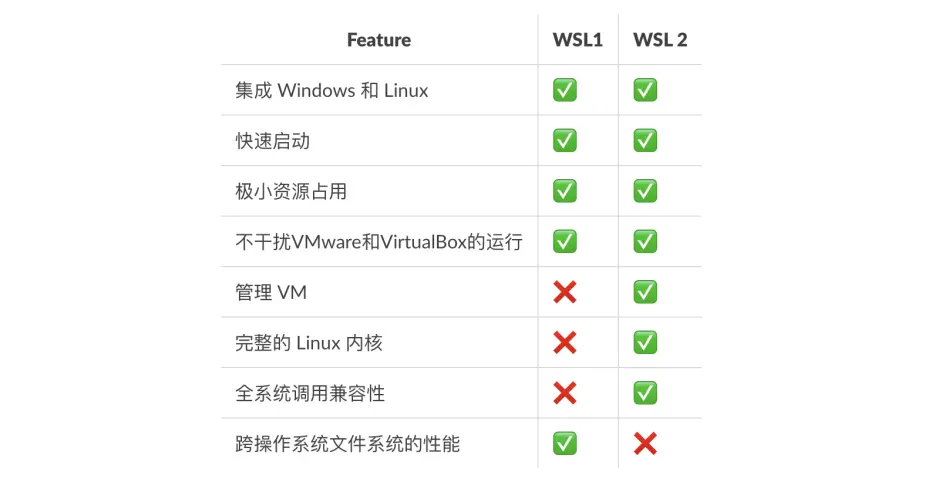
启用WSL
方法1:在启用或关闭 Windows 功能中,勾选“适用于 Linux 的 Windows 子系统” ,然后按照提示重启电脑。

方法2:可以通过命令行指令开启,管理员模式进入 powershell ,然后运行:
dism.exe /online /enable-feature /featurename:Microsoft-Windows-Subsystem-Linux /all /norestart
有些电脑可能提示安装 Linux kernel update package(https://docs.microsoft.com/en-us/windows/wsl/install-win10#step-4—-download-the-linux-kernel-update-package),下载安装即可。
如果需要切换WSL版本,可通过命令行 wsl --set-version <distribution name> <versionNumber>进行切换,例如将 Ubuntu-18.04 版本切换为 WSL2:
wsl --set-version Ubuntu-18.04 2
是否要切换取决于你的应用场景,如果需要使用 USB 和串口,可以暂时使用 WSL1,目前 WSL2 还不支持操作 USB 和串口(2021.12)。
选择并安装一个Linux发行版
直接在 Microsoft 应用商店搜索并安装:
安装好后在windows命令行输入:
wsl -l -v

克隆ESP-IDF代码仓库
方法1:从 github 下载,可以直接克隆主仓库和子仓库
git clone --recursive https://github.com/espressif/esp-idf.git
方法 2(推荐):从国内镜像 gitee 下载,需要使用以下操作:
下载子仓库重定向工具
esp-gitee-toolsgit clone https://gitee.com/EspressifSystems/esp-gitee-tools.git

下载好后可以在根目录下看到esp-gitee-tools的文件夹克隆主仓库代码
git clone https://gitee.com/EspressifSystems/esp-idf.git
克隆重定向后的子仓库代码
cd esp-gitee-toolsexport EGT_PATH=$(pwd)cd ..cd esp-idf$EGT_PATH/submodule-update.sh
官方 gitee 操作指南,请参考:
submodule-update(https://gitee.com/EspressifSystems/esp-gitee-tools/blob/master/docs/README-submodule-update.md)
更新ESP-IDF
更新至master分支
cd $IDF_PATHgit checkout mastergit pullgit submodule update --init --recursive
- 此外,您还应在后续工作中不时使用
git pull命令,将远端 master 上的更新同步到本地。注意,在更新 master 分支后,您可能需要更改工程代码,也可能遇到新的 bug。 - 如需从 master 分支切换至一个发布分支或稳定版本,请使用
git checkout命令。
更新至一个发布分支
cd $IDF_PATHgit fetchgit checkout release/v3.1git pullgit submodule update --init --recursive
安装ESP-IDF工具链
将默认 python 切换为 python3 (可选步骤,推荐)
修改ubuntu 源到国内镜像:
cd /etc/apt/sudo cp sources.list sources.list.baksudo vim sources.list
删除该文件全部内容,粘贴以下内容并保存:
deb http://mirrors.aliyun.com/ubuntu/ bionic main restricted universe multiversedeb http://mirrors.aliyun.com/ubuntu/ bionic-security main restricted universe multiversedeb http://mirrors.aliyun.com/ubuntu/ bionic-updates main restricted universe multiversedeb http://mirrors.aliyun.com/ubuntu/ bionic-proposed main restricted universe multiversedeb http://mirrors.aliyun.com/ubuntu/ bionic-backports main restricted universe multiversedeb-src http://mirrors.aliyun.com/ubuntu/ bionic main restricted universe multiversedeb-src http://mirrors.aliyun.com/ubuntu/ bionic-security main restricted universe multiversedeb-src http://mirrors.aliyun.com/ubuntu/ bionic-updates main restricted universe multiversedeb-src http://mirrors.aliyun.com/ubuntu/ bionic-proposed main restricted universe multiversedeb-src http://mirrors.aliyun.com/ubuntu/ bionic-backports main restricted universe multiverse
连续敲两次大写Z退出并返回命令行模式
安装 python3
sudo apt-get install python3 python3-pip python3-setuptools
将 python 默认切换为 python3
sudo update-alternatives --install /usr/bin/python python /usr/bin/python3 10
提示:Unable to locate package python3-pip 需要移除移除不兼容的architecture
sudo dpkg --print-architecture
如果输出amd64,就需要将其移除
sudo apt-get remove .*:amd64sudo dpkg --remove-architecture amd64sudo apt-get update
将 pip 源更换到国内镜像(可选步骤,推荐)
- 将
pip更换到国内镜像
方法 1 :pip 版本 >= 10.0.0,可以使用以下方式:
pip --versionpip config set global.index-url http://mirrors.aliyun.com/pypi/simplepip config set global.trusted-host mirrors.aliyun.com
报错:ERROR: unknown command “config” pip3版本较低,不支持config方法
sudo -H pip3 install -U pip
方法 2(通用):可以创建并修改配置文件 ~/.pip/pip.conf :
mkdir ~/.pipvim ~/.pip/pip.conf
将下面内容添加到文件并保存:
[global]index-url = http://mirrors.aliyun.com/pypi/simple[install]trusted-host = mirrors.aliyun.com
安装依赖包
在终端输入以下指令,安装依赖工具:
sudo apt-get install git wget flex bison gperf python python-pip python-setuptools cmake ninja-build ccache libffi-dev libssl-dev dfu-util
进入 esp-idf 目录,安装 Python 依赖包:(该步骤可忽略,后续 install.sh 会默认安装)
cd esp-idfpip3 install -r requirements.txt
安装编译工具链
方法 1 :从默认路径下载并安装工具链(不推荐,访问github网速很慢)
./install.sh
方法 2(推荐) :从国内镜像下载并安装工具链,需要使用以下操作:
cd esp-gitee-toolsexport EGT_PATH=$(pwd)cd ..cd esp-idf$EGT_PATH/install.sh
安装 VSCode WSL 插件

在命令行输入code.:
可以在windows上的vscode打开Linux系统上的路径
添加环境变量
. $HOME/esp-idf/export.sh
注意,这里设置的环境变量仅在当前终端生效,如果想要打开终端时候不用多次配置环境变量,可以使用以下命令:
nano ~/.bashrc
修改文件的最后一行:
. /home/zhongtian/esp-idf/export.sh
为
export IDF_PATH=/home/zhongtian/esp-idf. $IDF_PATH/export.sh
提示’cmake’ must be available on the PATH to use idf.py
需要手动安装cmake
sudo apt install cmake
连接设备
将 ESP32 开发板连接到 PC,并查看开发板使用的串口。
ls /dev/tty*
通常,串口在不同操作系统下显示的名称有所不同:
- Windows 操作系统:
COM1等 - Linux 操作系统: 以
/dev/tty开始 - macOS 操作系统: 以
/dev/cu.开始
配置项目
idf.py set-target <chip_name>可将项目的目标芯片设置为<chip_name>。运行idf.py set-target,不用带任何参数,可查看所有支持的目标芯片列表。idf.py menuconfig可打开一个基于文本的配置菜单,可以用来对项目进行配置编译示例程序
添加环境变量. $HOME/esp-idf/export.sh
提示’cmake’ must be available on the PATH to use idf.py 需要手动安装cmake
sudo apt install cmake
进入 helloworld 示例程序:
cd ~/esp-idf/examples/get-started/hello_world/
或者直接右键项目在终端中打开:
直接在终端输入:
idf.py build

烧录程序
idf.py -p /dev/[串口号] -b 115200 flash monitor
串口号可以使用ls /dev查看:
-b BAUD设置波特率,默认460800。
不必先运行 idf.py build 再运行 idf.py flash,idf.py flash 会根据需要自动重新构建项目。
观察串口输出
idf.py -p PORT monitor
idf.py monitor 会调用 idf_monitor 工具来显示乐鑫芯片的串口输出。idf_monitor 还包含一系列的功能来解析程序崩溃后的输出结果并与设备进行交互。更多详细内容,请参阅文档.
注意,不要忘记将 PORT 替换为串口名称。
可以使用快捷键Ctrl+]退出监视器
可以运行以下命令,一次性执行构建、烧录和监视过程: (有时候会报错,还是建议分部写)
idf.py -p PORT flash monitor
擦除Flash
idf.py flash 并不会擦除 flash 上所有的内容,但是有时候我们需要设备恢复到完全擦除的状态,尤其是分区表发生了变化或者 OTA 应用升级时。要擦除整块 flash 请运行 idf.py erase-flash。
这条命令还可以和其余命令整合在一起,idf.py -p PORT erase-flash flash 会擦除一切然后重新烧写新的应用程序、引导程序和分区表。
VSCode 插件
VSCode 插件视频:ESP-IDF VS Code 插件快速操作指南哔哩哔哩bilibili
官方编程指南:ESP-IDF 编程指南 - ESP32 - — ESP-IDF 编程指南 v4.2-beta1 文档 (espressif.com)
插件支持如下功能:
- 安装程序:帮助您迅速安装 ESP-IDF 及其相关工具链。
- 构建:通过一键构建和多目标构建,轻松构建并部署您的应用程序。
- 烧录:UART 和 JTAG 均可完成烧录。
- 监控:内置终端带有监控功能,您可以在 VS Code 中启用 IDF 监控命令,操作方法和传统终端一样。
- 调试 https://github.com/espressif/vscode-esp-idf-extension/blob/master/docs/tutorial/debugging.md:提供立即可用的硬件调试功能,同时支持事后剖析调试如 core-dump 功能,分析 bug 更加方便。
- GUI 菜单配置:提供简化的用户界面,用于配置您的芯片。
- 应用程序追踪 & 堆追踪:支持从应用程序中收集跟踪,并提供简化的用户界面分析跟踪。
- 系统视图查看器:读取并显示 .svdat 文件到用户追踪界面,同时支持多个内核追踪视图。
- IDF 二进制大小分析:为分析二进制文件大小提供用户界面。
- Rainmaker Cloud:我们有内置的 Rainmaker Cloud 支持,您可以轻松编辑/读取连接的物联网设备的状态。
- 代码覆盖:我们有内置的代码覆盖支持,将用颜色突出显示已经覆盖的行。我们也会在 IDE 内部直接渲染现有的 HTML 报告。
首先,需要安装VSCode、Git以及Python 3:
- VS Code: https://code.visualstudio.com/download
- Git Version Control System: https://git-scm.com/downloads
- Python 3: https://www.python.org/downloads/
然后在插件市场搜索安装:
按下F1键,输入ESP-IDF:Configure ESP-IDF extension,打开配置页面:
目前从这里安装有bug,参考插件GitHub的issue restart Visual Studio Code and run this wizard again. (VSC-812) · Issue #602 · espressif/vscode-esp-idf-extension (github.com))
使用说明
You have several options to create a project:
- Using one the examples from ESP-IDF or any additional supported framework using the ESP-IDF: Show Examples Projects command.
- Use one of the templates included with this extension using the ESP-IDF: Create ESP-IDF project command.
NOTE: To configure any additional supported framework, please review configuring additional frameworks
- Let’s use the ESP-IDF get-started’s blink example for this tutorial. Click menu View -> Command Palette… and type ESP-IDF: Show Examples Projects and choose
Use current ESP-IDF (/path/to/esp-idf). If the user doesn’t see the option, please review the setup in Install tutorial. - A window will be open with a list a projects, go the get-started section and choose the
blink_example. You will see a Create blink_example project button in the top and a description of the project below. Click Create blink_example project button.

- Now select a container directory where to copy the example project. For example, if the user choose
/Users/myUser/someFolderthe resulting folder will be/Users/myUser/someFolder/blink. This new project directory will be created and opened in Visual Studio Code. - First the user should select an Espressif target (esp32, esp32s2, etc.) with the ESP-IDF: Set Espressif device target command. Default is
esp32and the one used in this tutorial. - ESP-IDF有一个便利的项目配置工具 IDF menuconfig,在VS Code中还添加了图形用户界面(GUI),开发者无需离开IDE,也可以配置项目。点击底部状态栏的齿轮图标即可启动配置菜单:

或者使用命令: ESP-IDF: SDK Configuration editor。第一次启动需要等待一段时间,因为它要读取所有配置信息,并启动服务器来监视文件并编写更改。从第二次启动开始,它会尽可能多的进行缓存,以加快加载时间。
注意:一旦更改了设置,就需要重新构建项目并进行再次烧录。
- Configure the
.vscode/c_cpp_properties.jsonas explained in C/C++ Configuration. - Now to build the project, use the ESP-IDF: Build your project command (CTRL E B keyboard shortcut). The user will see a new terminal being launched with the build output and a notification bar with Building Project message until it is done then a Build done message when finished. You could modify the behavior of the build task with
idf.cmakeCompilerArgsfor Cmake configure step andidf.ninjaArgsfor Ninja step. For example, using[-j N]where N is the number of jobs run in parallel.
NOTE: There is a
idf.notificationSilentModeconfiguration setting if the user does not wants to see the output automatically. Please review ESP-IDF Settings) to see how to modify this configuration setting.

- (OPTIONAL) Use the ESP-IDF: Size analysis of the binaries command (CTRL E S keyboard shortcut) to review the application size information.

- Before flashing the project, the user needs to specify the serial port of the device with the ESP-IDF: Select port to use command (CTRL E P keyboard shortcut). You can choose between UART/JTAG flashing mode and then a list of serial ports will be shown for the user to select.
NOTE: Please take a look at ESP-PROG board the instructions or Configuring ESP32 Target your Espressif device and JTAG interface to your computer.
- Now to flash the project, use the ESP-IDF: Flash your project command (CTRL E F keyboard shortcut). Choose
UARTorJTAGflash mode (Configure JTAG flashing) and then flashing will start in the previously selected serial port. The user can also use the ESP-IDF: Flash (UART) your project or ESP-IDF: Flash (with JTag) directly.
NOTE: When using the ESP-IDF: Select Flash Method and Flash command, your choice will be saved in the
idf.flashTypeconfiguration setting.
The user will see a new terminal being launched with the flash output and a notification bar with Flashing Project message until it is done then a Flash done message when finished.
NOTE: There is an
idf.flashBaudRateconfiguration settings to modify the flashing baud rate. Please review ESP-IDF Settings to see how to modify this configuration setting.

- 烧录完成后可以使用ESP-IDF监视器来查看日志和输出,命令: ESP-IDF: Monitor your device。The user will see a new terminal being launched with the
idf.py monitoroutput.
NOTE The ESP-IDF Monitor default baud rate value is taken from your project’s skdconfig
CONFIG_ESPTOOLPY_MONITOR_BAUD(idf.py monitor’ baud rate). This value can be override by setting the environment variableIDF_MONITOR_BAUDorMONITORBAUDin your system environment variables or this extension’sidf.customExtraVarsconfiguration setting. Please review ESP-IDF Settings) to see how to modifyidf.customExtraVars.

Next steps
You can debug ESP-IDF projects as shown in the debug tutorial.
The ESP-IDF: Open ESP-IDF Terminal will launch a system terminal with ESP-IDF, ESP-IDF tools and ESP-IDF python virtual environment loaded as environment variables. Just typing idf.py or esptool.py should work to execute scripts from ESP-IDF and additional frameworks.
See other ESP-IDF extension features.
https://docs.espressif.com/projects/arduino-esp32/en/latest/getting_started.html)
Arduino-ESP32
官方教程:Getting Started — Arduino-ESP32 2.0.0 documentation (espressif.com)

若有收获,就点个赞吧
0 人点赞
