- 简介
- Core Container
- IOC 控制反转
- 容器
- Bean
- Dependencies 依赖
- bean scope
- 定制Bean的性质 Customizing the Nature of a Bean
- Bean定义继承
- 容器扩展点
- 基于注解的容器配置
- 类路径扫描和组件管理
- 使用JSR 330标准注解
- 基于java的容器配置
- IOC 控制反转
- 动态代理
- DataAcess
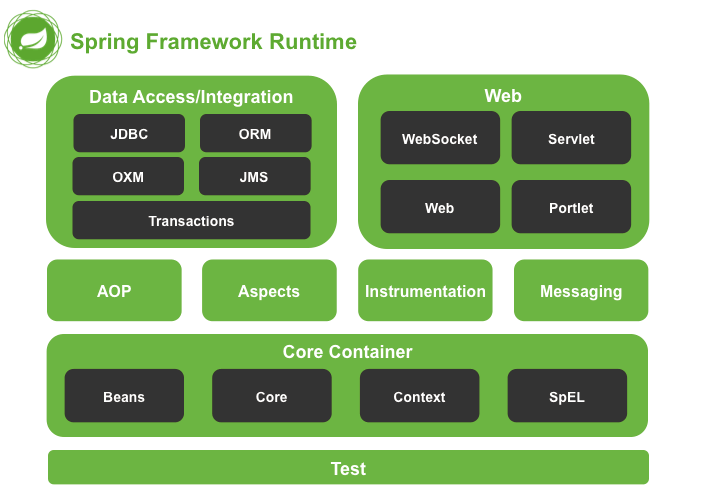
简介
1. Data Access/Integration(数据访问/集成)
数据访问/集成层包括 JDBC、ORM、OXM、JMS 和 Transactions 模块,具体介绍如下。
- JDBC 模块:提供了一个 JDBC 的抽象层,大幅度减少了在开发过程中对数据库操作的编码。
- ORM 模块:对流行的对象关系映射 API,包括 JPA、JDO、Hibernate 和 iBatis 提供了的集成层。
- OXM 模块:提供了一个支持对象/XML 映射的抽象层实现,如 JAXB、Castor、XMLBeans、JiBX 和 XStream。
- JMS 模块:指 Java 消息服务,包含的功能为生产和消费的信息。
Transactions 事务模块:支持编程和声明式事务管理实现特殊接口类,并为所有的 POJO。
2. Web 模块
Spring 的 Web 层包括 Web、Servlet、Struts 和 Portlet 组件,具体介绍如下。
Web 模块:提供了基本的 Web 开发集成特性,例如多文件上传功能、使用的 Servlet 监听器的 IoC 容器初始化以及 Web 应用上下文。
- Servlet模块:包括 Spring 模型—视图—控制器(MVC)实现 Web 应用程序。
- Struts 模块:包含支持类内的 Spring 应用程序,集成了经典的 Struts Web 层。
Portlet 模块:提供了在 Portlet 环境中使用 MV C实现,类似 Web-Servlet 模块的功能。
3. Core Container(核心容器)
Spring 的核心容器是其他模块建立的基础,由 Beans 模块、Core 核心模块、Context 上下文模块和 ExpressionLanguage 表达式语言模块组成,具体介绍如下。
Beans 模块:提供了 BeanFactory,是工厂模式的经典实现,Spring 将管理对象称为 Bean。
- Core 核心模块:提供了 Spring 框架的基本组成部分,包括 IoC 和 DI 功能。
- Context 上下文模块:建立在核心和 Beans 模块的基础之上,它是访问定义和配置任何对象的媒介。ApplicationContext 接口是上下文模块的焦点。
Expression Language 模块:是运行时查询和操作对象图的强大的表达式语言。
4. 其他模块
Spring的其他模块还有 AOP、Aspects、Instrumentation 以及 Test 模块,具体介绍如下。
AOP 模块:提供了面向切面编程实现,允许定义方法拦截器和切入点,将代码按照功能进行分离,以降低耦合性。
- Aspects 模块:提供与 AspectJ 的集成,是一个功能强大且成熟的面向切面编程(AOP)框架。
- Instrumentation 模块:提供了类工具的支持和类加载器的实现,可以在特定的应用服务器中使用。
- Test 模块:支持 Spring 组件,使用 JUnit 或 TestNG 框架的测试。
Core Container
IOC 控制反转
简单的说就是,创建对象的权利,或者是控制的位置,由JAVA代码转移到spring容器,由spring的容器控制对象的创建,就是控制反转,spring创建对象时,会读取配置文件中的信息,然后使用反射给我们创建好对象之后在容器中存储起来,当我们需要某个对象时,通过id获取对象即可,不需要我们自己去new。
Spring中IOC容器有两类,org.springframework.beans和org.springframework.context包是Spring Framework的IoC容器的基础。BeanFactory接口提供了一种高级配置机制,能够管理任何类型的对象。ApplicationContext是BeanFactory的子接口。ApplicationContext增加特性:
- 更容易与Spring的AOP特性集成
- 消息资源处理(用于国际化)
- 事件发布
- 应用层特定上下文,如web应用中使用的WebApplicationContext
BeanFactory提供了配置框架和基本功能,而ApplicationContext添加了更多特定于企业的功能。ApplicationContext是BeanFactory的一个完整的超集。常使用ApplicationContex容器。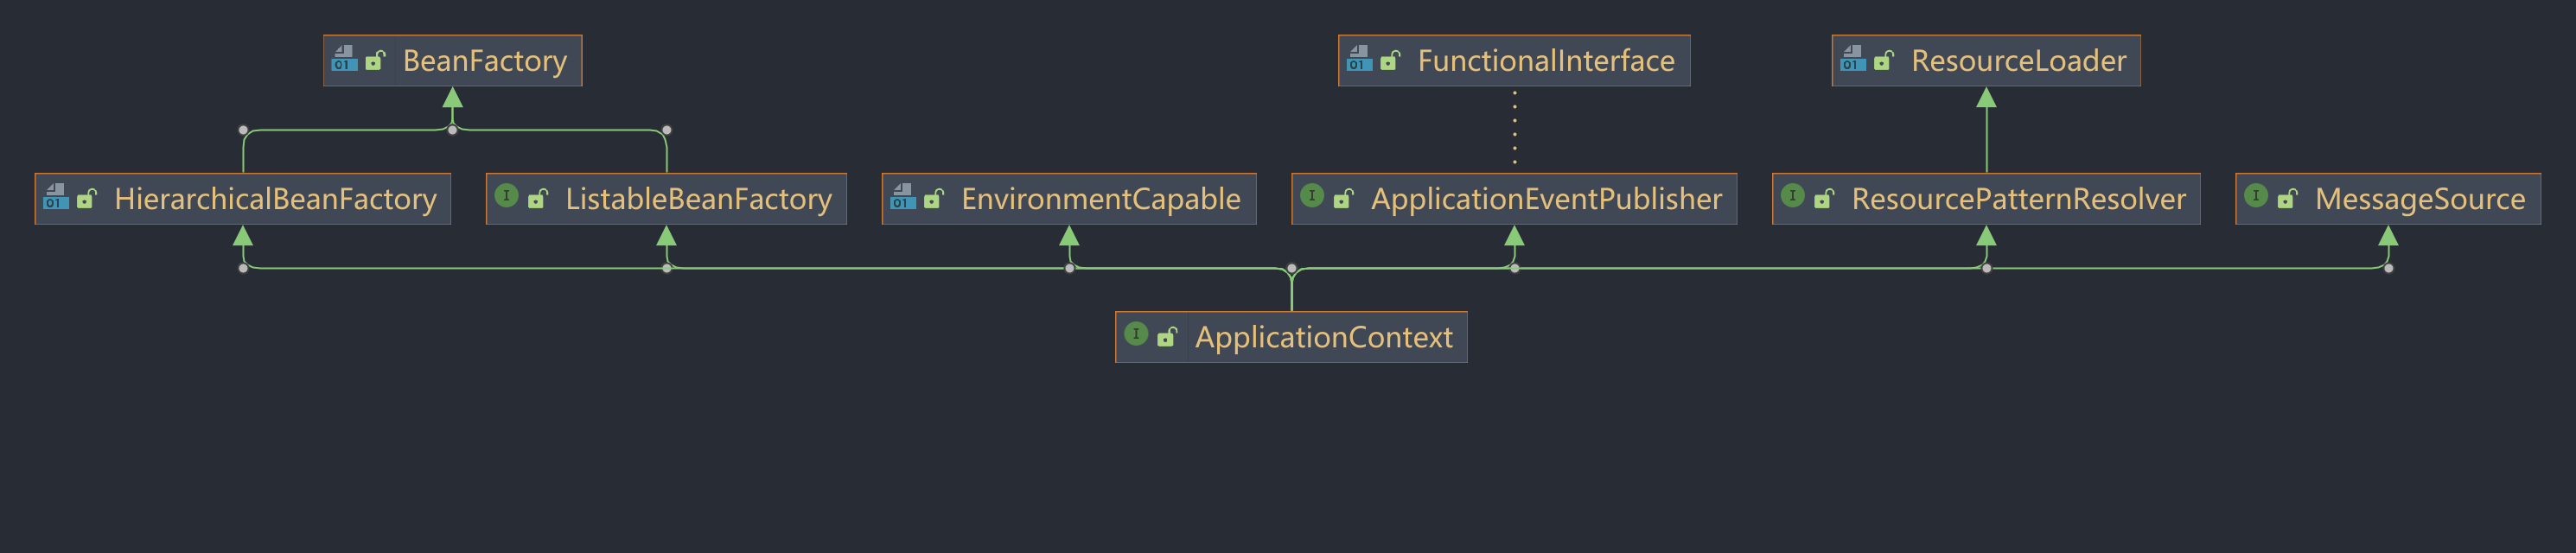
在Spring中,由Spring IoC容器管理的、构成应用程序主干的对象称为bean。bean是由Spring IoC容器实例化、组装和管理的对象。
容器
org.springframework.context.ApplicationContext接口表示Spring IoC容器,负责实例化、配置和组装bean。
ApplicationContex实现类:ClassPathXmlApplicationContex、FileSystemXmlApplicationContext等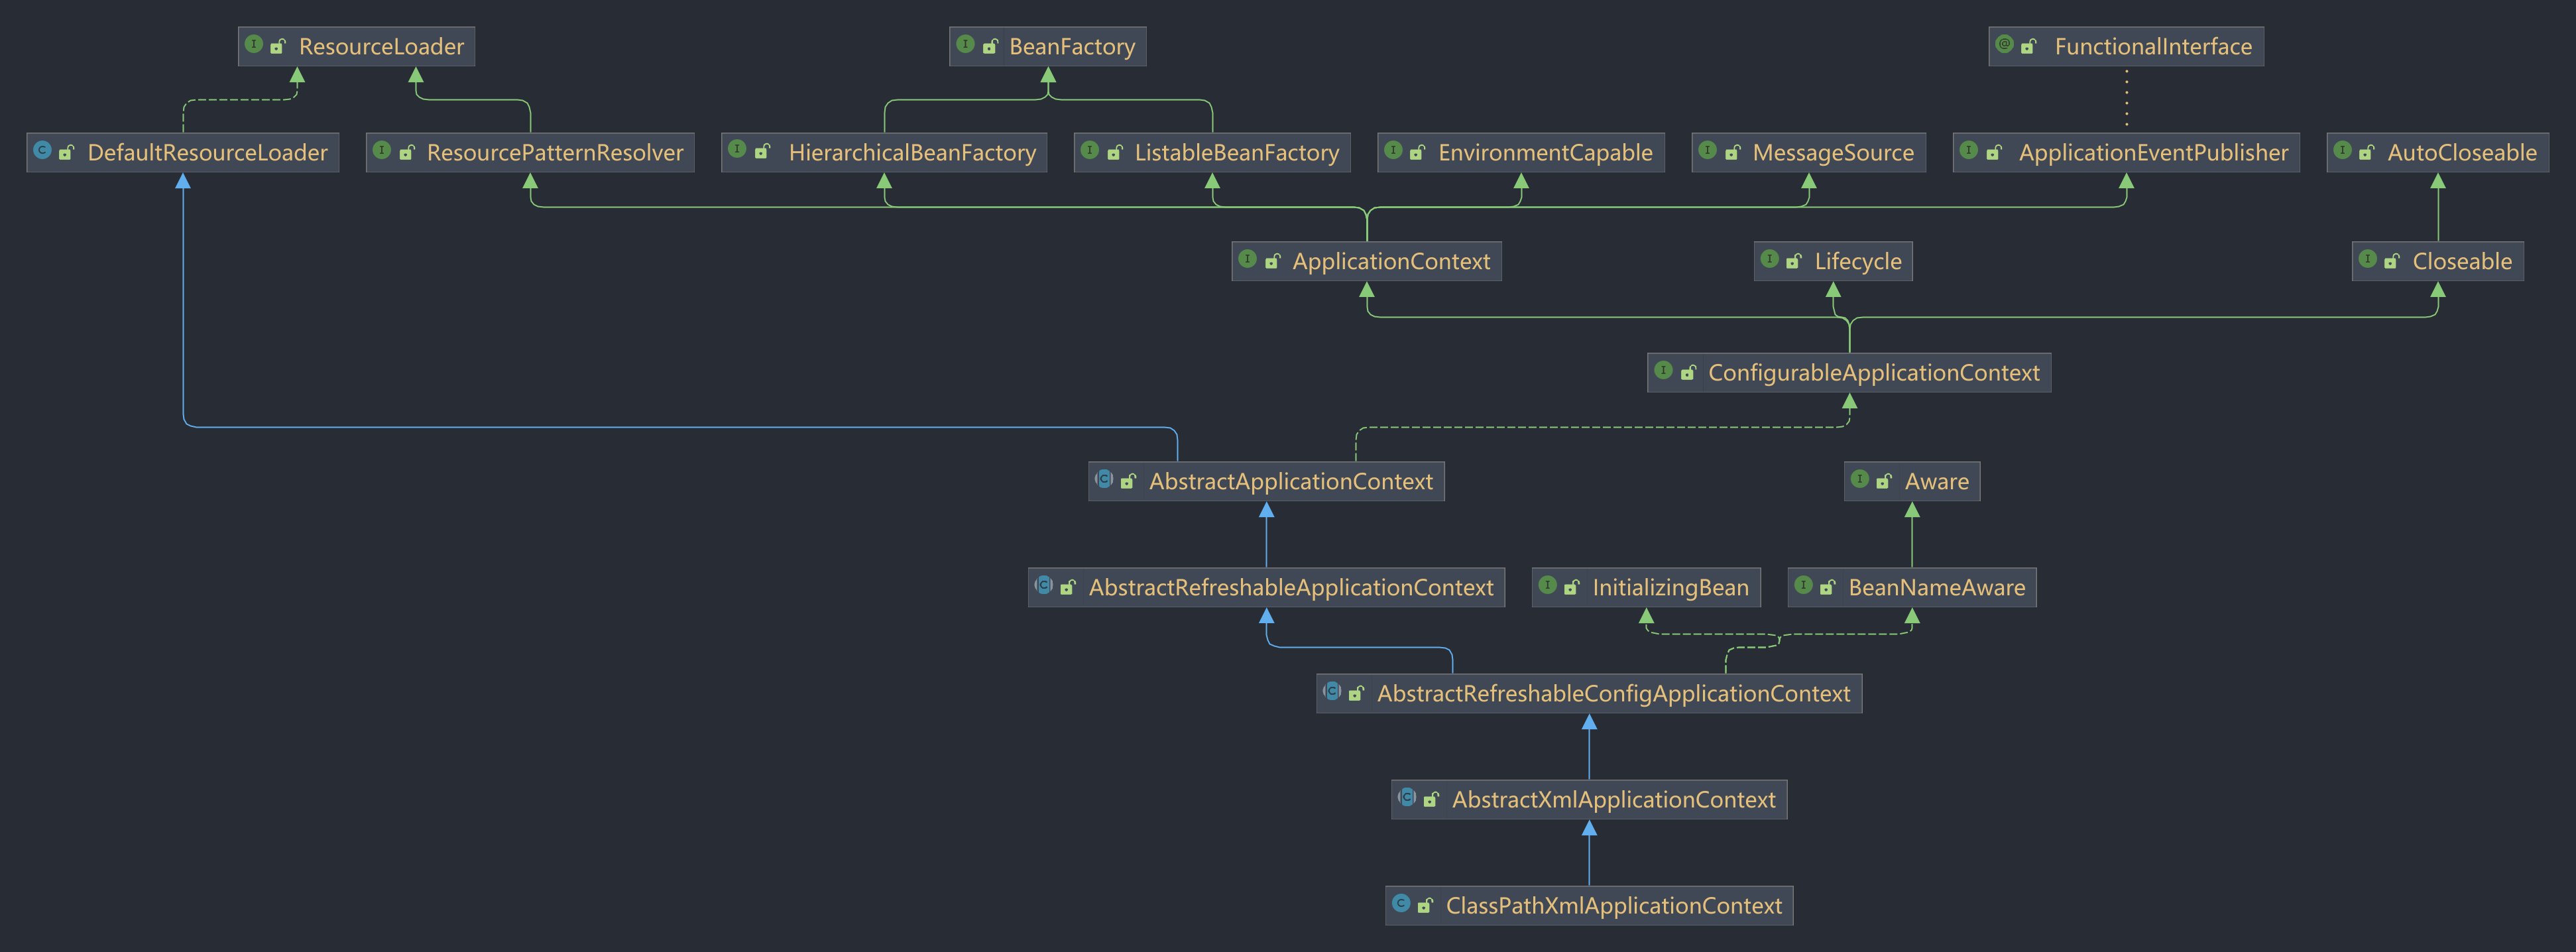
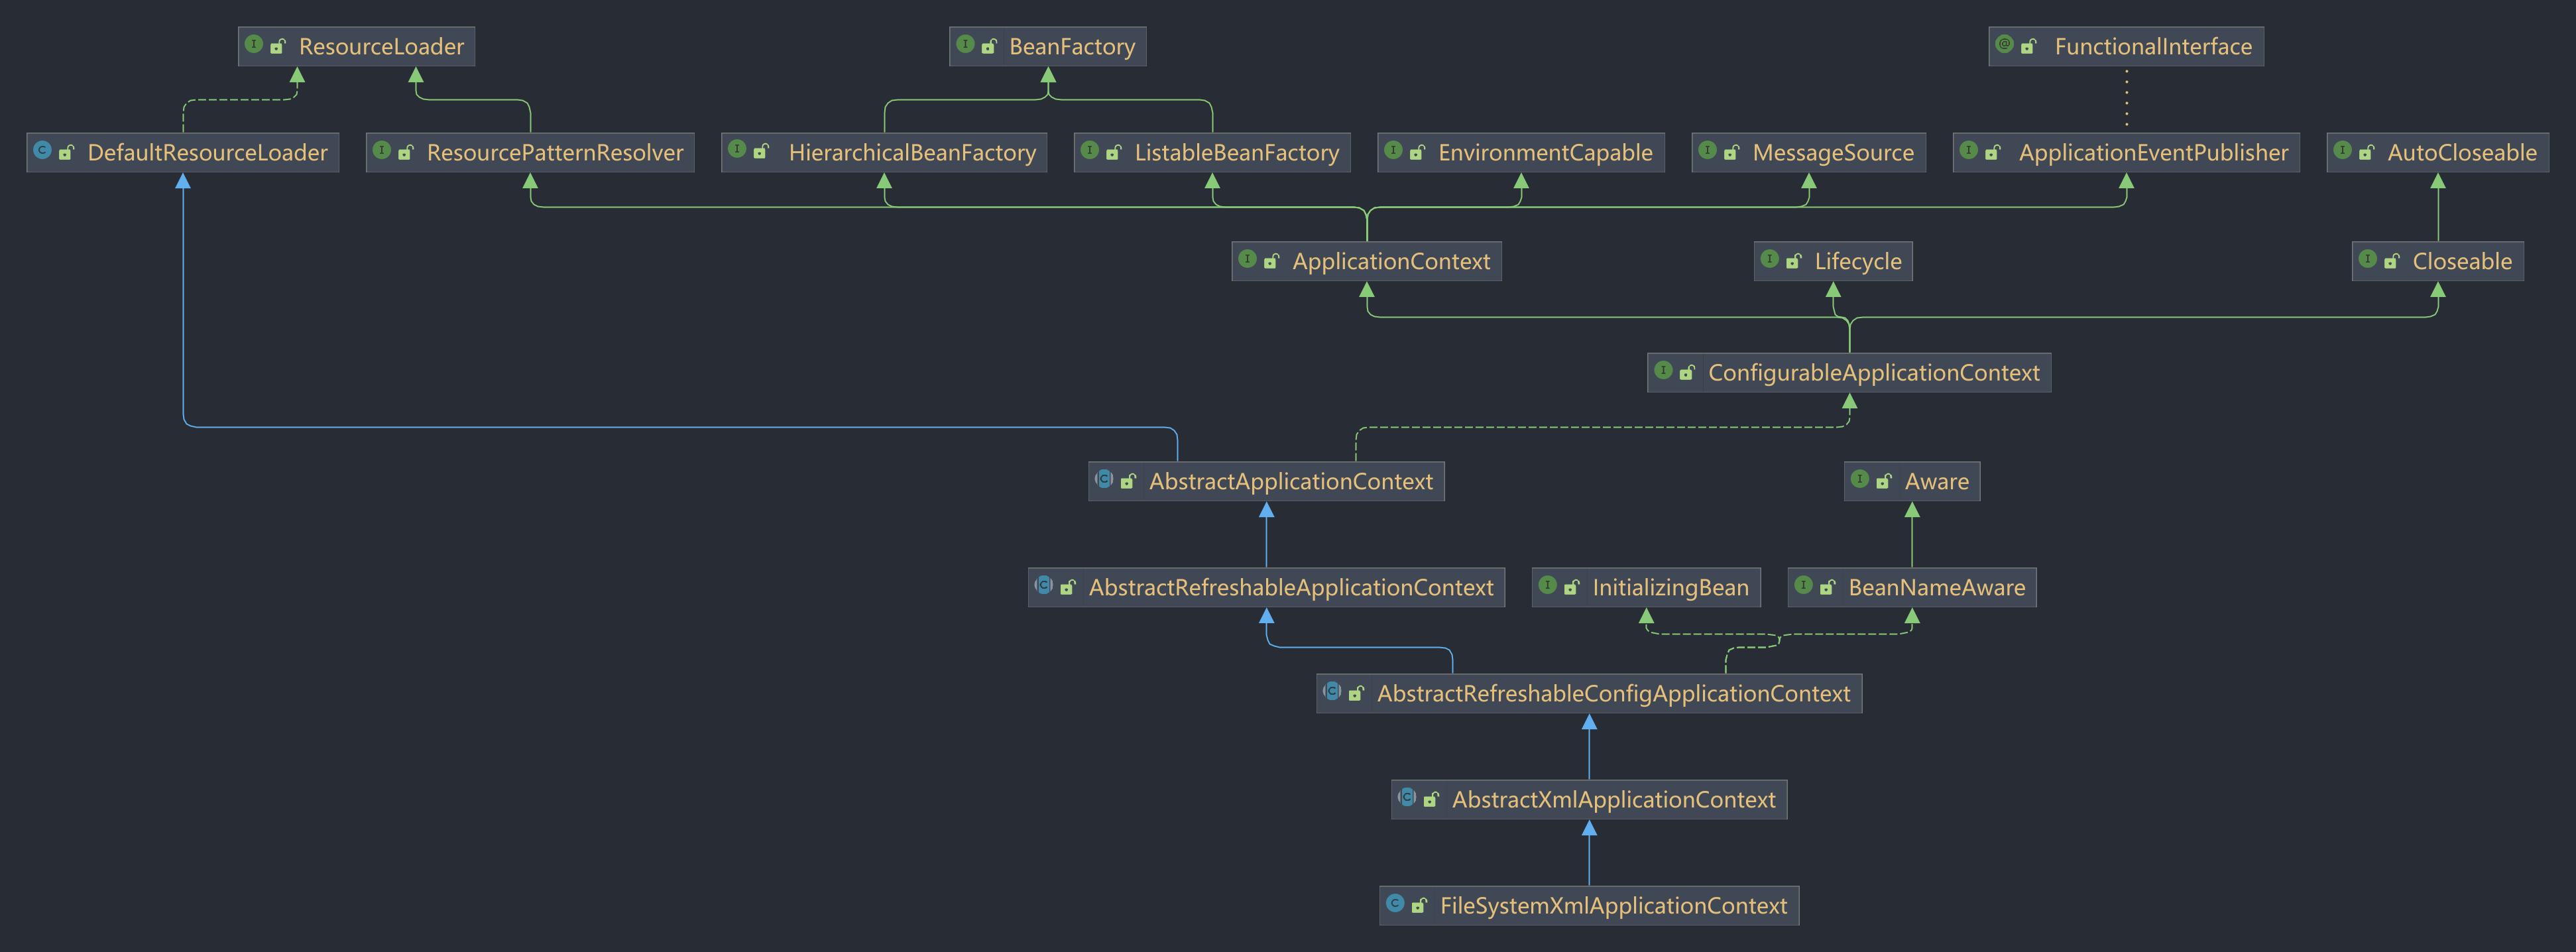
这两个实现类都是基于xml配置实现IOC和DI的,除了基于xmL、还可基于注解的配置、基于java的配置。
<?xml version="1.0" encoding="UTF-8"?><beans xmlns="http://www.springframework.org/schema/beans"xmlns:xsi="http://www.w3.org/2001/XMLSchema-instance"xsi:schemaLocation="http://www.springframework.org/schema/beanshttps://www.springframework.org/schema/beans/spring-beans.xsd"><!--id属性是标识单个bean定义的字符串;class属性定义bean的类型,并使用完全限定的类名。--><bean id="..." class="..."><!-- collaborators and configuration for this bean go here --></bean><bean id="..." class="..."><!-- collaborators and configuration for this bean go here --></bean><!-- more bean definitions go here --></beans>
IOC原理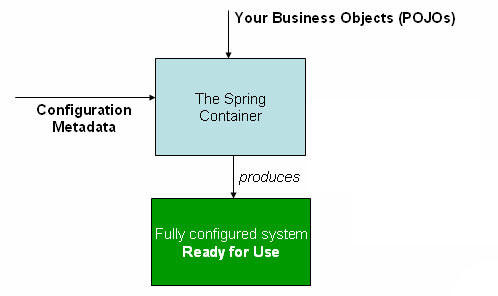
ApplicationContext context = new ClassPathXmlApplicationContext("applicationConfig.xml");
获取容器
基于XML配置
让bean定义跨越多个XML文件是很有用的。通常,每个单独的XML配置文件表示体系结构中的一个逻辑层或模块。
ApplicationContext context = new ClassPathXmlApplicationContext("services.xml", "daos.xml");
您可以使用应用程序上下文构造函数从所有这些XML片段加载bean定义。这个构造函数接受多个Resource位置,如前一节所示。或者,使用
<beans>
    <import resource="services.xml"/>
    <import resource="resources/messageSource.xml"/>
    <import resource="/resources/themeSource.xml"/>

    <bean id="bean1" class="..."/>
    <bean id="bean2" class="..."/>
</beans>
基于Groovy配置
beans {
    dataSource(BasicDataSource) {
        driverClassName = "org.hsqldb.jdbcDriver"
        url = "jdbc:hsqldb:mem:grailsDB"
        username = "sa"
        password = ""
        settings = [mynew:"setting"]
    }
    sessionFactory(SessionFactory) {
        dataSource = dataSource
    }
    myService(MyService) {
        nestedBean = { AnotherBean bean ->
            dataSource = dataSource
        }
    }
}
ApplicationContext context = new GenericGroovyApplicationContext("services.groovy", "daos.groovy");
结合GenericApplicationContext获取容器
GenericApplicationContext context = new GenericApplicationContext();
new XmlBeanDefinitionReader(context).loadBeanDefinitions("services.xml", "daos.xml");
context.refresh();
GenericApplicationContext context = new GenericApplicationContext();
new GroovyBeanDefinitionReader(context).loadBeanDefinitions("services.groovy", "daos.groovy");
context.refresh();
Bean
Spring IoC容器管理一个或多个bean。这些bean通过配置在在容器中实例化,在容器本身中,这些bean定义被表示为BeanDefinition对象,BeanDefinition对象包含以下信息:
- 包限定类名,通常是定义的bean的实际实现类。
- Bean行为配置元素,它声明Bean在容器中应该如何行为(范围、生命周期回调等)。
- 对其他bean的引用,这些bean需要这些引用来完成它的工作。这些引用也称为协作者或依赖关系。
- 在新创建的对象中设置的其他配置设置—例如,池的大小限制或在管理连接池的bean中使用的连接数量。 | Property | 解释 | | —- | —- | | Class | Instantiating Beans 类的全路径名 | | Name | Naming Beans 和id类似,一般不用 | | Scope | Bean Scopes 控制对象单例多例和使用范围 | | Constructor arguments | Dependency Injection | | Properties | Dependency Injection | | Autowiring mode | Autowiring Collaborators | | Lazy initialization mode | Lazy-initialized Beans 懒加载 调用getBean的时候再去实例化对象 | | Initialization method | Initialization Callbacks | | Destruction method | Destruction Callbacks |
bean 的命名
可以使用id和name属性来个bean命名,id是bean唯一表示。如果不设置id,spring会默认设置为bean名字为类名首字母小写。当然,bean也可以使用别名。
<!--myApp-dataSource、subsystemA-dataSource、subsystemB-dataSource指向同一个对象-->
<alias name="myApp-dataSource" alias="subsystemA-dataSource"/>
<alias name="myApp-dataSource" alias="subsystemB-dataSource"/>
bean实例化
构造方法
要求bean具备构造方法
<bean id="exampleBean" class="examples.ExampleBean"/>
静态工厂方法
在定义使用静态工厂方法创建的bean时,使用class属性来指定包含静态工厂方法的类,使用名为factory-method的属性来指定工厂方法本身的名称。要求工厂方法必须是静态的(被static修饰)
<bean id="clientService"
    class="examples.ClientService"
    factory-method="createInstance"/>
public class ClientService {
    private static ClientService clientService = new ClientService();
    private ClientService() {}

    public static ClientService createInstance() {
        return clientService;
    }
}
实例工厂方法
类似于通过静态工厂方法进行的实例化,使用实例工厂方法的实例化从容器中调用现有bean的非静态方法来创建新bean。要使用这种机制,将class属性保留为空,并在factory-bean属性中指定当前容器(或父容器或祖先容器)中bean的名称,该容器包含将被调用以创建对象的实例方法。使用factory-method属性设置工厂方法本身的名称。一个工厂可以有多个工厂方法。
<bean id="serviceLocator" class="examples.DefaultServiceLocator">
    <!-- inject any dependencies required by this locator bean -->
</bean>

<bean id="clientService"
    factory-bean="serviceLocator"
    factory-method="createClientServiceInstance"/>

<bean id="accountService"
    factory-bean="serviceLocator"
    factory-method="createAccountServiceInstance"/>
public class DefaultServiceLocator {

    private static ClientService clientService = new ClientServiceImpl();

    private static AccountService accountService = new AccountServiceImpl();

    public ClientService createClientServiceInstance() {
        return clientService;
    }

    public AccountService createAccountServiceInstance() {
        return accountService;
    }
}
在Spring文档中,“factory bean”指的是在Spring容器中配置的bean,它通过实例或静态工厂方法创建对象。相反,FactoryBean(注意大写)指的是一个特定于spring的FactoryBean实现类。
Dependencies 依赖
依赖注入 Dependency Injection(DI)
Constructor-based Dependency Injection 通过构造方法依赖注入
基于构造函数的DI是由容器调用带有许多参数的构造函数来完成的,每个参数代表一个依赖项。构造函数参数解析通过使用参数的类型进行匹配。
public class SimpleMovieLister {

    // the SimpleMovieLister has a dependency on a MovieFinder
    private final MovieFinder movieFinder;

    // a constructor so that the Spring container can inject a MovieFinder
    public SimpleMovieLister(MovieFinder movieFinder) {
        this.movieFinder = movieFinder;
    }

    // business logic that actually uses the injected MovieFinder is omitted...
}
<beans>
   <bean id="movieFinder" class="x.y.MovieFinder">

  <bean id="simpleMovieLister" class="x.y.SimpleMovieLister">
    <constructor-arg ref="movieFinder"/>
  </bean>
</beans>
当属性类型是已知的,可以直接进行匹配。担当属性类型为基本类型和String是,需要使用type属性
package examples;

public class ExampleBean {
    // Number of years to calculate the Ultimate Answer
    private final int years;
    // The Answer to Life, the Universe, and Everything
    private final String ultimateAnswer;
    public ExampleBean(int years, String ultimateAnswer) {
        this.years = years;
        this.ultimateAnswer = ultimateAnswer;
    }
}
<bean id="exampleBean" class="examples.ExampleBean">
    <constructor-arg type="int" value="7500000"/>
    <constructor-arg type="java.lang.String" value="42"/>
</bean>
也可以使用index属性显式指定构造函数参数的索引。除了解决多个简单值的歧义问题外,指定索引还解决构造函数具有两个相同类型参数时的歧义问题。索引从0开始。
<bean id="exampleBean" class="examples.ExampleBean">
    <constructor-arg index="0" value="7500000"/>
    <constructor-arg index="1" value="42"/>
</bean>
还可以使用构造函数参数名称来消除值歧义(常用)
<bean id="exampleBean" class="examples.ExampleBean">
    <constructor-arg name="years" value="7500000"/>
    <constructor-arg name="ultimateAnswer" value="42"/>
</bean>
Setter-based Dependency Injection 通过setter方法的依赖注入
在调用无参数构造函数或无参数静态工厂方法来实例化bean之后,容器调用bean上的setter方法来实现基于setter的DI。
Spring团队通常提倡构造函数注入,因为它允许您将应用程序组件实现为不可变对象,并确保所需的依赖项不为空。此外,构造函数注入的组件总是以完全初始化的状态返回给客户端(调用)代码。
顺便说一下,大量构造函数参数是一种糟糕的代码,这意味着类可能有太多的责任,应该进行重构,以更好地处理适当的关注点分离。
依赖解析过程 Dependency Resolution Process
- ApplicationContext是用描述所有bean的配置信息创建和初始化。配置信息可以通过XML、Java代码或注释定。
- 对于每个bean,它的依赖项都以属性、构造函数参数或静态工厂方法的参数的形式表示(如果使用静态工厂方法而不是普通构造函数的话)。当bean实际创建时,这些依赖项被提供给bean。
- 每个属性或构造函数参数都是要设置的值或者是引用容器中另一个bean。
- 每个具有值的属性或构造函数参数都将从其指定的格式转换为该属性或构造函数参数的实际类型。默认情况下,Spring可以将字符串格式提供的值转换为所有内置类型,如int、long、string、boolean等。
Spring容器在创建容器时验证每个bean的配置,但是,在实际创建bean之前,不会设置bean属性本身。单例作用域bean是在创建容器时创建。否则,bean只在请求时创建。创建bean可能会导致创建bean的图,因为创建并分配了bean的依赖项及其依赖项的依赖项(等等)。请注意,这些依赖项之间的解析不匹配可能会在在第一次创建受影响的bean时出现。
循环依赖 Circular dependencies
如果主要使用构造函数注入,则可能会创建一个不可解析的循环依赖场景。 如果将类A和类B的bean配置为相互注入,Spring IoC容器会在运行时检测此循环引用,并抛出BeanCurrentlyInCreationException。
@NoArgsConstructer
@AllArgsConstructer
@Data
public class Book implements Serializable {
    private static final long serialVersionUID = -8689340100141451821L;
    private String name;
    private Person author;
}

@NoArgsConstructer
@AllArgsConstructer
@Data
public class Person implements Serializable {
    private static final long serialVersionUID = 54481659510519603L;
    private Integer id;
    private String name;
    private Book book;
}
<?xml version="1.0" encoding="UTF-8"?>
<beans xmlns="http://www.springframework.org/schema/beans"
       xmlns:xsi="http://www.w3.org/2001/XMLSchema-instance"
       xsi:schemaLocation="http://www.springframework.org/schema/beans http://www.springframework.org/schema/beans/spring-beans.xsd">

<!--使用构造方法进行注入  循环依赖异常-->
    <bean id="person" class="com.msb.bean.Person">
        <constructor-arg name="id" value="1"/>
        <constructor-arg name="name" value="历史课"/>
        <constructor-arg name="book" ref="book"/>
    </bean>

    <bean id="book" class="com.msb.bean.Book">
        <constructor-arg name="name" value="小说"/>
        <constructor-arg name="author" ref="person"/>
    </bean>
</beans>
public class Demo1 {
    public static void main(String[] args) {
        ApplicationContext context = new ClassPathXmlApplicationContext("applicationConfig.xml");
        Person per = context.getBean(Person.class);
        System.out.println(per);
        Book bok = context.getBean(Book.class);
        System.out.println(bok);
    }
}

解决循环依赖问题:避免构造函数注入,只使用setter注入。换句话说,尽管不建议这样做,但您可以使用setter注入配置循环依赖项。
<?xml version="1.0" encoding="UTF-8"?>
<beans xmlns="http://www.springframework.org/schema/beans"
       xmlns:xsi="http://www.w3.org/2001/XMLSchema-instance"
       xsi:schemaLocation="http://www.springframework.org/schema/beans http://www.springframework.org/schema/beans/spring-beans.xsd">

  <!--使用setter方法注入  可以成功注入-->
  <bean id="person" class="com.msb.bean.Person">
    <property name="id" value="1"/>
    <property name="name" value="历史课"/>
    <property name="book" ref="book"/>
  </bean>

  <bean id="book" class="com.msb.bean.Book">
    <property name="name" value="小说"/>
    <property name="author" ref="person"/>
  </bean>
</beans>

与典型的情况不同(没有循环依赖项),具有循环依赖的两个bean,bean A和bean B之间的循环依赖项迫使其中一个bean在完全初始化自己之前被注入到另一个bean中(一个典型的先有鸡还是先有蛋的场景)。
依赖注入一些细节
如果不是具有循环依赖的beab,每个协作bean在被注入到依赖bean之前都已经完全配置好了,换句话说,bean被实例化(如果它不是一个预先实例化的单例),它的依赖项被设置,并且相关的生命周期方法(例如配置的init方法或InitializingBean回调方法)被调用。
p-namespace、c-namespace
xml配置文件可以使用p-namespace、c-namespace,只需在xml配置文件加上限定,使用p-namespace、c-namesapce,可以使代码更简洁。
<?xml version="1.0" encoding="UTF-8"?>
<beans xmlns="http://www.springframework.org/schema/beans"
    xmlns:xsi="http://www.w3.org/2001/XMLSchema-instance"
    xmlns:p="http://www.springframework.org/schema/p"
    xmlns:c="http://www.springframework.org/schema/c"
    xsi:schemaLocation="http://www.springframework.org/schema/beans
    https://www.springframework.org/schema/beans/spring-beans.xsd">

    <bean id="book2" class="com.msb.bean.Book" c:name="散文" c:author-ref="person" />
    <bean id="book3" class="com.msb.bean.Book" p:name="散文" p:author-ref="person" />
</beans>
注入空值和特殊符号
<?xml version="1.0" encoding="UTF-8"?>
<beans xmlns="http://www.springframework.org/schema/beans"
    xmlns:xsi="http://www.w3.org/2001/XMLSchema-instance"
    xmlns:p="http://www.springframework.org/schema/p"
    xmlns:c="http://www.springframework.org/schema/c"
    xsi:schemaLocation="http://www.springframework.org/schema/beans
    https://www.springframework.org/schema/beans/spring-beans.xsd">

    <bean id="book2" class="com.msb.bean.Book">
       <!-- 特殊符号  <![CDATA[内容]]>  -->
       <property name="name">
         <value><![CDATA[&<123456>]]></value>
       </property>
       <!--null-->
       <property name="autjor">
         <null/>
       </property>
    </bean>
</beans>
内部bean
内部bean定义不需要定义的ID或名称。如果指定了,则容器不使用该值作为标识符。容器在创建时也会忽略范围标志,因为内部bean总是匿名的,并且总是与外部bean一起创建。不可能独立地访问内部bean,也不可能将它们注入到除外围bean之外的协作bean中。
<?xml version="1.0" encoding="UTF-8"?>
<beans xmlns="http://www.springframework.org/schema/beans"
    xmlns:xsi="http://www.w3.org/2001/XMLSchema-instance"
    xmlns:p="http://www.springframework.org/schema/p"
    xmlns:c="http://www.springframework.org/schema/c"
    xsi:schemaLocation="http://www.springframework.org/schema/beans
    https://www.springframework.org/schema/beans/spring-beans.xsd">

    <bean id="book2" class="com.msb.bean.Book">
       <!-- 特殊符号  <![CDATA[内容]]>  -->
       <property name="name">
         <value><![CDATA[&<123456>]]></value>
       </property>
       <!--null-->
       <property name="autjor">
         <bean class="com.msb.bean.Person">
            <property name="id" value="1"/>
            <property name="name" value="历史课"/>
            <property name="book" ref="book"/>
         </bean>
       </property>
    </bean>
</beans>
集合Collection注入
、
<?xml version="1.0" encoding="UTF-8"?>
<beans xmlns="http://www.springframework.org/schema/beans"
     xmlns:xsi="http://www.w3.org/2001/XMLSchema-instance"
     xmlns:p="http://www.springframework.org/schema/p"
     xmlns:c="http://www.springframework.org/schema/c"
     xmlns:util="http://www.springframework.org/schema/util"
     xsi:schemaLocation="
     http://www.springframework.org/schema/beans
     http://www.springframework.org/schema/beans/spring-beans.xsd
     http://www.springframework.org/schema/util
     http://www.springframework.org/schema/util/spring-util.xsd
">
  <!--定义公共集合-->
  <util:list id="outerbookList">
      <!--声明多个Book对象-->
      <bean id="b1" class="com.msb.bean.Book" p:bname="JAVA" p:author="马士兵"></bean>
      <bean id="b2" class="com.msb.bean.Book" p:bname="Go" p:author="马士兵"></bean>
      <bean id="b3" class="com.msb.bean.Book" p:bname="JVM" p:author="马士兵"></bean>
  </util:list>

  <bean id="student1" class="com.msb.bean.Student">
      <!--数组属性注入-->
      <property name="books">
          <array>
              <value>JAVA</value>
              <value>MySQL</value>
              <value>Spring</value>
          </array>
      </property>

      <!--set集合注入-->
      <property name="bookSet">
          <set>
              <value>JAVA</value>
              <value>MySQL</value>
              <value>Spring</value>
          </set>
      </property>

      <!--list集合注入-->
      <property name="bookList">
          <list>
              <value>JAVA</value>
              <value>MySQL</value>
              <value>Spring</value>
          </list>
      </property>

      <!--map集合注入-->
      <property name="bookMap">
          <map>
              <entry key="JAVA" value="马士兵"></entry>
              <entry key="Go" value="马士兵"></entry>
              <entry key="JVM" value="马士兵"></entry>
          </map>
      </property>

      <!--List对象集合注入-->
      <property name="bookList2" ref="outerbookList"></property>
  </bean>
</beans>
depends-on 属性
如果一个bean是另一个bean的依赖项,这通常意味着一个bean被设置为另一个bean的属性。通常使用基于xml的配置元数据中的元素来完成这一任务。然而,有时bean之间的依赖关系不那么直接。例如,需要触发类中的静态初始化器时,例如数据库驱动程序注册时。depends-on属性可以显式地强制在使用此元素的bean初始化之前初始化一个或多个bean。依赖多个类,可使用逗号或者分号或者空格来分割多个依赖的bean。
<bean id="beanOne" class="ExampleBean" depends-on="manager,accountDao">
    <property name="manager" ref="manager" />
</bean>

<bean id="manager" class="ManagerBean" />
<bean id="accountDao" class="x.y.jdbc.JdbcAccountDao" />
延迟加载 Lazy-initialized beans
默认情况下,ApplicationContext实现会在初始化过程中主动创建和配置所有的单例bean。通常,这种预先实例化是可取的,因为配置或周围环境中的错误是立即发现的,而不是在几个小时甚至几天后发现的。当不需要这种行为时,可以通过将bean定义标记为延迟初始化来防止单例bean的预先实例化。延迟初始化的bean告诉IoC容器在第一次请求bean实例时,而不是在启动时创建它。
<bean id="lazy" class="com.something.ExpensiveToCreateBean" lazy-init="true"/>
<bean name="not.lazy" class="com.something.AnotherBean"/>
然而,当一个延迟初始化的bean是一个没有延迟初始化的单例bean的依赖时,ApplicationContext会在启动时创建这个延迟初始化的bean,因为它必须满足单例bean的依赖。延迟初始化的bean被注入到其他没有延迟初始化的单例bean中。
自动装配 Autowring Collaborators
当使用基于xml的配置时,可以使用
| Mode | Explanation |
|---|---|
| no | (Default) 没有自动装配 |
| byName | 按属性名自动装配 |
| byType | 按属性类型自动装配,如果存在多个同类型的bean,,则会抛出异常。 如果没有匹配的bean,则不会发生任何事情(没有设置属性)。 |
| constructor | 于byType,但适用于构造函数参数。如果容器中没有构造函数参数类型的bean,则会引发致命错误。 |
自动装配的局限性和缺点:
- property和constructor-arg设置中的显式依赖项总是会覆盖自动装配。不能自动装配简单的属性,如基本类型、字符串和类(以及此类简单属性的数组)。
- 自动装配不如显式注入精确。
- 从Spring容器生成文档的工具可能无法使用自动装配。
- 容器中的多个同类型的bean定义,按类型自动装配会抛出异常。
方法注入Method Injection
关于methid injection的博文:https://spring.io/blog/2004/08/06/method-injection/
在大多数应用程序场景中,容器中的大多数bean都是单例的。当一个单例bean需要与另一个单例bean协作,或者一个非单例bean需要与另一个非单例bean协作时,通常通过将一个bean定义为另一个bean的属性来处理依赖关系。当bean生命周期不同时,问题就出现了。
假设单例bean A需要使用非单例(原型)bean B,也许是在对A的每个方法调用中。容器只创建一次单例bean A,因此只得到一次设置属性的机会。容器不能在每次需要bean B的新实例时为bean A提供新实例。
一种解决方案是放弃某些控制倒置。你可以通过实现ApplicationContextAware接口让bean A知道容器,并且每次bean A需要它时,通过getBean(“B”)调用容器来请求(典型的新)bean B实例。下面的例子展示了这种方法:
// a class that uses a stateful Command-style class to perform some processing
package fiona.apple;

// Spring-API imports
import org.springframework.beans.BeansException;
import org.springframework.context.ApplicationContext;
import org.springframework.context.ApplicationContextAware;

public class CommandManager implements ApplicationContextAware {

    private ApplicationContext applicationContext;

    public Object process(Map commandState) {
        // grab a new instance of the appropriate Command
        Command command = createCommand();
        // set the state on the (hopefully brand new) Command instance
        command.setState(commandState);
        return command.execute();
    }

    protected Command createCommand() {
        // notice the Spring API dependency!
        return this.applicationContext.getBean("command", Command.class);
    }

    public void setApplicationContext(
        ApplicationContext applicationContext) throws BeansException {
        this.applicationContext = applicationContext;
    }
}
bean scope
| Scope | Description |
|---|---|
| singleton | (Default) 单例 |
| prototype | 原型 |
| request | 每个HTTP请求都有自己的bean实例,该实例是在单个bean定义的后面创建的。 |
| session | 将单个bean定义作用于HTTP会话的生命周期。 |
| application | 将一个bean定义作用域作用到ServletContext的生命周期 |
| websocket | 将一个bean定义定义到WebSocket的生命周期 |
sigleton 单例
单例bean只有一个共享实例被管理,所有对具有ID或与该bean定义匹配的ID的bean的请求都会导致Spring容器返回一个特定的bean实例。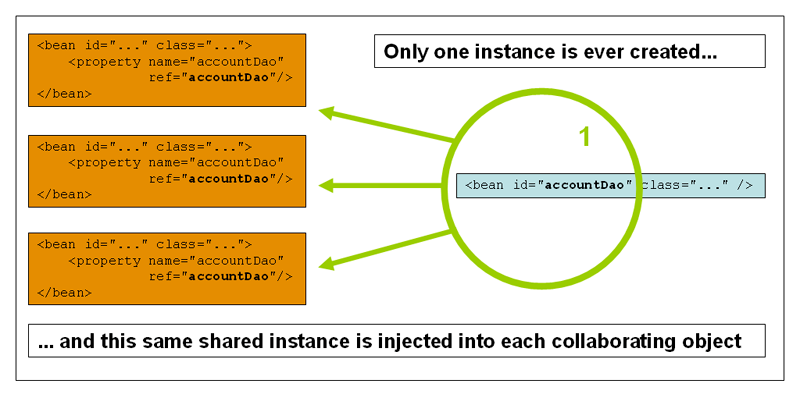
prototype 原型
bean部署的非单例原型范围导致每次对特定bean发出请求时都创建一个新的bean实例。也就是说,该bean被注入到另一个bean中,或者通过容器上的getBean()方法调用请求它。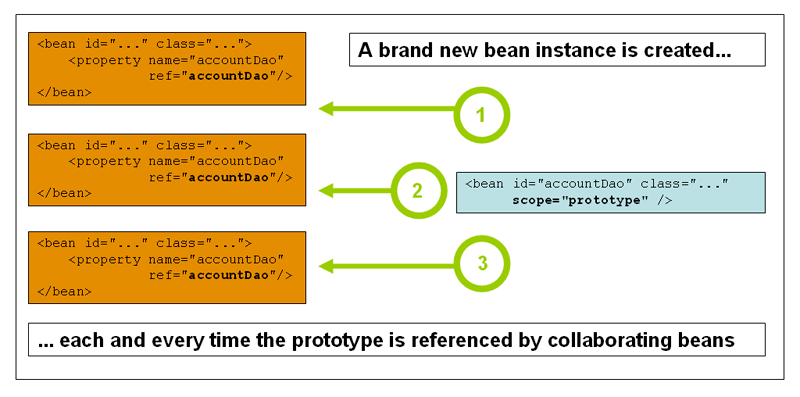
与其他作用域不同,Spring并不管理原型bean的完整生命周期。容器实例化、配置和组装一个原型对象,并将其传递给客户端,而不再有该原型实例的任何记录。因此,尽管在所有对象上调用初始化生命周期回调方法,而不考虑范围,但在原型的情况下,不会调用配置的销毁生命周期回调。
定制Bean的性质 Customizing the Nature of a Bean
生命周期回调 Lifecycle Callbacks
初始化回调 Initialization Callbacks
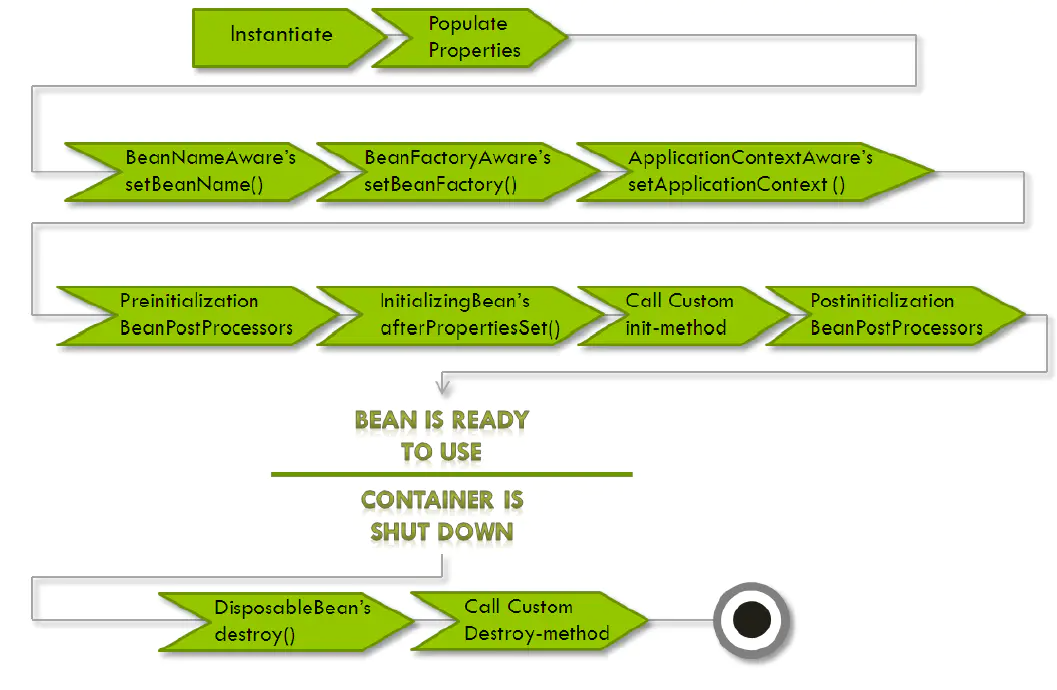
org.springframework.beans.factory.InitializingBean 接口允许bean在容器设置完bean上所有必要的属性后执行初始化工作。InitializingBean接口有一个方法:
void afterPropertiesSet() throws Exception;
public class AnotherExampleBean implements InitializingBean {

    @Override
    public void afterPropertiesSet() {
        // do some initialization work
    }
}
<bean id="exampleInitBean" class="examples.AnotherExampleBean"/>
建议不要使用InitializingBean接口,因为实现InitializingBean接口不必要地将代码与Spring耦合起来。相反,建议使用@PostConstruct注释或指定POJO初始化方法。
在基于xml的配置元数据的情况下,可以使用init-method属性指定具有空无参数签名的方法的名称。在Java配置中,您可以使用@Bean的initMethod属性。
public class ExampleBean {

    public void init() {
        // do some initialization work
    }
}
<bean id="exampleInitBean" class="examples.ExampleBean" init-method="init"/>
销毁回调 Destruction Callbacks
org.springframework.beans.factory.DisposableBean接口的实现让bean在容器被销毁时获得回调函数。DisposableBean接口指定了一个单独的方法:
void destroy() throws Exception;
public class AnotherExampleBean implements DisposableBean {

    @Override
    public void destroy() {
        // do some destruction work (like releasing pooled connections)
    }
}
<bean id="exampleInitBean" class="examples.AnotherExampleBean"/>
建议不要使用DisposableBean回调接口,因为实现DisosableBean接口不必要地将代码与Spring耦合起来。相反,建议使用@PreDestroy注释或指定bean定义支持的泛型方法。
使用基于xml的配置元数据,可以在
public class ExampleBean {

    public void cleanup() {
        // do some destruction work (like releasing pooled connections)
    }
}
<bean id="exampleInitBean" class="examples.ExampleBean" destroy-method="cleanup"/>
默认初始化和销毁方法 Default Initialization and Destroy Methods
您可以将Spring容器配置为在每个bean上查找命名的初始化并销毁回调方法名称。这意味着,编写应用程序类并使用名为init()的初始化回调函数,而不必为每个bean定义配置init-method=”init”属性。Spring IoC容器在创建bean时调用该方法。这个特性还对初始化和销毁方法回调执行一致的命名约定。初始化回调方法命名init(),销毁毁掉方法destory()。
设置顶级元素
public class DefaultBlogService implements BlogService {

    private BlogDao blogDao;

    public void setBlogDao(BlogDao blogDao) {
        this.blogDao = blogDao;
    }

    // this is (unsurprisingly) the initialization callback method
    public void init() {
        if (this.blogDao == null) {
            throw new IllegalStateException("The [blogDao] property must be set.");
        }
    }
}
<beans default-init-method="init">

    <bean id="blogService" class="com.something.DefaultBlogService">
        <property name="blogDao" ref="blogDao" />
    </bean>

</beans>
结合使用生命周期机制
在spring2.5之后有三个控制生命周期的的选项:
- InitializingBean和DisposableBean回调接口
- 自定义init()和destroy()方法
- @PostConstruct和@PreDestroy注释。组合这些机制来控制给定的bean。
当为一个bean配置了多个生命周期机制,并且每个机制配置了不同的方法名,那么每个配置的方法执行顺序如下:
初始化回调方法执行顺序:
- 调用@PostConstruct注释的方法
- 调用实现InitializingBean回调接口定义的afterPropertiesSet()方法
- 调用一个自定义配置的init()方法
销毁回调方法执行顺序:
- 调用@PreDestroy注释的方法
- 调用实现DisposableBean回调接口的destroy()方法
- 调用自定义配置的destroy()方法
容器的启动和关闭回调
Lifecyle接口为任何有自己生命周期需求的对象定义了基本方法(比如启动和停止一些后台进程)。LifeCycle接口只是在容器上下文显式的调用start()/stop()方法时,才会去回调LifeCycle的实现类的start stop方法逻辑。并不意味着在上下文刷新时自动启动。
public interface Lifecycle {
    /**
     * 启动当前组件
     * 如果组件已经在运行,不应该抛出异常
     * 在容器的情况下,这会将开始信号 传播到应用的所有组件中去。
     */
    void start();
    /**
     *(1)通常以同步方式停止该组件,当该方法执行完成后,该组件会被完全停止。
         当需要异步停止行为时,考虑实现SmartLifecycle 和它的 stop(Runnable) 方法变体。

          注意,此停止通知在销毁前不能保证到达:
          在常规关闭时,{@code Lifecycle} bean将首先收到一个停止通知,然后才传播常规销毁回调;
          在上下文的生命周期内的刷新或中止时,只调用销毁方法,对于容器,这将把停止信号传播到应用的所有组件
     */
    void stop();
    /**
      *  检查此组件是否正在运行。
      *  1. 只有该方法返回false时,start方法才会被执行。
      *  2. 只有该方法返回true时,stop(Runnable callback)或stop()方法才会被执行。
      */
    boolean isRunning();
}
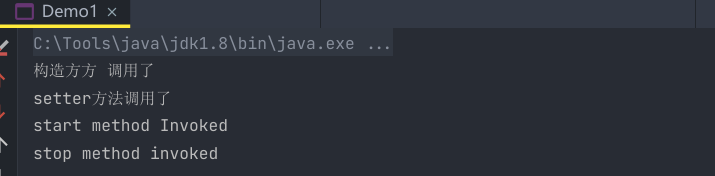
public class Demo1 {
    public static void main(String[] args) {
        ClassPathXmlApplicationContext context = new ClassPathXmlApplicationContext("applicationConfig.xml");
        context.start();
        context.stop();
    }
}
任何spring管理的对象都可以实现Lifecycle接口。然后,当ApplicationContext本身接收到启动和停止信号时(例如,对于运行时的停止/重启场景),它将这些调用级联到在该上下文中定义的所有生命周期实现。它通过委托给LifecycleProcessor来实现,LifecycleProcessor本身是Lifecycle接口的扩展。它还添加了另外两个方法,用于对刷新和关闭的上下文作出反应。
public interface LifecycleProcessor extends Lifecycle {
    /**
     * 响应Spring容器上下文 refresh
     */
    void onRefresh();
    /**
     * 响应Spring容器上下文 close
     */
    void onClose();
}
启动和关闭调用的顺序可能很重要。如果任意两个对象之间存在“依赖-被依赖”关系,依赖端在被依赖项之后开始,在被依赖项之前停止。然而有时,直接依赖关系是未知的。您可能只知道某种类型的对象应该在另一种类型的对象之前开始。在这些情况下,SmartLifecycle接口定义了另一个选项,即在其超级接口phase上定义的getPhase()方法。
public interface Phased {

    int getPhase();
}
public interface SmartLifecycle extends Lifecycle, Phased {

    boolean isAutoStartup();

    void stop(Runnable callback);
}
启动时,最小的phase最先启动,停止时相反。若对象实现了SmartLifecycle接口,它的getPhase()方法返回Integer.MIN_VALUE,那么该对象最先启动,最后停止。若是getPhase()方法返回Integer.MAX_VALUE,那么该方法最后启动最先停止。关于phase的值,常规的并未实现SmartLifecycle接口的Lifecycle对象,其值默认为0。因此,负phase值表示要在常规Lifecycle对象之前启动(在常规Lifecycyle对象之后停止),使用正值则恰恰相反。
SmartLifecycle中stop()方法有一个回调参数。所有的实现在关闭处理完成后会调用回调的run()方法,相当于开启异步关闭功能。
LifecycleProcessor接口在Spring中的默认实现是DefaultLifecycleProcessor类,该类会为每个回调等待超时,默认超时是30秒。可以重写该类默认的参数,该类在容器内默认bean名称是lifecycleProcessor。比如修改超时时间:
<bean id="lifecycleProcessor" class="org.springframework.context.support.DefaultLifecycleProcessor">
  <!-- timeout value in milliseconds -->
  <property name="timeoutPerShutdownPhase" value="10000"/>
</bean>
ApplicationContextAware and BeanNameAware
当一个ApplicationContex容器创建了一个实例bean实现了org.springframework.context.ApplicationContextAware接口,该实例bean提供了一个对ApplicationContext的引用
public interface ApplicationContextAware {
    void setApplicationContext(ApplicationContext applicationContext) throws BeansException;
}
因此,bean可以通过代码使用创建它们的ApplicationContext,通过ApplicationContext接口或通过转换ApplicationContex的子类(例如ConfigurableApplicationContext)。
当一个ApplicationContex容器创建了一个实例bean实现了org.springframework.beans.factory.BeanNameAware接口,这个实例bean将被提供一个对其关联对象定义中定义的名称的引用。在填充普通bean属性之后、初始化回调(如InitializingBean.afterPropertiesSet()或自定义初始化方法)之前调用回调。
其他Aware接口
| Name | 依赖注入 | Explained in… |
|---|---|---|
| ApplicationContextAware | 声明 ApplicationContext. | ApplicationContextAwareandBeanNameAware |
| ApplicationEventPublisherAware | 封闭的事件发布者ApplicationContext。 | Additional Capabilities of theApplicationContext |
| BeanClassLoaderAware | 类加载器用于加载bean | Instantiating Beans |
| BeanFactoryAware | 声明BeanFactory | TheBeanFactory |
| BeanNameAware | 声明bean的名称 | ApplicationContextAwareandBeanNameAware |
| LoadTimeWeaverAware | 用于在加载时处理类定义的定义编织器 | Load-time Weaving with AspectJ in the Spring Framework |
| MessageSourceAware | Additional Capabilities of theApplicationContext | |
| NotificationPublisherAware | Spring JMX 通知发布者 | Notifications |
| ResourceLoaderAware | 向低级访问资源配置加载器 | Resources |
| ServletConfigAware | 当前容器的ServletConfig。仅在web-aware Spring的容器有效。 | Spring MVC |
| ServletContextAware | 当前容器中ServletContext 。仅在web-aware Spring的容器有效 | Spring MVC |
Bean定义继承
bean定义可以包含大量配置信息,包括构造函数参数、属性值和特定于容器的信息,如初始化方法、静态工厂方法名等。子bean定义从父bean定义继承配置数据。子定义可以根据需要重写一些值或添加其他值。使用父bean和子bean定义可以节省大量的输入。实际上,这是一种模板形式。
<bean id="inheritedTestBean" abstract="true"
      class="org.springframework.beans.TestBean">
  <property name="name" value="parent"/>
  <property name="age" value="1"/>
</bean>

<bean id="inheritsWithDifferentClass"
      class="org.springframework.beans.DerivedTestBean"
      parent="inheritedTestBean" init-method="initialize">
  <property name="name" value="override"/>
  <!-- the age property value of 1 will be inherited from parent -->
</bean>
如果父bean定义没有指定类,则需要显式地将父bean定义标记为抽象。当定义是抽象的时,它只能作为一个纯模板bean定义,作为子定义的父定义使用。如果试图单独使用这样的抽象父bean,将其作为另一个bean的ref属性引用,或者使用父bean ID进行显式的getBean()调用,则会返回错误。
<bean id="inheritedTestBeanWithoutClass" abstract="true">
    <property name="name" value="parent"/>
    <property name="age" value="1"/>
</bean>

<bean id="inheritsWithClass" class="org.springframework.beans.DerivedTestBean"
        parent="inheritedTestBeanWithoutClass" init-method="initialize">
    <property name="name" value="override"/>
    <!-- age will inherit the value of 1 from the parent bean definition-->
</bean>
容器扩展点
使用BeanPostProcessor定制bean
如果我们想在Spring容器中完成bean实例化、配置以及其他初始化方法前后要添加一些自己逻辑处理。我们需要定义一个或多个BeanPostProcessor接口实现类,然后注册到Spring IoC容器中。
1、接口中的两个方法都要将传入的bean返回,而不能返回null,如果返回的是null那么我们通过getBean方法将得不到目标。
2、ApplicationContext会自动检测在配置文件中实现了BeanPostProcessor接口的所有bean,并把它们注册为后置处理器,然后在容器创建bean的适当时候调用它,因此部署一个后置处理器同部署其他的bean并没有什么区别。而使用BeanFactory实现的时候,bean 后置处理器必须通过代码显式地去注册,在IoC容器继承体系中的ConfigurableBeanFactory接口中定义了注册方法。
配置多个BeanPostProcessor实例,可以通过设置order属性来控制这些BeanPostProcessor实例运行的顺序。只有当BeanPostProcessor实现了Ordered接口时,才能设置此属性。如果编写自己的BeanPostProcessor,还应该考虑实现Ordered接口。
使用BeanFactoryPostProcessor定制配置元数据
BeanFactoryPostProcessor对bean配置元数据进行操作。也就是说,Spring IoC容器允许BeanFactoryPostProcessor读取配置元数据,并可能在容器实例化BeanFactoryPostProcessor实例以外的其他任何bean之前更改配置元数据。
配置多个BeanFactoryPostProcessor实例,通过设置order属性来控制这些BeanFactoryPostProcessor实例运行的顺序。但是只能在BeanFactoryPostProcessor实现了Ordered接口的情况下设置这个属性。
用FactoryBean定制实例化逻辑
你可以为那些本身就是工厂的对象实现org.springframework.beans.factory.FactoryBean接口。FactoryBean
- T getObject():返回此工厂创建的对象的实例。实例可以被共享,这取决于这个工厂返回的是单例还是原型。
- boolean isSingleton():如果FactoryBean返回单例则返回true,否则返回false。此方法的默认实现返回true。
- Class<?> getObjectType():返回由getObject()方法返回的对象类型,如果类型事先不知道,则为null。
当您需要向容器请求一个实际的FactoryBean实例本身,而不是它生成的bean时,在调用ApplicationContext的getBean()方法时,在bean的id前面加上&符号(&)。因此,对于一个id为myBean的给定FactoryBean,在容器上调用getBean(“myBean”)将返回FactoryBean的产品,而调用getBean(“&myBean”)将返回FactoryBean实例本身。
基于注解的容器配置
注释注入在XML注入之前执行。因此,XML配置覆盖了通过这两种方法连接的属性的注释。
你可以将后处理器注册为单独的bean定义,但它们也可以通过在基于xml的Spring配置中包含以下标签来隐式注册(注意包含上下文名称空间)
<?xml version="1.0" encoding="UTF-8"?>
<beans xmlns="http://www.springframework.org/schema/beans"
    xmlns:xsi="http://www.w3.org/2001/XMLSchema-instance"
    xmlns:context="http://www.springframework.org/schema/context"
    xsi:schemaLocation="http://www.springframework.org/schema/beans
        https://www.springframework.org/schema/beans/spring-beans.xsd
        http://www.springframework.org/schema/context
        https://www.springframework.org/schema/context/spring-context.xsd">

    <context:annotation-config/>

</beans>
- ConfigurationClassPostProcessor
- AutowiredAnnotationBeanPostProcessor
- CommonAnnotationBeanPostProcessor
- PersistenceAnnotationBeanPostProcessor
- EventListenerMethodProcessor
@Required
@Required注解应用于bean属性setter方法,该注解指出,该属性值必须显示注入或自动注入。如果未注入,容器将抛出异常。建议将断言放入bean类本身中(例如,放入init方法中)。即使在容器外部使用类,这样做也会强制执行那些必需的引用和值。
注意:RequiredAnnotationBeanPostProcessor必须注册为一个bean,以支持@Required注解。该注解已弃用。
@Autowired
- 可以将@Autowired注解应用到构造函数中。
注:如果目标bean一开始只定义了一个构造函数,那么就不再需要在这样的构造函数上添加@Autowired注释。但是,如果有几个构造函数可用,并且没有主/默认构造函数,那么至少有一个构造函数必须用@Autowired注释,以便指示容器使用哪个构造函数。
public class MovieRecommender {

    private final CustomerPreferenceDao customerPreferenceDao;
    private MovieCatalog movieCatalog;

    @Autowired
    public MovieRecommender(CustomerPreferenceDao customerPreferenceDao) {
        this.customerPreferenceDao = customerPreferenceDao;
    }

    public MovieRecommender(CustomerPreferenceDao customerPreferenceDao, MovieCatalog movieCatalog) {
        this.customerPreferenceDao = customerPreferenceDao;
        his.movieCatalog = movieCatalog;
    }
}
您还可以将注解应用到具有任意名称和多个参数的方法中 ```java public class MovieRecommender {
private MovieCatalog movieCatalog;
private CustomerPreferenceDao customerPreferenceDao;
@Autowired public void prepare(MovieCatalog movieCatalog,
      CustomerPreferenceDao customerPreferenceDao) {
  this.movieCatalog = movieCatalog;
  this.customerPreferenceDao = customerPreferenceDao;
}
}
- **您也可以将@Autowired应用于字段,甚至可以将其与构造函数混合使用**
```java
public class MovieRecommender {

    private final CustomerPreferenceDao customerPreferenceDao;
    @Autowired
    private MovieCatalog movieCatalog;

    @Autowired
    public MovieRecommender(CustomerPreferenceDao customerPreferenceDao) {
        this.customerPreferenceDao = customerPreferenceDao;
    }
}
你也可以让Spring从ApplicationContext中提供特定类型的所有bean,方法是在需要该类型数组的字段或方法中添加@Autowired注释。对于声明的数组、集合或映射,至少需要一个匹配的元素。
public class MovieRecommender {

  @Autowired
  private MovieCatalog[] movieCatalogs;
}
这同样适用于类型化集合 ```java public class MovieRecommender { private Set
movieCatalogs; @Autowired public void setMovieCatalogs(Set movieCatalogs) { this.movieCatalogs = movieCatalogs;}
}
只要期望的键类型是String,即使类型化的Map实例也可以自动注入。map值包含预期类型的所有bean, key包含相应的bean名称。
```java
public class MovieRecommender {

    private Map<String, MovieCatalog> movieCatalogs;

    @Autowired
    public void setMovieCatalogs(Map<String, MovieCatalog> movieCatalogs) {
        this.movieCatalogs = movieCatalogs;
    }
}
设置@Autowired的required属性,可以将一个不能满足的注入点标记为非必需的。
注:建议使用@Autowired的required属性,而不是setter方法上已弃用的@Required注释。将required属性设置为false表示该属性对于自动装配目的不是必需的,如果该属性不能自动装配,则将忽略该属性。另一方面,@Required更强,因为它强制使用容器支持的任何方式来设置属性,如果没有定义值,则会引发相应的异常。
对于Spring 5.0,还可以使用@Nullable注解,来规避无法注入的问题。
public class SimpleMovieLister {

    @Autowired
    public void setMovieFinder(@Nullable MovieFinder movieFinder) {
        ...
    }
}
也可以将@Autowired用于那些可解析依赖关系的接口:BeanFactory、ApplicationContext、Environment、ResourceLoader、ApplicationEventPublisher和MessageSource。或者他们的子接口,如ConfigurableApplicationContext或ResourcePatternResolver,依赖关系会被自动解析,不需要特殊的设置。 ```java public class MovieRecommender {
@Autowired private ApplicationContext context;
public MovieRecommender() { }
}
注:@Autowired、@Inject、@Value和@Resource注解是由Spring BeanPostProcessor实现处理的。这意味着您不能在自己的BeanPostProcessor或BeanFactoryPostProcessor类型(如果有的话)中应用这些注释。这些类型必须通过使用XML或Spring @Bean方法显式地“注入”。
<a name="puW9S"></a>
##### @Primary
因为按类型自动注入,容器中可能有多个该类型的实例bean,需是使用Spring的@Primary注释。<br />@Primary,bean自动注入时容器中有多个同类型实例bean时,应该优先考虑某个特定的bean。如果候选bean中只有一个主bean,那么它就成为自动注入的值。
```java
@Configuration
public class MovieConfiguration {

    @Bean
    @Primary
    public MovieCatalog firstMovieCatalog() { ... }
    @Bean
    public MovieCatalog secondMovieCatalog() { ... }

    // ...
}

public class MovieRecommender {
    @Autowired
    private MovieCatalog movieCatalog;  //注入 firstMovieCatalog

    // ...
}
<?xml version="1.0" encoding="UTF-8"?>
<beans xmlns="http://www.springframework.org/schema/beans"
       xmlns:xsi="http://www.w3.org/2001/XMLSchema-instance"
       xmlns:context="http://www.springframework.org/schema/context"
       xsi:schemaLocation="http://www.springframework.org/schema/beans
                           https://www.springframework.org/schema/beans/spring-beans.xsd
                           http://www.springframework.org/schema/context
                           https://www.springframework.org/schema/context/spring-context.xsd">

  <context:annotation-config/>

  <bean class="example.SimpleMovieCatalog" primary="true">
    <!-- inject any dependencies required by this bean -->
  </bean>

  <bean class="example.SimpleMovieCatalog">
    <!-- inject any dependencies required by this bean -->
  </bean>

  <bean id="movieRecommender" class="example.MovieRecommender"/>

</beans>
@Qualifier
根据属性名称注入依赖。@Autowired配合 @Qualifier,可以通过名称指定注入的对象。
除了@Qualifier注释之外,还可以使用Java泛型类型作为隐式的限定形式。
@Configuration
public class MyConfiguration {

    @Bean
    public StringStore stringStore() {
        return new StringStore();
    }

    @Bean
    public IntegerStore integerStore() {
        return new IntegerStore();
    }
}
public class Test{
    @Autowired
    private Store<String> s1; // <String> qualifier, injects the stringStore bean

    @Autowired
    private Store<Integer> s2; // <Integer> qualifier, injects the integerStore bean
}
@Resource
@Resource接受一个name属性。默认情况下,Spring将该值解释为要注入的bean名称。@Resource 如果不配置name 那么就是根据类型注入。配置name,就是根据名称注入
@Value
@Value通常用于注入外部化的属性
@Component
public class MovieRecommender {

    private final String catalog;

    public MovieRecommender(@Value("${catalog.name}") String catalog) {
        this.catalog = catalog;
    }
}
Spring提供了一个默认的轻量级嵌入式值解析器。它将尝试解析属性值,如果无法解析,则属性名(例如${catalog.name})将作为值注入。如果你想严格控制不存在的值,你应该声明一个propertysourcesconfigururer bean
@Configuration
public class AppConfig {

    @Bean
    public static PropertySourcesPlaceholderConfigurer propertyPlaceholderConfigurer() {
        return new PropertySourcesPlaceholderConfigurer();
    }
}
如果任何${}占位符不能被解析,上述配置将确保Spring初始化失败。也可以使用setprefix、setsuffix或setValueSeparator等方法来定制占位符。
当@Value包含一个SpEL表达式时,该值将在运行时被动态计算
@Component
public class MovieRecommender {

    private final String catalog;

    public MovieRecommender(@Value("#{systemProperties['user.catalog'] + 'Catalog' }") String catalog) {
        this.catalog = catalog;
    }
}
@PostConstruct和@PreDestroy
@PostConstruct 构造方法调用后回调函数
@PreDestroy 销毁前回调函数
public class CachingMovieLister {

    @PostConstruct
    public void populateMovieCache() {
        // populates the movie cache upon initialization...
    }

    @PreDestroy
    public void clearMovieCache() {
        // clears the movie cache upon destruction...
    }
}
类路径扫描和组件管理
@Component和进一步的原型注解
@Component是任何spring管理的组件的通用原型
@Repository、@Service和@Controller是@Component的专门化,用于更具体的用例(分别在持久化层、服务层和表示层)。
使用元注解和组合注解
@Target(ElementType.TYPE)
@Retention(RetentionPolicy.RUNTIME)
@Documented
@Component
public @interface Service {

    /**
     * The value may indicate a suggestion for a logical component name,
     * to be turned into a Spring bean in case of an autodetected component.
     * @return the suggested component name, if any (or empty String otherwise)
     */
    @AliasFor(annotation = Component.class)
    String value() default "";
}
自动检测类和注册Bean定义
要自动检测这些类并注册相应的bean,您需要将@ComponentScan添加到您的@Configuration类中,其中basePackages属性是这两个类的公共父包。(或者,您可以指定一个逗号或分号或空格分隔的列表,其中包含每个类的父包。)
@Configuration
@ComponentScan(basePackages = "org.example")
public class AppConfig  {
    // ...
}
<?xml version="1.0" encoding="UTF-8"?>
<beans xmlns="http://www.springframework.org/schema/beans"
    xmlns:xsi="http://www.w3.org/2001/XMLSchema-instance"
    xmlns:context="http://www.springframework.org/schema/context"
    xsi:schemaLocation="http://www.springframework.org/schema/beans
        https://www.springframework.org/schema/beans/spring-beans.xsd
        http://www.springframework.org/schema/context
        https://www.springframework.org/schema/context/spring-context.xsd">

    <context:component-scan base-package="org.example"/>

</beans>
使用过滤器自定义扫描
| Filter Type | Example Expression | Description |
|---|---|---|
| annotation (default) | org.example.SomeAnnotation | 要在目标组件的类型级别上存在或元存在的注释。 |
| assignable | org.example.SomeClass | 目标组件可分配给(扩展或实现)的类(或接口)。 |
| aspectj | org.example..*Service+ | 目标组件要匹配的AspectJ类型表达式。 |
| regex | org\.example\.Default.* | 与目标组件的类名匹配的正则表达式。 |
| custom | org.example.MyTypeFilter | org.springframework.core.type.TypeFilter接口的自定义实现。 |
//例子显示了配置忽略所有@Repository注释,而使用stub库代替:

@Configuration
@ComponentScan(basePackages = "org.example",
        includeFilters = @Filter(type = FilterType.REGEX, pattern = ".*Stub.*Repository"),
        excludeFilters = @Filter(Repository.class))
public class AppConfig {
    // ...
}
<beans>
  <context:component-scan base-package="org.example">
    <context:include-filter type="regex"
                            expression=".*Stub.*Repository"/>
    <context:exclude-filter type="annotation"
                            expression="org.springframework.stereotype.Repository"/>
  </context:component-scan>
</beans>
在组件中定义Bean元数据
@Component
public class FactoryMethodComponent {

    @Bean
    @Qualifier("public")
    public TestBean publicInstance() {
        return new TestBean("publicInstance");
    }

    public void doWork() {
        // Component method implementation omitted
    }
}
@Bean注释标识工厂方法和其他bean定义属性,例如通过@Qualifier注释标识限定符值。其他可以指定的方法级注释有@Scope、@Lazy和自定义限定符注释。
命名个组件
@Service("myMovieLister")
public class SimpleMovieLister {
    // ...
}
为自动检测组件提供范围
@Scope("prototype")
@Repository
public class MovieFinderImpl implements MovieFinder {
    // ...
}
用注释提供限定符元数据
@Component
@Qualifier("Action")
public class ActionMovieCatalog implements MovieCatalog {
    // ...
}
生成候选组件的索引
虽然类路径扫描非常快,但通过在编译时创建静态候选列表,可以提高大型应用程序的启动性能。在此模式下,所有组件扫描的目标模块都必须使用此机制。
您现有的@ComponentScan或
要生成索引,请向每个包含组件扫描指令目标组件的模块添加额外的依赖项。
<dependencies>
  <dependency>
    <groupId>org.springframework</groupId>
    <artifactId>spring-context-indexer</artifactId>
    <version>5.3.17</version>
    <optional>true</optional>
  </dependency>
</dependencies>
使用JSR 330标准注解
从Spring 3.0开始,Spring提供了对JSR-330标准注解(依赖注入)的支持。这些注解以与Spring注解相同的方式被扫描。要使用它们,需要在类路径中包含相关的jar文件。
<dependency>
  <groupId>javax.inject</groupId>
  <artifactId>javax.inject</artifactId>
  <version>1</version>
</dependency>
使用@Inject和@Named进行依赖注入
@Inject类似@Autowired注解 ;@Named类似@Qualifier注解
import javax.inject.Inject;

public class SimpleMovieLister {

    private MovieFinder movieFinder;

    @Inject
    public void setMovieFinder(MovieFinder movieFinder) {
        this.movieFinder = movieFinder;
    }

    public void listMovies() {
        this.movieFinder.findMovies(...);
        // ...
    }
}
如果你想要为需要注入的依赖项使用限定名,你应该使用@Named注释
import javax.inject.Inject;
import javax.inject.Named;

public class SimpleMovieLister {

    private MovieFinder movieFinder;

    @Inject
    public void setMovieFinder(@Named("main") MovieFinder movieFinder) {
        this.movieFinder = movieFinder;
    }

    // ...
}
@Named和@ManagedBean:与@Component注释等价的标准
@Named和@ManagedBean,类似与@Component注释
import javax.inject.Inject;
import javax.inject.Named;

@Named("movieListener")  // @ManagedBean("movieListener") could be used as well
public class SimpleMovieLister {

    private MovieFinder movieFinder;

    @Inject
    public void setMovieFinder(MovieFinder movieFinder) {
        this.movieFinder = movieFinder;
    }

    // ...
}
JSR 330标准注解的局限性
| Spring | javax.inject.* | javax.inject restrictions / comments |
|---|---|---|
| @Autowired | @Inject | @Inject没有’required’属性。可以用Java 8的Optional代替。 |
| @Component | @Named / @ManagedBean |
JSR-330没有提供一个可组合的模型,只提供了一种识别命名组件的方法。 |
| @Scope(“singleton”) | @Singleton | JSR-330的默认作用域类似于Spring的原型。然而,为了使其与Spring的一般默认值保持一致,在Spring容器中声明的JSR-330 bean默认是单例的。为了使用单例以外的作用域,您应该使用Spring的@Scope注释。javax.inject还提供了一个@Scope注释。不过,这一项仅用于创建您自己的注释。 |
| @Qualifier | @Qualifier / @Named | qualifier只是用于构建自定义限定符的元注释。具体的字符串限定符(比如带有值的Spring的@Qualifier)可以通过javax.inject.Named来关联。 |
| @Value | - | no equivalent |
| @Required | - | no equivalent |
| @Lazy | - | no equivalent |
| ObjectFactory | Provider | provider是Spring的ObjectFactory的直接替代品,只是有一个更短的get()方法名。它也可以与Spring的@Autowired或非注释的构造函数和setter方法结合使用。 |
基于java的容器配置
- Basic Concepts:@Beanand@Configuration
- Instantiating the Spring Container by UsingAnnotationConfigApplicationContext
- Using the@BeanAnnotation
- Using the@Configurationannotation
- Composing Java-based Configurations
- Bean Definition Profiles
- PropertySourceAbstraction
- Using@PropertySource
Placeholder Resolution in Statements
@Bean and @Configuration
用@Configuration注释类表明它的主要用途是作为bean定义的来源。此外,@Configuration类允许通过调用同一类中的其他@Bean方法来定义bean间的依赖关系。最简单的@Configuration类如下所示:
@Configuration
public class AppConfig {

  @Bean
  public MyService myService() {
      return new MyServiceImpl();
  }
}
<beans> <bean id="myService" class="com.acme.services.MyServiceImpl"/> </beans>注意:
当@Bean方法在没有使用@Configuration注释的类中声明时,它们被称为以“lite”模式处理。在@Component中甚至在一个普通的旧类中声明的Bean方法被认为是“精简的”,包含类的主要目的不同,@Bean方法是一种奖励。例如,服务组件可以通过在每个适用组件类上附加的@Bean方法向容器公开管理视图。在这种情况下,@Bean方法是一种通用的工厂方法机制。
与完整的@Configuration不同,lite @Bean方法不能声明bean间的依赖关系。相反,它们对包含组件的内部状态进行操作,并可选地对它们可能声明的参数进行操作。因此,这样的@Bean方法不应该调用其他@Bean方法。每个这样的方法实际上只是特定bean引用的工厂方法,没有任何特殊的运行时语义。这里的积极副作用是,不需要在运行时应用CGLIB子类,因此在类设计方面没有限制(也就是说,包含的类可能是final类,等等
在常见的场景中,@Bean方法要在@Configuration类中声明,以确保始终使用“full”模式,因此跨方法引用被重定向到容器的生命周期管理。这可以防止通过常规Java调用意外调用相同的@Bean方法,这有助于减少在“精简”模式下操作时难以追踪的细微错误。
使用AnnotationConfigApplicationContext实例化Spring容器
public static void main(String[] args) {
    ApplicationContext ctx = new AnnotationConfigApplicationContext(AppConfig.class);
    MyService myService = ctx.getBean(MyService.class);
    myService.doStuff();
}
AnnotationConfigApplicationContext并不仅限于使用@Configuration类。任何带@Component或JSR-330注释的类都可以作为输入提供给构造函数
public static void main(String[] args) {
    ApplicationContext ctx = new AnnotationConfigApplicationContext(MyServiceImpl.class, Dependency1.class, Dependency2.class);
    MyService myService = ctx.getBean(MyService.class);
    myService.doStuff();
}
通过使用register(Class<?>…)以编程方式构建容器
您可以使用无参数构造函数实例化一个AnnotationConfigApplicationContext,然后使用register()方法配置它。这种方法在以编程方式构建AnnotationConfigApplicationContext时特别有用
public static void main(String[] args) {
    AnnotationConfigApplicationContext ctx = new AnnotationConfigApplicationContext();
    ctx.register(AppConfig.class, OtherConfig.class);
    ctx.register(AdditionalConfig.class);
    ctx.refresh();
    MyService myService = ctx.getBean(MyService.class);
    myService.doStuff();
}
启用scan扫描组件
@Configuration
@ComponentScan(basePackages = "com.acme")
public class AppConfig  {
    // ...
}
支持带有AnnotationConfigWebApplicationContext的Web应用程序
您可以在配置Spring ContextLoaderListener servlet监听器、Spring MVC DispatcherServlet等等时使用这个实现。下面的web.xml代码片段配置了一个典型的Spring MVC web应用程序(注意contextClass context-param和init-param的使用)
<web-app>
  <!-- 配置ContextLoaderListener使用AnnotationConfigWebApplicationContext
      而不是默认的XmlWebApplicationContext -->
  <context-param>
    <param-name>contextClass</param-name>
    <param-value>
      org.springframework.web.context.support.AnnotationConfigWebApplicationContext
    </param-value>
  </context-param>

  <!-- 配置位置必须由一个或多个逗号或空格分隔的完全限定@ configuration类。
        完全合格的包装也可以指定组件扫描 -->
  <context-param>
    <param-name>contextConfigLocation</param-name>
    <param-value>com.acme.AppConfig</param-value>
  </context-param>

  <!-- 像往常一样使用ContextLoaderListener引导根应用程序上下文 -->
  <listener>
    <listener-class>org.springframework.web.context.ContextLoaderListener</listener-class>
  </listener>

  <!-- 声明一个Spring MVC DispatcherServlet -->
  <servlet>
    <servlet-name>dispatcher</servlet-name>
    <servlet-class>org.springframework.web.servlet.DispatcherServlet</servlet-class>
    <!--配置DispatcherServlet来使用AnnotationConfigWebApplicationContex而不是默认的XmlWebApplicationContext -->
    <init-param>
      <param-name>contextClass</param-name>
      <param-value>
        org.springframework.web.context.support.AnnotationConfigWebApplicationContext
      </param-value>
    </init-param>
    <!-- 配置位置必须由一个或多个逗号或空格分隔和完全限定的@Configuration类 -->
    <init-param>
      <param-name>contextConfigLocation</param-name>
      <param-value>com.acme.web.MvcConfig</param-value>
    </init-param>
  </servlet>

  <!-- 将/app/*的所有请求映射到dispatcherServlet -->
  <servlet-mapping>
    <servlet-name>dispatcher</servlet-name>
    <url-pattern>/app/*</url-pattern>
  </servlet-mapping>
</web-app>
@Bean注解使用
声明一个bean
要声明bean,可以使用@Bean注释对方法进行注释。您可以使用此方法在指定为方法返回值的类型的ApplicationContext中注册bean定义。默认情况下,bean名称与方法名称相同。
@Configuration
public class AppConfig {

    @Bean
    public TransferServiceImpl transferService() {
        return new TransferServiceImpl();
    }
}
public interface BaseConfig {
    @Bean
    default TransferServiceImpl transferService() {
        return new TransferServiceImpl();
    }
}

@Configuration
public class AppConfig implements BaseConfig {

}
Bean的依赖关系
带@ bean注释的方法可以有任意数量的参数,这些参数描述构建该bean所需的依赖项。解析机制与基于构造函数的依赖注入非常相似。
@Configuration
public class AppConfig {
    @Bean
    public TransferService transferService(AccountRepository accountRepository) {
        return new TransferServiceImpl(accountRepository);
    }
}
支持生命周期回调
- 任何用@Bean注解定义的类都支持常规的生命周期回调,并且可以使用JSR-250的@PostConstruct和@PreDestroy注解。
- 常规的Spring生命周期回调也得到了完全的支持。如果一个bean实现了InitializingBean、DisposableBean或Lifecycle,它们各自的方法都会被容器调用。
- 标准的*Aware接口集(如BeanFactoryAware、BeanNameAware、MessageSourceAware、ApplicationContextAware等)也得到了完全的支持。
@Bean注释支持指定任意初始化和销毁回调方法,很像bean元素上Spring XML的init-method和destroy-method属性,如下所示
public class BeanOne {

    public void init() {
        // initialization logic
    }
}

public class BeanTwo {

    public void cleanup() {
        // destruction logic
    }
}

@Configuration
public class AppConfig {

    @Bean(initMethod = "init")
    public BeanOne beanOne() {
        return new BeanOne();
    }

    @Bean(destroyMethod = "cleanup")
    public BeanTwo beanTwo() {
        return new BeanTwo();
    }
}
制定Bean的范围
@Configuration
public class MyConfiguration {

    @Bean
    @Scope("prototype")
    public Encryptor encryptor() {
        // ...
    }
}
设置bean名称
配置类使用@Bean方法的名称作为生成的bean的名称。但是可以被name属性覆盖
@Configuration
public class AppConfig {

    @Bean("myThing")
    public Thing thing() {
        return new Thing();
    }
}
bean的别名
@Configuration
public class AppConfig {

    @Bean({"dataSource", "subsystemA-dataSource", "subsystemB-dataSource"})
    public DataSource dataSource() {
        // instantiate, configure and return DataSource bean...
    }
}
bean描述
@Configuration
public class AppConfig {

    @Bean
    @Description("Provides a basic example of a bean")
    public Thing thing() {
        return new Thing();
    }
}
@Configuration注解使用
注入Inter-bean依赖性
@Configuration
public class AppConfig {

    @Bean
    public BeanOne beanOne() {
        return new BeanOne(beanTwo());
    }

    @Bean
    public BeanTwo beanTwo() {
        return new BeanTwo();
    }
}
查找方法注入
查找方法注入是一个应该很少使用的高级特性。在单例作用域bean依赖于原型作用域bean的情况下,它是有用的。对于这种类型的配置,使用Java为实现这种模式提供了一种自然的方法。
public abstract class CommandManager {
    public Object process(Object commandState) {
        // grab a new instance of the appropriate Command interface
        Command command = createCommand();
        // set the state on the (hopefully brand new) Command instance
        command.setState(commandState);
        return command.execute();
    }

    // okay... but where is the implementation of this method?
    protected abstract Command createCommand();
}
通过使用Java配置,您可以创建CommandManager的一个子类,其中抽象的createCommand()方法以一种查找新(原型)命令对象的方式被重写。
@Bean
@Scope("prototype")
public AsyncCommand asyncCommand() {
    AsyncCommand command = new AsyncCommand();
    // 根据需要在这里注入依赖项
    return command;
}

@Bean
public CommandManager commandManager() {
    // 用createCommand()返回命令管理器的新匿名实现
    // 重写以返回一个新的原型Command对象
    return new CommandManager() {
        protected Command createCommand() {
            return asyncCommand();
        }
    }
}
基于java代码编写配置
@Import注解
就像在Spring XML文件中使用
@Configuration
public class ConfigA {

    @Bean
    public A a() {
        return new A();
    }
}

@Configuration
@Import(ConfigA.class)
public class ConfigB {

    @Bean
    public B b() {
        return new B();
    }
}
在导入的@Bean定义中注入依赖项
@Configuration
public class ServiceConfig {

    @Bean
    public TransferService transferService(AccountRepository accountRepository) {
        return new TransferServiceImpl(accountRepository);
    }
}

@Configuration
public class RepositoryConfig {
    @Bean
    public AccountRepository accountRepository(DataSource dataSource) {
        return new JdbcAccountRepository(dataSource);
    }
}

@Configuration
@Import({ServiceConfig.class, RepositoryConfig.class})
public class SystemTestConfig {

    @Bean
    public DataSource dataSource() {
        // return new DataSource
    }
}

public static void main(String[] args) {
    ApplicationContext ctx = new AnnotationConfigApplicationContext(SystemTestConfig.class);
    // everything wires up across configuration classes...
    TransferService transferService = ctx.getBean(TransferService.class);
    transferService.transfer(100.00, "A123", "C456");
}
Profile 定义运行环境
当一个或多个指定的概要文件处于活动状态时,@Profile注释允许您指示一个组件有资格注册
@Configuration
@Profile("development")
public class StandaloneDataConfig {

    @Bean
    public DataSource dataSource() {
        return new EmbeddedDatabaseBuilder()
            .setType(EmbeddedDatabaseType.HSQL)
            .addScript("classpath:com/bank/config/sql/schema.sql")
            .addScript("classpath:com/bank/config/sql/test-data.sql")
            .build();
    }
}

@Configuration
@Profile("production")
public class JndiDataConfig {

    @Bean(destroyMethod="")
    public DataSource dataSource() throws Exception {
        Context ctx = new InitialContext();
        return (DataSource) ctx.lookup("java:comp/env/jdbc/datasource");
    }
}


@Configuration
public class AppConfig {

    @Bean("dataSource")
    @Profile("development")
    public DataSource standaloneDataSource() {
        return new EmbeddedDatabaseBuilder()
            .setType(EmbeddedDatabaseType.HSQL)
            .addScript("classpath:com/bank/config/sql/schema.sql")
            .addScript("classpath:com/bank/config/sql/test-data.sql")
            .build();
    }

    @Bean("dataSource")
    @Profile("production")
    public DataSource jndiDataSource() throws Exception {
        Context ctx = new InitialContext();
        return (DataSource) ctx.lookup("java:comp/env/jdbc/datasource");
    }
}
激活一个概要文件
AnnotationConfigApplicationContext ctx = new AnnotationConfigApplicationContext();
ctx.getEnvironment().setActiveProfiles("development");
ctx.register(SomeConfig.class, StandaloneDataConfig.class, JndiDataConfig.class);
ctx.refresh();
您还可以通过spring.profiles.active属性声明性地激活概要文件,它可以通过系统环境变量、JVM系统属性、web.xml中的servlet上下文参数来指定,甚至可以作为JNDI中的一个条目来指定。在集成测试中,可以使用spring-test模块中的@ActiveProfiles注释声明活动概要文件。
配置文件不是一个“非此即彼”的命题。您可以同时激活多个配置文件。
ctx.getEnvironment().setActiveProfiles("profile1", "profile2");
动态代理
基于接口的JDK Proxy动态代理
//创建接口实现类代理对象
Class[] interfaces = {UserDao.class};
Proxy.newProxyInstance(JDKProxy.class.getClassLoader(), interfaces,new InvocationHandler() {
    @Override
    public Object invoke(Object proxy, Method method, Object[] args)throws Throwable {
          /*
          Object proxy, 代理对象
          Method method,被代理的方法
          Object[] args,被代理方法运行时的实参
          */
        return null;
    }
});
- JDK Proxy 动态代理面向接口的动态代理,一定要有接口和实现类的存在,代理对象增强的是实现类在实现接口的方法。
- 生成的代理对象只能转换成接口,不能转换成被代理类
- 代理对象只能增强接口中定义的方法,实现类中其他和接口无关的方法是无法增强的
代理对象只能读取到接口中方法上的注解,不能读取到实现类方法上的注解
基于继承的CGlib动态代理
Person person =new Person();
// 获取一个Person的代理对象
// 1 获得一个Enhancer对象
Enhancer enhancer=new Enhancer();
// 2 设置父类字节码
enhancer.setSuperclass(person.getClass());
// 3 获取MethodIntercepter对象 用于定义增强规则
MethodInterceptor methodInterceptor=new MethodInterceptor() {
  @Override
  public Object intercept(Object o, Method method, Object[] objects, MethodProxy methodProxy) throws Throwable {
      /*
      Method method,  父类中原本要执行的方法  Person>>> eat()
      Object[] objects, 方法在调用时传入的实参数组
      MethodProxy methodProxy  子类中重写父类的方法 personProxy >>> eat()
      */
  }
};
// 4 设置methodInterceptor
enhancer.setCallback(methodInterceptor);
// 5 获得代理对象
Person personProxy = (Person)enhancer.create();
CGlib动态代理是面向父类的,和接口没有直接关系;
- CGlib动态代理不仅可以增强接口中定义的方法,还可以增强类中其他方面
- CGlib动态代理可以读取父类中所有注释
- CGlib动态代理,不能代理被final修饰的类和方法。
获取@AspectJ Proxies
```java // create a factory that can generate a proxy for the given target object AspectJProxyFactory factory = new AspectJProxyFactory(targetObject);
// add an aspect, the class must be an @AspectJ aspect // you can call this as many times as you need with different aspects factory.addAspect(SecurityManager.class);
// you can also add existing aspect instances, the type of the object supplied must be an @AspectJ aspect factory.addAspect(usageTracker);
// now get the proxy object… MyInterfaceType proxy = factory.getProxy();
<a name="LrmGt"></a>
## AOP 面向切片编程
AOP切面编程一般可以帮助我们在不修改现有代码的情况下,对程序的功能进行拓展,往往用于实现日志处理、权限控制、性能检测、事务控制等。AOP实现的原理就是动态代理,在有接口的情况下,使用JDK动态代理;在没有接口的情况下使用cglib动态代理。
<a name="ML716"></a>
### AOP中的术语辨析
<a name="siCvW"></a>
#### 连接点 Joint point
类里面那些可以被增强的方法,这些方法称之为连接点<br />表示在程序中明确定义的点,典型的包括方法调用,对类成员的访问以及异常处理程序块的执行等等,它自身还可以嵌套其它 joint point
<a name="CVf6d"></a>
#### 切入点 Pointcut
实际被增强的方法,称之为切入点<br />表示一组 joint point,这些 joint point 或是通过逻辑关系组合起来,或是通过通配、正则表达式等方式集中起来,它定义了相应的 Advice 将要发生的地方
<a name="f9wUt"></a>
#### 通知 Advice
实际增强的逻辑部分称为通知 (增加的功能)<br />Advice 定义了在 Pointcut 里面定义的程序点具体要做的操作,它通过 before、after 和 around 来区别是在每个 joint point 之前、之后还是代替执行的代码。<br />通知类型: 1 前置通知 2 后置通知 3 环绕通知 4 异常通知 5 最终通知
<a name="EJpl5"></a>
#### 目标对象 Target:被增强功能的对象(被代理的对象)
织入 Advice 的目标对象
<a name="CSLYA"></a>
#### 切面Aspect: 表现为功能相关的一些advice方法放在一起声明成的一个Java类
Aspect 声明类似于 Java 中的类声明,在 Aspect 中会包含着一些 Pointcut 以及相应的 Advice。
<a name="MAw7p"></a>
#### 织入 Weaving
创建代理对象并实现功能增强的声明并运行过程<br />将 Aspect 和其他对象连接起来, 并创建 Adviced object 的过程
<a name="WTbX6"></a>
### Spring AOP包括以下类型的通知
<a name="MN4ie"></a>
#### Before advice
在连接点之前运行的通知,但不具有阻止执行流继续到连接点的能力(除非它抛出异常)。
<a name="z2ae1"></a>
#### After returning advice
在连接点正常完成后运行的通知(例如,如果方法返回时没有抛出异常)。
<a name="gPgKn"></a>
#### After throwing advice
如果方法因抛出异常而退出,则要运行的通知。
<a name="bNkV8"></a>
#### After (finally) advice
无论连接点以何种方式退出(正常或异常返回),都要运行的通知。
<a name="IiW9K"></a>
#### Around advice
环绕连接点(如方法调用)的通知。这是最有力的建议。Around通知可以在方法调用之前和之后执行自定义行为。它还负责选择是继续到连接点,还是通过返回自己的返回值或抛出异常来简化被建议的方法的执行。
<a name="VBe5z"></a>
### 基于@AspectJ的切面编程
1、启用Spring支持,以基于@AspectJ方面配置Spring AOP<br />2、导入aspectjweaver.jar依赖
```java
@Configuration
@EnableAspectJAutoProxy
public class AppConfig {

}
<aop:aspectj-autoproxy/>
声明一个切面(Aspect)
package org.xyz;
import org.aspectj.lang.annotation.Aspect;
@Aspect
public class NotVeryUsefulAspect {

}
<bean id="myAspect" class="org.xyz.NotVeryUsefulAspect">
    <!-- configure properties of the aspect here -->
</bean>
Aspects(用@Aspect注释的类)可以有方法和字段,与任何其他类一样。它们还可以包含切入点、通知和引入(类型间)声明。
声明一个切点Pointcut
@Pointcut("execution(* transfer(..))") // the pointcut expression
private void anyOldTransfer() {} // the pointcut signature
Spring AOP支持在切入点表达式中使用以下AspectJ切入点指示符(PCD)
- execution:用于匹配方法执行连接点。这是使用Spring AOP时使用的主要切入点指示符。
- within:将匹配限制为特定类型中的连接点(使用Spring AOP时在匹配类型中声明的方法的执行)。
- this:限制匹配连接点(使用Spring AOP的方法),在那里bean引用(Spring AOP代理)是给定类型的实例。
- target:限制匹配连接点(使用Spring AOP时的方法),其中目标对象(被代理的对象)是给定类型的一个实例。
- args:限制匹配到连接点(使用Spring AOP时的方法),其中参数是给定类型的实例。
- @target:将匹配限制为连接点(使用Spring AOP时的方法),其中执行对象的类具有给定类型的注释。
- @args:限制匹配到连接点(使用Spring AOP时的方法),其中传递的参数的运行时类型具有给定类型的注释。
- @within:限制匹配具有给定注释的类型内的连接点(使用Spring AOP时,执行方法声明具有给定的注释)。
- @annotation:将匹配限制为连接点的对象(在Spring AOP中运行的方法)具有给定注释的连接点。
```java
// 任何公共方法的
execution(public (..))
// 任何名称以set开头的方法的 execution( set(..) // ccountService接口定义的任何方法
execution( com.xyz.service.AccountService.(..))
// service包中定义的任何方法 execution( com.xyz.service..*(..))
// service包中的任何连接点(仅在Spring AOP中执行方法)
within(com.xyz.service.)
// service或其子包中的任何连接点(仅在Spring AOP中执行方法)
within(com.xyz.service..)
//代理实现AccountService接口的任何连接点(仅在Spring AOP中执行方法)
this(com.xyz.service.AccountService)
// 目标对象实现AccountService接口的任何连接点(仅在Spring AOP中执行方法)
target(com.xyz.service.AccountService)
//任何接受单个参数且运行时传递的参数是可序列化的连接点(仅在Spring AOP中执行方法)
args(java.io.Serializable)
// 任何目标对象有@Transactional注释的连接点(仅在Spring AOP中执行方法) @target(org.springframework.transaction.annotation.Transactional)
// 目标对象声明的类型具有@Transactional注释的任何连接点(仅在Spring AOP中执行方法)
@within(org.springframework.transaction.annotation.Transactional)
// 任何执行方法有@Transactional注释的连接点(仅在Spring AOP中执行方法)
@annotation(org.springframework.transaction.annotation.Transactional)
// 任何接受单个参数的连接点(仅在Spring AOP中执行方法),其中传递的参数的运行时类型具有@Classified注释
@args(com.xyz.security.Classified)
// 在名为tradeService的Spring bean上的任何连接点(仅在Spring AOP中执行方法)
bean(tradeService)
// Spring bean上的任何连接点(仅在Spring AOP中执行方法),其名称与通配符表达式Service匹配
bean(Service)
<a name="abQjR"></a>
#### 切入点表达式
切入点表达式: 通过一个表达式来确定AOP要增强的是哪个或者那些方法<br />语法结构:
```java
execution([权限修饰符][返回值类型][类的全路径名][方法名](参数 列表) )

execution(* com.msb.dao.UserDaoImpl.add(..))  //指定切点为UserDaoImpl.add方法

 // 匹配方法执行连接点是否表示任何公共方法的执行。
@Pointcut("execution(public * *(..))")
private void anyPublicOperation() {}

// 如果方法执行在交易模块中,则匹配
@Pointcut("within(com.xyz.myapp.trading..*)")
private void inTrading() {}
// 匹配一个方法执行是否表示交易模块中的任何公共方法。
@Pointcut("anyPublicOperation() && inTrading()")
private void tradingOperation() {}
共享公共的切点
package com.xyz.myapp;

import org.aspectj.lang.annotation.Aspect;
import org.aspectj.lang.annotation.Pointcut;

@Aspect
public class CommonPointcuts {

    // 如果方法被定义,那么连接点就在web层中。在com.xyz.myapp.web包或任何子包的类型中下。
    @Pointcut("within(com.xyz.myapp.web..*)")
    public void inWebLayer() {}

   // 如果方法被定义,那么连接点就在service层中。在com.xyz.myapp.service包或任何子包的类型中下。
    @Pointcut("within(com.xyz.myapp.service..*)")
    public void inServiceLayer() {}

 /// 如果方法被定义,那么连接点就在dao层中。在com.xyz.myapp.dao包或任何子包的类型中下。
    @Pointcut("within(com.xyz.myapp.dao..*)")
    public void inDataAccessLayer() {}

// 业务服务是服务上定义的任何方法的执行接口。该定义假设接口放置在“service”包,并且实现类型在子包中。
// 如果按功能区域(例如,在com.xyz.myapp.abc.service和com.xyz.myapp.def.service包中)然后
// 切入点表达式“执行(* com.xyz.myapp. service.*.*(..))”可以用*来代替。
    @Pointcut("execution(* com.xyz.myapp..service.*.*(..))")
    public void businessService() {}

// 对象上定义的任何方法的执行是数据访问操作dao接口。该定义假设接口放置在"dao"包,实现类型在子包中。
    @Pointcut("execution(* com.xyz.myapp.dao.*.*(..))")
    public void dataAccessOperation() {}

}
<!--您可以在任何需要切入点表达式的地方引用在这样一个方面中定义的切入点-->

<!--要使服务层具有事务性-->
<aop:config>
  <aop:advisor
     pointcut="com.xyz.myapp.CommonPointcuts.businessService()"
     advice-ref="tx-advice"/>
</aop:config>

<tx:advice id="tx-advice">
  <tx:attributes>
    <tx:method name="*" propagation="REQUIRED"/>
  </tx:attributes>
</tx:advice>
声明一个通知(Advice)
通知与切入点表达式相关联,在切入点匹配的方法执行之前、之后或周围运行。切入点表达式可以是对命名切入点的简单引用,也可以是适当声明的切入点表达式
Before Advice
前置通知使用@Before注解
import org.aspectj.lang.annotation.Aspect;
import org.aspectj.lang.annotation.Before;

@Aspect
public class BeforeExample {
    @Before("com.xyz.myapp.CommonPointcuts.dataAccessOperation()")
    public void doAccessCheck() {
        // ...
    }
}
// ---------------------------------------------------------------------

import org.aspectj.lang.annotation.Aspect;
import org.aspectj.lang.annotation.Before;

@Aspect
public class BeforeExample {

    @Before("execution(* com.xyz.myapp.dao.*.*(..))")
    public void doAccessCheck() {
        // ...
    }
}
After returning advice
返回通知使用@AdterReturning注解 。返回属性中使用的名称必须与通知方法中的参数名称相对应。当方法执行返回时,返回值作为相应的参数值传递给advice方法。返回子句还限制只匹配那些返回指定类型值的方法执行
import org.aspectj.lang.annotation.Aspect;
import org.aspectj.lang.annotation.AfterReturning;

@Aspect
public class AfterReturningExample {

    @AfterReturning("com.xyz.myapp.CommonPointcuts.dataAccessOperation()")
    public void doAccessCheck() {
        // ...
    }
}

//--------------------------------------------------------------------------
import org.aspectj.lang.annotation.Aspect;
import org.aspectj.lang.annotation.AfterReturning;

@Aspect
public class AfterReturningExample {

    @AfterReturning(
        pointcut="com.xyz.myapp.CommonPointcuts.dataAccessOperation()",
        returning="retVal")
    public void doAccessCheck(Object retVal) {
        // ...
    }
}
After Throwing Advice
异常通知,使用@AfterThrowing注解。 在抛出属性中使用的名称必须与通知方法中的参数名称相对应。当方法执行通过抛出异常而退出时,该异常将作为相应的参数值传递给advice方法。抛出子句还将匹配限制为仅对那些抛出指定类型异的方法执行进行匹配
import org.aspectj.lang.annotation.Aspect;
import org.aspectj.lang.annotation.AfterThrowing;

@Aspect
public class AfterThrowingExample {

    @AfterThrowing("com.xyz.myapp.CommonPointcuts.dataAccessOperation()")
    public void doRecoveryActions() {
        // ...
    }
}

// ------------------------------------------------------------------------------

import org.aspectj.lang.annotation.Aspect;
import org.aspectj.lang.annotation.AfterThrowing;

@Aspect
public class AfterThrowingExample {

    @AfterThrowing(
        pointcut="com.xyz.myapp.CommonPointcuts.dataAccessOperation()",
        throwing="ex")
    public void doRecoveryActions(DataAccessException ex) {
        // ...
    }
}
After (Finally) Advice
最终通知,使用@After注解。AspectJ中的@After 通知被定义为“after finally advice”,类似于try-catch语句中的finally块。对于从连接点(用户声明的目标方法)抛出的任何结果、正常返回或异常,都将调用它,而@afterReturning只适用于成功的正常返回。
import org.aspectj.lang.annotation.Aspect;
import org.aspectj.lang.annotation.After;

@Aspect
public class AfterFinallyExample {

    @After("com.xyz.myapp.CommonPointcuts.dataAccessOperation()")
    public void doReleaseLock() {
        // ...
    }
}

// ---------------------------------------------------------------------
Around Advice
环绕通知,使用@Ariund注解。Around通知是通过使用@Around注释注释方法来声明的。该方法应该声明Object为其返回类型,并且该方法的第一个参数必须为ProceedingJoinPoint类型。
import org.aspectj.lang.annotation.Aspect;
import org.aspectj.lang.annotation.Around;
import org.aspectj.lang.ProceedingJoinPoint;

@Aspect
public class AroundExample {

    @Around("com.xyz.myapp.CommonPointcuts.businessService()")
    public Object doBasicProfiling(ProceedingJoinPoint pjp) throws Throwable {
        // start stopwatch
        Object retVal = pjp.proceed();
        // stop stopwatch
        return retVal;
    }
}
Adivice执行顺序
根据它们的通知类型按照以下顺序分配优先级:@Around、@Before、@After、@AfterReturning、@AfterThrowing。然而,请注意,@After通知方法将在同一方面的任何@AfterReturning或@AfterThrowing通知方法之后有效地被调用
基于AOP的切面编程
声明一个切面(Aspect)
你可以通过使用
<aop:config>
  <aop:aspect id="myAspect" ref="aBean">
    ...
  </aop:aspect>
</aop:config>

<bean id="aBean" class="...">
  ...
</bean>
声明一个切点(Pointcut)
您可以在
<aop:config>

    <aop:pointcut id="businessService"
        expression="execution(* com.xyz.myapp.service.*.*(..))"/>

</aop:config>
<!-------------------------------------------------------------------------------->
<aop:config>
    <aop:pointcut id="businessService"
        expression="com.xyz.myapp.CommonPointcuts.businessService()"/>
</aop:config>
切面内声明切点
<aop:config>
    <aop:aspect id="myAspect" ref="aBean">
        <aop:pointcut id="businessService"
            expression="execution(* com.xyz.myapp.service.*.*(..))"/>
        ...
    </aop:aspect>
</aop:config>
声明一个通知(Advice)
Before Advice
<aop:aspect id="beforeExample" ref="aBean">

    <aop:before
        pointcut-ref="dataAccessOperation"
        method="doAccessCheck"/>
    ...
</aop:aspect>

<!----------------------------------------->
<aop:aspect id="beforeExample" ref="aBean">

    <aop:before
        pointcut="execution(* com.xyz.myapp.dao.*.*(..))"
        method="doAccessCheck"/>
    ...
</aop:aspect>
After Returning Advice
<aop:aspect id="afterReturningExample" ref="aBean">

    <aop:after-returning
        pointcut-ref="dataAccessOperation"
        returning="retVal"
        method="doAccessCheck"/>
    ...
</aop:aspect>
After Throwing Advice
<aop:aspect id="afterThrowingExample" ref="aBean">

    <aop:after-throwing
        pointcut-ref="dataAccessOperation"
        throwing="dataAccessEx"
        method="doRecoveryActions"/>

    ...
</aop:aspect>
After (Finally) Advice
<aop:aspect id="afterFinallyExample" ref="aBean">

    <aop:after
        pointcut-ref="dataAccessOperation"
        method="doReleaseLock"/>
    ...
</aop:aspect>
Around Advice
<aop:aspect id="aroundExample" ref="aBean">

    <aop:around
        pointcut-ref="businessService"
        method="doBasicProfiling"/>
    ...
</aop:aspect>
通知方法应该声明Object为其返回类型,并且该方法的第一个参数必须为ProceedingJoinPoint类型。在通知方法的主体中,必须在ProceedingJoinPoint上调用proceed(),以便底层方法运行。
public Object doBasicProfiling(ProceedingJoinPoint pjp) throws Throwable {
    // start stopwatch
    Object retVal = pjp.proceed();
    // stop stopwatch
    return retVal;
}
DataAcess
事务管理
事务特点:原子性、一致性、隔离性、持久性
事务并发问题:脏读、不可重复读、幻读
事务隔离级别:Read Uncommit(读未提交)、Read Commited(已提交)、Repeatable Read(可重复度)、Serializable(串行化)
Spring框架事务抽象的关键是事务策略的概念,事务策略是有TransactionManager接口定义,特别是用于强制事务管理的org.springframework.transaction.PlatformTransactionManager接口和用于响应式事务管理的org.springframework.transaction.ReactiveTransactionManager接口。
getTransaction(..)方法根据TransactionDefinition参数返回一个TransactionStatus对象。如果当前调用堆栈中存在匹配的事务,则返回现有事务;不存在匹配的事务,返回的TransactionStatus则表示一个新事务;TransactionStatus接口为事务代码提供了一种简单的方式来控制事务执行和查询事务状态。
public interface PlatformTransactionManager extends TransactionManager {

    TransactionStatus getTransaction(TransactionDefinition definition) throws TransactionException;

    void commit(TransactionStatus status) throws TransactionException;

    void rollback(TransactionStatus status) throws TransactionException;
}
public interface TransactionStatus extends TransactionExecution, SavepointManager, Flushable {

    @Override
    boolean isNewTransaction();

    boolean hasSavepoint();

    @Override
    void setRollbackOnly();

    @Override
    boolean isRollbackOnly();

    void flush();

    @Override
    boolean isCompleted();
}
public interface ReactiveTransactionManager extends TransactionManager {

    Mono<ReactiveTransaction> getReactiveTransaction(TransactionDefinition definition) throws TransactionException;

    Mono<Void> commit(ReactiveTransaction status) throws TransactionException;

    Mono<Void> rollback(ReactiveTransaction status) throws TransactionException;
}
TransactionDefinition接口指定
- Propagation(事务传播机制)
- Isolation(事务隔离机制)
- Timeout(事务超时时间)
- Read-only status(是否只读)
无论您在Spring中选择声明式事务管理还是编程式事务管理,定义正确的TransactionManager实现都是绝对必要的。通常通过依赖注入来定义这个实现。
<bean id="dataSource" class="org.apache.commons.dbcp.BasicDataSource" destroy-method="close">
  <property name="driverClassName" value="${jdbc.driverClassName}" />
  <property name="url" value="${jdbc.url}" />
  <property name="username" value="${jdbc.username}" />
  <property name="password" value="${jdbc.password}" />
</bean>

<bean id="txManager" class="org.springframework.jdbc.datasource.DataSourceTransactionManager">
  <property name="dataSource" ref="dataSource"/>
</bean>
声明性事务实现的例子
// the service interface that we want to make transactional

package x.y.service;

public interface FooService {

    Foo getFoo(String fooName);

    Foo getFoo(String fooName, String barName);

    void insertFoo(Foo foo);

    void updateFoo(Foo foo);

}

package x.y.service;

public class DefaultFooService implements FooService {

    @Override
    public Foo getFoo(String fooName) {
        // ...
    }

    @Override
    public Foo getFoo(String fooName, String barName) {
        // ...
    }

    @Override
    public void insertFoo(Foo foo) {
        // ...
    }

    @Override
    public void updateFoo(Foo foo) {
        // ...
    }
}
<!-- from the file 'context.xml' -->
<?xml version="1.0" encoding="UTF-8"?>
<beans xmlns="http://www.springframework.org/schema/beans"
    xmlns:xsi="http://www.w3.org/2001/XMLSchema-instance"
    xmlns:aop="http://www.springframework.org/schema/aop"
    xmlns:tx="http://www.springframework.org/schema/tx"
    xsi:schemaLocation="
        http://www.springframework.org/schema/beans
        https://www.springframework.org/schema/beans/spring-beans.xsd
        http://www.springframework.org/schema/tx
        https://www.springframework.org/schema/tx/spring-tx.xsd
        http://www.springframework.org/schema/aop
        https://www.springframework.org/schema/aop/spring-aop.xsd">

    <!-- this is the service object that we want to make transactional -->
    <bean id="fooService" class="x.y.service.DefaultFooService"/>

    <!-- the transactional advice (what 'happens'; see the <aop:advisor/> bean below) -->
    <tx:advice id="txAdvice" transaction-manager="txManager">
        <!-- the transactional semantics... -->
        <tx:attributes>
            <!-- all methods starting with 'get' are read-only -->
            <tx:method name="get*" read-only="true"/>
            <!-- other methods use the default transaction settings (see below) -->
            <tx:method name="*"/>
        </tx:attributes>
    </tx:advice>

    <!-- ensure that the above transactional advice runs for any execution
        of an operation defined by the FooService interface -->
    <aop:config>
        <aop:pointcut id="fooServiceOperation" expression="execution(* x.y.service.FooService.*(..))"/>
        <aop:advisor advice-ref="txAdvice" pointcut-ref="fooServiceOperation"/>
    </aop:config>

    <!-- don't forget the DataSource -->
    <bean id="dataSource" class="org.apache.commons.dbcp.BasicDataSource" destroy-method="close">
        <property name="driverClassName" value="oracle.jdbc.driver.OracleDriver"/>
        <property name="url" value="jdbc:oracle:thin:@rj-t42:1521:elvis"/>
        <property name="username" value="scott"/>
        <property name="password" value="tiger"/>
    </bean>

    <!-- similarly, don't forget the TransactionManager -->
    <bean id="txManager" class="org.springframework.jdbc.datasource.DataSourceTransactionManager">
        <property name="dataSource" ref="dataSource"/>
    </bean>

    <!-- other <bean/> definitions here -->

</beans>
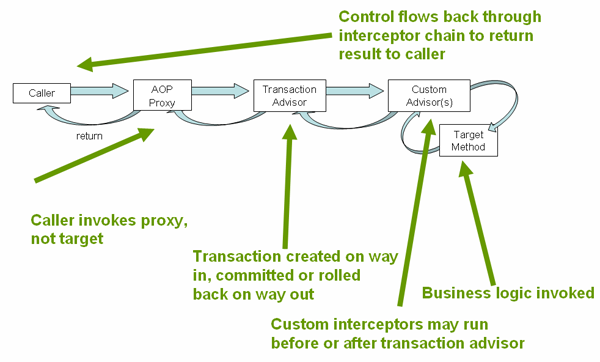
查上述配置。它假设您想要创建一个服务对象,即fooService bean,它是事务性的。要应用的事务语义封装在
注意:如果要连接的TransactionManager的bean名称为TransactionManager,则可以省略事务通知(
声明性事务的回滚
回滚规则
回滚规则确定在抛出给定异常时是否应该回滚事务,这些规则基于模式。
回滚规则可以通过Rollback -for和no-rollback-for属性在XML中配置,它们允许将模式指定为字符串。
通过rollback-for属性提供异常模式,为已检查的特定于应用程序的异常类型配置回滚
<tx:advice id="txAdvice" transaction-manager="txManager">
<tx:attributes>
<tx:method name="get*" read-only="true" rollback-for="NoProductInStockException"/>
<tx:method name="*"/>
</tx:attributes>
</tx:advice>
通过no-rollback-for属性提供异常模式,为已检查的特定于应用程序的异常类型不配置回滚
<tx:advice id="txAdvice">
<tx:attributes>
<tx:method name="updateStock" no-rollback-for="InstrumentNotFoundException"/>
<tx:method name="*"/>
</tx:attributes>
</tx:advice>
当使用@Transactional时,回滚规则可以通过rollbackFor/noRollbackFor和rollbackForClassName/noRollbackForClassName属性配置,它们允许模式分别被指定为Class引用或字符串。当一个异常类型被指定为类引用时,它的全限定名将被用作模式。因此,@Transactional(rollbackFor = example.CustomException.class)等价于rollbackForClassName = “example.CustomException”)
编程设置回滚(与spring耦合,不推荐)
public void resolvePosition() {
  try {
      // some business logic...
  } catch (NoProductInStockException ex) {
      // trigger rollback programmatically
      TransactionAspectSupport.currentTransactionStatus().setRollbackOnly();
  }
}
为不同的Bean配置不同的事务管理例子
```xml <?xml version=”1.0” encoding=”UTF-8”?>
<tx:method name="get*" read-only="true"/>
<tx:method name="*"/>
<tx:method name="*" propagation="NEVER"/>
<a name="I9YUE"></a>
#### <tx:advice/> 属性设置
| **Attribute** | **Required?** | **Default** | **Description** |
| --- | --- | --- | --- |
| name | Yes |  | 事务属性要与之关联的方法名。通配符(*)字符可用于将相同的事务属性设置与许多方法关联(例如,get*、handle*、on*Event,等等)。 |
| propagation | No | REQUIRED | 事务传播行为。 |
| isolation | No | DEFAULT | 事务隔离级别。仅适用于REQUIRED或REQUIRES_NEW的传播设置。 |
| timeout | No | -1 | 事务超时(秒)。仅适用于传播REQUIRED或REQUIRES_NEW。 |
| read-only | No | false | 读写事务与只读事务。仅适用于REQUIRED或REQUIRES_NEW。 |
| rollback-for | No |  | 触发回滚的异常实例列表,多个异常以逗号隔开。 |
| no-rollback-for | No |  | 不触发回滚的的异常实例列表,多个异常易豆浩隔开。 |

<a name="EJS7z"></a>
#### 使用@Transactional注解
@Transactional注解以使用在类上,表示类中所有方法都开启事务;也可以单独使用在方法上,表示给方法开始事务。
```java
// the service class that we want to make transactional
@Transactional
public class DefaultFooService implements FooService {

    @Override
    public Foo getFoo(String fooName) {
        // ...
    }

    @Override
    public Foo getFoo(String fooName, String barName) {
        // ...
    }

    @Override
    public void insertFoo(Foo foo) {
        // ...
    }

    @Override
    public void updateFoo(Foo foo) {
        // ...
    }
}
<!-- from the file 'context.xml' -->
<?xml version="1.0" encoding="UTF-8"?>
<beans xmlns="http://www.springframework.org/schema/beans"
       xmlns:xsi="http://www.w3.org/2001/XMLSchema-instance"
       xmlns:aop="http://www.springframework.org/schema/aop"
       xmlns:tx="http://www.springframework.org/schema/tx"
       xsi:schemaLocation="
                           http://www.springframework.org/schema/beans
                           https://www.springframework.org/schema/beans/spring-beans.xsd
                           http://www.springframework.org/schema/tx
                           https://www.springframework.org/schema/tx/spring-tx.xsd
                           http://www.springframework.org/schema/aop
                           https://www.springframework.org/schema/aop/spring-aop.xsd">

  <!-- this is the service object that we want to make transactional -->
  <bean id="fooService" class="x.y.service.DefaultFooService"/>

  <!-- enable the configuration of transactional behavior based on annotations -->
  <!-- a TransactionManager is still required -->
  <tx:annotation-driven transaction-manager="txManager"/>

  <bean id="txManager" class="org.springframework.jdbc.datasource.DataSourceTransactionManager">
    <!-- (this dependency is defined somewhere else) -->
    <property name="dataSource" ref="dataSource"/>
  </bean>

  <!-- other <bean/> definitions here -->

</beans>
@Transactional注解属性
| Property | Type | Description |
|---|---|---|
| value | String | 指定要使用的事务管理器的可选限定符 |
| transactionManager | String | 事务管理器的别名 |
| label | String[] | 事务管理器可以对标签进行评估,以将特定于实现的行为与实际事务关联起来。 |
| propagation | enum: Propagation | 事务传播行为 |
| isolation | enum: Isolation | 事务隔离级别。仅适用于REQUIRED或REQUIRES_NEW的传播设置。 |
| timeout | int (秒) | 事务超时时间。仅适用于REQUIRED或REQUIRES_NEW的传播设置。 |
| timeoutString | String (秒) | 事务超时时间。仅适用于REQUIRED或REQUIRES_NEW的传播设置。 |
| readOnly | boolean | 读写事务与只读事务。仅适用于REQUIRED或REQUIRES_NEW的值。 |
| rollbackFor | 异常类型的数组 | 导致回滚的异常类型的可选数组 |
| rollbackForClassName | 异常名称的数组 | 导致回滚的异常名称的可选数组。 |
| noRollbackFor | 异常类型的数组 | 不回滚的异常类型 |
| noRollbackForClassName | 异常名称的数组 | 不回滚的异常名称 |
事务传播行为Propagation
在spring管理的事务中,请注意物理事务和逻辑事务之间的差异,以及传播设置如何应用于这种差异。
PROPAGATION_REQUIRED
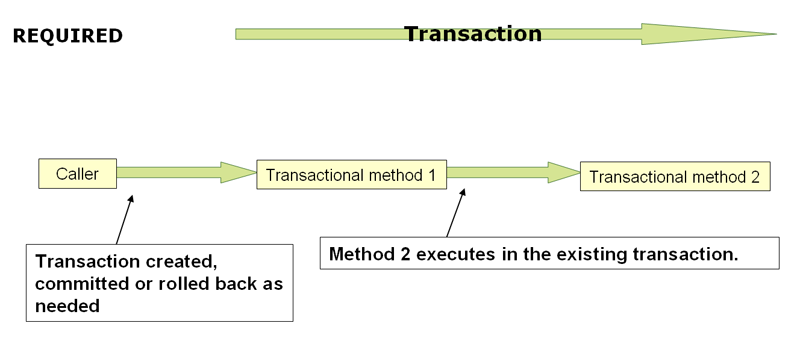
PROPAGATION_REQUIRED强制执行一个物理事务,如果没有事务存在,就新建立一个事务;如果有事务存在,就加入到这个事务中。
PROPAGATION_REQUIRES_NEW
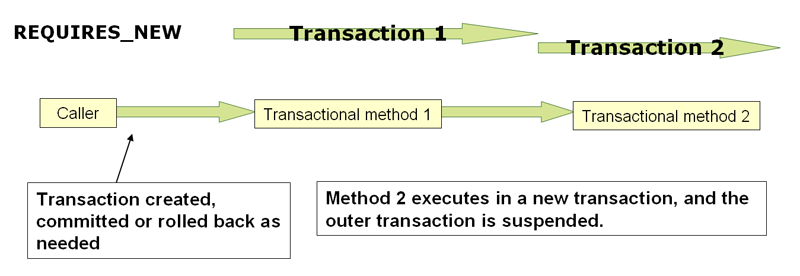
PROPAGATION_REQUIRES_NEW总是为每个受影响的事务范围使用独立的物理事务,而从不参与外部范围的现有事务。在这种安排中,底层资源事务是不同的,因此,可以独立提交或回滚,外部事务不受内部事务回滚状态的影响,内部事务完成后立即释放锁。这样一个独立的内部事务也可以声明它自己的隔离级别、超时和只读设置,而不继承外部事务的特征。
PROPAGATION_NESTED
如果当前存在事务,则在嵌套事务内执行。如果当前没有事务,则执行与PROPAGATION_REQUIRED类似的操作。
PROPAGATION_MANDATORY
PROPAGATION_SUPPORTS
PROPAGATION_NOT_SUPPORTED
PROPAGATION_NEVER
以非事务方式执行,如果当前存在事务,则抛出异常。
使用Aspecj来开启@Transactional
// construct an appropriate transaction manager
DataSourceTransactionManager txManager = new DataSourceTransactionManager(getDataSource());

// configure the AnnotationTransactionAspect to use it; this must be done before executing any transactional methods
AnnotationTransactionAspect.aspectOf().setTransactionManager(txManager);
编程式使用事务(了解)
TransactionTemplate
TransactionTemplate采用了与其他Spring模板(如JdbcTemplate)相同的方法。它使用回调方法(将应用程序代码从获取和释放事务性资源的样板中解放出来),并产生意图驱动的代码,因为您的代码只关注您想要做的事情。
public class SimpleService implements Service {

    // single TransactionTemplate shared amongst all methods in this instance
    private final TransactionTemplate transactionTemplate;

    // use constructor-injection to supply the PlatformTransactionManager
    public SimpleService(PlatformTransactionManager transactionManager) {
        this.transactionTemplate = new TransactionTemplate(transactionManager);
    }

    public Object someServiceMethod() {
        return transactionTemplate.execute(new TransactionCallback() {
            // the code in this method runs in a transactional context
            public Object doInTransaction(TransactionStatus status) {
                updateOperation1();
                return resultOfUpdateOperation2();
            }
        });
    }

    // 没有返回值
    transactionTemplate.execute(new TransactionCallbackWithoutResult() {
    protected void doInTransactionWithoutResult(TransactionStatus status) {
        updateOperation1();
        updateOperation2();
    }
});

}
回调中的代码可以通过调用提供的TransactionStatus对象上的setRollbackOnly()方法回滚事务
transactionTemplate.execute(new TransactionCallbackWithoutResult() {

    protected void doInTransactionWithoutResult(TransactionStatus status) {
        try {
            updateOperation1();
            updateOperation2();
        } catch (SomeBusinessException ex) {
            status.setRollbackOnly();
        }
    }
});
您可以通过编程方式或配置在TransactionTemplate上指定事务设置(例如传播模式、隔离级别、超时等)。默认情况下,TransactionTemplate实例具有默认的事务设置。
public class SimpleService implements Service {

    private final TransactionTemplate transactionTemplate;

    public SimpleService(PlatformTransactionManager transactionManager) {
        this.transactionTemplate = new TransactionTemplate(transactionManager);

        // the transaction settings can be set here explicitly if so desired
        this.transactionTemplate.setIsolationLevel(TransactionDefinition.ISOLATION_READ_UNCOMMITTED);
        this.transactionTemplate.setTimeout(30); // 30 seconds
        // and so forth...
    }
}
<bean id="sharedTransactionTemplate"
        class="org.springframework.transaction.support.TransactionTemplate">
    <property name="isolationLevelName" value="ISOLATION_READ_UNCOMMITTED"/>
    <property name="timeout" value="30"/>
</bean>
TransactionOperator
TransactionalOperator有两种用法:
- 使用Project Reactor类型的操作符风格(mono.as(transactionalOperator::transactional))
其他情况的回调样式(transactionalOperator.execute(TransactionCallback
)) public class SimpleService implements Service { // single TransactionOperator shared amongst all methods in this instance private final TransactionalOperator transactionalOperator; // use constructor-injection to supply the ReactiveTransactionManager public SimpleService(ReactiveTransactionManager transactionManager) { this.transactionOperator = TransactionalOperator.create(transactionManager); } public Mono<Object> someServiceMethod() { // the code in this method runs in a transactional context Mono<Object> update = updateOperation1(); return update.then(resultOfUpdateOperation2).as(transactionalOperator::transactional); } }transactionalOperator.execute(new TransactionCallback<>() { public Mono<Object> doInTransaction(ReactiveTransaction status) { return updateOperation1().then(updateOperation2) .doOnError(SomeBusinessException.class, e -> status.setRollbackOnly()); } } });transactionalOperator设置
public class SimpleService implements Service {

  private final TransactionalOperator transactionalOperator;

  public SimpleService(ReactiveTransactionManager transactionManager) {
      DefaultTransactionDefinition definition = new DefaultTransactionDefinition();

      // the transaction settings can be set here explicitly if so desired
      definition.setIsolationLevel(TransactionDefinition.ISOLATION_READ_UNCOMMITTED);
      definition.setTimeout(30); // 30 seconds
      // and so forth...

      this.transactionalOperator = TransactionalOperator.create(transactionManager, definition);
  }
}
TransactionManager
PlatformTransactionManager
对于命令式事务,您可以直接使用org.springframework.transaction.PlatformTransactionManager来管理您的事务。为此,通过一个bean引用将您使用的PlatformTransactionManager的实现传递给您的bean。然后,通过使用TransactionDefinition和TransactionStatus对象,您可以初始化事务、回滚和提交 ```java DefaultTransactionDefinition def = new DefaultTransactionDefinition(); // explicitly setting the transaction name is something that can be done only programmatically def.setName(“SomeTxName”); def.setPropagationBehavior(TransactionDefinition.PROPAGATION_REQUIRED);
TransactionStatus status = txManager.getTransaction(def); try { // put your business logic here } catch (MyException ex) { txManager.rollback(status); throw ex; } txManager.commit(status);
<a name="jLJzf"></a>
###### ReactiveTransactionManager
当处理响应式事务时,您可以直接使用org.springframework.transaction.ReactiveTransactionManager来管理您的事务。为此,通过一个bean引用将您使用的ReactiveTransactionManager的实现传递给您的bean。然后,通过使用TransactionDefinition和ReactiveTransaction对象,您可以初始化事务、回滚和提交。
```java
DefaultTransactionDefinition def = new DefaultTransactionDefinition();
// explicitly setting the transaction name is something that can be done only programmatically
def.setName("SomeTxName");
def.setPropagationBehavior(TransactionDefinition.PROPAGATION_REQUIRED);

Mono<ReactiveTransaction> reactiveTx = txManager.getReactiveTransaction(def);

reactiveTx.flatMap(status -> {

    Mono<Object> tx = ...; // put your business logic here

    return tx.then(txManager.commit(status))
            .onErrorResume(ex -> txManager.rollback(status).then(Mono.error(ex)));
});
Spring JDBC
JDBC操作数据库方法
- JdbcTemplate:是最经典也是最流行的Spring JDBC方法。这种“最低级别”的方法和其他所有方法都在幕后使用JdbcTemplate。
- NamedParameterJdbcTemplate:封装JdbcTemplate来提供命名参数,而不是传统的JDBC ?占位符。当SQL语句有多个参数时,这种方法提供了更好的文档和易用性。
SimpleJdbcInsert and SimpleJdbcCall:优化数据库元数据,限制必要配置的数量。这种方法简化了编码,因此您只需要提供表或过程的名称,并提供匹配列名的参数映射。这只在数据库提供足够的元数据时才有效。如果数据库不提供此元数据,则必须提供参数的显式配置。
Spring框架的JDBC抽象框架由四个不同的包组成
core:core包包含了JdbcTemplate类及其各种回调接口,以及各种相关类。一个名为org.springframework.jdbc.core.simple的子包包含了SimpleJdbcInsert和simplejdbcall类。另一个名为org.springframework.jdbc.core.namedparam的子包包含了NamedParameterJdbcTemplate类和相关的支持类。
- datasource:dataSource包包含一个实用程序类,用于方便的DataSource访问和各种简单的DataSource实现,您可以使用它们在Java EE容器外测试和运行未经修改的JDBC代码。一个名为org.springfamework.jdbc.datasource.embedded的子包提供了通过使用Java数据库引擎(如HSQL、H2和Derby)创建嵌入式数据库的支持。
- object:object包包含将RDBMS查询、更新和存储过程表示为线程安全的、可重用的对象的类。这种方法由JDO建模,尽管查询返回的对象自然与数据库断开连接。这个高层的JDBC抽象依赖于org.springframework.jdbc.core包中的低层抽象。
- support:支持包提供了SQLException转换功能和一些实用程序类。在JDBC处理期间抛出的异常会被转换为org.springframework.dao包中定义的异常。这意味着使用Spring JDBC抽象层的代码不需要实现JDBC或特定于rdbms的错误处理。所有转换后的异常都是未检查的,这为您提供了捕获异常的选项,您可以从中恢复异常,同时让其他异常传播到调用者。
使用JdbcTemplate
查询 query
```java public int findEmpCount() { /*查询员工个数- queryForObject 两个参数
- 1 SQL语句
- 2 返回值类型
- */ Integer empCount = jdbcTemplate.queryForObject(“select count(1) from emp”, Integer.class); return empCount; }
public Emp findByEmpno(int empno) { /*
* 查询单个员工对象
* queryForObject三个参数
* 1 SQL语句
* 2 RowMapper接口的实现类对象,用于执行返回的结果用哪个类来进行封装 ,实现类为BeanPropertyRowMapper
* 3 SQL语句中需要的参数 (可变参数)
* */
BeanPropertyRowMapper<Emp> rowMapper =new BeanPropertyRowMapper<>(Emp.class);
Emp emp = jdbcTemplate.queryForObject("select * from emp where empno =?", rowMapper, empno);
return emp;
}
public List
 * 查询多个员工对象
 * query三个参数
 * 1 SQL语句
 * 2 RowMapper接口的实现类对象,用于执行返回的结果用哪个类来进行封装 ,实现类为BeanPropertyRowMapper
 * 3 SQL语句中需要的参数 (可变参数)
 * */
BeanPropertyRowMapper<Emp> rowMapper =new BeanPropertyRowMapper<>(Emp.class);
List<Emp> emps = jdbcTemplate.query("select * from emp where deptno =?", rowMapper, deptno);
return emps;
}
<a name="ehXXX"></a>
##### 更新(增、删、改)update
```java
public int addEmp(Emp emp) {
    /*增删改
     * 统统用update方法 两个参数
     * 1 SQL语句
     * 2 SQL语句需要的参数 (可变参数)
     *
     * */
    String sql ="insert into emp values(DEFAULT ,?,?,?,?,?,?,?)";
    Object[] args ={emp.getEname(),emp.getJob(),emp.getMgr(),emp.getHiredate(),emp.getSal(),emp.getComm(),emp.getDeptno()};
    return jdbcTemplate.update(sql,args);
}

public int updateEmp(Emp emp) {
    String sql ="update emp set ename =? , job =?, mgr=? , hiredate =?, sal=?, comm=?, deptno =? where empno =?";
    Object[] args ={emp.getEname(),emp.getJob(),emp.getMgr(),emp.getHiredate(),emp.getSal(),emp.getComm(),emp.getDeptno(),emp.getEmpno()};
    return jdbcTemplate.update(sql,args);
}

public int deleteEmp(int empno) {
    String sql ="delete  from emp where empno =?";
    return jdbcTemplate.update(sql, empno);
}
批操作 batchUpdate
// 批操作  batchUpdate
public int[] deptBatchAdd(List<Dept> depts) {
    String sql ="insert into dept values(DEFAULT,?,?)";
    List<Object[]> args =new LinkedList<>();
    for (Dept dept : depts) {
        Object[] arg ={dept.getDname(),dept.getLoc()};
        args.add(arg);
    }
    return jdbcTemplate.batchUpdate(sql, args);
}

public int[] deptBatchUpdate(List<Dept> depts) {
    String sql ="update dept set dname =? ,loc =? where deptno=?";
    List<Object[]> args =new LinkedList<>();
    for (Dept dept : depts) {
        Object[] arg ={dept.getDname(),dept.getLoc(),dept.getDeptno()};
        args.add(arg);
    }
    return jdbcTemplate.batchUpdate(sql, args);
}
excute() DDL语句
//可以使用execute(..)方法运行任意SQL。因此,该方法经常用于DDL语句。
jdbcTemplate.execute("create table mytable (id integer, name varchar(100))");
连接数据库
使用DataSource(常用)
配置DriverManagerDataSource
DriverManagerDataSource dataSource = new DriverManagerDataSource();
dataSource.setDriverClassName("org.hsqldb.jdbcDriver");
dataSource.setUrl("jdbc:hsqldb:hsql://localhost:");
dataSource.setUsername("sa");
dataSource.setPassword("");
<bean id="dataSource" class="org.springframework.jdbc.datasource.DriverManagerDataSource">
  <property name="driverClassName" value="${jdbc.driverClassName}"/>
  <property name="url" value="${jdbc.url}"/>
  <property name="username" value="${jdbc.username}"/>
  <property name="password" value="${jdbc.password}"/>
</bean>
<context:property-placeholder location="jdbc.properties"/>
使用DataSourceUtils
DataSourceUtils类是一个方便而强大的助手类,它提供了从JNDI获取连接和在必要时关闭连接的静态方法。它支持线程绑定连接,例如DataSourceTransactionManager。
实现SmartDataSource接口
SmartDataSource接口应该由能够提供到关系数据库连接的类来实现。它扩展了DataSource接口,让使用它的类查询在给定操作之后是否应该关闭连接。当您知道需要重用连接时,这种用法是有效的。
使用SingleConnectionDataSource
SingleConnectionDataSource类是SmartDataSource接口的一个实现,它封装了一个在每次使用后不会关闭的连接。这不是多线程的能力。如果任何客户端代码在假设连接池时调用close(比如使用持久性工具时),则应该将suppresclose属性设置为true。此设置返回封装物理连接的关闭抑制代理。注意,您不能再将其强制转换为本机Oracle Connection或类似的对象。SingleConnectionDataSource主要是一个测试类。它通常支持在应用服务器外部与简单的JNDI环境一起进行简单的代码测试。与DriverManagerDataSource相比,它始终重用相同的连接,避免了过度创建物理连接。
使用DriverManagerDataSource
DriverManagerDataSource类是标准DataSource接口的实现,该接口通过bean属性配置普通的JDBC驱动程序,并每次返回一个新的Connection。这个实现对于Java EE容器之外的测试和独立环境非常有用,可以作为Spring IoC容器中的数据源bean,也可以与简单的JNDI环境结合使用。假设池的connection .close()调用会关闭连接,因此任何感知数据源的持久性代码都应该可以工作。然而,即使在测试环境中,使用javabean风格的连接池(如commons-dbcp)也非常容易,因此在DriverManagerDataSource上使用这样的连接池几乎总是更好的。
使用TransactionAwareDataSourceProxy
TransactionAwareDataSourceProxy是一个目标数据源的代理。代理包装了目标数据源,以添加对spring管理的事务的感知。在这方面,它类似于由Java EE服务器提供的事务JNDI数据源
使用DataSourceTransactionManager
DataSourceTransactionManager类是单个JDBC数据源的PlatformTransactionManager实现。它将指定数据源的JDBC连接绑定到当前执行的线程,从而可能允许每个数据源有一个线程连接。
应用程序代码需要通过DataSourceUtils.getConnection(DataSource)而不是Java EE的标准DataSource. getconnection来检索JDBC连接。它抛出未经检查的org.springframework.dao异常,而不是经过检查的SQLExceptions异常。所有框架类(如JdbcTemplate)都隐式地使用这个策略。如果不与此事务管理器一起使用,则查找策略的行为与通用策略完全相同。因此,它可以在任何情况下使用。
DataSourceTransactionManager类支持自定义隔离级别和超时应用,这将应用于适当的JDBC语句查询超时。为了支持它,应用程序代码必须使用JdbcTemplate或调用DataSourceUtils.applyTransactionTimeout(. .)方法。
在单资源的情况下,你可以使用这个实现代替JtaTransactionManager,因为它不需要容器支持JTA。如果您坚持使用所需的连接查找模式,那么在两者之间切换只是一个配置问题。JTA不支持自定义隔离级别。

若有收获,就点个赞吧
0 人点赞
