Solr简介
为什么使用Solr
在海量数据下,对MySQL或Oracle进行模糊查询或条件查询的效率是很低的。而搜索功能在绝大多数项目中都是必须的,如何提升搜索效率是很多互联网项目必须要考虑的问题。
既然使用关系型数据库进行搜索效率比较低,最直接的解决方案就是使用专用搜索工具进行搜索,从而提升搜索效率。常见搜索解决方案:
- 基于Apache Lucene(全文检索工具库)实现搜索。
- 基于谷歌API实现搜索。
- 基于百度API实现搜索。
Solr简介
Solr是基于Apache Lucene构建的用于搜索和分析的开源解决方案。可提供可扩展索引、搜索功能、高亮显示和文字解析功能。Solr本质就是一个Java web 项目,且内嵌了Jetty服务器,所以安装起来非常方便。客户端操作Solr的过程和平时我们所写项目一样,就是请求Solr中控制器,处理完数据后把结果响应给客户端。正向索引和反向索引
正向索引(forward index):从文档内容到词组的过程。每次搜索的实收需要搜索所有文档,每个文档比较搜索条件和词组。
| 文档 | 词组 |
|---|---|
| I am a chinese | I,am,a,chinese |
反向索引(inverted index):是正向索引的逆向。建立词组和文档的映射关系。通过找到词组就能找到文档内容。(和新华字典找字很像)
| 词组 | 文档 |
|---|---|
| I,am,a,chinese | I am a chinese |
Solr搜索原理
Solr能够提升检索效率的主要原因就是分词和索引(反向索引,通过)。
分词:会对搜索条件/存储内容进行分词,分成日常所使用的词语。
索引:存储在Solr中内容会按照程序员的要求来是否建立索引。如果要求建立索引,会把存储内容中关键字(分词)建立索引。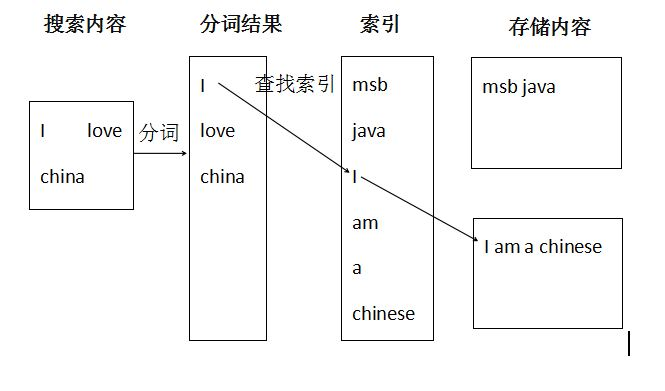
Solr为了给内容建立索引,所以Solr就必须具备数据存储能力。
所有需要被搜索的内容都需要存储在Solr中,在开发中需要把数据库中数据添加到Solr中进行初始化,每次修改数据库中数据还需要同步Solr中的数据。
Solr中数据存储是存储在Document对象中,对象中可以包含的属性和属性类型都定义在scheme.xml中。如果需要自定义属性或自定义属性类型都需要修改scheme.xml配置文件。从Solr5开始schema.xml更改名称为managed-scheme(没有扩展名)
solr内置Jetty,可以直接启动。监听8983端口。注意,solr默认不推荐root账户启动,如果是root账户启动需要添加参数-force。
如果要出去警告,可修改启动参数,设置提示SOLR_ULIMIT_CHECKS=false
cd /myprogram/solr/binvim solr.in.shSOLR_ULIMIT_CHECKS=false
启动solr后,可通过url:192.168.126.128:8983进行访问,显示solr可视化管理界面:

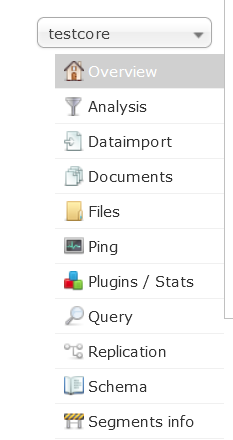
主页左侧有5个菜单,分别为:
- Dashbord:面板,显示Solr的总体信息
- Logging:日志
- Core Admin:Solr的核心(类似数据的database)
- Java Perperities:所有java相关的属性
- Thread Dump:线程相关的信息
- 如果有Core,将显示Core的信息
Solr新建Core(Add Core)
创建core文件夹(自定义目录名称)
cd /myprogram/solr/server/solr
mkdir testcore
复制配置文件(在configsets文件夹里包含了_default和sample_techproducts_configs两个文件夹,里面都是配置文件示例。_default属于默认配置,比较纯净;sample_techproducts_configs是带有一些配置示例。这里选择_default
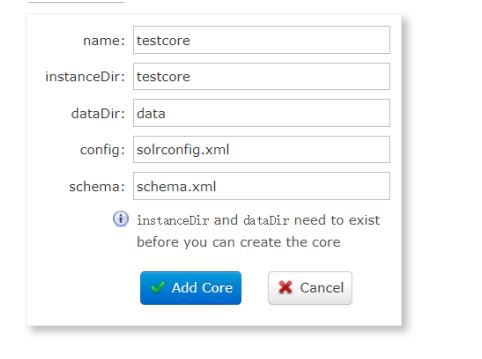
cd /myprogram/solr/server/solr
cp -r configsets/_default/conf testcore/
在solr可视化面板中Core Admin 中编写信息,然后点击Add Core 。instanceDir即是创建的核心目录。
创建成功后,可以在可视化客户端对core进行操作。同时创建core后,创建的cere文件夹中创建了core.properties文件和data文件夹。
分词Analysis
在Solr可视化管理界面中,Core的管理菜单项中都会有Analysis。表示根据Scheme.xml(managed-schema)中配置要求进行解析。对英文解析就比较简单了,只要按照空格把英文语句拆分成英文单词即可。但是如果条件是中文时,把一句话按照字进行拆分就不是很合理了。正确的方式是按照合理的词组进行拆分。对中文分词,需要使用中文分词库ik_analyzer。
配置中文分词库ik-analyzer
- 下载ik-analyzer.jar(注意版本和solr对应),上传到/myprogram/solr/server/solr-webapp/webapp/WEB-INF/lib 文件夹中
修改/myprogram/solr/server/testcore/conf/managed-schema文件,添加内容
<field name="myfield" type="text_ik" indexed="true" stored="true" />
<fieldType name="text_ik" class="solr.TextField">
<analyzer type="index">
    <tokenizer class="org.wltea.analyzer.lucene.IKTokenizerFactory" useSmart="false" conf="ik.conf"/>
    <filter class="solr.LowerCaseFilterFactory"/>
</analyzer>
<analyzer type="query">
    <tokenizer class="org.wltea.analyzer.lucene.IKTokenizerFactory" useSmart="true" conf="ik.conf"/>
    <filter class="solr.LowerCaseFilterFactory"/>
</analyzer>
</fieldType>
配置完后重启solr,即可在可视化面板是使用myfield进行中文分词:

managed-schema配置说明
```xml <?xml version=”1.0” encoding=”UTF-8” ?>
   1.0: multiValued attribute did not exist, all fields are multiValued
        by nature
   1.1: multiValued attribute introduced, false by default
   1.2: omitTermFreqAndPositions attribute introduced, true by default
        except for text fields.
   1.3: removed optional field compress feature
   1.4: autoGeneratePhraseQueries attribute introduced to drive QueryParser
        behavior when a single string produces multiple tokens.  Defaults
        to off for version >= 1.4
   1.5: omitNorms defaults to true for primitive field types
        (int, float, boolean, string...)
   1.6: useDocValuesAsStored defaults to true.
-->
       Kuromoji has a search mode (default) that does segmentation useful for search.  A heuristic
       is used to segment compounds into its parts and the compound itself is kept as synonym.

       Valid values for attribute mode are:
          normal: regular segmentation
          search: segmentation useful for search with synonyms compounds (default)
        extended: same as search mode, but unigrams unknown words (experimental)

       For some applications it might be good to use search mode for indexing and normal mode for
       queries to reduce recall and prevent parts of compounds from being matched and highlighted.
       Use <analyzer type="index"> and <analyzer type="query"> for this and mode normal in query.

       Kuromoji also has a convenient user dictionary feature that allows overriding the statistical
       model with your own entries for segmentation, part-of-speech tags and readings without a need
       to specify weights.  Notice that user dictionaries have not been subject to extensive testing.

       User dictionary attributes are:
                 userDictionary: user dictionary filename
         userDictionaryEncoding: user dictionary encoding (default is UTF-8)

       See lang/userdict_ja.txt for a sample user dictionary file.

       Punctuation characters are discarded by default.  Use discardPunctuation="false" to keep them.
    -->
  <tokenizer class="solr.JapaneseTokenizerFactory" mode="search"/>
  <!--<tokenizer class="solr.JapaneseTokenizerFactory" mode="search" userDictionary="lang/userdict_ja.txt"/>-->
  <!-- Reduces inflected verbs and adjectives to their base/dictionary forms (辞書形) -->
  <filter class="solr.JapaneseBaseFormFilterFactory"/>
  <!-- Removes tokens with certain part-of-speech tags -->
  <filter class="solr.JapanesePartOfSpeechStopFilterFactory" tags="lang/stoptags_ja.txt" />
  <!-- Normalizes full-width romaji to half-width and half-width kana to full-width (Unicode NFKC subset) -->
  <filter class="solr.CJKWidthFilterFactory"/>
  <!-- Removes common tokens typically not useful for search, but have a negative effect on ranking -->
  <filter class="solr.StopFilterFactory" ignoreCase="true" words="lang/stopwords_ja.txt" />
  <!-- Normalizes common katakana spelling variations by removing any last long sound character (U+30FC) -->
  <filter class="solr.JapaneseKatakanaStemFilterFactory" minimumLength="4"/>
  <!-- Lower-cases romaji characters -->
  <filter class="solr.LowerCaseFilterFactory"/>
</analyzer>
      This dictionary was built with MeCab, it defines a format for the features adapted
      for the Korean language.

      Nori also has a convenient user dictionary feature that allows overriding the statistical
      model with your own entries for segmentation, part-of-speech tags and readings without a need
      to specify weights. Notice that user dictionaries have not been subject to extensive testing.

      The tokenizer supports multiple schema attributes:
        * userDictionary: User dictionary path.
        * userDictionaryEncoding: User dictionary encoding.
        * decompoundMode: Decompound mode. Either 'none', 'discard', 'mixed'. Default is 'discard'.
        * outputUnknownUnigrams: If true outputs unigrams for unknown words.
    -->
  <tokenizer class="solr.KoreanTokenizerFactory" decompoundMode="discard" outputUnknownUnigrams="false"/>
  <!-- Removes some part of speech stuff like EOMI (Pos.E), you can add a parameter 'tags',
      listing the tags to remove. By default it removes:
      E, IC, J, MAG, MAJ, MM, SP, SSC, SSO, SC, SE, XPN, XSA, XSN, XSV, UNA, NA, VSV
      This is basically an equivalent to stemming.
    -->
  <filter class="solr.KoreanPartOfSpeechStopFilterFactory" />
  <!-- Replaces term text with the Hangul transcription of Hanja characters, if applicable: -->
  <filter class="solr.KoreanReadingFormFilterFactory" />
  <filter class="solr.LowerCaseFilterFactory" />
</analyzer>
<a name="M2SCB"></a>
##### < fieldType/>
```xml
<fieldType name="text_ik" class="solr.TextField">
    <analyzer type="index">
        <tokenizer class="org.wltea.analyzer.lucene.IKTokenizerFactory" useSmart="false" conf="ik.conf"/>
        <filter class="solr.LowerCaseFilterFactory"/>
    </analyzer>
    <analyzer type="query">
        <tokenizer class="org.wltea.analyzer.lucene.IKTokenizerFactory" useSmart="true" conf="ik.conf"/>
        <filter class="solr.LowerCaseFilterFactory"/>
    </analyzer>
</fieldType>
表示定义一个属性类型。在Solr中属性类型都是自定义的。在上面配置中name=”text_ik”为自定义类型。当某个属性取值为text_ik时IK Analyzer才能生效。
< field/>
<field name="myfield" type="text_ik" indexed="true" stored="true" />
表示向Document中添加一个属性。常用属性:
- name:属性名
- type:属性类型。所有类型都是solr使用配置的
- indexed:是否建立索引
- stored::solr是否把该属性值响应给搜索用户。
- required:该属性是否是必须的。默认id是必须的。
multiValued:如果为true,表示该属性为复合属性,此属性中包含了多个其他的属性。常用在多个列作为搜索条件时,把这些列定义定义成一个新的复合属性,通过搜索一个复合属性就可以实现搜索多个列。当设置为true时与< copyField source=”” dest=””/>结合使用
< uniqueKey>
唯一主键,Solr中默认定义id属性为唯一主键。ID的值是不允许重复的。
< dynamicField>
名称中允许*进行通配。代表满足特定名称要求的一组属性。如:
msb_bigdata
- msb_UI
- msb_*
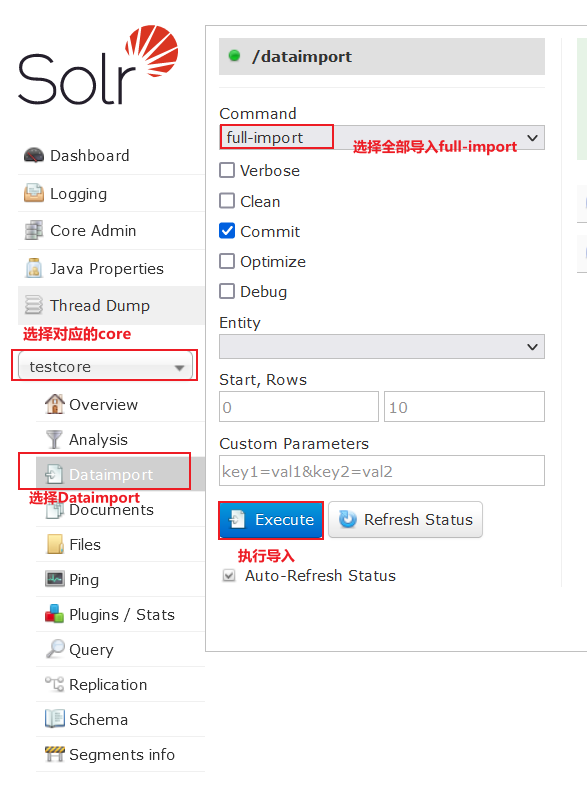
导入数据Dataimport
- 可以使用Solr自带的Dataimport功能把数据库中数据快速导入到solr中。必须保证managed-schema和数据库中表的列对应。


修改solrconfig.xml,配置数据导入的处理器
<!-- 配置数据导入的处理器 -->
<requestHandler name="/dataimport" class="org.apache.solr.handler.dataimport.DataImportHandler">
<lst name="defaults">
<!--  加载data-config.xml-->
<str name="config">data-config.xml</str>
</lst>
</requestHandler>
在同级目录下创建data-config.xml文件
```xml <?xml version=”1.0” encoding=”UTF-8”?>
<document>
  <!--多个表格,添加多个<entity>字段-->
    <entity name="product" query="SELECT id,name,price from t_product">
    <!-- 实现数据库的列和索引库的字段的映射
    column 指定数据库的列表
    name 指定索引库的字段名字,必须和schema.xml中定义的一样
    -->
        <field column="id" name="id"/>
        <field column="name" name="name"/>
        <field column="price" name="price"/>
    </entity>
</document>
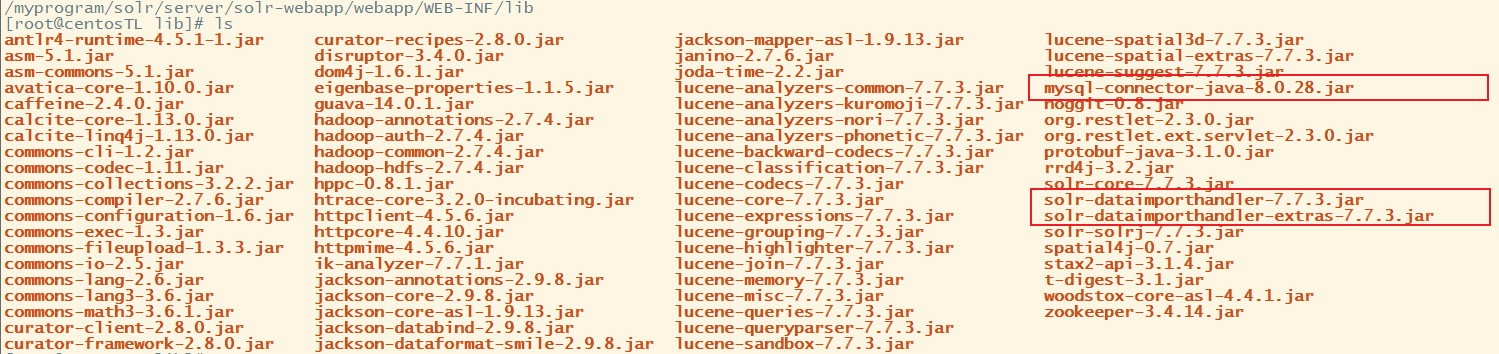
4. 向/myprogram/solr/server/solr-webapp/webapp/WEB-INF/lib下导入3个依赖,其中2个在/myprogram/solr/dist目录中,为 solr-dataimporthandler-7.7.3.jar、solr-dataimporthandler-extras-7.7.3.jar,还有一个数据库驱动mysql-connector-java-8.0.28.jar
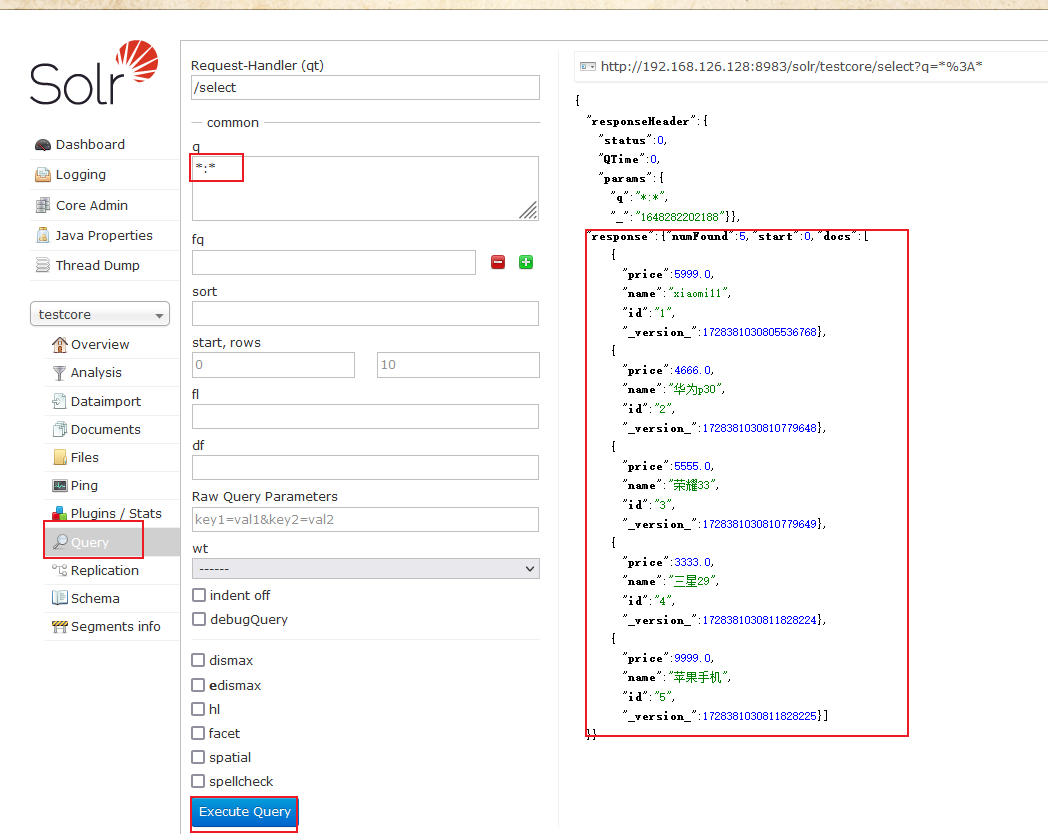
5. 重启solr,在可视化面板进行数据导入,导入完成后进行query查看,mysql数据已经全部导入solr testcore中
<a name="DN2pV"></a>
### solr查询Query
| **参数** | **描述** |
| --- | --- |
| q | 查询条件,必填项 |
| fq | 过滤查询。该参数可将查询的结果限定在某一范围,由于 Solr 会对过滤查询进行缓存,因此它可以显著提升复杂查询的效率 |
| sort | 排序 |
| start | 结果集第一条记录的偏移位置,用于分页,默认为 0 |
| rows | 每页显示几行数据 |
| fl | 指定返回字段,多个字段用逗号或空格分隔,默认返回所有字段 |
| wt | 指定输出格式,例如xml、json等 |
| hl | 高亮 |
<a name="hjzsR"></a>
### 菜单选项Documents
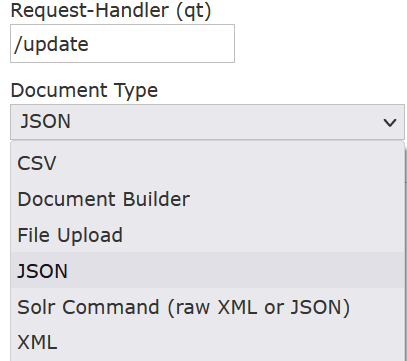<br />request-handler是选择/update,Document Type有多种格式,常用Json 和 XML(JSON只能实现更新和新增,无法删除,如果删除使用XML格式)
```json
// 新增
{id:9,name:"手机号或或或或或或":price:99}
// 更新
{id:9,name:"手机号":price:99}
//json模式无法执行删除,使用xml模式进行删除
// 新增
<doc>
  <id>9</id>
  <name>王者</name>
  <price>666566</price>
</doc>

// 新增
<doc>
  <id>9</id>
  <name>平安街</name>
  <price>666566</price>
</doc>

// 删除 Document Type 使用xml
// 根据id删除
<delete>
  <id>9</id>
</delete>
<commit/>

// 根据查询条件删除
<delete>
    <query>*:*</query>
</delete>
<commit/>
使用SolrJ操作Solr
导入SolrJ依赖
<?xml version="1.0" encoding="UTF-8"?>
<project xmlns="http://maven.apache.org/POM/4.0.0"
         xmlns:xsi="http://www.w3.org/2001/XMLSchema-instance"
         xsi:schemaLocation="http://maven.apache.org/POM/4.0.0 http://maven.apache.org/xsd/maven-4.0.0.xsd">
    <modelVersion>4.0.0</modelVersion>

    <groupId>org.example</groupId>
    <artifactId>solr</artifactId>
    <version>1.0-SNAPSHOT</version>

    <properties>
        <maven.compiler.source>8</maven.compiler.source>
        <maven.compiler.target>8</maven.compiler.target>
    </properties>
    <dependencies>
        <dependency>
            <groupId>org.apache.solr</groupId>
            <artifactId>solr-solrj</artifactId>
            <version>7.7.3</version>
        </dependency>
    </dependencies>
</project>
package com.msb.solrtest;

import org.apache.solr.client.solrj.SolrServerException;
import org.apache.solr.client.solrj.impl.HttpSolrClient;
import org.apache.solr.common.SolrInputDocument;

import java.io.IOException;
import java.util.HashMap;
import java.util.Map;

/**
* @author :Administrator
* @date :2022/3/26 0026
*/
public class DemoTest {
    // solr对应core的URL地址
    private static final String URL = "http://192.168.126.128:8983/solr/testcore";

    public static void main(String[] args) {
        // 获取solr客户端
        HttpSolrClient httpSolrClient = new HttpSolrClient.Builder(URL).build();

        Map<String,Object> params = new HashMap<>();
        params.put("id",11);
        params.put("name","宇宙无敌好用手机");
        params.put("price",99999);
        update(httpSolrClient,params);

    }

    private static void update(HttpSolrClient httpSolrClient, Map<String,Object> params) {
        SolrInputDocument inputDocument = new SolrInputDocument();
        // 新增/修改实现
        for (String key : params.keySet()) {
            inputDocument.addField(key, params.get(key));
        }
        try {
            httpSolrClient.add(inputDocument);
            httpSolrClient.commit();
        } catch (SolrServerException | IOException e) {
            e.printStackTrace();
        } finally {
            try {
                httpSolrClient.close();
            } catch (IOException e) {
                e.printStackTrace();
            }
        }
    }
}
public class DemoTest {
     // solr对应core的URL地址
    private static final String URL = "http://192.168.126.128:8983/solr/testcore";
    public static void main(String[] args) {
        // 获取solr客户端
        HttpSolrClient httpSolrClient = new HttpSolrClient.Builder(URL).build();
        try {
            // 通过id进行删除
            httpSolrClient.deleteById("10");
            httpSolrClient.commit();
        } catch (SolrServerException | IOException e) {
            e.printStackTrace();
        } finally {
            try {
                httpSolrClient.close();
            } catch (IOException e) {
                e.printStackTrace();
            }
        }
    }
}
public class DemoTest {
    private static final String URL = "http://192.168.126.128:8983/solr/testcore";

    public static void main(String[] args) {

        HttpSolrClient httpSolrClient = new HttpSolrClient.Builder(URL).build();

        SolrQuery queryParam = new SolrQuery();
        // 设置查询条件
        queryParam.setQuery("name:手机");
        // 设置排序规则
        queryParam.setSort("id", SolrQuery.ORDER.desc);
        // 设置分页
        queryParam.setStart(0);
        queryParam.setRows(2);
        // 设置高亮规则
        queryParam.setHighlight(true);
        queryParam.addHighlightField("name");
        queryParam.setHighlightSimplePre("<span>");
        queryParam.setHighlightSimplePost("</span>");

        try {
            QueryResponse response = query(httpSolrClient, queryParam);
            SolrDocumentList results = response.getResults();
            System.out.println("查询结果条数:" + results.getNumFound());
            for (SolrDocument result : results) {
                System.out.println(result);
            }

            System.out.println("高亮------");

            Map<String, Map<String, List<String>>> highlighting = response.getHighlighting();
            for (String key : highlighting.keySet()) {
                Map<String, List<String>> map = highlighting.get(key);
                for (String subKey : map.keySet()) {
                    System.out.print("id=" + key + " " + subKey + "=");
                    map.get(subKey).forEach(System.out::println);
                }
            }
        } catch (SolrServerException | IOException e) {
            e.printStackTrace();
        } finally {
            try {
                httpSolrClient.close();
            } catch (IOException e) {
                e.printStackTrace();
            }
        }

    }

    private static QueryResponse query(HttpSolrClient httpSolrClient, SolrQuery queryParam) throws SolrServerException, IOException {
        return httpSolrClient.query(queryParam);
    }
}
Spring Data for Apache Solr
Spring Data 是Spring的顶级项目。里面包含了N多个二级子项目,每个子项目对应一种技术或工具。其目的为了让数据访问更加简单,更加方便的和Spring进行整合。Spring Data 项目如果单独使用是还需要配置XML配置文件的,当和Spring Boot整合后使用起来非常方便。spring-boot-starter-data-xx就是对应的启动器。
<dependency>
  <groupId>org.springframework.boot</groupId>
  <artifactId>spring-boot-starter-data-solr</artifactId>
  <version>2.4.13</version>
</dependency>
@Configuration(proxyBeanMethods = false)
@ConditionalOnClass({ HttpSolrClient.class, CloudSolrClient.class })
@EnableConfigurationProperties(SolrProperties.class)
public class SolrAutoConfiguration {
    @Bean
    @ConditionalOnMissingBean
    public SolrClient solrClient(SolrProperties properties) {
        if (StringUtils.hasText(properties.getZkHost())) {
            return new CloudSolrClient.Builder(Arrays.asList(properties.getZkHost()), Optional.empty()).build();
        }
        return new HttpSolrClient.Builder(properties.getHost()).build();
    }
}
// 导入的依赖,看SolrAutoConfiguration源码,没有自动创建SolrTenplate,只创建SolrClient,
// 如果需要使用主动注入SolrTemplate,需要配置
@Configuration
public class SolrConfig {
    @Bean
    public SolrTemplate getSolrTemplate(SolrClient solrClient) {
        return new SolrTemplate(solrClient);
    }
}
@Autowired
private SolrTemplate solrTemplate;

@Test
public void testInsert() {
    SolrInputDocument doc = new SolrInputDocument();
    doc.setField("id", 13);
    doc.setField("name", "这是一个手机");
    doc.setField("price", 9999);
    UpdateResponse ur = solrTemplate.saveBean("testcore", doc);
    if (ur.getStatus() == 0) {
        System.out.println("成功");
    } else {
        System.out.println("失败");
    }
    solrTemplate.commit("testcore");
    }
@Test
public void testDelete() {
    UpdateResponse ur = solrTemplate.deleteByIds("testcore", "1");
    if (ur.getStatus() == 0) {
        System.out.println("成功");
    } else {
        System.out.println("失败");
    }
    solrTemplate.commit("testcore");
}
@Test
public void query() {
    SimpleHighlightQuery query = new SimpleHighlightQuery();
    Criteria c = new Criteria("name");
    c.is("手机");
    query.addCriteria(c);
    query.setOffset(0L);
    query.setRows(10);
    HighlightOptions highlightOptions = new HighlightOptions();
    highlightOptions.addField("name");
    highlightOptions.setSimplePrefix("<span>");
    highlightOptions.setSimplePostfix("</span>");
    query.setHighlightOptions(highlightOptions);

    ScoredPage<Product> sp = solrTemplate.queryForPage("testcore", query, Product.class);
    System.out.println(sp.getContent());

    System.out.println("++++++++++++++高亮查询+++++++++++++++");
    HighlightPage<Product> respose = solrTemplate.queryForHighlightPage("testcore", query, Product.class);
    List<Product> products = respose.getContent();
    for (Product product : products) {
        System.out.println(product);
    }

    System.out.println("================高亮部分================");
    List<HighlightEntry<Product>> highlighted = respose.getHighlighted();
    for (HighlightEntry<Product> productHighlightEntry : highlighted) {
        for (HighlightEntry.Highlight highlight : productHighlightEntry.getHighlights()) {
            for (String snipplet : highlight.getSnipplets()) {
                System.out.println(snipplet);
            }
        }
    }
}
@Test
public void queryHL() {
    List<Product> listResult = new ArrayList<>();
    SimpleHighlightQuery query = new SimpleHighlightQuery();
    //设置查询条件
    Criteria c = new Criteria("name");
    c.is("手机");
    query.addCriteria(c);
    //分页
    query.setOffset(0L);
    query.setRows(10);
    //排序
    List<String> propertis = new ArrayList<>();
    propertis.add("id");
    Sort sort = Sort.by(Sort.Direction.DESC, "id");
    query.addSort(sort);
    //高亮设置
    HighlightOptions hlo = new HighlightOptions();
    hlo.addField("name");
    hlo.setSimplePrefix("<span style='color:red;'>");
    hlo.setSimplePostfix("</span>");
    query.setHighlightOptions(hlo);
    HighlightPage<Product> hl = solrTemplate.queryForHighlightPage("testcore", query, Product.class);

    List<HighlightEntry<Product>> highlighted = hl.getHighlighted();
    for (HighlightEntry<Product> hle : highlighted) {
        List<HighlightEntry.Highlight> list = hle.getHighlights();
        Product dp = hle.getEntity();
        for (HighlightEntry.Highlight h : list) {//一个对象里面可能多个属性是高亮属性
            if (h.getField().getName().equals("name")) {
                dp.setName(h.getSnipplets().get(0));
            }
        }
        listResult.add(dp);
    }
    System.out.println(listResult);
}
Zookeeper管理Solr集群
搭建Zookeeper集群
- 创建目录,将单机版zookeeper复制三份,分别为zoo1、zoo2、zoo3 ```bash mkdir /myprogram/zookeerper-cluster
cp /myprogram/tmp/zookeeper /myprogram/zookeerper-cluster/zoo1 cp /myprogram/tmp/zookeeper /myprogram/zookeerper-cluster/zoo2 cp /myprogram/tmp/zookeeper /myprogram/zookeerper-cluster/zoo3
2.  在zoo1、zoo2、zoo3 中分别创建data目录,在data中创建myid,分别写入1、2、3
```bash
cd  /myprogram/zookeerper-cluster/zoo1
mkdir data
vim myid
# vim模式写入1

cd  /myprogram/zookeerper-cluster/zoo2
mkdir data
vim myid
# vim模式写入2

cd  /myprogram/zookeerper-cluster/zoo3
mkdir data
vim myid
# vim模式写入3
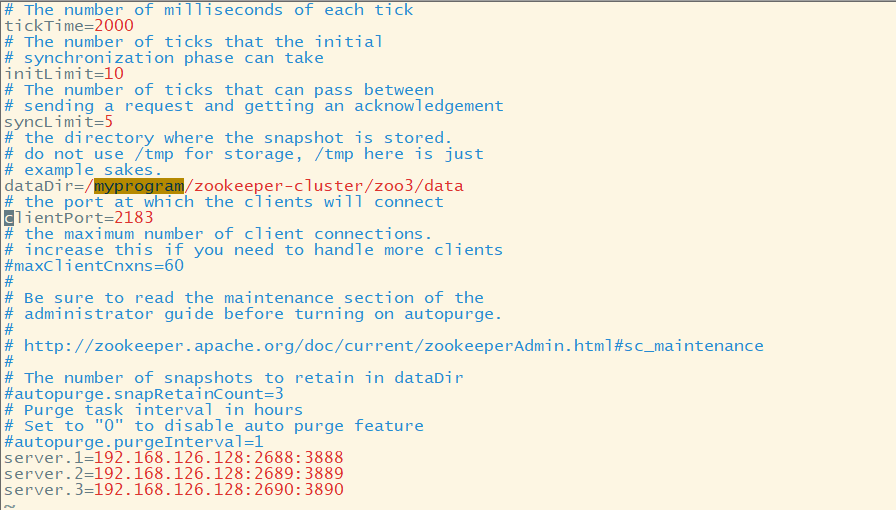
- 进行配置文件修改
```bash
zoo1
cd /myprogram/zookeerper-cluster/zoo1/conf cp zoo_sample.cfg zoo.cfg vim zoo.cfgvim编辑模式,修改dataDir 和clientPort,并添加
dataDir=/myprogram/zookeerper-cluster/zoo1/data clientPort=2181
server.1=192.168.126.128:2688:3888 server.2=192.168.126.128:2689:3889 server.3=192.168.126.128:10:2690:3890
zoo2
cd /myprogram/zookeerper-cluster/zoo2/conf cp zoo_sample.cfg zoo.cfg vim zoo.cfg
vim编辑模式,修改dataDir 和clientPort,并添加
dataDir=/myprogram/zookeerper-cluster/zoo2/data clientPort=2182
server.1=192.168.126.128:2688:3888 server.2=192.168.126.128:2689:3889 server.3=192.168.126.128:10:2690:3890
zoo3
cd /myprogram/zookeerper-cluster/zoo3/conf cp zoo_sample.cfg zoo.cfg vim zoo.cfg
vim编辑模式,修改dataDir 和clientPort,并添加
dataDir=/myprogram/zookeerper-cluster/zoo3/data clientPort=2183
server.1=192.168.126.128:2688:3888 server.2=192.168.126.128:2689:3889 server.3=192.168.126.128:10:2690:3890
 <br />启动3个zookeeper
```bash
cd /myprogram/zookeeper-cluster/zoo1/bin
./zkServer.sh start
cd /myprogram/zookeeper-cluster/zoo2/bin
./zkServer.sh start
cd /myprogram/zookeeper-cluster/zoo3/bin
./zkServer.sh start
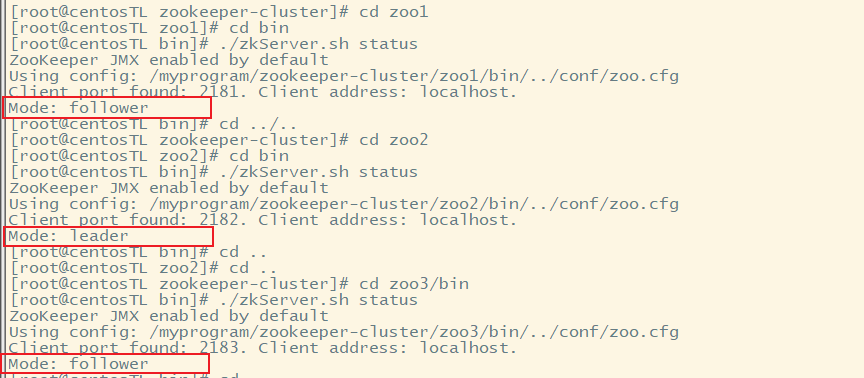
##查看状态
cd /myprogram/zookeeper-cluster/zoo1/bin
./zkServer.sh status
cd /myprogram/zookeeper-cluster/zoo2/bin
./zkServer.sh status
cd /myprogram/zookeeper-cluster/zoo3/bin
./zkServer.sh status
SolrCloud
Solr可以搭建具备容错能力和高可用的Solr集群。集群中集群配置、自动负载均衡和查询故障转移、Zookeeper集群实现集群协调管理,这些全部功能统称为SolrCloud。SolrCloud是基于Zookeeper进行管理的。在Solr中已经内置了Zookeeper相关内容,当执行集群创建命令会自动创建Zookeeper相关内容。这个使用的是Zookeeper的集群管理功能实现的。
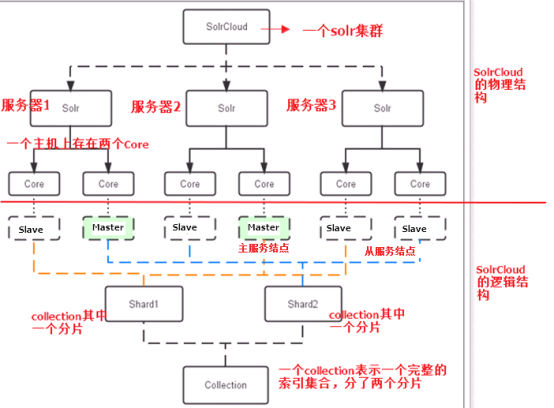
- 物理结构
三个Solr实例( 每个实例包括两个Core),组成一个SolrCloud。
- 逻辑结构
索引集合包括两个Shard(shard1和shard2),shard1和shard2分别由三个Core组成,其中一个Leader两个Replication,Leader是由zookeeper选举产生,zookeeper控制每个shard上三个Core的索引数据一致,解决高可用问题。 用户发起索引请求分别从shard1和shard2上获取,解决高并发问题。
- collection
Collection在SolrCloud集群中是一个逻辑意义上的完整的索引结构。它常常被划分为一个或多个Shard(分片),它们使用相同的配置信息。 比如:针对商品信息搜索可以创建一个collection。 collection=shard1+shard2+….+shardX
- Core
每个Core是Solr中一个独立运行单位,提供 索引和搜索服务。一个shard需要由一个Core或多个Core组成。由于collection由多个shard组成所以collection一般由多个core组成。
- Master或Slave
Master是master-slave结构中的主结点(通常说主服务器),Slave是master-slave结构中的从结点(通常说从服务器或备服务器)。同一个Shard下master和slave存储的数据是一致的,这是为了达到高可用目的。
- Shard
Collection的逻辑分片。每个Shard被化成一个或者多个replication,通过选举确定哪个是Leader。 注意:collection就是一个完整的索引库,分片存储,有两片,两片的内容不一样的。一片存储在三个节点,一主两从,他们之间的内容就是一样的。
创建
SolrCloud已经包含在了Solr中,可以直接启动Solr集群。
# ./solr -e cloud -noprompt -force
此命令等同于# ./solr -e cloud -force全部参数为默认值。运行成功后会在example文件夹多出cloud文件夹。
停止
# ./solr stop -all
重新运行
# ./solr start -c -p 8983 -s ../example/cloud/node1/solr/ -force
#./solr start -c -p 7574 -z localhost:9983 -s ../example/cloud/node2/solr/ -force

若有收获,就点个赞吧
0 人点赞
