Redis 单机使用三大问题:单点故障、容量有限、连接压力。
通过主从复制、sentinel监控Master-replica集群状态,实现自动转移故障实现Redis高可用,可以解决Redis单点故障问题。解决容量有限问题,可以采用(1)根据业务拆分数据,存储与不同的Redis主从集群,(2)根据数据优先级对同类业务数据进行分片存储。
Redis数据分片存储
client端根据业务拆分

- 当单个业务数据无法拆分,更通过对数据进行分区存储
- 采用hash取模的方式

采用hasn+取模的方式,可以比较简单地实现数据分区存储,但是其缺点是影响redis集群的动态扩展性,如果增加Redis主从集群,同一个key进行hash取模操作,结果会不同,这样就无法取到数据,就需要对全量数据重新取模操作。
可采取预分区的策略,提前规划多余的Redis,做好映射。实际加入进来时只需将一定的槽位数据转移到新的Redis主从集群中即可,避免全量数据重写的问题。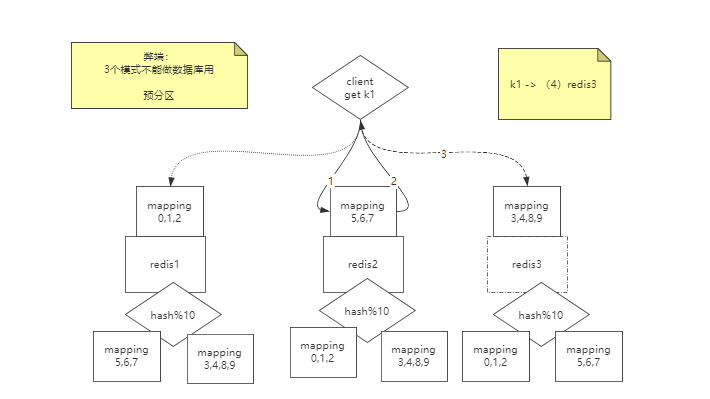
也可采取随机分区存储

随机存储是无法知道知道数据存在哪个Redis主从集群的,但是对于类型消息队列的应用场景还是比较有用的。存储数据是LPUSH,提取数据是RPOP操作。
采取一致性hash
将每个Redis主从集群的hash映射到环上,为物理节点;存储的key按相同hash算法映射到环上,顺时针(或逆时针)存储在最近物理节点的Redis主从节点上。 需要注意,为避免数据倾斜,需要多个虚拟节点映射到物理节点上。 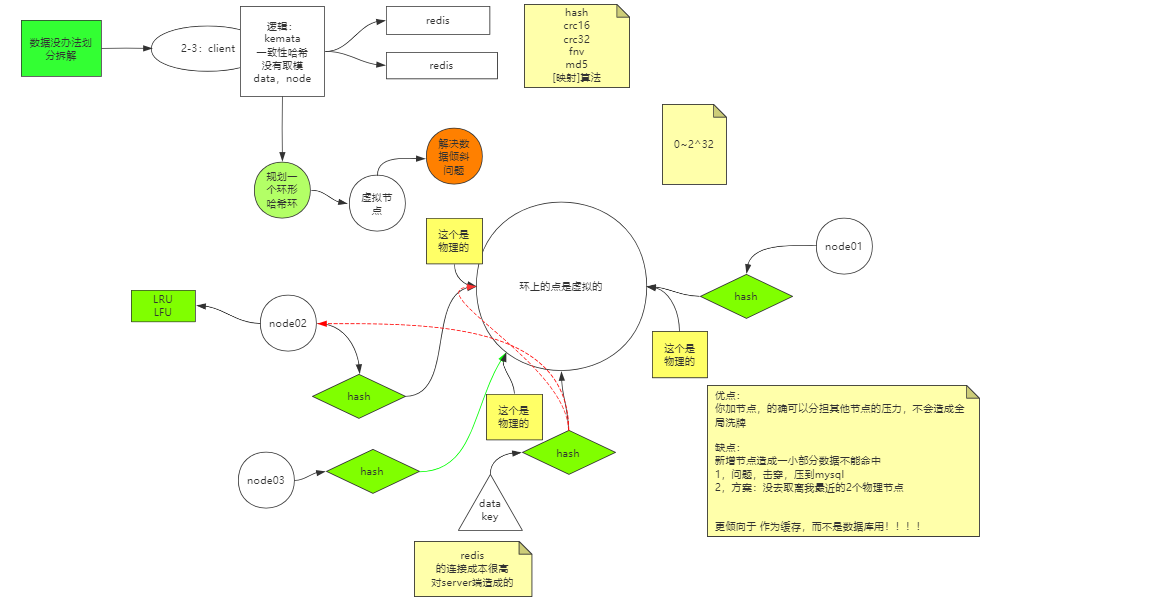
一致性hash的优点:加节点,可以分担其他节点的压力,不会造成全局洗牌
缺点:新增节点造成一小部分数据不能命中,会造成击穿出现,将流量压力压到mysql。解决方案是方案:每次取数据区离我最近的2个物理节点。
- 如果Redis被当做缓存使用,使用一致性哈希实现动态扩容缩容。
如果Redis被当做一个持久化存储使用,必须使用固定的keys-to-nodes映射关系,节点的数量一旦确定不能变化。
不同的分区实现方案
分区可以在程序的不同层次实现。
客户端分区就是在客户端就已经决定数据会被存储到哪个redis节点或者从哪个redis节点读取。大多数客户端已经实现了客户端分区。
- 代理分区 意味着客户端将请求发送给代理,然后代理决定去哪个节点写数据或者读数据。代理根据分区规则决定请求哪些Redis实例,然后根据Redis的响应结果返回给客户端。redis和memcached的一种代理实现就是Twemproxy
查询路由(Query routing) 的意思是客户端随机地请求任意一个redis实例,然后由Redis将请求转发给正确的Redis节点。Redis Cluster实现了一种混合形式的查询路由,但并不是直接将请求从一个redis节点转发到另一个redis节点,而是在客户端的帮助下直接redirected到正确的redis节点。
代理分区—Twemproxy
https://github.com/twitter/twemproxy
twemproxy 也叫 nutcracker,是 Twtter 开源的一个快速、轻量级的 Redis 和 Mencached 代理服务器,主要用于管理 Redis 和 memcached 集群,减少到后端缓存服务器的连接数量。
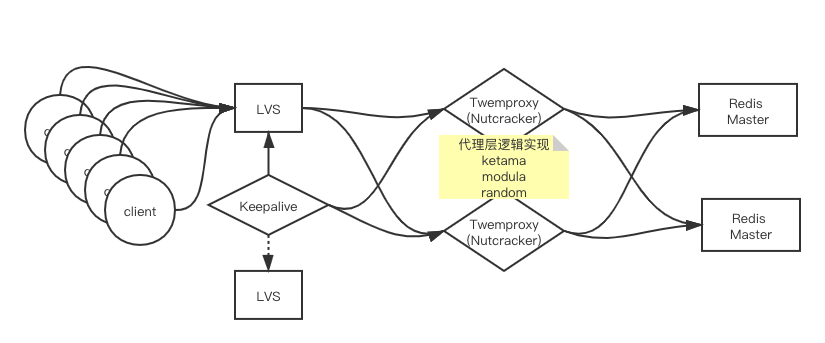
Twemproxy是一种代理分片机制,Twemproxy作为代理,可接受来自多个程序的访问,按照路由规则,转发给后台的各个Redis服务器,再原路返回。这个方案顺理成章地解决了单个Redis实例承载能力的问题。其特点:轻量级、快速
- 保持长连接
- 减少了直接与缓存服务器连接的连接数量
- 使用 pipelining 处理请求和响应
- 支持代理到多台服务器上
- 同时支持多个服务器池
- 自动分片数据到多个服务器上
- 实现完整的 memcached 的 ASCII 和再分配协议
- 通过 yaml 文件配置服务器池
- 支持多个哈希模式,包括一致性哈希和分布
- 能够配置删除故障节点
- 可以通过端口监控状态
- 支持 linux, *bsd,os x 和 solaris
Twemproxy使用
Github下载源码
git https://github.com/twitter/twemproxy.git
查看readme 文档,根据提示进行编译操作,编译前需要安装automake libtool
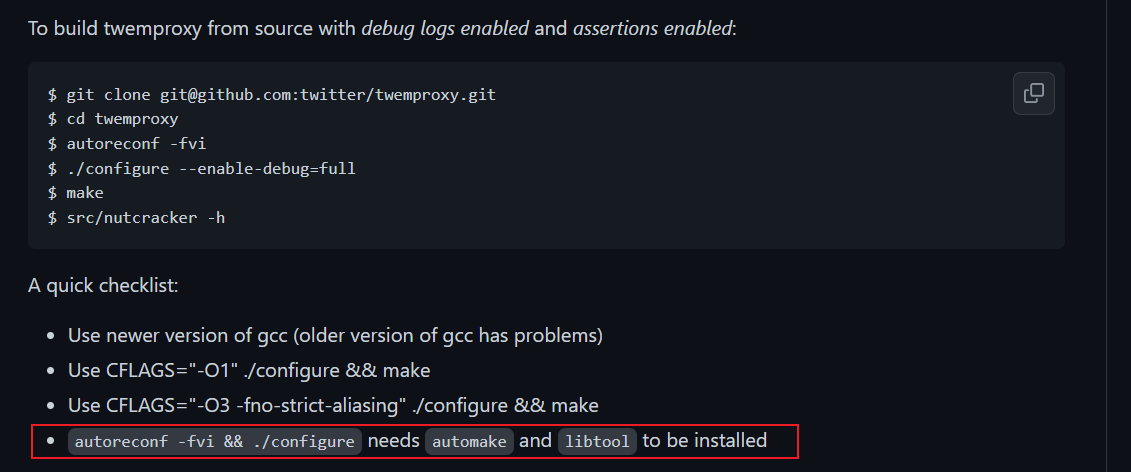
yum install automake lintool
makereconf -fvi
./configure
make
- 编译完成后进入scripts目录下,可以找到nutcracker.init文件,这是个脚本文件可以打开看下。里面有指定了,将该脚本拷贝到/etc/init.d/文件夹下作为服务使用
```bashchkconfig ## 执行程序: prog=“nutcracker” ## 配置文件nutcracker.yml: OPTIONS="-d -c /etc/nutcracker/nutcracker.yml"将nutcracker.init 复制到 /etc/init.d/ 目录下,并添加执行权限
cp ./scripts/nutcracker.init /etc/init.d/twemproxy chmod +x /etc/init.d/twemproxy
复制配置文件到指定文件夹
mkdir /etc/nutcracker cp ./conf/* etc/nutcracker/
在编译文件的src目录下找到程序nutcracker,并复制到/usr/bin/下
cp ./src/nutcracker /usr/bin
操作完以上步骤,此时twemproxy可以作为一个服务启动
4. 修改配置文件
```bash
alpha:
  listen: 127.0.0.1:22121  # 监听端口号
  hash: fnv1a_64 # hash算法
  distribution: ketama # 分配模式
  auto_eject_hosts: true #当连接一个server失败次数超过server_failure_limit值时,是否把这个server驱逐出集群,默认是false
  redis: true
  server_retry_timeout: 2000 #单位毫秒,当auto_eject_host打开后,重试被临时驱逐的server之前的等待时间
  server_failure_limit: 1 #当auto_eject_host打开后,驱逐一个server之前重试次数
  servers:
   - 127.0.0.1:6379:1
Twemproxy can be configured through a YAML file specified by the -c or --conf-file command-line argument on process start. The configuration file is used to specify the server pools and the servers within each pool that twemproxy manages. The configuration files parses and understands the following keys:

listen: The listening address and port (name:port or ip:port) or an absolute path to sock file (e.g. /var/run/nutcracker.sock) for this server pool.

client_connections: The maximum number of connections allowed from redis clients. Unlimited by default, though OS-imposed limitations will still apply.

hash: The name of the hash function. Possible values are:
one_at_a_time
md5
crc16
crc32 (crc32 implementation compatible with libmemcached)
crc32a (correct crc32 implementation as per the spec)
fnv1_64
fnv1a_64 (default)
fnv1_32
fnv1a_32
hsieh
murmur
jenkins

hash_tag: A two character string that specifies the part of the key used for hashing. Eg "{}" or "$$". Hash tag enable mapping different keys to the same server as long as the part of the key within the tag is the same.

distribution: The key distribution mode for choosing backend servers based on the computed hash value. Possible values are:
  ketama (default, recommended. An implementation of https://en.wikipedia.org/wiki/Consistent_hashing)
  modula (use hash modulo number of servers to choose the backend)
  random (choose a random backend for each key of each request)

timeout: The timeout value in msec that we wait for to establish a connection to the server or receive a response from a server. By default, we wait indefinitely.

backlog: The TCP backlog argument. Defaults to 512.

tcpkeepalive: A boolean value that controls if tcp keepalive is enabled for connections to servers. Defaults to false.

preconnect: A boolean value that controls if twemproxy should preconnect to all the servers in this pool on process start. Defaults to false.

redis: A boolean value that controls if a server pool speaks redis or memcached protocol. Defaults to false.

redis_auth: Authenticate to the Redis server on connect.

redis_db: The DB number to use on the pool servers. Defaults to 0. Note: Twemproxy will always present itself to clients as DB 0.

server_connections: The maximum number of connections that can be opened to each server. By default, we open at most 1 server connection.

auto_eject_hosts: A boolean value that controls if server should be ejected temporarily when it fails consecutively server_failure_limit times.
See liveness recommendations for information. Defaults to false.

server_retry_timeout: The timeout value in msec to wait for before retrying on a temporarily ejected server, when auto_eject_hosts is set to true. Defaults to 30000 msec.

server_failure_limit: The number of consecutive failures on a server that would lead to it being temporarily ejected when auto_eject_hosts is set to true. Defaults to 2.

servers: A list of server address, port and weight (name:port:weight or ip:port:weight) for this server pool.
- 不支持Redis的事务操作。
- 不支持针对多个值的操作,比如取sets的子交并补等。
- Twemproxy本身也是单点,需要用Lvs + Keepalived做高可用方案。
Predixy
https://github.com/joyieldInc/predixy/blob/master
Predixy 是一款高性能全特征redis代理,支持redis-sentinel和redis-cluster,其特点:
- 高性能并轻量级
- 支持多线程
- 多平台支持:Linux、OSX、BSD、Windows(Cygwin)
- 支持Redis Sentinel,可配置一组或者多组redis
- 支持Redis Cluster
- 支持redis阻塞型命令,包括blpop、brpop、brpoplpush
- 支持scan命令,无论是单个redis还是多个redis实例都支持
- 多key命令支持: mset/msetnx/mget/del/unlink/touch/exists
- 支持redis的多数据库,即可以使用select命令
- 支持事务,当前仅限于Redis Sentinel下单一redis组可用
- 支持脚本,包括命令:script load、eval、evalsha
- 支持发布订阅机制,也即Pubub系列命令
- 多数据中心支持,读写分离支持
- 扩展的AUTH命令,强大的读、写、管理权限控制机制,健空间限制机制
- 日志可按级别采样输出,异步日志记录避免线程被io阻塞
- 日志文件可以按时间、大小自动切分
- 丰富的统计信息,包括CPU、内存、请求、响应等信息
- 延迟监控信息,可以看到整体延迟,分后端redis实例延迟
Presixy和其他代理的对比:https://www.jianshu.com/p/dfd28d3b545f
Predixy使用
- Github 下载源码编译或者下载编译好的版本解压
https://github.com/joyieldInc/predixy/blob/master/README_CN.md
wget https://github.com/joyieldInc/predixy/releases/download/1.0.5/predixy-1.0.5-bin-amd64-linux.tar.gz
tar -xf predixy-1.0.5-bin-amd64-linux.tar.gz
将bin下的predixy 复制到/usr/bin,复制配置文件到/etc/predixy下
cp ./bin/predixy /usr/bin
cp ./conf/*  /etc/predixy
启动predixy
predixy /etc/predixy/predixy.confpredixy的配置类似redis, 具体配置项的含义在配置文件里有详细解释,请参考下列配置文件:
- predixy.conf,整体配置文件,会引用下面的配置文件
- cluster.conf,用于Redis Cluster时,配置后端redis信息
- sentinel.conf,用于Redis Sentinel时,配置后端redis信息
- auth.conf,访问权限控制配置,可以定义多个验证密码,可每个密码指定读、写、管理权限,以及定义可访问的健空间
- dc.conf,多数据中心支持,可以定义读写分离规则,读流量权重分配
- latency.conf, 延迟监控规则定义,可以指定需要监控的命令以及延时时间间隔

若有收获,就点个赞吧
0 人点赞
