1 项目架构变化
单体项目架构
单体项目架构:一个项目里包含这个项目的全部代码,一个应用搞定全部功能。
DNS服务器可以是单映射,也可以是多映射。
单体项目架构中,团队通过包名(package)区分每个模块
项目名:-- com--msb-- common-- utils--user-- controller-- service-- mapper-- sys-- controller-- service-- mapper
优点:部署简单、维护方便、成本低
缺点:当项目规模大、用户访问频率高、并发量高、数据量大时,大大降低程序执行效率,甚至出现宕机情况。
适用项目:单体架构项目适用传统管理项目、小型互联网项目
分布式架构
分布式架构把一个项目按照特点要求(不同模块、功能)拆分为多个项目,分别部署到不同的服务器上。
项目1:
  --com.msb.xxx
    -- controller
    -- service
    -- mapper
项目2
  --com.msb.mmm
    -- controller
    -- service
    -- mapper
优点:增大系统的可用性,减少单点故障导致整个应用不可用的风险;增加重用性,模块化重用性更高;增加扩展性,有新模块增加新的项目即可;增加每个模块的负载能力。
缺点:成本更高、架构更复杂、整体响应变长(一些业务需要多项目通信后给出结果),吞吐量更大。
分布式架构中各个模块如何通信?——采用Http协议、RPC协议等。与HTTP协议相比,RPC协议更适合项目内部通信。
2 RPC简介
Request For Comments(RFC),是一系列以编号排定的文件。文件收集了有关互联网相关信息,以及UNIX和互联网社区的软件文件。RFC文件是由Internet Society(ISOC)赞助发行。基本的互联网通信协议都有在RFC文件内详细说明。RFC文件还额外加入许多在标准内的论题,例如对于互联网新开发的协议及发展中所有的记录。因此几乎所有的互联网标准都有收录在RFC文件之中。
RPC就就收集在RFC1831中: https://datatracker.ietf.org/doc/rfc1831/
RPC(Remote Procedure Call)远程调用协议
RPC协议规定允许互联网中一台主机程序调用另一台主机程序,而程序员无需对这个交互过程进行编程。在RPC协议中,强调A程序调用B程序中的方法或功能时,A程序不知道B程序的具体实现。
RPC是上层协议,底层可以基于TCP,也可基于HTTP协议,一般所说的RPC都是基于RPC的具体实现,如Dubbo框架。广义上满足网络中进行的通讯调用都统称为RPC,甚至HTTP都可以说是RPC的具体实现,但是具体分析来看RPC协议要比HTTP协议更加高效,基于RPC的框架功能更多。
RPC协议与HTTP协议对比
具体实现:
- HTTP基于TCP实现,
- RPC可以基于TCP实现,也可基于HTTP实现
效率:
- HTTP 1.1 报文中很多内容是无用的;HTTP 2.0以后与RPC相差不大,与RPC相比少一些服务治理功能
- RPC自定义具体实现可以减少很多无用报文内容,使得报文体积更小,传输效率更高
连接方式:
- HTTP 1.1 每次连接都是3次握手
- RPC可以长连接
性能
- HTTP主要通过JSON,序列化和反序列化效率更低
- RPC可以基于多种序列化方式
注册中心
- HTTP是直连方式
- RPC框架都用带有注册中心
负载均衡
- HTTP需借助第三方工具,如Ngix
- RPC框架大都带有负载均衡
综上:RPC框架带有丰富的服务治理等功能,更适合企业内部接口调用;而HTTP更适合多平台之间相互调用。
3 RPC 实现
HttpClient 实现RPC
@RestController
public class DemoController {
    @RequestMapping("/demo")
    public String demo(String name) {
        return name + "你好";
    }
}

/*

以上请求可直接通过浏览器访问请求到

*/
public class HttpClientGet {
    public static void main(String[] args) {
        try {
            // 创建http工具,发起请求,解析响应
            CloseableHttpClient httpClient = HttpClients.createDefault();


            // 请求路径
            URIBuilder uriBuilder = new URIBuilder("http://localhost:8080/demo");
            // 添加请求参数
            uriBuilder.addParameter("name", "张三丰");

            // 创建HTTP GET 请求
            HttpGet get = new HttpGet(uriBuilder.build());
            // 创建响应
            CloseableHttpResponse response = httpClient.execute(get);

            // 响应体是字符串,因此把HttpEntity类型转换为字符串,并设置UTF-8字符编码
            String content = EntityUtils.toString(response.getEntity(), "utf-8");

            System.out.println(content);
            // 关闭资源
            response.close();
            httpClient.close();
        } catch (URISyntaxException | IOException e) {
            e.printStackTrace();
        }
    }
}
public class HttpClientPost {
    public static void main(String[] args) {
        try {
            // 创建http工具(理解成:浏览器) 发起请求,解析响应
            CloseableHttpClient httpClient = HttpClients.createDefault();
            // 创建HttpPOST请求对象
            HttpPost httpPost = new HttpPost("http://localhost:8080/demo");
            // 设置请求参数
            List<NameValuePair> params = new ArrayList<>();
            params.add(new BasicNameValuePair("name", "梅梅"));
            // 创建HttpEntity 文本实现类对象,放入参数并设置字符编码
            HttpEntity httpEntity = new UrlEncodedFormEntity(params, "utf-8");
            // 将封装请求参数的HttpEntity 实现对象放入httpPost请求对象中
            httpPost.setEntity(httpEntity);
            // 执行请求并获得响应
            CloseableHttpResponse response = httpClient.execute(httpPost);

            // 响应文文本,转换为字符串打印显示
            String content = EntityUtils.toString(response.getEntity(), "utf-8");
            System.out.println(content);

            response.close();
            httpClient.close();
        } catch (IOException e) {
            e.printStackTrace();
        }
    }
}
public class HttpClientJson {
    public static void main(String[] args) {

        try {
            CloseableHttpClient httpclient = HttpClients.createDefault();

            HttpPost httpPost = new HttpPost("http://localhost:8080/demo");

            // JackSon将Person转换为JSON字符串
            ObjectMapper objectMapper = new ObjectMapper();
            Person person = new Person(1,"不知火");
            String param = objectMapper.writeValueAsString(person);

            // 设置请求参数为json数据
            StringEntity entity = new StringEntity(param, ContentType.APPLICATION_JSON);
            httpPost.setEntity(entity);

            CloseableHttpResponse response = httpclient.execute(httpPost);

            String content = EntityUtils.toString(response.getEntity());

            System.out.println(content);

            //将json字符串转换为对象
            Person person2 = objectMapper.readValue(content, Person.class);
            System.out.println(person2);

            response.close();
            httpclient.close();
        } catch (IOException e) {
            e.printStackTrace();
        }
    }
}
JackSon用法
3.1 把对象转换为json字符串
ObjectMapper objectMapper = new ObjectMapper();
People peo = new People();
objectMapper.writeValueAsString(peo);
3.2 把json字符串转换为对象
ObjectMapper objectMapper = new ObjectMapper();
People peo = objectMapper.readValue(content, People.class);
3.3 把json字符串转换为List集合
ObjectMapper objectMapper = new ObjectMapper();
JavaType javaType = objectMapper.getTypeFactory().constructParametricType(List.class, People.class);
List<People> list = objectMapper.readValue(content, javaType);
请求参数是json数据且请求的Content-Type=”application/json”,在控制器参数中使用@RequestBody注解,把请求体中流数据转换为指定对象
@RequestMapping("/demo4")
@ResponseBody
public String demo4(@RequestBody List<People> list) {
    System.out.println(list);
    return list.toString();
}
ajax发送json请求
var json = '[{"id":123,"name":"msb"},{"id":123,"name":"mashibing"}]';
 $.ajax({
     url:'/demo5',
     type:'post',
     success:function(data){
         alert(data);
         for(var i = 0 ;i<data.length;i++){

             alert(data[i].id +"  "+data[i].name);
         }
     },
     contentType:'application/json',//请求体中内容类型
     dataType:'json',//响应内容类型。
     data:json
 });
注意:ajax请求是要求同源的(同源策略:浏览器默认只允许ajax访问同源(协议、ip、端口都相同)的内容。只要协议、ip、端口有一个不同就是跨域请求。
结局同源策略,在服务器端配置CrossOrigin注解,或者设置CrossConfig配置,本质实在响应头中添加Access-Control-Allow-Origin:*
@Configuration
public class CorsConfig {

    private CorsConfiguration buildConfig() {
        CorsConfiguration configuration = new CorsConfiguration();
        //  你需要跨域的地址  注意这里的 127.0.0.1 != localhost
        // * 表示对所有的地址都可以访问
        configuration.addAllowedOrigin("http://localhost:8000");
        //  跨域的请求头
        configuration.addAllowedHeader("*");
        //  跨域的请求方法
        configuration.addAllowedMethod("*");
        //加上了这一句,大致意思是可以携带 cookie
        //最终的结果是可以 在跨域请求的时候获取同一个 session
        configuration.setAllowCredentials(true);
        return configuration;
    }

    @Bean
    public CorsFilter corsFilter() {
        UrlBasedCorsConfigurationSource source = new UrlBasedCorsConfigurationSource();
        source.registerCorsConfiguration("/**", buildConfig());
        return new CorsFilter(source);

    }
}
RMI 实现RPC
RMI(Remote Method Invocation) 远程方法调用;RMI是从JDK1.2推出的功能,它可以实现在一个Java应用中可以像调用本地方法一样调用另一个服务器中Java应用(JVM)中的内容。RMI 是Java语言的远程调用,无法实现跨语言。
RMI执行流程:
Registry(注册表)是放置所有服务器对象的命名空间。 每次服务端创建一个对象时,它都会使用bind()或rebind()方法注册该对象。 这些是使用称为绑定名称的唯一名称注册的。
要调用远程对象,客户端需要该对象的引用。即通过服务端绑定的名称从注册表中获取对象(lookup()方法)。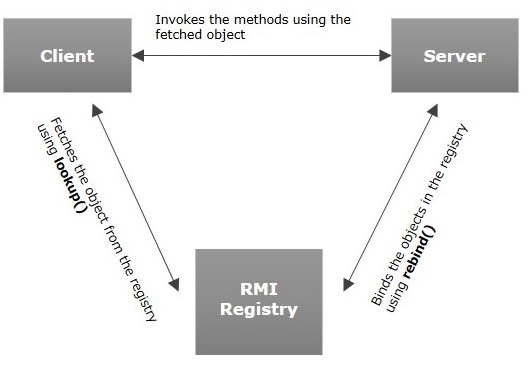
jdk RMI API
- java.rmi.Remote ,定义为远程调用接口,如果某接口方法被外部调用,需要继承此接口
- java.rmi.RemoteException,继承了Remote接口的接口,如果方法允许被远程调用,需要抛出此异常
- java.rmi.server.UnicastRemoteObject,该类实现了Remote接口和Serializable接口,自定义接口实现类,除了实现自定义接口,还需要继承此类
- jav.rmi.registry.LocateRegistry,可以通过LocateRegistry在本机上创建Registry(注册中心),通过特定的端口就可以访问这个Registry
- java.rmi.Naming,定义了发布内容可访问RMI名称,也是通过Naming获取指定的远程方法
// Service接口 继承Remote接口
public interface DemoService extends Remote {
    // 接口被远程调用的方法 需要抛出RemoteException
    public String demo(String name) throws RemoteException;
}


// 接口实现类 继承UnicastRemoteObject
public class DemoServiceImpl extends UnicastRemoteObject implements DemoService {
    public DemoServiceImpl() throws RemoteException {
    }

    @Override
    public String demo(String name) throws RemoteException {
        return name+"你好";
    }
}


// 定义服务类
public class DemoServer {
    public static void main(String[] args) {
        try {
            // 创建接口实例
            DemoService demoService = new DemoServiceImpl();
            // 创建注册表
            LocateRegistry.createRegistry(8989);
            // 绑定服务
            Naming.bind("rmi://localhost:8989/demoService",demoService);
        } catch (RemoteException | AlreadyBoundException | MalformedURLException e) {
            e.printStackTrace();
        }
    }
}
// Service接口 继承Remote接口
public interface DemoService extends Remote {
    // 接口被远程调用的方法 需要抛出RemoteException
    public String demo(String name) throws RemoteException;
}


public class DemoClient {
    public static void main(String[] args) {
        try {
            // Naming.lookup方法,获取指定的远程方法,强制转换为接口类型
            DemoService demoService = (DemoService) Naming.lookup("rmi://localhost:8989/demoService");
            // 使用接口可被远程调用的方法
            System.out.println(demoService.demo("张辉"));
        } catch (NotBoundException | MalformedURLException | RemoteException e) {
            e.printStackTrace();
        }
    }
}
4 Zookeeper
ZooKeeper 配置文件zoo.cfg
# The number of milliseconds of each tick
# ZooKeeper使用的基本时间单位(毫秒)。它用于做心跳,并且最小会话超时将是tickTime的两倍。
tickTime=2000


# The number of ticks that the initial
# synchronization phase can take

# 是超时ZooKeeper用于限制仲裁中的ZooKeeper服务器必须连接到领导者的时间长度
# zookeeper集群中的包含多台server, 其中一台为leader,
# 集群中其余的server为follower. initLimit参数配置初始化连接时,
# follower和leader之间的最长心跳时间.
# 此时该参数设置为10, 说明时间限制为10倍tickTime, 即10*2000ms=10000ms=20s.
initLimit=10


# The number of ticks that can pass between
# sending a request and getting an acknowledgement
# 限制了服务器与领导者之间的过时距离。
# 该参数配置leader和follower之间发送消息, 请求和应答的最大时间长度.
# 此时该参数设置为5, 说明时间限制为5倍tickTime, 即5*2000ms=10s.
syncLimit=5


# the directory where the snapshot is stored.
# do not use /tmp for storage, /tmp here is just
# example sakes.
# 存储内存数据库快照的位置,除非另有说明,否则存储数据库更新的事务日志。
dataDir=/myprogram/zookeeper/data


# the port at which the clients will connect
# 用于侦听客户端连接的端口
clientPort=2181
# the maximum number of client connections.
# increase this if you need to handle more clients
#maxClientCnxns=600
#
# Be sure to read the maintenance section of the
# administrator guide before turning on autopurge.
#
# http://zookeeper.apache.org/doc/current/zookeeperAdmin.html#sc_maintenance
#
# The number of snapshots to retain in dataDir
#autopurge.snapRetainCount=3
# Purge task interval in hours
# Set to "0" to disable auto purge feature
#autopurge.purgeInterval=1
Zookeeper客户端常用命令
进入到./zkCli.sh命令行工具后,可以使用下面常用命令
1、ls
ls [-s][-R] /path<br /> -s 详细信息,替代老版的ls2<br /> -R 当前目录和子目录中内容都罗列出来<br /> 例如:ls -R / 显示根目录下所有内容
2、create
create /path [data]<br /> [data] 包含内容<br /> 创建指定路径信息<br /> 例如:create /demo 创建/demo
3、get
get [-s] /path<br /> [-s] 详细信息<br /> 查看指定路径下内容。<br /> 例如: get -s /demo<br />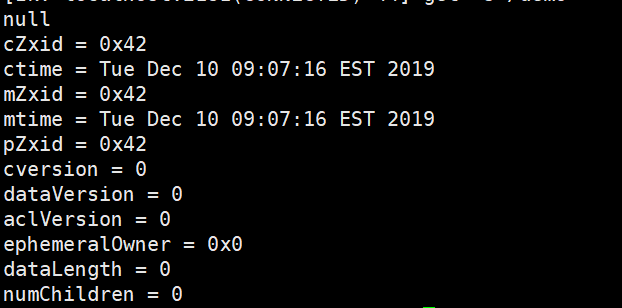<br />**null:**存放的数据<br />**cZxid:**创建时zxid(znode每次改变时递增的事务id)<br />**ctime:**创建时间戳<br />**mZxid:**最近一次更新的zxid<br />**mtime:**最近一次更新的时间戳<br />**pZxid:**子节点的zxid<br />**cversion:**子节点更新次数<br />**dataversion:**节点数据更新次数<br />**aclVersion:**节点ACL(授权信息)的更新次数<br />**ephemeralOwner**:如果该节点为ephemeral节点(临时,生命周期与session一样), ephemeralOwner值表示与该节点绑定的session id. 如果该节点不是ephemeral节点, ephemeralOwner值为0.<br />**dataLength**:节点数据字节数<br />**numChildren:**子节点数量
4、set
5、delete
Idea 连接Zookeeper
添加依赖,尽量保持与zookeeper服务器版本相同(安装zookeeper版本3.5.5,Idea导入依赖3.5.5正常使用,测试3.7.0依赖也正常使用)
<dependencies>
    <dependency>
        <groupId>org.apache.zookeeper</groupId>
        <artifactId>zookeeper</artifactId>
        <version>3.5.5</version>
    </dependency>
</dependencies>
向Zookeeeper注册内容
注:这里可能出现异常:KeeperErrorCode = Connection Loss for path
排查顺序:
服务器端
1、检查Zookeeper服务是否启动(进入到zookeeper/bin目录,执行./zkServer.sh status)
2、检查服务器Zookeeper端口2181 是否打开(网上说永久关闭防火墙,实际是只需需要端口打开就行)
客户端
1、主机能够ping通服务器
2、检查连接IP地址和端口号是否正确(192.168.126.128:2181)
3、检查连接时长sessionTimeout 是否设置太短(本机需要设置20000毫秒,太短就连接不上)
public class MyApp {
    public static void main(String[] args) {
        try {
            ZooKeeper zooKeeper = new ZooKeeper("192.168.126.128:2181", 20000, new Watcher() {
                @Override
                public void process(WatchedEvent watchedEvent) {
                    System.out.println("获取到连接");
                }
            });

         /*   发送内容 向zookeeper 服务器中
            参数1:发送的文件
            参数2:发送的内容
            参数3:权限
            参数4:内容的模式
            */
            String content = zooKeeper.create("/demo/rmi-address"
                    ,"rim://localhost:8080/demoService".getBytes()
                    , ZooDefs.Ids.OPEN_ACL_UNSAFE
                    , CreateMode.PERSISTENT_SEQUENTIAL);

            System.out.println("content"+content);
        } catch (IOException | KeeperException | InterruptedException e) {
            e.printStackTrace();
        }
    }
}
public class RecieveContent {
    public static void main(String[] args) {
        try {
            ZooKeeper zooKeeper = new ZooKeeper("192.168.126.128:2181",
                    20000,(event)-> System.out.println("连接成功"));

            List<String> list = zooKeeper.getChildren("/demo", false);
            for (String s : list) {
                byte[] data = zooKeeper.getData("/demo/" + s, false, null);
                System.out.println(new String(data));
            }
        } catch (IOException | KeeperException | InterruptedException e) {
            e.printStackTrace();
        }

    }
}
5 应用RMI与Zookeeper手写简单RPC框架
创建父级项目myrpc
创建子项目:pojo
创建子项目:service
创建子项目:provider(serviceImpl)
创建子项目:consumer 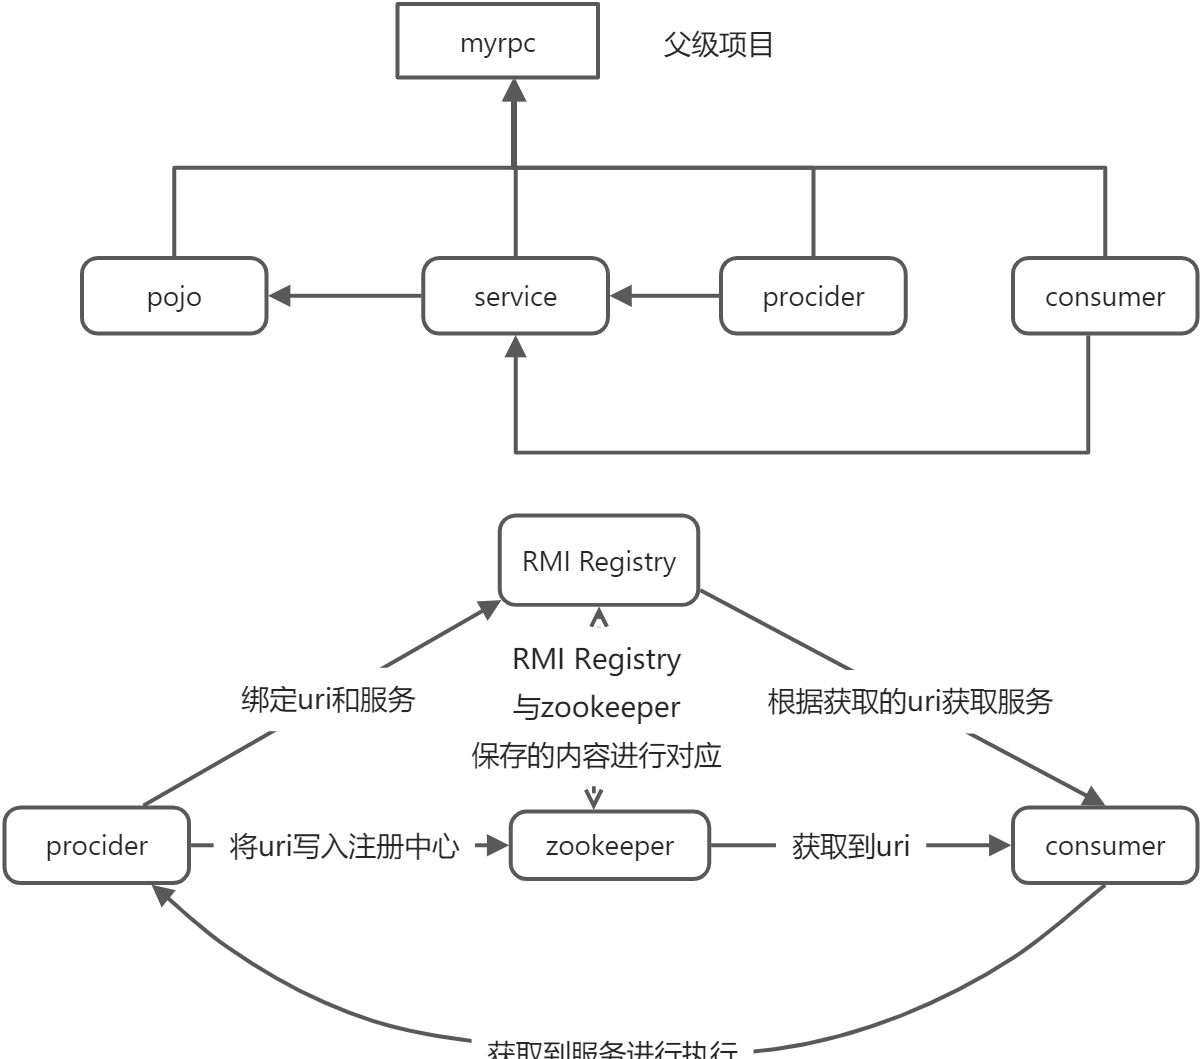
pojo子项目用于pojo统一管理
@NoArgsconstructor
@AllArgsConstructor
@Data
public class Person implements Serializable {
    private static final long serialVersionUID = 9005448934005102545L;
    private Integer id;
    private String name;
}
service子项目用于服务统一管理
// 该接口可被远程调用 需继承Remote接口
public interface DemoService extends Remote {

    // 可被远程调用的方法需抛出RemoteException
    String demo(Person person) throws RemoteException;
}
provider子项目,实现service接口方法,并使用RMI和Zookeeper实现远程调用注册
// 实现可被远程调用的接口时,需继承UnicastRemoteObject类,并重写构造方法为public
public class DemoServiceImpl extends UnicastRemoteObject implements DemoService {
    private static final long serialVersionUID = 6892850469247154478L;

    public DemoServiceImpl() throws RemoteException {
        super();
    }

    @Override
    public String demo(Person person) throws RemoteException {
        String content = "";
        try {
            ObjectMapper objectMapper = new ObjectMapper();
            content = objectMapper.writeValueAsString(person);
            return content;
        } catch (JsonProcessingException e) {
            e.printStackTrace();
        }
        return content;
    }
}
public class ProviderRun {
    public static void main(String[] args) {
        try {
            DemoServiceImpl demoService = new DemoServiceImpl();
            // LocateRegister 注册服务端口号
            LocateRegistry.createRegistry(8888);
            String uri = "rmi://localhost:8888/demoService";
            // 绑定uri和服务
            Naming.bind(uri, demoService);
            // 将服务保存到zookeeper注册中心
            ZooKeeper zooKeeper = new ZooKeeper("192.168.126.128:2181", 20000, event -> System.out.println("连接zookeeper成功"));
            // 将uri 保存到节点 /demo/demoService下
            String content = zooKeeper.create("/demo/demoService", uri.getBytes(), ZooDefs.Ids.OPEN_ACL_UNSAFE, CreateMode.PERSISTENT);
            System.out.println("content:" + content);
        } catch (AlreadyBoundException | IOException | KeeperException | InterruptedException e) {
            e.printStackTrace();
        }

    }
}

consumer 子项目用于远程调用DemoService接口中的方法
public interface ConsumerService {
    String demo(Person person);
}
@Service
public class ConsumerServiceImpl implements ConsumerService {
    @Override
    public String demo(Person person) {
        String content = "";
        try {
            ZooKeeper zooKeeper = new ZooKeeper("192.168.126.128:2181", 20000, evevt -> System.out.println("连接zookper成成功"));

            // 获取/demo/demoService节点下的内容
            byte[] data = zooKeeper.getData("/demo/demoService", null, null);

            String uri = new String(data);

            // Naming.lookup()方法查找绑定的服务
            DemoService demoService = (DemoService) Naming.lookup(uri);
            content = demoService.demo(person);
        } catch (IOException | KeeperException | InterruptedException | NotBoundException e) {
            e.printStackTrace();
        }
        return content;
    }
}
@Controller
public class ConsumerController {

    ConsumerService consumerService;

    @Autowired
    public ConsumerController(ConsumerService consumerService) {
        this.consumerService = consumerService;
    }

    @RequestMapping("/demo")
    @ResponseBody
    public String demo(Person person) {
        String s = consumerService.demo(person);
        System.out.println(s);
        return s;
    }
}
浏览器访问结果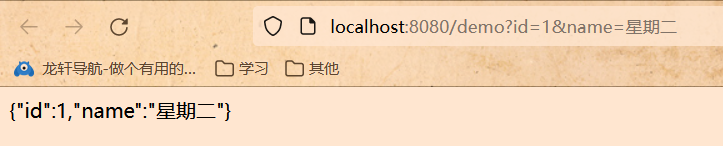

若有收获,就点个赞吧
0 人点赞
