参考:
[1]. Durand, N.C., et al., Juicer Provides a One-Click System for Analyzing Loop-Resolution Hi-C Experiments. Cell Systems, 2016. 3(1): p. 95-98.
[2]. Ben Zouari, Y., et al., ChiCMaxima: a robust and simple pipeline for detection and visualization of chromatin looping in Capture Hi-C. Genome Biology, 2019. 20(1).
[3]. Forcato, M., et al., Comparison of computational methods for Hi-C data analysis. Nature Methods, 2017. 14(7): p. 679-685.
[4] HiC 主要分析内容
[5] How to analyze Hi-C data with Juicer and scaffold your genome assembly using 3D-DNA
介绍:
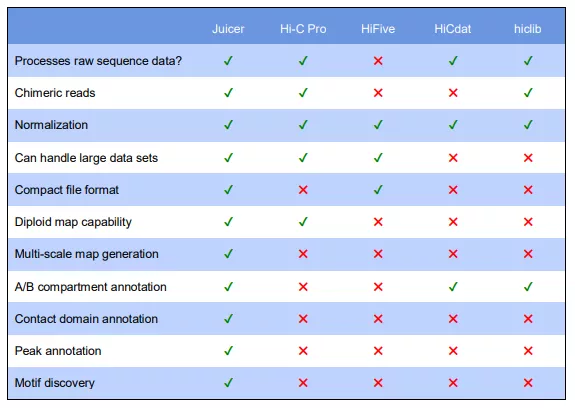
从上图我们看到 Juicer 相比其他软件还是蛮有优势的。文章中介绍突出的两个优点是(1)流程化,使用简单。(2)高性能,平行计算,对大数据友好。
软件安装
主程序是github上的脚本,git clone 下就行,主要是依赖软件需要解决。官方要求的下面这些,我服务器上都有,所以很幸运。当然针对不同的服务器群并行运算有不同的脚本,这里主要用的是CPU这个目录下的脚本。
- For alignment and creation of the Hi-C pairs file
merged_nodups.txt: - For .hic file creation and Juicer tools analysis:
- Java 1.7 or 1.8 JDK. (Alternative link for Ubuntu/LinuxMint). Minimum system requirements for running Java can be found at http://java.com/en/download/help/sysreq.xml
- Latest Juicer Tools jar
- For peak calling:
- CUDA and an NVIDIA GPU
- The native libraries included with Juicer are compiled for CUDA 7. Other versions of CUDA can be used, but you will need to download the respective native libraries from JCuda.
- For best performance, use a dedicated GPU. You may also be able to obtain access to GPU clusters through Amazon Web Services or a local research institution.
脚本原理(juicer.sh)
fastq等文件输入 —-》bwa比对 —-》排序 —-》合并 —-》去PCR重复 —-》生成 hic文件
代码流程
#创建工作目录,其后所有操作都在此目录下进行mkdir ./optcd opt#克隆 juicergit clone https://github.com/theaidenlab/juicer.gitln -s juicer/CPU scriptscd scripts/commonwget http://hicfiles.tc4ga.com.s3.amazonaws.com/public/juicer/juicer_tools.1.7.6_jcuda.0.8.jarln -s juicer_tools.1.7.6_jcuda.0.8.jar juicer_tools.jarcd ../..# 参考基因组建立索引,我用的是 Homo_sapiens_assembly38.fastamkdir referencescd referencescp <path>/Homo_sapiens_assembly38.fasta # 或者 ln -s <path>/Homo_sapiens_assembly38.fastabwa index Homo_sapiens_assembly38.fastacd ..# 添加限制性内切酶位点信息,注意自己的是不是 MboI 酶。mkdir restriction_sitescd restriction_sites/python2 ../juicer/misc/generate_site_positions.py MboI hg38_MboI ../references/Homo_sapiens_assembly38.fasta # 生成了 hg38_MboI.txt 文件awk 'BEGIN{OFS="\t"}{print $1, $NF}' hg38_MboI.txt > hg38.chrom.sizescd ..# 添加 fastq 文件 (官方测试文件)mkdir fastq && cd fastqnohub wget http://juicerawsmirror.s3.amazonaws.com/opt/juicer/work/HIC003/fastq/HIC003_S2_L001_R1_001.fastq.gz &nohub wget http://juicerawsmirror.s3.amazonaws.com/opt/juicer/work/HIC003/fastq/HIC003_S2_L001_R2_001.fastq.gz &cd ..# 运行 Juicerbash scripts/juicer.sh -d <path/opt> -D <path/opt> -y restriction_sites/hg38_MboI.txt -z references/Homo_sapiens_assembly38.fasta -p restriction_sites/hg38.chrom.sizes -s MboI# 上面-z -p 设置绝对路径吧,要不然会识别不了。我直接改软件源码了,-d -D 都设置了还需要绝对路径,作者写的不人性化啊
结果文件
结果文件都放在了生成的 aligned 中,主要文件是 .hic 文件,其中的inter_30.hic 是设置了 mapq threshold >30 后得到的结果。如果 GPU (cudd)可用,软件还会自动使用自带 HiCCUPS 算法计算 contact domains 并保存在 inter_30_contact_domains 文件夹中。如果GPU不可用,可手动用自带的 CPU HiCCUPS 算法来计算,后面章节有介绍。
hic文件格式请看 https://github.com/theaidenlab/juicebox/blob/master/HiC_format_v8.docx
重复样本合并
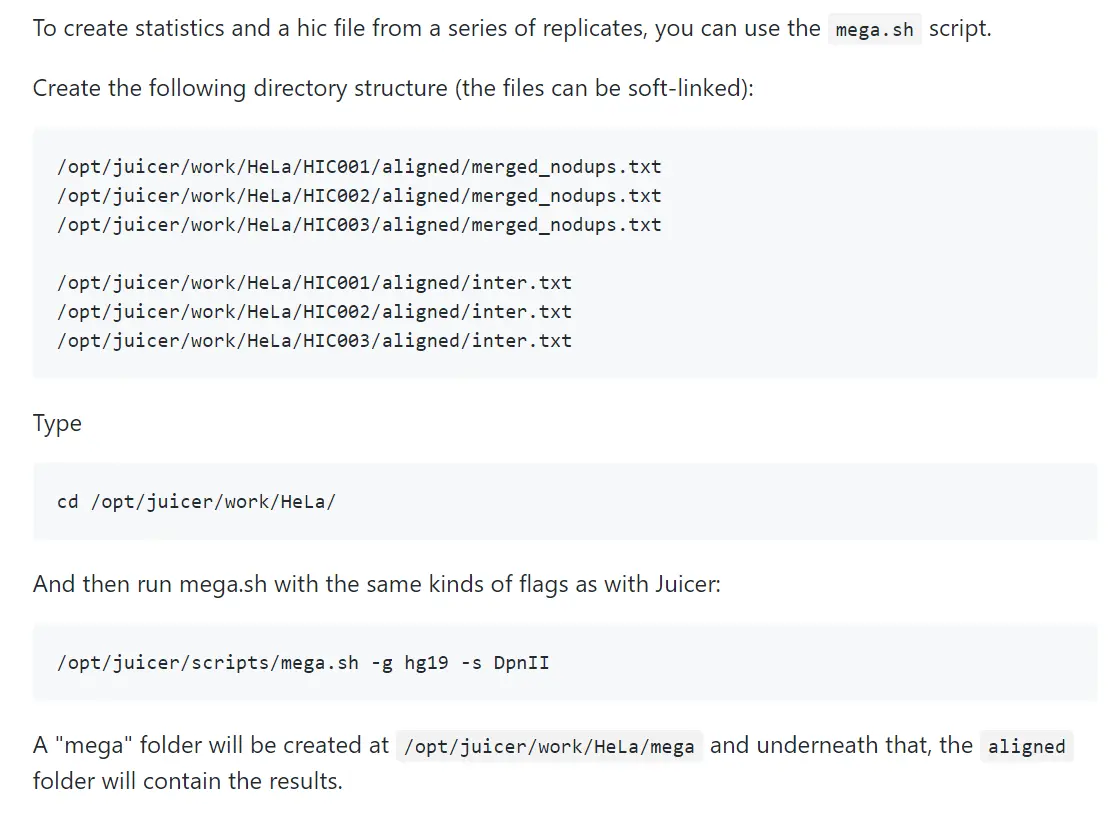
参照官方说明挺容易做的,但是这个mega.sh 脚本有几点错误。1、脚本默认了$juiceDir 参数,又不提供可以传入的参数,代码肯定会报错。我就将脚本里的代码修改如下,可以根据自己的实际路径传入 juiceDir。2、在前面的 juicer.sh 脚本中,默认所有其他脚本的路径是 ${juiceDir}/scripts/common/ 中。而到了这个脚本中,默认的其他脚本路径是 ${juiceDir}/scripts/ ,emmm。所以要么就 cp * common ./, 要么就修改成 ${juiceDir}/scripts/common/ 。这些我已经反馈给作者,并且得到了回复,应该会得到修改。
while getopts "d:g:hxs:SD:" opt; docase $opt ing) genomeID=$OPTARG ;;h) printHelpAndExit 0;;d) topDir=$OPTARG ;;s) site=$OPTARG ;;x) exclude=1 ;;S) stage=$OPTARG ;;D) juiceDir=$OPTARG ;;[?]) printHelpAndExit 1;;esacdone
3、也许你会遇到Error: the chromosome combination 2_2 appears in multiple blocks 错误,反正我是遇到了,原因可见链接。
补充
Juicer 官网 http://aidenlab.org/documentation.html
Github https://github.com/aidenlab/juicer

若有收获,就点个赞吧
1 人点赞
