卷
Container 中的文件在磁盘上是临时存放的,这给 Container 中运行的较重要的应用 程序带来一些问题。一是当容器崩溃时文件丢失,kubelet 会重新启动容器, 但容器会以干净的状态重启。
二是在同一 Pod 中运行多个容器并共享文件时出现。 Kubernetes 卷(Volume) 这一抽象概念能够解决这两个问题。
Docker 也有 卷(Volume) 的概念,但对它只有少量且松散的管理。 Docker 卷是磁盘上或者另外一个容器内的一个目录。 Docker 提供卷驱动程序,但是其功能非常有限。
Kubernetes 支持很多类型的卷。 Pod 可以同时使用任意数目的卷类型。 临时卷类型的生命周期与 Pod 相同,但持久卷可以比 Pod 的存活期长。 因此,卷的存在时间会超出 Pod 中运行的所有容器,并且在容器重新启动时数据也会得到保留。 当 Pod 不再存在时,卷也将不再存在。
卷的核心是包含一些数据的一个目录,Pod 中的容器可以访问该目录。 所采用的特定的卷类型将决定该目录如何形成的、使用何种介质保存数据以及目录中存放 的内容。
使用卷时, 在 .spec.volumes 字段中设置为 Pod 提供的卷,并在 .spec.containers[*].volumeMounts 字段中声明卷在容器中的挂载位置。
Pod使用存储的几种方式
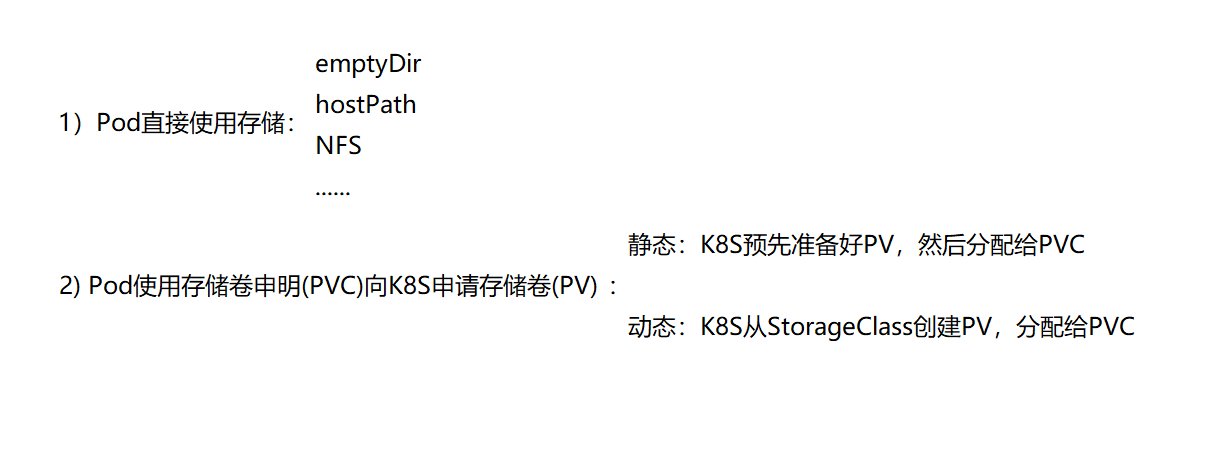
Pod直接使用存储
Kubernetes支持非常多的卷类型,参考官方文档:
https://kubernetes.io/zh/docs/concepts/storage/volumes/
本文中会介绍其中几种:
emptyDir
当 Pod 分派到某个 Node 上时,emptyDir 卷会被创建,并且在 Pod 在该节点上运行期间,卷一直存在。 就像其名称表示的那样,卷最初是空的。 尽管 Pod 中的容器挂载 emptyDir 卷的路径可能相同也可能不同,这些容器都可以读写 emptyDir 卷中相同的文件。 当 Pod 因为某些原因被从节点上删除时,emptyDir 卷中的数据也会被永久删除。
说明: 容器崩溃并不会导致 Pod 被从节点上移除,因此容器崩溃期间 emptyDir 卷中的数据是安全的。<br />emptyDir 的一些用途:
- 缓存空间,例如基于磁盘的归并排序。
- 为耗时较长的计算任务提供检查点,以便任务能方便地从崩溃前状态恢复执行。
- 在 Web 服务器容器服务数据时,保存内容管理器容器获取的文件。
emptyDir 卷存储在该节点所使用的介质上;这里的介质可以是磁盘或 SSD 或网络存储。但是,你可以将 emptyDir.medium 字段设置为 "Memory",以告诉 Kubernetes 为你挂载 tmpfs(基于 RAM 的文件系统)。 虽然 tmpfs 速度非常快,但是要注意它与磁盘不同。 tmpfs 在节点重启时会被清除,并且你所写入的所有文件都会计入容器的内存消耗,受容器内存限制约束。
[root@clientvm ~]# cat emptyDir-pod.yamlapiVersion: v1kind: Podmetadata:name: test-pdspec:containers:- image: nginxname: test-containerimagePullPolicy: IfNotPresentvolumeMounts:- mountPath: /cachename: cache-volumevolumes:- name: cache-volumeemptyDir: {}
pod已经在worker1上运行:
[root@clientvm ~]# kubectl get pod -n mytest -o wideNAME READY STATUS RESTARTS AGE IP NODE NOMINATED NODE READINESS GATESbusybox 1/1 Running 43 5d 10.244.2.55 worker2.example.com <none> <none>dns 1/1 Running 42 4d22h 10.244.1.40 worker1.example.com <none> <none>test-pd 1/1 Running 0 3m24s 10.244.1.46 worker1.example.com <none> <none>[root@clientvm ~]# kubectl describe pod test-pd -n mytest......Volumes:cache-volume:Type: EmptyDir (a temporary directory that shares a pod's lifetime)Medium:SizeLimit: <unset>
验证:
[root@clientvm ~]# kubectl exec test-pd -n mytest -it -- bashroot@test-pd:/# cd /cache/root@test-pd:/cache# touch aaa bbb ccc dddroot@test-pd:/cache# exitexit
worker1上,查找容器名字
[root@worker1 ~]# docker ps | grep test-container8c61c355f7bb bc9a0695f571 "/docker-entrypoint.…" 4 minutes ago Up 4 minutes k8s_test-container_test-pd_mytest_a75956a3-a140-4582-b02c-03f25163d3d2_0
查找dir
[root@worker1 ~]# docker inspect 8c61c355f7bb | grep -A3 -B3 '/cache'......"Mounts": [{"Type": "bind","Source": "/var/lib/kubelet/pods/a75956a3-a140-4582-b02c-03f25163d3d2/volumes/kubernetes.io~empty-dir/cache-volume","Destination": "/cache","Mode": "Z","RW": true,"Propagation": "rprivate"[root@worker1 ~]#[root@worker1 ~]# ll "/var/lib/kubelet/pods/a75956a3-a140-4582-b02c-03f25163d3d2/volumes/kubernetes.io~empty-dir/cache-volume"total 0-rw-r--r--. 1 root root 0 Dec 14 12:24 aaa-rw-r--r--. 1 root root 0 Dec 14 12:24 bbb-rw-r--r--. 1 root root 0 Dec 14 12:24 ccc-rw-r--r--. 1 root root 0 Dec 14 12:24 ddd
删除Pod后,发现dir也随之删除
[root@clientvm ~]# kubectl delete -f emptyDir-pod.yaml -n mytestpod "test-pd" deleted[root@worker1 ~]# ll "/var/lib/kubelet/pods/a75956a3-a140-4582-b02c-03f25163d3d2/volumes/kubernetes.io~empty-dir/cache-volume"ls: cannot access /var/lib/kubelet/pods/a75956a3-a140-4582-b02c-03f25163d3d2/volumes/kubernetes.io~empty-dir/cache-volume: No such file or directory
限制emptyDir容量
[root@clientvm ~]# cat empty-Dir-limit-pod.yamlapiVersion: v1kind: Podmetadata:name: test-pdspec:containers:- image: nginxname: test-containerimagePullPolicy: IfNotPresentvolumeMounts:- mountPath: /cachename: cache-volumevolumes:- name: cache-volumeemptyDir:sizeLimit: 2Gi
[root@clientvm ~]# kubectl apply -f empty-Dir-limit-pod.yaml -n mytestpod/test-pd created[root@clientvm ~]# kubectl describe pod -n mytest test-pd......Volumes:cache-volume:Type: EmptyDir (a temporary directory that shares a pod's lifetime)Medium:SizeLimit: 2Gi
hostPath
hostPath 卷能将主机节点文件系统上的文件或目录挂载到你的 Pod 中。
hostPath 的一些用法有:
- 运行一个需要访问 Docker 内部机制的容器;可使用
hostPath挂载/var/lib/docker路径。 - 允许 Pod 指定给定的
hostPath在运行 Pod 之前是否应该存在,是否应该创建以及应该以什么方式存在。
除了必需的 path 属性之外,用户可以选择性地为 hostPath 卷指定 type。
| 取值 | 行为 |
|---|---|
| 空字符串(默认)用于向后兼容,这意味着在安装 hostPath 卷之前不会执行任何检查。 | |
DirectoryOrCreate |
如果在给定路径上什么都不存在,那么将根据需要创建空目录,权限设置为 0755,具有与 kubelet 相同的组和属主信息。 |
Directory |
在给定路径上必须存在的目录。 |
FileOrCreate |
如果在给定路径上什么都不存在,那么将在那里根据需要创建空文件,权限设置为 0644,具有与 kubelet 相同的组和所有权。 |
File |
在给定路径上必须存在的文件。 |
Socket |
在给定路径上必须存在的 UNIX 套接字。 |
CharDevice |
在给定路径上必须存在的字符设备。 |
BlockDevice |
在给定路径上必须存在的块设备。 |
配置范例:
[root@clientvm ~]# cat hostPath-pod.yamlapiVersion: v1kind: Podmetadata:name: test-pdspec:containers:- image: nginximagePullPolicy: IfNotPresentname: test-containervolumeMounts:- mountPath: /test-pdname: test-volumevolumes:- name: test-volumehostPath:path: /data# Optionaltype: DirectoryOrCreate
[root@clientvm ~]# kubectl apply -f hostPath-pod.yamlpod/test-pd created[root@clientvm ~]# kubectl get pod -o wideNAME READY STATUS RESTARTS AGE IP NODE NOMINATED NODE READINESS GATEStest-pd 1/1 Running 0 99s 10.244.1.49 worker1.example.com <none> <none>[root@clientvm ~]# kubectl exec test-pd -it -- bashroot@test-pd:/# cd /test-pd/root@test-pd:/test-pd# touch aaa bbb ccc dddroot@test-pd:/test-pd# exitexit
到worker1上验证:
[root@worker1 ~]# cd /data/[root@worker1 data]# lltotal 0-rw-r--r--. 1 root root 0 Dec 14 12:47 aaa-rw-r--r--. 1 root root 0 Dec 14 12:47 bbb-rw-r--r--. 1 root root 0 Dec 14 12:47 ccc-rw-r--r--. 1 root root 0 Dec 14 12:47 ddd
删除Pod后再查看:
[root@clientvm ~]# kubectl delete -f hostPath-pod.yamlpod "test-pd" deleted[root@worker1 /]# ll /data/total 0-rw-r--r--. 1 root root 0 Dec 14 12:47 aaa-rw-r--r--. 1 root root 0 Dec 14 12:47 bbb-rw-r--r--. 1 root root 0 Dec 14 12:47 ccc-rw-r--r--. 1 root root 0 Dec 14 12:47 ddd
NFS
apiVersion: v1kind: Podmetadata:name: test-pdspec:containers:- image: nginximagePullPolicy: IfNotPresentname: test-containervolumeMounts:- mountPath: /usr/share/nginx/htmlname: test-volumevolumes:- name: test-volumenfs:server: 192.168.198.128path: /data
[root@clientvm ~]# kubectl apply -f pod-nfs.yaml -n mytest[root@clientvm ~]# cd /data/[root@clientvm data]# ls[root@clientvm data]# echo AAAAAAAAAAAAAA >index.html
[root@master ~]# kubectl get pod -o wide -n mytestNAME READY STATUS RESTARTS AGE IP NODE NOMINATED NODE READINESS GATES......test-pd 1/1 Running 0 6m43s 10.244.71.214 worker2.example.com <none> <none>[root@master ~]# curl 10.244.71.214AAAAAAAAAAAAAA
使用持久卷 Persistent Volume
理论基础
持久卷(PersistentVolume,PV)是集群中的一块存储,可以由管理员事先供应,或者 使用存储类(Storage Class)来动态供应。 持久卷是集群资源,就像节点也是集群资源一样。PV 持久卷和普通的 Volume 一样,也是使用 卷插件来实现的,只是它们拥有独立于任何使用 PV 的 Pod 的生命周期。 此 API 对象中记述了存储的实现细节,无论其背后是 NFS、iSCSI 还是特定于云平台的存储系统。
持久卷申明(PersistentVolumeClaim,PVC)表达的是用户对存储的请求。概念上与 Pod 类似。 Pod 会耗用节点资源,而 PVC 申领会耗用 PV 资源。Pod 可以请求特定数量的资源(CPU 和内存);同样 PVC 申领也可以请求特定的大小和访问模式 (例如,可以要求 PV 卷能够以 ReadWriteOnce、ReadOnlyMany 或 ReadWriteMany 模式之一来挂载,参见访问模式)。
回收策略
当用户不再使用其存储卷时,他们可以从 API 中将 PVC 对象删除,从而允许 该资源被回收再利用。PersistentVolume 对象的回收策略告诉集群,当其被 从申领中释放时如何处理该数据卷。 目前,数据卷可以被 Retained(保留)、 Deleted(删除)及Recycle(此策略已废弃)。
Retained(保留)
回收策略 Retain 使得用户可以手动回收资源。当 PersistentVolumeClaim 对象 被删除时,PersistentVolume 卷仍然存在,对应的数据卷被视为”已释放(released)”。 由于卷上仍然存在这前一申领人的数据,该卷还不能用于其他申领。 管理员可以通过下面的步骤来手动回收该卷:
- 删除 PersistentVolume 对象。与之相关的、位于外部基础设施中的存储资产 (例如 AWS EBS、GCE PD、Azure Disk 或 Cinder 卷)在 PV 删除之后仍然存在。
- 根据情况,手动清除所关联的存储资产上的数据。
- 手动删除所关联的存储资产;如果你希望重用该存储资产,可以基于存储资产的 定义创建新的 PersistentVolume 卷对象。
删除(Delete)
对于支持 Delete 回收策略的卷插件,删除动作会将 PersistentVolume 对象从 Kubernetes 中移除,同时也会从外部基础设施(如 AWS EBS、GCE PD、Azure Disk 或 Cinder 卷)中移除所关联的存储资产。 动态供应的卷会继承其 StorageClass 中设置的回收策略,该策略默认 为 Delete。
访问模式
PersistentVolume 卷可以用资源提供者所支持的任何方式挂载到宿主系统上。 如下表所示,提供者(驱动)的能力不同,每个 PV 卷的访问模式都会设置为 对应卷所支持的模式值。 例如,NFS 可以支持多个读写客户,但是某个特定的 NFS PV 卷可能在服务器 上以只读的方式导出。每个 PV 卷都会获得自身的访问模式集合,描述的是 特定 PV 卷的能力。
访问模式有:
- ReadWriteOnce — 卷可以被一个节点以读写方式挂载;
- ReadOnlyMany — 卷可以被多个节点以只读方式挂载;
- ReadWriteMany — 卷可以被多个节点以读写方式挂载。
在命令行接口(CLI)中,访问模式也使用以下缩写形式:
- RWO - ReadWriteOnce
- ROX - ReadOnlyMany
- RWX - ReadWriteMany
范例
创建基于NFS的PV
[root@clientvm ~]# cat nfs-pv.yamlapiVersion: v1kind: PersistentVolumemetadata:name: nfs-pv1spec:capacity:storage: 100MiaccessModes:- ReadWriteManypersistentVolumeReclaimPolicy: Recyclenfs:server: 192.168.241.128path: "/data"[root@clientvm ~]# kubectl apply -f nfs-pv.yamlpersistentvolume/nfs-pv1 created[root@clientvm ~]# kubectl get pvNAME CAPACITY ACCESS MODES RECLAIM POLICY STATUS CLAIM STORAGECLASS REASON AGEnfs-pv1 100Mi RWX Recycle Available 6s
创建PVC
[root@clientvm ~]# cat pvc.yamlapiVersion: v1kind: PersistentVolumeClaimmetadata:name: nfs-pvc1spec:accessModes:- ReadWriteManystorageClassName: ""resources:requests:storage: 100Mi[root@clientvm ~]# kubectl apply -f pvc.yamlpersistentvolumeclaim/nfs1 created[root@clientvm ~]# kubectl get pvNAME CAPACITY ACCESS MODES RECLAIM POLICY STATUS CLAIM STORAGECLASS REASON AGEnfs-pv1 100Mi RWX Recycle Bound default/nfs-pvc1 15s[root@clientvm ~]# kubectl get pvcNAME STATUS VOLUME CAPACITY ACCESS MODES STORAGECLASS AGEnfs-pvc1 Bound nfs-pv1 100Mi RWX 110s
创建Pod,使用PVC
[root@clientvm ~]# cat pod-with-pvc.yamlapiVersion: v1kind: Podmetadata:name: task-pv-podspec:volumes:- name: task-pv-storagepersistentVolumeClaim:claimName: nfs-pvc1containers:- name: task-pv-containerimage: nginximagePullPolicy: IfNotPresentports:- containerPort: 80name: "http-server"volumeMounts:- mountPath: "/usr/share/nginx/html"name: task-pv-storage
[root@clientvm ~]# kubectl apply -f pod-with-pvc.yamlpod/task-pv-pod created[root@clientvm ~]# kubectl get podNAME READY STATUS RESTARTS AGE......task-pv-pod 1/1 Running 0 13s
验证读写数据
[root@clientvm ~]# kubectl exec task-pv-pod -it -- bashroot@task-pv-pod:/# cd "/usr/share/nginx/html"root@task-pv-pod:/usr/share/nginx/html# lsroot@task-pv-pod:/usr/share/nginx/html# echo AAAAAA >index.htmlroot@task-pv-pod:/usr/share/nginx/html# exitexit[root@clientvm ~]# ls /data/index.html[root@clientvm ~]# cat /data/index.htmlAAAAAA
删除PVC与Pod,PV重新可用
[root@clientvm ~]# kubectl delete -f pod-with-pvc.yamlpod "task-pv-pod" deleted[root@clientvm ~]# kubectl delete -f nfs-pvc.yamlpersistentvolumeclaim "nfs-pvc1" deleted[root@clientvm ~]# kubectl get pvNAME CAPACITY ACCESS MODES RECLAIM POLICY STATUS CLAIM STORAGECLASS REASON AGEnfs-pv1 100Mi RWX Recycle Available 2m11s
使用StorageClass
创建基于NFS的StorageClass
参考: https://github.com/kubernetes-sigs/nfs-subdir-external-provisioner
[root@clientvm ~]# kubectl create namespace nfs-sc
[root@clientvm ~]# kubectl apply -f /resources/yaml/nfs-storage-class/rbac.yaml[root@clientvm ~]# kubectl apply -f /resources/yaml/nfs-storage-class/deployment.yaml[root@clientvm ~]# kubectl apply -f /resources/yaml/nfs-storage-class/class.yaml[root@clientvm ~]# kubectl get scNAME PROVISIONER RECLAIMPOLICY VOLUMEBINDINGMODE ALLOWVOLUMEEXPANSION AGEmanaged-nfs-storage fuseim.pri/ifs Delete Immediate false 6m55s
创建PVC
[root@clientvm ~]# cat sc-pvc.yamlkind: PersistentVolumeClaimapiVersion: v1metadata:name: test-pvcspec:accessModes:- ReadWriteManystorageClassName: managed-nfs-storageresources:requests:storage: 100Mi
[root@clientvm ~]# kubectl apply -f sc-pvc.yamlpersistentvolumeclaim/test-pvc created[root@clientvm ~]# kubectl get pvcNAME STATUS VOLUME CAPACITY ACCESS MODES STORAGECLASS AGEtest-pvc Bound pvc-17482f72-47c7-4409-9810-ce6ac1178a02 100Mi RWX managed-nfs-storage 9s
创建Pod
[root@clientvm ~]# cat sc-pvc-pod.yamlkind: PodapiVersion: v1metadata:name: test-pod-scspec:containers:- name: test-pod-scimage: nginximagePullPolicy: IfNotPresentvolumeMounts:- name: nfs-pvcmountPath: "/usr/share/nginx/html/"restartPolicy: "Never"volumes:- name: nfs-pvcpersistentVolumeClaim:claimName: test-pvc
[root@clientvm ~]# kubectl apply -f sc-pvc-pod.yamlpod/test-pod-sc created[root@clientvm ~]# kubectl get podNAME READY STATUS RESTARTS AGE......test-pod-sc 1/1 Running 0 6s
[root@clientvm ~]# kubectl exec test-pod-sc -it -- bashroot@test-pod-sc:/# df -hFilesystem Size Used Avail Use% Mounted on......192.168.241.128:/data/default-test-pvc-pvc-17482f72-47c7-4409-9810-ce6ac1178a02 8.0G 3.9G 4.2G 48% /usr/share/nginx/html......root@test-pod-sc:/# echo AAAAAAAAAAAA>/usr/share/nginx/html/index.htmlroot@test-pod-sc:/# exitexit[root@clientvm ~]# ll /data/default-test-pvc-pvc-17482f72-47c7-4409-9810-ce6ac1178a02/total 4-rw-r--r--. 1 root root 13 Dec 14 17:12 index.html[root@clientvm ~]# cat /data/default-test-pvc-pvc-17482f72-47c7-4409-9810-ce6ac1178a02/index.htmlAAAAAAAAAAAA
删除PVC与Pod后,NFS上的数据也被删除
[root@clientvm ~]# kubectl delete -f sc-pvc-pod.yamlpod "test-pod-sc" deleted[root@clientvm ~]# kubectl delete -f sc-pvc.yamlpersistentvolumeclaim "test-pvc" deleted[root@clientvm ~]# ll /data/total 0
在StateFulset中使用StorageClass自动创建PV/PVC
[root@clientvm ~]# cat statefulset-sc.yamlapiVersion: v1kind: Servicemetadata:name: nginxlabels:app: nginxnamespace: mytestspec:ports:- port: 80name: webclusterIP: Noneselector:app: nginx---apiVersion: apps/v1kind: StatefulSetmetadata:labels:app: nginxname: mystatefulsetnamespace: mytestspec:replicas: 3serviceName: nginxselector:matchLabels:app: nginxtemplate:metadata:labels:app: nginxspec:containers:- image: nginxname: nginximagePullPolicy: IfNotPresent## volumevolumeMounts:- name: wwwmountPath: /usr/share/nginx/html## StorageClassvolumeClaimTemplates:- metadata:name: wwwspec:accessModes: [ "ReadWriteOnce" ]storageClassName: "managed-nfs-storage"resources:requests:storage: 100Mi
[root@clientvm ~]# kubectl get pod -n mytestNAME READY STATUS RESTARTS AGE......mystatefulset-0 1/1 Running 0 15smystatefulset-1 1/1 Running 0 12smystatefulset-2 1/1 Running 0 7s[root@clientvm ~]# kubectl get pvNAME CAPACITY ACCESS MODES RECLAIM POLICY STATUS CLAIM STORAGECLASS REASON AGEnfs-pv1 100Mi RWX Recycle Available 102mpvc-85799af8-a9de-46fd-a268-b15edefb9eb5 100Mi RWO Delete Bound mytest/www-mystatefulset-2 managed-nfs-storage 13spvc-b3529c5a-cb07-4823-87be-9c4961988c2b 100Mi RWO Delete Bound mytest/www-mystatefulset-1 managed-nfs-storage 18spvc-c8faafe4-50a7-4ff4-acd7-9c45f3b5d4de 100Mi RWO Delete Bound mytest/www-mystatefulset-0 managed-nfs-storage 21s
设置默认StorageClass
kubectl patch storageclass managed-nfs-storage -p '{"metadata": {"annotations":{"storageclass.kubernetes.io/is-default-class":"true"}}}'
或者
[root@clientvm ~]# kubectl annotate storageclasses.storage.k8s.io managed-nfs-storage storageclass.kubernetes.io/is-default-class=truestorageclass.storage.k8s.io/managed-nfs-storage annotated[root@clientvm ~]#[root@clientvm ~]# kubectl get scNAME PROVISIONER RECLAIMPOLICY VOLUMEBINDINGMODE ALLOWVOLUMEEXPANSION AGEmanaged-nfs-storage (default) fuseim.pri/ifs Delete Immediate false 2m41s

若有收获,就点个赞吧
0 人点赞
