- 为避免k8s的master单点故障而无法对集群进行管理和操作,必须采用多master架构部署。
- node运算节点受master主控节点调度,在故障时相关应用可以自动调度到集群其他运算节点,故障节点可以从集群中删除后进行维修。
- 本方案使用操作系统为CentOS7.4,采用kubeadm安装方式实现,kubernetesVersion: v1.18.4。
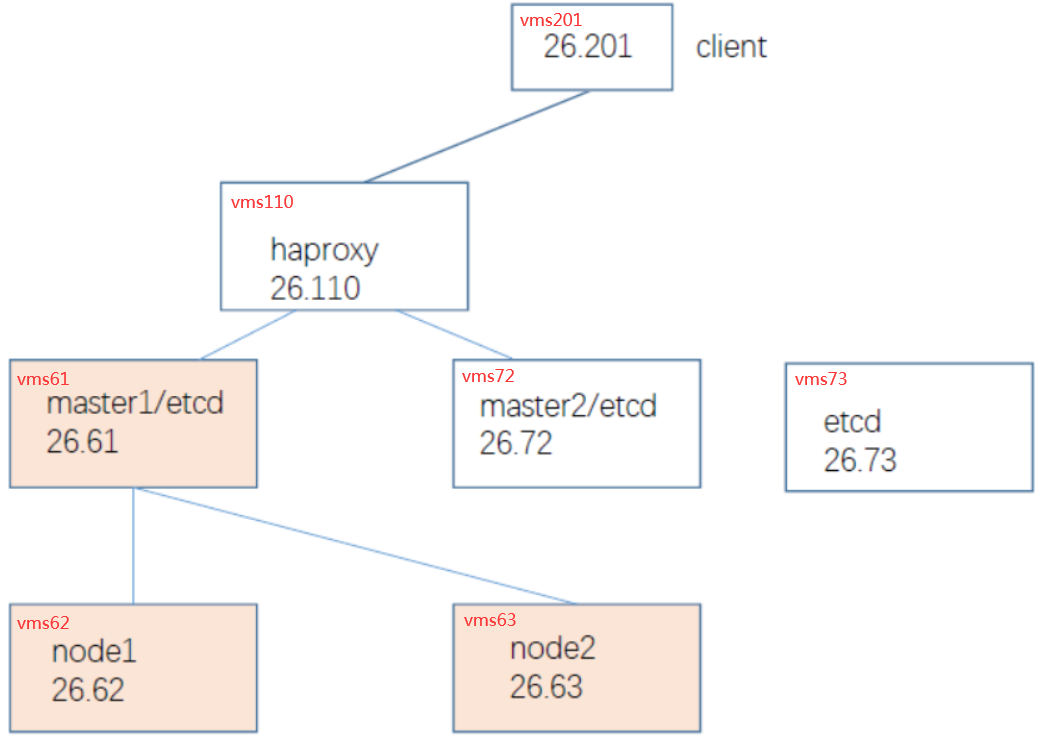
一、实验拓扑图
二、负载均衡部署haproxy(vms110)
安装
[root@vms110 ~]# yum install haproxy
在/etc/haproxy/haproxy.cfg 末尾添加如下几行:
[root@vms110 ~]# vi /etc/haproxy/haproxy.cfg
listen k8s-lb *:6443mode tcpbalance roundrobinserver s1 192.168.26.61:6443 weight 1server s2 192.168.26.72:6443 weight 1
[root@vms110 ~]# systemctl start haproxy[root@vms110 ~]# systemctl enable haproxy[root@vms110 ~]# netstat -ntulp |grep 6443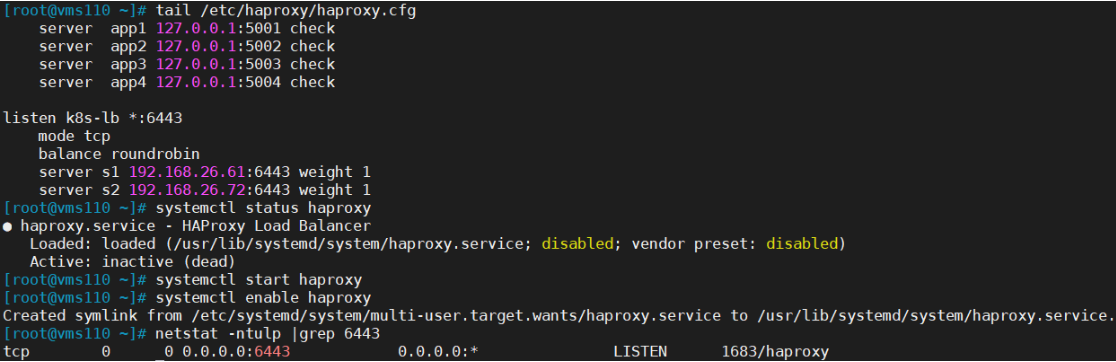
三、etcd集群部署(vms61、vms72、vms73)
在两台master(vms61、vms72)上及第三台(vms73)上安装etcd:
- vms61重置和安装etcd:(由于k8s不能以容器方式运行,需要重置)
[root@vms61 ~]# netstat -ntulp |grep 2379[root@vms61 ~]# kubeadm reset # 需要 rm -rf $HOME/.kube 、rm -rf /etc/kubernetes[root@vms61 ~]# yum install etcd -y
- vms72、vms73:安装etcd
[root@vms72 ~]# yum install etcd -y[root@vms73 ~]# yum install etcd -y
配置etcd:
[root@vms61~]# vi /etc/etcd/etcd.conf
ETCD_DATA_DIR="/var/lib/etcd/cluster.etcd"ETCD_LISTEN_PEER_URLS="http://192.168.26.61:2380,http://localhost:2380"ETCD_LISTEN_CLIENT_URLS="http://192.168.26.61:2379,http://localhost:2379"ETCD_NAME="etcd-61"ETCD_INITIAL_ADVERTISE_PEER_URLS="http://192.168.26.61:2380"ETCD_ADVERTISE_CLIENT_URLS="http://localhost:2379,http://192.168.26.61:2379"ETCD_INITIAL_CLUSTER="etcd-61=http://192.168.26.61:2380,etcd-72=http://192.168.26.72:2380,etcd-73=http://192.168.26.73:2380"ETCD_INITIAL_CLUSTER_TOKEN="etcd-cluster"ETCD_INITIAL_CLUSTER_STATE="new"
[root@vms72~]# vi /etc/etcd/etcd.conf
ETCD_DATA_DIR="/var/lib/etcd/cluster.etcd"ETCD_LISTEN_PEER_URLS="http://192.168.26.72:2380,http://localhost:2380"ETCD_LISTEN_CLIENT_URLS="http://192.168.26.72:2379,http://localhost:2379"ETCD_NAME="etcd-72"ETCD_INITIAL_ADVERTISE_PEER_URLS="http://192.168.26.72:2380"ETCD_ADVERTISE_CLIENT_URLS="http://localhost:2379,http://192.168.26.72:2379"ETCD_INITIAL_CLUSTER="etcd-61=http://192.168.26.61:2380,etcd-72=http://192.168.26.72:2380,etcd-73=http://192.168.26.73:2380"ETCD_INITIAL_CLUSTER_TOKEN="etcd-cluster"ETCD_INITIAL_CLUSTER_STATE="new"
[root@vms73~]# vi /etc/etcd/etcd.conf
ETCD_DATA_DIR="/var/lib/etcd/cluster.etcd"ETCD_LISTEN_PEER_URLS="http://192.168.26.73:2380,http://localhost:2380"ETCD_LISTEN_CLIENT_URLS="http://192.168.26.73:2379,http://localhost:2379"ETCD_NAME="etcd-73"ETCD_INITIAL_ADVERTISE_PEER_URLS="http://192.168.26.73:2380"ETCD_ADVERTISE_CLIENT_URLS="http://localhost:2379,http://192.168.26.73:2379"ETCD_INITIAL_CLUSTER="etcd-61=http://192.168.26.61:2380,etcd-72=http://192.168.26.72:2380,etcd-73=http://192.168.26.73:2380"ETCD_INITIAL_CLUSTER_TOKEN="etcd-cluster"ETCD_INITIAL_CLUSTER_STATE="new"
启动etcd
[root@vms61 ~]# systemctl start etcd[root@vms72 ~]# systemctl start etcd[root@vms73 ~]# systemctl start etcd[root@vms73 ~]# etcdctl member list
[root@vms61 ~]# systemctl enable etcd[root@vms72 ~]# systemctl enable etcd[root@vms73 ~]# systemctl enable etcd
3个节点的etcd集群,必须要有2个(过半数)正常,etcd才能使用
四、k8s集群部署
1、在所有master(vms61和vms72)及worker(vms62和vms63)上分别安装:
- 设置selinux、防火墙、内核参数
- 安装并启动docker
- 安装kubectl、kubeadm、kubelet
- 启动kubelet等
2、在所有节点编辑或同步
/etc/hosts:[root@vms61 ~]# vi /etc/hosts192.168.26.61 vms61.example.com vms61192.168.26.62 vms62.example.com vms62192.168.26.63 vms63.example.com vms63192.168.26.72 vms72.example.com vms72
[root@vms61 ~]# scp /etc/hosts vms62:/etc/hosts[root@vms61 ~]# scp /etc/hosts vms63:/etc/hosts[root@vms61 ~]# scp /etc/hosts vms72:/etc/hosts3、在所有节点配置
k8s.conf~]# vi /etc/sysctl.d/k8s.confnet.bridge.bridge-nf-call-ip6tables = 1net.bridge.bridge-nf-call-iptables = 1net.ipv4.ip_forward = 1
~]# sysctl -p /etc/sysctl.d/k8s.conf4、在所有节点安装安装kubectl、kubeadm、kubelet
yum install -y kubelet-1.18.2-0 kubeadm-1.18.2-0 kubectl-1.18.2-0 --disableexcludes=kubernetes
如果安装指定版本失败或出现错误,则删除后安装最新版本yum remove -y kubelet kubeadm kubectlyum install -y kubelet kubeadm kubectl --disableexcludes=kubernetes5、在vms61初始化集群:(master节点)
vi kubeadm-config.yaml #可以在已安装集群使用kubectl config view``获取后再修改apiServer:extraArgs:authorization-mode: Node,RBACtimeoutForControlPlane: 4m0sapiVersion: kubeadm.k8s.io/v1beta2certificatesDir: /etc/kubernetes/pkiclusterName: kubernetescontrolPlaneEndpoint: "192.168.26.110:6443"controllerManager: {}dns:type: CoreDNSetcd:external:endpoints:- "http://192.168.26.61:2379"- "http://192.168.26.72:2379"imageRepository: registry.aliyuncs.com/google_containerskind: ClusterConfigurationkubernetesVersion: v1.18.4networking:dnsDomain: cluster.localpodSubnet: 10.244.0.0/16serviceSubnet: 10.96.0.0/12scheduler: {}
[root@vms61 ~]# systemctl enable kubelet --now[root@vms61 ~]# systemctl is-active kubelet[root@vms61 ~]# kubeadm init --config=kubeadm-config.yaml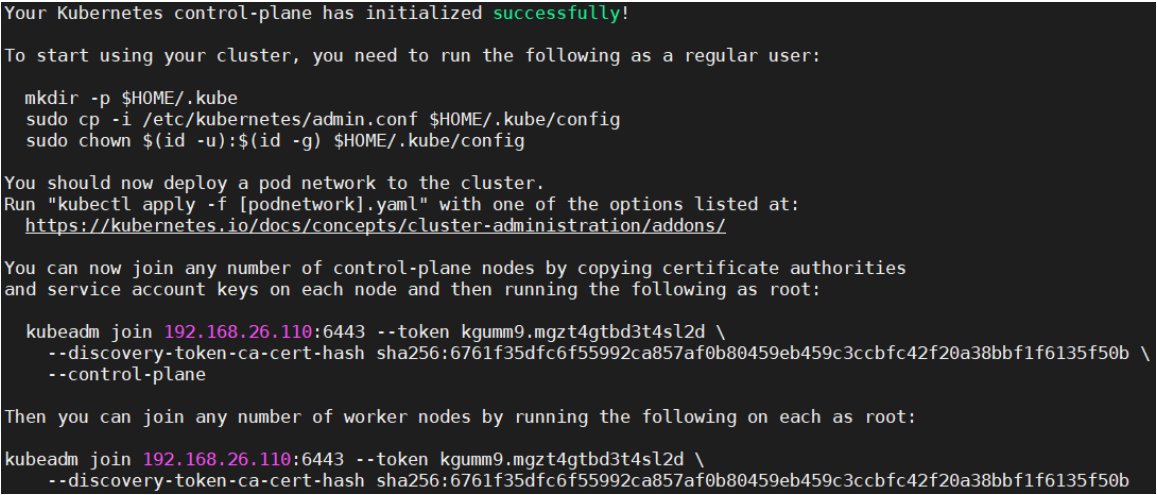 ```
Your Kubernetes control-plane has initialized successfully!
```
Your Kubernetes control-plane has initialized successfully!
To start using your cluster, you need to run the following as a regular user:
mkdir -p $HOME/.kube sudo cp -i /etc/kubernetes/admin.conf $HOME/.kube/config sudo chown $(id -u):$(id -g) $HOME/.kube/config
You should now deploy a pod network to the cluster. Run “kubectl apply -f [podnetwork].yaml” with one of the options listed at: https://kubernetes.io/docs/concepts/cluster-administration/addons/
You can now join any number of control-plane nodes by copying certificate authorities and service account keys on each node and then running the following as root:
kubeadm join 192.168.26.110:6443 —token kgumm9.mgzt4gtbd3t4sl2d \ —discovery-token-ca-cert-hash sha256:6761f35dfc6f55992ca857af0b80459eb459c3ccbfc42f20a38bbf1f6135f50b \ —control-plane
Then you can join any number of worker nodes by running the following on each as root:
kubeadm join 192.168.26.110:6443 —token kgumm9.mgzt4gtbd3t4sl2d \ —discovery-token-ca-cert-hash sha256:6761f35dfc6f55992ca857af0b80459eb459c3ccbfc42f20a38bbf1f6135f50b
<a name="PHxgn"></a>#### 6、将vms62、vms63 加入集群节点:(worker节点)> kubeadm join 192.168.26.110:6443 --token kgumm9.mgzt4gtbd3t4sl2d --discovery-token-ca-cert-hash sha256:6761f35dfc6f55992ca857af0b80459eb459c3ccbfc42f20a38bbf1f6135f50b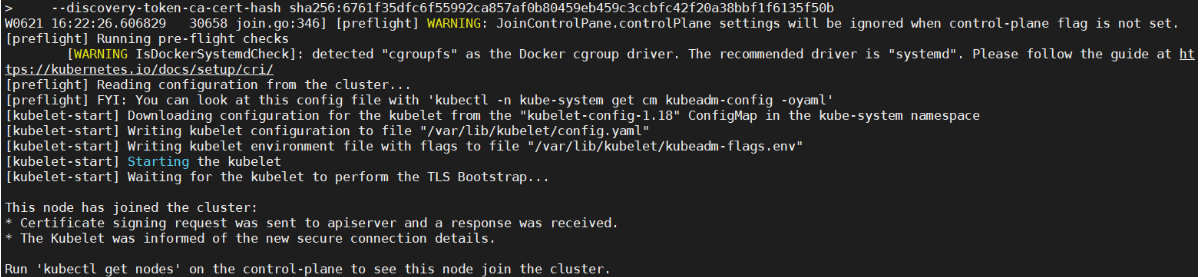<a name="QecQH"></a>#### 7、在vms72:(master节点二)以master身份加入集群> 配置docker镜像仓库`[root@vms72 ~]# vi /etc/docker/daemon.json````json{"registry-mirrors": ["https://5gce61mx.mirror.aliyuncs.com"]}
从vms61(master)将以下文件复制到
/etc/kubernetes/pki目录
[root@vms61 ~]# cat cert.txt/etc/kubernetes/pki/ca.crt/etc/kubernetes/pki/ca.key/etc/kubernetes/pki/sa.key/etc/kubernetes/pki/sa.pub/etc/kubernetes/pki/front-proxy-ca.crt/etc/kubernetes/pki/front-proxy-ca.key
[root@vms72 ~]# mkdir -p /etc/kubernetes/pki[root@vms61 ~]# scp /etc/kubernetes/pki/sa.* vms72:/etc/kubernetes/pki[root@vms61 ~]# scp /etc/kubernetes/pki/ca.* vms72:/etc/kubernetes/pki[root@vms61 ~]# scp /etc/kubernetes/pki/front-proxy-ca.* vms72:/etc/kubernetes/pki
[root@vms72 ~]# kubeadm join 192.168.26.110:6443 —token kgumm9.mgzt4gtbd3t4sl2d —discovery-token-ca-cert-hash sha256:6761f35dfc6f55992ca857af0b80459eb459c3ccbfc42f20a38bbf1f6135f50b —control-plane
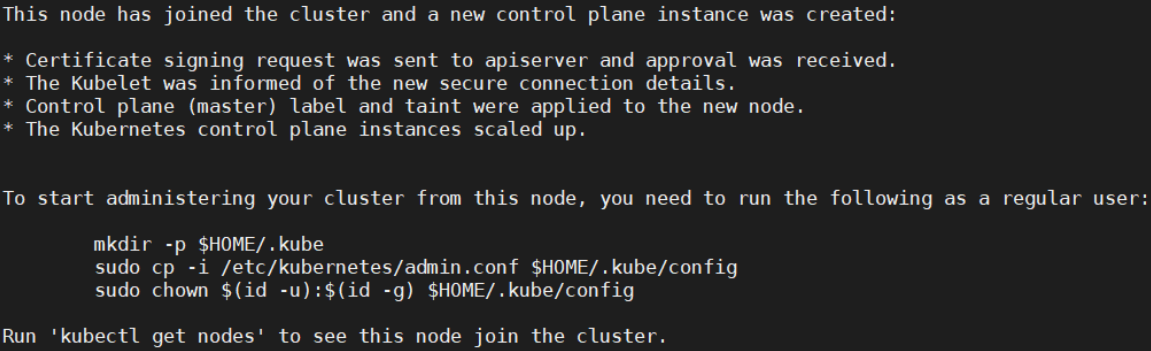
This node has joined the cluster and a new control plane instance was created:* Certificate signing request was sent to apiserver and approval was received.* The Kubelet was informed of the new secure connection details.* Control plane (master) label and taint were applied to the new node.* The Kubernetes control plane instances scaled up.To start administering your cluster from this node, you need to run the following as a regular user:mkdir -p $HOME/.kubesudo cp -i /etc/kubernetes/admin.conf $HOME/.kube/configsudo chown $(id -u):$(id -g) $HOME/.kube/configRun 'kubectl get nodes' to see this node join the cluster.
[root@vms72 ~]# mkdir -p $HOME/.kube[root@vms72 ~]# sudo cp -i /etc/kubernetes/admin.conf $HOME/.kube/config[root@vms72 ~]# sudo chown $(id -u):$(id -g) $HOME/.kube/config[root@vms72 ~]# kubectl get nodes #查看到新加入节点NotReady
NAME STATUS ROLES AGE VERSIONvms61.example.com Ready master 38m v1.18.4vms62.example.com Ready <none> 37m v1.18.4vms63.example.com Ready <none> 36m v1.18.4vms72.example.com NotReady master 17s v1.18.4
8、在集群所有节点安装网络( calico)
上传:
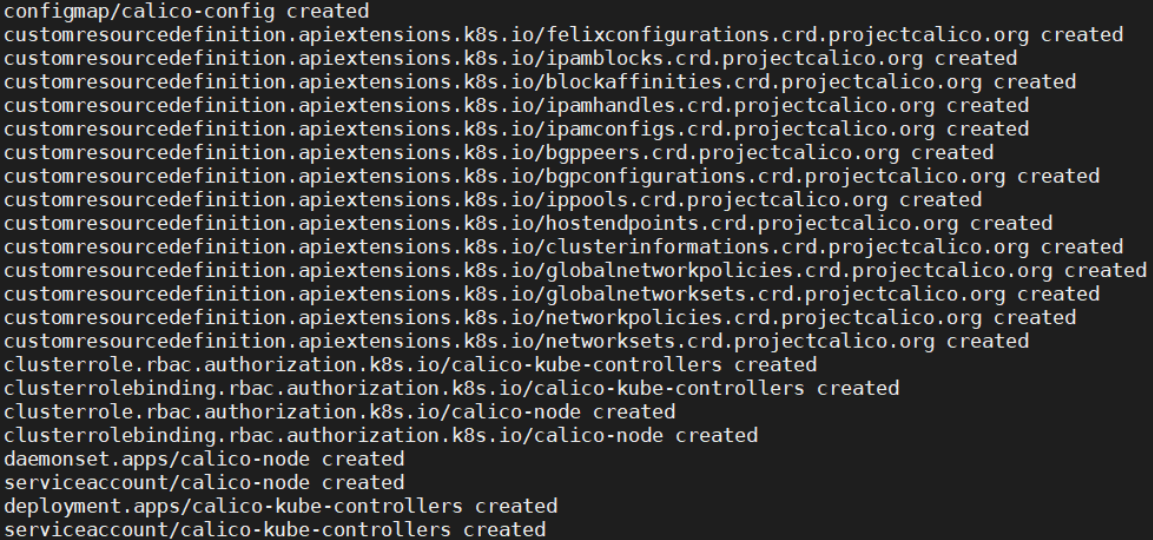
calico_v3_10.tar导入:docker load -i calico_v3_10.tar[root@vms61 ~]# kubectl apply -f calico_v3.10.yaml[root@vms72 ~]# kubectl get nodes #查看到所有节点Ready
NAME STATUS ROLES AGE VERSIONvms61.example.com Ready master 58m v1.18.4vms62.example.com Ready <none> 57m v1.18.4vms63.example.com Ready <none> 56m v1.18.4vms72.example.com Ready master 20m v1.18.49、验证与测试高可用
在两个master(vms72、vms61)都可查看、使用集群
[root@vms72 ~]# kubectl create ns ns2[root@vms61 ~]# ``kubectl get ns
安装kubectl客户端(vms201)
[root@vms61 ~]# rpm -qa|grep kubectl
kubectl-1.18.4-0.x86_64
[root@vms201 ~]# yum install kubectl-1.18.4-0.x86_64
使用装kubectl客户端(vms201)通过负载(vms110)访问集群
- 在所有master上(vms72、vms61)
vim /etc/kubernetes/manifests/kube-apiserver.yaml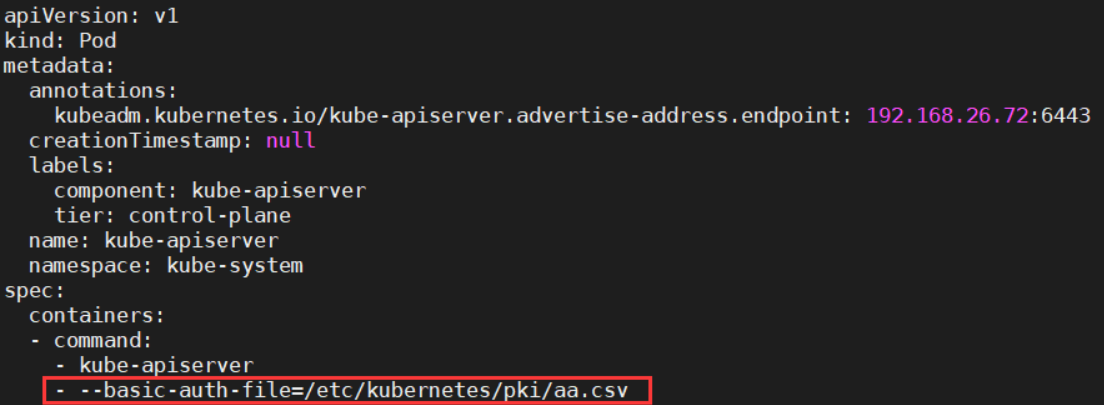
- --basic-auth-file=/etc/kubernetes/pki/aa.csv #aa.csv必须放在这个目录,放在其他目录有可能访问不到vi /etc/kubernetes/pki/aa.csv #密码文件格式:密码,用户名,uid
redhat,admin,1redhat,tom,2redhat,bob,3
- 重启kubelet
[root@vms61 ~]# systemctl restart kubelet
[root@vms72 ~]# systemctl restart kubelet
- 在任意master节点
[root@vms72 ~]# kubectl create clusterrolebinding cluster-test2 --clusterrole=cluster-admin --user=admin
测试一(通过两个master、负载均可访问)
kubectl -s="``[https://192.168.26.110:6443](https://192.168.26.110:6443)``" --insecure-skip-tls-verify=true --username="admin" --password="redhat" get nodes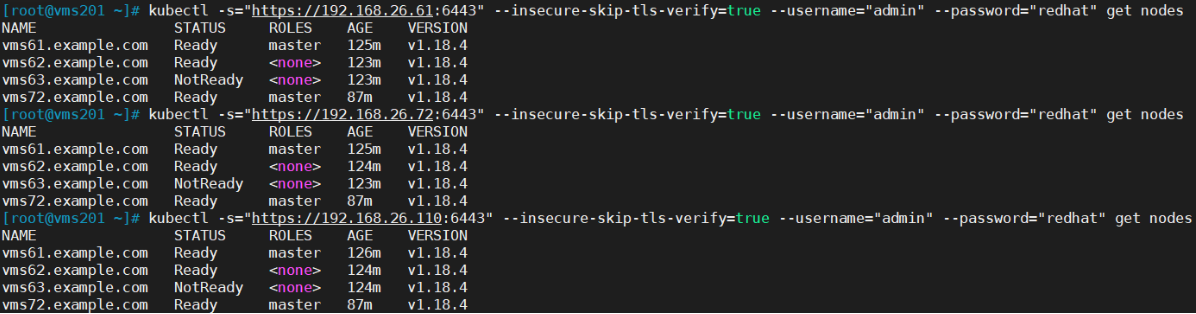
测试二(关闭其中一个master节点vms61,集群仍可通过负载访问。etcd集群需要保持2个节点正常才可以使用)
kubectl -s="``[https://192.168.26.110:6443](https://192.168.26.110:6443)``" --insecure-skip-tls-verify=true --username="admin" --password="redhat" get nodes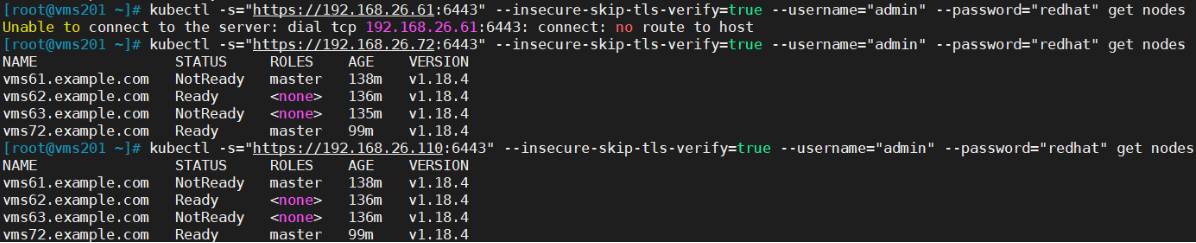
至此,完美成功实现了k8s有master节点高可用。

若有收获,就点个赞吧
0 人点赞
