1、理论基础
1)问题
Pod生成后会自动获取一个集群内部IP,Pod重新调度后,会重新分配IP,IP网段由安装时指定的参数—pod-network-cidr决定。
Kubernetes Pod 是有生命周期的。 它们可以被创建,而且销毁之后不会再启动。 如果你使用 Deployment 来运行你的应用程序,则它可以动态创建和销毁 Pod。
每个 Pod 都有自己的 IP 地址,但是在 Deployment 中,在同一时刻运行的 Pod 集合可能与稍后运行该应用程序的 Pod 集合不同。
这导致了一个问题: 如果一组 Pod(称为“后端”)为集群内的其他 Pod(称为“前端”)提供功能, 那么前端如何找出并跟踪要连接的 IP 地址,以便前端可以使用工作量的后端部分?
2)Service资源
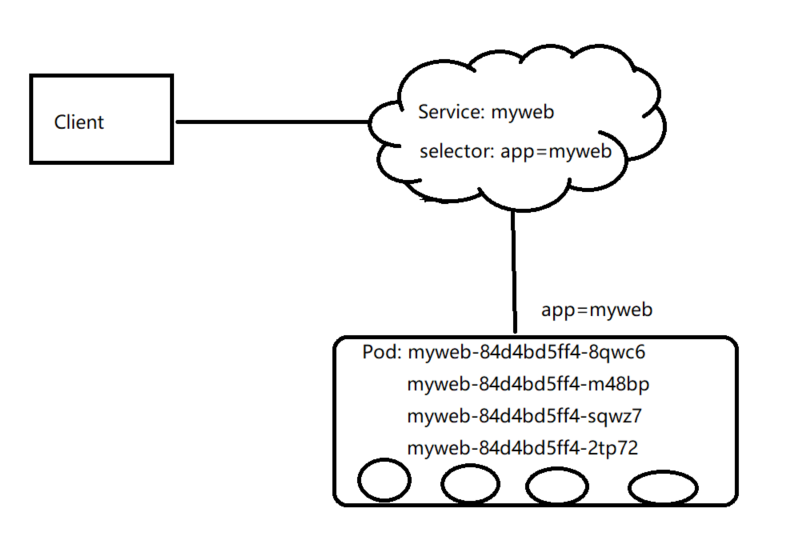
Service是一种为一组功能相同的pod提供单一不变的接入点的资源。service存在时,它的IP和端口不会改变。通常,service通过标签和指定pod进行匹配。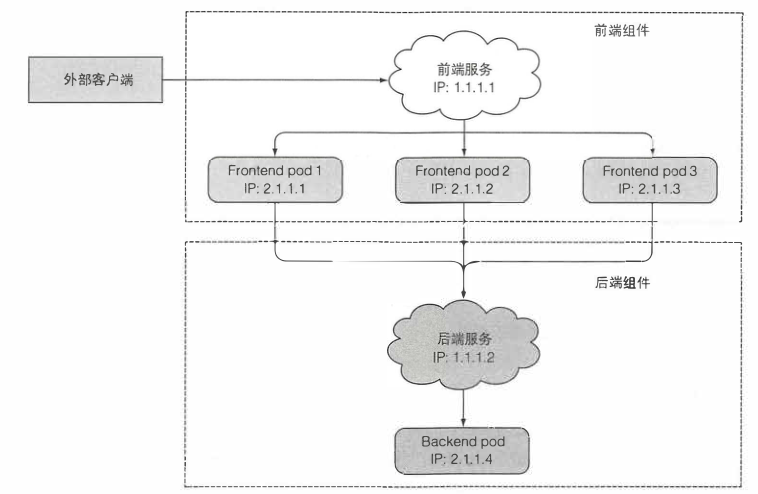
3)网络实现
service IP为集群中的虚拟IP,不是实际存在的,所以是无法PING。service网络由每个节点上运行的kube-proxy实现,kube-proxy常见实现模式有两种:
1) iptables (默认)
2)IPVS
查看你的集群中的实现模式:
[root@clientvm ~]# kubectl get configmaps kube-proxy -n kube-system -o yaml | grep -i modedetectLocalMode: ""mode: ""
如果没有设置,默认为iptables。
更改kube-proxy的实现模式需要在安装集群时,修改集群配置文件,增加kube-proxy相关配置。
https://github.com/kubernetes/kubernetes/blob/master/pkg/proxy/ipvs/README.md
...---apiVersion: kubeproxy.config.k8s.io/v1alpha1kind: KubeProxyConfigurationclusterCIDR: "10.244.0.0/16"mode: "ipvs"ipvs:minSyncPeriod: 5ssyncPeriod: 5sscheduler: "wrr"
查看IPVS网络
[root@master ~]# yum -y install ipvsadm[root@master ~]# ipvsadm -lnIP Virtual Server version 1.2.1 (size=4096)Prot LocalAddress:Port Scheduler Flags-> RemoteAddress:Port Forward Weight ActiveConn InActConnTCP 10.96.0.1:443 wrr-> 192.168.198.129:6443 Masq 1 4 0TCP 10.96.0.10:53 wrr-> 10.244.204.65:53 Masq 1 0 0-> 10.244.204.66:53 Masq 1 0 0TCP 10.96.0.10:9153 wrr-> 10.244.204.65:9153 Masq 1 0 0-> 10.244.204.66:9153 Masq 1 0 0UDP 10.96.0.10:53 wrr-> 10.244.204.65:53 Masq 1 0 0-> 10.244.204.66:53 Masq 1 0 0
4)查看service网络

5)定义service
假定有一组 Pod,它们对外暴露了 9376 端口,同时还被打上 app=MyApp 标签。
apiVersion: v1kind: Servicemetadata:name: my-servicespec:selector:app: MyAppports:- protocol: TCPport: 80targetPort: 9376
上述配置创建一个名称为 “my-service” 的 Service 对象,它会将请求代理到使用 TCP 端口 9376,并且具有标签 "app=MyApp" 的 Pod 上。 Kubernetes 为该服务分配一个 IP 地址(有时称为 “集群IP”),该 IP 地址由服务代理使用。 服务selector 的控制器不断扫描与其选择器匹配的 Pod,然后将所有更新发布到也称为 “my-service” 的 Endpoint 对象。
2、Service 操作范例
1) 创建Deployment
[root@clientvm ~]# cat Dep-myweb.yamlapiVersion: apps/v1kind: Deploymentmetadata:labels:app: mywebname: mywebnamespace: mytestspec:replicas: 4selector:matchLabels:app: mywebtemplate:metadata:creationTimestamp: nulllabels:app: mywebspec:containers:- image: nginxname: nginximagePullPolicy: IfNotPresent
[root@clientvm ~]# kubectl apply -f Dep-myweb.yamldeployment.apps/myweb created[root@clientvm ~]# kubectl get pod -n mytest -o wideNAME READY STATUS RESTARTS AGE IP NODE NOMINATED NODE READINESS GATESmyweb-84d4bd5ff4-2tp72 1/1 Running 0 5m6s 10.244.2.50 worker2.example.com <none> <none>myweb-84d4bd5ff4-8qwc6 1/1 Running 0 5m6s 10.244.1.37 worker1.example.com <none> <none>myweb-84d4bd5ff4-m48bp 1/1 Running 0 5m6s 10.244.1.38 worker1.example.com <none> <none>myweb-84d4bd5ff4-sqwz7 1/1 Running 0 5m6s 10.244.2.51 worker2.example.com <none> <none>
2) 创建Service
[root@clientvm ~]# kubectl create service clusterip -hCreate a ClusterIP service with the specified name.Usage:kubectl create service clusterip NAME [--tcp=<port>:<targetPort>] [--dry-run=server|client|none] [options]Examples:# Create a new ClusterIP service named my-cskubectl create service clusterip my-cs --tcp=5678:8080# Create a new ClusterIP service named my-cs (in headless mode)kubectl create service clusterip my-cs --clusterip="None"
[root@clientvm ~]# kubectl create service clusterip myweb --tcp=80:80 -n mytestservice/myweb created[root@clientvm ~]# kubectl get service -n mytestNAME TYPE CLUSTER-IP EXTERNAL-IP PORT(S) AGEmyweb ClusterIP 10.97.70.147 <none> 80/TCP 86s[root@clientvm ~]# kubectl describe service -n mytest mywebName: mywebNamespace: mytestLabels: app=mywebAnnotations: <none>Selector: app=mywebType: ClusterIPIP: 10.97.70.147Port: 80-80 80/TCPTargetPort: 80/TCPEndpoints: 10.244.1.37:80,10.244.1.38:80,10.244.2.50:80 + 1 more...
注意比较Endpoint IP与deployment中的Pod IP。
3)验证Service
[root@master ~]# kubectl run busybox --image=nginx -n mytest -- sleep 10000pod/busybox created[root@master ~]# kubectl get pod -n mytestNAME READY STATUS RESTARTS AGEbusybox 1/1 Running 0 8s[root@master ~]# kubectl exec busybox -n mytest -it -- bashroot@busybox:/#root@busybox:/# curl myweb<!DOCTYPE html><html><head><title>Welcome to nginx!</title>......root@busybox:/# curl 10.244.1.37<!DOCTYPE html><html><head><title>Welcome to nginx!</title>......
4)范例理解
3、服务发现
service的工作范围为集群内部。集群内部,同一nameSpace中所有的Pod都能通过Service访问后端的Pod。
Kubernetes为Pod发现服务提供以下几种方式:
1)环境变量
[root@clientvm ~]# kubectl get svc -n mytestNAME TYPE CLUSTER-IP EXTERNAL-IP PORT(S) AGEmyweb ClusterIP 10.97.70.147 <none> 80/TCP 141m[root@clientvm ~]# kubectl exec busybox -n mytest -- env | grep -i serviceMYWEB_SERVICE_PORT=80KUBERNETES_SERVICE_PORT=443KUBERNETES_SERVICE_PORT_HTTPS=443MYWEB_SERVICE_HOST=10.97.70.147MYWEB_SERVICE_PORT_80_80=80
2) DNS
[root@clientvm ~]# kubectl run dns --image=busybox -n mytest -- sleep 10000pod/dns created[root@clientvm ~]# kubectl exec dns -n mytest -- nslookup mywebServer: 10.96.0.10Address: 10.96.0.10:53Name: myweb.mytest.svc.example.comAddress: 10.97.70.147
4、几种不同的Service类型
4.1 简介
[root@clientvm ~]# kubectl create service -hCreate a service using specified subcommand.Aliases:service, svcAvailable Commands:clusterip Create a ClusterIP service.externalname Create an ExternalName service.loadbalancer Create a LoadBalancer service.nodeport Create a NodePort service.Usage:kubectl create service [flags] [options]
ClusterIP: 如以上范例所示,ClusterIP主要用于集群内部访问Pod。
ExternalName:用于连接外部服务,其本质是在集群DNS上创建一个指向外部域名的CNAME记录,因此连接到这类service的客户端会直接访问到外部资源。
NodePort: 在每个集群节点上都打开一个端口,并在该端口上接收流量并转发到内部的Pod,通过NodePort可以暴露服务到集群外部。
LoadBalancer: NodePort类型的扩展,由K8S外部设施提供负载均衡服务,将流量转发到所以节点的某个端口。需要集群外部基础架构支持。
4.2 ClusterIP
4.3 NodePort范例
创建NodePort Service:
[root@clientvm ~]# kubectl create service nodeport -hCreate a NodePort service with the specified name.Examples:# Create a new NodePort service named my-nskubectl create service nodeport my-ns --tcp=5678:8080Usage:kubectl create service nodeport NAME [--tcp=port:targetPort] [--dry-run=server|client|none] [options]
[root@clientvm ~]# kubectl create service nodeport myweb-nodeport -n mytest --tcp=80:80service/myweb-nodeport created[root@clientvm ~]# kubectl edit service myweb-nodeport -n mytest......selector:app: myweb. ......[root@clientvm ~]# kubectl get service -n mytestNAME TYPE CLUSTER-IP EXTERNAL-IP PORT(S) AGEmyweb ClusterIP 10.97.70.147 <none> 80/TCP 3h16mmyweb-nodeport NodePort 10.110.40.185 <none> 80:30568/TCP 88s[root@clientvm ~]# kubectl describe service -n mytest myweb-nodeportName: myweb-nodeportNamespace: mytestLabels: app=myweb-nodeportAnnotations: <none>Selector: app=mywebType: NodePortIP: 10.110.40.185Port: 80-80 80/TCPTargetPort: 80/TCPNodePort: 80-80 30568/TCPEndpoints: 10.244.1.37:80,10.244.1.38:80,10.244.2.50:80 + 1 more...Session Affinity: NoneExternal Traffic Policy: ClusterEvents: <none>[root@clientvm ~]# curl worker1:30568<!DOCTYPE html><html><head><title>Welcome to nginx!</title>......##到节点上验证,有端口在侦听[root@worker2 ~]# netstat -ntlp | grep 30568tcp 0 0 0.0.0.0:30568 0.0.0.0:* LISTEN 48001/kube-proxy
4.4 ExternalName范例
Externalname的本质就是在DNS中创建一条CNAME记录,通常可用于跨NameSpace服务访问的链接,访问外部url资源等场景。
[root@clientvm ~]# kubectl create service externalname -hCreate an ExternalName service with the specified name.ExternalName service references to an external DNS address instead of only pods, which will allow application authorsto reference services that exist off platform, on other clusters, or locally.Examples:# Create a new ExternalName service named my-nskubectl create service externalname my-ns --external-name bar.comUsage:kubectl create service externalname NAME --external-name external.name [--dry-run=server|client|none] [options]
## 创建ExternalName[root@clientvm ~]# kubectl create service externalname my-ns --external-name www.qq.comservice/my-ns created## 创建测试工具Pod[root@clientvm ~]# kubectl run tools --image=tutum/dnsutils --image-pull-policy=IfNotPresent -- sleep 1000pod/tools createdroot@tools:/# ping my-nsPING ins-r23tsuuf.ias.tencent-cloud.net (121.14.77.201) 56(84) bytes of data.64 bytes from 121.14.77.201: icmp_seq=1 ttl=127 time=6.66 ms64 bytes from 121.14.77.201: icmp_seq=2 ttl=127 time=6.63 msroot@tools:/# dig -t cname my-ns.default.svc.example.com;; QUESTION SECTION:;my-ns.default.svc.example.com. IN CNAME;; ANSWER SECTION:my-ns.default.svc.example.com. 30 IN CNAME www.qq.com.
4.5 LoadBalancer类型
1)介绍
在云提供商的Kubernetes集群中,您请求负载均衡器,云平台为您分配IP地址。在自建的集群中,可以使用MetallB负责该这一类型的IP分配。
Metallb无法从空气中创建IP地址,因此您必须提供它可以使用的IP地址池。 Metallb将根据服务需求分配IP,并提供服务。
如何获取MetallB的IP地址池取决于您的环境。如果您在托管设施中运行裸机集群,则托管提供商可能提供IP地址以供租赁。在这种情况下,您将租赁,例如IP空间(64个地址),并为MetallB提供群集服务的范围。
或者,您的群集可能是纯粹的私人,为附近的LAN提供服务,但不会暴露在互联网上。在这种情况下,您可以从其中一个私有地址空间中选择一系列IP,并将那些分配给MetallB。此类地址是免费的,只要您只为您的LAN提供集群服务,就可以正常工作。
官网https://metallb.universe.tf/
架构如下图: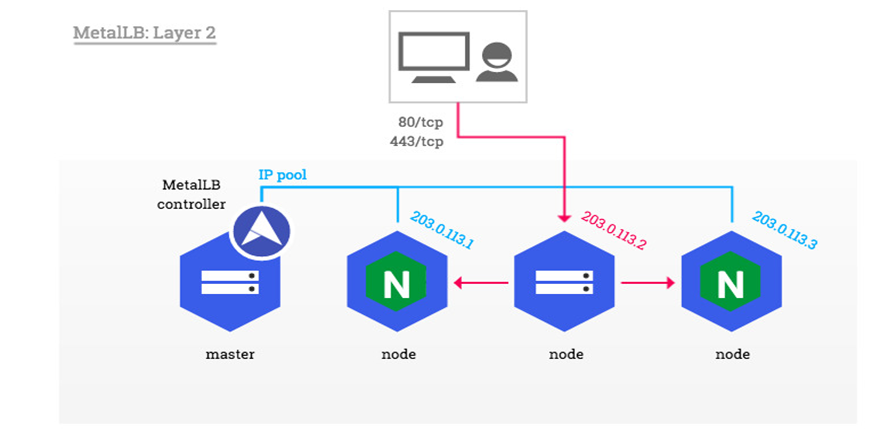
2)安装前准备
如果你的kube-proxy使用的IPVS模式,那么必须手动启用strict ARP模式。如果是iptable模式,可忽略这一步骤。
要验证使用模式,可在任一节点上执行:
[root@prod-master-01 ~]# curl http://localhost:10249/proxyModeiptables
为IPVS启用strict ARP:
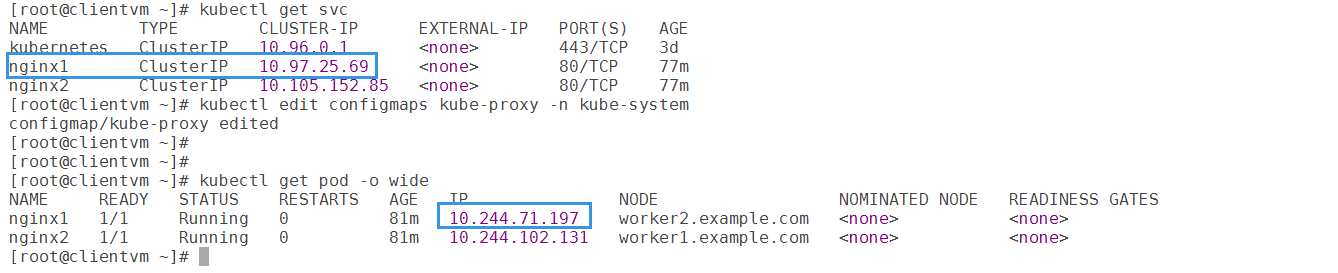
kubectl edit configmap -n kube-system kube-proxy
apiVersion: kubeproxy.config.k8s.io/v1alpha1kind: KubeProxyConfigurationmode: "ipvs"ipvs:strictARP: true
3)安装MetalLB
[root@clientvm k8s]# kubectl apply -f /resources/yaml/matelLB/namespace.yamlnamespace/metallb-system created[root@clientvm k8s]# kubectl apply -f /resources/yaml/matelLB/metallb.yamlWarning: policy/v1beta1 PodSecurityPolicy is deprecated in v1.21+, unavailable in v1.25+podsecuritypolicy.policy/controller createdpodsecuritypolicy.policy/speaker createdserviceaccount/controller createdserviceaccount/speaker createdclusterrole.rbac.authorization.k8s.io/metallb-system:controller createdclusterrole.rbac.authorization.k8s.io/metallb-system:speaker createdrole.rbac.authorization.k8s.io/config-watcher createdrole.rbac.authorization.k8s.io/pod-lister createdrole.rbac.authorization.k8s.io/controller createdclusterrolebinding.rbac.authorization.k8s.io/metallb-system:controller createdclusterrolebinding.rbac.authorization.k8s.io/metallb-system:speaker createdrolebinding.rbac.authorization.k8s.io/config-watcher createdrolebinding.rbac.authorization.k8s.io/pod-lister createdrolebinding.rbac.authorization.k8s.io/controller createddaemonset.apps/speaker createddeployment.apps/controller created
这将在MetallB-System命名空间下将MetallB部署到群集。清单中的组件是:
MetallB-System / Controller部署。这是处理IP地址分配的群集控制器。
Metallb-system /speaker守护程序。这是讲述您选择的协议的组件,以使服务可以到达。
为controller和speaker创建SA账户,以及组件需要运行的RBAC权限。
安装清单不包括配置文件。MetallB的组件仍将启动,但在您定义和部署ConfigMap之前将保持闲置。
4)配置MetalLB
创建configMap,为matelLB分配IP池:
请根据你的环境,修改IP网段。
[root@clientvm ~]# cat /resources/yaml/matelLB/metalLB-configmap.yamlapiVersion: v1kind: ConfigMapmetadata:namespace: metallb-systemname: configdata:config: |address-pools:- name: defaultprotocol: layer2addresses:- 192.168.126.40-192.168.126.45
kubectl apply -f /resources/yaml/matelLB/metalLB-configmap.yaml
[root@clientvm ~]# kubectl get all -n metallb-systemNAME READY STATUS RESTARTS AGEpod/controller-7dcc8764f4-rhh8k 1/1 Running 0 2m37spod/speaker-4p2g8 1/1 Running 0 2m37spod/speaker-78v9b 1/1 Running 0 2m37spod/speaker-xqh8k 1/1 Running 0 2m37sNAME DESIRED CURRENT READY UP-TO-DATE AVAILABLE NODE SELECTOR AGEdaemonset.apps/speaker 3 3 3 3 3 kubernetes.io/os=linux 2m37sNAME READY UP-TO-DATE AVAILABLE AGEdeployment.apps/controller 1/1 1 1 2m37sNAME DESIRED CURRENT READY AGEreplicaset.apps/controller-7dcc8764f4 1 1 1 2m37s
5)创建LB类型service
[root@clientvm ~]# kubectl create deployment nginx --image=nginx --replicas=3 --image-pull-policy='IfNotPresent'deployment.apps/nginx created[root@clientvm ~]#[root@clientvm ~]# kubectl expose deployment nginx --name myweb --port=80 --type LoadBalancerservice/myweb exposed[root@clientvm ~]#[root@clientvm ~]# kubectl get svcNAME TYPE CLUSTER-IP EXTERNAL-IP PORT(S) AGEkubernetes ClusterIP 10.96.0.1 <none> 443/TCP 19hmyweb LoadBalancer 10.99.138.22 192.168.126.40 80:31581/TCP 7s[root@clientvm ~]# kubectl get podNAME READY STATUS RESTARTS AGEnginx-6799fc88d8-7lt6q 1/1 Running 0 18snginx-6799fc88d8-lcbp7 1/1 Running 0 18snginx-6799fc88d8-tkg57 1/1 Running 0 18s
验证:
[root@clientvm ~]# curl 192.168.126.40<!DOCTYPE html><html><head><title>Welcome to nginx!</title><style>html { color-scheme: light dark; }body { width: 35em; margin: 0 auto;font-family: Tahoma, Verdana, Arial, sans-serif; }</style></head><body><h1>Welcome to nginx!</h1><p>If you see this page, the nginx web server is successfully installed andworking. Further configuration is required.</p><p>For online documentation and support please refer to<a href="http://nginx.org/">nginx.org</a>.<br/>Commercial support is available at<a href="http://nginx.com/">nginx.com</a>.</p><p><em>Thank you for using nginx.</em></p></body></html>
4.6 其他
1)为Service指定ExternallP
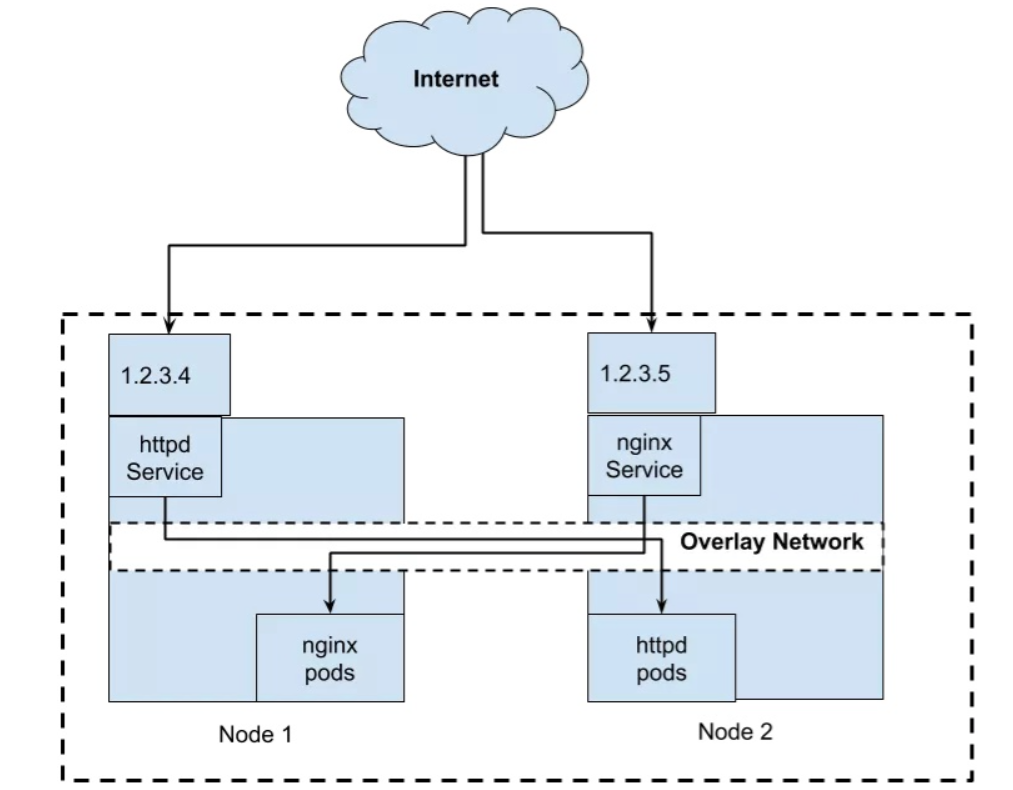
curl 1.2.3.4 —->httpd pod
curl 1.2.3.5 ——> nginx pod
Why not Ingress? Ingress是7层LB,不支持HTTP/HTTPS之外的其他类型协议。
[root@clientvm ~]# cat externalIP.yamlapiVersion: v1kind: Servicemetadata:name: myweb-externalipnamespace: mytestspec:selector:app: myawebports:- name: httpprotocol: TCPport: 80targetPort: 80externalIPs:- 192.168.241.130
192.168.241.130为节点IP。
[root@clientvm ~]# kubectl apply -f externalIP.yamlservice/myweb-externalip configured[root@clientvm ~]#[root@clientvm ~]# kubectl get service -n mytestNAME TYPE CLUSTER-IP EXTERNAL-IP PORT(S) AGEmyweb ClusterIP 10.97.70.147 <none> 80/TCP 4h12mmyweb-externalip ClusterIP 10.99.149.3 192.168.241.130 80/TCP 3mmyweb-externalname ExternalName <none> myweb.mytest.svc.example.com <none> 44mmyweb-nodeport NodePort 10.110.40.185 <none> 80:30568/TCP 57m[root@clientvm ~]# curl 192.168.241.130<!DOCTYPE html><html><head><title>Welcome to nginx!</title>[root@worker1 ~]# netstat -ntlp | grep 80tcp 0 0 192.168.241.130:80 0.0.0.0:* LISTEN 25256/kube-proxy
2)headless服务
headless服务是指ClusterIP定义为None的service。使用无头服务,因为service不再获取到集群IP,因此客户端在访问service时,DNS解析会直接将后端POD的IP返回给客户端,headless服务依然可以提供跨pod的负载均衡,但是通过DNS轮询机制,而不是通过service来代理。
[root@clientvm ~]# cat myweb-headless.yamlapiVersion: v1kind: Servicemetadata:name: myweb-headlessnamespace: mytestspec:ports:- name: 80-80port: 80protocol: TCPtargetPort: 80selector:app: mywebclusterIP: None
[root@clientvm ~]# kubectl apply -f myweb-headless.yamlservice/myweb-headless created[root@clientvm ~]# kubectl get service -n mytestNAME TYPE CLUSTER-IP EXTERNAL-IP PORT(S) AGEmyweb ClusterIP 10.97.70.147 <none> 80/TCP 4h23mmyweb-externalip ClusterIP 10.99.149.3 192.168.241.130 80/TCP 13mmyweb-externalname ExternalName <none> myweb.mytest.svc.example.com <none> 55mmyweb-headless ClusterIP None <none> 80/TCP 9smyweb-nodeport NodePort 10.110.40.185 <none> 80:30568/TCP 67m
[root@clientvm ~]# kubectl exec busybox -n mytest -it -- bashroot@busybox:/# curl myweb-headless<!DOCTYPE html><html><head><title>Welcome to nginx!</title>
[root@clientvm ~]# kubectl exec dns -n mytest -it -- sh/ # nslookup 10.244.1.37Server: 10.96.0.10Address: 10.96.0.10:5337.1.244.10.in-addr.arpa name = 10-244-1-37.myweb-headless.mytest.svc.example.com

若有收获,就点个赞吧
0 人点赞
