k8s-centos8u2-集群部署01:部署架构及规划、DNS、证书签发、docker、harbor、etcd、…
本实验环境每次关机后重启需要检查:
- keepalived是否工作(systemctl status keepalived),vip是否正常。(ip addr查看192.168.26.10是否存在)
- harbaor启动是否正常:在启动目录下docker-compose ps查看是否正常。
- supervisorctl status:查看各进程启动状态。
- 检查docker和k8s集群。
准备
下载CentOS-8.2.2004-x86_64-minimal.iso:http://mirrors.cn99.com/centos/8.2.2004/isos/x86_64/
CentOS-8.2.2004-x86_64-minimal.iso 09-Jun-2020 06:09 2G
- 制作虚拟机模板
- 克隆完整虚拟机
- 设置虚拟机网络
- 安装必要的软件
# systemctl stop firewalld# systemctl disable firewalld# setenforce 0# sed -ir '/^SELINUX=/s/=.+/=disabled/' /etc/selinux/config# yum install -y epel-release# yum install -y wget net-tools telnet tree nmap sysstat lrzsz dos2unix bind-utils vim less
规划
1 主机列表
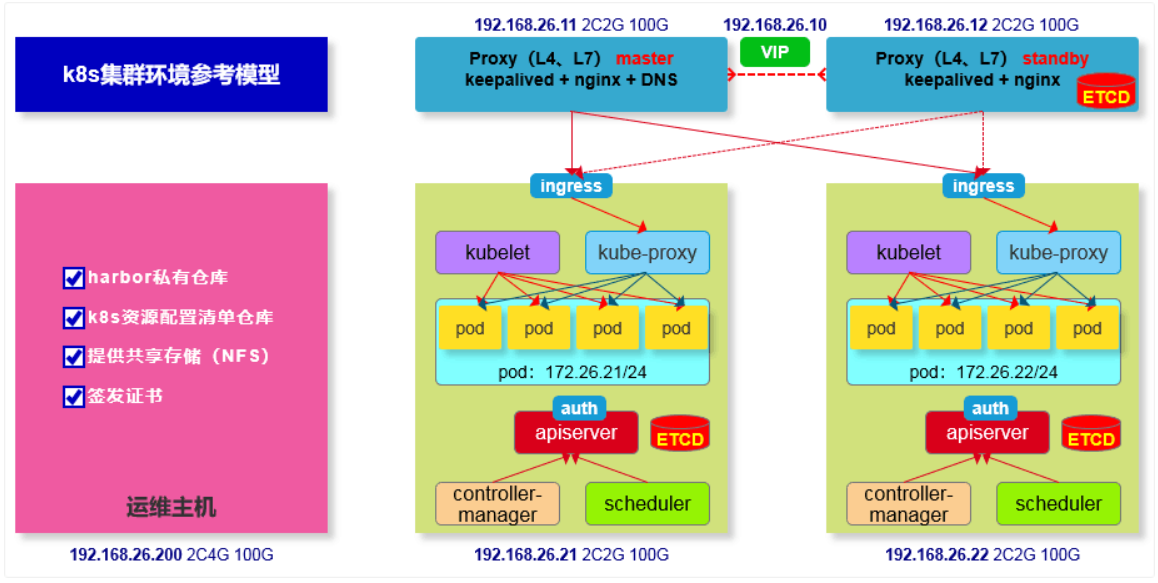
| 主机名 | 角色 | IP | 部署服务 |
|---|---|---|---|
| vms11.cos.com | LB、DNS | 192.168.26.11 | bind9 nginx(四层代理)keepalived supervisior |
| vms12.cos.com | LB、ETCD | 192.168.26.12 | etcd nginx(四层代理)keepalived supervisor |
| vms21.cos.com | k8s master、k8s worker、ETCD | 192.168.26.21 | etcd kube-api kube-conytroller-manager kube-scheduler kube-kubelet kube-proxy supervisior |
| vms22.cos.com | k8s master、k8s worker、ETCD | 192.168.26.22 | etcd kube-api kube-conytroller-manager kube-scheduler kube-kubelet kube-proxy supervisior |
| vms200.cos.com | 运维管理主机 | 192.168.26.200 | 证书服务 docker仓库(harbor) nginx代理本机harbor |
2 部署拓扑
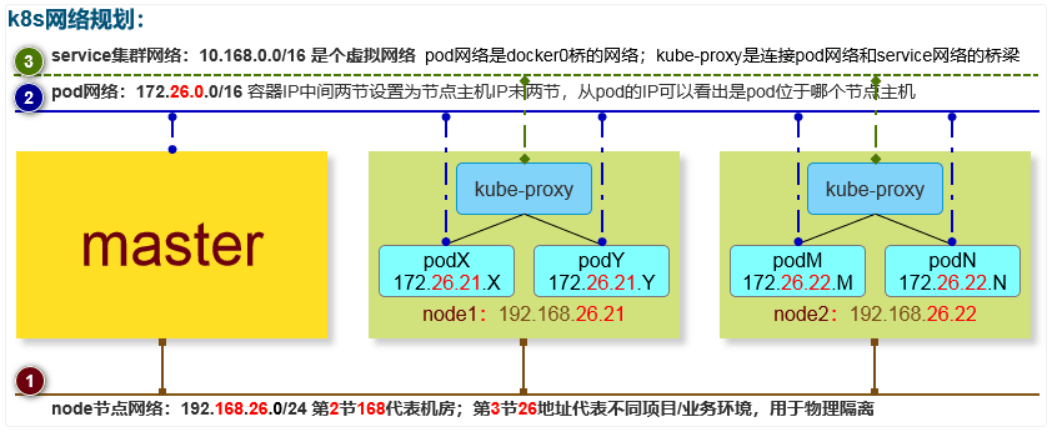
3 网络规划
4 软件列表
| 软件名称及版本 | 下载链接 | 安装方式 | 安装主机 |
|---|---|---|---|
| CentOS-8.2.2004-x86_64-minimal.iso | https://www.centos.org/download/ | VMware® Workstation 15 Pro (15.5.2 build-15785246) | vms11、vms12、vms21、vms22、vms200 |
| bind-9.11.13-3.el8.x86_64 | yum | yum install bind -y | vms11 |
| CFSSL 1.2 | https://pkg.cfssl.org | 下载直接使用 | vms200 |
| docker-19.03.12 | https://download.docker.com/linux/static/stable/x86_64/docker-19.03.12.tgz | 下载解压、配置、systemd | vms200、vms21、vms22 |
| docker-compose-Linux-x86_64-1.26.2 | https://github.com/docker/compose/releases/download/1.26.2/docker-compose-Linux-x86_64 | 下载直接使用 | vms200 |
| harbor-v2.0.1 | https://github.com/goharbor/harbor/releases/download/v2.0.1/harbor-offline-installer-v2.0.1.tgz | install.sh、docker-compose | vms200 |
| nginx-1.14.1 | yum | yum install nginx -y | vms200、vms11、vms12 |
| keepalived-2.0.10 | yum | yum install keepalived -y | vms11、vms12 |
| etcd-v3.4.10-linux-amd64.tar.gz | https://github.com/etcd-io/etcd/releases | 下载解压、配置、supervisor | vms12、vms21、vms22 |
| supervisor-4.2.0 | yum | yum install supervisor -y | vms12、vms21、vms22 |
| kubernetes-v1.18.5 (平滑升级到v1.18.6) | https://dl.k8s.io/v1.18.5/kubernetes-server-linux-amd64.tar.gz | 下载解压、配置、supervisor | vms21、vms22 |
| flannel-v0.12.0 | https://github.com/coreos/flannel/releases | 下载解压、配置、supervisor | vms21、vms22 |
| coredns-1.7.0 | https://github.com/kubernetes/kubernetes/tree/master/cluster/addons/dns/coredns | kubectl apply -f coredns-1.7.0.yaml | vms21、vms22任一节点 |
| Traefik v2.2.7 | https://github.com/containous/traefik | kubectl apply -f traefik-deploy.yaml -n kube-system | vms21、vms22任一节点 |
| dashboard:v2.0.3 | https://github.com/kubernetes/kubernetes/tree/master/cluster/addons/dashboard | kubectl apply -f recommended.yaml | vms21、vms22任一节点 |
| metrics-server:v0.3.7 | https://github.com/kubernetes-sigs/metrics-server | kubectl apply -f components.yaml | vms21、vms22任一节点 |
DNS-bind
在vms11安装bind
1 安装bind
[root@vms11~]# yum install bind -y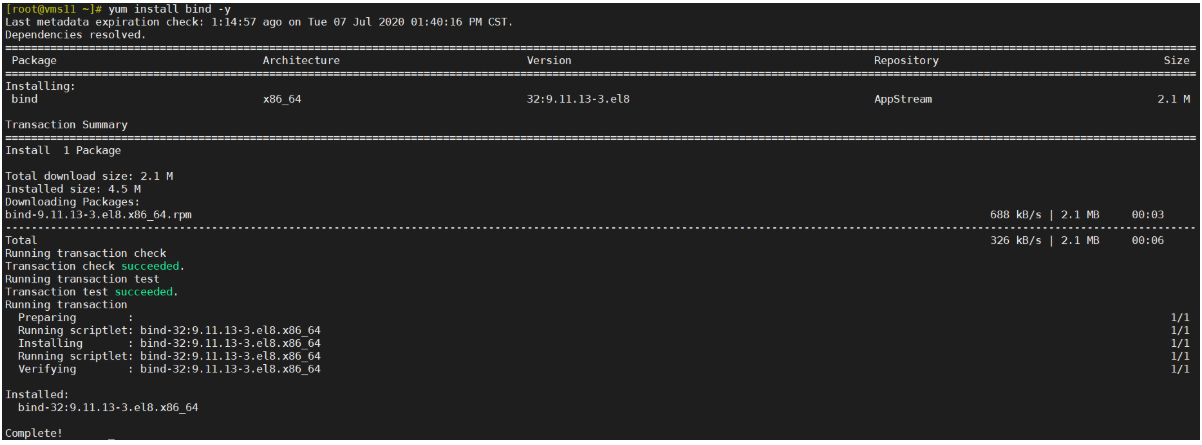
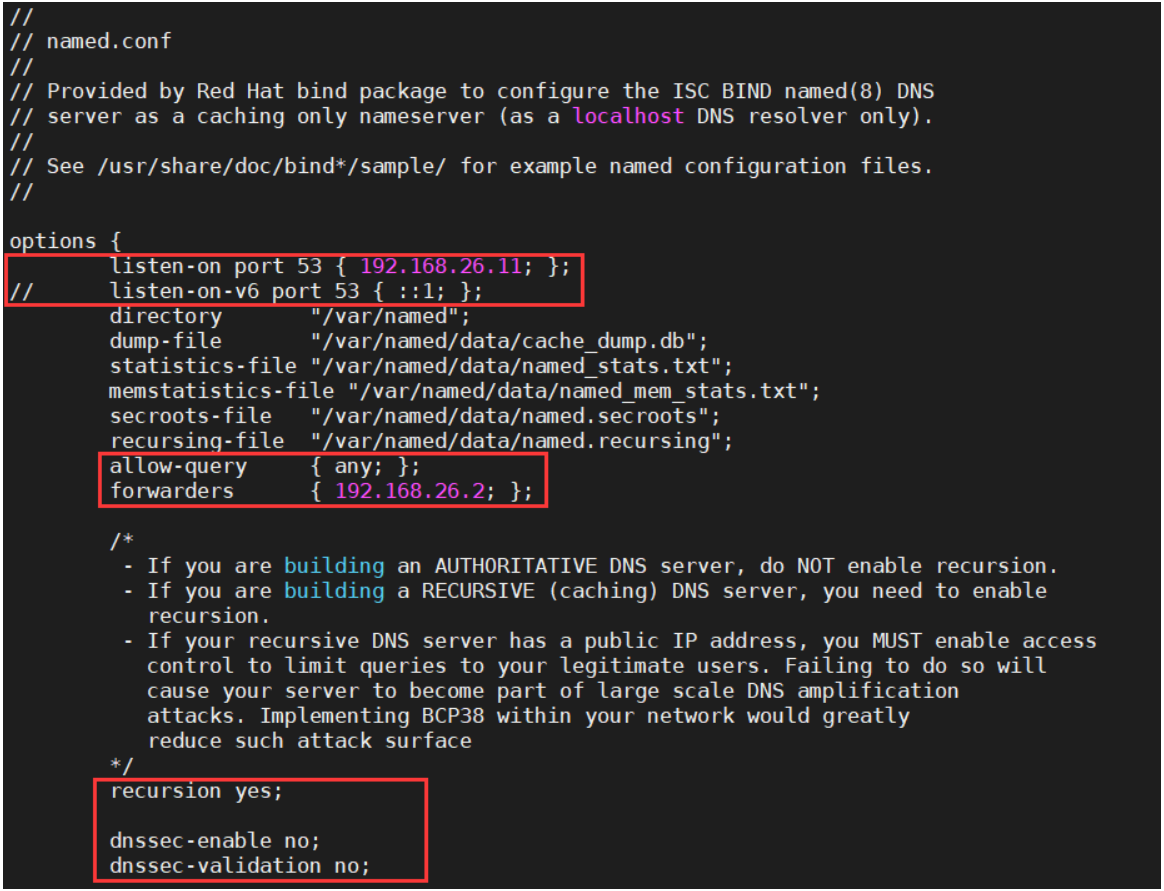
2 编辑/etc/named.conf
[root@vms11~]# vi /etc/named.conf #修改以下内容
listen-on port 53 { 192.168.26.11; }; # 监听本机IPlisten-on-v6 port 53 { ::1; }; # 删除,不监听IPV6allow-query { any; }; # 允许所有主机查看forwarders { 192.168.26.2; }; # 办公网上一级的DNS,(生产写运营商dns)recursion yes; # dns采用递归的查询dnssec-enable no; # 关闭,节省资源(生产可能不需要关闭)dnssec-validation no; # 关闭,节省资源,不做互联网认证
检查配置[root@vms11~]# named-checkconf[root@vms11~]# echo $?
3 编辑区域配置文件
配置区域配置文件,在文件末尾添加 [root@vms11 ~]# vi /etc/named.rfc1912.zones ```ini zone “cos.com” IN { type master; file “cos.com.zone”; allow-update { 192.168.26.11; }; };
zone “op.com” IN { type master; file “op.com.zone”; allow-update { 192.168.26.11; }; };
<a name="eee6de21"></a>### 4 编辑区域数据文件> [root[@vms11 ](/vms11 ) ~]# vi /var/named/cos.com.zone> ```ini$ORIGIN cos.com.$TTL 600 ; 10 minutes@ IN SOA dns.cos.com. dnsadmin.cos.com. (2020070701 ; serial10800 ; refresh (3 hours)900 ; retry (15 minutes)604800 ; expire (1 week)86400 ; minimum (1 day))NS dns.cos.com.$TTL 60 ; 1 minutedns A 192.168.26.11vms11 A 192.168.26.11vms12 A 192.168.26.12vms21 A 192.168.26.21vms22 A 192.168.26.22vms200 A 192.168.26.200
[root@vms11 ~]# vi /var/named/op.com.zone
$ORIGIN op.com.$TTL 600 ; 10 minutes@ IN SOA dns.op.com. dnsadmin.op.com. (20200606 ; serial10800 ; refresh (3 hours)900 ; retry (15 minutes)604800 ; expire (1 week)86400 ; minimum (1 day))NS dns.op.com.$TTL 60 ; 1 minutedns A 192.168.26.11检测区域数据文件 [root@vms11 ~]# named-checkconf [root@vms11 ~]# named-checkzone “cos.com” /var/named/cos.com.zone
zone cos.com/IN: loaded serial 2020070701
OK
[root@vms11 ~]# named-checkzone “op.com” /var/named/op.com.zone
zone op.com/IN: loaded serial 20200606
OK更改文件的属组权限 [root@vms11 ~]# chown root:named /var/named/cos.com.zone
[root@vms11 ~]# chown root:named /var/named/op.com.zone
[root@vms11 ~]# chmod 640 /var/named/cos.com.zone
[root@vms11 ~]# chmod 640 /var/named/op.com.zone
5 启动bind服务,并测试
[root@vms11 ~]# systemctl start named ; systemctl enable named
Created symlink /etc/systemd/system/multi-user.target.wants/named.service → /usr/lib/systemd/system/named.service.[root@vms11 ~]# netstat -lntup|grep 53
[root@vms11 ~]# host vms200 192.168.26.11验证解析 [root@vms11 ~]# dig -t A vms11.cos.com @192.168.26.11 +short
192.168.26.11
[root@vms11 ~]# dig -t A vms12.cos.com @192.168.26.11 +short
192.168.26.12
[root@vms11 ~]# dig -t A vms21.cos.com @192.168.26.11 +short
192.168.26.21
[root@vms11 ~]# dig -t A vms22.cos.com @192.168.26.11 +short
192.168.26.22
[root@vms11 ~]# dig -t A vms200.cos.com @192.168.26.11 +short
192.168.26.200
6 修改所有主机的dns服务器地址
sed -i ‘/DNS1/s/192.168.26.2/192.168.26.11/‘ /etc/sysconfig/network-scripts/ifcfg-ens160 nmcli connection reload; nmcli connection up ens160 cat /etc/resolv.conf
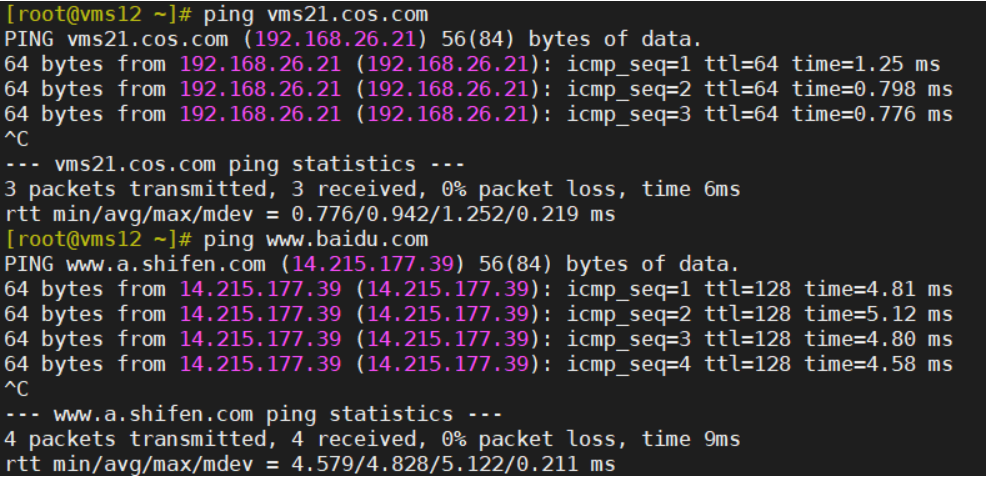
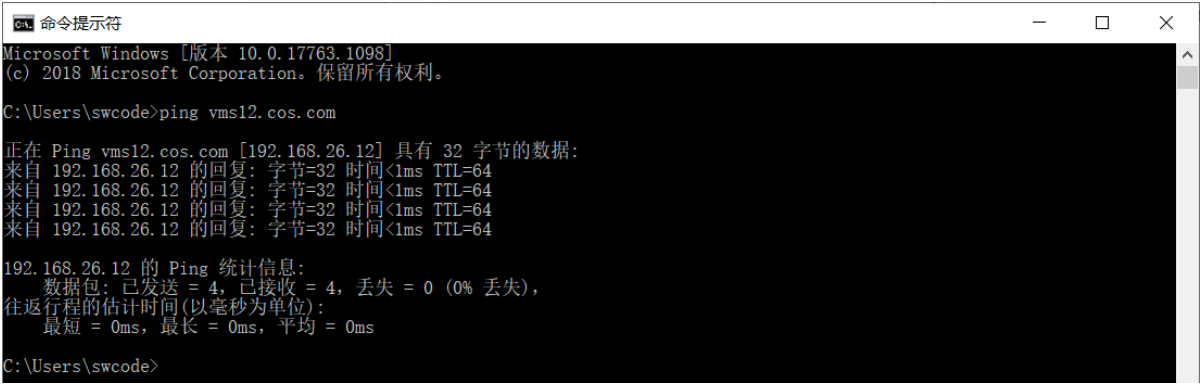
本次实验环境使用的是虚拟机,因此也要对windows宿主机NAT网卡DNS进行修改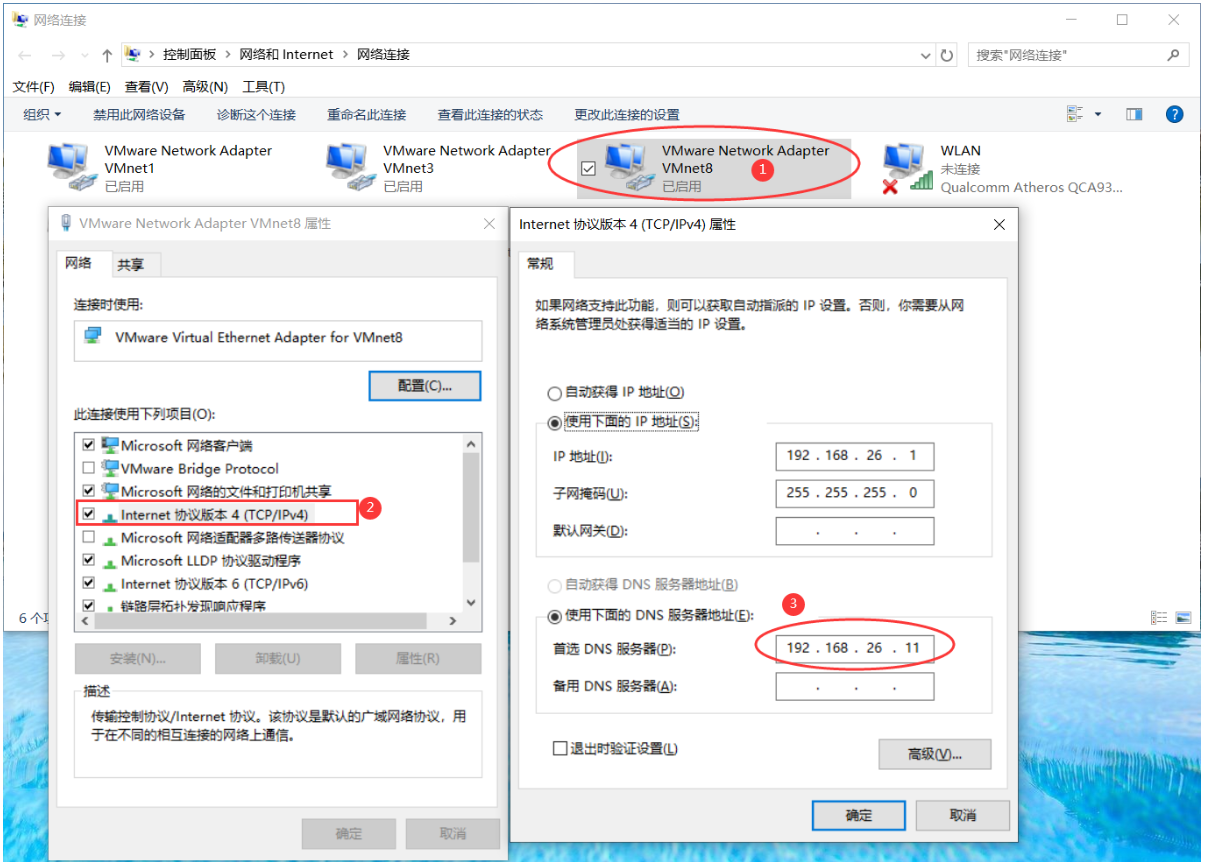
7 配置rndc实现对BIND的管理
rndc是BIND安装包提供的一种控制域名服务运行的工具,可以实现在不重启BIND的情况下对zone及解析记录等配置进行更新。
略
证书
在vms200安装
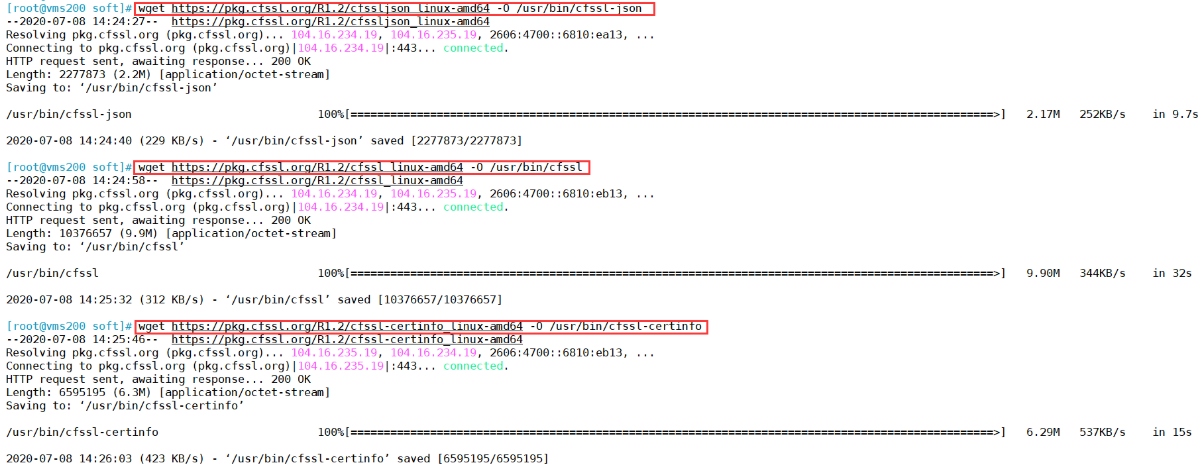
1 下载证书签发工具cfssl
- 下载证书签发工具cfssl:
cfssl_linux-amd64、cfssljson_linux-amd64、cfssl-certinfo_linux-amd64
https://pkg.cfssl.org 选择下载版本:CFSSL 1.2
wget https://pkg.cfssl.org/R1.2/cfssl_linux-amd64 -O /usr/bin/cfsslwget https://pkg.cfssl.org/R1.2/cfssljson_linux-amd64 -O /usr/bin/cfssl-jsonwget https://pkg.cfssl.org/R1.2/cfssl-certinfo_linux-amd64 -O /usr/bin/cfssl-certinfo
[root@vms200 soft]# ls -l /usr/bin/cfssl
-rw-r—r— 1 root root 10376657 Mar 30 2016 /usr/bin/cfssl
-rw-r—r— 1 root root 6595195 Mar 30 2016 /usr/bin/cfssl-certinfo
-rw-r—r— 1 root root 2277873 Mar 30 2016 /usr/bin/cfssl-json
[root@vms200 soft]# chmod +x /usr/bin/cfssl
[root@vms200 soft]# ls -l /usr/bin/cfssl*
-rwxr-xr-x 1 root root 10376657 Mar 30 2016 /usr/bin/cfssl
-rwxr-xr-x 1 root root 6595195 Mar 30 2016 /usr/bin/cfssl-certinfo
-rwxr-xr-x 1 root root 2277873 Mar 30 2016 /usr/bin/cfssl-json
2 签发根证书
- 创建目录
[root@vms200 ~]# mkdir /opt/certs/ ; cd /opt/certs/
- 创建生成CA证书的JSON配置文件
[root@vms200 certs]# vim /opt/certs/ca-config.json
{"signing": {"default": {"expiry": "175200h"},"profiles": {"server": {"expiry": "175200h","usages": ["signing","key encipherment","server auth"]},"client": {"expiry": "175200h","usages": ["signing","key encipherment","client auth"]},"peer": {"expiry": "175200h","usages": ["signing","key encipherment","server auth","client auth"]}}}}证书类型
- client certificate: 客户端使用,用于服务端认证客户端,例如etcdctl、etcd proxy、fleetctl、docker客户端
- server certificate: 服务端使用,客户端以此验证服务端身份,例如docker服务端、kube-apiserver
- peer certificate: 双向证书,用于etcd集群成员间通信
- 创建生成CA证书签名请求(csr)的JSON配置文件
[root@vms200 certs]# vim /opt/certs/ca-csr.json
{"CN": "swcloud","hosts": [],"key": {"algo": "rsa","size": 2048},"names": [{"C": "CN","ST": "beijing","L": "beijing","O": "op","OU": "ops"}],"ca": {"expiry": "175200h"}}
- CN: Common Name,浏览器使用该字段验证网站是否合法,一般写的是域名。非常重要。浏览器使用该字段验证网站是否合法
- C: Country, 国家
- ST: State,州,省
- L: Locality,地区,城市
- O: Organization Name,组织名称,公司名称
- OU: Organization Unit Name,组织单位名称,公司部门
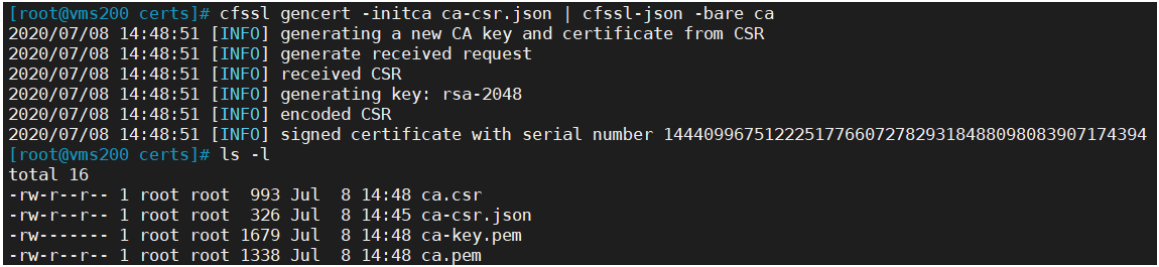
- 生成CA证书和私钥
[root@vms200 certs]# cfssl gencert -initca ca-csr.json | cfssl-json -bare ca - 生成ca.pem、ca.csr、ca-key.pem(CA私钥,需妥善保管)
docker
下载地址:https://download.docker.com/linux/static/stable/x86_64/docker-19.03.12.tgz
以下在vms21、vms22、vms200操作。这里采用二进制安装,用yum安装也一样。
在centos7上可以使用下面的安装:(centos8还不行)
curl -fsSL https://get.docker.com | bash -s docker --mirror Aliyun以下跳过步骤1和2即可
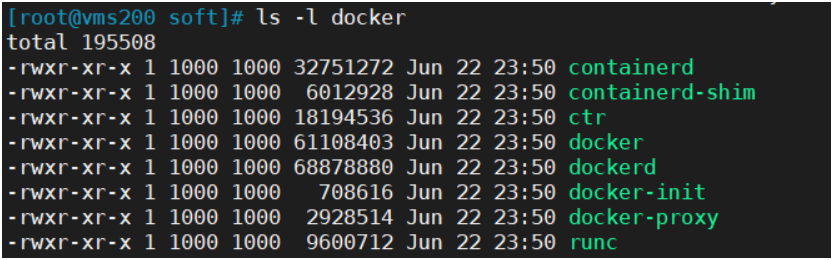
1 解压二进制包
tar zxvf docker-19.03.12.tgzmv docker/* /usr/bin
2 systemd管理docker
cat > /usr/lib/systemd/system/docker.service << EOF[Unit]Description=Docker Application Container EngineDocumentation=https://docs.docker.comAfter=network-online.target firewalld.serviceWants=network-online.target[Service]Type=notifyExecStart=/usr/bin/dockerdExecReload=/bin/kill -s HUP $MAINPIDLimitNOFILE=infinityLimitNPROC=infinityLimitCORE=infinityTimeoutStartSec=0Delegate=yesKillMode=processRestart=on-failureStartLimitBurst=3StartLimitInterval=60s[Install]WantedBy=multi-user.targetEOF
3 创建配置文件
mkdir /etc/docker
mkdir -p /data/docker
vi /etc/docker/daemon.json
{"graph": "/data/docker","storage-driver": "overlay2","insecure-registries": ["registry.access.redhat.com","quay.io","harbor.op.com"],"registry-mirrors": ["https://5gce61mx.mirror.aliyuncs.com"],"bip": "172.26.200.1/24","exec-opts": ["native.cgroupdriver=systemd"],"live-restore": true}
- registry-mirrors 可以配置阿里云镜像加速器。
- 不安全的registry中增加了harbor地址。
- 各个机器上bip网段不一致,bip中间两段与宿主机最后两段相同,目的是方便定位问题。
json
注意:bip要根据宿主机ip变化
vms21   bip 172.26.21.1/24    对应:192.168.26.21
vms22   bip 172.26.22.1/24    对应:192.168.26.22
vms200  bip 172.26.200.1/24   对应:192.168.26.200
4 启动并设置开机启动
systemctl start docker ; systemctl enable docker docker version docker info
5 查看容器运行是否符合配置
在vms200进行测试
]# docker pull busyboxUsing default tag: latestlatest: Pulling from library/busybox91f30d776fb2: Pull completeDigest: sha256:9ddee63a712cea977267342e8750ecbc60d3aab25f04ceacfa795e6fce341793Status: Downloaded newer image for busybox:latestdocker.io/library/busybox:latest]# docker run -it --rm busybox /bin/sh/ # ip add1: lo: <LOOPBACK,UP,LOWER_UP> mtu 65536 qdisc noqueue qlen 1000link/loopback 00:00:00:00:00:00 brd 00:00:00:00:00:00inet 127.0.0.1/8 scope host lovalid_lft forever preferred_lft forever23: eth0@if24: <BROADCAST,MULTICAST,UP,LOWER_UP,M-DOWN> mtu 1500 qdisc noqueuelink/ether 02:42:ac:1a:c8:02 brd ff:ff:ff:ff:ff:ffinet 172.26.200.2/24 brd 172.26.200.255 scope global eth0valid_lft forever preferred_lft forever/ # exit]# ls /data/dockerbuilder buildkit containerd containers image network overlay2 plugins runtimes swarm tmp trust volumes
容器IP为172.26.200.2,符合设置。
harbor
参考地址:https://www.yuque.com/duduniao/trp3ic/ohrxds#9Zpxx
官方地址:https://goharbor.io/
下载地址:https://github.com/goharbor/harbor/releases
下载v2.0.1:https://github.com/goharbor/harbor/releases/download/v2.0.1/harbor-offline-installer-v2.0.1.tgz
在vms200安装
1 下载并解压二进制包
目录说明:
- /opt/src : 源码、文件下载上传目录
- /opt/release : 各个版本软件存放位置
- /opt/apps : 各个软件当前版本的软链接
mkdir -p /opt/src /opt/release /opt/appssrc]# tar zxvf harbor-offline-installer-v2.0.1.tgzsrc]# mv harbor /opt/release/harbor-v2.0.1src]# ln -s /opt/release/harbor-v2.0.1 /opt/apps/harborsrc]# ll /opt/apps/lrwxrwxrwx 1 root root 26 Jul 8 16:27 harbor -> /opt/release/harbor-v2.0.1
2 修改harbor.yml
实验环境仅修改以下配置项,生产环境还得修改密码复杂些 harbor]# cp harbor.yml.tmpl harbor.yml #从
harbor.yml.tmpl复制 mkdir -p /data/harbor/logs vim /opt/apps/harbor/harbor.yml
hostname: harbor.op.comhttp:port: 370#https:#certificate: /opt/certs/ca.pem#private_key: /opt/certs/ca-key.pemdata_volume: /data/harborlog:local:location: /data/harbor/logsharbor_admin_password: Harbor12543
这里需要注释掉
https。 如果启用https,则需要设置https证书,否则会报错: Error happened in config validation…
ERROR:root:Error: The protocol is https but attribute ssl_cert is not set 证书生成参考上面,也可以参考Configure HTTPS Access to Harbor
https://goharbor.io/docs/2.0.0/install-config/configure-https/
3 安装docker-compose
安装方法参考:https://docs.docker.com/compose/install/ 下载docker-compose:https://github.com/docker/compose/releases 本次下载1.26.2 (2020-07-02):https://github.com/docker/compose/releases/download/1.26.2/docker-compose-Linux-x86_64
src]# mv docker-compose-Linux-x86_64 /opt/release/docker-compose-Linux-x86_64-1.26.2src]# chmod +x /opt/release/docker-compose-Linux-x86_64-1.26.2src]# ln -s /opt/release/docker-compose-Linux-x86_64-1.26.2 /opt/apps/docker-composesrc]# ln -s /opt/apps/docker-compose /usr/bin/docker-composesrc]# docker-compose -vdocker-compose version 1.26.2, build eefe0d31
4 执行安装install.sh
cd /opt/apps/harbor/
[root@vms200 harbor]# ./install.sh
[Step 0]: checking if docker is installed ...Note: docker version: 19.03.12[Step 1]: checking docker-compose is installed ...Note: docker-compose version: 1.26.2[Step 2]: loading Harbor images ...Loaded image: goharbor/trivy-adapter-photon:v2.0.1Loaded image: goharbor/harbor-portal:v2.0.1Loaded image: goharbor/harbor-core:v2.0.1Loaded image: goharbor/harbor-jobservice:v2.0.1Loaded image: goharbor/notary-server-photon:v2.0.1Loaded image: goharbor/harbor-log:v2.0.1Loaded image: goharbor/registry-photon:v2.0.1Loaded image: goharbor/notary-signer-photon:v2.0.1Loaded image: goharbor/clair-photon:v2.0.1Loaded image: goharbor/chartmuseum-photon:v2.0.1Loaded image: goharbor/prepare:v2.0.1Loaded image: goharbor/harbor-db:v2.0.1Loaded image: goharbor/harbor-registryctl:v2.0.1Loaded image: goharbor/nginx-photon:v2.0.1Loaded image: goharbor/redis-photon:v2.0.1Loaded image: goharbor/clair-adapter-photon:v2.0.1[Step 3]: preparing environment ...[Step 4]: preparing harbor configs ...prepare base dir is set to /opt/release/harbor-v2.0.1Generated configuration file: /config/log/logrotate.confGenerated configuration file: /config/log/rsyslog_docker.confGenerated configuration file: /config/nginx/nginx.confGenerated configuration file: /config/core/envGenerated configuration file: /config/core/app.confGenerated configuration file: /config/registry/config.ymlGenerated configuration file: /config/registryctl/envGenerated configuration file: /config/registryctl/config.ymlGenerated configuration file: /config/db/envGenerated configuration file: /config/jobservice/envGenerated configuration file: /config/jobservice/config.ymlGenerated and saved secret to file: /data/secret/keys/secretkeySuccessfully called func: create_root_certGenerated configuration file: /compose_location/docker-compose.ymlClean up the input dir[Step 5]: starting Harbor ...Creating network "harbor-v201_harbor" with the default driverCreating harbor-log ... doneCreating redis ... doneCreating harbor-db ... doneCreating harbor-portal ... doneCreating registry ... doneCreating registryctl ... doneCreating harbor-core ... doneCreating nginx ... doneCreating harbor-jobservice ... done✔ ----Harbor has been installed and started successfully.----
检查启动情况 [root@vms200 harbor]# docker ps -a [root@vms200 harbor]# docker-compose ps

此时可以在浏览器打开:https://192.168.26.200:370
5 设置harbor开机启动
- 手工启动:每次重启docker需要执行也可以通过脚本方式启动
[root@vms200 harbor]# docker-compose up -d #在/opt/apps/harbor目录下[root@vms200 harbor]# docker-compose ps #在/opt/apps/harbor目录下[root@vms200 harbor]# docker-compose down #Stop and remove containers, networks, images, and volumes- 开机启动:vim /etc/rc.d/rc.local # 增加以下内容
chmod +x /etc/rc.d/rc.local
# start harborcd /opt/apps/harbor# /usr/bin/docker-compose stop# /usr/bin/docker-compose start/usr/bin/docker-compose down/usr/bin/docker-compose up -d
6 安装Nginx反向代理harbor
在vms200安装
[root@vms200 harbor]# yum install nginx -y
- 当前机器中Nginx功能较少,使用yum安装即可。如有多个harbor考虑源码编译且配置健康检查。
- nginx配置此处忽略,仅仅使用最简单的配置。
[root@vms200 harbor]# vi /etc/nginx/conf.d/harbor.op.com.conf
server {listen 80;server_name harbor.op.com;# 避免出现上传失败的情况client_max_body_size 1000m;location / {proxy_pass http://127.0.0.1:370;}}
[root@vms200 harbor]# nginx -t
nginx: the configuration file /etc/nginx/nginx.conf syntax is ok
nginx: configuration file /etc/nginx/nginx.conf test is successful
[root@vms200 harbor]# systemctl start nginx ; systemctl enable nginx
Created symlink /etc/systemd/system/multi-user.target.wants/nginx.service → /usr/lib/systemd/system/nginx.service.
7 配置DNS解析
在vms11配置
[root@vms11 ~]# vim /var/named/op.com.zone
$ORIGIN op.com.$TTL 600 ; 10 minutes@ IN SOA dns.op.com. dnsadmin.op.com. (20200701 ; serial10800 ; refresh (3 hours)900 ; retry (15 minutes)604800 ; expire (1 week)86400 ; minimum (1 day))NS dns.op.com.$TTL 60 ; 1 minutedns A 192.168.26.11harbor A 192.168.26.200
- 序列号
serial需要向前滚动一个 - 末尾增加一行:
harbor A 192.168.26.200
8 DNS重启与验证测试
在vms11操作
[root@vms11 ~]# systemctl restart named.service
[root@vms11 ~]# dig -t A harbor.op.com +short
192.168.26.200
[root@vms11 ~]# host harbor.op.com
harbor.op.com has address 192.168.26.200
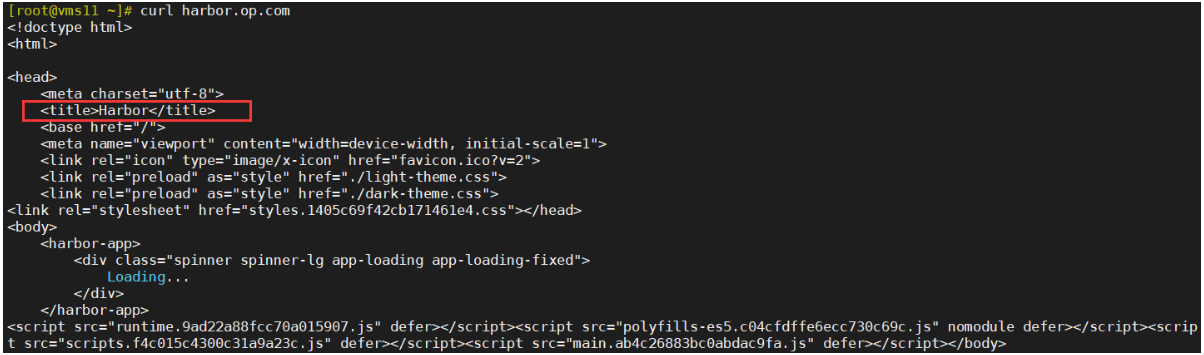
[root@vms11 ~]# curl harbor.op.com
在windows主机打开浏览器,输入地址:harbor.op.com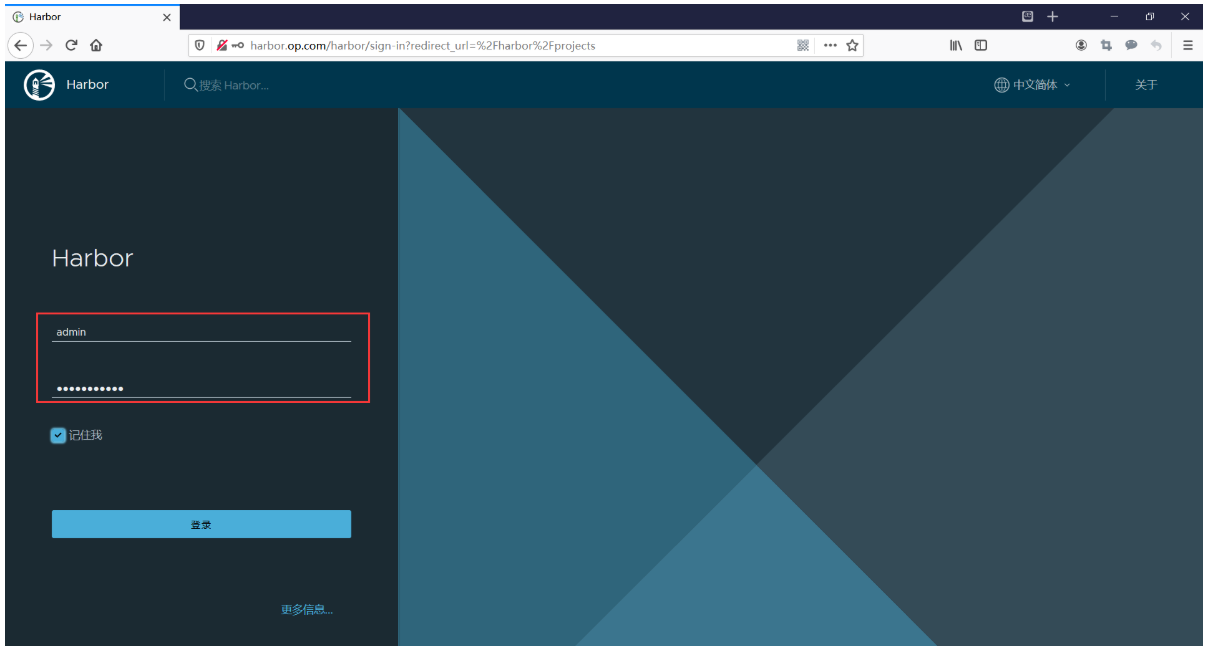
输入用户名和密码(admin用户密码在配置文件中),登录后,新建一个public项目,公开。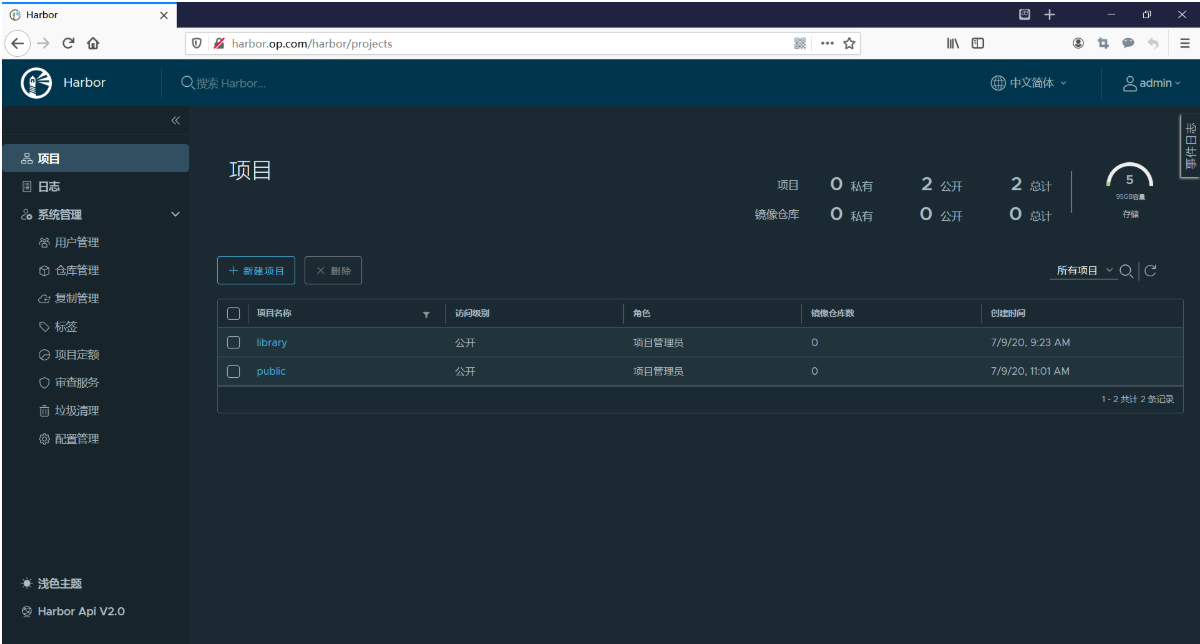
下载镜像并上传给harbor仓库:
在vms200操作
[root@vms200 harbor]# docker login -u admin harbor.op.comPassword:WARNING! Your password will be stored unencrypted in /root/.docker/config.json.Configure a credential helper to remove this warning. Seehttps://docs.docker.com/engine/reference/commandline/login/#credentials-storeLogin Succeeded[root@vms200 harbor]# docker pull nginx:1.7.9......[root@vms200 harbor]# docker pull busybox......[root@vms200 harbor]# docker images |grep harbor.opharbor.op.com/public/busybox v2007.10 c7c37e472d31 10 days ago 1.22MBharbor.op.com/public/nginx v1.7.9 84581e99d807 5 years ago 91.7MB[root@vms200 harbor]# docker push harbor.op.com/public/busybox:v2007.10The push refers to repository [harbor.op.com/public/busybox]50761fe126b6: Pushedv2007.10: digest: sha256:2131f09e4044327fd101ca1fd4043e6f3ad921ae7ee901e9142e6e36b354a907 size: 527[root@vms200 harbor]# docker push harbor.op.com/public/nginx:v1.7.9The push refers to repository [harbor.op.com/public/nginx]5f70bf18a086: Pushed4b26ab29a475: Pushedccb1d68e3fb7: Pushede387107e2065: Pushed63bf84221cce: Pushede02dce553481: Pusheddea2e4984e29: Pushedv1.7.9: digest: sha256:b1f5935eb2e9e2ae89c0b3e2e148c19068d91ca502e857052f14db230443e4c2 size: 3012
登harbor录管理页面,在项目列表中点击public,查看push的镜像: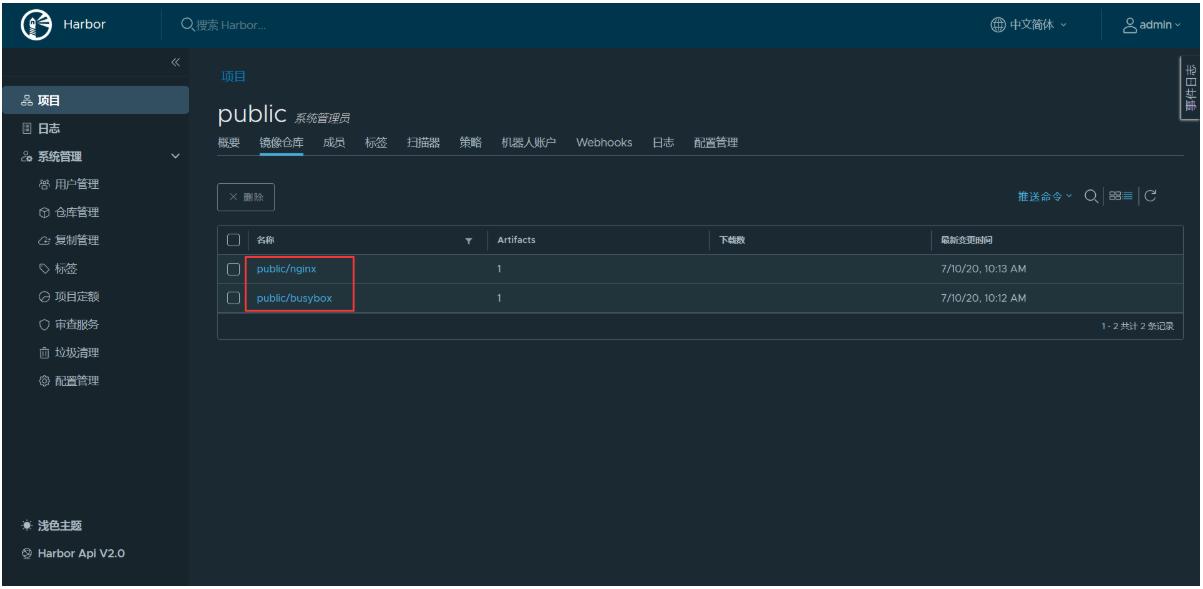
harbor配置目录/data/harbor,查看镜像的存储位置:
[root@vms200 harbor]# ls -l /data/harbor/total 4drwxr-xr-x 2 10000 10000 6 Jul 9 09:23 ca_downloaddrwx------ 19 systemd-coredump input 4096 Jul 10 10:03 databasedrwxr-xr-x 2 10000 10000 6 Jul 9 09:23 job_logsdrwxr-xr-x 2 10000 10000 161 Jul 9 09:23 logsdrwxr-xr-x 2 systemd-coredump input 22 Jul 10 10:18 redisdrwxr-xr-x 3 10000 10000 20 Jul 10 10:12 registrydrwxr-xr-x 6 root root 58 Jul 9 09:23 secret[root@vms200 harbor]# ls -l /data/harbor/registry/docker/registry/v2/repositories/public/total 0drwxr-xr-x 5 10000 10000 55 Jul 10 10:12 busyboxdrwxr-xr-x 5 10000 10000 55 Jul 10 10:13 nginx[root@vms200 harbor]# ls -l /data/harbor/registry/docker/registry/v2/repositories/public/busybox/total 0drwxr-xr-x 3 10000 10000 20 Jul 10 10:12 _layersdrwxr-xr-x 4 10000 10000 35 Jul 10 10:12 _manifestsdrwxr-xr-x 2 10000 10000 6 Jul 10 10:12 _uploads
etcd
1 集群规划
| 主机名 | 角色 | ip |
|---|---|---|
| vms12.cos.com | etcd lead | 192.168.26.12 |
| vms21.cos.com | etcd follow | 192.168.26.21 |
| vms22.cos.com | etcd follow | 192.168.26.22 |
注意:这里部署文档以vms12.cos.com主机为例,另外两台主机安装部署方法类似
2 签发证书
运维主机vms200.cos.com上:
创建生成证书签名请求(csr)的JSON配置文件
[root@vms200 certs]# vim /opt/certs/etcd-peer-csr.json
{"CN": "etcd-peer","hosts": ["192.168.26.11","192.168.26.12","192.168.26.21","192.168.26.22"],"key": {"algo": "rsa","size": 2048},"names": [{"C": "CN","ST": "beijing","L": "beijing","O": "op","OU": "ops"}]}
生成etcd证书和私钥
[root@vms200 certs]# cfssl gencert -ca=ca.pem -ca-key=ca-key.pem -config=ca-config.json -profile=peer etcd-peer-csr.json | cfssl-json -bare etcd-peer
2020/07/13 10:16:29 [INFO] generate received request2020/07/13 10:16:29 [INFO] received CSR2020/07/13 10:16:29 [INFO] generating key: rsa-20482020/07/13 10:16:30 [INFO] encoded CSR2020/07/13 10:16:30 [INFO] signed certificate with serial number 381406169224105523992187876800236250258155960142020/07/13 10:16:30 [WARNING] This certificate lacks a "hosts" field. This makes it unsuitable forwebsites. For more information see the Baseline Requirements for the Issuance and Managementof Publicly-Trusted Certificates, v.1.1.6, from the CA/Browser Forum (https://cabforum.org);specifically, section 10.2.3 ("Information Requirements").
检查生成的证书、私钥
[root@vms200 certs]# ls -l |grep etcd
-rw-r--r-- 1 root root 1066 Jul 13 10:16 etcd-peer.csr-rw-r--r-- 1 root root 380 Jul 13 10:12 etcd-peer-csr.json-rw------- 1 root root 1675 Jul 13 10:16 etcd-peer-key.pem-rw-r--r-- 1 root root 1428 Jul 13 10:16 etcd-peer.pem
3 安装etcd
vms12.cos.com上:
创建etcd用户
[root@vms12 ~]# useradd -s /sbin/nologin -M etcd
下载软件,解压,做软连接
- etcd下载地址:https://github.com/etcd-io/etcd/releases
- 下载软件:etcd-v3.4.9-linux-amd64.tar.gz 或 etcd-v3.4.10-linux-amd64.tar.gz
工作目录:/opt/src
[root@vms12 src]# pwd/opt/src[root@vms12 src]# ls -ltotal 16960-rw-r--r-- 1 root root 17364053 Jul 13 10:30 etcd-v3.4.9-linux-amd64.tar.gz[root@vms12 src]# tar xf etcd-v3.4.9-linux-amd64.tar.gz -C /opt[root@vms12 src]# ls /optetcd-v3.4.9-linux-amd64 src[root@vms12 src]# mv /opt/etcd-v3.4.9-linux-amd64 /opt/etcd-v3.4.9[root@vms12 src]# ln -s /opt/etcd-v3.4.9 /opt/etcd[root@vms12 src]# ls -l /opttotal 0lrwxrwxrwx 1 root root 28 Jul 13 10:36 etcd -> /opt/etcd-v3.4.9drwxr-xr-x 3 630384594 600260513 123 May 22 03:54 etcd-v3.4.9drwxr-xr-x 2 root root 44 Jul 13 10:30 src
创建目录,拷贝证书、私钥
- 创建目录
[root@vms12 src]# mkdir -p /opt/etcd/certs /data/etcd /data/logs/etcd-server[root@vms12 src]# chown -R etcd.etcd /opt/etcd/certs /data/etcd /data/logs/etcd-server/
- 将运维主机上生成的
ca.pem、etcd-peer-key.pem、etcd-peer.pem拷贝到/opt/etcd/certs目录中,注意私钥文件权限600
[root@vms12 src]# scp vms200:/opt/certs/ca.pem /opt/etcd/certs[root@vms12 src]# scp vms200:/opt/certs/etcd-peer-key.pem /opt/etcd/certs[root@vms12 src]# scp vms200:/opt/certs/etcd-peer.pem /opt/etcd/certs[root@vms12 src]# ls -l /opt/etcd/certs/total 12-rw-r--r-- 1 root root 1338 Jul 13 10:45 ca.pem-rw------- 1 root root 1675 Jul 13 10:45 etcd-peer-key.pem-rw-r--r-- 1 root root 1428 Jul 13 10:46 etcd-peer.pem[root@vms12 src]# cd /opt/etcd/certs[root@vms12 certs]# chmod 600 etcd-peer-key.pem[root@vms12 certs]# ls -ltotal 12-rw-r--r-- 1 etcd etcd 1338 Jul 13 10:45 ca.pem-rw------- 1 etcd etcd 1675 Jul 13 10:45 etcd-peer-key.pem-rw-r--r-- 1 etcd etcd 1428 Jul 13 10:46 etcd-peer.pem
创建etcd服务启动脚本
[root@vms12 certs]# vi /opt/etcd/etcd-server-startup.sh
#!/bin/sh./etcd --name=etcd-server-26-12 \--data-dir=/data/etcd/etcd-server \--listen-client-urls=https://192.168.26.12:2379,http://127.0.0.1:2379 \--advertise-client-urls=https://192.168.26.12:2379,http://127.0.0.1:2379 \--listen-peer-urls=https://192.168.26.12:2380 \--initial-advertise-peer-urls=https://192.168.26.12:2380 \--initial-cluster=etcd-server-26-12=https://192.168.26.12:2380,etcd-server-26-21=https://192.168.26.21:2380,etcd-server-26-22=https://192.168.26.22:2380 \--quota-backend-bytes=8000000000 \--cert-file=./certs/etcd-peer.pem \--key-file=./certs/etcd-peer-key.pem \--peer-cert-file=./certs/etcd-peer.pem \--peer-key-file=./certs/etcd-peer-key.pem \--trusted-ca-file=./certs/ca.pem \--peer-trusted-ca-file=./certs/ca.pem \--log-outputs=stdout \--logger=zap \--enable-v2=true
注意:
- etcd集群各主机的启动脚本略有不同,部署其他节点时注意修改。不同版本的etcd启动配置有区别,请参考github文档。
--enable-v2=true是因为etcd3.4以上默认v3版本(ETCDCTL_API=3is now the default.),为了与flannel-v0.12.0的配合,需要设置为v2。
调整权限和目录
# chmod +x /opt/etcd/etcd-server-startup.sh# chmod 700 /data/etcd/etcd-server
安装supervisor软件
Supervisor是用Python开发的一个client/server服务,是Linux系统下的一个进程管理工具。它可以很方便的监听、启动、停止、重启一个或多个进程。用Supervisor管理的进程,当一个进程意外被杀死,supervisort监听到进程死后,会自动将它重新拉起,很方便的做到进程自动恢复的功能,不再需要自己写shell脚本来控制。 源码下载:https://github.com/Supervisor/supervisor/releases (可以使用源码进行安装)
yum install epel-release
Last metadata expiration check: 0:41:41 ago on Mon 13 Jul 2020 01:18:51 PM CST.Dependencies resolved.===============================================================================================================================================Package Architecture Version Repository Size===============================================================================================================================================Installing:epel-release noarch 8-8.el8 extras 23 kTransaction Summary===============================================================================================================================================Install 1 PackageTotal download size: 23 kInstalled size: 32 kIs this ok [y/N]: yDownloading Packages:epel-release-8-8.el8.noarch.rpm 6.0 kB/s | 23 kB 00:03-----------------------------------------------------------------------------------------------------------------------------------------------Total 3.2 kB/s | 23 kB 00:07Running transaction checkTransaction check succeeded.Running transaction testTransaction test succeeded.Running transactionPreparing : 1/1Installing : epel-release-8-8.el8.noarch 1/1Running scriptlet: epel-release-8-8.el8.noarch 1/1Verifying : epel-release-8-8.el8.noarch 1/1Installed:epel-release-8-8.el8.noarchComplete!
yum install supervisor -y
Extra Packages for Enterprise Linux Modular 8 - x86_64 6.1 kB/s | 82 kB 00:13Extra Packages for Enterprise Linux 8 - x86_64 114 kB/s | 7.3 MB 01:06Dependencies resolved.===============================================================================================================================================Package Architecture Version Repository Size===============================================================================================================================================Installing:supervisor noarch 4.2.0-1.el8 epel 570 kInstalling dependencies:python3-pip noarch 9.0.3-16.el8 AppStream 19 kpython3-setuptools noarch 39.2.0-5.el8 BaseOS 162 kpython36 x86_64 3.6.8-2.module_el8.1.0+245+c39af44f AppStream 19 kEnabling module streams:python36 3.6Transaction Summary===============================================================================================================================================Install 4 PackagesTotal download size: 771 kInstalled size: 3.3 MDownloading Packages:(1/4): python36-3.6.8-2.module_el8.1.0+245+c39af44f.x86_64.rpm 4.6 kB/s | 19 kB 00:04(2/4): python3-pip-9.0.3-16.el8.noarch.rpm 4.7 kB/s | 19 kB 00:04(3/4): python3-setuptools-39.2.0-5.el8.noarch.rpm 37 kB/s | 162 kB 00:04(4/4): supervisor-4.2.0-1.el8.noarch.rpm 79 kB/s | 570 kB 00:07-----------------------------------------------------------------------------------------------------------------------------------------------Total 24 kB/s | 771 kB 00:32warning: /var/cache/dnf/epel-6519ee669354a484/packages/supervisor-4.2.0-1.el8.noarch.rpm: Header V3 RSA/SHA256 Signature, key ID 2f86d6a1: NOKEYExtra Packages for Enterprise Linux 8 - x86_64 1.6 MB/s | 1.6 kB 00:00Importing GPG key 0x2F86D6A1:Userid : "Fedora EPEL (8) <epel@fedoraproject.org>"Fingerprint: 94E2 79EB 8D8F 25B2 1810 ADF1 21EA 45AB 2F86 D6A1From : /etc/pki/rpm-gpg/RPM-GPG-KEY-EPEL-8Key imported successfullyRunning transaction checkTransaction check succeeded.Running transaction testTransaction test succeeded.Running transactionPreparing : 1/1Installing : python3-setuptools-39.2.0-5.el8.noarch 1/4Installing : python36-3.6.8-2.module_el8.1.0+245+c39af44f.x86_64 2/4Running scriptlet: python36-3.6.8-2.module_el8.1.0+245+c39af44f.x86_64 2/4Installing : python3-pip-9.0.3-16.el8.noarch 3/4Installing : supervisor-4.2.0-1.el8.noarch 4/4Running scriptlet: supervisor-4.2.0-1.el8.noarch 4/4Verifying : python3-pip-9.0.3-16.el8.noarch 1/4Verifying : python36-3.6.8-2.module_el8.1.0+245+c39af44f.x86_64 2/4Verifying : python3-setuptools-39.2.0-5.el8.noarch 3/4Verifying : supervisor-4.2.0-1.el8.noarch 4/4Installed:python3-pip-9.0.3-16.el8.noarch python3-setuptools-39.2.0-5.el8.noarch python36-3.6.8-2.module_el8.1.0+245+c39af44f.x86_64supervisor-4.2.0-1.el8.noarchComplete!
[root@vms12 ~]# rpm -qa supervisorsupervisor-4.2.0-1.el8.noarch[root@vms12 ~]# systemctl start supervisord[root@vms12 ~]# systemctl enable supervisordCreated symlink /etc/systemd/system/multi-user.target.wants/supervisord.service → /usr/lib/systemd/system/supervisord.service.[root@vms12 ~]# yum info supervisorLast metadata expiration check: 0:13:17 ago on Mon 13 Jul 2020 02:02:04 PM CST.Installed PackagesName : supervisorVersion : 4.2.0Release : 1.el8Architecture : noarchSize : 2.9 MSource : supervisor-4.2.0-1.el8.src.rpmRepository : @SystemFrom repo : epelSummary : A System for Allowing the Control of Process State on UNIXURL : http://supervisord.org/License : BSD and MITDescription : The supervisor is a client/server system that allows its users to control a: number of processes on UNIX-like operating systems.
创建etcd-server的启动配置
[root@vms12 ~]# vi /etc/supervisord.d/etcd-server.ini
[program:etcd-server-26-12]command=/opt/etcd/etcd-server-startup.sh ; the program (relative uses PATH, can take args)numprocs=1 ; number of processes copies to start (def 1)directory=/opt/etcd ; directory to cwd to before exec (def no cwd)autostart=true ; start at supervisord start (default: true)autorestart=true ; retstart at unexpected quit (default: true)startsecs=30 ; number of secs prog must stay running (def. 1)startretries=3 ; max # of serial start failures (default 3)exitcodes=0,2 ; 'expected' exit codes for process (default 0,2)stopsignal=QUIT ; signal used to kill process (default TERM)stopwaitsecs=10 ; max num secs to wait b4 SIGKILL (default 10)user=etcd ; setuid to this UNIX account to run the programredirect_stderr=false ; redirect proc stderr to stdout (default false)stdout_logfile=/data/logs/etcd-server/etcd.stdout.log ; stdout log path, NONE for none; default AUTOstdout_logfile_maxbytes=64MB ; max # logfile bytes b4 rotation (default 50MB)stdout_logfile_backups=4 ; # of stdout logfile backups (default 10)stdout_capture_maxbytes=1MB ; number of bytes in 'capturemode' (default 0)stdout_events_enabled=false ; emit events on stdout writes (default false)stderr_logfile=/data/logs/etcd-server/etcd.stderr.log ; stderr log path, NONE for none; default AUTOstderr_logfile_maxbytes=64MB ; max # logfile bytes b4 rotation (default 50MB)stderr_logfile_backups=4 ; # of stderr logfile backups (default 10)stderr_capture_maxbytes=1MB ; number of bytes in 'capturemode' (default 0)stderr_events_enabled=false ; emit events on stderr writes (default false)killasgroup=truestopasgroup=true
注意:etcd集群各主机启动配置略有不同,配置其他节点时注意修改。
启动etcd服务并检查
[root@vms12 etcd]# supervisorctl start all #或使用 supervisorctl updateetcd-server-26-12: started[root@vms12 etcd]# supervisorctl statusetcd-server-26-12 RUNNING pid 2693, uptime 0:02:19[root@vms12 ~]# netstat -luntp|grep etcdtcp 0 0 192.168.26.12:2379 0.0.0.0:* LISTEN 1174/./etcdtcp 0 0 127.0.0.1:2379 0.0.0.0:* LISTEN 1174/./etcdtcp 0 0 192.168.26.12:2380 0.0.0.0:* LISTEN 1174/./etcd
至此,vms12上成功安装etcd。在vms21、vms22上安装时注意修改etcd-server-startup.sh、etcd-server.ini
etcd日志目录:/data/logs/etcd-server
etcd启停方式:
[root@vms12 etcd]# supervisorctl start etcd-server-26-12[root@vms12 etcd]# supervisorctl stop etcd-server-26-12[root@vms12 etcd]# supervisorctl restart etcd-server-26-12[root@vms12 etcd]# supervisorctl status etcd-server-26-12
启动出错处理:
2020-07-13 16:12:49,444 INFO spawned: 'etcd-server-26-12' with pid 25472020-07-13 16:12:49,490 INFO exited: etcd-server-26-12 (exit status 2; not expected)2020-07-13 16:12:50,492 INFO gave up: etcd-server-26-12 entered FATAL state, too many start retries too quickly

- 查看日志:
[root@vms12 etcd]# tail -f /var/log/supervisor/supervisord.log - 查看输出、错误信息
[root@vms12 ~]# supervisorctl tail etcd-server-26-12 stdout
[root@vms12 ~]# supervisorctl tail etcd-server-26-12 stderr
发现报错信息中有:flag provided but not defined: -ca-file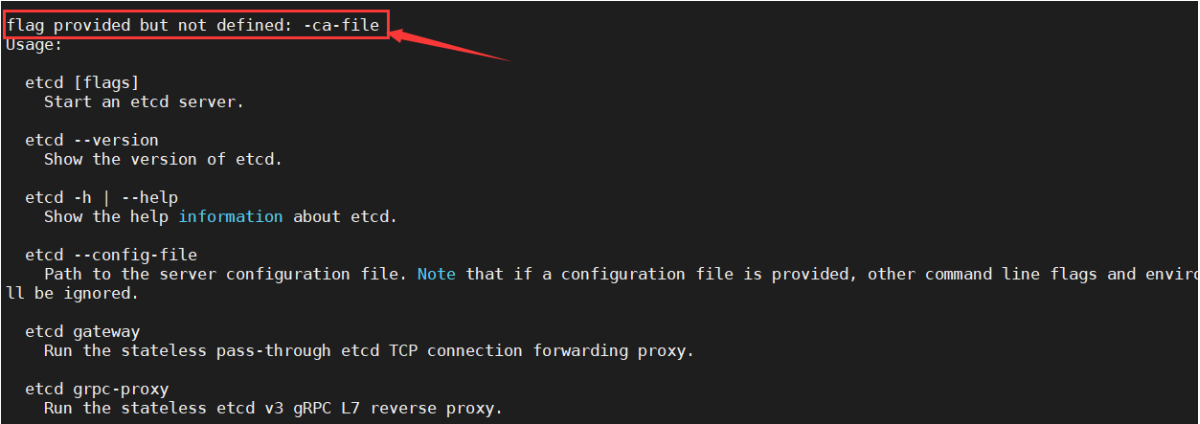
说明etcd的启动参数有错误,检查并修改:/opt/etcd/etcd-server-startup.sh
4 快速部署vms21和vms22
vms21.cos.com上(vms22类似)
安装supervisor
[root@vms21 ~]# yum install epel-release -y[root@vms21 ~]# yum install supervisor -y[root@vms21 ~]# systemctl start supervisord[root@vms21 ~]# systemctl enable supervisordCreated symlink /etc/systemd/system/multi-user.target.wants/supervisord.service → /usr/lib/systemd/system/supervisord.service.
从vms12复制etcd
[root@vms21 ~]# scp -r vms12:/opt/etcd-v3.4.9 /opt/
[root@vms21 opt]# ln -s /opt/etcd-v3.4.9 /opt/etcd
[root@vms21 opt]# mkdir -p /data/etcd /data/logs/etcd-server
[root@vms21 etcd]# vi /opt/etcd/etcd-server-startup.sh
#!/bin/sh./etcd --name etcd-server-26-21 \--data-dir /data/etcd/etcd-server \--listen-peer-urls https://192.168.26.21:2380 \--listen-client-urls https://192.168.26.21:2379,http://127.0.0.1:2379 \--quota-backend-bytes 8000000000 \--initial-advertise-peer-urls https://192.168.26.21:2380 \--advertise-client-urls https://192.168.26.21:2379,http://127.0.0.1:2379 \--initial-cluster etcd-server-26-12=https://192.168.26.12:2380,etcd-server-26-21=https://192.168.26.21:2380,etcd-server-26-22=https://192.168.26.22:2380 \--initial-cluster-state=existing \--cert-file ./certs/etcd-peer.pem \--key-file ./certs/etcd-peer-key.pem \--peer-cert-file ./certs/etcd-peer.pem \--peer-key-file ./certs/etcd-peer-key.pem \--trusted-ca-file ./certs/ca.pem \--peer-trusted-ca-file ./certs/ca.pem \--log-outputs=stdout \--logger=zap \--enable-v2=true
修改:name、listen-peer-urls、listen-client-urls、initial-advertise-peer-urls、advertise-client-urls
启动失败时添加:--initial-cluster-state=existing,再重新启动。
启动失败其它处理方法
- 方式1:删除所有etcd节点的 data-dir 文件(不删也行),重启各个节点的etcd服务,这个时候,每个节点的data-dir的数据都会被更新,就不会有以上故障了。
- 方式2:复制其他节点的data-dir中的内容,以此为基础上以
--force-new-cluster的形式强行拉起一个,然后以添加新成员的方式恢复这个集群。
vms22.cos.com上的启动脚本/opt/etcd/etcd-server-startup.sh
#!/bin/sh./etcd --name etcd-server-26-22 \--data-dir /data/etcd/etcd-server \--listen-peer-urls https://192.168.26.22:2380 \--listen-client-urls https://192.168.26.22:2379,http://127.0.0.1:2379 \--quota-backend-bytes 8000000000 \--initial-advertise-peer-urls https://192.168.26.22:2380 \--advertise-client-urls https://192.168.26.22:2379,http://127.0.0.1:2379 \--initial-cluster etcd-server-26-12=https://192.168.26.12:2380,etcd-server-26-21=https://192.168.26.21:2380,etcd-server-26-22=https://192.168.26.22:2380 \--cert-file ./certs/etcd-peer.pem \--key-file ./certs/etcd-peer-key.pem \--peer-cert-file ./certs/etcd-peer.pem \--peer-key-file ./certs/etcd-peer-key.pem \--trusted-ca-file ./certs/ca.pem \--peer-trusted-ca-file ./certs/ca.pem \--log-outputs=stdout \--logger=zap \--enable-v2=true
创建etcd用户及授权
# useradd -s /sbin/nologin -M etcd# chown -R etcd.etcd /opt/etcd-v3.4.9 /opt/etcd/certs /data/etcd /data/logs/etcd-server# chmod 700 /data/etcd/etcd-server
[root@vms21 opt]# ls -l /opt/etcd/total 40544drwxr-xr-x 2 etcd etcd 66 Jul 14 10:12 certsdrwxr-xr-x 14 etcd etcd 4096 Jul 14 10:12 Documentation-rwxr-xr-x 1 etcd etcd 23827424 Jul 14 10:12 etcd-rwxr-xr-x 1 etcd etcd 17612384 Jul 14 10:12 etcdctl-rwxr-xr-x 1 etcd etcd 878 Jul 14 14:20 etcd-server-startup.sh-rw-r--r-- 1 etcd etcd 43094 Jul 14 10:12 README-etcdctl.md-rw-r--r-- 1 etcd etcd 8431 Jul 14 10:12 README.md-rw-r--r-- 1 etcd etcd 7855 Jul 14 10:12 READMEv2-etcdctl.md
创建etcd-server的启动配置
[root@vms21 ~]# vi /etc/supervisord.d/etcd-server.ini
[program:etcd-server-26-21]command=/opt/etcd/etcd-server-startup.sh ; the program (relative uses PATH, can take args)numprocs=1 ; number of processes copies to start (def 1)directory=/opt/etcd ; directory to cwd to before exec (def no cwd)autostart=true ; start at supervisord start (default: true)autorestart=true ; retstart at unexpected quit (default: true)startsecs=30 ; number of secs prog must stay running (def. 1)startretries=3 ; max # of serial start failures (default 3)exitcodes=0,2 ; 'expected' exit codes for process (default 0,2)stopsignal=QUIT ; signal used to kill process (default TERM)stopwaitsecs=10 ; max num secs to wait b4 SIGKILL (default 10)user=etcd ; setuid to this UNIX account to run the programredirect_stderr=false ; redirect proc stderr to stdout (default false)stdout_logfile=/data/logs/etcd-server/etcd.stdout.log ; stdout log path, NONE for none; default AUTOstdout_logfile_maxbytes=64MB ; max # logfile bytes b4 rotation (default 50MB)stdout_logfile_backups=4 ; # of stdout logfile backups (default 10)stdout_capture_maxbytes=1MB ; number of bytes in 'capturemode' (default 0)stdout_events_enabled=false ; emit events on stdout writes (default false)stderr_logfile=/data/logs/etcd-server/etcd.stderr.log ; stderr log path, NONE for none; default AUTOstderr_logfile_maxbytes=64MB ; max # logfile bytes b4 rotation (default 50MB)stderr_logfile_backups=4 ; # of stderr logfile backups (default 10)stderr_capture_maxbytes=1MB ; number of bytes in 'capturemode' (default 0)stderr_events_enabled=false ; emit events on stderr writes (default false)killasgroup=truestopasgroup=true
修改program:为etcd-server-26-21。vms22.cos.com上修改为[program:etcd-server-26-22]
启动etcd服务并检查
[root@vms21 ~]# supervisorctl updateetcd-server-26-21: added process group[root@vms21 ~]# supervisorctl status #等30setcd-server-26-21 STARTING[root@vms21 ~]# supervisorctl statusetcd-server-26-21 RUNNING pid 2151, uptime 0:00:30[root@vms21 ~]# netstat -luntp|grep etcdtcp 0 0 192.168.26.21:2379 0.0.0.0:* LISTEN 2152/./etcdtcp 0 0 127.0.0.1:2379 0.0.0.0:* LISTEN 2152/./etcdtcp 0 0 192.168.26.21:2380 0.0.0.0:* LISTEN 2152/./etcd
在vms22上安装时注意修改相关配置etcd-server-startup.sh、etcd-server.ini
[root@vms22 opt]# supervisorctl updateetcd-server-26-22: added process group[root@vms22 opt]# supervisorctl statusetcd-server-26-22 STARTING[root@vms22 opt]# supervisorctl statusetcd-server-26-22 RUNNING pid 1804, uptime 0:00:49[root@vms22 opt]# netstat -luntp|grep etcdtcp 0 0 192.168.26.22:2379 0.0.0.0:* LISTEN 1805/./etcdtcp 0 0 127.0.0.1:2379 0.0.0.0:* LISTEN 1805/./etcdtcp 0 0 192.168.26.22:2380 0.0.0.0:* LISTEN 1805/./etcd
5 查看集群状态
在任一节点进行:
- 注意检查etcd日志有没有报错:/data/logs/etcd-server
ETCDCTL_API=2版本查看
[root@vms21 etcd]# ETCDCTL_API=2 /opt/etcd/etcdctl member list46b9a327aae1e4d2: name=etcd-server-26-22 peerURLs=https://192.168.26.22:2380 clientURLs=http://127.0.0.1:2379,https://192.168.26.22:2379 isLeader=false4858c97d15f32459: name=etcd-server-26-21 peerURLs=https://192.168.26.21:2380 clientURLs=http://127.0.0.1:2379,https://192.168.26.21:2379 isLeader=trueb0123fbb75c41193: name=etcd-server-26-12 peerURLs=https://192.168.26.12:2380 clientURLs=http://127.0.0.1:2379,https://192.168.26.12:2379 isLeader=false[root@vms21 etcd]# ETCDCTL_API=2 /opt/etcd/etcdctl cluster-healthmember 46b9a327aae1e4d2 is healthy: got healthy result from http://127.0.0.1:2379member 4858c97d15f32459 is healthy: got healthy result from http://127.0.0.1:2379member b0123fbb75c41193 is healthy: got healthy result from http://127.0.0.1:2379
ETCDCTL_API=3版本查看
[root@vms12 etcd]# ETCDCTL_API=3 /opt/etcd/etcdctl --cacert=/opt/etcd/certs/ca.pem --cert=/opt/etcd/certs/etcd-peer.pem --key=/opt/etcd/certs/etcd-peer-key.pem --endpoints="https://192.168.26.12:2379,https://192.168.26.21:2379,https://192.168.26.22:2379" endpoint healthhttps://192.168.26.12:2379 is healthy: successfully committed proposal: took = 22.294448mshttps://192.168.26.21:2379 is healthy: successfully committed proposal: took = 41.10793mshttps://192.168.26.22:2379 is healthy: successfully committed proposal: took = 43.398697ms[root@vms22 etcd]# ETCDCTL_API=3 /opt/etcd/etcdctl --cacert=/opt/etcd/certs/ca.pem --cert=/opt/etcd/certs/etcd-peer.pem --key=/opt/etcd/certs/etcd-peer-key.pem --endpoints="https://192.168.26.12:2379,https://192.168.26.21:2379,https://192.168.26.22:2379" endpoint status --write-out=table

[root@vms12 etcd]# ETCDCTL_API=3 /opt/etcd/etcdctl --write-out=table endpoint status+----------------+------------------+---------+---------+-----------+------------+-----------+------------+--------------------+--------+| ENDPOINT | ID | VERSION | DB SIZE | IS LEADER | IS LEARNER | RAFT TERM | RAFT INDEX | RAFT APPLIED INDEX | ERRORS |+----------------+------------------+---------+---------+-----------+------------+-----------+------------+--------------------+--------+| 127.0.0.1:2379 | b0123fbb75c41193 | 3.4.9 | 20 kB | true | false | 13494 | 11 | 11 | |+----------------+------------------+---------+---------+-----------+------------+-----------+------------+--------------------+--------+[root@vms21 etcd]# ETCDCTL_API=3 /opt/etcd/etcdctl --write-out=table endpoint status+----------------+------------------+---------+---------+-----------+------------+-----------+------------+--------------------+--------+| ENDPOINT | ID | VERSION | DB SIZE | IS LEADER | IS LEARNER | RAFT TERM | RAFT INDEX | RAFT APPLIED INDEX | ERRORS |+----------------+------------------+---------+---------+-----------+------------+-----------+------------+--------------------+--------+| 127.0.0.1:2379 | 4858c97d15f32459 | 3.4.9 | 29 kB | false | false | 13494 | 11 | 11 | |+----------------+------------------+---------+---------+-----------+------------+-----------+------------+--------------------+--------+[root@vms22 etcd]# ETCDCTL_API=3 /opt/etcd/etcdctl --write-out=table endpoint status+----------------+------------------+---------+---------+-----------+------------+-----------+------------+--------------------+--------+| ENDPOINT | ID | VERSION | DB SIZE | IS LEADER | IS LEARNER | RAFT TERM | RAFT INDEX | RAFT APPLIED INDEX | ERRORS |+----------------+------------------+---------+---------+-----------+------------+-----------+------------+--------------------+--------+| 127.0.0.1:2379 | 46b9a327aae1e4d2 | 3.4.9 | 25 kB | false | false | 13494 | 11 | 11 | |+----------------+------------------+---------+---------+-----------+------------+-----------+------------+--------------------+--------+
至此,完美成功部署了docker、etcd等软件。下一篇进行k8s核心组件的部署。

若有收获,就点个赞吧
0 人点赞
