事件查看
[root@clientvm ~]# kubectl describe pod nginx2[root@clientvm ~]# kubectl logs nginx2
节点维护
禁止调度
[root@clientvm ~]# kubectl cordon worker1.example.comnode/worker1.example.com cordoned[root@clientvm ~]# kubectl get nodeNAME STATUS ROLES AGE VERSIONmaster.example.com Ready master 19d v1.19.4worker1.example.com Ready,SchedulingDisabled <none> 18d v1.19.4worker2.example.com Ready <none> 18d v1.19.4
驱逐Pod
[root@clientvm ~]# kubectl drain worker1.example.com --ignore-daemonsetsnode/worker1.example.com already cordonedWARNING: ignoring DaemonSet-managed Pods: kube-system/kube-proxy-c9ghqnode/worker1.example.com drained
重新开始调度
[root@clientvm ~]# kubectl uncordon worker1.example.comnode/worker1.example.com uncordoned[root@clientvm ~]#[root@clientvm ~]# kubectl get nodeNAME STATUS ROLES AGE VERSIONmaster.example.com Ready master 19d v1.19.4worker1.example.com Ready <none> 18d v1.19.4worker2.example.com Ready <none> 18d v1.19.4
cordon 停止调度
影响最小,只会将node调为SchedulingDisabled
之后再发创建pod,不会被调度到该节点
旧有的pod不会受到影响,仍正常对外提供服务
恢复调度
kubectl uncordon node_name
================================================
drain 驱逐节点
首先,驱逐node上的pod,其他节点重新创建
接着,将节点调为 SchedulingDisabled
恢复调度
kubectl uncordon node_name
安装Metrics Server
Metrics Server是Kubernetes内置自动缩放管道的可扩展,高效的容器资源指标来源。
Metrics Server从Kubelet收集资源指标,并通过Metrics API在Kubernetes apiserver中公开它们,以供Horizontal Pod Autoscaler使用。 还可以通过kubectl top访问Metrics API,从而更容易调试自动缩放。
Metrics Server提供:
- 适用于大多数群集的Deployment
- 可扩展支持多达5,000个节点集群
- 资源效率:Metrics Server使用1m核心CPU和每个节点3 MB内存
安装参考官方文档:
https://github.com/kubernetes-sigs/metrics-server
kubectl apply -f https://github.com/kubernetes-sigs/metrics-server/releases/latest/download/components.yaml
下载components.yaml后要修改如下内容:
containers:- args:- --cert-dir=/tmp- --secure-port=4443- --kubelet-preferred-address-types=InternalIP- --kubelet-insecure-tls- --kubelet-use-node-status-portimage: bitnami/metrics-server:0.4.1
[root@clientvm ~]# kubectl apply -f /resources/yaml/metrics-server-components.yamlserviceaccount/metrics-server createdclusterrole.rbac.authorization.k8s.io/system:aggregated-metrics-reader createdclusterrole.rbac.authorization.k8s.io/system:metrics-server createdrolebinding.rbac.authorization.k8s.io/metrics-server-auth-reader createdclusterrolebinding.rbac.authorization.k8s.io/metrics-server:system:auth-delegator createdclusterrolebinding.rbac.authorization.k8s.io/system:metrics-server createdservice/metrics-server createddeployment.apps/metrics-server created
查看
[root@clientvm ~]# kubectl top nodeNAME CPU(cores) CPU% MEMORY(bytes) MEMORY%master.example.com 119m 2% 1417Mi 51%worker1.example.com 24m 0% 953Mi 20%worker2.example.com 1079m 26% 1079Mi 23%[root@clientvm ~]# kubectl top podNAME CPU(cores) MEMORY(bytes)nginx-taint 0m 1Minginx2 0m 1Mireadiness-exec 2m 0Mitest-pod-secret-volume 0m 1Miwith-node-affinity 0m 1Miwith-pod-affinity 0m 1Mi
HPA(Horizontal Pod Autoscaler)
Pod 水平自动扩缩(Horizontal Pod Autoscaler) 可以基于 CPU 利用率自动扩缩 Deployment、ReplicaSet 和 StatefulSet 中的 Pod 数量。 Pod 自动扩缩不适用于无法扩缩的对象,比如 DaemonSet。
Pod 水平自动扩缩器的实现是一个控制回路,由控制器管理器(/etc/kubernetes/manifests/kube-controller-manager.yaml)的 --horizontal-pod-autoscaler-sync-period 参数指定周期(默认值为 15 秒),其他可用值:
—horizontal-pod-autoscaler-downscale-stabilization:即自从上次缩容执行结束后,多久可以再次执行缩容,默认时间是 5 分钟--horizontal-pod-autoscaler-initial-readiness-delay 参数(默认为 30s)用于设置 Pod 准备时间, 在此时间内的 Pod 统统被认为未就绪。--horizontal-pod-autoscaler-cpu-initialization-period 参数(默认为5分钟) 用于设置 Pod 的初始化时间, 在此时间内的 Pod,CPU 资源度量值将不会被采纳。
对于按 Pod 统计的资源指标(如 CPU),控制器从资源指标 API 中获取每一个 HorizontalPodAutoscaler 指定的 Pod 的度量值,如果设置了目标使用率, 控制器获取每个 Pod 中的容器资源使用情况,并计算资源使用率。
注:自 Kubernetes 1.11 起,从 Heapster 获取指标特性已废弃。
HPA默认行为:
behavior:scaleDown:stabilizationWindowSeconds: 300policies:- type: Percentvalue: 100periodSeconds: 15scaleUp:stabilizationWindowSeconds: 0policies:- type: Percentvalue: 100periodSeconds: 15- type: Podsvalue: 4periodSeconds: 15selectPolicy: Max
HPA实验
1) 创建Deployment & Service
[root@clientvm ~]# cat hpa-example.yamlapiVersion: apps/v1kind: Deploymentmetadata:name: php-apachespec:selector:matchLabels:run: php-apachereplicas: 1template:metadata:labels:run: php-apachespec:containers:- name: php-apacheimage: pilchard/hpa-exampleimagePullPolicy: IfNotPresentports:- containerPort: 80resources:limits:cpu: 500mrequests:cpu: 200m---apiVersion: v1kind: Servicemetadata:name: php-apachelabels:run: php-apachespec:ports:- port: 80selector:run: php-apache
[root@clientvm ~]# kubectl apply -f hpa-example.yamldeployment.apps/php-apache createdservice/php-apache created[root@master manifests]# curl 10.105.137.102OK!
2) 创建HPA
[root@clientvm ~]# kubectl autoscale deployment -hUsage:kubectl autoscale (-f FILENAME | TYPE NAME | TYPE/NAME) [--min=MINPODS] --max=MAXPODS [--cpu-percent=CPU] [options]Examples:# Auto scale a deployment "foo", with the number of pods between 2 and 10, no target CPU utilization specified so adefault autoscaling policy will be used:kubectl autoscale deployment foo --min=2 --max=10# Auto scale a replication controller "foo", with the number of pods between 1 and 5, target CPU utilization at 80%:kubectl autoscale rc foo --max=5 --cpu-percent=80
[root@clientvm ~]# kubectl autoscale deployment --max=10 php-apache --cpu-percent=30horizontalpodautoscaler.autoscaling/php-apache autoscaled[root@clientvm ~]# kubectl get hpaNAME REFERENCE TARGETS MINPODS MAXPODS REPLICAS AGEphp-apache Deployment/php-apache 0%/30% 1 10 1 20s
3) 测试
在master上使用ab工具发送大量并发
[root@master manifests]# ab -n 1000 -c 200 http://10.105.137.102/
在clientvm节点上观察
[root@clientvm ~]# kubectl get pod -wNAME READY STATUS RESTARTS AGEnginx2 1/1 Running 0 4d23hphp-apache-69f8f79bfc-sbzhm 1/1 Running 0 8m48sphp-apache-69f8f79bfc-wdwwq 0/1 Pending 0 0sphp-apache-69f8f79bfc-wdwwq 0/1 Pending 0 0sphp-apache-69f8f79bfc-fkb7k 0/1 Pending 0 0sphp-apache-69f8f79bfc-92pv4 0/1 Pending 0 0sphp-apache-69f8f79bfc-fkb7k 0/1 Pending 0 0sphp-apache-69f8f79bfc-92pv4 0/1 Pending 0 0sphp-apache-69f8f79bfc-wdwwq 0/1 ContainerCreating 0 0sphp-apache-69f8f79bfc-fkb7k 0/1 ContainerCreating 0 0sphp-apache-69f8f79bfc-92pv4 0/1 ContainerCreating 0 0sphp-apache-69f8f79bfc-92pv4 1/1 Running 0 2sphp-apache-69f8f79bfc-fkb7k 1/1 Running 0 2sphp-apache-69f8f79bfc-wdwwq 1/1 Running 0 2sphp-apache-69f8f79bfc-fwb5x 0/1 Pending 0 0sphp-apache-69f8f79bfc-fwb5x 0/1 Pending 0 0sphp-apache-69f8f79bfc-s5624 0/1 Pending 0 0sphp-apache-69f8f79bfc-qkf7f 0/1 Pending 0 0sphp-apache-69f8f79bfc-s5624 0/1 Pending 0 0sphp-apache-69f8f79bfc-jbgtp 0/1 Pending 0 0sphp-apache-69f8f79bfc-qkf7f 0/1 Pending 0 0sphp-apache-69f8f79bfc-fwb5x 0/1 ContainerCreating 0 0sphp-apache-69f8f79bfc-jbgtp 0/1 Pending 0 0sphp-apache-69f8f79bfc-s5624 0/1 ContainerCreating 0 0sphp-apache-69f8f79bfc-qkf7f 0/1 ContainerCreating 0 0sphp-apache-69f8f79bfc-jbgtp 0/1 ContainerCreating 0 0sphp-apache-69f8f79bfc-qkf7f 1/1 Running 0 3sphp-apache-69f8f79bfc-jbgtp 1/1 Running 0 3sphp-apache-69f8f79bfc-fwb5x 1/1 Running 0 3s
[root@clientvm k8s]# kubectl get hpaNAME REFERENCE TARGETS MINPODS MAXPODS REPLICAS AGEphp-apache Deployment/php-apache 206%/30% 1 10 10 7m3s
HPA的算法:
期望副本数 = ceil[当前副本数 * (当前指标 / 期望指标)]
etcd
Backup Etcd
在master节点上查找etcd 容器
[root@master manifests]# docker ps | grep etcd44623e84772a d4ca8726196c "etcd --advertise-cl…" 6 days ago Up 6 days k8s_etcd_etcd-master.example.com_kube-system_1511fba334ccb18c8972b0adfa135f94_0
copy etcdctl命令到本机
[root@master manifests]# docker cp 44623e84772a:/usr/local/bin/etcdctl /usr/bin/
根据 静态Pod etcd.yaml文件的内容指定ca相关证书备份etcd
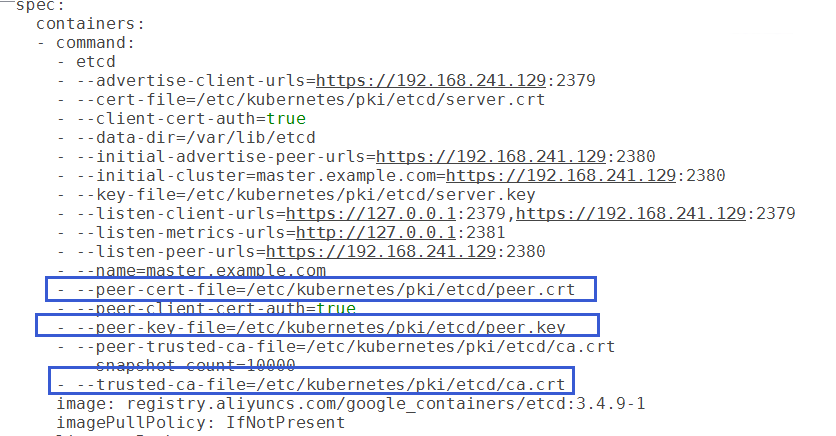
[root@master manifests]# ETCDCTL_API=3 etcdctl --endpoints=https://127.0.0.1:2379 \--cacert=/etc/kubernetes/pki/etcd/ca.crt \--cert=/etc/kubernetes/pki/etcd/peer.crt \--key=/etc/kubernetes/pki/etcd/peer.key snapshot save /tmp/etcd.db
- 验证 ```bash [root@master manifests]# ETCDCTL_API=3 etcdctl —write-out=table snapshot status /tmp/etcd.db +—————+—————+——————+——————+ | HASH | REVISION | TOTAL KEYS | TOTAL SIZE | +—————+—————+——————+——————+ | 88cde7c7 | 1498047 | 1854 | 3.3 MB | +—————+—————+——————+——————+
<a name="Gl4Ri"></a>## Restore Etcd1. 停止 kubelet```bash[root@master manifests]# systemctl stop kubelet.service
删除原有DB数据
[root@master manifests]# cd /var/lib/etcd/[root@master etcd]# lsmember[root@master etcd]# rm -rf /var/lib/etcd
根据 静态Pod etcd.yaml文件的内容,Restore Backup
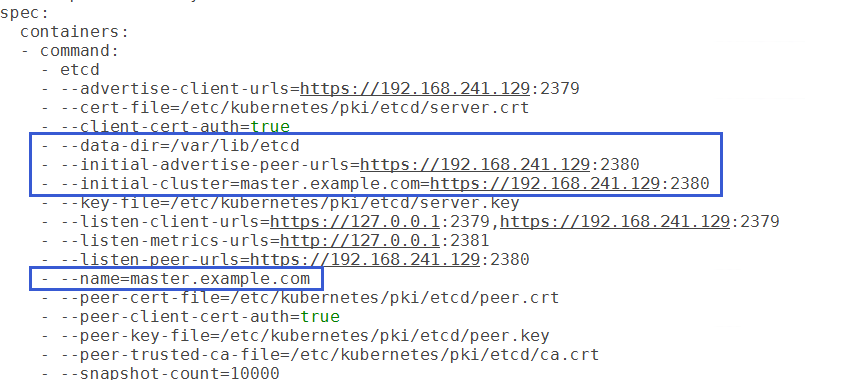
[root@master manifests]# ETCDCTL_API=3 etcdctl snapshot restore /tmp/etcd.db \> --data-dir="/var/lib/etcd" \> --name=master.example.com --skip-hash-check \> --initial-advertise-peer-urls=https://127.0.0.1:2380 \> --initial-cluster=master.example.com=https://127.0.0.1:2380
启动 kubelet 服务
[root@master manifests]# systemctl start kubelet.service
验证
[root@master manifests]# ETCDCTL_API=3 etcdctl --endpoints=https://127.0.0.1:2379 --cacert=/etc/kubernetes/pki/etcd/ca.crt --cert=/etc/kubernetes/pki/etcd/peer.crt --key=/etc/kubernetes/pki/etcd/peer.key endpoint healthhttps://127.0.0.1:2379 is healthy: successfully committed proposal: took = 11.884856ms
[root@clientvm ~]# kubectl get pod -n kube-systemNAME READY STATUS RESTARTS AGEcalico-kube-controllers-6dfcd885bf-dk4jj 1/1 Running 0 6d23hcalico-node-7nlkr 1/1 Running 0 6d23hcalico-node-8xdqh 1/1 Running 0 6d23hcalico-node-dskkk 1/1 Running 0 6d23hcoredns-6d56c8448f-lsl8p 1/1 Running 0 7dcoredns-6d56c8448f-t8t55 1/1 Running 0 23hetcd-master.example.com 1/1 Running 1 7dkube-apiserver-master.example.com 1/1 Running 0 7dkube-controller-manager-master.example.com 1/1 Running 1 6d21hkube-proxy-2ddnd 1/1 Running 0 7dkube-proxy-cjl2b 1/1 Running 0 6d23hkube-proxy-n5djk 1/1 Running 0 6d23hkube-scheduler-master.example.com 1/1 Running 1 6d21hmetrics-server-85b5d6b8fb-vmprh 1/1 Running 0 3h51m
集群升级
升级Master节点
选择要升级的版本
[root@master ~]# yum list --showduplicates kubeadmkubeadm.x86_64 1.19.0-0 kuberneteskubeadm.x86_64 1.19.0-0 localkubeadm.x86_64 1.19.1-0 kuberneteskubeadm.x86_64 1.19.2-0 kuberneteskubeadm.x86_64 1.19.3-0 kuberneteskubeadm.x86_64 1.19.4-0 kuberneteskubeadm.x86_64 1.19.5-0 kuberneteskubeadm.x86_64 1.20.0-0 kubernetes
升级kubeadm
[root@master ~]# yum install kubeadm-1.19.1-0 -y
验证版本
[root@master ~]# kubeadm versionkubeadm version: &version.Info{Major:"1", Minor:"19", GitVersion:"v1.19.1", GitCommit:"206bcadf021e76c27513500ca24182692aabd17e", GitTreeState:"clean", BuildDate:"2020-09-09T11:24:31Z", GoVersion:"go1.15", Compiler:"gc", Platform:"linux/amd64"}
设置不可调度,并驱逐控制节点上的Pod
[root@clientvm ~]# kubectl drain master.example.com --ignore-daemonsets
在master上执行升级计划
kubeadm upgrade plan
在master执行升级命令
修改集群配置对应版本,然后执行升级
[root@master ~]# kubeadm upgrade apply v1.19.1......[upgrade/successful] SUCCESS! Your cluster was upgraded to "v1.19.1". Enjoy![upgrade/kubelet] Now that your control plane is upgraded, please proceed with upgrading your kubelets if you haven't already done so.
恢复节点调度
[root@clientvm ~]# kubectl uncordon master.example.com
升级kubelet和kubectl
yum install -y kubelet-1.19.1-0 kubectl-1.19.1-0
重启kubelet 服务
systemctl daemon-reloadsystemctl restart kubelet
[root@master ~]# kubectl get nodeNAME STATUS ROLES AGE VERSIONmaster.example.com Ready master 7d1h v1.19.1worker1.example.com Ready <none> 7d1h v1.19.0worker2.example.com Ready <none> 7d1h v1.19.0
逐个升级worker节点
在worker节点上升级kubeadm
[root@worker1 ~]# yum install kubeadm-1.19.1-0[root@worker1 ~]# kubeadm upgrade node
将节点标记为不可调度并逐出工作负载,为维护做好准备
kubectl drain worker1.example.com --ignore-daemonsets
升级kubelet和kubectl
yum install -y kubelet-1.19.1-0 kubectl-1.19.1-0
重启 kubelet 服务
systemctl daemon-reloadsystemctl restart kubelet
恢复节点调度
kubectl uncordon worker1.example.com
[root@master ~]# kubectl get nodeNAME STATUS ROLES AGE VERSIONmaster.example.com Ready master 7d1h v1.19.1worker1.example.com Ready <none> 7d1h v1.19.1worker2.example.com Ready <none> 7d1h v1.19.0
验证集群状态,并逐一升级其他worker节点
[root@master ~]# kubectl get nodeNAME STATUS ROLES AGE VERSIONmaster.example.com Ready master 7d1h v1.19.1worker1.example.com Ready <none> 7d1h v1.19.1worker2.example.com Ready <none> 7d1h v1.19.1
升级完成后验证集群组件
[root@clientvm ~]# kubectl get pod -n kube-systemNAME READY STATUS RESTARTS AGEcalico-kube-controllers-6dfcd885bf-dk4jj 1/1 Running 0 7d1hcalico-node-7nlkr 1/1 Running 0 7d1hcalico-node-8xdqh 1/1 Running 0 7d1hcalico-node-dskkk 1/1 Running 0 7d1hcoredns-6d56c8448f-h6wvr 1/1 Running 0 6m41scoredns-6d56c8448f-lsl8p 1/1 Running 0 7d1hetcd-master.example.com 1/1 Running 0 6m57skube-apiserver-master.example.com 1/1 Running 0 6m42skube-controller-manager-master.example.com 1/1 Running 0 6m40skube-proxy-8422l 1/1 Running 0 6m4skube-proxy-df9t9 1/1 Running 0 5m55skube-proxy-vmm7j 1/1 Running 0 5m25skube-scheduler-master.example.com 1/1 Running 0 6m38smetrics-server-85b5d6b8fb-vmprh 1/1 Running 0 5h23m
[root@clientvm ~]# kubectl versionClient Version: version.Info{Major:"1", Minor:"19", GitVersion:"v1.19.1", GitCommit:"206bcadf021e76c27513500ca24182692aabd17e", GitTreeState:"clean", BuildDate:"2020-09-09T11:26:42Z", GoVersion:"go1.15", Compiler:"gc", Platform:"linux/amd64"}Server Version: version.Info{Major:"1", Minor:"19", GitVersion:"v1.19.1", GitCommit:"206bcadf021e76c27513500ca24182692aabd17e", GitTreeState:"clean", BuildDate:"2020-09-09T11:18:22Z", GoVersion:"go1.15", Compiler:"gc", Platform:"linux/amd64"}

若有收获,就点个赞吧
0 人点赞
