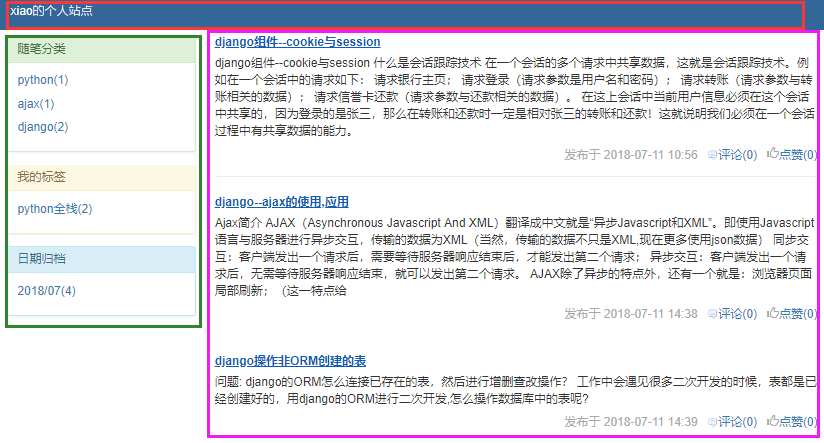
一、个人主页
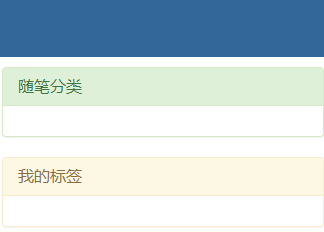
随笔分类
需求:查询当前站点每一个分类的名称以及对应的文章数
完成这个需求,就可以展示左侧的分类
它需要利用分组查询,那么必须要会基于双下划线的查询。
基于双下划线的查询,简单来讲,就是用join。将多个表拼接成一张表,那么就可以单表操作了!
表关系图
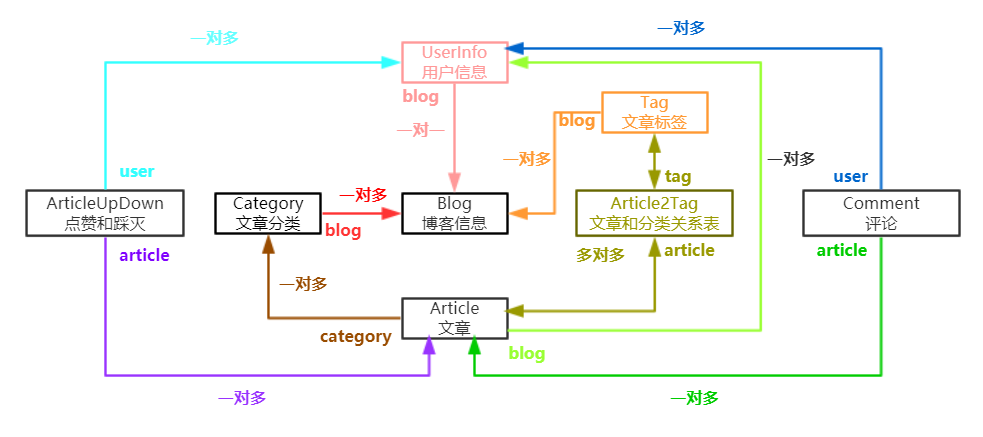
图中箭头开始的英文字母表示关联字段
按照箭头方向查询,表示正向查询,否则为反向查询
分解步骤:
先来查询每一个分类的名称以及对应的文章数
看上面的关系图,以Category表为基础表来查询Article表对应的文章数,需要用到反向查询。
记住一个原则,正向查询使用字段,反向查询使用表名
修改views.py,导入相关表和聚合函数
from django.shortcuts import render,HttpResponse,redirectfrom django.contrib import authfrom blog.models import Article,UserInfo,Blog,Category,Tagfrom django.db.models import Sum,Avg,Max,Min,Count# Create your views here.def login(request):if request.method=="POST":user=request.POST.get("user")pwd=request.POST.get("pwd")# 用户验证成功,返回user对象,否则返回Noneuser=auth.authenticate(username=user,password=pwd)if user:# 登录,注册session# 全局变量 request.user=当前登陆对象(session中)auth.login(request,user)return redirect("/index/")return render(request,"login.html")def index(request):article_list=Article.objects.all()return render(request,"index.html",{"article_list":article_list})def logout(request): # 注销auth.logout(request)return redirect("/index/")def homesite(request,username):"""查询:param request::param username::return:"""# 查询当前站点的用户对象user=UserInfo.objects.filter(username=username).first()if not user:return render(request,"not_found.html")# 查询当前站点对象blog=user.blog# 查询当前用户发布的所有文章article_list=Article.objects.filter(user__username=username)ret = Category.objects.values("pk").annotate(c=Count("article__title")).values("title","c")print(ret)dict = {"blog":blog,"article_list":article_list,}return render(request,"homesite.html",dict)
解释:
pk表示主键
上面这句sql表示以Category表id来分组,得到分类名以及统计数
多添加几篇文章,给另外一个用户也添加几篇文章
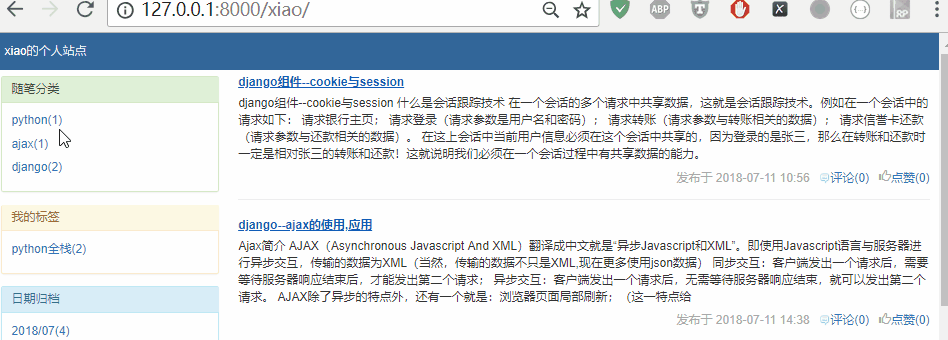
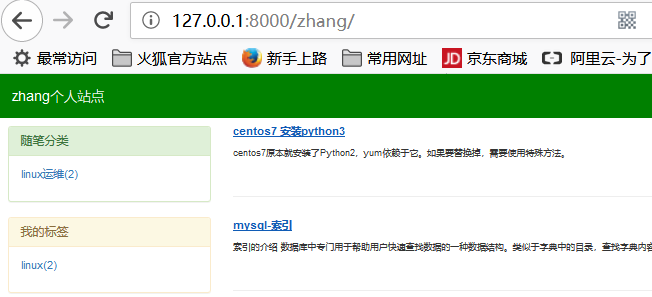
访问个人站点:http://127.0.0.1:8000/xiao/
查看Pycharm控制台输出:
上面得到了所有文章的分类以及文章数。
再来查询当前站点每一个分类的名称以及对应的文章数
思路:只需要对Category表进行筛选,过滤中当前站点用户的分类
在homesite视图函数中,已经有一个当前站点的blog对象。
在Category模型表中,有一个blog属性,它和blog是一对多关系。那么只需要blog=blog,就可以了
修改视图函数homesite的ret变量
ret = Category.objects.filter(blog=blog).annotate(c=Count("article__title")).values("title","c")
注意:等式左边的blog表示Category模型表的blog属性,实际上就是blog_id字段
等式右边的是blog变量,它是一个model对象。那么blog=blog,就可以查询出,当前站点的分类了!
刷新网页,查看Pycharm控制台输出:
<QuerySet [{‘title’: ‘python’, ‘c’: 1}, {‘title’: ‘ajax’, ‘c’: 1}, {‘title’: ‘django’, ‘c’: 2}]
既然结果出来了,模板就可以渲染了
修改homesite视图函数,完整代码如下:
from django.shortcuts import render,HttpResponse,redirectfrom django.contrib import authfrom blog.models import Article,UserInfo,Blog,Category,Tagfrom django.db.models import Sum,Avg,Max,Min,Count# Create your views here.def login(request):if request.method=="POST":user=request.POST.get("user")pwd=request.POST.get("pwd")# 用户验证成功,返回user对象,否则返回Noneuser=auth.authenticate(username=user,password=pwd)if user:# 登录,注册session# 全局变量 request.user=当前登陆对象(session中)auth.login(request,user)return redirect("/index/")return render(request,"login.html")def index(request):article_list=Article.objects.all()return render(request,"index.html",{"article_list":article_list})def logout(request): # 注销auth.logout(request)return redirect("/index/")def homesite(request,username):"""查询:param request::param username::return:"""# 查询当前站点的用户对象user=UserInfo.objects.filter(username=username).first()if not user:return render(request,"not_found.html")# 查询当前站点对象blog=user.blogprint(blog,type(blog))# 查询当前用户发布的所有文章article_list=Article.objects.filter(user__username=username)cate_list = Category.objects.filter(blog=blog).annotate(c=Count("article__title")).values_list("title", "c")print(cate_list)dict = {"blog":blog,"article_list":article_list,"cate_list":cate_list}return render(request,"homesite.html",dict)
修改homesite.html
<!DOCTYPE html><html lang="en"><head><meta charset="UTF-8"><title>Title</title><style>* {margin: 0;padding: 0;}.header {width: 100%;height: 59px;background-color: #369;}.header .title {line-height: 59px;color: white;font-weight: lighter;margin-left: 20px;font-size: 18px;}.left_region {margin-top: 10px;}.info {margin-top: 10px;color: darkgray;}h5 a {color: #105cb6;font-size: 14px;font-weight: bold;text-decoration: underline;}</style><link rel="stylesheet" href="/static/bootstrap/css/bootstrap.css"><script src="/static/js/jquery.js"></script><script src="/static/bootstrap/js/bootstrap.js"></script></head><body><div class="header"><p class="title">{{ blog.title }}</p></div><div class="container-fluid"><div class="row"><div class="col-md-3"><div class="left_region"><div class="panel panel-success"><div class="panel-heading"><h3 class="panel-title">随笔分类</h3></div><div class="panel-body">{% for cate in cate_list %}<p><a href="">{{ cate.0 }}({{ cate.1 }})</a></p>{% endfor %}</div></div><div class="panel panel-warning"><div class="panel-heading"><h3 class="panel-title">我的标签</h3></div><div class="panel-body">Panel content</div></div><div class="panel panel-info"><div class="panel-heading"><h3 class="panel-title">日期归档</h3></div><div class="panel-body">Panel content</div></div></div></div><div class="col-md-9"><div class="article_list">{% for article in article_list %}<div class="article_item clearfix"><h5><a href="">{{ article.title }}</a></h5><div><span class="small desc ">{{ article.desc }}</span></div><div class="info small pull-right">发布于 <span>{{ article.create_time|date:'Y-m-d H:i' }}</span><img src="/static/img/icon_comment.gif" alt=""><ahref="">评论({{ article.comment_count }})</a><span class="glyphicon glyphicon-thumbs-up"></span><a href="">点赞({{ article.up_count }})</a></div></div><hr>{% endfor %}</div></div></div></div></body></html>
values_list返回的是一个元组,所以模板中,直接用cate.0就可以取到分类名
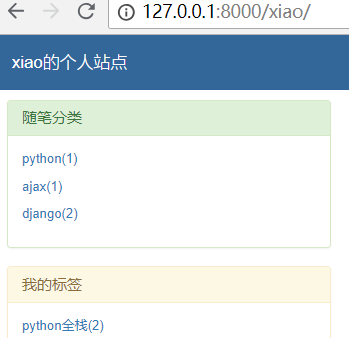
刷新网页,效果如下:

我的标签
我的标签和随笔的查询语句是类似的,换一个表名,就可以了!
先在admin后台为不同的用户,添加标签

由于admin后台无法直接将博客表和标签表做对应关系,所以只能手动绑定关系。
使用navicat打开blog_article2tag表
注意:以实际情况为准
修改homesite视图函数,查询我的标签
def homesite(request,username):"""查询:param request::param username::return:"""# 查询当前站点的用户对象user=UserInfo.objects.filter(username=username).first()if not user:return render(request,"not_found.html")# 查询当前站点对象blog=user.blogprint(blog,type(blog))# 查询当前用户发布的所有文章article_list=Article.objects.filter(user__username=username)#随笔分类cate_list = Category.objects.filter(blog=blog).annotate(c=Count("article__title")).values_list("title", "c")print(cate_list)#我的标签tag_list = Tag.objects.filter(blog=blog).annotate(c=Count("article__title")).values_list("title", "c")print(tag_list)dict = {"blog":blog,"article_list":article_list,"cate_list":cate_list,"tag_list":tag_list,}return render(request,"homesite.html",dict)
刷新网页,查看Pycharm控制台
<QuerySet [('python全栈', 2)]>
修改homesite.html,开始渲染网页
<!DOCTYPE html>
<html lang="en">
<head>
    <meta charset="UTF-8">
    <title>Title</title>

    <style>
        * {
            margin: 0;
            padding: 0;
        }

        .header {
            width: 100%;
            height: 59px;
            background-color: #369;
        }

        .header .title {
            line-height: 59px;
            color: white;
            font-weight: lighter;
            margin-left: 20px;
            font-size: 18px;
        }

        .left_region {
            margin-top: 10px;
        }

        .info {
            margin-top: 10px;
            color: darkgray;

        }

        h5 a {
            color: #105cb6;
            font-size: 14px;
            font-weight: bold;
            text-decoration: underline;
        }

    </style>
    <link rel="stylesheet" href="/static/bootstrap/css/bootstrap.css">
    <script src="/static/js/jquery.js"></script>
    <script src="/static/bootstrap/js/bootstrap.js"></script>
</head>
<body>
<div class="header">
    <p class="title">{{ blog.title }}</p>
</div>


<div class="container-fluid">
    <div class="row">
        <div class="col-md-3">
            <div class="left_region">
                <div class="panel panel-success">
                    <div class="panel-heading">
                        <h3 class="panel-title">随笔分类</h3>
                    </div>
                    <div class="panel-body">
                        {% for cate in cate_list %}
                            <p><a href="">{{ cate.0 }}({{ cate.1 }})</a></p>
                        {% endfor %}

                    </div>

                </div>
                <div class="panel panel-warning">
                    <div class="panel-heading">
                        <h3 class="panel-title">我的标签</h3>
                    </div>
                    <div class="panel-body">
                        {% for tag in tag_list %}
                            <p><a href="">{{ tag.0 }}({{ tag.1 }})</a></p>
                        {% endfor %}

                    </div>

                </div>
                <div class="panel panel-info">
                    <div class="panel-heading">
                        <h3 class="panel-title">日期归档</h3>
                    </div>
                    <div class="panel-body">
                        Panel content
                    </div>
                </div>
            </div>
        </div>
        <div class="col-md-9">

            <div class="article_list">
                {% for article in article_list %}

                    <div class="article_item clearfix">
                        <h5><a href="">{{ article.title }}</a></h5>
                        <div>

                          <span class="small desc ">
                              {{ article.desc }}
                          </span>

                        </div>
                        <div class="info small pull-right">
                            发布于 <span>{{ article.create_time|date:'Y-m-d H:i' }}</span>
                            <img src="/static/img/icon_comment.gif" alt=""><a
                                href="">评论({{ article.comment_count }})</a>
                            <span class="glyphicon glyphicon-thumbs-up"></span><a href="">点赞({{ article.up_count }})</a>
                        </div>
                    </div>
                    <hr>
                {% endfor %}
            </div>

        </div>
    </div>
</div>


</body>
</html>
刷新网页,效果如下:
注意:如果网页数据没有展示,请一定要查看数据库是否有对应的记录!
日期归档
查看Article表的create_time字段
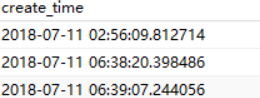
注意:它的时间后面,有很多小数点。每一条是不一样的,所以不能直接分组,否则没有意义!
要实现这个功能,有3个小知识点:
- 1.dateformat
- 2.extra
- 3.单表分组查询
dateformat
DATE_FORMAT() 函数用于以不同的格式显示日期/时间数据。
每个数据库都有日期/时间 处理的函数,在MySQL中,叫dateformat。SQLite中,叫strftime
举例:
#截取年月日
mysql> select date_format("2018-07-11 06:39:07",'%Y-%m-%d') as date;
+------------+
| date       |
+------------+
| 2018-07-11 |
+------------+
1 row in set (0.00 sec)

#截取年月
mysql> select date_format("2018-07-11 06:39:07",'%Y-%m') as date;
+---------+
| date    |
+---------+
| 2018-07 |
+---------+
1 row in set (0.00 sec)
extra
有些情况下,Django的查询语法难以表达复杂的where子句,对于这种情况, Django 提供了extra()QuerySet修改机制 。它能在QuerySet生成的SQL从句中注入新子句,extra可以指定一个或多个参数,例如select、where或tables。 这些参数都不是必须的,但是至少要使用一个。
语法:
extra(select=None, where=None, params=None,
      tables=None, order_by=None, select_params=None)
select参数
select参数可以在select从句中添加其他字段信息,它应该是一个字典,存放着属性名到 SQL 从句的映射。
举例:
修改homesite视图函数,增加几行代码
def homesite(request,username):
    """
    查询
    :param request:
    :param username:
    :return:
    """
    # 查询当前站点的用户对象
    user=UserInfo.objects.filter(username=username).first()
    if not user:
        return render(request,"not_found.html")
    # 查询当前站点对象
    blog=user.blog
    print(blog,type(blog))

    # 查询当前用户发布的所有文章
    article_list=Article.objects.filter(user__username=username)
    #随笔分类
    cate_list = Category.objects.filter(blog=blog).annotate(c=Count("article__title")).values_list("title", "c")
    print(cate_list)

    #我的标签
    tag_list = Tag.objects.filter(blog=blog).annotate(c=Count("article__title")).values_list("title", "c")
    print(tag_list)
    #测试日期
    test_date = Article.objects.filter(comment_count=0).extra(select={'y_m_date': "create_time > '2017-09-05'"})
    print(test_date)
    for i in test_date:
        print(i.y_m_date)

    dict = {"blog":blog,
            "article_list":article_list,
            "cate_list":cate_list,
            "tag_list":tag_list,
            }

    return render(request,"homesite.html",dict)
大概意思就是,查询创建时间大于2017-09-05的记录
刷新网页,查看Pycharm控制台输出:
1
1
1
如果条件成立,返回1。否则返回0
需要注意的是:此时已经给Article表增加一个临时字段y_m_date。它在内存中,每次使用extra查询才会存在!
单表分组查询
查询当前用户的所有文章,根据日期归档
def homesite(request,username):
    """
    查询
    :param request:
    :param username:
    :return:
    """
    # 查询当前站点的用户对象
    user=UserInfo.objects.filter(username=username).first()
    if not user:
        return render(request,"not_found.html")
    # 查询当前站点对象
    blog=user.blog
    print(blog,type(blog))

    # 查询当前用户发布的所有文章
    article_list=Article.objects.filter(user__username=username)
    #随笔分类
    cate_list = Category.objects.filter(blog=blog).annotate(c=Count("article__title")).values_list("title", "c")
    print(cate_list)

    #我的标签
    tag_list = Tag.objects.filter(blog=blog).annotate(c=Count("article__title")).values_list("title", "c")
    print(tag_list)

    #日期归档
    date_list = Article.objects.filter(user=user).extra(select={"y_m_date": "strftime('%%Y/%%m',create_time)"}).values(
        "y_m_date").annotate(c=Count("title")).values_list("y_m_date", "c")
    print(date_list)

    dict = {"blog":blog,
            "article_list":article_list,
            "cate_list":cate_list,
            "tag_list":tag_list,
            "date_list":date_list,
            }

    return render(request,"homesite.html",dict)
解释:
SQLite的日期格式化使用strftime,它使用2个%号来区分。
user=user 等式左边的user是Article模型表的user属性,也就是user_id。等式右边的user是UserInfo表的model对象!
刷新页面,查看Pychram控制台输出:
<QuerySet [('2018/07', 4)]>
修改homesite.html,开始渲染网页
<!DOCTYPE html>
<html lang="en">
<head>
    <meta charset="UTF-8">
    <title>Title</title>

    <style>
        * {
            margin: 0;
            padding: 0;
        }

        .header {
            width: 100%;
            height: 59px;
            background-color: #369;
        }

        .header .title {
            line-height: 59px;
            color: white;
            font-weight: lighter;
            margin-left: 20px;
            font-size: 18px;
        }

        .left_region {
            margin-top: 10px;
        }

        .info {
            margin-top: 10px;
            color: darkgray;

        }

        h5 a {
            color: #105cb6;
            font-size: 14px;
            font-weight: bold;
            text-decoration: underline;
        }

    </style>
    <link rel="stylesheet" href="/static/bootstrap/css/bootstrap.css">
    <script src="/static/js/jquery.js"></script>
    <script src="/static/bootstrap/js/bootstrap.js"></script>
</head>
<body>
<div class="header">
    <p class="title">{{ blog.title }}</p>
</div>


<div class="container-fluid">
    <div class="row">
        <div class="col-md-3">
            <div class="left_region">
                <div class="panel panel-success">
                    <div class="panel-heading">
                        <h3 class="panel-title">随笔分类</h3>
                    </div>
                    <div class="panel-body">
                        {% for cate in cate_list %}
                            <p><a href="">{{ cate.0 }}({{ cate.1 }})</a></p>
                        {% endfor %}

                    </div>

                </div>
                <div class="panel panel-warning">
                    <div class="panel-heading">
                        <h3 class="panel-title">我的标签</h3>
                    </div>
                    <div class="panel-body">
                        {% for tag in tag_list %}
                            <p><a href="">{{ tag.0 }}({{ tag.1 }})</a></p>
                        {% endfor %}

                    </div>

                </div>
                <div class="panel panel-info">
                    <div class="panel-heading">
                        <h3 class="panel-title">日期归档</h3>
                    </div>
                    <div class="panel-body">
                        {% for date in date_list %}
                            <p><a href="">{{ date.0 }}({{ date.1 }})</a></p>
                        {% endfor %}

                    </div>
                </div>
            </div>
        </div>
        <div class="col-md-9">

            <div class="article_list">
                {% for article in article_list %}

                    <div class="article_item clearfix">
                        <h5><a href="">{{ article.title }}</a></h5>
                        <div>

                          <span class="small desc ">
                              {{ article.desc }}
                          </span>

                        </div>
                        <div class="info small pull-right">
                            发布于 <span>{{ article.create_time|date:'Y-m-d H:i' }}</span>
                            <img src="/static/img/icon_comment.gif" alt=""><a
                                href="">评论({{ article.comment_count }})</a>
                            <span class="glyphicon glyphicon-thumbs-up"></span><a href="">点赞({{ article.up_count }})</a>
                        </div>
                    </div>
                    <hr>
                {% endfor %}
            </div>

        </div>
    </div>
</div>


</body>
</html>
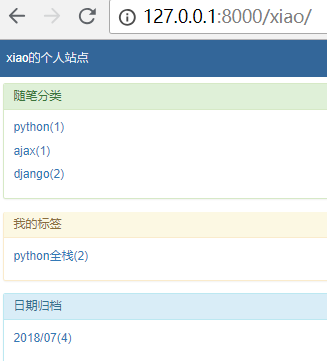
刷新网页,效果如下:
左侧面板添加链接
接下来,需要点击左边的分类、标签、归档,显示相关的文章
访问博客园左侧的分类、标签、归档,方法它有一个规律
标签:
http://www.cnblogs.com/用户名/tag/标签名/
分类:
https://www.cnblogs.com/用户名/category/分类id.html
归档:
https://www.cnblogs.com/用户名/archive/年/月.html
修改urls.py,增加3个路径。注意要导入re_path模块
re_path('(?P<username>\w+)/category/(?P<params>.*)', views.homesite),
re_path('(?P<username>\w+)/tag/(?P<params>.*)', views.homesite),
re_path('(?P<username>\w+)/achrive/(?P<params>.*)', views.homesite),
仔细观察个人站点网页的布局
发现,点击不同的分类、标签、归档。红色区域和绿色区域始终不变,只有紫色区域在变动。变动区域取决于article_list变量!
那么个人站点首页、分类、标签、归档这4种url可以共用一个视图函数homesite模板以及视图函数。
重新修改urls.py,完整代码如下:
from django.contrib import admin
from django.urls import path,re_path

from blog import  views
urlpatterns = [
    path('admin/', admin.site.urls),
    path('login/', views.login),
    path('index/', views.index),
    path('logout/', views.logout),
    path('', views.index),

    # 跳转
    re_path('(?P<username>\w+)/(?P<condition>category|tag|achrive)/(?P<params>.*)/$', views.homesite),
    # 个人站点
    re_path('(?P<username>\w+)/$', views.homesite),
]
那么问题来了,访问个人站点时,不需要额外的参数。
访问分类/标签/归档 这2个类别是,必须要2个额外的变量。分别是类别、类别参数。
homesite视图函数,如果分别接收呢?答案是,使用**kwargs,它可以接收可变的关键字参数,至少1个或者多个参数!
修改homesite.html,增加一个网页图标,否则待会测试时,会有2次请求。
如果网页没有图标,每次会请求一次网络请求,请求favicon.ico
在title标签下面,增加一行
<link rel="shortcut icon" href="https://common.cnblogs.com/favicon.ico" type="image/x-icon" />
修改homesite视图函数
def homesite(request,username,**kwargs):
    """
    查询
    :param request:
    :param username:
    :return:
    """
    print("kwargs", kwargs)

    # 查询当前站点的用户对象
    user=UserInfo.objects.filter(username=username).first()
    if not user:
        return render(request,"not_found.html")
    # 查询当前站点对象
    blog=user.blog

    # 查询当前用户发布的所有文章
    article_list=Article.objects.filter(user__username=username)
    #随笔分类
    cate_list = Category.objects.filter(blog=blog).annotate(c=Count("article__title")).values_list("title", "c")
    # print(cate_list)

    #我的标签
    tag_list = Tag.objects.filter(blog=blog).annotate(c=Count("article__title")).values_list("title", "c")
    # print(tag_list)

    #日期归档
    date_list = Article.objects.filter(user=user).extra(select={"y_m_date": "strftime('%%Y/%%m',create_time)"}).values(
        "y_m_date").annotate(c=Count("title")).values_list("y_m_date", "c")
    # print(date_list)

    dict = {"blog":blog,
            "article_list":article_list,
            "cate_list":cate_list,
            "tag_list":tag_list,
            "date_list":date_list,
            }

    return render(request,"homesite.html",dict)
访问个人站点: http://127.0.0.1:8000/xiao/
Pycharm控制台输出:kwargs {}
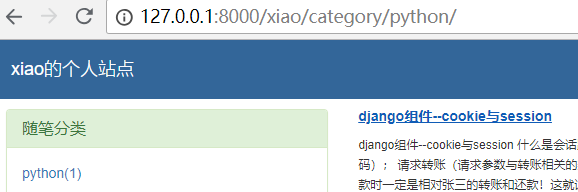
访问个人分类python: http://127.0.0.1:8000/xiao/category/python/
Pycharm控制台输出:kwargs {‘params’: ‘python/‘, ‘condition’: ‘category’}
访问个人标签: http://127.0.0.1:8000/xiao/tag/python全栈/
Pycharm控制台输出:kwargs {‘params’: ‘python全栈/‘, ‘condition’: ‘tag’}
访问个人归档: http://127.0.0.1:8000/xiao/achrive/2018/07
Pycharm控制台输出:kwargs {‘params’: ‘2018/07’, ‘condition’: ‘achrive’}
注意:要带上用户名,否则出现404错误
那么,只需要判断kwargs变量,就可以区分了!
修改homesite视图函数
def homesite(request,username,**kwargs):
    """
    查询
    :param request:
    :param username:
    :return:
    """
    print("kwargs", kwargs)

    # 查询当前站点的用户对象
    user=UserInfo.objects.filter(username=username).first()
    if not user:
        return render(request,"not_found.html")
    # 查询当前站点对象
    blog=user.blog

    # 查询当前用户发布的所有文章
    if not kwargs:
        article_list = Article.objects.filter(user__username=username)

    else:
        condition = kwargs.get("condition")
        params = kwargs.get("params")
        #判断分类、随笔、归档
        if condition == "category":
            article_list = Article.objects.filter(user__username=username).filter(category__title=params)
        elif condition == "tag":
            article_list = Article.objects.filter(user__username=username).filter(tags__title=params)
        else:
            year, month = params.split("/")
            article_list = Article.objects.filter(user__username=username).filter(create_time__year=year,
                                                                                  create_time__month=month)
    #随笔分类
    cate_list = Category.objects.filter(blog=blog).annotate(c=Count("article__title")).values_list("title", "c")
    # print(cate_list)

    #我的标签
    tag_list = Tag.objects.filter(blog=blog).annotate(c=Count("article__title")).values_list("title", "c")
    # print(tag_list)

    #日期归档
    date_list = Article.objects.filter(user=user).extra(select={"y_m_date": "strftime('%%Y/%%m',create_time)"}).values(
        "y_m_date").annotate(c=Count("title")).values_list("y_m_date", "c")
    # print(date_list)

    dict = {"blog":blog,
            "article_list":article_list,
            "cate_list":cate_list,
            "tag_list":tag_list,
            "date_list":date_list,
            "username":username,
            }

    return render(request,"homesite.html",dict)
修改homesite.html
<!DOCTYPE html>
<html lang="en">
<head>
    <meta charset="UTF-8">
    <title>Title</title>
    <link rel="shortcut icon" href="https://common.cnblogs.com/favicon.ico" type="image/x-icon"/>

    <style>
        * {
            margin: 0;
            padding: 0;
        }

        .header {
            width: 100%;
            height: 59px;
            background-color: #369;
        }

        .header .title {
            line-height: 59px;
            color: white;
            font-weight: lighter;
            margin-left: 20px;
            font-size: 18px;
        }

        .left_region {
            margin-top: 10px;
        }

        .info {
            margin-top: 10px;
            color: darkgray;

        }

        h5 a {
            color: #105cb6;
            font-size: 14px;
            font-weight: bold;
            text-decoration: underline;
        }

    </style>
    <link rel="stylesheet" href="/static/bootstrap/css/bootstrap.css">
    <script src="/static/js/jquery.js"></script>
    <script src="/static/bootstrap/js/bootstrap.js"></script>
</head>
<body>
<div class="header">
    <p class="title">{{ blog.title }}</p>
</div>


<div class="container-fluid">
    <div class="row">
        <div class="col-md-3">
            <div class="left_region">
                <div class="panel panel-success">
                    <div class="panel-heading">
                        <h3 class="panel-title">随笔分类</h3>
                    </div>
                    <div class="panel-body">
                        {% for cate in cate_list %}
                            <p><a href="/{{ username }}/category/{{ cate.0 }}">{{ cate.0 }}({{ cate.1 }})</a></p>
                        {% endfor %}

                    </div>

                </div>
                <div class="panel panel-warning">
                    <div class="panel-heading">
                        <h3 class="panel-title">我的标签</h3>
                    </div>
                    <div class="panel-body">
                        {% for tag in tag_list %}
                            <p><a href="/{{ username }}/tag/{{ tag.0 }}">{{ tag.0 }}({{ tag.1 }})</a></p>
                        {% endfor %}
                    </div>

                </div>
                <div class="panel panel-info">
                    <div class="panel-heading">
                        <h3 class="panel-title">日期归档</h3>
                    </div>
                    <div class="panel-body">
                        {% for date in date_list %}
                            <p><a href="/{{ username }}/achrive/{{ date.0 }}">{{ date.0 }}({{ date.1 }})</a></p>
                        {% endfor %}

                    </div>
                </div>
            </div>
        </div>
        <div class="col-md-9">

            <div class="article_list">
                {% for article in article_list %}

                    <div class="article_item clearfix">
                        <h5><a href="">{{ article.title }}</a></h5>
                        <div>

                          <span class="small desc ">
                              {{ article.desc }}
                          </span>

                        </div>
                        <div class="info small pull-right">
                            发布于 <span>{{ article.create_time|date:'Y-m-d H:i' }}</span>
                            <img src="/static/img/icon_comment.gif" alt=""><a
                                href="">评论({{ article.comment_count }})</a>
                            <span class="glyphicon glyphicon-thumbs-up"></span><a href="">点赞({{ article.up_count }})</a>
                        </div>
                    </div>
                    <hr>
                {% endfor %}
            </div>

        </div>
    </div>
</div>


</body>
</html>
访问个人站点:http://127.0.0.1:8000/xiao/
效果如下:
主题切换
查看blog_blog表,有2条记录

theme对应主题的css文件
在homesite.html中的style标签定义了一些样式。现在需要分离出来!
每一个用户有自己的标题颜色,比如xiao用默认的蓝色,zhang用绿色
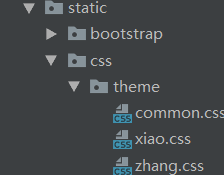
在static中新建css目录,在css中新建文件夹theme,新建3个css文件,其中common.css是公共样式!
common.css
* {
    margin: 0;
    padding: 0;
}

.header {
    width: 100%;
    height: 59px;
    background-color: #369;
}

.header .title {
    line-height: 59px;
    color: white;
    font-weight: lighter;
    margin-left: 20px;
    font-size: 18px;
}

.left_region {
    margin-top: 10px;
}

.info {
    margin-top: 10px;
    color: darkgray;

}

h5 a {
    color: #105cb6;
    font-size: 14px;
    font-weight: bold;
    text-decoration: underline;
}
xiao.css
.header {
    width: 100%;
    height: 59px;
    background-color: #369;
}
zhang.css
.header {
    width: 100%;
    height: 59px;
    background-color: green;
}
修改homesite.html,修改head部分,完整代码如下:
<!DOCTYPE html>
<html lang="en">
<head>
    <meta charset="UTF-8">
    <title>Title</title>
    <link rel="shortcut icon" href="https://common.cnblogs.com/favicon.ico" type="image/x-icon"/>
    {#公共样式#}
    <link rel="stylesheet" href="/static/css/theme/common.css">
    {#个人站点主题样式#}
    <link rel="stylesheet" href="/static/css/theme/{{ blog.theme }}">

    <link rel="stylesheet" href="/static/bootstrap/css/bootstrap.css">
    <script src="/static/js/jquery.js"></script>
    <script src="/static/bootstrap/js/bootstrap.js"></script>
</head>
<body>
<div class="header">
    <p class="title">{{ blog.title }}</p>
</div>


<div class="container-fluid">
    <div class="row">
        <div class="col-md-3">
            <div class="left_region">
                <div class="panel panel-success">
                    <div class="panel-heading">
                        <h3 class="panel-title">随笔分类</h3>
                    </div>
                    <div class="panel-body">
                        {% for cate in cate_list %}
                            <p><a href="/{{ username }}/category/{{ cate.0 }}">{{ cate.0 }}({{ cate.1 }})</a></p>
                        {% endfor %}

                    </div>

                </div>
                <div class="panel panel-warning">
                    <div class="panel-heading">
                        <h3 class="panel-title">我的标签</h3>
                    </div>
                    <div class="panel-body">
                        {% for tag in tag_list %}
                            <p><a href="/{{ username }}/tag/{{ tag.0 }}">{{ tag.0 }}({{ tag.1 }})</a></p>
                        {% endfor %}
                    </div>

                </div>
                <div class="panel panel-info">
                    <div class="panel-heading">
                        <h3 class="panel-title">日期归档</h3>
                    </div>
                    <div class="panel-body">
                        {% for date in date_list %}
                            <p><a href="/{{ username }}/achrive/{{ date.0 }}">{{ date.0 }}({{ date.1 }})</a></p>
                        {% endfor %}

                    </div>
                </div>
            </div>
        </div>
        <div class="col-md-9">

            <div class="article_list">
                {% for article in article_list %}

                    <div class="article_item clearfix">
                        <h5><a href="">{{ article.title }}</a></h5>
                        <div>

                          <span class="small desc ">
                              {{ article.desc }}
                          </span>

                        </div>
                        <div class="info small pull-right">
                            发布于 <span>{{ article.create_time|date:'Y-m-d H:i' }}</span>
                            <img src="/static/img/icon_comment.gif" alt=""><a
                                href="">评论({{ article.comment_count }})</a>
                            <span class="glyphicon glyphicon-thumbs-up"></span><a href="">点赞({{ article.up_count }})</a>
                        </div>
                    </div>
                    <hr>
                {% endfor %}
            </div>

        </div>
    </div>
</div>


</body>
</html>
使用谷歌浏览器登录xiao的用户,进入个人主页
使用火狐浏览器登录zhang的用户
进入个人主页,发现标题颜色没有换过来
进入admin后台,点击users表,找到zhang用户,发现它没有绑定个人站点。
因为使用命令创建用户时,blog_id字段,默认为空!
手动绑定一下
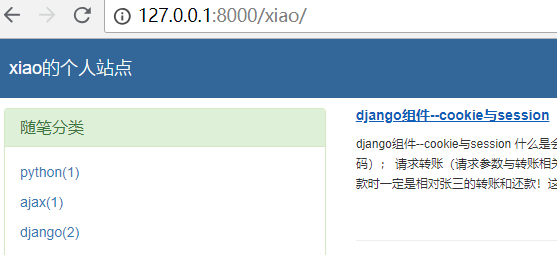
再次刷新页面,效果如下:
文章详情
由于文章详情页,功能繁多,必须专门做一个视图才行。
修改urls.py,增加路径article_detail
urlpatterns = [
    path('admin/', admin.site.urls),
    path('login/', views.login),
    path('index/', views.index),
    path('logout/', views.logout),
    path('', views.index),

    #文章详情
    re_path('(?P<username>\w+)/articles/(?P<article_id>\d+)/$', views.article_detail),
    # 跳转
    re_path('(?P<username>\w+)/(?P<condition>category|tag|achrive)/(?P<params>.*)/$', views.homesite),
    # 个人站点
    re_path('(?P<username>\w+)/$', views.homesite),
]
由于文章详情页的左测和标题部分是通用的,需要用到模板继承
模板继承
新建base.html,将homesite.html的代码复制过来,删除多余的部分。增加block
<!DOCTYPE html>
<html lang="en">
<head>
    <meta charset="UTF-8">
    <title>Title</title>
    {#公共样式#}
    <link rel="stylesheet" href="/static/css/theme/common.css">
    {#个人站点主题样式#}
    <link rel="stylesheet" href="/static/css/theme/{{ blog.theme }}">
    {#bootstrap#}
    <link rel="stylesheet" href="/static/bootstrap/css/bootstrap.css">
    <script src="/static/js/jquery.js"></script>
    <script src="/static/bootstrap/js/bootstrap.js"></script>

    <link rel="shortcut icon" href="https://common.cnblogs.com/favicon.ico" type="image/x-icon" />
</head>
<body>
<div class="header">
    <p class="title">{{ blog.title }}</p>
</div>


<div class="container-fluid">
    <div class="row">
        <div class="col-md-3">
            <div class="left_region">
                <div class="panel panel-success">
                    <div class="panel-heading">
                        <h3 class="panel-title">随笔分类</h3>
                    </div>
                    <div class="panel-body">
                        {% for cate in cate_list %}
                            <p><a href="/{{ username }}/category/{{ cate.0 }}">{{ cate.0 }}({{ cate.1 }})</a></p>
                        {% endfor %}

                    </div>

                </div>
                <div class="panel panel-warning">
                    <div class="panel-heading">
                        <h3 class="panel-title">我的标签</h3>
                    </div>
                    <div class="panel-body">
                        {% for tag in tag_list %}
                            <p><a href="/{{ username }}/tag/{{ tag.0 }}">{{ tag.0 }}({{ tag.1 }})</a></p>
                        {% endfor %}
                    </div>

                </div>
                <div class="panel panel-info">
                    <div class="panel-heading">
                        <h3 class="panel-title">日期归档</h3>
                    </div>
                    <div class="panel-body">
                        {% for date in date_list %}
                            <p><a href="/{{ username }}/achrive/{{ date.0 }}">{{ date.0 }}({{ date.1 }})</a></p>
                        {% endfor %}

                    </div>
                </div>
            </div>
        </div>
        <div class="col-md-9">

           {% block content %}

           {% endblock %}

        </div>
    </div>
</div>


</body>
</html>
修改homesite.html
{% extends "base.html" %}

{% block content %}
  <div class="article_list">
                {% for article in article_list %}
                 <div class="article_item clearfix">
                      <h5><a href="/{{ username }}/articles/{{ article.pk }}">{{ article.title }}</a></h5>
                      <div>

                          <span class="small desc ">
                              {{ article.desc }}
                          </span>

                      </div>
                      <div class="info small pull-right">
                            发布于 <span>{{ article.create_time|date:'Y-m-d H:i' }}</span>
                           <span class="glyphicon glyphicon-comment"></span><a href="">评论({{ article.comment_count }})</a>
                           <span class="glyphicon glyphicon-thumbs-up"></span><a href="">点赞({{ article.up_count }})</a>
                      </div>
                 </div>
                    <hr>
                {% endfor %}
            </div>
{% endblock %}
增加article_detail.html
{% extends "base.html" %}

{% block content %}

    <div class="article_info">
        <h4 class="text-center">{{ article_obj.title }}</h4>
        <div class="content">
            {{ article_obj.content }}
        </div>
    </div>

{% endblock %}
修改article_detail视图函数
def article_detail(request,username,article_id):
    user = UserInfo.objects.filter(username=username).first()
    # 查询当前站点对象
    blog = user.blog

    # 查询指定id的文章
    article_obj=Article.objects.filter(pk=article_id).first()

    # 随笔分类
    cate_list = Category.objects.filter(blog=blog).annotate(c=Count("article__title")).values_list("title", "c")
    # print(cate_list)

    # 我的标签
    tag_list = Tag.objects.filter(blog=blog).annotate(c=Count("article__title")).values_list("title", "c")
    # print(tag_list)

    # 日期归档
    date_list = Article.objects.filter(user=user).extra(select={"y_m_date": "strftime('%%Y/%%m',create_time)"}).values(
        "y_m_date").annotate(c=Count("title")).values_list("y_m_date", "c")
    # print(date_list)

    dict = {"blog": blog,
            "article_obj": article_obj,
            "cate_list": cate_list,
            "tag_list": tag_list,
            "date_list": date_list,
            "username": username,
            }

    return render(request,'article_detail.html',dict)
刷新网页,点击左侧的一个分类,效果如下:
点击右边的一篇文章
关于内容部分,为什么是html标签。这些暂时不处理,后面会讲到如何处理!
查看article_detail和homesite 这2个视图函数,有重复的代码。在编程的过程中,最好不要出现重复代码,怎么办呢?使用函数封装!
函数封装
修改views.py,增加函数get_query_data。删掉article_detail和homesite 这2个视图函数中的重复代码,完整代码如下:
from django.shortcuts import render,HttpResponse,redirect
from django.contrib import auth
from blog.models import Article,UserInfo,Blog,Category,Tag
from django.db.models import Sum,Avg,Max,Min,Count
# Create your views here.
def login(request):

    if request.method=="POST":
        user=request.POST.get("user")
        pwd=request.POST.get("pwd")
        # 用户验证成功,返回user对象,否则返回None
        user=auth.authenticate(username=user,password=pwd)
        if user:
            # 登录,注册session
            # 全局变量 request.user=当前登陆对象(session中)
            auth.login(request,user)
            return redirect("/index/")

    return render(request,"login.html")

def index(request):
    article_list=Article.objects.all()
    return render(request,"index.html",{"article_list":article_list})

def logout(request):  # 注销
    auth.logout(request)
    return redirect("/index/")

def get_query_data(request,username):
    user = UserInfo.objects.filter(username=username).first()
    # 查询当前站点对象
    blog = user.blog

    # 随笔分类
    cate_list = Category.objects.filter(blog=blog).annotate(c=Count("article__title")).values_list("title", "c")
    # print(cate_list)

    # 我的标签
    tag_list = Tag.objects.filter(blog=blog).annotate(c=Count("article__title")).values_list("title", "c")
    # print(tag_list)

    # 日期归档
    date_list = Article.objects.filter(user=user).extra(select={"y_m_date": "strftime('%%Y/%%m',create_time)"}).values(
        "y_m_date").annotate(c=Count("title")).values_list("y_m_date", "c")
    # print(date_list)

    dict = {"blog": blog,
            "cate_list": cate_list,
            "tag_list": tag_list,
            "date_list": date_list,
            "username": username,
            }

    return dict #返回字典


def homesite(request,username,**kwargs):
    """
    查询
    :param request:
    :param username:
    :return:
    """
    print("kwargs", kwargs)

    # 查询当前站点的用户对象
    user=UserInfo.objects.filter(username=username).first()
    if not user:
        return render(request,"not_found.html")
    # 查询当前站点对象
    blog=user.blog

    # 查询当前用户发布的所有文章
    if not kwargs:
        article_list = Article.objects.filter(user__username=username)

    else:
        condition = kwargs.get("condition")
        params = kwargs.get("params")
        #判断分类、随笔、归档
        if condition == "category":
            article_list = Article.objects.filter(user__username=username).filter(category__title=params)
        elif condition == "tag":
            article_list = Article.objects.filter(user__username=username).filter(tags__title=params)
        else:
            year, month = params.split("/")
            article_list = Article.objects.filter(user__username=username).filter(create_time__year=year,
                                                                                  create_time__month=month)
    dict = get_query_data(request,username)  #调用函数
    dict['article_list'] = article_list  # 增加一个key
    return render(request,"homesite.html",dict)

def article_detail(request,username,article_id):
    content_text = get_query_data(request,username)  #调用函数
    #查询指定id的文章
    article_obj = Article.objects.filter(pk=article_id).first()
    content_text['article_obj'] = article_obj  # 增加一个key

    return render(request,'article_detail.html',content_text)
注意:get_query_data必须要在2个视图函数的上面,否则无法调用!
重新访问网页,效果如下:

封装函数,有一个局限性,如果新增变量,需要增加字典key-value。由于继承模板时,变量是不会继承的。所以引用的视图函数,必须重新传值才可以渲染。那么可不可以,将模板和数据包装成一个模板,作为一个整体。其他模板继承时,就是一个已经渲染过的模板呢?
答案是有的,那就是inclusion_tag
包含标签(Inclusion tags)
Django过滤器和标签功能很强大,而且支持自定义标签,很是方便;其中一种标签是Inclusion tags,即包含标签
包含标签(Inclusion tags)通过渲染其他的模板来展示内容,这类标签的用途在于一些相似的内容的展示,并且返回的内容是渲染其他模板得到的内容。
自定义标签必须在应用名目录下创建**t**emplatetags目录。注意:此目录名必须叫这个名字,不可改变。
在templatetags目录下,创建my_tags.py,这个文件名,是可以随便的
先来增加一个乘法的标签
from django import template

register=template.Library()

@register.simple_tag
def mul_tag(x,y):

    return x*y
修改article_detail.html,调用这个自定义标签
{% extends "base.html" %}

{% block content %}
    {% load my_tags %}
    <p>{% mul_tag 2 7 %}</p>
    <div class="article_info">
        <h4 class="text-center">{{ article_obj.title }}</h4>
        <div class="content">
            {{ article_obj.content }}
        </div>
    </div>

{% endblock %}
必须重启django项目,否则模板无法引用自定义标签!
必须重启django项目,否则模板无法引用自定义标签!
必须重启django项目,否则模板无法引用自定义标签!
随便访问一篇文章,出现一个14,说明调用成功了
那么这个my_tags,如何渲染左侧的分类,标签,归档呢?
新建标签get_query_data,必须返回一个字典
将视图函数中的相关代码,复制过来即可。
from django import template

register=template.Library()

@register.simple_tag
def mul_tag(x,y):

    return x*y

from blog.models import Category,Tag,Article,UserInfo
from django.db.models import Count,Avg,Max


@register.inclusion_tag("left_region.html")
def get_query_data(username):
    user = UserInfo.objects.filter(username=username).first()
    # 查询当前站点对象
    blog = user.blog

    # 查询当前站点每一个分类的名称以及对应的文章数
    cate_list = Category.objects.filter(blog=blog).annotate(c=Count("article__title")).values_list("title", "c")
    # print(cate_list)

    # 查询当前站点每一个标签的名称以及对应的文章数
    tag_list = Tag.objects.filter(blog=blog).annotate(c=Count("article__title")).values_list("title", "c")

    # 日期归档
    date_list = Article.objects.filter(user=user).extra(select={"y_m_date": "strftime('%%Y/%%m',create_time)"}).values(
        "y_m_date").annotate(c=Count("title")).values_list("y_m_date", "c")
    # print(date_list)

    return {"blog":blog,"username":username,"cate_list":cate_list,"tag_list":tag_list,"date_list":date_list}
@register.inclusion_tag(“left_region.html”) 表示将返回结果渲染给left_region.html
如果在模板中有调用left_redig.html,那么这个文件,就会渲染,是渲染后的html文件!
在templates中新建文件left_region.html
<div class="left_region">
    <div class="panel panel-success">
        <div class="panel-heading">
            <h3 class="panel-title">随笔分类</h3>
        </div>
        <div class="panel-body">
            {% for cate in cate_list %}
                <p><a href="/{{ username }}/category/{{ cate.0 }}">{{ cate.0 }}({{ cate.1 }})</a></p>
            {% endfor %}

        </div>
    </div>
    <div class="panel panel-warning">
        <div class="panel-heading">
            <h3 class="panel-title">我的标签</h3>
        </div>
        <div class="panel-body">
            {% for tag in tag_list %}
                <p><a href="/{{ username }}/tag/{{ tag.0 }}">{{ tag.0 }}({{ tag.1 }})</a></p>
            {% endfor %}
        </div>
    </div>
    <div class="panel panel-info">
        <div class="panel-heading">
            <h3 class="panel-title">日期归档</h3>
        </div>
        <div class="panel-body">
            {% for date in date_list %}
                <p><a href="/{{ username }}/achrive/{{ date.0 }}">{{ date.0 }}({{ date.1 }})</a></p>
            {% endfor %}

        </div>
    </div>
</div>
修改base.html,将
中的内容部分,改为引用get_query_data标签<!DOCTYPE html>
<html lang="en">
<head>
<meta charset="UTF-8">
<title>Title</title>
{#公共样式#}
<link rel="stylesheet" href="/static/css/theme/common.css">
{#个人站点主题样式#}
<link rel="stylesheet" href="/static/css/theme/{{ blog.theme }}">
{#bootstrap#}
<link rel="stylesheet" href="/static/bootstrap/css/bootstrap.css">
<script src="/static/js/jquery.js"></script>
<script src="/static/bootstrap/js/bootstrap.js"></script>
<link rel="shortcut icon" href="https://common.cnblogs.com/favicon.ico" type="image/x-icon"/>
</head>
<body>
<div class="header">
<p class="title">{{ blog.title }}</p>
</div>
<div class="container-fluid">
<div class="row">
<div class="col-md-3">
{#加载自定义标签模块#}
{% load my_tags %}
{#调用get_query_data标签,它返回left_region.html,是已经被渲染过的文件#}
{% get_query_data username %}
</div>
<div class="col-md-9">
{% block content %}
{% endblock %}
</div>
</div>
</div>
</body>
</html>
此时刷新网页,效果同上!
修改views.py中的视图函数,删除get_query_data!
删除homesite和article_detail两个视图函数多余的代码
from django.shortcuts import render,HttpResponse,redirect
from django.contrib import auth
from blog.models import Article,UserInfo,Blog,Category,Tag
from django.db.models import Sum,Avg,Max,Min,Count
# Create your views here.
def login(request):

    if request.method=="POST":
        user=request.POST.get("user")
        pwd=request.POST.get("pwd")
        # 用户验证成功,返回user对象,否则返回None
        user=auth.authenticate(username=user,password=pwd)
        if user:
            # 登录,注册session
            # 全局变量 request.user=当前登陆对象(session中)
            auth.login(request,user)
            return redirect("/index/")

    return render(request,"login.html")

def index(request):
    article_list=Article.objects.all()
    return render(request,"index.html",{"article_list":article_list})

def logout(request):  # 注销
    auth.logout(request)
    return redirect("/index/")

def query_current_site(request,username):  # 查询当前站点的博客标题
    # 查询当前站点的用户对象
    user = UserInfo.objects.filter(username=username).first()
    if not user:
        return render(request, "not_found.html")
    # 查询当前站点对象
    blog = user.blog
    return blog

def homesite(request,username,**kwargs):
    """
    查询
    :param request:
    :param username:
    :return:
    """
    print("kwargs", kwargs)

    blog = query_current_site(request,username)

    # 查询当前用户发布的所有文章
    if not kwargs:
        article_list = Article.objects.filter(user__username=username)
    else:
        condition = kwargs.get("condition")
        params = kwargs.get("params")
        #判断分类、随笔、归档
        if condition == "category":
            article_list = Article.objects.filter(user__username=username).filter(category__title=params)
        elif condition == "tag":
            article_list = Article.objects.filter(user__username=username).filter(tags__title=params)
        else:
            year, month = params.split("/")
            article_list = Article.objects.filter(user__username=username).filter(create_time__year=year,
                                                                                  create_time__month=month)
    return render(request,"homesite.html",{"blog":blog,"username":username,"article_list":article_list})

def article_detail(request,username,article_id):
    blog = query_current_site(request,username)

    #查询指定id的文章
    article_obj = Article.objects.filter(pk=article_id).first()

    return render(request,'article_detail.html',{"blog":blog,"username":username,'article_obj':article_obj})
注意:get_query_data标签只是定义了左侧的标签!那么homesite和article_detail两个视图函数,需要知道当前站点的博客标题。
所以需要专门定义个函数,来获取博客标题!
修改article_detail.html,删除测试的自定义标签
{% extends "base.html" %}

{% block content %}
    <div class="article_info">
        <h4 class="text-center">{{ article_obj.title }}</h4>
        <div class="content">
            {{ article_obj.content }}
        </div>
    </div>

{% endblock %}
重新访问个人站点,随便乱点,效果同上!
Inclusion tags的优点:
1.不用在视图函数中return字典
2.数据和样式结合在一起,返回一个渲染后的html
详情页显示html代码问题
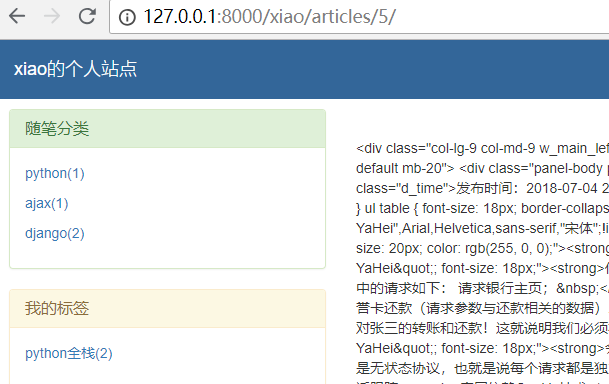
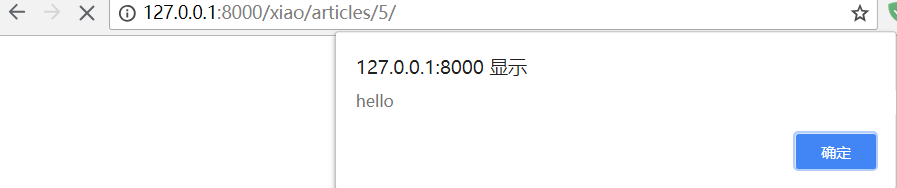
访问一篇博客详情,比如:
http://127.0.0.1:8000/xiao/articles/5/
效果如下:
那么django响应给浏览器的,真的是原来的html代码吗?
修改id为5的文章记录,修改content字段的数据,先备份一下,改成一个h1标签。

刷新网页,效果如下:

打开浏览器控制台—>network,查看这次请求的响应体
发现代码被转义了!那么是谁转义了呢?当然是….
注意:这不是浏览器的锅,是django转义的,这是它的安全策略做的。遇到html或者js代码,会自动转义!
那么我们不要django转义呢?使用safe过滤器即可!
修改article_detail.html中的代码
{{ article_obj.content|safe }}
重新刷新页面,效果如下:
注意:这样有一个安全隐患!
举例:将内容修改为一段js代码

重新刷新页面,它会有一个提示框

注意:它只会弹一次。如果是下面这段代码呢?
<script>for (var i = 0; i < 99999; i++) {alert("hello");}</script>
数据库记录如下:

刷新页面试试?不用想了,你今天啥事不用干,疯狂的点击吧!
那么既要网页安全,又需要网站展示真实的内容,怎么办呢?
答案就是:数据库不存储html代码即可!存html和js代码时,需要做特殊处理。
后面讲到富文本编辑器,会讲到。完美解决这个问题!

若有收获,就点个赞吧
0 人点赞
