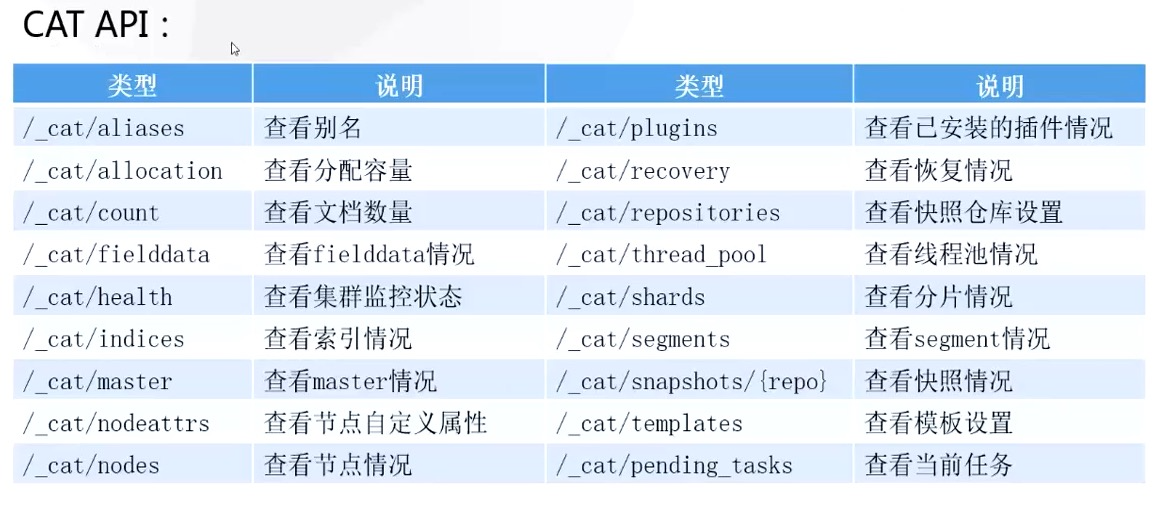
ES 集群管理
ES 集群管理内容:
- 集群管理
- 备份恢复
- 升级维护
- 数据迁移
- 数据重建
- 冷热分层
- 健康监控
-
集群管理
集群管理 api
# 集群健康
http://127.0.0.1:9200/_cluster/health?pretty
# 集群状态
http://127.0.0.1:9200/_cluster/state?pretty
# 集群统计信息
http://127.0.0.1:9200/_cluster/stats?human&pretty
# 集群待更新元数据任务
http://127.0.0.1:9200/_cluster/pending_tasks?pretty动态集群参数
PUT /_cluster/settings
{
“transient”: {
“indices.recovery.max_bytes_per_sec”: “50mb”
},
“perssitent”: {
“discovery.zen.minimum_master_nodes”: 2
}
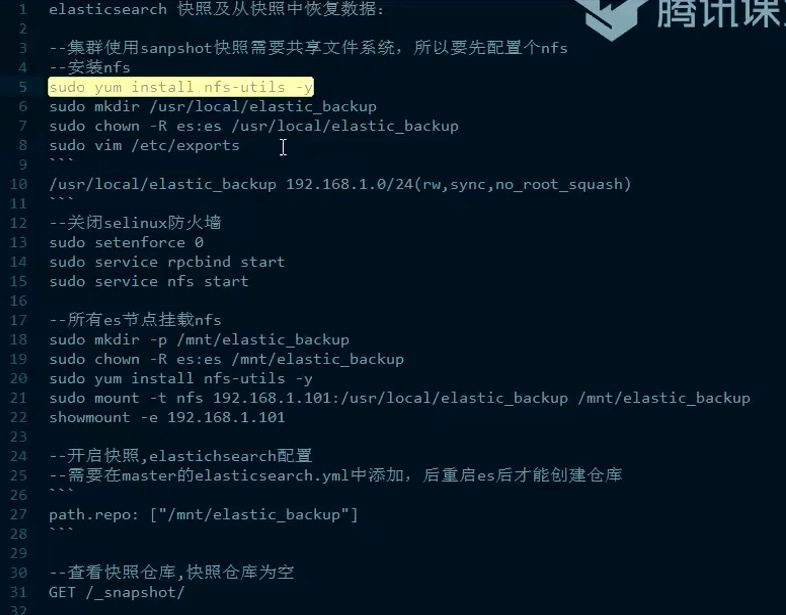
}备份恢复
创建备份仓库
PUT /_snapshot/my_backup
{
“type”: “fs”, // 备份系统,例如:亚马逊 S3、谷歌云存储
“settings”: {
“location”: “/mnt/elastic_backup”, // 仓库位置
“compress”: true // 启用压缩
}
}
查询当前仓库:
GET /_snapshot/快照备份
PUT /snapshot/my_backup/snapshot1?wait_for_completion=true // 同步调用,返回快照备份结果
{
“indices”: “index_1, index_2”, // 默认包含左右索引
“ignore_unavailable”: true, // 忽略不可用,true-遇到不可用索引继续备份
“include_global_state”: false
}
查看快照:
GET /_snapshot/my_backup/_all?pretty=true
快照恢复:
POST /_snapshot/my_backup/snapshot_1/_restore
{
“indices”: “index_1, index_2”, // 默认包含左右索引
“ignore_unavailable”: true, // 忽略不可用,true-遇到不可用索引继续备份
“include_global_state”: false,
“rename_pattern”: “index(.+)”,
“renamereplacement”: “restore_index$1”,
“index_settings”: {
“index.number_of_replicas”: 0
},
“ignore_index_settings”: [
“index.refresh_interval”,
“index.routing.allocation.include._ip”
]
}升级维护
停止业务,全集群重启升级
- 滑动升级
滑动升级
- 停止索引新的数据。
- 禁止分片分配。 PUT /_cluster/settings
{
“transient”: {“cluster.routing.allocation.enable”: “none”} // 禁止 master 自动分配下线的副本分片
} - 关闭单个节点。
- 执行维护升级。
- 重启节点,然后确认它加入到集群了。
- 重启分片分配。PUT /_cluster/settings
{
“transient”: {“cluster.routing.allocation.enable”: “all”} // 禁止 master 自动分配下线的副本分片
} - 分片再平衡消耗一定时间,直到集群恢复绿色状态。
节点下线
集群级别:
PUT /_cluster/settings
{
“transient”: {
“cluster.routing.allocation.excluse._ip”: “192.168.1.101”
}
}
索引级别:
PUT /my_index/_settings
{
“index.routing.allocation.exclude._ip”: “192.168.11.101”
}节点上线
新节点上线,要避免新创建索引,以防止新索引所有的主分片都分配到这台新节点上。
解决办法:配置好单节点分片的限额。
例如,一个 5 个节点的集群,做一年主分片 10 个,副本 1 份。则平均下来每个节点应该有 4 个分片。
PUT /my_index/settings
{
“index”: {“routing.allocation.total_shards_per_node”:”5”} // (10*2) / 5 + 1=5,预留1个分片
}数据迁移
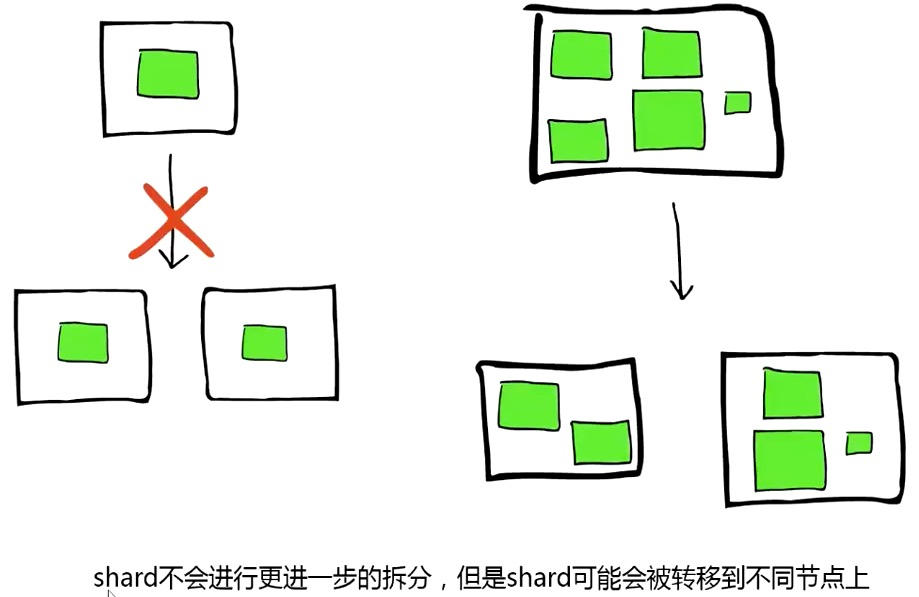
分片分配
利用 reroute 接口,可以手动完成对分片的分配选择的控制。
三种指令:move、cancel、allocate_replica。
cancel 默认只控制副本,需要明确指定 allow_primary 参数才能控制主分片。
POST /_cluster/reroute
{
“commands”: [
{
“allocate_replica”: {“index”: “my_index”, “shard”: 1, “node”: “192.168.1.102”}
}
]
}
手动取消分片:
POST /_cluster/reroute
{
“commands”: {
“index”: “my_index”,
“shard”: 0,
“node”: “192.168.1.102”,
“allow_primary”: true
}
}
其他参数:
- 集群是否允许重均衡:cluster.routing.rebalance.enable: {all, primaries, replicas, none}
- 集群何时开始重均衡:cluster.routing.allocation.allow_rebalance: {always, indices_primaries_active, indices_all_active}
集群内同时重均衡的分片数:cluster.routing.allocation.cluster_concurrent_rebalance: 2
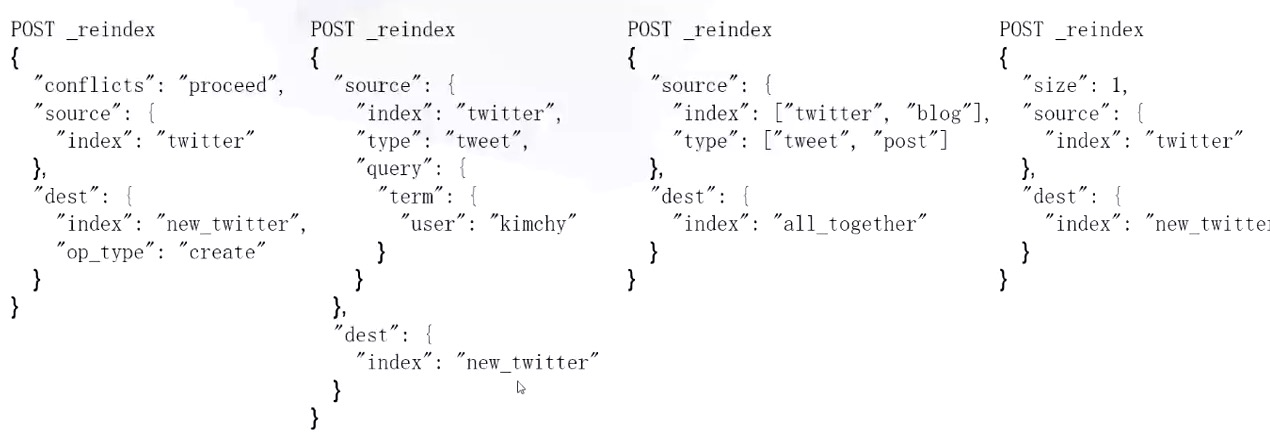
数据重建
自定义程序用 scroll 方式读出来,用过 bulk 接口写到新索引里。
- 利用 2.3 版之后的 reindex 接口:PUT _reindex {
“source”: {“index”: “twitter”},
“dest”: {“index”: “new_twitter”, “version_type”: “external”, “op_type”: “create”}
}
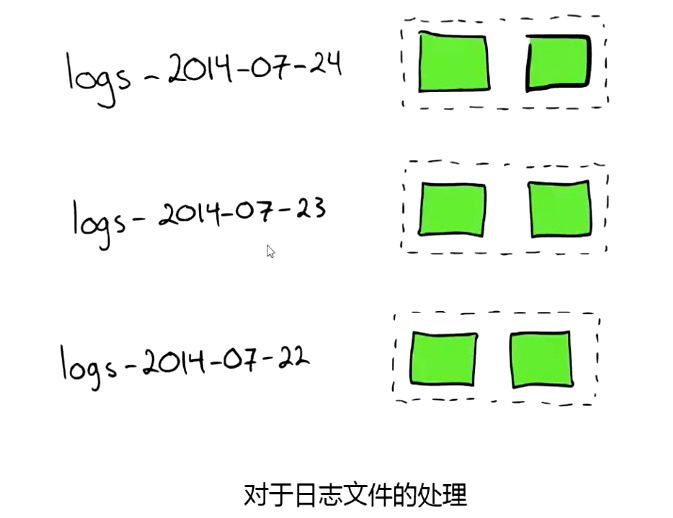
冷热分层
- 热:当前正在写入的索引
- 温:当前只读不写的索引
- 冷:不读也不写(已关闭的索引)
分层节点配置:在节点 elasticsearch.yml 中配置:node.tag 属性,例如:
- 在一部分热索引节点(硬件性能高的节点)上配置 node.tag: hot
- 在一部分温索引节点(硬件性能略低的节点)上配置 node.tag: warm
- 在一部分冷索引节点上配置 node.tag: cold
新索引模板配置:
PUT /_template/hot_index
{
“order”: 0,
“template”: “*”,
“settings”: {
“index.routing.allocation.require.tag”: “hot”
}
}
- 每天定时任务,对前几天的索引执行自动迁移:
PUT /my_index-yyyy.mm.dd/_settings
{
“index”: {
“routing.allocation.require.tag”: “warm”
}
}
-
健康监控
集群优化
系统参数:
增大虚拟内存映射:/etc/sysctl.conf -> vm.max_map_count
- 禁止内存交换:memory_lock 锁内存、禁用 swap
- 最大文件数:/etc/security/limits.conf
- 创建本地线程数:/etc/security/linits.d/90-nproc.conf
独立部署:
- master node:主节点、更新同步元数据
- data node:数据存储、查询
- client nide:协调节点、处理请求
集群分组:
- node tag:进行分组
定义分片规则:
- 设置索引分片分配规则:PUT /my_index/_settings
{
“index.routing.allocation.exclude.xxx”: “yyy,zzz”, // 索引不可以分配到 yyy,zzz
“index.routing.allocation.include.xxx”: “yyy,zzz”,
“index.routing.allocation.require.xxx”: “yyy”
}
默认 node tags:
- _name:节点名称
- _host_ip:节点 host ip
- _publish_ip:节点对外发布 ip
- _ip:host ip 或者对外发布
-
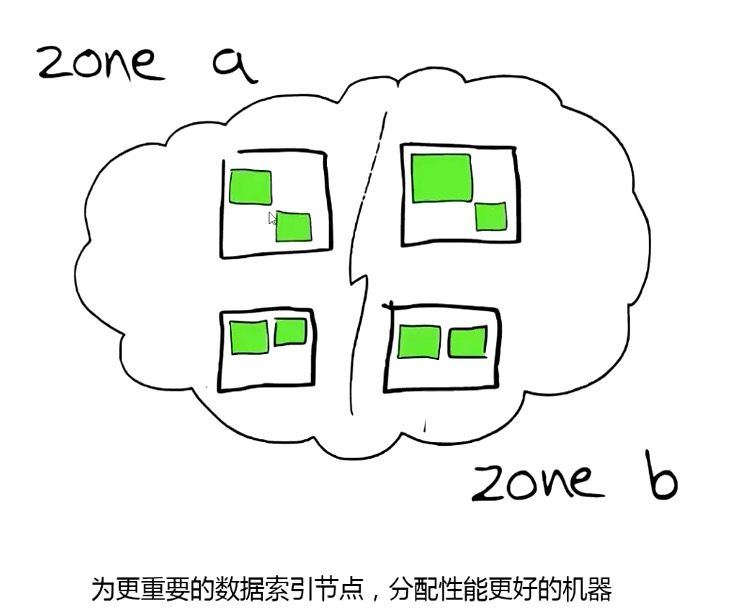
分片分配意识
Awareness:
让 ES 知道多个节点位于同一个物理机、机架、同区域,此时 ES 在分配分片时,让同一个分片主、副分分片尽量不分配到同一区域。
elasticsearch.yml -> node.zone: zone1
cluster.routing.allocation.awareness.attribute: zone
强制分布:
同一个主分片和副本分片必须不能分配到同一个区域。
cluster.routing.allocation.awareness.force.zone.values: zone1,zone2
cluster.routing.allocation.awareness.attributes: zone索引规则
设置合理的索引分片数:每个分片大小控制在 10GB 以内。
每个节点最多分配的分片数:
index.routing.allocation.total_shards_per_node: num,
num = 总分片数 / 节点数 + 1导入优化
使用 bulk 批量导入接口
- 增大 refresh_interval 刷新间隔
- 增大 translog flush 间隔
- 减少副本数量,导入大量数据时可以设置为 0
-
内存优化
尽量使用 doc_values,少用 fielddata。
string 类型:尽量使用 keyword。
限制查询数量(from, size),严禁深度翻页。
设置 fielddata 缓存参数: 缓存大小:indices.fielddata.cache.size: 30%(默认无限制)
- 缓存有效期:indices.fielddata.cache.expire: “720h”
设置内存断路器:
- indices.breaker.fielddata.limit: 30%(默认 60%)
- indices.breaker.request.limit: 20%(默认 40%)
indices.breaker.total.limit: 50%(默认 70%)
fielddata
搜索利用 inverted index(倒排索引)
聚合利用 uninverted index(field data cache)
在第一次查询时,从整个 inverted index 里读取出来 document,生成 field data 数据,放在内存(JVM),以便做聚合。
Doc -> {words}doc_value
存在磁盘文件中(列式存储)
- 在创建索引时生成
- 利用操作系统的缓存,可以提供更好地性能
- 10%-25% 慢于 fielddata
- 只能存储 not-analyzed 的字符串
查询优化
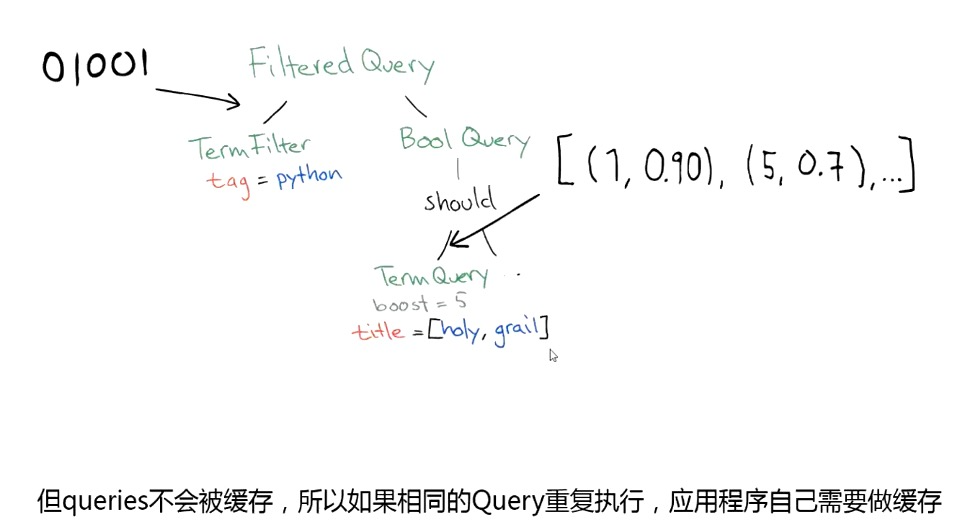
尽量使用 Filter 代替 Query:
- query 搜索需要计算相关度评分并排序,无法使用缓存。
- filter 过滤无序计算相关度评分,可以使用缓存。
尽量使用 Bool 组合代替 AND OR:
- bool 使用 must、must_not、should、filter 条件可以复用,结果保存在 bitset 中,做交集效率高。
- and/or 逐个文档处理、检查是否匹配,效率低,把过滤多的文档条件放在最前面。
Routing:
自定义路由规则,把同区域的文档存放在同一个分片上,提高查询性能。
磁盘使用率限制
磁盘使用超过阈值后不再分配新的分片:cluster_routing_allocation.disk.watermark.low: “85%”。
磁盘使用超过阈值后迁移现有分片:cluster_routing_allocation.disk.watermark.low: “90%”。
检测时间间隔:cluster.info.update.interval: “2m”集群异常恢复
允许同时打开的数据流通道:cluster.routing.allocation.node_concurrent_recoveries: 3。
每秒传输的最大数据量:indices.recovery.max_bytes_per_sec: “100mb”。
是否启用压缩:indices.recovery.compress: true。
每次复制事务日志块大小:indices.recovery.translog_size: “512k”。
每次复制事务日志行数:indices.recovery.translog_ops: 1000。
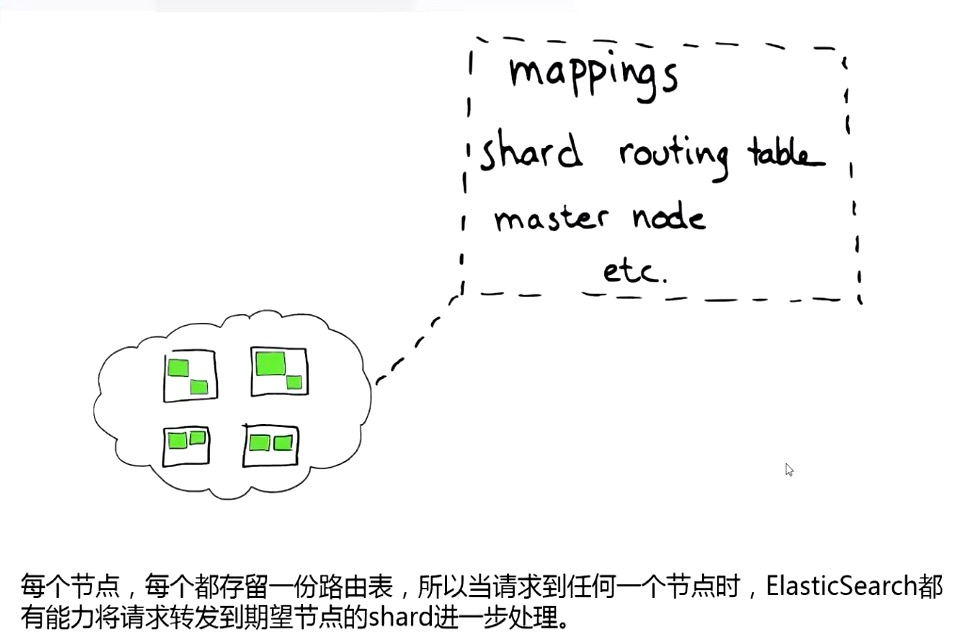
每次复制的数据块的大小:indices.recovery.file_chunk_size: “512k”。ES 集群图解
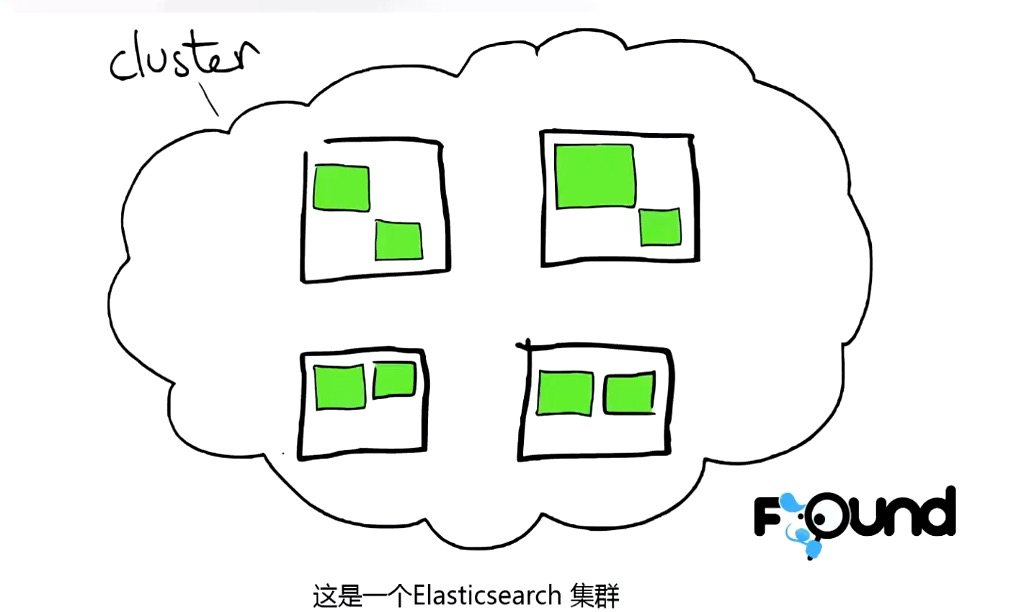
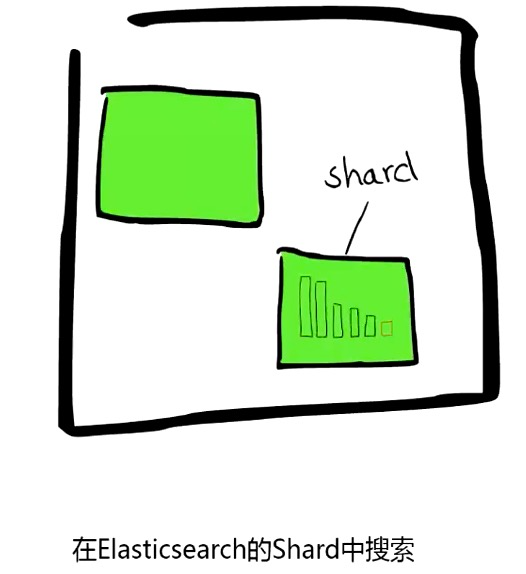
节点:
索引:
分片: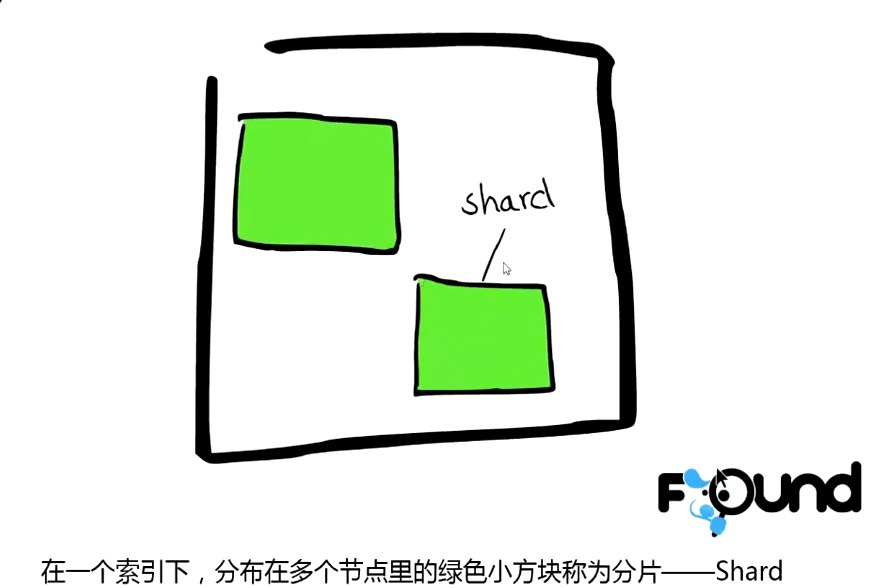
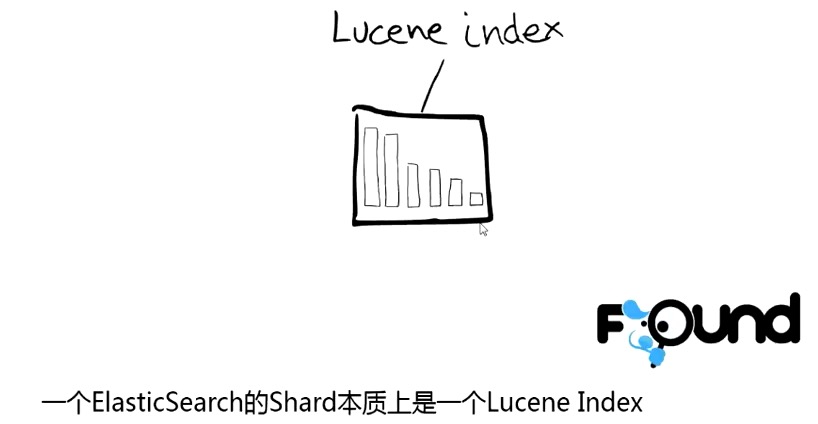
Segment: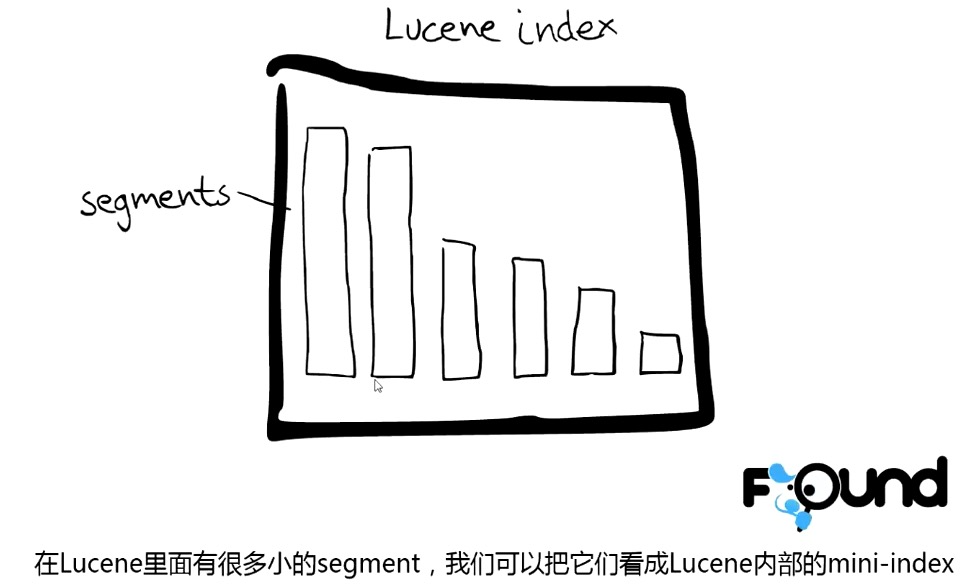
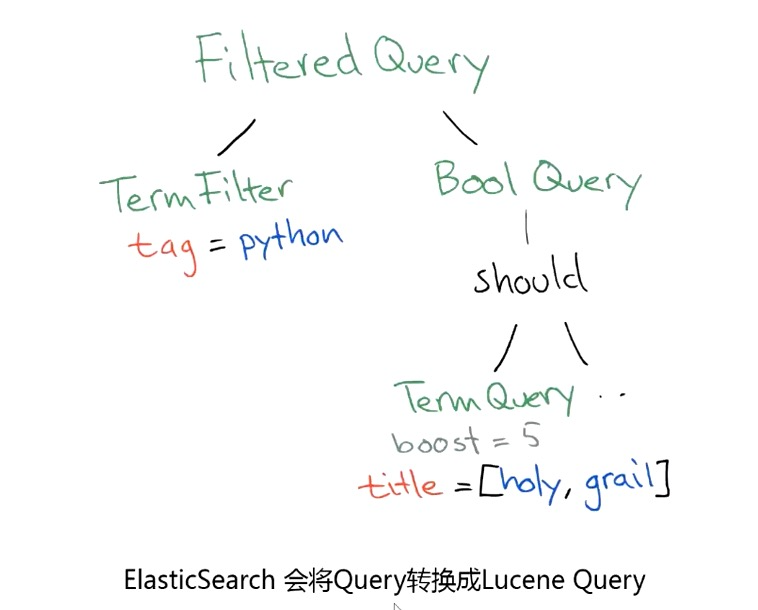
Lucene 数据结构: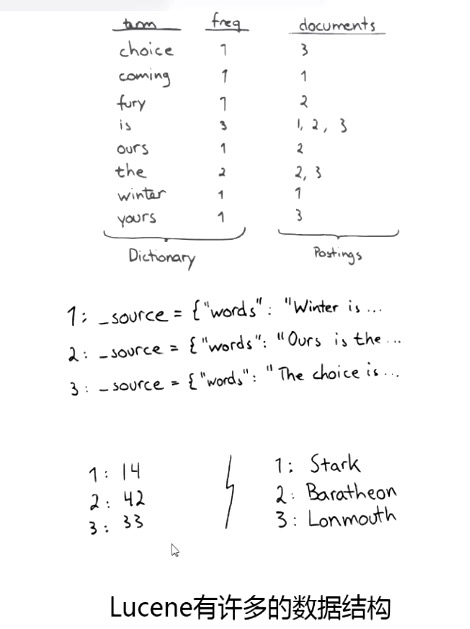
倒排索引: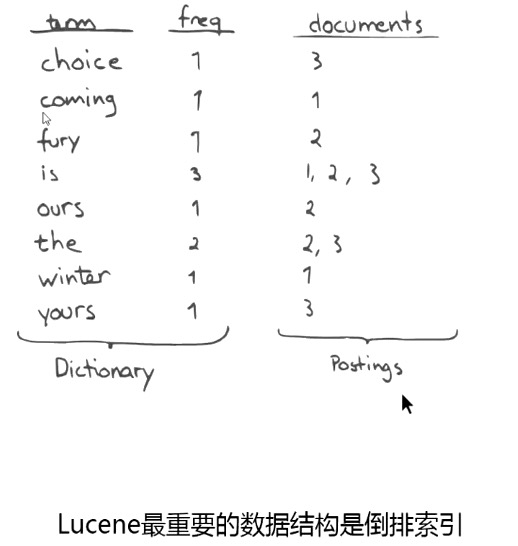
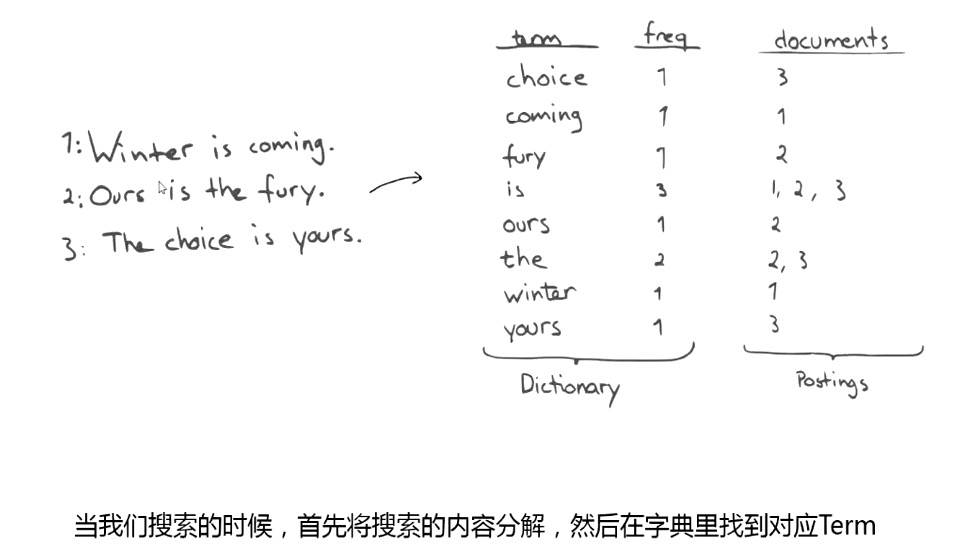
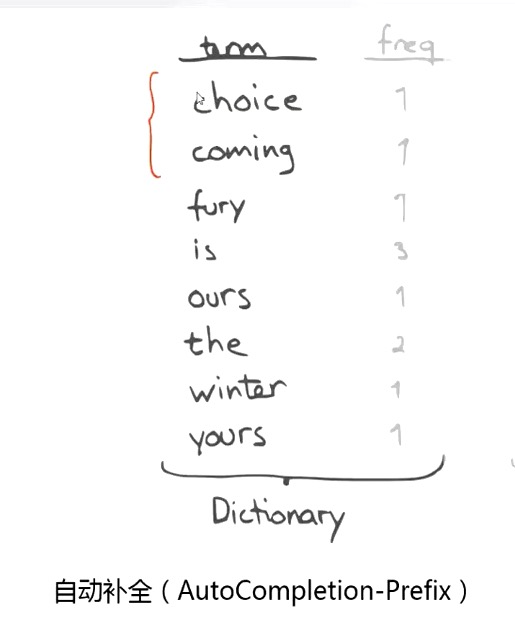


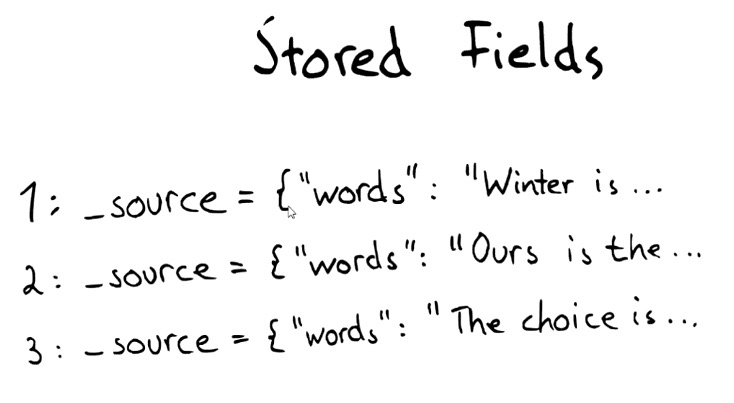
Document Values: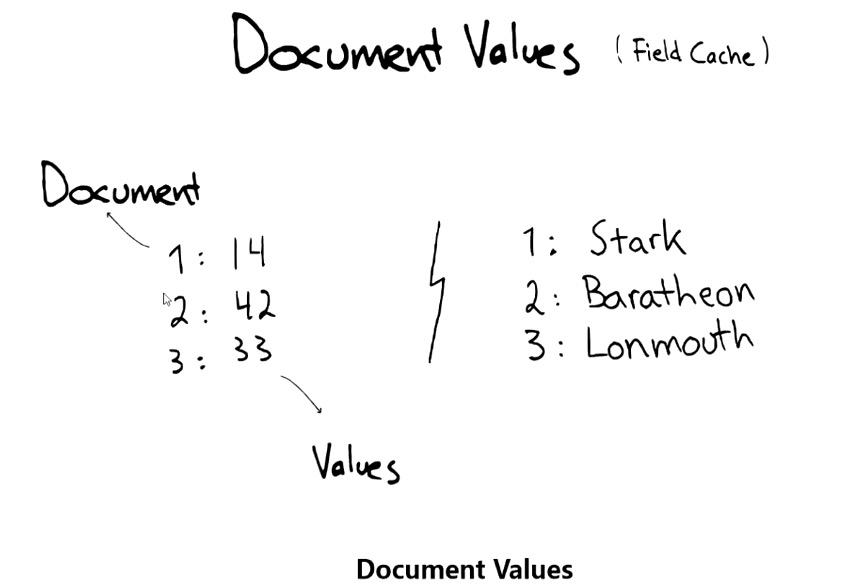
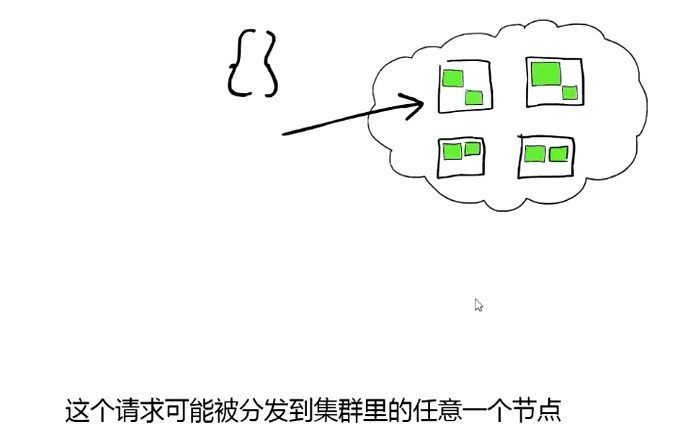
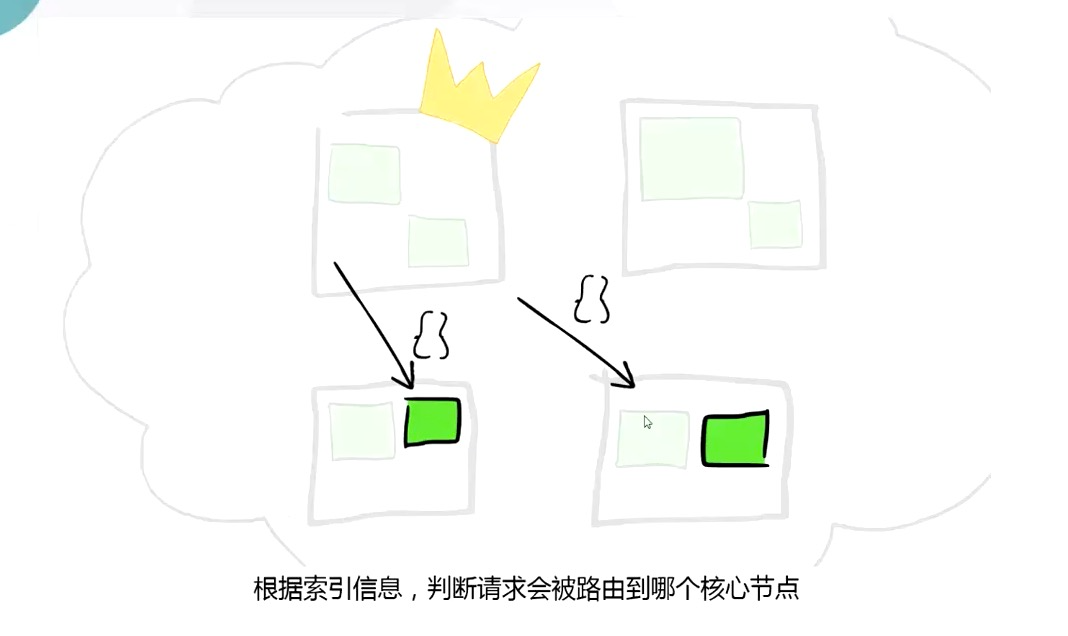
ES 操作原理:
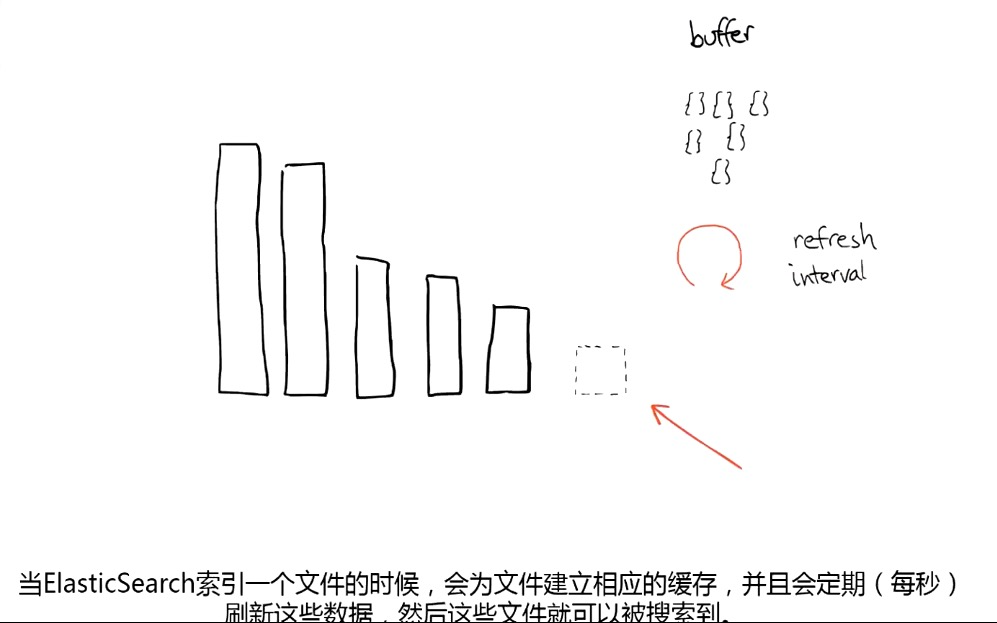
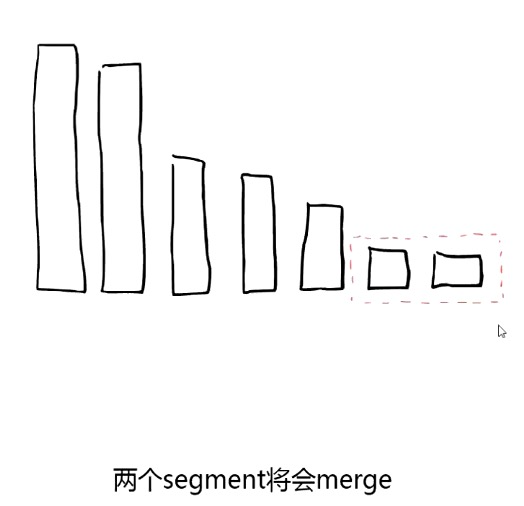
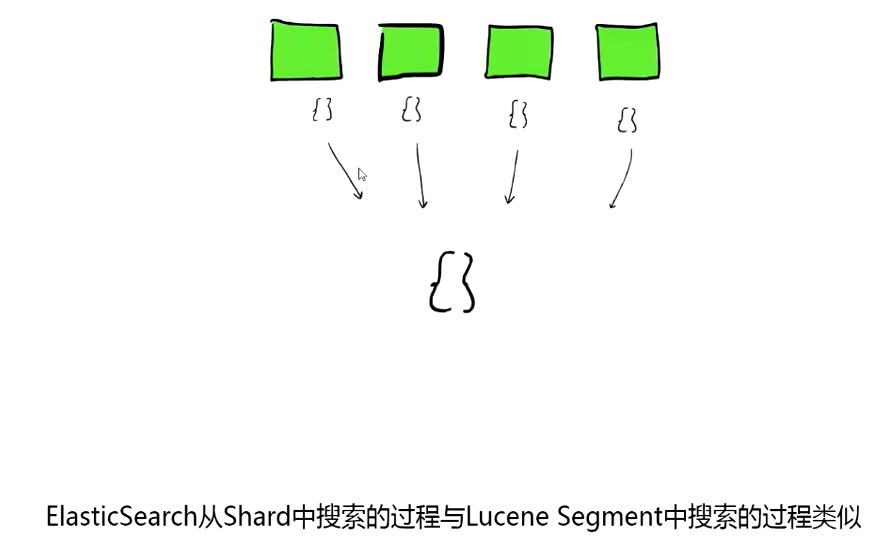
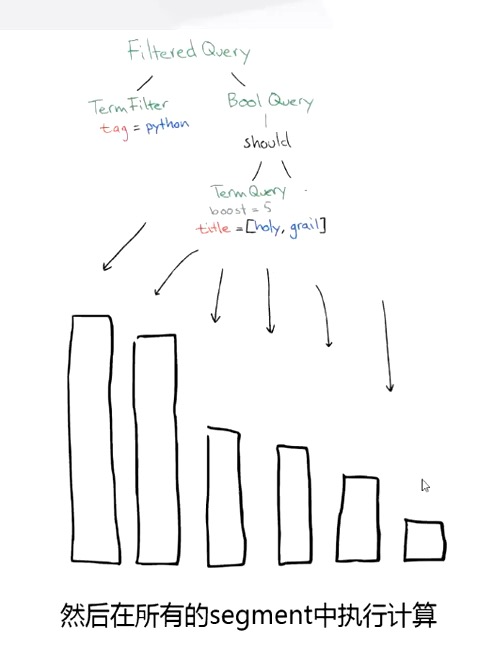
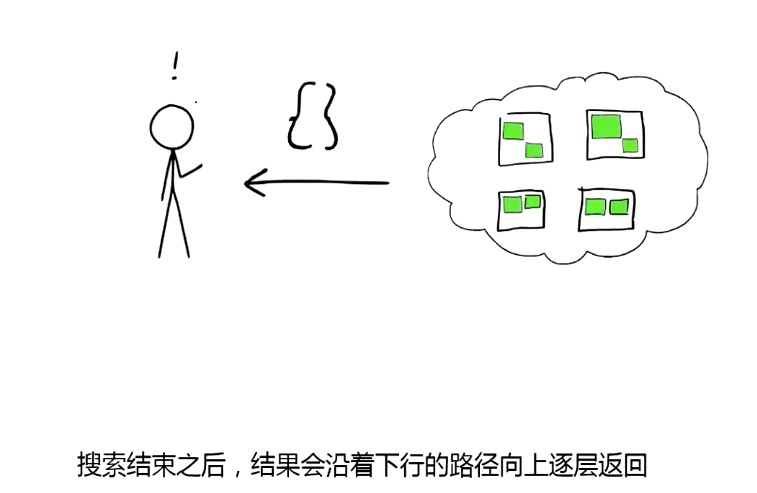
搜索时,Lucene 会搜索所有的 segment 然后将每个 segment 的搜索结果返回,最后合并呈现给客户。
Lucene 的一些特征使得这个过程非常重要:Segments 不可变(immutable):
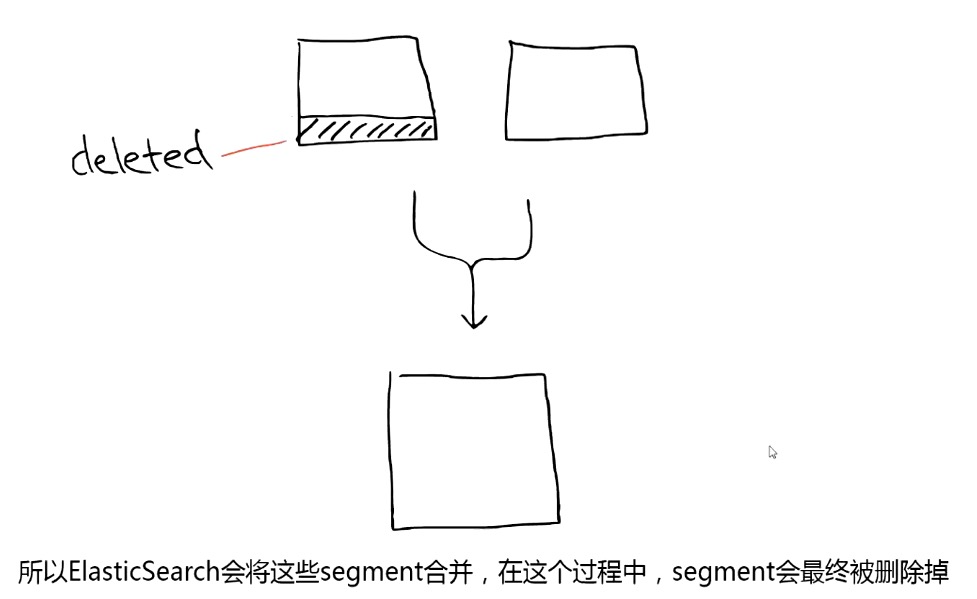
- Delete:当删除发生时,Lucene 做的知识将其标志位置为删除,但是文件还是会在它原来的地方,不会发生改变。
- Update:所以对于更新来说,本质上它做的工作是 先删除 -> 重新索引。
- 随处可见的压缩:Lucene 非常擅长压缩数据,基本所有教科书上的压缩方式,都能在 Lucene 中找到。
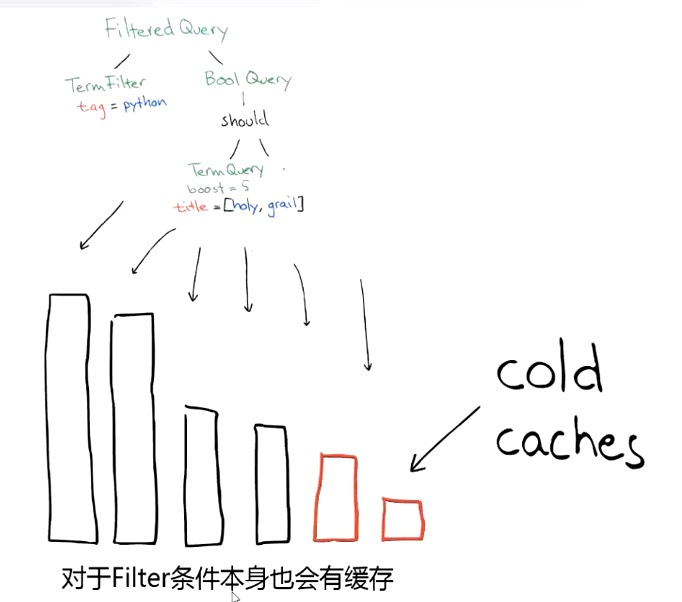
- 缓存所有的所有:Lucene 会将所有的信息做缓存,大大提高了它的查询效率。


快照练习

若有收获,就点个赞吧
0 人点赞
