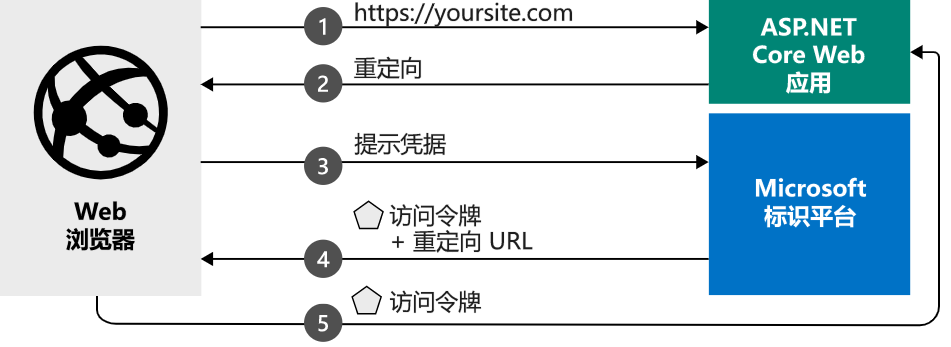
参考:Microsoft 帐户外部登录设置与 ASP.NET Core
启用 Microsoft 身份验证
为了保证兼容性,需先安装 2.2.0 版本:
然后在 appsettings.json 中配置 ClientId 和 ClientSecret。
再在 Startup 中进行配置:
services.AddAuthentication().AddMicrosoftAccount(opt =>{opt.ClientId = _configuration["Authentication:Microsoft:ClientId"];opt.ClientSecret = _configuration["Authentication:Microsoft:ClientSecret"];});
修改 LoginViewModel:
/// <summary>/// 登录视图模型/// </summary>public class LoginViewModel{[Required(ErrorMessage = "邮箱地址不能为空")][EmailAddress][Display(Name = "邮箱地址")]public string Email { get; set; }[Required(ErrorMessage = "密码不能为空")][DataType(DataType.Password)][Display(Name = "密码")]public string Password { get; set; }[Display(Name = "记住我")]public bool RememberMe { get; set; }public string ReturnUrl { get; set; }public IList<AuthenticationScheme> ExternalLogins { get; set; }}
Login.cshtml 添加扩展登录按钮:
<div class="col-md-6"><h1>扩展登录</h1><form class="mt-3" method="post" asp-action="ExternalLogin" asp-controller="Account" asp-route-returnUrl="@Model.ReturnUrl"><div>@foreach (var provider in Model.ExternalLogins){<button type="submit" class="btn btn-info" name="provider" style="width: auto"value="@provider.Name" title="Log in using your @provider.DisplayName account">@provider.DisplayName</button>}</div></form></div>
修改 AccountController 中的代码:
[HttpGet][AllowAnonymous]public async Task<IActionResult> Login(string returnUrl){var model = new LoginViewModel{ReturnUrl = returnUrl,ExternalLogins = (await _signInManager.GetExternalAuthenticationSchemesAsync()).ToList()};return View(model);}...#region 扩展登录[HttpPost]public IActionResult ExternalLogin(string provider, string returnUrl){var redirectUrl = Url.Action("ExternalLoginCallback", "Account", new { ReturnUrl = returnUrl });var properties = _signInManager.ConfigureExternalAuthenticationProperties(provider, redirectUrl);return new ChallengeResult(provider, properties);}public async Task<IActionResult> ExternalLoginCallback(string returnUrl = null, string remoteError = null){returnUrl = returnUrl ?? Url.Content("~/");var loginViewModel = new LoginViewModel{ReturnUrl = returnUrl,ExternalLogins = (await _signInManager.GetExternalAuthenticationSchemesAsync()).ToList()};if (remoteError != null){ModelState.AddModelError(string.Empty, $"外部提供程序错误: {remoteError}");return View("Login", loginViewModel);}// 从外部登录提供者,即微软账户体系中,获取关于用户的登录信息。var info = await _signInManager.GetExternalLoginInfoAsync();if (info == null){ModelState.AddModelError(string.Empty, "加载外部登录信息出错。");return View("Login", loginViewModel);}//如果用户之前已经登录过了,会在 AspNetUserLogins 表有对应的记录,这个时候无需创建新的记录,直接使用当前记录登录系统即可。var signInResult = await _signInManager.ExternalLoginSignInAsync(info.LoginProvider, info.ProviderKey,isPersistent: false, bypassTwoFactor: true);if (signInResult.Succeeded){return LocalRedirect(returnUrl);}// 如果 AspNetUserLogins 表中没有记录,则代表用户没有一个本地帐户,这个时候我们就需要创建一个记录了。var email = info.Principal.FindFirstValue(ClaimTypes.Email);if (email != null){// 通过邮箱地址去查询用户是否已存在var user = await _userManager.FindByEmailAsync(email);if (user == null){user = new ApplicationUser{UserName = info.Principal.FindFirstValue(ClaimTypes.Email),Email = info.Principal.FindFirstValue(ClaimTypes.Email)};// 如果不存在,则创建一个用户,但是这个用户没有密码。await _userManager.CreateAsync(user);}// 在 AspNetUserLogins 表中,添加一行用户数据,然后将当前用户登录到系统中await _userManager.AddLoginAsync(user, info);await _signInManager.SignInAsync(user, isPersistent: false);return LocalRedirect(returnUrl);}// 如果我们获取不到电子邮件地址,我们需要将请求重定向到错误视图中。ViewBag.ErrorTitle = $"我们无法从提供商:{info.LoginProvider}中解析到您的邮件地址 ";ViewBag.ErrorMessage = "请通过联系 ltm@ddxc.org 寻求技术支持。";return View("Error");}#endregion
解决“我们无法完成你的请求”

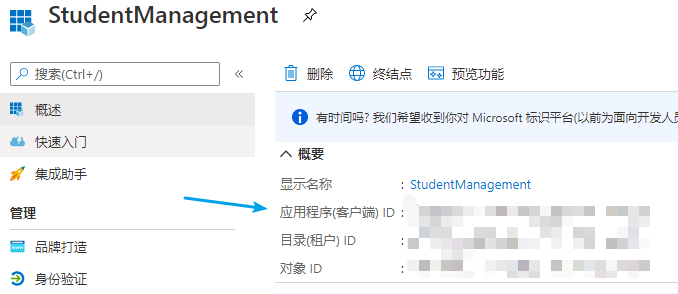
遇到这个奇葩问题,是因为 ClientId 设置错误。
首先,ClientSecret 确实是 证书和密码 - 客户端密码 里面的 值。但我们需要的 ClientId 不是此处的 ID,而是概述界面中的 应用程序(客户端)ID。

