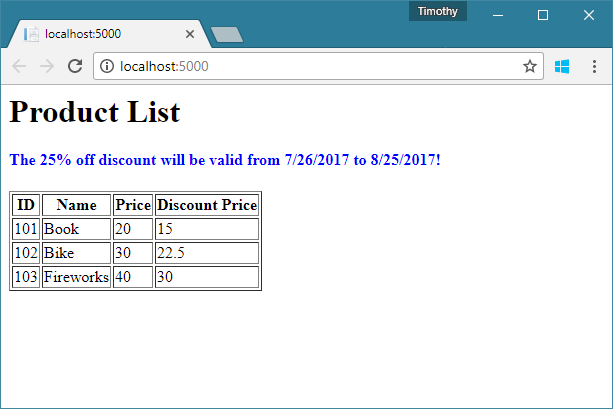
本实验演示基本的 Razor 语法。
代码很简单,运行起来看看效果就能懂。
Model 类:
namespace MyWebApp.Models{public class Product{public int ID { get; set; }public string Name { get; set; }public double Price { get; set; }}public class Discount{public DateTime Start { get; set; }public DateTime End { get; set; }public double Rate { get; set; }}public class ProductListVM{public Discount Discount { get; set; }public IList<Product> Products { get; set; }}}
Product 和 Discount 是领域模型,ProductListVM 是 View Model。
ProductList.cshtml:
@using MyWebApp.Models@model ProductListVM@{var start = this.Model.Discount.Start.ToString("d");var end = this.Model.Discount.End.ToString("d");var rate = this.Model.Discount.Rate;var off = (1 - rate) * 100;}<html><body><h1>Product List</h1><h4 style="color: blue">The @off% off discount will be valid from @start to @end!</h4><table border="1"><tr><th>ID</th><th>Name</th><th>Price</th><th>Discount Price</th></tr>@foreach (var p in this.Model.Products){<tr><td>@p.ID</td><td>@p.Name</td><td>@p.Price</td><td>@(p.Price * rate)</td></tr>}</table></body></html>
Controller:
namespace MyWebApp.Controllers{public class ProductController : Controller{public IActionResult Index(){var vm = new ProductListVM();vm.Discount = new Discount { Start = DateTime.Today, End = DateTime.Today.AddDays(30), Rate = 0.75 };vm.Products = new List<Product>();vm.Products.Add(new Product { ID = 101, Name = "Book", Price = 20 });vm.Products.Add(new Product { ID = 102, Name = "Bike", Price = 30 });vm.Products.Add(new Product { ID = 103, Name = "Fireworks", Price = 40 });return View("ProductList", vm);}...}}
运行效果:

