概述
用户界面由业务逻辑确定,业务逻辑又由数据确定。完成 Model(数据)的设计后,便可以开始设计控制器(业务逻辑)和视图(用户界面)。
Layout 视图
除非是那种只有一两个页面的小 Web 程序,否则我们总是从要共享使用的 Layout 视图开始设计。
从 Layout 视图开始的一大好处是,它可以概述 Web 程序的大纲,并作为控制器的目录。例如,如果在 Layout 导航栏中添加了 Products 和 Types 链接,就意味着将来一定会添加 ProductController 和 TypeController。
创建 Layout 视图
_Layout.cshtml 必须创建在 Views\Shared\ 文件夹下:
<html><!--use table as the navigation bar--><table><tr><td>|@Html.ActionLink("Home", "Index", "Home")</td><td>|@Html.ActionLink("Products", "Index", "Product")</td><td>|@Html.ActionLink("Types", "Index", "ProductType")</td></tr></table><hr/>@RenderBody()<hr/>Welcome to My Website! (@DateTime.Now)</html>
视图使用此 Layout 作为模板时,其内容将呈现在 @RenderBody() 处。
应用 Layout 视图
为了将 _Layout.cshtml 设置为默认视图,需在 Views 文件夹下创建 _ViewStart.cshtml 并添加如下代码:
@{Layout = "_Layout";}
如果有的视图不想使用该默认 Layout,可以在视图顶部添加代码:
@{Layout = null;}
Home 的控制器和视图
首先添加控制器是用于渲染 Web 程序主页的 HomeController。
添加 HomeController
希望你还记得默认的路由模板:{controller=Home}/{action=Index}/{id?}。
在 Controllers 文件夹下创建 HomeController:
using Microsoft.AspNetCore.Mvc;public class HomeController : Controller{public IActionResult Index(){return View();}}
Layout 视图中 @Html.ActionLink("Home", "Index", "Home") 生成的超链接就链接到该控制器的 Index 方法。
添加 Index 视图
在 Views\Hone 文件夹下创建 Index.cshtml:
<h1>Welcome to Use Product Manager</h1><h2>Introduction</h2><p>With this simple web application, you can manage the products and product types.<br/>To manage products, please click the Products link. To manage product types, please click the Types link.</p>
添加 Index 视图后,运行程序访问主页,效果如下: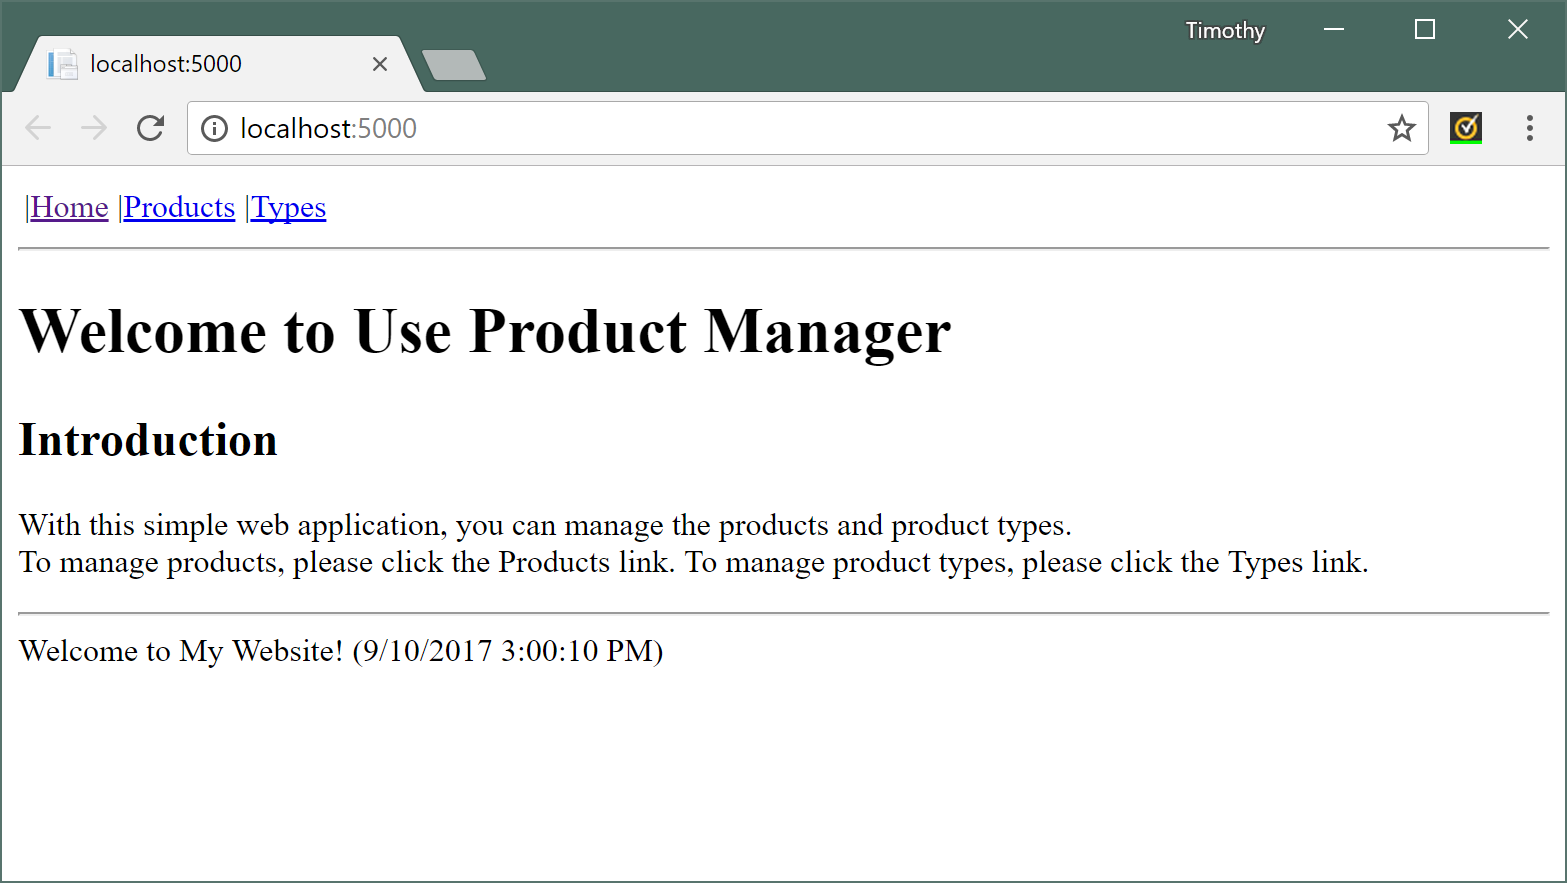
注:此时由于另外两个视图尚未实现,所以点击它们的链接会报 404 Not Found。
ProductType 的控制器和视图
主页创建后,接着就是创建功能性的控制器。因为 Product 是依赖于 ProductType 的,所以要先创建 ProductType 的控制器和视图。
ProductType 的控制器和 Index 操作
创建功能性控制器时,我们通常从创建一个空 Controller 并添加 Index 操作开始。众所周知功能性控制器的主要工作就是 CRUD,与 Retrieve 对应的操作就是 Index。
ProductTypeController.cs:
using Microsoft.AspNetCore.Mvc;using ProductManager.Models;namespace ProductManager.Controllers{public class ProductTypeController : Controller{public IActionResult Index(){var types = DataSource.GetProductTypes();return View(types);}// other actions will be here}}
添加 Index 视图
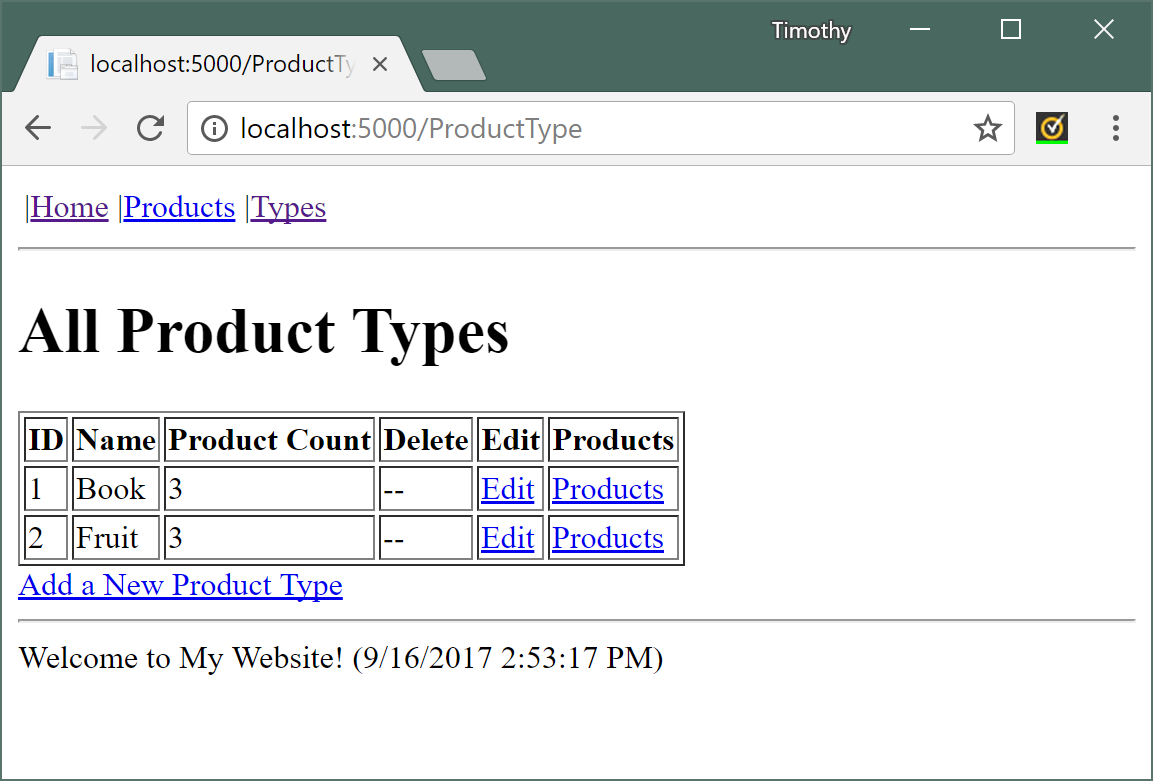
在 Views\ProductType 文件夹下创建 Index.cshtml:
@model List<ProductManager.Models.ProductType><h1>All Product Types</h1><table border="1"><tr><th>ID</th><th>Name</th><th>Product Count</th><th>Delete</th><th>Edit</th><th>Products</th></tr>@foreach (var pt in Model) {<tr><td>@pt.ID</td><td>@pt.Name</td><td>@pt.Products.Count</td><td>@if (pt.CanBeRemoved) {@Html.ActionLink("Delete", "Delete", new { id = pt.ID })} else {<span>--</span>}</td><td>@Html.ActionLink("Edit", "Edit", new { id = pt.ID })</td><td>@Html.ActionLink("Products", "IndexByTypeID", "Product", new { id = pt.ID })</td></tr>}</table>@Html.ActionLink("Add a New Product Type", "Create")
顶部的 @model List <ProductManager.Models.ProductType> 表示该视图的 View Model(视图模型)是 List
添加 Create 操作和视图
通常在添加 Index 后,紧跟着添加的就是 Create。这样也方便创建产品类型后在 Index 页面进行查看。
CRUD 里 Create 和 Update 通常都对应一对方法,一个用来页面跳转,一个实际执行操作。
Create Action:
[HttpGet]public IActionResult Create(){return View();}[HttpPost]public IActionResult Create(ProductType productType){if (ModelState.IsValid) {DataSource.AddProductType(productType);}return RedirectToAction("Index");}
Create.cshtml:
@model ProductManager.Models.ProductType<h1>Add a New Product Type</h1>@using (Html.BeginForm()) {@Html.LabelFor(pt => pt.Name)@Html.TextBoxFor(pt=>pt.Name)<input type="submit" value="Add" />}
Model 属性绑定的类型是 ProductType
使用
Html.BeginForm()生成了创建产品类型的表单
添加 Delete 操作
Delete 删除 ProductType 后就直接跳转回 Index 页面,所以省了视图。
Delete Action:
public IActionResult Delete(int id){DataSource.RemoveProductTypeByID(id);return RedirectToAction("Index");}
添加 Edit 操作和视图
Edit 和 Create 功能非常相似,唯一区别就是编辑时要跟踪记录 ProductType 的 ID。一般通过 <input type="hidden/> 实现。
Edit Action:
[HttpGet]public IActionResult Edit(int id){var pt = DataSource.GetProductTypeByID(id);return View(pt);}[HttpPost]public IActionResult Edit(ProductType productType){if (ModelState.IsValid){DataSource.UpdateProductTypeByID(productType.ID, productType);}return RedirectToAction("Index");}
Edit.cshtml:
@model ProductManager.Models.ProductType<h1>Edit Product Type</h1>@using (Html.BeginForm()) {@Html.HiddenFor(pt=>pt.ID)@Html.LabelFor(pt=>pt.Name)@Html.TextBoxFor(pt=>pt.Name)<input type="submit" value="Update" />}
不难看出 Edit 视图和 Create 相差无几,而实际项目中也经常使用一个视图。
Product 的控制器和视图
上一节中,我们学习了如何创建控制器及其视图 —— 从 Index 的操作和视图开始,然后是 Create 和 Delete,最后是 Edit。现在,让我们继续按照这个顺序创建 Product 的控制器和视图。
Product 的控制器和 Index
Controllers\ProductController:
using Microsoft.AspNetCore.Mvc;using ProductManager.Models;namespace ProductManager.Controllers {public class ProductController : Controller {public IActionResult Index() {ViewData["Title"] = "All Products";var products = DataSource.GetProducts();return View(products);}public IActionResult IndexByTypeID(int id) {var pt = DataSource.GetProductTypeByID(id);ViewData["Title"] = $"Products of {pt.Name}";var products = DataSource.GetProductsByTypeID(id);return View("Index", products); // reuse Index view}// other actions}}
与 ProductTypeController 不同,ProductController 有两个 Index 操作。第一个返回所有产品的列表,第二个按产品类别返回产品列表。回顾 ProductType 的 Index 页面里面的 @Html.ActionLink("Products", "IndexByTypeID", "Product", new { id = pt.ID }),很明显它生成的超链接对应此处的第二个操作。
因为 Index 和 IndexByTypeID 都将显式产品列表,所以它俩可以共享视图文件。
Views\Product\Index.cshtml:
@model IList<ProductManager.Models.Product><h1>@ViewData["Title"]</h1><table border="1"><tr><th>ID</th><th>Name</th><th>Type</th><th>Price</th><th>Delete</th><th>Edit</th><th>Detail</th></tr>@foreach (var p in Model) {<tr><td>@p.ID</td><td>@p.Name</td><td>@p.Type.Name</td><td>@p.Price</td><td>@Html.ActionLink("Delete", "Delete", new { id = p.ID })</td><td>@Html.ActionLink("Edit", "Edit", new { id = p.ID })</td><td>@Html.ActionLink("Detail", "ShowDetail", new { id = p.ID })</td></tr>}</table>@Html.ActionLink("Add a New Product", "Create")
Master-Detail 的操作和视图
Web 程序可以通过主从页(master-detail page)来渲染有主从关系的数据。主从页的想法是在 master 页呈现主题的简要信息,并在简要信息中提供 detail 页的入口。
上面的 Index 视图就是 master 页,页面中的 @Html.ActionLink("Detail", "ShowDetail", new { id = p.ID }) 就是 detail 页的入口。
下面是 ShowDetail 操作的代码:
public IActionResult ShowDetail(int id) {var product = DataSource.GetProductByID(id);if (product != null)return View("Detail", product);elsereturn RedirectToAction("Index");}
Views\Product\Detail.cshtml:
@model ProductManager.Models.Product<h1>Product Detail</h1><table border="1"><tr><td>@Html.DisplayNameFor(p => p.ID)</td><td>@Html.DisplayFor(p => p.ID)</td></tr><tr><td>@Html.DisplayNameFor(p => p.Name)</td><td>@Html.DisplayFor(p => p.Name)</td></tr><tr><td>@Html.DisplayNameFor(p => p.Type)</td><td>@Html.ActionLink(Model.Type.Name, "IndexByTypeID", new { id = Model.TypeID })</td></tr><tr><td>@Html.DisplayNameFor(p => p.Price)</td><td>@Html.DisplayFor(p => p.Price)</td></tr></table>
现在来测试 Index 和 Detail 视图。运行程序。导航到 Product 页面然后单击任意一个 Detail 链接,你应该会看到以下页面:
添加 Create 和 Delete
和 ProductTypeController 代码类似:
[HttpGet]public IActionResult Create() {return View();}[HttpPost]public IActionResult Create(Product product) {if (ModelState.IsValid)DataSource.AddProduct(product);return RedirectToAction("Index");}public IActionResult Delete(int id) {DataSource.RemoveProductByID(id);return RedirectToAction("Index");}
Views\Product\Create.cshtml:
@using ProductManager.Models@model Product<h1>Add a New Product</h1>@using (Html.BeginForm()) {<table><tr><td>@Html.LabelFor(p => p.Name)</td><td>@Html.TextBoxFor(p => p.Name)</td></tr><tr><td>@Html.LabelFor(p => p.Price)</td><td>@Html.TextBoxFor(p => p.Price)</td></tr><tr><td>@Html.LabelFor(p => p.Type)</td><td>@Html.DropDownListFor(p => p.TypeID,new SelectList(DataSource.GetProductTypes(), "ID", "Name"))</td></tr><tr><td></td><td><input type="submit" value="Add" /></td></tr></table>}
大部分代码都很容易理解。需要注意的地方是:
@Html.DropDownListFor(p => p.TypeID,new SelectList(DataSource.GetProductTypes(), "ID", "Name"))
它将被渲染成:
<select id="TypeID" name="TypeID"><option value="1">Book</option><option value="2">Fruit</option></select>
现在来测试 Create 和 Delete。运行程序。创建并删除产品,你应该会看到以下页面: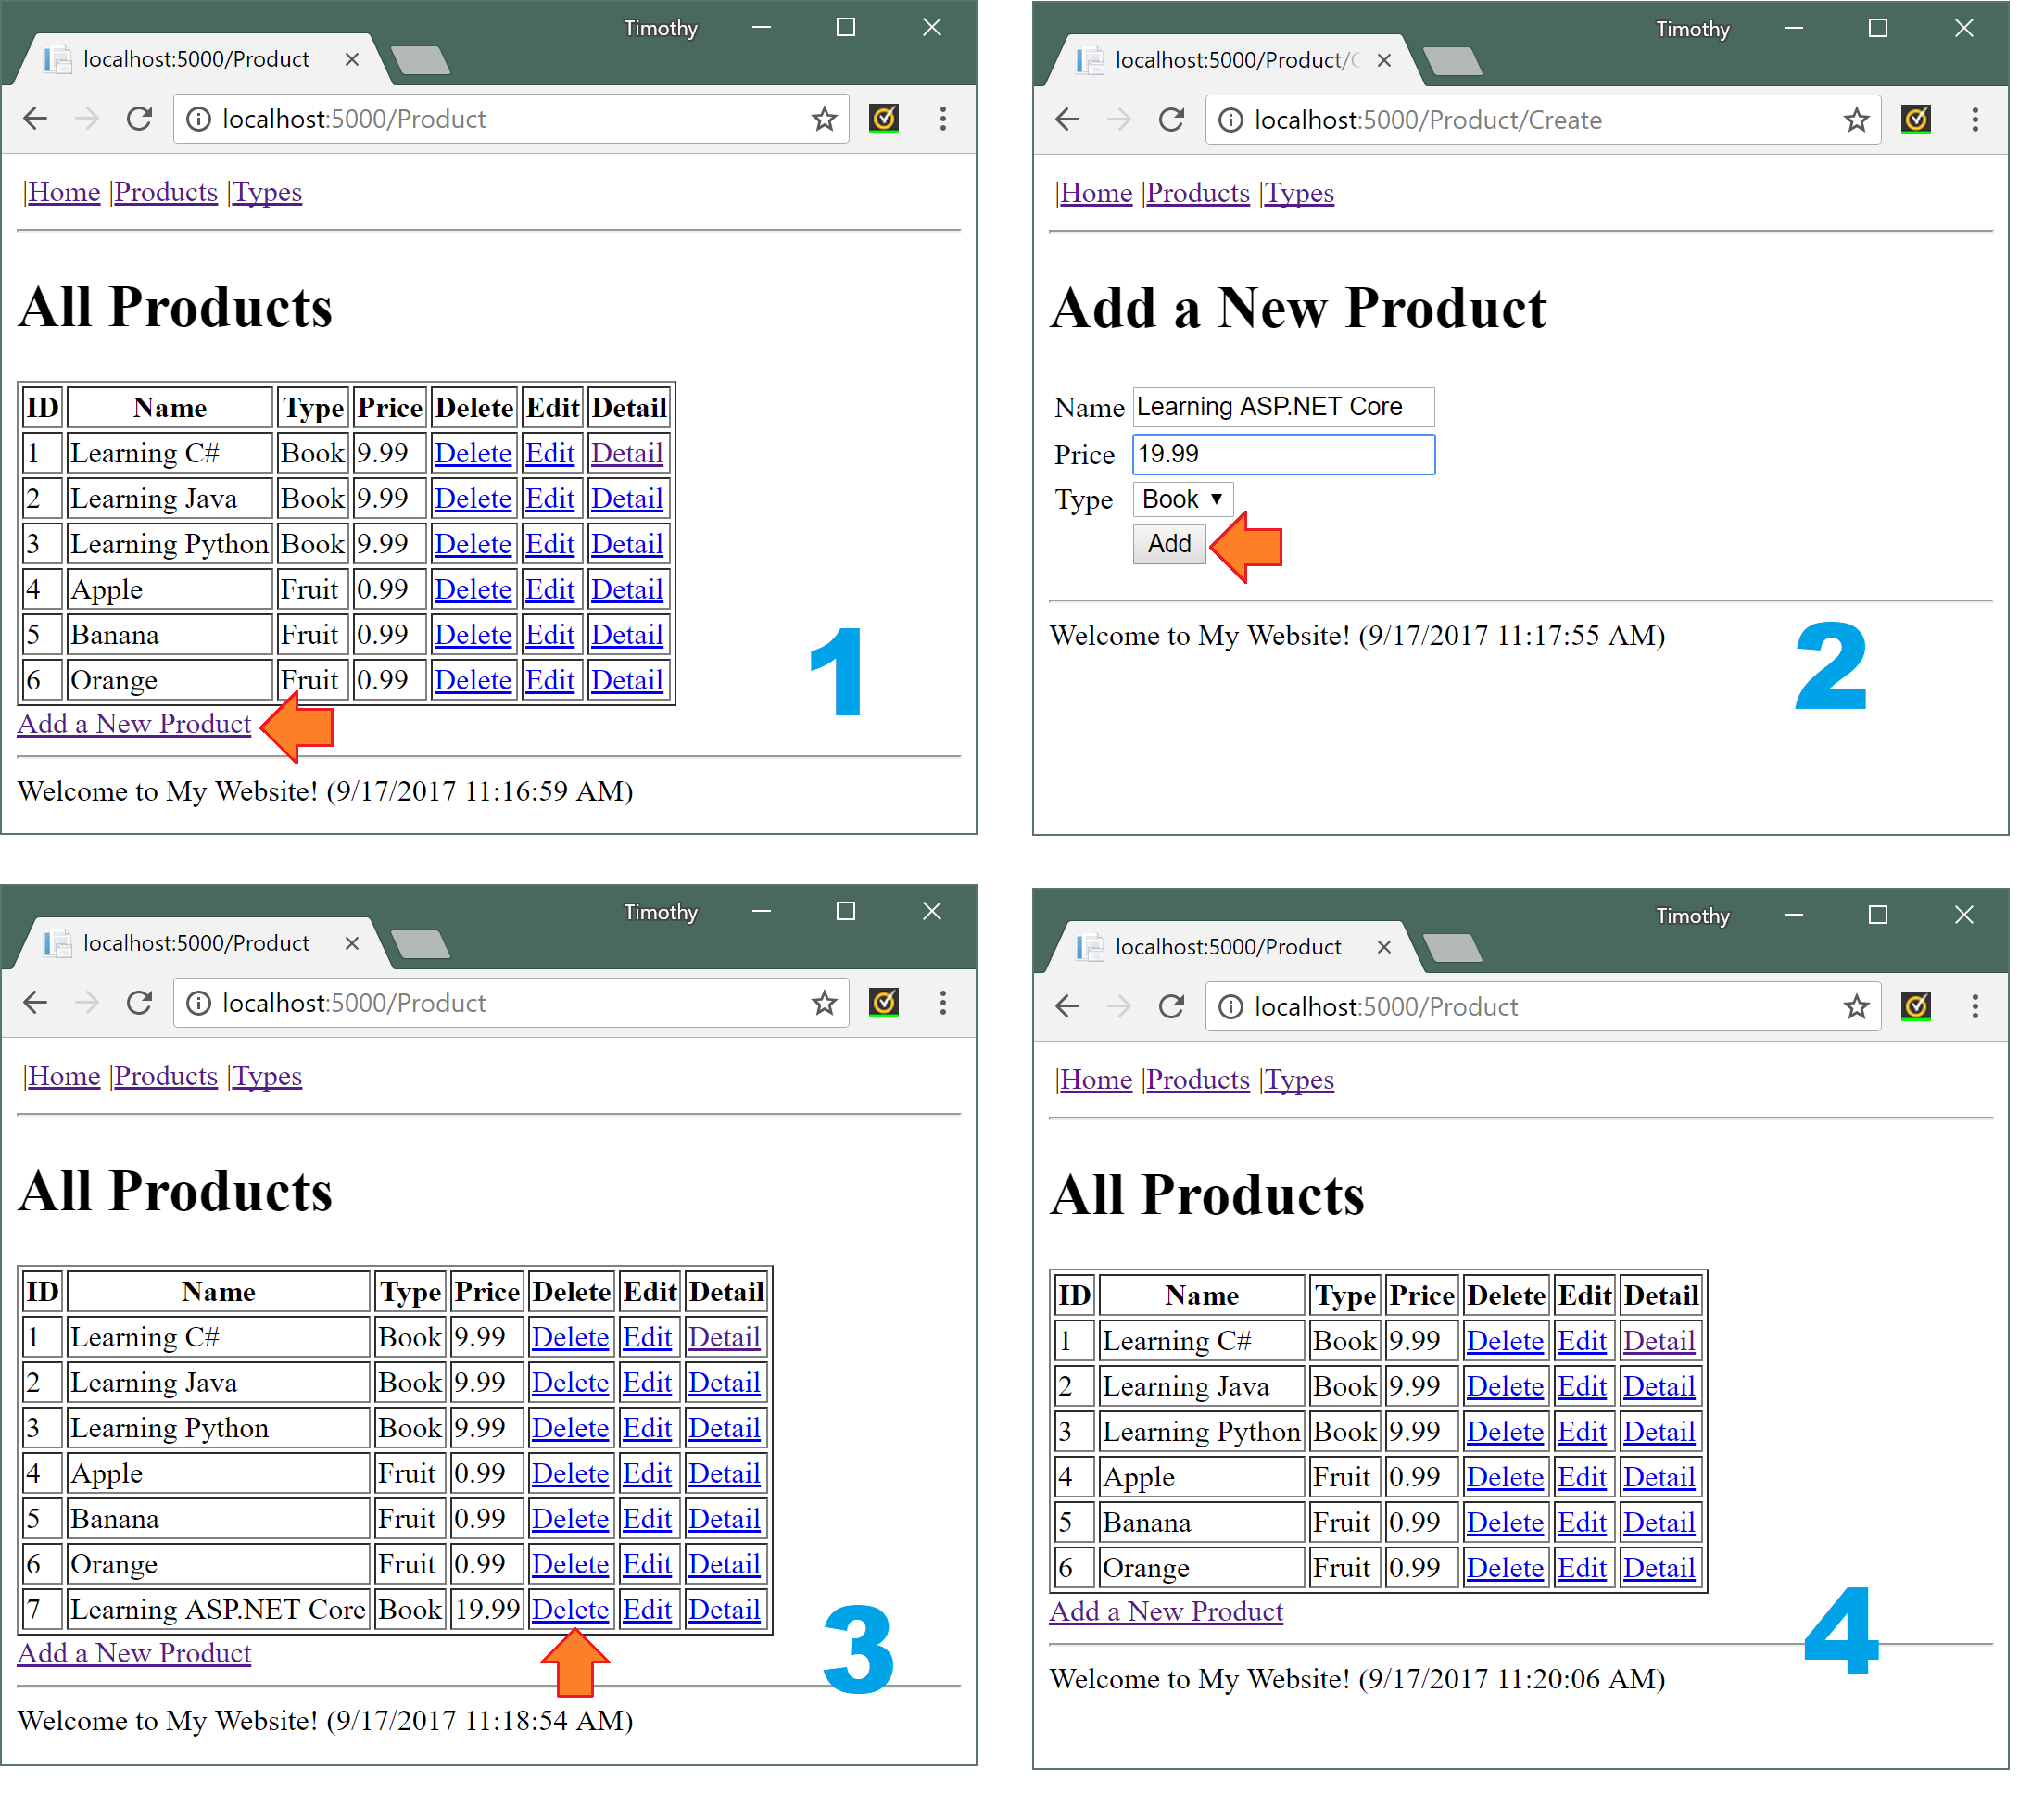
添加 Edit 操作和视图
基于 Create 操作和视图,我们可以很快的编写 Edit 的代码:
[HttpGet]public IActionResult Edit(int id) {var product = DataSource.GetProductByID(id);return View(product);}[HttpPost]public IActionResult Edit(Product product) {if (ModelState.IsValid)DataSource.UpdateProductByID(product.ID, product);return RedirectToAction("Index");}
Views\Product\Edit.cshtml:
@using ProductManager.Models@model Product<h1>Edit Product</h1>@using (Html.BeginForm()) {@Html.HiddenFor(p => p.ID)<table><tr><td>@Html.LabelFor(p => p.Name)</td><td>@Html.TextBoxFor(p => p.Name)</td></tr><tr><td>@Html.LabelFor(p => p.Price)</td><td>@Html.TextBoxFor(p => p.Price)</td></tr><tr><td>@Html.LabelFor(p => p.Type)</td><td>@Html.DropDownListFor(p => p.TypeID,new SelectList(DataSource.GetProductTypes(), "ID", "Name"))</td></tr><tr><td></td><td><input type="submit" value="Update" /></td></tr></table>}
最后,让我们来测试一下 Edit 功能: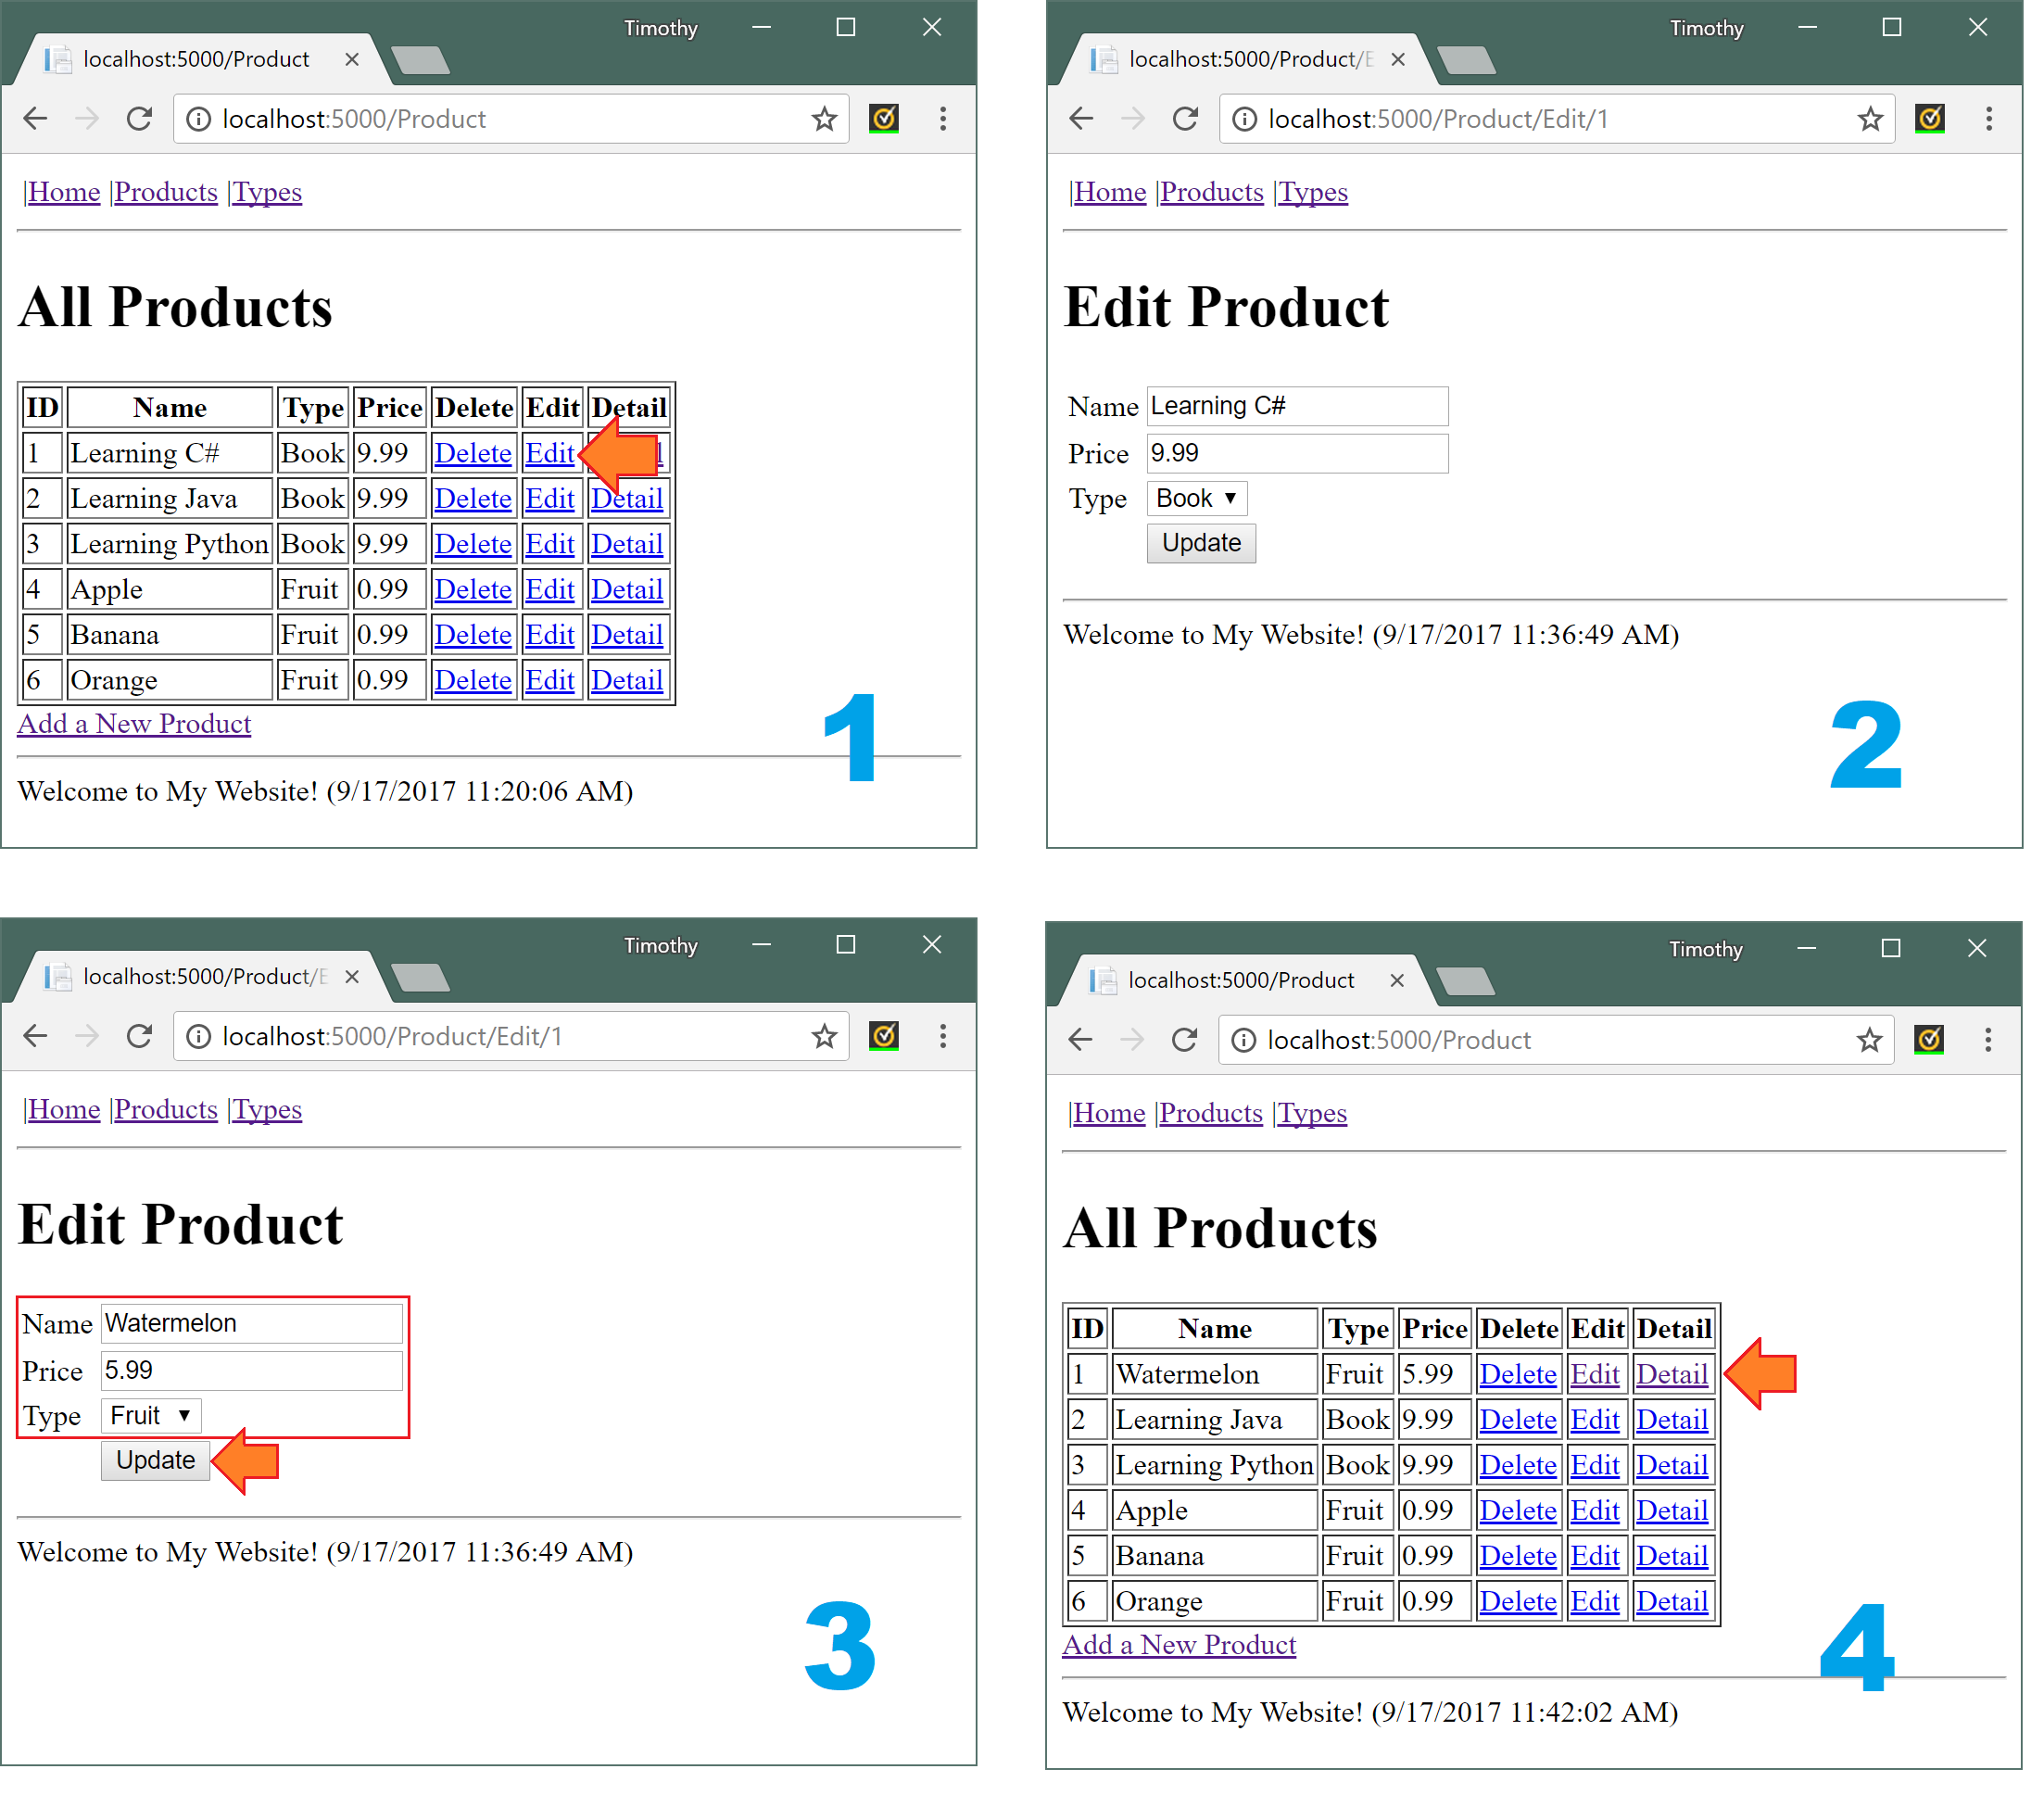
恭喜你!你实现了一个包含整个课程内容的 ASP.NET Core Web 程序。

若有收获,就点个赞吧
0 人点赞
