1 创建Isolate
void test() {print('外部代码1');Isolate.spawn(func1, 10);print('外部代码2');}void func1(int count) {print("子线程");}main() {test();// dioDemo();}
执行结果:
外部代码1外部代码2子线程
2 Isolate子线程的执行顺序:Isolate创建后,和main线程同步执行
void test() {print('外部代码1');Isolate.spawn(func1, 10);Isolate.spawn(func3, 10);Isolate.spawn(func1, 10);Isolate.spawn(func3, 10);Isolate.spawn(func1, 10);Isolate.spawn(func3, 10);Isolate.spawn(func1, 10);Isolate.spawn(func3, 10);print('外部代码2');}void func1(int count) {print("子线程1");}void func3(int count) {print("子线程2");}
执行结果:
外部代码1外部代码2子线程1子线程2子线程2子线程1子线程1子线程2子线程1子线程2
3 Isolate线程内存空间独立
有独立的内存,不用担心资源抢夺的问题,不需要锁,但不利于数据交互
void test() {print('外部代码1');Isolate.spawn(func1, 100);print("a=$a");print('外部代码2');}int a = 10;void func1(int count) {a = count;print("子线程1:$a");}void main() {test();// dioDemo();}
执行结果
外部代码1子线程1:100a=10外部代码2
4 Isolate线程间通信
void test1()async{print("外部代码1");//创建PortReceivePort port = ReceivePort();Isolate iso = await Isolate.spawn(func, port.sendPort);port.listen((message) {a = message;print(a);port.close();iso.kill();});print('外部代码2');}int a = 10;void func(SendPort send){print('第一个来了!');send.send(1000);}
打印结果:
外部代码1第一个来了!外部代码21000
5 compute的使用(在Isolate上层进行的封装)
import 'package:flutter/foundation.dart';void computeTest(){print('外部代码1');compute(func2,10).then((value) => print(value));print('外部代码2');}int func2(int count){sleep(Duration(seconds: 1));return 10000;}
打印结果:
外部代码1外部代码210000
await 等待
void computeTest() async{print('外部代码1');int x = await compute(func2,10);print(x);sleep(Duration(seconds: 1));print('外部代码2');}int func2(int count){return 10000;}
打印结果
外部代码110000外部代码2
多线程执行
void isolateDemo(){Future(()=>compute(func1,123).then((value) => print("1结束了")));Future(()=>compute(func1,123).then((value) => print("2结束了")));Future(()=>compute(func1,123).then((value) => print("3结束了")));Future(()=>compute(func1,123).then((value) => print("4结束了")));Future(()=>compute(func1,123).then((value) => print("5结束了")));}void func1(int count){}/*//多个线程结束后回到主线程的时间没有固定顺序,每次运行打印顺序可能不一样:5结束了1结束了4结束了3结束了2结束了*/
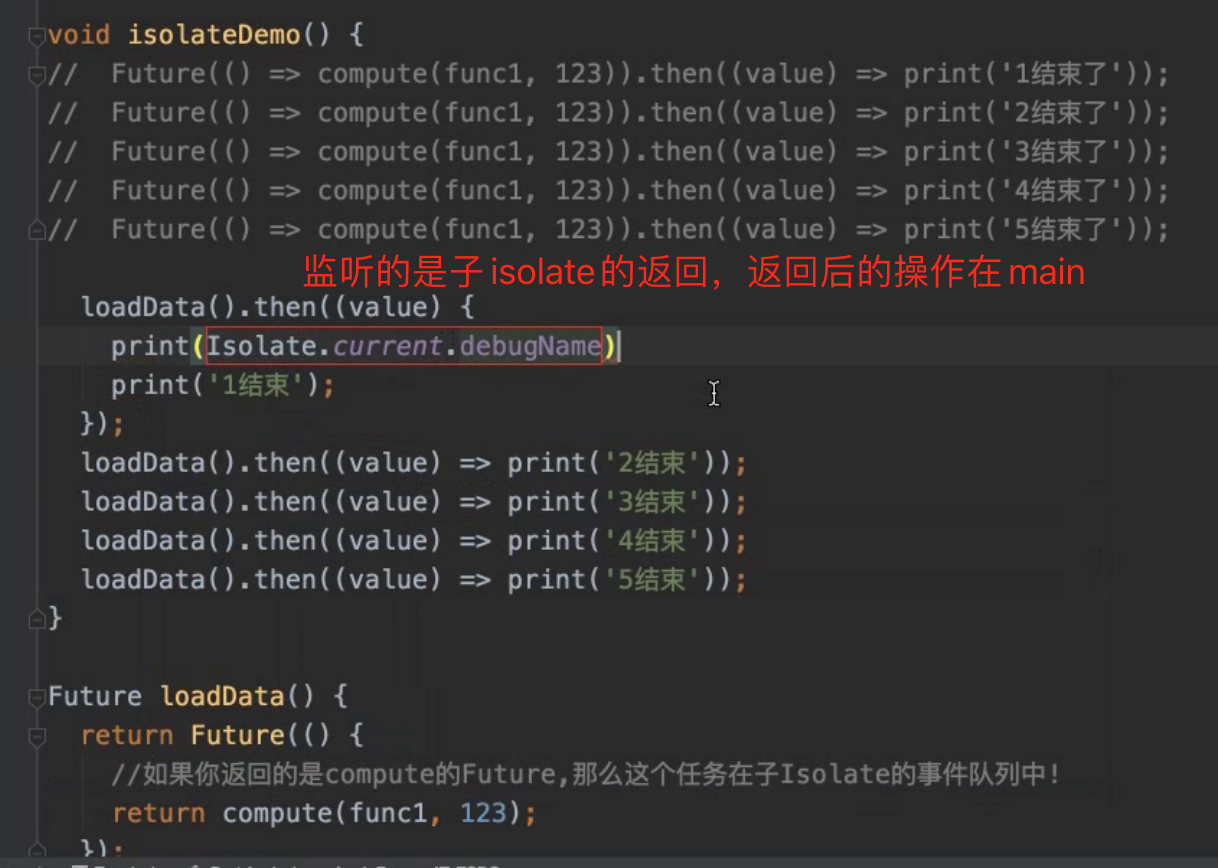
案例
void isolateDemo(){loadData().then((value) => print("1结束了"));loadData().then((value) => print("2结束了"));loadData().then((value) => print("3结束了"));loadData().then((value) => print("4结束了"));loadData().then((value) => print("5结束了"));}Future loadData(){return Future((){compute(func1,123);});}/*//loadData().then监听的是主线程的Future,打印有序I/flutter (23211): 1结束了I/flutter (23211): 2结束了I/flutter (23211): 3结束了I/flutter (23211): 4结束了I/flutter (23211): 5结束了*/void isolateDemo1(){loadData1().then((value) => print("1结束了"));loadData1().then((value) => print("2结束了"));loadData1().then((value) => print("3结束了"));loadData1().then((value) => print("4结束了"));loadData1().then((value) => print("5结束了"));}Future loadData1(){return Future((){return compute(func1,123);});}/*//loadData().then监听的是compute子线程的Future的返回,多个子线程间是并行执行的,打印无序//但是then中执行的代码打印输出是在主线程中执行I/flutter (23211): 1结束了I/flutter (23211): 5结束了I/flutter (23211): 3结束了I/flutter (23211): 4结束了I/flutter (23211): 2结束了*/
then中的代码块师傅添加到微任务:不会,then会和Future在同一个消息循环,是同一个任务,在Future任务执行完成后立刻执行 Future x = Future((){
print(‘A异步任务1’);
scheduleMicrotask(()=>print(“B微任务1”));
});
x.then((value) => print(‘C异步1结束’));
print(‘D主任务’);
打印:
I/flutter (23211): D主任务I/flutter (23211): A异步任务1 I/flutter (23211): C异步1结束 I/flutter (23211): B微任务1
6 Timer.run:开启异步任务,本质是开启Timer
import 'dart:async';void test1(){Timer.run(() {print("异步任务");});print("来了");}Timer _timer;void test2(){int _count = 0;_timer = Timer.periodic(Duration(seconds: 1),(timer){print(Isolate.current.debugName);_count++;print(_count);if(_count == 99){timer.cancel();}});}@overridevoid dispose(){super.dispose();if(_timer!=null && _timer.isActive){_timer.cancel();}}
注意: 在initState中创建的timer,需要在dispose中取消掉,否则重构页面时,会有多个timer

若有收获,就点个赞吧
0 人点赞
