- 1 Transform
- ">

- 2 RotatedBox
- 3 装饰容器DecoratedBox & BoxDecoration
- 4 FittedBox (缩放布局,不会超过父容器)
- 5 FractionallySizedBox根据父容器宽高的百分比来设置子组件宽高
- 6 ConstrainedBox(带限制的盒子)
- 7 LimitedBox (限制最大宽高布局)
- 8 Baseline
- 9 TabBar
- 10 Flex 弹性布局
- 11 Wrap:解决row/column被撑破的问题
- 12 Flow:性能好,且灵活,一般少用,需要自己实现FlowDelegate
- 13 PageView
- 14 Stack & Positioned
- 15 Align (对齐布局)
- 16 Padding (设置边距填充布局)
- 17 Opacity(透明度处理)
- 18 AspectRatio(宽高比)
- 19 IndexedStack (显示第index个child,其他child都不可见)
- 21 OverflowBox (溢出父容器显示)
1 Transform
平移 Transform.translate
DecoratedBox(decoration:BoxDecoration(color: Colors.red),//默认原点为左上角,左移20像素,向上平移5像素child: Transform.translate(offset: Offset(-20.0, -5.0),child: Text("Hello world"),),)
旋转 Transform.rotate
import 'dart:math' as math;DecoratedBox(decoration:BoxDecoration(color: Colors.red),child: Transform.rotate(//旋转90度angle:math.pi/2 ,child: Text("Hello world"),),);
缩放Transform.scale
DecoratedBox(decoration:BoxDecoration(color: Colors.red),child: Transform.scale(scale: 1.5, //放大到1.5倍child: Text("Hello world")));

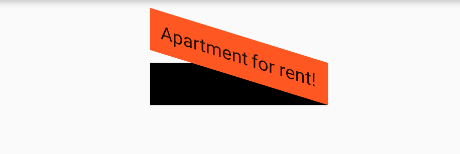
Container(color: Colors.black,child: new Transform(alignment: Alignment.topRight, //相对于坐标系原点的对齐方式transform: new Matrix4.skewY(0.3), //沿Y轴倾斜0.3弧度child: new Container(padding: const EdgeInsets.all(8.0),color: Colors.deepOrange,child: const Text('Apartment for rent!'),),),);
2 RotatedBox
RotatedBox和Transform.rotate功能相似,都可以对子组件进行旋转变换,
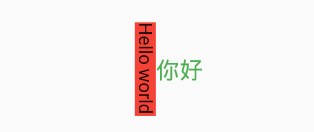
有一点不同:RotatedBox的变换是在layout阶段,会影响在子组件的位置和大小
Row(mainAxisAlignment: MainAxisAlignment.center,children: <Widget>[DecoratedBox(decoration: BoxDecoration(color: Colors.red),//将Transform.rotate换成RotatedBoxchild: RotatedBox(quarterTurns: 1, //旋转90度(1/4圈)child: Text("Hello world"),),),Text("你好", style: TextStyle(color: Colors.green, fontSize: 18.0),)],),
3 装饰容器DecoratedBox & BoxDecoration
DecoratedBox可以在其子组件绘制前(或后)绘制一些装饰(Decoration),如背景、边框、渐变
const DecoratedBox({Decoration decoration,DecorationPosition position = DecorationPosition.background,Widget child});/*decoration:代表将要绘制的装饰,它的类型为Decoration。Decoration是一个抽象类,它定义了一个接口 createBoxPainter(),子类的主要职责是需要通过实现它来创建一个画笔,该画笔用于绘制装饰。position:此属性决定在哪里绘制Decoration,它接收DecorationPosition的枚举类型,该枚举类有两个值:background:在子组件之后绘制,即背景装饰。foreground:在子组件之上绘制,即前景。*/
我们通常会直接使用BoxDecoration类,它是一个Decoration的子类,实现了常用的装饰元素的绘制。
BoxDecoration({Color color, //颜色DecorationImage image,//图片BoxBorder border, //边框BorderRadiusGeometry borderRadius, //圆角List boxShadow, //阴影,可以指定多个Gradient gradient, //渐变BlendMode backgroundBlendMode, //背景混合模式BoxShape shape = BoxShape.rectangle, //形状})
案例:
DecoratedBox(decoration: BoxDecoration(gradient: LinearGradient(colors:[Colors.red,Colors.orange[700]]), //背景渐变borderRadius: BorderRadius.circular(3.0), //3像素圆角boxShadow: [ //阴影BoxShadow(color:Colors.black54,offset: Offset(2.0,2.0),blurRadius: 4.0)]),child: Padding(padding: EdgeInsets.symmetric(horizontal: 80.0, vertical: 18.0),child: Text("Login", style: TextStyle(color: Colors.white),),))
4 FittedBox (缩放布局,不会超过父容器)
fit:缩放方式,默认属性是 BoxFit.contain
BoxFitBoxFit.none //没有任何填充模式BoxFit.fill //不按宽高比例填充,内容不会超过容器范围BoxFit.contain //按照宽高比等比模式填充,内容不会超过容器范围BoxFit.cover //按照原始尺寸填充整个容器模式。内容可能回超过容器范围BoxFit.width //按照宽高比等比模式填充,适配宽度BoxFit.height //按照宽高比等比模式填充,适配高度BoxFit.scaleDown //会根据情况缩小范围
alignment: 设置对齐方式,默认属性是 Aligment.center,居中显示 child
class MyApp extends StatelessWidget {// This widget is the root of your application.@overrideWidget build(BuildContext context) {return MaterialApp(title: '布局示例',home: LayoutDemo(),);}}class LayoutDemo extends StatelessWidget {@overrideWidget build(BuildContext context) {return new Scaffold(appBar: AppBar(title: Text('Center'),),body: Container(width: 250,height: 250,color: Colors.grey,child: FittedBox(fit: BoxFit.scaleDown,alignment: Alignment.topLeft,child: Container(color: Colors.deepOrange,child: Text('缩放布局'),),),),);}}
5 FractionallySizedBox根据父容器宽高的百分比来设置子组件宽高
widthFactor 宽度缩放因子
heightFactor 高度缩放因子
FractionallySizedBox(// 对齐方式alignment: Alignment.center,// 宽度因子 1为占满整行widthFactor: 1,// 高度因子heightFactor: 1,child: Text("123"),);
6 ConstrainedBox(带限制的盒子)
BoxConstraints属性
const BoxConstraints({this.minWidth = 0.0, //最小宽度this.maxWidth = double.infinity, //最大宽度this.minHeight = 0.0, //最小高度this.maxHeight = double.infinity //最大高度})
ConstrainedBox使用
ConstrainedBox(constraints: BoxConstraints(minWidth: double.infinity, //宽度尽可能大minHeight: 50.0 //最小高度为50像素),child: Container(height: 5.0,child: redBox),)/*虽然将Container的高度设置为5像素,但是最终却是50像素,这是ConstrainedBox的最小高度限制生效了。如果将Container的高度设置为80像素,那么最终红色区域的高度也会是80像素*/
7 LimitedBox (限制最大宽高布局)
/*const LimitedBox({Key key,this.maxWidth = double.infinity,this.maxHeight = double.infinity,Widget child,})*/LimitedBox(maxWidth: 150.0,//设置最大宽度 限定child在此范围内child: Container(color: Colors.lightGreen,width: 250.0,),)
8 Baseline
//baseline的构造函数const Baseline({Key key,@required this.baseline,@required this.baselineType,Widget child,})
- baseline基准线位置,是以像素为基本的单位
- baselineType 定位child的基准线类型,分为两种:alphabetic对齐字符底部的水平线,ideographic对齐表意字符的水平线
[Row(mainAxisAlignment: MainAxisAlignment.spaceBetween,children: <Widget>[new Baseline(baseline: 80.0,baselineType: TextBaseline.alphabetic,child: new Text('AaBbCc',style: new TextStyle(fontSize: 18.0,textBaseline: TextBaseline.alphabetic,),),),new Baseline(baseline: 80.0,baselineType: TextBaseline.alphabetic,child: new Container(width: 40.0,height: 40.0,color: Colors.green,),),new Baseline(baseline: 80.0,baselineType: TextBaseline.alphabetic,child: new Text('DdEeFf',style: new TextStyle(fontSize: 26.0,textBaseline: TextBaseline.alphabetic,),),)],)
](https://blog.csdn.net/huang3513/article/details/97639004)
9 TabBar
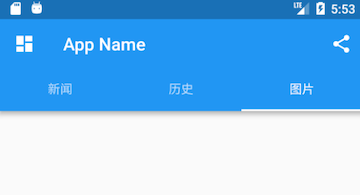
通过AppBar的“bottom”属性来添加一个导航栏底部Tab按钮组
TabBar + TabController + TabBarView
class _ScaffoldRouteState extends State<ScaffoldRoute>with SingleTickerProviderStateMixin {TabController _tabController; //需要定义一个ControllerList tabs = ["新闻", "历史", "图片"];@overridevoid initState() {super.initState();// 创建Controller_tabController = TabController(length: tabs.length, vsync: this);}@overrideWidget build(BuildContext context) {return Scaffold(appBar: AppBar(... //省略无关代码bottom: TabBar(controller: _tabController,tabs: tabs.map((e) => Tab(text: e)).toList()),),drawer: new MyDrawer(),body: TabBarView(controller: _tabController,children: tabs.map((e) { //创建3个Tab页return Container(alignment: Alignment.center,child: Text(e, textScaleFactor: 5),);}).toList(),),... // 省略无关代码);}
10 Flex 弹性布局
direction:扩展方向
flex:弹性系数
flex为弹性系数,如果为0或null,则child是没有弹性的,即不会被扩伸占用的空间。如果大于0,所有的Expanded按照其flex的比例来分割主轴的全部空闲空间
Flex(direction: Axis.horizontal,children: <Widget>[Expanded(flex: 1,child: Container(height: 80.0,color: Colors.red,),),Expanded(flex: 2,child: Container(height: 80.0,color: Colors.green,),),],),
11 Wrap:解决row/column被撑破的问题
[
](https://book.flutterchina.club/chapter4/wrap_and_flow.html)
//火爆专区子项Widget _wrapList(){if(hotGoodsList.length!=0){List<Widget> listWidget = hotGoodsList.map((val){return InkWell(onTap:(){print('点击了火爆商品');},child:Container(width: ScreenUtil().setWidth(372),color:Colors.white,padding: EdgeInsets.all(5.0),margin:EdgeInsets.only(bottom:3.0),child: Column(children: <Widget>[Image.network(val['image'],width: ScreenUtil().setWidth(375),),Text(val['name'],maxLines: 1,overflow:TextOverflow.ellipsis ,style: TextStyle(color:Colors.pink,fontSize: ScreenUtil().setSp(26)),),Row(children: <Widget>[Text('¥${val['mallPrice']}'),Text('¥${val['price']}',style: TextStyle(color:Colors.black26,decoration: TextDecoration.lineThrough),)],)],),));}).toList();return Wrap(spacing: 8.0, // 主轴(水平)方向间距runSpacing: 4.0, // 纵轴(垂直)方向间距alignment: WrapAlignment.center, //纵轴方向的对齐方式:沿主轴方向居中children: listWidget,);}else{return Text(' ');}}
12 Flow:性能好,且灵活,一般少用,需要自己实现FlowDelegate
//对六个色块进行自定义流式布局:Flow(delegate: TestFlowDelegate(margin: EdgeInsets.all(10.0)),children: <Widget>[new Container(width: 80.0, height:80.0, color: Colors.red,),new Container(width: 80.0, height:80.0, color: Colors.green,),new Container(width: 80.0, height:80.0, color: Colors.blue,),new Container(width: 80.0, height:80.0, color: Colors.yellow,),new Container(width: 80.0, height:80.0, color: Colors.brown,),new Container(width: 80.0, height:80.0, color: Colors.purple,),],)//实现TestFlowDelegate:class TestFlowDelegate extends FlowDelegate {EdgeInsets margin = EdgeInsets.zero;TestFlowDelegate({this.margin});@overridevoid paintChildren(FlowPaintingContext context) {var x = margin.left;var y = margin.top;//计算每一个子widget的位置for (int i = 0; i < context.childCount; i++) {var w = context.getChildSize(i).width + x + margin.right;if (w < context.size.width) {context.paintChild(i,transform: new Matrix4.translationValues(x, y, 0.0));x = w + margin.left;} else {x = margin.left;y += context.getChildSize(i).height + margin.top + margin.bottom;//绘制子widget(有优化)context.paintChild(i,transform: new Matrix4.translationValues(x, y, 0.0));x += context.getChildSize(i).width + margin.left + margin.right;}}}@overridegetSize(BoxConstraints constraints){//指定Flow的大小return Size(double.infinity,200.0);}@overridebool shouldRepaint(FlowDelegate oldDelegate) {return oldDelegate != this;}}
13 PageView
PageView
class PageViewDemo extends StatelessWidget {@overrideWidget build(BuildContext context) {// TODO: implement buildreturn PageView(// pageSnapping: false, //这个值默认是true;此值为true时当拖动划过一半会切换到下一个页面,否则会弹回上一个页面;此值为false时,滑动多少就切换多少// reverse: true,//页面顺序倒置// scrollDirection: Axis.vertical,//页面滚动方向onPageChanged: (currentPage) =>debugPrint('page:$currentPage'), //页面切换的回调,controller: PageController(initialPage: 1,keepPage: false, //是否记住滚动到的页面viewportFraction: 1.0, //页面占可视窗口的比例),children: <Widget>[Container(color: Colors.brown[900],alignment: Alignment(0.0, 0.0),child: Text('ONE',style: TextStyle(fontSize: 32.0, color: Colors.white),),),Container(color: Colors.green[900],alignment: Alignment(0.0, 0.0),child: Text('TWO',style: TextStyle(fontSize: 32.0, color: Colors.white),),),Container(color: Colors.red[900],alignment: Alignment(0.0, 0.0),child: Text('THREE',style: TextStyle(fontSize: 32.0, color: Colors.white),),)],);}}
PageView.builder
class ViewDemo extends StatelessWidget {Widget _pageItemBuilder(BuildContext context, int index) {return Stack(children: <Widget>[SizedBox.expand(child: Image.network(posts[index].imageUrl,fit:BoxFit.cover),),Positioned(bottom: 8.0,left: 8.0,child: Column(crossAxisAlignment: CrossAxisAlignment.start,children: <Widget>[Text(posts[index].title,style:TextStyle(fontWeight: FontWeight.bold)),Text(posts[index].author,),],),),],);}@overrideWidget build(BuildContext context) {// TODO: implement buildreturn PageView.builder(itemCount: posts.length,itemBuilder: _pageItemBuilder,);}}
14 Stack & Positioned
Stack
Stack({this.alignment = AlignmentDirectional.topStart,this.textDirection,this.fit = StackFit.loose,this.overflow = Overflow.clip,List children = const [],})
alignment:此参数决定如何去对齐没有定位(没有使用Positioned)或部分定位的子组件。所谓部分定位,在这里特指没有在某一个轴上定位:left、right为横轴,top、bottom为纵轴,只要包含某个轴上的一个定位属性就算在该轴上有定位。textDirection:和Row、Wrap的textDirection功能一样,都用于确定alignment对齐的参考系,即:textDirection的值为TextDirection.ltr,则alignment的start代表左,end代表右,即从左往右的顺序;textDirection的值为TextDirection.rtl,则alignment的start代表右,end代表左,即从右往左的顺序。fit:此参数用于确定没有定位的子组件如何去适应Stack的大小。StackFit.loose表示使用子组件的大小,StackFit.expand表示扩伸到Stack的大小。overflow:此属性决定如何显示超出Stack显示空间的子组件;值为Overflow.clip时,超出部分会被剪裁(隐藏),值为Overflow.visible 时则不会。
Positioned
const Positioned({Key key,this.left,this.top,this.right,this.bottom,this.width,this.height,@required Widget child,})
left、top 、right、 bottom分别代表离Stack左、上、右、底四边的距离。width和height用于指定需要定位元素的宽度和高度。注意,Positioned的width、height 和其它地方的意义稍微有点区别,此处用于配合left、top 、right、 bottom来定位组件,举个例子,在水平方向时,你只能指定left、right、width三个属性中的两个,如指定left和width后,right会自动算出(left+width),如果同时指定三个属性则会报错,垂直方向同理。
示例
//通过ConstrainedBox来确保Stack占满屏幕ConstrainedBox(constraints: BoxConstraints.expand(),child: Stack(alignment:Alignment.center , //指定未定位或部分定位widget的对齐方式children: [Container(child: Text("Hello world",style: TextStyle(color: Colors.white)),color: Colors.red,),Positioned(left: 18.0,child: Text("I am Jack"),),Positioned(top: 18.0,child: Text("Your friend"),)],),);
15 Align (对齐布局)
Align组件可以调整子组件的位置,并且可以根据子组件的宽高来确定自身的的宽高,定义如下:
Align({Key key,this.alignment = Alignment.center,this.widthFactor,this.heightFactor,Widget child,})
- alignment: 需要一个AlignmentGeometry类型的值,表示子组件在父组件中的起始位置。AlignmentGeometry是一个抽象类,它有两个常用的子类:Alignment和FractionalOffset
- widthFactor和heightFactor是用于确定Align组件本身宽高的属性;它们是两个缩放因子,会分别乘以子元素的宽、高,最终的结果就是Align组件的宽高。如果值为null,则组件的宽高将会占用尽可能多的空间。
[
](https://book.flutterchina.club/chapter4/alignment.html)
/*static const Alignment topLeft = Alignment(-1.0, -1.0);static const Alignment topCenter = Alignment(0.0, -1.0);static const Alignment topRight = Alignment(1.0, -1.0);static const Alignment centerLeft = Alignment(-1.0, 0.0);static const Alignment center = Alignment(0.0, 0.0);static const Alignment centerRight = Alignment(1.0, 0.0);static const Alignment bottomLeft = Alignment(-1.0, 1.0);static const Alignment bottomCenter = Alignment(0.0, 1.0);static const Alignment bottomRight = Alignment(1.0, 1.0);*/Container(height: 120.0,width: 120.0,color: Colors.blue[50],child: Align(alignment: Alignment.topRight,child: FlutterLogo(size: 60,),),)
16 Padding (设置边距填充布局)
给其子节点添加填充(留白)
Padding(//上下左右各添加16像素补白padding: EdgeInsets.all(16.0),child: Column(//显式指定对齐方式为左对齐,排除对齐干扰crossAxisAlignment: CrossAxisAlignment.start,children: <Widget>[Padding(//左边添加8像素补白padding: const EdgeInsets.only(left: 8.0),child: Text("Hello world"),),Padding(//上下各添加8像素补白padding: const EdgeInsets.symmetric(vertical: 8.0),child: Text("I am Jack"),),Padding(// 分别指定四个方向的补白padding: const EdgeInsets.fromLTRB(20.0,.0,20.0,20.0),child: Text("Your friend"),)],),);
17 Opacity(透明度处理)
/** 设置子控件透明度const Opacity({Key key,@required this.opacity,//透明度,0.0 到 1.0,0.0表示完全透明,1.0表示完全不透明this.alwaysIncludeSemantics = false,Widget child,})*/Opacity(opacity:0.5,child:Text('透明度50%'),)
18 AspectRatio(宽高比)
aspectRatio不能为null,必须是大于0的有限的值<br /> 如果父组件有指定宽高,则响应父组件的宽和高设置
/**AspectRatio作用于父控件,根据aspectRatio计算父控件的宽或者高,AspectRatio的子控件将填充满父控件,子控件的宽高无效。强制子部件的宽度和高度具有给定的宽高比,可以父容器给定一个宽或者高,来换算另一个值const AspectRatio({Key key,@required this.aspectRatio,//宽高比Widget child})*/Container(width: 100.0,child: AspectRatio(aspectRatio: 2.0 / 3.0,child: Container(color: Color(0xffff0000),),),)
19 IndexedStack (显示第index个child,其他child都不可见)
IndexedStack({ Key key,AlignmentGeometry alignment = AlignmentDirectional.topStart,TextDirection textDirection,StackFit sizing = StackFit.loose,this.index = 0,List<Widget> children = const <Widget>[],})
- IndexedStack和Stack一样,都可以在一个组件上面放置另一个组件,唯一不同的是IndexedStack只能同时显示子组件中的一个组件,并通过Index属性来设置要显示的控件
- alignment: 设置子组件在Stack中的对齐方式
- index: 要显示的子组件的下标,对应children的List的下标
- textDirection:设置子组件在Stack中从左往右排列,还是从右往左排列
- sizing:调整IndexedStack组件中的没有使用Position包裹的子组件的宽高
loose: 子组件的宽高从Stack约束的最小值到最大值之间取值
expand: 子组件的宽高取Stack约束的最大值
passthrough:从父组件传递到Stack组件的约束将不加修改地传递给Stack组件中没有被Position组件包裹的子组件
IndexedStack(alignment: AlignmentDirectional.center,textDirection: TextDirection.ltr,sizing: StackFit.loose,index: 0,children: [Container(width: 100,height: 100,color: Colors.red,),Container(width: 80,height: 80,color: Colors.blue,),Container(width: 50,height: 50,color: Colors.green,),],);
[
](https://blog.csdn.net/gzx110304/article/details/102541042)
[
](https://blog.csdn.net/gzx110304/article/details/102541042)
21 OverflowBox (溢出父容器显示)
当OverflowBox的最大尺寸大于child的时候,child可以完整显示
否则以最大尺寸为基准maxWidth maxHeight
const OverflowBox({ Key key,this.alignment = Alignment.center,this.minWidth,this.maxWidth,this.minHeight,this.maxHeight,Widget child,})
- OverflowBox允许其子组件溢出OverflowBox的父组件显示
- minWidth:对子组件的最小宽度约束
- maxWidth:对子组件的最大宽度约束
- minHeight:对子组件的最小高度约
- maxHeight:对子组件的最大高度约束
注意:设置maxWidth或者maxHeight时,其值不能小于父组件的宽高,如果父组件有padding限制,则其值不能小于父组件的宽高减去Padding
Container(height: 100.0,width: 100.0,color: Colors.black26,child: OverflowBox(maxWidth: 80.0,minWidth: 50.0,minHeight: 50.0,maxHeight: 80.0,child: Container(width: 100.0,height: 200.0,color: Colors.blue,),),)
蓝色的Container的最大高度不会超过80,最小高度不会小于50.最大宽度不会超过80,最小高度不会小于50.


