问:在Android xml布局中Fragment与FrameLayout的区别?
答:在Activity中托管一个UI Fragment有两种方式:
(1)添加fragment到activity布局中。用name属性表明需要显示的fragment<br /> (2)在activity代码中动态添加删除fragment。FrameLayout并不是相对布局,它就是一个容器,向其中添加的任何子组件,需要通过layout_gravity属性值决定在父视图中的位置,而各个子组件并不能像RelativeLayout一样,定义相对位置。
一、fragment的产生
平板电脑界面动态灵活设计<br />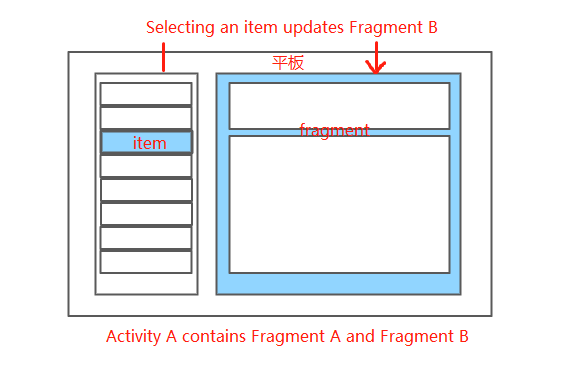<br />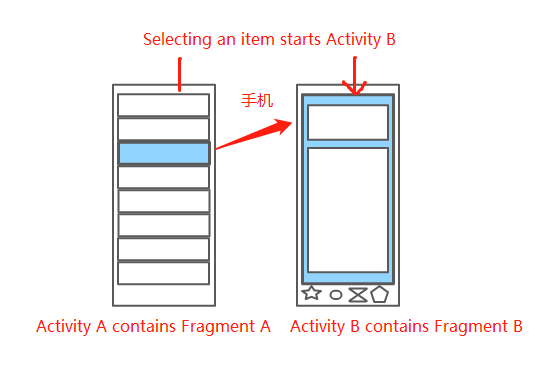
二、什么是fragment
1.具备生命周期,子activity
2.比须委托在activity中才能运行
三、压缩包
四、实现具体步骤
1.创建fragment

2.在碎片的xml文件中设置布局

3.在片段逻辑代码中,对布局进行逻辑处理
4.在主布局xml文件中进行片段绑定activity数组
五、整体代码
1.布局activity_main.xml文件
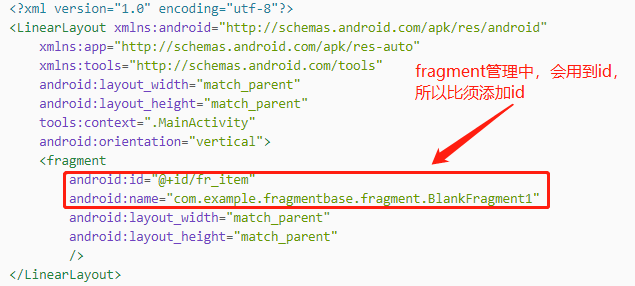
<?xml version="1.0" encoding="utf-8"?><LinearLayout xmlns:android="http://schemas.android.com/apk/res/android"xmlns:app="http://schemas.android.com/apk/res-auto"xmlns:tools="http://schemas.android.com/tools"android:layout_width="match_parent"android:layout_height="match_parent"tools:context=".MainActivity"android:orientation="vertical"><fragmentandroid:id="@+id/fr_item"android:name="com.example.fragmentbase.fragment.BlankFragment1"android:layout_width="match_parent"android:layout_height="match_parent"/></LinearLayout>
2.布局fragment_blank_fragment1.xml文件
<?xml version="1.0" encoding="utf-8"?><LinearLayout xmlns:android="http://schemas.android.com/apk/res/android"xmlns:tools="http://schemas.android.com/tools"android:layout_width="match_parent"android:layout_height="match_parent"android:orientation="vertical"tools:context=".fragment.BlankFragment1"><!-- TODO: Update blank fragment layout --><TextViewandroid:id="@+id/tv_item"android:layout_width="match_parent"android:layout_height="40dp"android:text="@string/hello_blank_fragment" /><Buttonandroid:layout_width="match_parent"android:layout_height="40dp"android:text="how are you"android:id="@+id/btn_item"/></LinearLayout>
3.MainActivity文件代码
package com.example.fragmentbase;import androidx.appcompat.app.AppCompatActivity;import android.os.Bundle;public class MainActivity extends AppCompatActivity {@Overrideprotected void onCreate(Bundle savedInstanceState) {super.onCreate(savedInstanceState);setContentView(R.layout.activity_main);}}
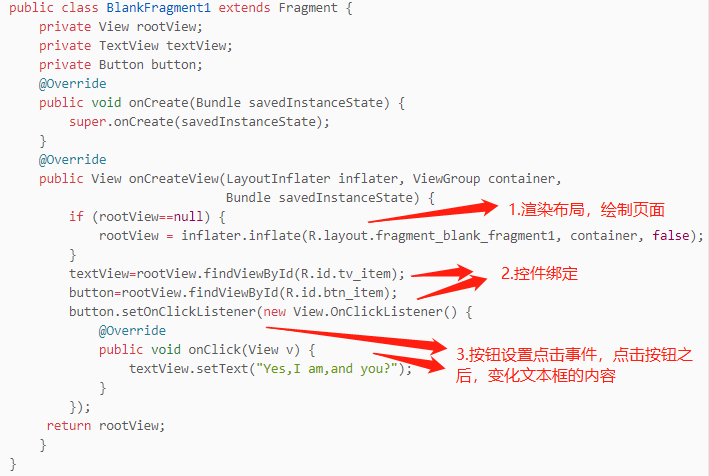
4.BlankFragment1文件代码
package com.example.fragmentbase.fragment;import android.os.Bundle;import androidx.fragment.app.Fragment;import android.view.LayoutInflater;import android.view.View;import android.view.ViewGroup;import android.widget.Button;import android.widget.TextView;import com.example.fragmentbase.R;public class BlankFragment1 extends Fragment {private View rootView;private TextView textView;private Button button;@Overridepublic void onCreate(Bundle savedInstanceState) {super.onCreate(savedInstanceState);}@Overridepublic View onCreateView(LayoutInflater inflater, ViewGroup container,Bundle savedInstanceState) {if (rootView==null) {rootView = inflater.inflate(R.layout.fragment_blank_fragment1, container, false);}textView=rootView.findViewById(R.id.tv_item);button=rootView.findViewById(R.id.btn_item);button.setOnClickListener(new View.OnClickListener() {@Overridepublic void onClick(View v) {textView.setText("Yes,I am,and you?");}});return rootView;}}
5.效果图:
(1)运行之后<br /><br /> (2)点击按钮之后<br />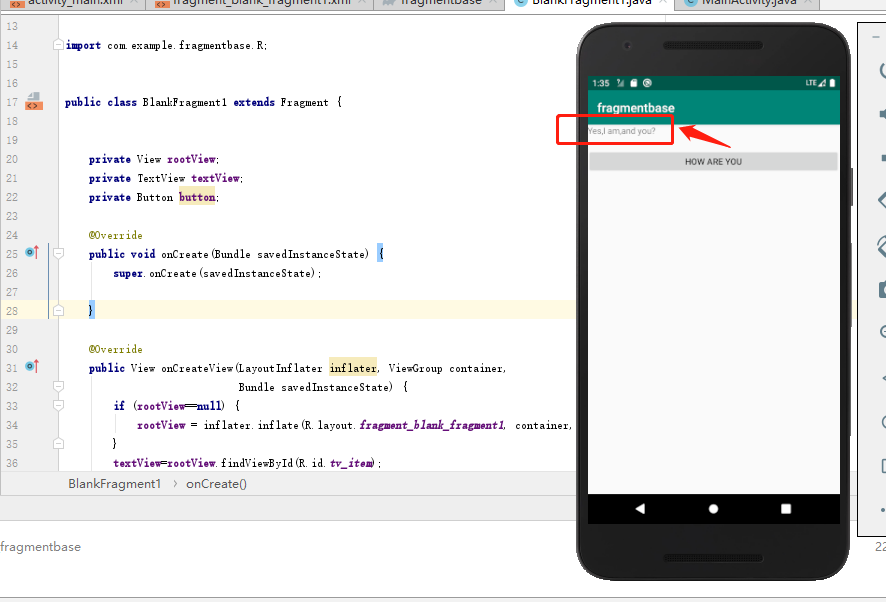

若有收获,就点个赞吧
0 人点赞
