Ball Tracking
#!/usr/bin/env python# encoding: utf-8# import the necessary packagesfrom collections import dequefrom imutils.video import VideoStreamimport numpy as npimport argparseimport cv2import imutilsimport time# construct the argument parse and parse the argumentsap = argparse.ArgumentParser()ap.add_argument("-v", "--video", help="path to the (optional) video file")ap.add_argument("-b", "--buffer", type=int, default=64, help="max buffer size")args = vars(ap.parse_args())# define the lower and upper boundaries of the "green"# ball in the HSV color space,# then initialize the list of tracked pointsgreenLower = (29, 86, 6)greenUpper = (64, 255, 255)pts = deque(maxlen=args["buffer"])# if a video path was not supplied, grab the reference to the webcamif not args.get("video", False):vs = VideoStream(src=0).start()# otherwise, grab a reference to the video fileelse:vs = cv2.VideoCapture(args["video"])# allow the camera or video file to warm uptime.sleep(2.0)# keep loopingwhile True:# grab the current frameframe = vs.read()# handle the frame from VideoCapture or VideoStreamframe = frame[1] if args.get("video", False) else frame# if we are viewing a video and we did not grab a frame,# then we have reached the end of the videoif frame is None:break# resize the frame, blur it, and convert it to the HSV color spaceframe = imutils.resize(frame, width=600)blurred = cv2.GaussianBlur(frame, (11, 11), 0)hsv = cv2.cvtColor(blurred, cv2.COLOR_BGR2HSV)# construct a mask for the color "green",# then perform a series of dilations and# erosions to remove any small blobs left in the maskmask = cv2.inRange(hsv, greenLower, greenUpper)mask = cv2.erode(mask, None, iterations=2)mask = cv2.dilate(mask, None, iterations=2)# find contours in the mask and initialize the current# (x, y) center of the ballcnts = cv2.findContours(mask.copy(), cv2.RETR_EXTERNAL, cv2.CHAIN_APPROX_SIMPLE)cnts = imutils.grab_contours(cnts)center = None# only proceed if at least one contour was foundif len(cnts) > 0:# find the largest contour in the mask,# then use it to compute the minimum enclosing circle# and centroidc = max(cnts, key=cv2.contourArea)((x, y), radius) = cv2.minEnclosingCircle(c)M = cv2.moments(c)center = (int(M["m10"] / M["m00"]), int(M["m01"] / M["m00"]))# only proceed if the radius meets a minimum sizeif radius > 10:# draw the circle and centroid on the frame,# then update the list of tracked pointscv2.circle(frame, (int(x), int(y)), int(radius), (0, 255, 255), 2)cv2.circle(frame, center, 5, (0, 0, 255), -1)# update the points queuepts.appendleft(center)# loop over the set of tracked pointsfor i in range(1, len(pts)):# if either of the tracked points are None, ignore themif pts[i - 1] is None or pts[i] is None:continue# otherwise, compute the thickness of the line and# draw the connecting linesthickness = int(np.sqrt(args["buffer"] / float(i + 1)) * 2.5)cv2.line(frame, pts[i - 1], pts[i], (0, 0, 255), thickness)# show the frame to our screencv2.imshow("Frame", frame)key = cv2.waitKey(1) & 0xFF# if the 'q' key is pressed, stop the loopif key == ord("q"):break# if we are not using a video file, stop the camera video streamif not args.get("video", False):vs.stop()# otherwise, release the cameraelse:vs.release()# close all windowscv2.destroyAllWindows()
The size of Object(s)
pixels per metric ratio:
- The reference object should have known dimensions (such as width or height) in terms of a measurable unit (inches, millimeters, etc.).
- The reference object should be easy to find, either in terms of location of the object or in its appearance.
Problems:
- Without a perfect 90-degree view (or as close to it as possible), the dimensions of the objects can appear distorted.
- Need to calibrate the iPhone using the intrinsic and extrinsic parameters of the camera. Without determining these parameters, photos can be prone to radial and tangential lens distortion.
#!/usr/bin/env python# encoding: utf-8# import the necessary packagesfrom scipy.spatial import distance as distfrom imutils import perspectivefrom imutils import contoursimport numpy as npimport argparseimport imutilsimport cv2def midpoint(ptA, ptB):return ((ptA[0] + ptB[0]) * 0.5, (ptA[1] + ptB[1]) * 0.5)# construct the argument parse and parse the argumentsap = argparse.ArgumentParser()ap.add_argument("-i", "--image", required=True, help="path to the input image")ap.add_argument("-w", "--width", type=float, required=True, help="width of the left-most object in the image (in inches)")args = vars(ap.parse_args())# load the image, convert it to grayscale, and blur it slightlyimage = cv2.imread(args["image"])gray = cv2.cvtColor(image, cv2.COLOR_BGR2GRAY)gray = cv2.GaussianBlur(gray, (7, 7), 0)# perform edge detection, then perform a dilation + erosion to# close gaps in between object edgesedged = cv2.Canny(gray, 50, 100)edged = cv2.dilate(edged, None, iterations=1)edged = cv2.erode(edged, None, iterations=1)# find contours in the edge mapcnts = cv2.findContours(edged.copy(), cv2.RETR_EXTERNAL, cv2.CHAIN_APPROX_SIMPLE)cnts = imutils.grab_contours(cnts)# sort the contours from left-to-right and initialize the# 'pixels per metric' calibration variable(cnts, _) = contours.sort_contours(cnts)pixelsPerMetric = None# loop over the contours individuallyfor c in cnts:# if the contour is not sufficiently large, ignore itif cv2.contourArea(c) < 100:continue# compute the rotated bounding box of the contourorig = image.copy()box = cv2.minAreaRect(c)box = cv2.cv.BoxPoints(box) if imutils.is_cv2() else cv2.boxPoints(box)box = np.array(box, dtype="int")# order the points in the contour such that they appear# in top-left, top-right, bottom-right, and bottom-left# order, then draw the outline of the rotated bounding# boxbox = perspective.order_points(box)cv2.drawContours(orig, [box.astype("int")], -1, (0, 255, 0), 2)# loop over the original points and draw themfor (x, y) in box:cv2.circle(orig, (int(x), int(y)), 5, (0, 0, 255), -1)# unpack the ordered bounding box, then compute the midpoint# between the top-left and top-right coordinates, followed by# the midpoint between bottom-left and bottom-right coordinates(tl, tr, br, bl) = box(tltrX, tltrY) = midpoint(tl, tr)(blbrX, blbrY) = midpoint(bl, br)# compute the midpoint between the top-left and top-right points,# followed by the midpoint between the top-righ and bottom-right(tlblX, tlblY) = midpoint(tl, bl)(trbrX, trbrY) = midpoint(tr, br)# draw the midpoints on the imagecv2.circle(orig, (int(tltrX), int(tltrY)), 5, (255, 0, 0), -1)cv2.circle(orig, (int(blbrX), int(blbrY)), 5, (255, 0, 0), -1)cv2.circle(orig, (int(tlblX), int(tlblY)), 5, (255, 0, 0), -1)cv2.circle(orig, (int(trbrX), int(trbrY)), 5, (255, 0, 0), -1)# draw lines between the midpointscv2.line(orig, (int(tltrX), int(tltrY)), (int(blbrX), int(blbrY)), (255, 0, 255), 2)cv2.line(orig, (int(tlblX), int(tlblY)), (int(trbrX), int(trbrY)), (255, 0, 255), 2)# compute the Euclidean distance between the midpointsdA = dist.euclidean((tltrX, tltrY), (blbrX, blbrY))dB = dist.euclidean((tlblX, tlblY), (trbrX, trbrY))# if the pixels per metric has not been initialized, then# compute it as the ratio of pixels to supplied metric# (in this case, inches)if pixelsPerMetric is None:pixelsPerMetric = dB / args["width"]# compute the size of the objectdimA = dA / pixelsPerMetricdimB = dB / pixelsPerMetric# draw the object sizes on the imagecv2.putText(orig, "{:.1f}in".format(dimA), (int(tltrX - 15), int(tltrY - 10)), cv2.FONT_HERSHEY_SIMPLEX, 0.65, (255, 255, 255), 2)cv2.putText(orig, "{:.1f}in".format(dimB), (int(trbrX + 10), int(trbrY)), cv2.FONT_HERSHEY_SIMPLEX, 0.65, (255, 255, 255), 2)# show the output imagecv2.imshow("Image", orig)cv2.waitKey(0)
Facial Landmarks
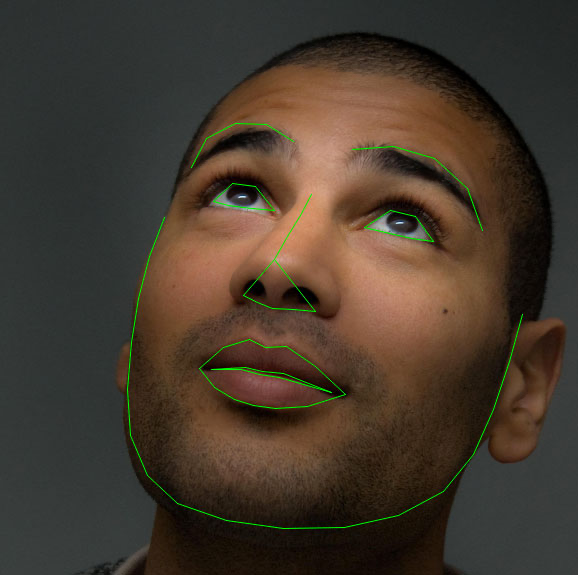
The pre-trained facial landmark detector inside the dlib library is used to estimate the location of 68 (x, y)-coordinates that map to facial structures on the face.
The indexes of the 68 coordinates can be visualized on the image below:
#!/usr/bin/env python# encoding: utf-8# import the necessary packagesfrom imutils import face_utilsimport numpy as npimport argparseimport imutilsimport dlibimport cv2# construct the argument parser and parse the argumentsap = argparse.ArgumentParser()ap.add_argument("-p", "--shape-predictor", required=True, help="path to facial landmark predictor")ap.add_argument("-i", "--image", required=True, help="path to input image")args = vars(ap.parse_args())# initialize dlib's face detector (HOG-based) and then create# the facial landmark predictordetector = dlib.get_frontal_face_detector()predictor = dlib.shape_predictor(args["shape_predictor"])# load the input image, resize it, and convert it to grayscaleimage = cv2.imread(args["image"])image = imutils.resize(image, width=500)gray = cv2.cvtColor(image, cv2.COLOR_BGR2GRAY)# detect faces in the grayscale imagerects = detector(gray, 1)# loop over the face detectionsfor (i, rect) in enumerate(rects):# determine the facial landmarks for the face region, then# convert the facial landmark (x, y)-coordinates to a NumPy# arrayshape = predictor(gray, rect)shape = face_utils.shape_to_np(shape)# convert dlib's rectangle to a OpenCV-style bounding box# [i.e., (x, y, w, h)], then draw the face bounding box(x, y, w, h) = face_utils.rect_to_bb(rect)cv2.rectangle(image, (x, y), (x + w, y + h), (0, 255, 0), 2)# show the face numbercv2.putText(image, "Face #{}".format(i + 1), (x - 10, y - 10),cv2.FONT_HERSHEY_SIMPLEX, 0.5, (0, 255, 0), 2)# loop over the (x, y)-coordinates for the facial landmarks# and draw them on the imagefor (x, y) in shape:cv2.circle(image, (x, y), 1, (0, 0, 255), -1)# show the output image with the face detections + facial landmarkscv2.imshow("Output", image)cv2.waitKey(0)
Dlib
Eye Blink
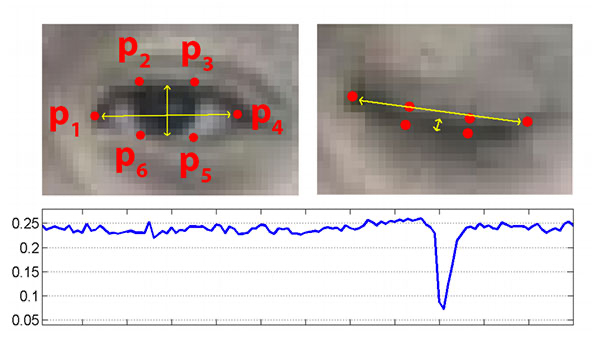

Due to noise in a video stream, subpar facial landmark detections, or fast changes in viewing angle, a simple threshold on the eye aspect ratio could produce a false-positive detection, reporting that a blink had taken place when in reality the person had not blinked.
To make the blink detector more robust to these challenges, it is recommend:
- Computing the eye aspect ratio for the N-th frame, along with the eye aspect ratios for N – 6 and N + 6 frames, then concatenating these eye aspect ratios to form a 13 dimensional feature vector.
- Training a Support Vector Machine (SVM) on these feature vectors.
Drowsiness
#!/usr/bin/env python# encoding: utf-8# import the necessary packagesfrom scipy.spatial import distance as distfrom imutils.video import VideoStreamfrom imutils import face_utilsfrom threading import Threadimport numpy as npimport playsoundimport argparseimport imutilsimport timeimport dlibimport cv2import osfrom urllib.parse import quotedef sound_alarm(fname):# play an alarm soundcwd = os.getcwd()path = os.path.join(cwd, fname)playsound.playsound(quote(path))def eye_aspect_ratio(eye):# compute the euclidean distances between the two sets of# vertical eye landmarks (x, y)-coordinatesA = dist.euclidean(eye[1], eye[5])B = dist.euclidean(eye[2], eye[4])# compute the euclidean distance between the horizontal# eye landmark (x, y)-coordinatesC = dist.euclidean(eye[0], eye[3])# compute the eye aspect ratioear = (A + B) / (2.0 * C)# return the eye aspect ratioreturn ear# construct the argument parse and parse the argumentsap = argparse.ArgumentParser()ap.add_argument("-p", "--shape-predictor", default='../facial_landmarks/shape_predictor_68_face_landmarks.dat', required=False, help="path to facial landmark predictor")ap.add_argument("-a", "--alarm", type=str, default="alarm.mp3", help="path alarm .WAV file")ap.add_argument("-w", "--webcam", type=int, default=0, help="index of webcam on system")args = vars(ap.parse_args())# define two constants, one for the eye aspect ratio to indicate blink# and then a second constant for the number of consecutive frames# the eye must be below the threshold for to set off the alarmEYE_AR_THRESH = 0.18EYE_AR_CONSEC_FRAMES = 48# initialize the frame counter as well as a boolean used to# indicate if the alarm is going offCOUNTER = 0ALARM_ON = False# initialize dlib's face detector (HOG-based) and then create# the facial landmark predictorprint("[INFO] loading facial landmark predictor...")detector = dlib.get_frontal_face_detector()predictor = dlib.shape_predictor(args["shape_predictor"])# grab the indexes of the facial landmarks for the left# and right eye, respectively(lStart, lEnd) = face_utils.FACIAL_LANDMARKS_IDXS["left_eye"](rStart, rEnd) = face_utils.FACIAL_LANDMARKS_IDXS["right_eye"]# start the video stream threadprint("[INFO] starting video stream thread...")vs = VideoStream(src=args["webcam"]).start()time.sleep(1.0)# loop over frames from the video streamwhile True:# grab the frame from the threaded video file stream,# resize it, and convert it to grayscale channels)frame = vs.read()frame = imutils.resize(frame, width=450)gray = cv2.cvtColor(frame, cv2.COLOR_BGR2GRAY)# detect faces in the grayscale framerects = detector(gray, 0)# loop over the face detectionsfor rect in rects:# determine the facial landmarks for the face region,# then convert the facial landmark (x, y)-coordinates to# a NumPy arrayshape = predictor(gray, rect)shape = face_utils.shape_to_np(shape)# extract the left and right eye coordinates, then use the# coordinates to compute the eye aspect ratio for both eyesleftEye = shape[lStart:lEnd]rightEye = shape[rStart:rEnd]leftEAR = eye_aspect_ratio(leftEye)rightEAR = eye_aspect_ratio(rightEye)# average the eye aspect ratio together for both eyesear = (leftEAR + rightEAR) / 2.0# compute the convex hull for the left and right eye,# then visualize each of the eyesleftEyeHull = cv2.convexHull(leftEye)rightEyeHull = cv2.convexHull(rightEye)cv2.drawContours(frame, [leftEyeHull], -1, (0, 255, 0), 1)cv2.drawContours(frame, [rightEyeHull], -1, (0, 255, 0), 1)# check to see if the eye aspect ratio is below the blink# threshold, and if so, increment the blink frame counterif ear < EYE_AR_THRESH:COUNTER += 1# if the eyes were closed for a sufficient number of frames# then sound the alarmif COUNTER >= EYE_AR_CONSEC_FRAMES:# if the alarm is not on, turn it onif not ALARM_ON:ALARM_ON = True# check to see if an alarm file was supplied,# and if so, start a thread to have the alarm# sound played in the backgroundif args["alarm"] != "":t = Thread(target=sound_alarm, args=(args["alarm"],))t.deamon = Truet.start()# draw an alarm on the framecv2.putText(frame, "DROWSINESS ALERT!", (10, 30), cv2.FONT_HERSHEY_SIMPLEX, 0.7, (0, 0, 255), 2)# otherwise, the eye aspect ratio is not below the blink# threshold, so reset the counter and alarmelse:COUNTER = 0ALARM_ON = False# draw the computed eye aspect ratio on the frame to help# with debugging and setting the correct eye aspect ratio# thresholds and frame counterscv2.putText(frame, "EAR: {:.2f}".format(ear), (300, 30), cv2.FONT_HERSHEY_SIMPLEX, 0.7, (0, 0, 255), 2)# show the framecv2.imshow("Frame", frame)key = cv2.waitKey(1) & 0xFF# if the `q` key was pressed, break from the loopif key == ord("q"):break# do a bit of cleanupcv2.destroyAllWindows()vs.stop()
Neural Network
the feedforward network: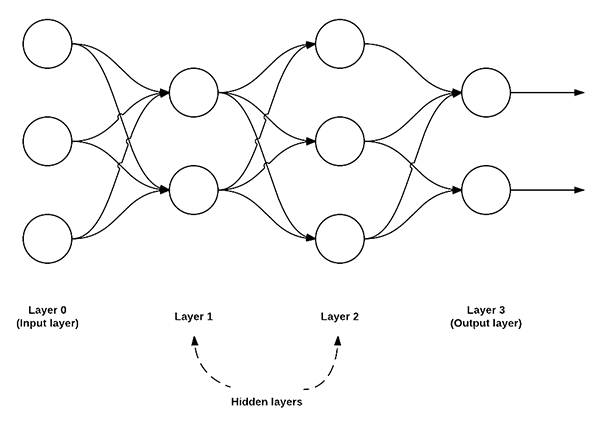
#!/usr/bin/env python# encoding: utf-8# import the necessary packagesfrom sklearn.preprocessing import LabelEncoderfrom sklearn.model_selection import train_test_splitfrom keras.models import Sequentialfrom keras.layers import Activationfrom keras.optimizers import SGDfrom keras.layers import Densefrom keras.utils import np_utilsfrom imutils import pathsimport numpy as npimport argparseimport cv2import osdef image_to_feature_vector(image, size=(32, 32)):# resize the image to a fixed size, then flatten the image into# a list of raw pixel intensitiesreturn cv2.resize(image, size).flatten()# construct the argument parse and parse the argumentsap = argparse.ArgumentParser()ap.add_argument("-d", "--dataset", default='/Users/jfdi/Downloads/dogs-vs-cats/train', help="path to input dataset")ap.add_argument("-m", "--model", default='neural_network.hdf5', help="path to output model file")args = vars(ap.parse_args())# grab the list of images that we'll be describingprint("[INFO] describing images...")imagePaths = list(paths.list_images(args["dataset"]))# initialize the data matrix and labels listdata = []labels = []# loop over the input imagesfor (i, imagePath) in enumerate(imagePaths, 1):# load the image and extract the class label (assuming that our# path as the format: /path/to/dataset/{class}.{image_num}.jpgimage = cv2.imread(imagePath)label = imagePath.split(os.path.sep)[-1].split(".")[0]# construct a feature vector raw pixel intensities, then update# the data matrix and labels listfeatures = image_to_feature_vector(image)data.append(features)labels.append(label)# show an update every 1,000 imagesif i > 0 and i % 1000 == 0:print("[INFO] processed {}/{}".format(i, len(imagePaths)))# encode the labels, converting them from strings to integersle = LabelEncoder()labels = le.fit_transform(labels)# scale the input image pixels to the range [0, 1], then transform# the labels into vectors in the range [0, num_classes] -- this# generates a vector for each label where the index of the label# is set to `1` and all other entries to `0`data = np.array(data) / 255.0labels = np_utils.to_categorical(labels, 2)# partition the data into training and testing splits, using 75%# of the data for training and the remaining 25% for testingprint("[INFO] constructing training/testing split...")(trainData, testData, trainLabels, testLabels) = train_test_split(data, labels, test_size=0.25, random_state=42)# define the architecture of the networkmodel = Sequential()model.add(Dense(768, input_dim=3072, kernel_initializer="uniform", activation="relu"))model.add(Dense(384, activation="relu", kernel_initializer="uniform"))model.add(Dense(2))model.add(Activation("softmax"))# train the model using SGDprint("[INFO] compiling model...")sgd = SGD(lr=0.01)model.compile(loss="binary_crossentropy", optimizer=sgd, metrics=["accuracy"])model.fit(trainData, trainLabels, epochs=50, batch_size=128, verbose=1)# show the accuracy on the testing setprint("[INFO] evaluating on testing set...")(loss, accuracy) = model.evaluate(testData, testLabels, batch_size=128, verbose=1)print("[INFO] loss={:.4f}, accuracy: {:.4f}%".format(loss, accuracy * 100))# dump the network architecture and weights to fileprint("[INFO] dumping architecture and weights to file...")model.save(args["model"])
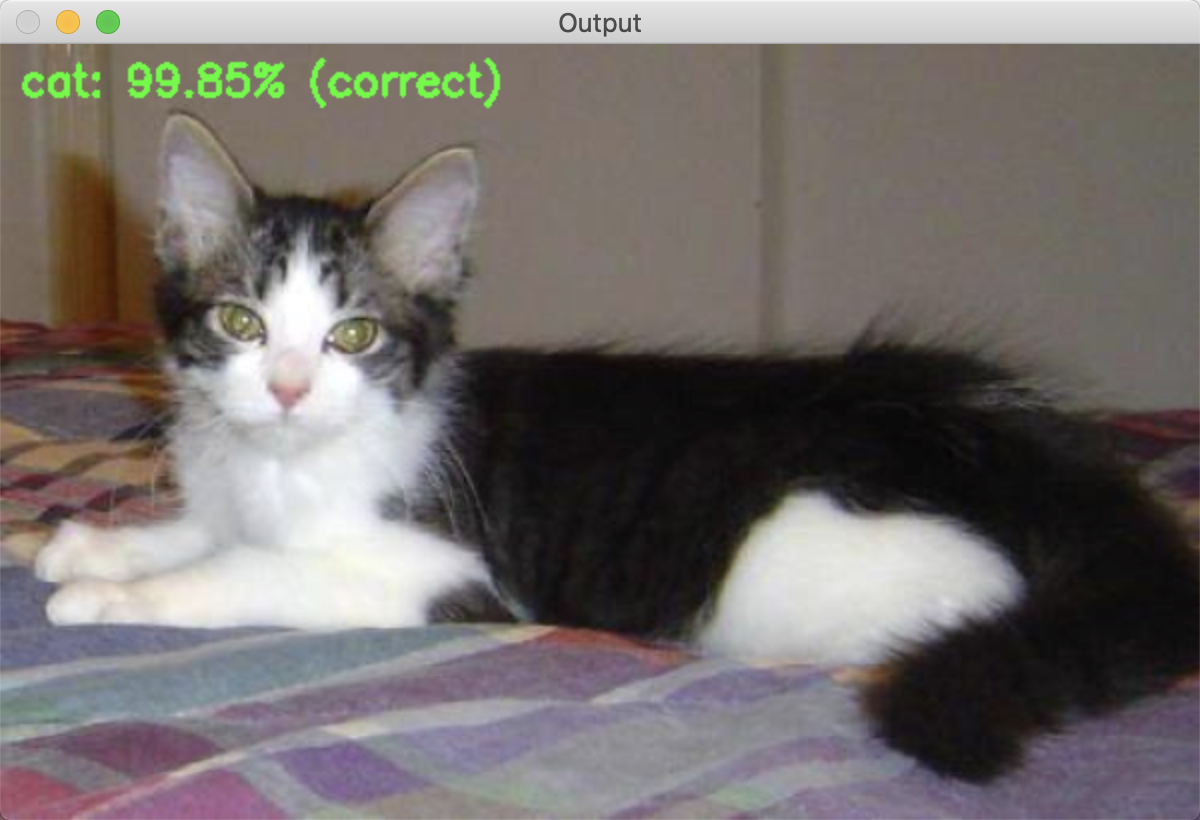
Deep Learning
- Load a model from disk.
- Pre-process an input image.
- Pass the image through the network and obtain the output classifications.
```python
load images
cv2.dnn.blobFromImage cv2.dnn.blobFromImages
import models from various frameworks
cv2.dnn.createCaffeImporter cv2.dnn.createTensorFlowImporter cv2.dnn.createTorchImporter
load a serialized model from disk directly
cv2.dnn.readNetFromCaffe cv2.dnn.readNetFromTensorFlow cv2.dnn.readNetFromTorch cv2.dnn.readhTorchBlob
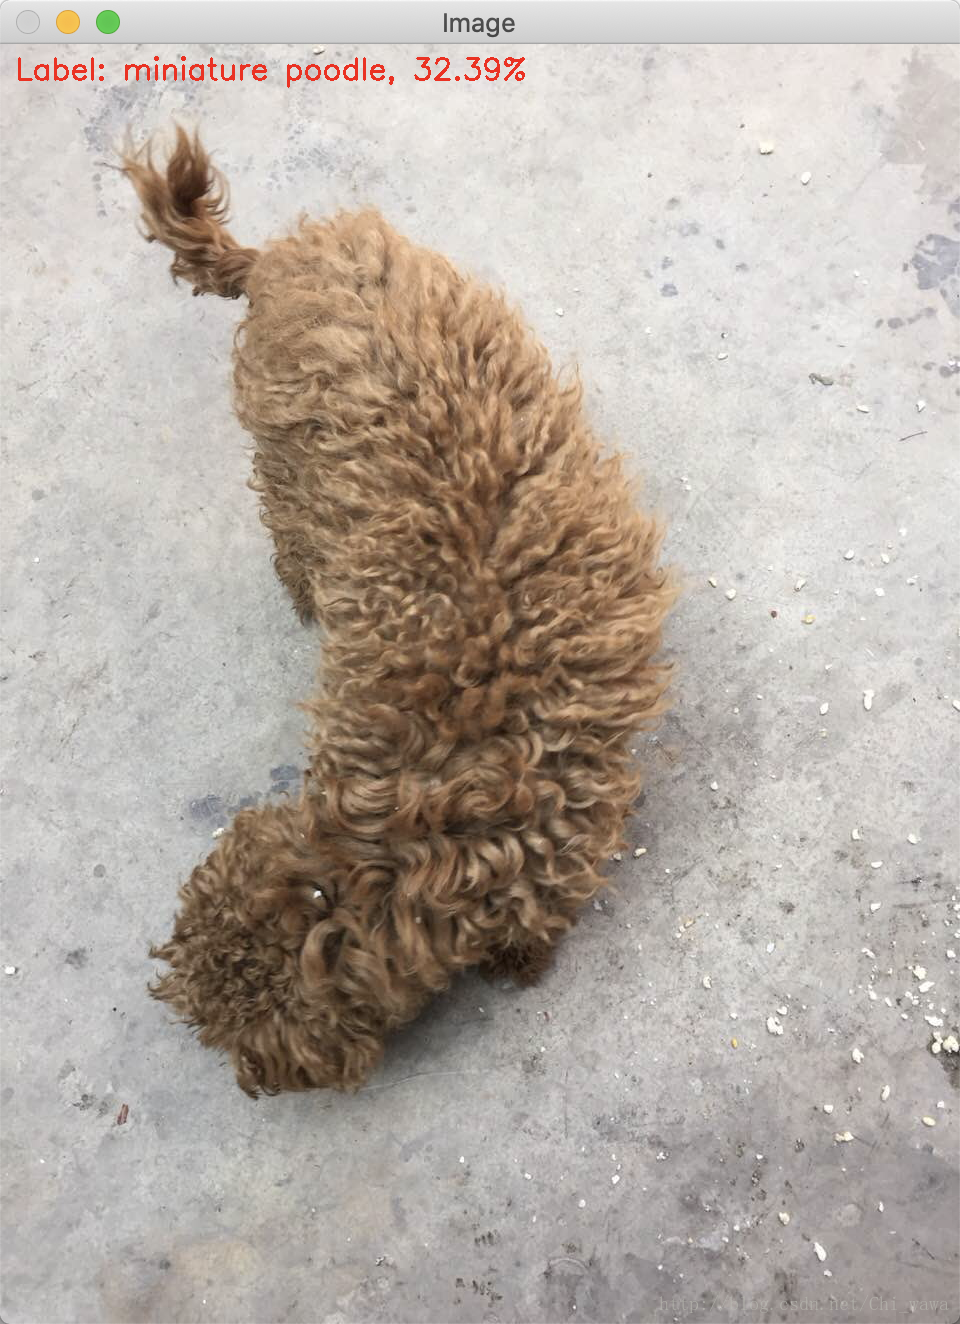```python#!/usr/bin/env python# encoding: utf-8# import the necessary packagesimport numpy as npimport argparseimport timeimport cv2def cv2waitKeyQ():while True:if (cv2.waitKey(0) & 0xFF) == ord('q'):breakpasscv2.destroyAllWindows()pass# construct the argument parse and parse the argumentsap = argparse.ArgumentParser()ap.add_argument("-i", "--image", default='test.png', help="path to input image")ap.add_argument("-p", "--prototxt", default='bvlc_googlenet.prototxt', help="path to Caffe 'deploy' prototxt file")ap.add_argument("-m", "--model", default='bvlc_googlenet.caffemodel', help="path to Caffe pre-trained model")ap.add_argument("-l", "--labels", default='synset_words.txt', help="path to ImageNet labels (i.e., syn-sets)")args = vars(ap.parse_args())# load the input image from diskimage = cv2.imread(args["image"])# load the class labels from diskrows = open(args["labels"]).read().strip().split("\n")classes = [r[r.find(" ") + 1:].split(",")[0] for r in rows]# our CNN requires fixed spatial dimensions for our input image(s)# so we need to ensure it is resized to 224x224 pixels while# performing mean subtraction (104, 117, 123) to normalize the input;# after executing this command our "blob" now has the shape:# (1, 3, 224, 224)blob = cv2.dnn.blobFromImage(image, 1, (224, 224), (104, 117, 123))# load our serialized model from diskprint("[INFO] loading model...")net = cv2.dnn.readNetFromCaffe(args["prototxt"], args["model"])# set the blob as input to the network and perform a forward-pass to# obtain our output classificationnet.setInput(blob)start = time.time()preds = net.forward()end = time.time()print("[INFO] classification took {:.5} seconds".format(end - start))# sort the indexes of the probabilities in descending order (higher# probabilitiy first) and grab the top-5 predictionsidxs = np.argsort(preds[0])[::-1][:5]# loop over the top-5 predictions and display themfor (i, idx) in enumerate(idxs):# draw the top prediction on the input imageif i == 0:text = "Label: {}, {:.2f}%".format(classes[idx], preds[0][idx] * 100)cv2.putText(image, text, (15, 35), cv2.FONT_HERSHEY_SIMPLEX, 1., (0, 0, 255), 2)# display the predicted label + associated probability# to the consoleprint("[INFO] {}. label: {}, probability: {:.5}".format(i + 1, classes[idx], preds[0][idx]))# display the output imagecv2.imshow("Image", image)cv2waitKeyQ()
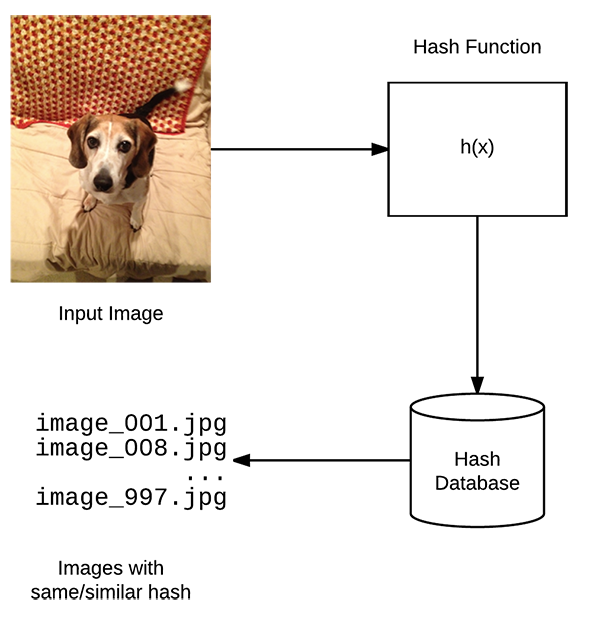
Image Hashing

#!/usr/bin/env python# encoding: utf-8# import the necessary packagesfrom imutils import pathsimport argparseimport timeimport sysimport cv2import osdef dhash(image, hashSize=8):if image is None:return Noneimage = cv2.cvtColor(image, cv2.COLOR_BGR2GRAY)# resize the input image, adding a single column (width) so we# can compute the horizontal gradientresized = cv2.resize(image, (hashSize + 1, hashSize))# compute the (relative) horizontal gradient between adjacent column pixelsdiff = resized[:, 1:] > resized[:, :-1]print(''.join([str(int(x)) for x in diff.flatten()]))# convert the difference image to a hashreturn sum([2 ** i for (i, v) in enumerate(diff.flatten()) if v])ap = argparse.ArgumentParser()ap.add_argument("-i", "--image", default='test.png', help="image to do difference hashing")args = vars(ap.parse_args())image = cv2.imread(args['image'])dhash = dhash(image)print(dhash)text = str(dhash)cv2.putText(image, text, (15, 35), cv2.FONT_HERSHEY_SIMPLEX, 1., (0, 0, 255), 2)cv2.imshow('image', image)cv2.waitKey()cv2.destroyAllWindows()
CNNs
VGGNet-like architectures are characterized by:
- Using only 3×3 convolutional layers stacked on top of each other in increasing depth
- Reducing volume size by max pooling
- Fully-connected layers at the end of the network prior to a softmax classifier
#!/usr/bin/env python# encoding: utf-8# set the matplotlib backend so figures can be saved in the backgroundimport matplotlibmatplotlib.use("Agg")# import the necessary packagesfrom tensorflow.keras.preprocessing.image import ImageDataGeneratorfrom tensorflow.keras.optimizers import Adamfrom tensorflow.keras.preprocessing.image import img_to_arrayfrom sklearn.preprocessing import LabelBinarizerfrom sklearn.model_selection import train_test_splitfrom smallervggnet import SmallerVGGNetimport matplotlib.pyplot as pltfrom imutils import pathsimport numpy as npimport argparseimport randomimport pickleimport cv2import osfrom tensorflow.python.client import device_libdef device_vailable_gpus():local_device_protos = device_lib.list_local_devices()print(local_device_protos)return [x.name for x in local_device_protos if x.device_type == 'GPU']print(device_vailable_gpus())# construct the argument parse and parse the argumentsap = argparse.ArgumentParser()ap.add_argument("-d", "--dataset", default='/Users/jfdi/Downloads/dogs-vs-cats/train', help="path to input dataset (i.e., directory of images)")ap.add_argument("-m", "--model", default='catsdogs.model', help="path to output model")ap.add_argument("-l", "--labelbin", default='lb.pickle', help="path to output label binarizer")ap.add_argument("-p", "--plot", type=str, default="plot.png", help="path to output accuracy/loss plot")args = vars(ap.parse_args())# initialize the number of epochs to train for, initial learning rate,# batch size, and image dimensionsEPOCHS = 100INIT_LR = 1e-3BS = 32IMAGE_DIMS = (96, 96, 3)# initialize the data and labelsdata = []labels = []# grab the image paths and randomly shuffle themprint("[INFO] loading images...")imagePaths = sorted(list(paths.list_images(args["dataset"])))random.seed(42)random.shuffle(imagePaths)imagePaths = imagePaths[:1000]# loop over the input imagesfor (i, imagePath) in enumerate(imagePaths, 1):# load the image, pre-process it, and store it in the data listimage = cv2.imread(imagePath)image = cv2.resize(image, (IMAGE_DIMS[1], IMAGE_DIMS[0]))image = img_to_array(image)data.append(image)# extract the class label from the image path and update the# labels list#label = imagePath.split(os.path.sep)[-2]label = (imagePath.split(os.path.sep)[-1]).split('.')[0]#label = label*2 if random.randint(1, 10) > 5 else labellabels.append(label)# show an update every 1,000 imagesif i > 0 and i % 100 == 0:print("[INFO] processed {}/{}".format(i, len(imagePaths)))# scale the raw pixel intensities to the range [0, 1]data = np.array(data, dtype="float") / 255.0labels = np.array(labels)print("[INFO] data matrix: {:.2f}MB".format(data.nbytes / (1024 * 1000.0)))# binarize the labelslb = LabelBinarizer()labels = lb.fit_transform(labels)print(lb.classes_)# partition the data into training and testing splits using 80% of# the data for training and the remaining 20% for testing(trainX, testX, trainY, testY) = train_test_split(data, labels, test_size=0.2, random_state=42)# construct the image generator for data augmentationaug = ImageDataGenerator(rotation_range=25, width_shift_range=0.1, height_shift_range=0.1, shear_range=0.2, zoom_range=0.2, horizontal_flip=True, fill_mode="nearest")# initialize the modelprint("[INFO] compiling model...")model = SmallerVGGNet.build(width=IMAGE_DIMS[1], height=IMAGE_DIMS[0], depth=IMAGE_DIMS[2], classes=len(lb.classes_))opt = Adam(lr=INIT_LR, decay=INIT_LR / EPOCHS)model.compile(loss="SparseCategoricalCrossentropy", optimizer=opt, metrics=["accuracy"])# binary_crossentropy, categorical_crossentropy# train the networkprint("[INFO] training network...")H = model.fit(x=aug.flow(trainX, trainY, batch_size=BS), validation_data=(testX, testY), steps_per_epoch=len(trainX) // BS, epochs=EPOCHS, verbose=1)# save the model to diskprint("[INFO] serializing network...")model.save(args["model"], save_format="h5")# save the label binarizer to diskprint("[INFO] serializing label binarizer...")f = open(args["labelbin"], "wb")f.write(pickle.dumps(lb))f.close()# plot the training loss and accuracyplt.style.use("ggplot")plt.figure()N = EPOCHSplt.plot(np.arange(0, N), H.history["loss"], label="train_loss")plt.plot(np.arange(0, N), H.history["val_loss"], label="val_loss")plt.plot(np.arange(0, N), H.history["accuracy"], label="train_acc")plt.plot(np.arange(0, N), H.history["val_accuracy"], label="val_acc")plt.title("Training Loss and Accuracy")plt.xlabel("Epoch #")plt.ylabel("Loss/Accuracy")plt.legend(loc="upper left")plt.savefig(args["plot"])
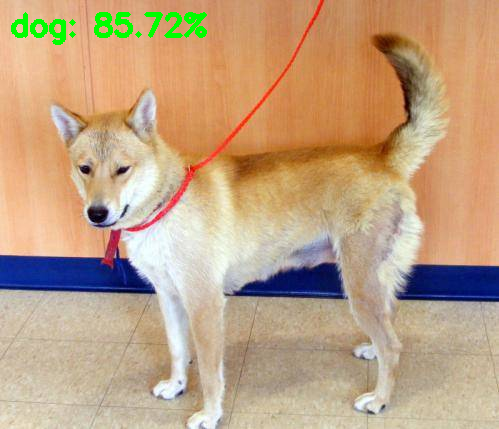
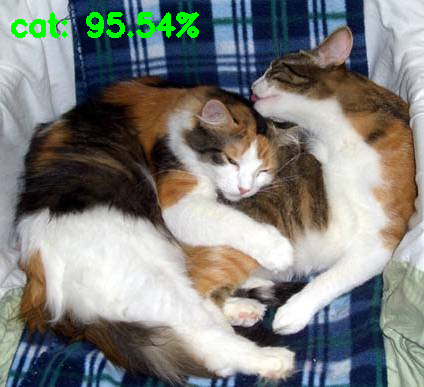
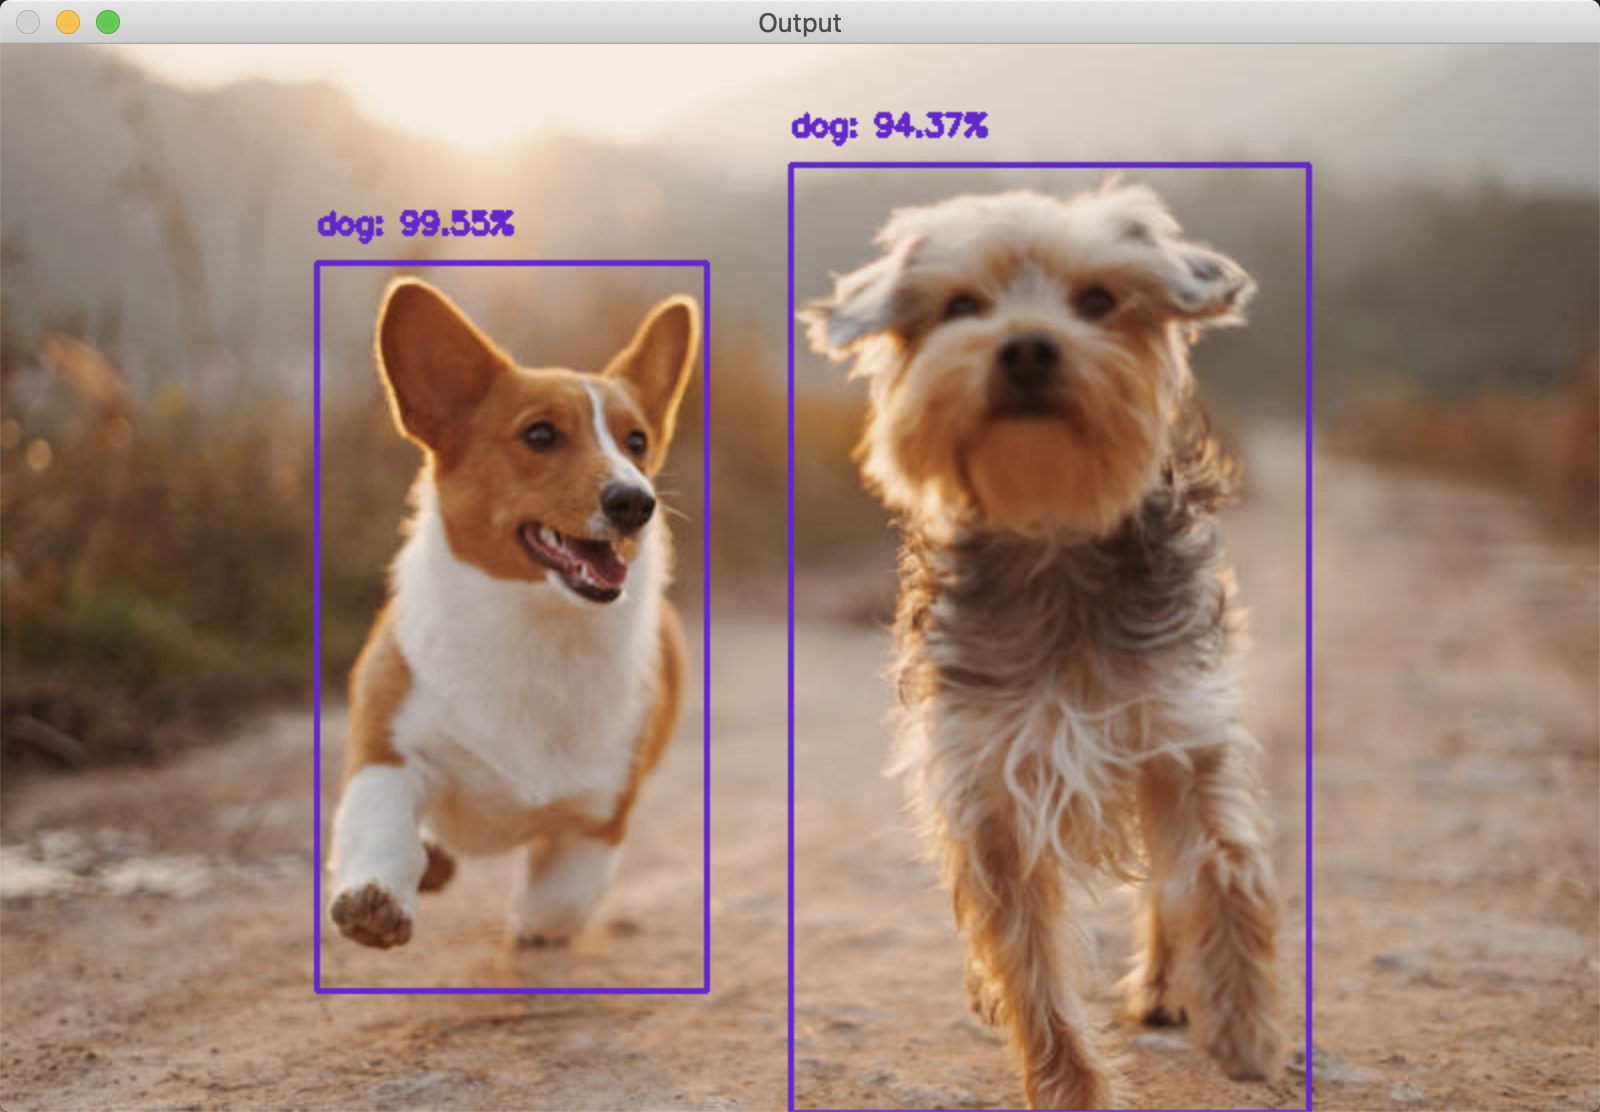
Object Detection
#!/usr/bin/env python# encoding: utf-8# import the necessary packagesfrom imutils.video import VideoStreamfrom imutils.video import FPSimport numpy as npimport argparseimport imutilsimport timeimport cv2# construct the argument parse and parse the argumentsap = argparse.ArgumentParser()ap.add_argument("-p", "--prototxt", default='MobileNetSSD_deploy.prototxt', help="path to Caffe 'deploy' prototxt file")ap.add_argument("-m", "--model", default='MobileNetSSD_deploy.caffemodel', help="path to Caffe pre-trained model")ap.add_argument("-c", "--confidence", type=float, default=0.2, help="minimum probability to filter weak detections")args = vars(ap.parse_args())# initialize the list of class labels MobileNet SSD was trained to# detect, then generate a set of bounding box colors for each classCLASSES = ["background", "aeroplane", "bicycle", "bird", "boat", "bottle", "bus", "car", "cat", "chair", "cow", "diningtable", "dog", "horse", "motorbike", "person", "pottedplant", "sheep", "sofa", "train", "tvmonitor"]COLORS = np.random.uniform(0, 255, size=(len(CLASSES), 3))# load our serialized model from diskprint("[INFO] loading model...")net = cv2.dnn.readNetFromCaffe(args["prototxt"], args["model"])# initialize the video stream, allow the cammera sensor to warmup,# and initialize the FPS counterprint("[INFO] starting video stream...")vs = VideoStream(src=0).start()time.sleep(2.0)fps = FPS().start()# loop over the frames from the video streamwhile True:# grab the frame from the threaded video stream# and resize it to have a maximum width of 400 pixelsframe = vs.read()frame = imutils.resize(frame, width=800)# grab the frame dimensions and convert it to a blob(h, w) = frame.shape[:2]blob = cv2.dnn.blobFromImage(cv2.resize(frame, (300, 300)), 0.007843, (300, 300), 127.5)# pass the blob through the network and obtain the detections# and predictionsnet.setInput(blob)detections = net.forward()# loop over the detectionsfor i in np.arange(0, detections.shape[2]):# extract the confidence (i.e., probability) associated with# the predictionconfidence = detections[0, 0, i, 2]# filter out weak detections by ensuring the `confidence` is# greater than the minimum confidenceif confidence > args["confidence"]:# extract the index of the class label from the# `detections`, then compute the (x, y)-coordinates of# the bounding box for the objectidx = int(detections[0, 0, i, 1])box = detections[0, 0, i, 3:7] * np.array([w, h, w, h])(startX, startY, endX, endY) = box.astype("int")# draw the prediction on the framelabel = "{}: {:.2f}%".format(CLASSES[idx], confidence * 100)cv2.rectangle(frame, (startX, startY), (endX, endY), COLORS[idx], 2)y = startY - 15 if startY - 15 > 15 else startY + 15cv2.putText(frame, label, (startX, y), cv2.FONT_HERSHEY_SIMPLEX, 0.5, COLORS[idx], 2)# show the output framecv2.imshow("Frame", frame)key = cv2.waitKey(1) & 0xFF# if the `q` key was pressed, break from the loopif key == ord("q"):break# update the FPS counterfps.update()# stop the timer and display FPS informationfps.stop()print("[INFO] elapsed time: {:.2f}".format(fps.elapsed()))print("[INFO] approx. FPS: {:.2f}".format(fps.fps()))# do a bit of cleanupcv2.destroyAllWindows()vs.stop()

若有收获,就点个赞吧
0 人点赞
