最终效果
索引点击回调
经过上篇,我们把简单的布局已经弄好了,但是点击索引条的时候ListView的cell并不会偏移。那么此时我们这里来实现下:点击索引的时候,我们需要把当前点击的值传递给上一层friend_page页面,这里控制着所有的Widget, 那我们就在IndexBar里面新增一个回调
class IndexBar extends StatefulWidget {final void Function(String str) indexBarCallBack;IndexBar({required this.indexBarCallBack});@override_IndexBarState createState() => _IndexBarState();}
在onVerticalDragDown和onVerticalDragUpdate�的时候调用
onVerticalDragUpdate: (DragUpdateDetails details) {widget.indexBarCallBack(getIndexWord(context, details.globalPosition));},
同时,在FriendPage这个页面初始化构造IndexBar的时候传递这个indexBarCallBack
索引点击屏幕滚动
在Flutter中把当前的控制器移动一定的偏移量有一个函数
Future<void> animateTo(double offset, {required Duration duration,required Curve curve,}) async {assert(_positions.isNotEmpty, 'ScrollController not attached to any scroll views.');await Future.wait<void>(<Future<void>>[for (int i = 0; i < _positions.length; i += 1) _positions[i].animateTo(offset, duration: duration, curve: curve),]);}
所以我们需要计算出点击了侧边索引之后,主屏幕需要移动的偏移量,这个Index和对应的偏移量我们可以使用一个Map字典来保存
// 字典,里面用来存放item和高度对应final Map _groupOffsetMap = {INDEX_WORDS[0]: 0.0, // 搜索INDEX_WORDS[1]: 0.0, // 五角星 点击这两个的时候屏幕不用滚动};
之前在initState函数中计算出了排序之后的_listData,我们可以通过对这个数据源的indexLetter逐个计算,当下一个与上一个的indexLetter相同的时候,这个便宜量是一个_cellHeight的大小,当下一个与上一个的indexLetter不相同的时候,这个偏移量就是_cellheight + _cellGroupTitleHeight
@overridevoid initState() {// TODO: implement initStatesuper.initState();_viewController = ScrollController();_listData..addAll(datas)..addAll(datas);_listData.sort((Friends a, Friends b) {return a.indexLetter!.compareTo(b.indexLetter!);});// 第三个开始var _groupOffset = _cellHeight * _headerData.length;for (int i = 0; i < _listData.length; i++) {if (i < 1) {_groupOffsetMap.addAll({_listData[i].indexLetter: _groupOffset});_groupOffset += _cellGroupHeight + _cellHeight;} else if (_listData[i].indexLetter == _listData[i - 1].indexLetter) {_groupOffset += _cellHeight;} else {_groupOffsetMap.addAll({_listData[i].indexLetter: _groupOffset});_groupOffset += _cellGroupHeight + _cellHeight;}}}
这样操作了之后,这个_groupOffsetMap里面的每个字母和偏移量就一一对应好了,打印来观察下: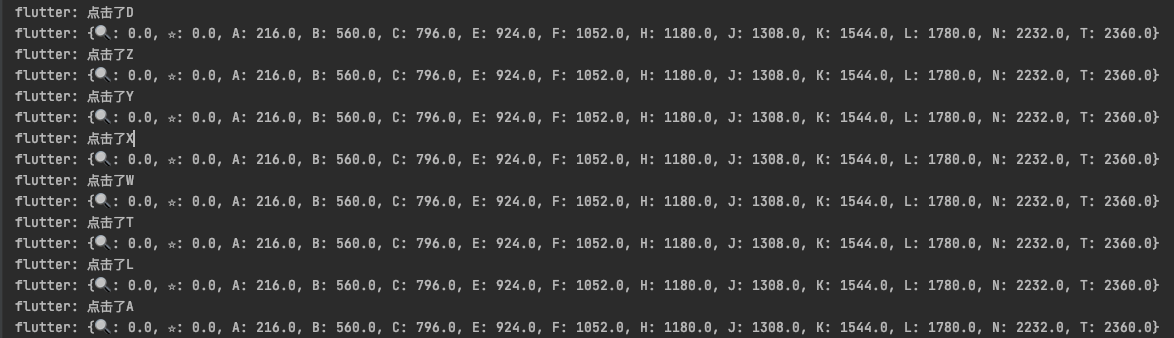
当然这里的_groupOffsetMap[indexStr]也需要判空一下,毕竟有些首字母可能没有。
IndexBar(indexBarCallBack: (String str) {print('点击了$str');print('$_groupOffsetMap');if (_groupOffsetMap[str] != null) { // 注意啦 这里有个问题_viewController!.animateTo(_groupOffsetMap[str],duration: Duration(microseconds: 100),curve: Curves.easeIn);} ;})
当我像上面那样写的时候,一直提示type 'null' is not a subtype of type 'string' of 'function result',最后查了下资料,这个Map初始化的时候默认的是!= null时就会编译报错,解决的办法是直接类型转换new Map<String, double>.from(_groupOffsetMap)
气泡浮窗
分析:这里点击到索引条的时候会出现一个气泡的图案,这个气泡可以看做是一个Image + Text构成的Stack布局, 文字可通过获取当前的index拿到,这个上篇就已经实现了。图片的话是一个固定的气泡切图,通过动态控制这个Stack的显示和隐藏来达到效果,这里唯一比较难一点的是计算这个偏移量。
我们在Positioned中新增一个Row布局,第一个child是一个Stack,第二个child就是index_bar,先在中心(0,0)固定显示A
Container(width: 100,color: Colors.red,child: Stack(// alignment: Alignment(-0.2, 0),children: [Container(child: Image.asset('images/气泡.png'),width: 60,),Container(child: Text('A',style: TextStyle(fontSize: 35, color: Colors.white)),)],),),

位置有点偏左,调整一下alignment,我这里使用的是alignment: Alignment(-0.2, 0)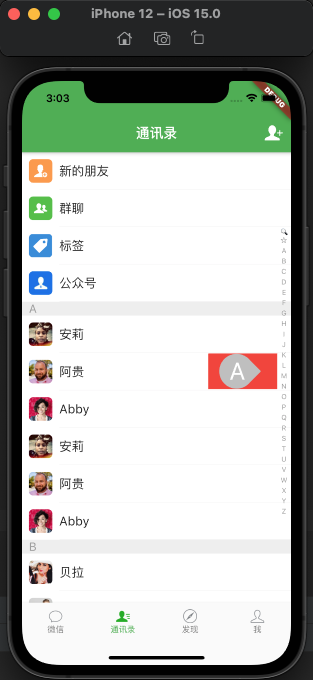
修改这个stack在Container中的alignment,移动到底部alignment: Alignment(0, 1.1)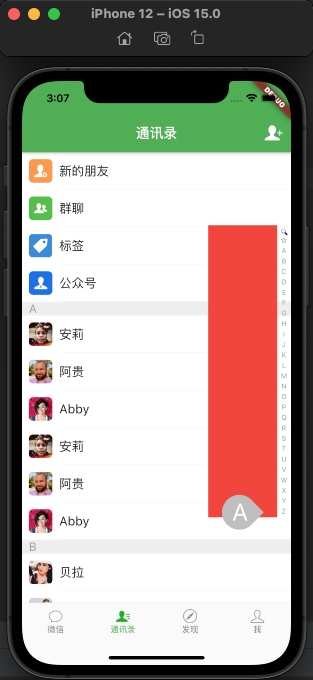
所以上下的间距是2.2,每一个index的偏移量就是 2.2/索引总个数 * 当前的index -1.1.此时三个控制变量的条件都齐全了
double _indexBarOffsetY = 0.0; // -1.1到1.1之间的偏移量 中心点的是0bool _indexBarHidden = true; // 是否隐藏String _indexBarText = 'A'; // 当前正在显示的字母
此时完整的代码是:
import 'package:flutter/material.dart';import 'const_data.dart';import 'friend_data.dart';class IndexBar extends StatefulWidget {final void Function(String str) indexBarCallBack;IndexBar({required this.indexBarCallBack});@override_IndexBarState createState() => _IndexBarState();}class _IndexBarState extends State<IndexBar> {Color _backColor = Color.fromRGBO(1, 1, 1, 0);Color _textColor = Colors.grey;double _indexBarOffsetY = 0.0; // -1.1到1.1之间的偏移量 中心点的是0bool _indexBarHidden = true; // 是否隐藏String _indexBarText = 'A'; // 当前正在显示的字母@overridevoid initState() {// TODO: implement initStatesuper.initState();}@overrideWidget build(BuildContext context) {final List<Widget> _widgetData = [];for (int i = 0; i < INDEX_WORDS.length; i++) {_widgetData.add(Expanded(child: Text(INDEX_WORDS[i],style: TextStyle(fontSize: 10, color: _textColor))));}return Positioned(right: 0,top: screenHeight(context) / 8,height: screenHeight(context) / 2,width: 120,child: Row(children: [Container(alignment: Alignment(0, -_indexBarOffsetY), // 最上面是-1.1 最下面是1.1width: 100,child: _indexBarHidden? null: Stack(alignment: Alignment(-0.2, 0),children: [Container(child: Image.asset('images/气泡.png'),width: 60,),Container(child: Text(_indexBarText,style: TextStyle(fontSize: 35, color: Colors.white),),)],),),Container(child: GestureDetector(onVerticalDragDown: (DragDownDetails details) {int index = getIndexWord(context, details.globalPosition);widget.indexBarCallBack(INDEX_WORDS[index]);setState(() {_backColor = Color.fromRGBO(1, 1, 1, 0.5);_textColor = Colors.white;_indexBarHidden = false;_indexBarOffsetY = 2.2 / INDEX_WORDS.length * index - 1.1;_indexBarText = INDEX_WORDS[index];});},onVerticalDragEnd: (DragEndDetails details) {setState(() {_backColor = Color.fromRGBO(1, 1, 1, 0);_textColor = Colors.grey;_indexBarHidden = true;});},onVerticalDragUpdate: (DragUpdateDetails details) {int index = getIndexWord(context, details.globalPosition);widget.indexBarCallBack(INDEX_WORDS[index]);setState(() {_indexBarHidden = false;_indexBarOffsetY = 2.2 / INDEX_WORDS.length * index - 1.1;_indexBarText = INDEX_WORDS[index];});},child: Container(width: 20,child: Column(children: _widgetData),color: _backColor,),),)],),);}}int getIndexWord(BuildContext context, Offset globalPosition) {RenderBox box = context.findRenderObject() as RenderBox;Offset y = box.globalToLocal(globalPosition);var itemHeight = screenHeight(context) / 2 / INDEX_WORDS.length;int index = (y.dy ~/ itemHeight).clamp(0, INDEX_WORDS.length - 1);return index;}
好了,到这里索引指示器就正式告一段落了。

若有收获,就点个赞吧
0 人点赞
