异步+多线程组合使用
上一节异步和多线程我们是分开介绍的,那么异步Future + 多线程compute搭配使用会是什么样子的呢?还是用代码执行来观察吧
void isolateFunc() {Future(() => compute(test, 1)).then((value) => print('任务1结束'));Future(() => compute(test, 1)).then((value) => print('任务2结束'));Future(() => compute(test, 1)).then((value) => print('任务3结束'));Future(() => compute(test, 1)).then((value) => print('任务4结束'));Future(() => compute(test, 1)).then((value) => print('任务5结束'));}
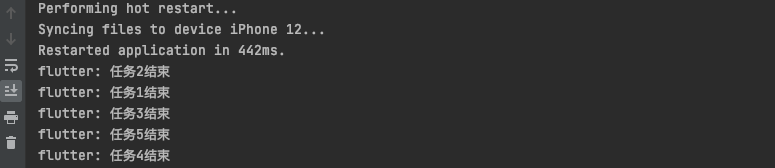
我们看到这个执行顺序并不是按照顺序的。我们换一种写法,把箭头函数写成一行执行语句
void isolateFunc() {Future(() {compute(test, 1);}).then((value) => print('任务1结束'));Future(() {compute(test, 1);}).then((value) => print('任务2结束'));Future(() {compute(test, 1);}).then((value) => print('任务3结束'));Future(() {compute(test, 1);}).then((value) => print('任务4结束'));Future(() {compute(test, 1);}).then((value) => print('任务5结束'));}
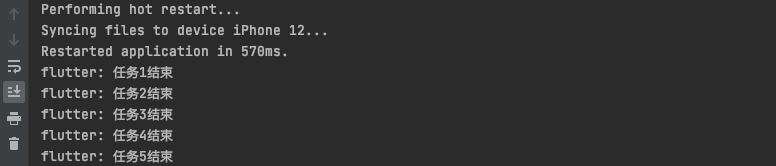
这时可以发现这个执行又是按照顺序的,那么明明是一样的代码,为什么执行的结果不同呢?真的是一样的吗,仔细一看,箭头函数实际上是包含了return的执行语句。我们在compute前面添加一个return之后再次执行会发现跟首次的结果是一样的。
我们看下compute的定义,typedef ComputeImpl = Future<R> Function<Q, R>(ComputeCallback<Q, R> callback, Q message, { String? debugLabel });可以知道compute也是一个Future,所以return compute(test, 1);之后得到的是一个子线程的Future,此时执行的then也是在子线程。如果没有return此时then执行的当前主线程的异步Future.这也就解释了上面添加return与否执行结果完全不同的原因。
那么Future内的任务执行有序嘛?
void isolateFunc() {Future(() {print('1');return compute(test, 1);}).then((value) => print('任务1结束'));Future(() {print('2');return compute(test, 1);}).then((value) => print('任务2结束'));Future(() {print('3');return compute(test, 1);}).then((value) => print('任务3结束'));}

从日志可以看出:异步的任务还是按照顺序执行,但是子线程的执行是没有顺序的。
去掉return使得.then在主线程内异步执行那么顺序又是怎么样的?
void isolateFunc() {Future(() {print('1');compute(test, 1);}).then((value) => print('任务1结束'));Future(() {print('2');compute(test, 1);}).then((value) => print('任务2结束'));Future(() {print('3');compute(test, 1);}).then((value) => print('任务3结束'));}

Timer使用
Timer默认会开启异步任务
void timer() {Timer.run(() {print('异步任务');});print('1');}

我们知道在iOS中如果没有设置Timer的模式为commonMode,那么在拖拽scrollView的时候定时器就会停止下来,那么在Flutter中是否有这样的现象呢?我们可以来测试下
来到项目中的这个页面,在下面方法中插入Timer的代码并且拖动当前的ListView
@overridevoid initState() {// TODO: implement initStatesuper.initState();int count = 0;Timer.periodic(Duration(seconds: 1), (timer) {count++;print(count);if (count > 8) {timer.cancel();}});}
我们看下控制台的打印是否会停止,结果发现并没有。说明在Flutter内部对Timer的处理还是比较友好的。
页面切换出去再回来,状态保留同时Timer也没有紊乱。此时是建立在bool get wantKeepAlive => true;的基础上,如果把这个属性改为false,切换出去再回来会重复创建Timer,此时也好解决。我们可以在页面销毁的时候销毁这个Timer就可以了。
@overridevoid dispose() {// TODO: implement disposeif (timer != null && timer.isActive) {timer.cancel();}super.dispose();}
异步+多线程使用场景
在该页面新增一个耗时操作,此时再看当前的页面会不会卡顿。
在AppBar新增一个action,在点击的时候新增一个耗时操作,点击这里的时候会发现当前的页面卡住在了这里,ListView不能拖动了。
GestureDetector(child: Container(child: Icon(Icons.ac_unit_sharp)),onTap: () {Future(() {print('开始了');for (int i = 0; i < 10000000000000; i++) {}print('结束了');});})
由此得出结论,如果是耗时操作的话,我们应该放到子线程中去处理,仅仅是放入到异步并不行。
所以我们需要改造一下:
GestureDetector(child: Container(child: Icon(Icons.ac_unit_sharp)),onTap: () {Future(() {return compute(test, 1);});})test(int message) {print('开始了');for (int i = 0; i < 100000000000; i++) {}print('结束了');}
这样把耗时操作放入到子线程中去处理,此时拖动ListView就不会卡住,同时定时器也在运行。这里直接调用compute不使用Future包装效果是一样的直接开启子线程。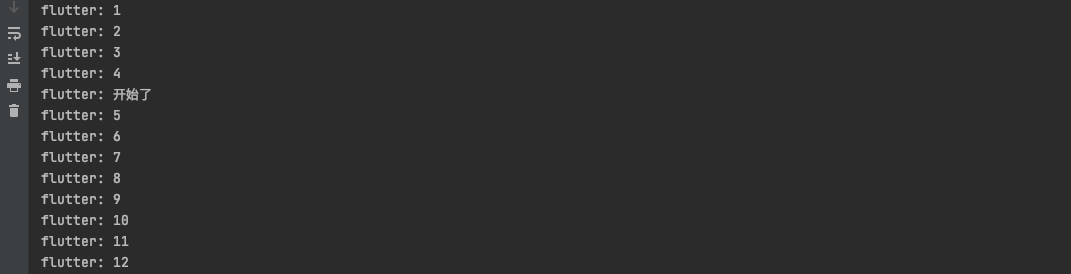
网络dio
在pub上搜索dio
复制dio: ^4.0.4到pubspec.yaml文件,运行flutter pub get安装
那么怎么使用呢?我们以下载腾讯课堂mac端为例,首先在官网上拿到dmg的地址:腾讯课堂Mac端下载地址
void dioTest() {final dio = Dio();String downloadUrl ='https://edu-files-1251502357.cos.ap-shanghai.myqcloud.com/CourseTeacher_2.8.1.13_DailyBuild.dmg';dio.download(downloadUrl, '/Users/liukun/Desktop/腾讯课堂.dmg',onReceiveProgress: onReceiveProgress);}void onReceiveProgress(int count, int total) {var progress = count.toDouble() / total.toDouble();print('count = $count, total = $total progress = $progress');}
调用download方法有一个属性是onReceiveProgress,command+enter查看对此的定义typedef ProgressCallback = void Function(int count, int total);有count和total马上就能联想到当前已经下载的数据大小和总的数据大小
通过控制台的打印输出也验证了确实是这样: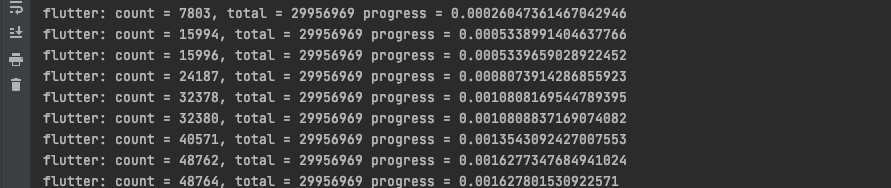
以上是存储在电脑桌面上,如果想要存储在项目中的话,可以修改savePath,通过Directory.systemTemp.path就能拿到文件的沙盒systemTemp
void dioTest() {final dio = Dio();String downloadUrl ='https://edu-files-1251502357.cos.ap-shanghai.myqcloud.com/CourseTeacher_2.8.1.13_DailyBuild.dmg';String savePath = Directory.systemTemp.path + '/腾讯课堂.dmg';dio.download(downloadUrl, savePath, onReceiveProgress: onReceiveProgress);}
dio的功能是比较强大的,它的监测手段比较丰富,可以随时观测,所以在实战的项目中更偏向于使用dio
回到项目,我们把http替换成dio,首先创建一个http_manager的网络工具类,在这里封装网络请求
import 'package:dio/dio.dart';class HttpManager {static Future<Response> get(String path) {return Dio().get(path);}}
回到首页在getData()方法中把http替换下来
改动一:首先换掉了Uri使用Url
改动二:http的response.body需要手动转换成字典map,而使用dio则自动帮我们转换了
改动三:http的数据存在response.body中,而dio的数据存在data中
Future<List<ChatModel>> getData() async {String path = 'http://rap2api.taobao.org/app/mock/293759/home/chat/list';var response = await HttpManager.get(path);if (response.statusCode == 200) {// json转换成字典// final responseBody = json.decode(response.body);return response.data['data'].map<ChatModel>((item) => ChatModel.fromMap(item)).toList();//转模型} else {throw Exception('statusCode=${response.statusCode}');}}
其实HttpManager我们可以更进一步的封装
static Future _sendRequest(String path,HttpMethod method, {data,Map<String, dynamic>? queryParameters,CancelToken? cancelToken,Options? options,ProgressCallback? onSendProgress,ProgressCallback? onReceiveProgress,}) async {try {switch (method) {case HttpMethod.GET:return await _dioInstance.get(path,queryParameters: queryParameters,options: options,cancelToken: cancelToken,onReceiveProgress: onReceiveProgress);case HttpMethod.POST:return await _dioInstance.post(path,data: data,queryParameters: queryParameters,cancelToken: cancelToken,options: options,onSendProgress: onSendProgress,onReceiveProgress: onReceiveProgress);default:throw Exception('请求方式错误');}} on DioError catch (e) {print(e.message);} on Exception catch (e) {print(e.toString());}}enum HttpMethod {GET,POST,}

若有收获,就点个赞吧
0 人点赞
