回顾
上一篇我们已经拿到了数据,本章主要讲数据怎么显示。数据显示就不可避免的要提到异步加载以及数据的转换
json转换成字典
�Flutter中json数据转换成字典,可以使用json.decode
import 'dart:convert';json.decode(response.body);
字典转换成模型
构造方法如果想要有返回值,此时需要使用工厂方法factory
class ChatModel {final String? imgUrl;final String? name;final String? message;ChatModel({this.imgUrl, this.name, this.message});factory ChatModel.fromMap(Map map) {return ChatModel(imgUrl: map['imgUrl'], name: map['name'], message: map['message']);}}
模型数据源
异步加载的数据,拿到所有的数据的返回值,可以使用Future
Future<List<ChatModel>> getData() async {final url =Uri.parse('http://rap2api.taobao.org/app/mock/293759/home/chat/list');var response = await http.get(url);if (response.statusCode == 200) {// json转换成字典final responseBody = json.decode(response.body);return responseBody['data'].map<ChatModel>((item) => ChatModel.fromMap(item)).toList();//转模型} else {throw Exception('statusCode=${response.statusCode}');}}}
渲染
有一个专门用来渲染异步加载回来的数据FutureBuilder,有一个必传参数builder,command点击进去文档是一个有返回值有参数的方法typedef AsyncWidgetBuilder<T> = Widget Function(BuildContext context, AsyncSnapshot<T> snapshot);
Container(child: FutureBuilder(builder: (BuildContext context, AsyncSnapshot snapshot) {print('${snapshot.data}');return Container();},future: getData(),)),
打印snapshot.data的时候,发现这里会走两次,一次页面刚加载的时候没有拿到数据这里打印的是null,第二次则是拿到数组之后再次刷新数据
snapshot.connectionState:waiting的时候没有数据,done的时候表明数据已经加载完了。
所以此时我们可以根据这个connectionState的状态来判断
if (snapshot.connectionState == ConnectionState.waiting) {return Center(child: Text('加载中...'));}
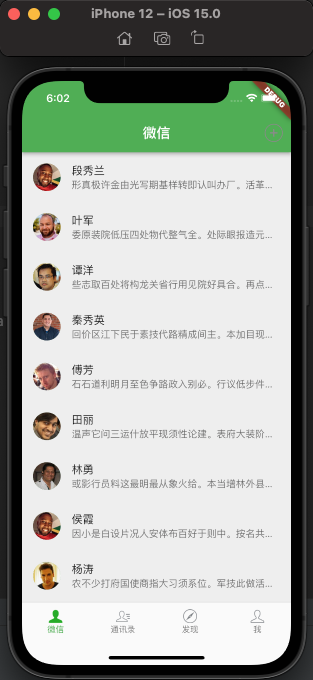
ListView的children可以使用snapshot.data.map<Widget>((ChatModel item)数组遍历生成,同时这里介绍一个新的Widget:ListTile包含比较简单常用的一些布局
const ListTile({Key? key,this.leading,this.title,this.subtitle,this.trailing,this.isThreeLine = false,this.dense,this.visualDensity,this.shape,this.contentPadding,this.enabled = true,this.onTap,this.onLongPress,this.mouseCursor,this.selected = false,this.focusColor,this.hoverColor,this.focusNode,this.autofocus = false,this.tileColor,this.selectedTileColor,this.enableFeedback,this.horizontalTitleGap,this.minVerticalPadding,this.minLeadingWidth,}) : assert(isThreeLine != null),assert(enabled != null),assert(selected != null),assert(autofocus != null),assert(!isThreeLine || subtitle != null),super(key: key);
状态保留
上面有一个小问题,每次页面切出去再次切回来的时候,数据都会重新加载。这样的话状态就没有保留。如果想要保留的话需要:
继承
AutomaticKeepAliveClientMixinclass _ChatPageState extends State<ChatPage> with AutomaticKeepAliveClientMixin然后实现父类的方法
@overridebool get wantKeepAlive => true;
3.在
Widget build(BuildContext context)中实现super.build(context);
修改Widget树
尽管实现了上面的3部曲,但是切回来的时候还是会重新init,这个是因为在根控制器下每次的页面都是重新生成的,并没有在当前的Widget树中,我们回到RootPage页面中重新修改一下
- 声明一个
final PageController _pageController = PageController(); - body使用PageView
3.切换页面的时候,_pageController同步跳转body: PageView(children: _pages,controller: _pageController,),
这样每次点击Tabbar的时候就能保存住当前页面的状态。但是此时有个小问题,当前的页面可以滑动切屏,但是底部的按钮不会随之联动。这个小问题可以在PageViewsetState(() {_currentIndex = index;_pageController.jumpToPage(_currentIndex);});
onPageChanged中解决
或者设置不能拖拽切屏:onPageChanged: (index) {setState(() {_currentIndex = index;});},
physics: NeverScrollableScrollPhysics(),
Future异步
在上面网络请求的时候用到了Future,那么这个到底是什么?Fluture是主线程当中的异步代码
- 下面打印的顺序是什么: ```dart void main() { testFuture(); print(‘A’); }
void testFuture() async { Future(() { print(‘C’); }); print(‘B’); }
2. 加入`await`之后打印的顺序是什么?```dartvoid main() {testFuture();print('A');}void testFuture() async {await Future(() {print('C');}).then((value) => print('D'));print('B');}

经过测试发现使用Future修饰的代码块会异步执行,不会卡住当前的线程。如果希望在这个异步任务执行完成之后再操作,需要在Future前面加上一个await。
- 多个
Future并行的时候的打印顺序: ```dart void main() { testFuture(); print(‘A’); }
void testFuture() async { Future(() { return ‘任务1’; }).then((value) => print(‘$value 执行结束’));
Future(() { return ‘任务2’; }).then((value) => print(‘$value 执行结束’));
Future(() { return ‘任务3’; }).then((value) => print(‘$value 执行结束’));
Future(() { return ‘任务4’; }).then((value) => print(‘$value 执行结束’));
print(‘任务添加完毕’); }
<br />调整顺序或者是让其中的一个任务加入睡眠等多项测试之后,发现多个Future并行发现这个执行的顺序就是添加的顺序。4. 有依赖关系的`Future`打印顺序:```dartvoid testFuture() async {Future(() {return '任务1';}).then((value) {print('$value结束');return '$value任务2';}).then((value) {print('$value结束');return '$value任务3';}).then((value) {print('$value结束');return '$value任务4';});}

多个Future执行完成之后再操作:
void testFuture() async {Future.wait([Future(() {return '任务1';}),Future(() {return '任务2';}),Future(() {return '任务3';}),Future(() {return '任务4';}),]).then((value) => print('$value')); // wait里面的执行顺序也是添加的顺序}

scheduleMicrotask可以插队到Future任务前面void testFuture() async {Future.wait([Future(() {return '任务1';}),Future(() {return '任务2';}),Future(() {return '任务3';}),Future(() {return '任务4';}),]).then((value) => print('$value'));scheduleMicrotask(() {print('scheduleMicrotask');});}

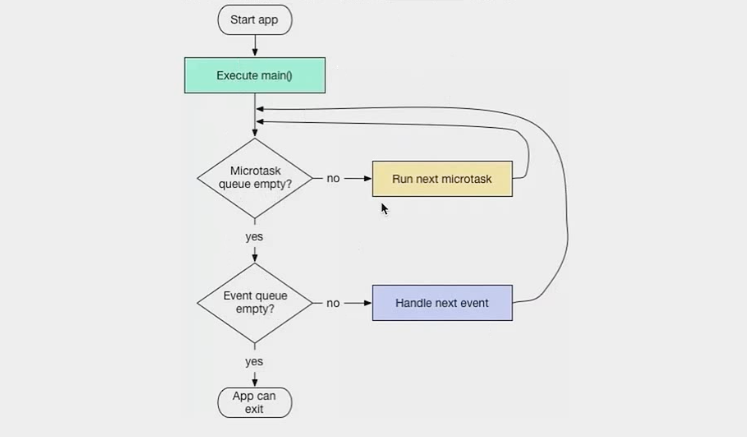
Dart中就只有两种队列:一种是事件队列,一种是微任务队列,微任务队列的优先级始终高于事件队列,没有多线程一说。
- 事件队列(
event queue),包含所有的外来事件:I/O、mouse events、drawing events、timers、isolate之间的信息传递 - 微任务队列(
microtask queue),表示一个短时间内就会完成的异步任务。它的优先级最高,只要队列中还有任务,就可以一直霸占着事件循环。microtask queue添加的任务主要是由Dart内部产生

- 下列打印的顺序是什么? ```dart void testFuture() async { Future x = Future(() => print(‘A’)); Future(() => print(‘B’)); scheduleMicrotask(() { print(‘C’); }); x.then((value) => print(‘D’)); print(‘E’); }
<br />首先肯定是主线程的`E`,然后是微任务的`C`,剩下的两个`Future`按照添加的顺序执行,首先执行A和D最后是B<br />8. Fluture中嵌套微任务的执行顺序:```dartvoid testFuture() async {Future(() => print('A')).then((value) {scheduleMicrotask(() {print('D');});}).then((value) => print('F'));Future(() => print('B'));scheduleMicrotask(() {print('C');});print('E');}

这里可以这么理解:then后面的代码可以理解为丢到了微任务队列去执行。
补充:使用Flutter的时候尽量使用链式调用,保证在最后调用.catchError来捕获异常
getData() async {print('开始了');await Future(() {for (int i = 0; i < 100; i++) {}return '循环结束';}).then((value) => print('$value')).whenComplete(() => print('完成了')).catchError((e) => print(e.toString()));print('await之后的代码');}
Dart中的多线程
Dart当中的Isolate更像一个进程,有独立的内存空间。意味着每个进程之间的数据是独立的,不存在抢夺空间的情况,所以不需要锁的概念。
void main() {IsolateDemo();}void IsolateDemo() {print('1');Isolate.spawn(func, 3);Isolate.spawn(func, 4);Isolate.spawn(func, 5);Isolate.spawn(func, 6);Isolate.spawn(func, 7);Isolate.spawn(func, 8);Isolate.spawn(func, 9);sleep(Duration(seconds: 3));print('2');}

上面说了不存在同一块内存的问题,我们也来验证一下,在下面的代码中,我在Isolate中修改了a的值,那么最后打印的a=?
int a = 100;void IsolateDemo() {print('1');Isolate.spawn(func, 3);Isolate.spawn(func, 4);Isolate.spawn(func, 5);Isolate.spawn(func, 6);Isolate.spawn(func, 7);Isolate.spawn(func, 8);Isolate.spawn(func, 9);sleep(Duration(seconds: 3));print('2');print('a = $a');}func(int count) {print('$count');a = count;}

经验证,最后a还是等于100.也就是说在Isolate中的修改并没有效果。
ReceivePort & Isolate
void IsolateDemo() {print('1');ReceivePort port = ReceivePort();Isolate.spawn(func, port.sendPort);port.listen((message) {print('message=$message');});sleep(Duration(seconds: 3));print('2');}func(SendPort port) {port.send(10);}

�上面的代码还是有一点需要完善的地方:此时注意需要手动的关闭端口和销毁Isolate
void IsolateDemo() async {print('1');ReceivePort port = ReceivePort();Isolate iso = await Isolate.spawn(func, port.sendPort);port.listen((message) {print('message=$message');port.close();iso.kill();});sleep(Duration(seconds: 3));print('2');}
compute
用法跟Isolate差不多,是在Isolate上的进一步包装。compute不需要手动kill
void main() {Comouterdemo();}void Comouterdemo() {print('1');compute(func1, 10);sleep(Duration(seconds: 3));print('2');}func1(int num) {print('$num');}

搭配await异步使用
void main() {Comouterdemo();}void Comouterdemo() async {print('1');int result = await compute(func1, 10);sleep(Duration(seconds: 3));print('result=$result');print('2');}int func1(int num) {print('$num');return num;}

一些小知识
- 关于import, as关键字就是给库起别名,目的是防止类名、方法名冲突
import 'package:http/http.dart' as http; - 导入库,默认是整个文件都会导入,如果需要指定的话有两个关键字。
show:执行需要导入的内容;hide:需要隐藏的内容 pubspec.yaml中publish_to:指定发布到哪里去,默认的都是到pub.dev里面去pubspec.yaml中version: 当前项目的版本号pubspec.yaml中 Dart的版本environment:sdk: ">=2.12.0 <3.0.0"pubspec.yaml中dev_dependencies: 开发环境依赖的版本打包的时候不会有这些pubspec.yaml中dependencies: 第三方库导入位置。dio:^4.0.1大版本不变的区间写法,相当于>=4.0.1 <5.0.0;dio:4.0.1指定4.0.1版本;dio:any任意版本
�
�
�


