BlockingQueue 阻塞队列
BlockingQueue是最常见的一种。BlockingQueue是一个带阻塞功能的队列,当入队列时,若队列已满,则阻塞调用者;当出队列时,若队列为空,则阻塞调用者
在Concurrent包中,BlockingQueue是一个接口,有许多个不同的实现类,如图所示。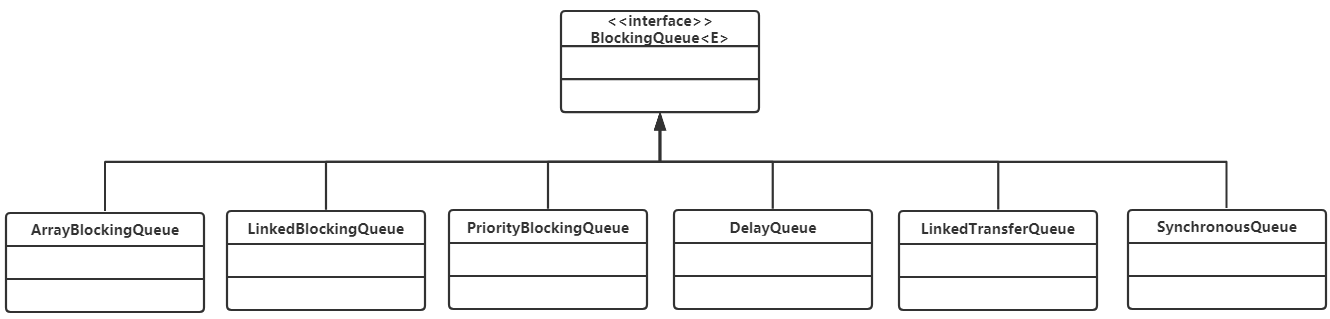
接口定义:
public interface BlockingQueue<E> extends Queue<E> {//...boolean add(E e);boolean offer(E e);void put(E e) throws InterruptedException;boolean remove(Object o); E take() throws InterruptedException;E poll(long timeout, TimeUnit unit) throws InterruptedException;//...}
add(…)和offer(..)是无阻塞的,也是Queue本身定义的接口,
而put(..)是阻塞的。add(…)和offer(..)的区别不大,当队列为满的时候,前者会抛出异常,后者则直接返回false。
出队列与之类似,提供了remove()、poll()、take()等方法,remove()是非阻塞式的,take()和poll()是阻塞式的。
ArrayBlockingQueue
ArrayBlockingQueue是一个用数组实现的环形队列,在构造方法中,会要求传入数组的容量。
public ArrayBlockingQueue(int capacity) {this(capacity, false);}public ArrayBlockingQueue(int capacity, boolean fair) {// ...}public ArrayBlockingQueue(int capacity, boolean fair, Collection<? extends E> c) {this(capacity, fair);// ...}
其核心数据结构:
public class ArrayBlockingQueue<E> extends AbstractQueue<E> implements BlockingQueue<E>, java.io.Serializable {//...final Object[] items;// 队头指针int takeIndex;// 队尾指针int putIndex;int count;// 核心为1个锁外加两个条件final ReentrantLock lock;private final Condition notEmpty;private final Condition notFull;//...}
其put方法:
/*** Inserts the specified element at the tail of this queue, waiting* for space to become available if the queue is full.** @throws InterruptedException {@inheritDoc}* @throws NullPointerException {@inheritDoc}*/public void put(E e) throws InterruptedException {Objects.requireNonNull(e);final ReentrantLock lock = this.lock;//可中断的Locklock.lockInterruptibly();try {while (count == items.length)//若队列满,则阻塞notFull.await();enqueue(e);} finally {lock.unlock();}}private void enqueue(E e) {// assert lock.isHeldByCurrentThread();// assert lock.getHoldCount() == 1;// assert items[putIndex] == null;final Object[] items = this.items;items[putIndex] = e;if (++putIndex == items.length) putIndex = 0;count++;notEmpty.signal();//当数据put到queue中,通知非空条件}
take方法:
public E take() throws InterruptedException {final ReentrantLock lock = this.lock;lock.lockInterruptibly();try {while (count == 0)//如果队列为空 则阻塞notEmpty.await();return dequeue();} finally {lock.unlock();}}private E dequeue() {// assert lock.isHeldByCurrentThread();// assert lock.getHoldCount() == 1;// assert items[takeIndex] != null;final Object[] items = this.items;@SuppressWarnings("unchecked")E e = (E) items[takeIndex];items[takeIndex] = null;if (++takeIndex == items.length) takeIndex = 0;count--;if (itrs != null)itrs.elementDequeued();notFull.signal(); //take结束 通知非满条件return e;}
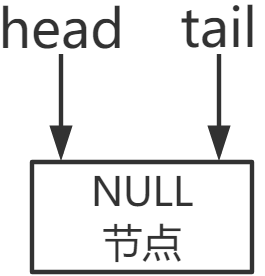
LinkedBlockingQueue
LinkedBlockingQueue是一种基于单向链表的阻塞队列。因为队头和队尾是2个指针分开操作的,所以用了2把锁+2个条件,同时有1个AtomicInteger的原子变量记录count数。
public class LinkedBlockingQueue<E> extends AbstractQueue<E> implements BlockingQueue<E>, java.io.Serializable {// ...private final int capacity;// 原子变量private final AtomicInteger count = new AtomicInteger(0);// 单向链表的头部private transient Node<E> head;// 单向链表的尾部private transient Node<E> last;// 两把锁,两个条件private final ReentrantLock takeLock = new ReentrantLock();private final Condition notEmpty = takeLock.newCondition();private final ReentrantLock putLock = new ReentrantLock();private final Condition notFUll = putLock.newCondition();// ...}
在其构造方法中,也可以指定队列的总容量。如果不指定,默认为Integer.MAX_VALUE。
/*** Creates a {@code LinkedBlockingQueue} with a capacity of* {@link Integer#MAX_VALUE}.*/public LinkedBlockingQueue() {this(Integer.MAX_VALUE);}/*** Creates a {@code LinkedBlockingQueue} with the given (fixed) capacity.** @param capacity the capacity of this queue* @throws IllegalArgumentException if {@code capacity} is not greater* than zero*/public LinkedBlockingQueue(int capacity) {if (capacity <= 0) throw new IllegalArgumentException();this.capacity = capacity;last = head = new Node<E>(null);}
put方法:
public void put(E e) throws InterruptedException {if (e == null) throw new NullPointerException();final int c;final Node<E> node = new Node<E>(e);final ReentrantLock putLock = this.putLock;final AtomicInteger count = this.count;putLock.lockInterruptibly();try {//无空间生产元素while (count.get() == capacity) {notFull.await();}enqueue(node);//拿到count值后将count加一c = count.getAndIncrement();//当前元素个数如果小于容量if (c + 1 < capacity)notFull.signal(); //如果队列还有剩余空间则通知其他put线程} finally {putLock.unlock();}if (c == 0) //上面写入说明队列有值了signalNotEmpty(); //唤醒其他消费者}
take 方法:
public E take() throws InterruptedException {final E x;final int c;final AtomicInteger count = this.count;final ReentrantLock takeLock = this.takeLock;takeLock.lockInterruptibly();try {//没有元素则阻塞while (count.get() == 0) {notEmpty.await();}x = dequeue();//获取到count值给c count之后减一c = count.getAndDecrement();//如果还有元素,则通知其他take线程if (c > 1)notEmpty.signal();} finally {takeLock.unlock();}if (c == capacity) //上面消费一个之后有空位signalNotFull();//唤醒生产者return x;}
LinkedBlockingQueue和ArrayBlockingQueue的差异:
1. 为了提高并发度,用2把锁,分别控制队头、队尾的操作。意味着在put(…)和put(…)之间、take()与take()之间是互斥的,put(…)和take()之间并不互斥。但对于count变量,双方都需要操作,所以必须是原子类型。
2. 因为各自拿了一把锁,所以当需要调用对方的condition的signal时,还必须再加上对方的锁,就是signalNotEmpty()和signalNotFull()方法。示例如下所示。
/*** Signals a waiting take. Called only from put/offer (which do not* otherwise ordinarily lock takeLock.)*/private void signalNotEmpty() {final ReentrantLock takeLock = this.takeLock;takeLock.lock(); //必须获取takeLock锁 才可以调用notEmpty.signal()try {notEmpty.signal();} finally {takeLock.unlock();}}/*** Signals a waiting put. Called only from take/poll.*/private void signalNotFull() {final ReentrantLock putLock = this.putLock;putLock.lock();try {notFull.signal();} finally {putLock.unlock();}}
- 不仅put会通知 take,take 也会通知 put。当put 发现非满的时候,也会通知其他 put线程;当take发现非空的时候,也会通知其他take线程。
PriorityBlockingQueue
队列通常是先进先出的,而PriorityQueue是按照元素的优先级从小到大出队列的。正因为如此,PriorityQueue中的2个元素之间需要可以比较大小,并实现Comparable接口。
其核心数据结构如下:
public class PriorityBlockingQueue<E> extends AbstractQueue<E> implements BlockingQueue<E>, java.io.Serializable {//...// 用数组实现的二插小根堆private transient Object[] queue;private transient int size;private transient Comparator<? super E> comparator;// 1个锁+一个条件,没有非满条件private final ReentrantLock lock;private final Condition notEmpty;//...}
其构造方法如下所示,如果不指定初始大小,内部会设定一个默认值11,当元素个数超过这个大小之后,会自动扩容。
/*** Default array capacity.*/private static final int DEFAULT_INITIAL_CAPACITY = 11;/*** The maximum size of array to allocate.* Some VMs reserve some header words in an array.* Attempts to allocate larger arrays may result in* OutOfMemoryError: Requested array size exceeds VM limit*/private static final int MAX_ARRAY_SIZE = Integer.MAX_VALUE - 8;public PriorityBlockingQueue() {this(DEFAULT_INITIAL_CAPACITY, null);}/*** Creates a {@code PriorityBlockingQueue} with the specified* initial capacity that orders its elements according to their* {@linkplain Comparable natural ordering}.** @param initialCapacity the initial capacity for this priority queue* @throws IllegalArgumentException if {@code initialCapacity} is less* than 1*/public PriorityBlockingQueue(int initialCapacity) {this(initialCapacity, null);}/*** Creates a {@code PriorityBlockingQueue} with the specified initial* capacity that orders its elements according to the specified* comparator.** @param initialCapacity the initial capacity for this priority queue* @param comparator the comparator that will be used to order this* priority queue. If {@code null}, the {@linkplain Comparable* natural ordering} of the elements will be used.* @throws IllegalArgumentException if {@code initialCapacity} is less* than 1*/public PriorityBlockingQueue(int initialCapacity,Comparator<? super E> comparator) {if (initialCapacity < 1)throw new IllegalArgumentException();this.comparator = comparator;this.queue = new Object[Math.max(1, initialCapacity)];}
put方法:
public void put(E e) {offer(e); // never need to block 自定扩容,不会阻塞}/*** Inserts the specified element into this priority queue.* As the queue is unbounded, this method will never return {@code false}.** @param e the element to add* @return {@code true} (as specified by {@link Queue#offer})* @throws ClassCastException if the specified element cannot be compared* with elements currently in the priority queue according to the* priority queue's ordering* @throws NullPointerException if the specified element is null*/public boolean offer(E e) {if (e == null)throw new NullPointerException();final ReentrantLock lock = this.lock;//唯一的同步锁lock.lock();int n, cap;Object[] es;while ((n = size) >= (cap = (es = queue).length))tryGrow(es, cap); //元素数超过了数据的长度,则扩容try {final Comparator<? super E> cmp;if ((cmp = comparator) == null) //如果没有定义比较操作,则使用元素自带的比较功能siftUpComparable(n, e, es);else //元素入堆, 执行siftUp操作siftUpUsingComparator(n, e, es, cmp);size = n + 1;notEmpty.signal();} finally {lock.unlock();}return true;}
take方法:
public E take() throws InterruptedException {//获取锁 可打断final ReentrantLock lock = this.lock;lock.lockInterruptibly();E result;try {//出队列while ( (result = dequeue()) == null)notEmpty.await();} finally {lock.unlock();}return result;}/*** Mechanics for poll(). Call only while holding lock.*/private E dequeue() {// assert lock.isHeldByCurrentThread();final Object[] es;final E result;//因为是最小二叉堆,堆顶就是要出队的元素if ((result = (E) ((es = queue)[0])) != null) {final int n;final E x = (E) es[(n = --size)];es[n] = null;if (n > 0) {final Comparator<? super E> cmp;if ((cmp = comparator) == null) //出了一个元素 需要调整最小二叉堆siftDownComparable(0, x, es, n);else //调整堆,执行siftDown方法siftDownUsingComparator(0, x, es, n, cmp);}}return result;}
从上面可以看到,在阻塞的实现方面,和ArrayBlockingQueue的机制相似,主要区别是用数组实现了一个二叉堆,从而实现按优先级从小到大出队列。另一个区别是没有notFull条件,当元素个数超出数组长度时,执行扩容操作。
DelayQueue
DelayQueue即延迟队列,也就是一个按延迟时间从小到大出队的PriorityQueue。所谓延迟时间,就是“未来将要执行的时间”减去“当前时间”。为此,放入DelayQueue中的元素,必须实现Delayed接口,如下所示。
/*** A mix-in style interface for marking objects that should be* acted upon after a given delay.** <p>An implementation of this interface must define a* {@code compareTo} method that provides an ordering consistent with* its {@code getDelay} method.** @since 1.5* @author Doug Lea*/public interface Delayed extends Comparable<Delayed> {/*** Returns the remaining delay associated with this object, in the* given time unit.** @param unit the time unit* @return the remaining delay; zero or negative values indicate* that the delay has already elapsed*/long getDelay(TimeUnit unit);}
关于该接口:
1. 如果getDelay的返回值小于或等于0,则说明该元素到期,需要从队列中拿出来执行。
2. 该接口首先继承了 Comparable 接口,所以要实现该接口,必须实现 Comparable 接口。具体来说,就是基于getDelay()的返回值比较两个元素的大小。
核心数据结构:
public class DelayQueue<E extends Delayed> extends AbstractQueue<E> implements BlockingQueue<E> {// ...// 一把锁和一个非空条件private final transient ReentrantLock lock = new ReentrantLock();private final Condition available = lock.newCondition();// 优先级队列private final PriorityQueue<E> q = new PriorityQueue<E>();// ...}
put/take的实现,先从take说起,因为这样更能看出DelayQueue的特性
/*** Retrieves and removes the head of this queue, waiting if necessary* until an element with an expired delay is available on this queue.** @return the head of this queue* @throws InterruptedException {@inheritDoc}*/public E take() throws InterruptedException {final ReentrantLock lock = this.lock;lock.lockInterruptibly();try {for (;;) {E first = q.peek(); //取出二叉堆的堆顶元素, 即延迟时间最小的if (first == null)available.await();//队列为空 则take线程阻塞else {//堆顶元素的延迟时间小于等于0 出队列返回long delay = first.getDelay(NANOSECONDS);if (delay <= 0L)return q.poll();first = null; // don't retain ref while waiting//如果有其他线程也在等待该元素,则无限期等待。if (leader != null)available.await();else {//如果当前线程是leader 则表示该我获取元素了Thread thisThread = Thread.currentThread();leader = thisThread;try {available.awaitNanos(delay); //否则阻塞有限时间} finally {if (leader == thisThread)leader = null;}}}}} finally {if (leader == null && q.peek() != null)available.signal(); //当前线程是leader 已经获取了堆顶元素,唤醒其他线程lock.unlock();}}
关于take()方法:
1. 不同于一般的阻塞队列,只在队列为空的时候,才阻塞。如果堆顶元素的延迟时间没到,也会阻塞。
2. 在上面的代码中使用了一个优化技术,用一个Thread leader变量记录了等待堆顶元素的第1个线程。为什么这样做呢?通过 getDelay(..)可以知道堆顶元素何时到期,不必无限期等待,可以使用condition.awaitNanos()等待一个有限的时间;只有当发现还有其他线程也在等待堆顶元素(leader!=NULL)时,才需要无限期等待。
put的实现:
public void put(E e) {offer(e);}/*** Inserts the specified element into this delay queue.** @param e the element to add* @return {@code true}* @throws NullPointerException if the specified element is null*/public boolean offer(E e) {final ReentrantLock lock = this.lock;lock.lock();try {q.offer(e); //元素放入二叉堆//如果放进去的元素刚好在堆顶,说明放入的元素延迟时间最小,需要通知等待的线程;否则放入的元素不在堆顶,没有必要通知等待的线程。if (q.peek() == e) {leader = null;available.signal();}return true;} finally {lock.unlock();}}
注意:不是每放入一个元素,都需要通知等待的线程。放入的元素,如果其延迟时间大于当前堆顶的元素延迟时间,就没必要通知等待的线程;只有当延迟时间是最小的,在堆顶时,才有必要通知等待的线程,也就是上面代码中的if (q.peek() == e)
SynchronousQueue
SynchronousQueue是一种特殊的BlockingQueue,它本身没有容量。先调put(…),线程会阻塞;直到另外一个线程调用了take(),两个线程才同时解锁,反之亦然。对于多个线程而言,例如3个线程,调用3次put(…),3个线程都会阻塞;直到另外的线程调用3次take(),6个线程才同时解锁,反之亦然
构造方法:
/*** Creates a {@code SynchronousQueue} with the specified fairness policy.** @param fair if true, waiting threads contend in FIFO order for* access; otherwise the order is unspecified.*/public SynchronousQueue(boolean fair) {transferer = fair ? new TransferQueue<E>() : new TransferStack<E>();}
和锁一样,也有公平和非公平模式。如果是公平模式,则用TransferQueue实现;如果是非公平模式,则用TransferStack实现。这两个类分别是什么呢?先看一下put/take的实现。
/*** Adds the specified element to this queue, waiting if necessary for* another thread to receive it.** @throws InterruptedException {@inheritDoc}* @throws NullPointerException {@inheritDoc}*/public void put(E e) throws InterruptedException {if (e == null) throw new NullPointerException();if (transferer.transfer(e, false, 0) == null) {Thread.interrupted();throw new InterruptedException();}}/*** Retrieves and removes the head of this queue, waiting if necessary* for another thread to insert it.** @return the head of this queue* @throws InterruptedException {@inheritDoc}*/public E take() throws InterruptedException {E e = transferer.transfer(null, false, 0);if (e != null)return e;Thread.interrupted();throw new InterruptedException();}
可以看到,put/take都调用了transfer(…)接口。而TransferQueue和TransferStack分别实现了这个接口。该接口在SynchronousQueue内部,如下所示。如果是put(…),则第1个参数就是对应的元素;如果是take(),则第1个参数为null。后2个参数分别为是否设置超时和对应的超时时间。
/*** Shared internal API for dual stacks and queues.*/abstract static class Transferer<E> {/*** Performs a put or take.** @param e if non-null, the item to be handed to a consumer;* if null, requests that transfer return an item* offered by producer.* @param timed if this operation should timeout* @param nanos the timeout, in nanoseconds* @return if non-null, the item provided or received; if null,* the operation failed due to timeout or interrupt --* the caller can distinguish which of these occurred* by checking Thread.interrupted.*/abstract E transfer(E e, boolean timed, long nanos);}
公平模式和非公平模式
设3个线程分别调用了put(…),3个线程会进入阻塞状态,直到其他线程调用3次take(),和3个put(…)一一配对。
如果是公平模式(队列模式),则第1个调用put(…)的线程1会在队列头部,第1个到来的take()线程和它进行配对,遵循先到先配对的原则,所以是公平的;如果是非公平模式(栈模式),则第3个调用put(…)的线程3会在栈顶,第1个到来的take()线程和它进行配对,遵循的是后到先配对的原则,所以是非公平的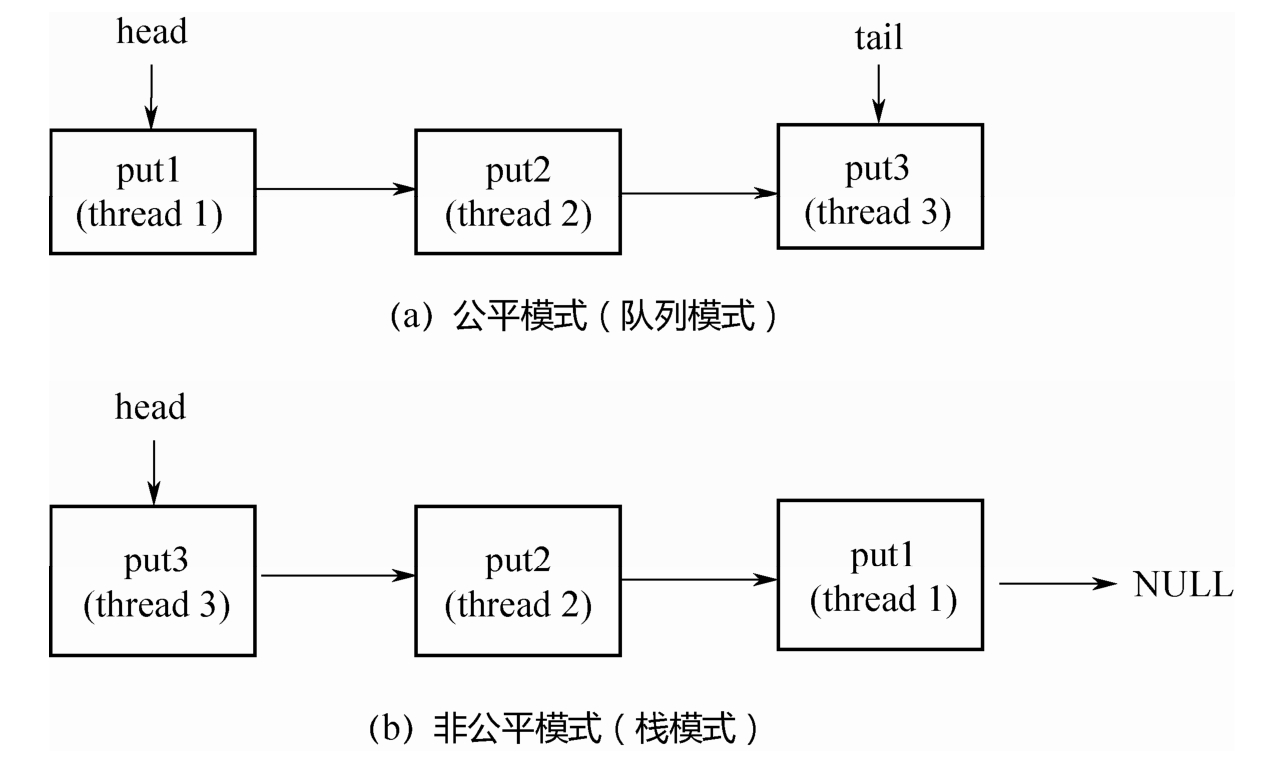
TransferQueue和TransferStack的实现:
TransferQueue:
public class SynchronousQueue<E> extends AbstractQueue<E> implements BlockingQueue<E>, java.io.Serializable {// ...static final class TransferQueue<E> extends Transferer<E> {static final class QNode {volatile QNode next;volatile Object item;volatile Thread waiter;final boolean isData;//...}transient volatile QNode head;transient volatile QNode tail;// ...}}
TransferQueue是一个基于单向链表而实现的队列,通过head和tail 2个指针记录头部和尾部。初始的时候,head和tail会指向一个空节点,构造方法如下所示。
TransferQueue() {QNode h = new QNode(null, false); // initialize to dummy node.head = h;tail = h;}
阶段(a):队列中是一个空的节点,head/tail都指向这个空节点。
阶段(b):3个线程分别调用put,生成3个QNode,进入队列。
阶段(c):来了一个线程调用take,会和队列头部的第1个QNode进行配对。
阶段(d):第1个QNode出队列。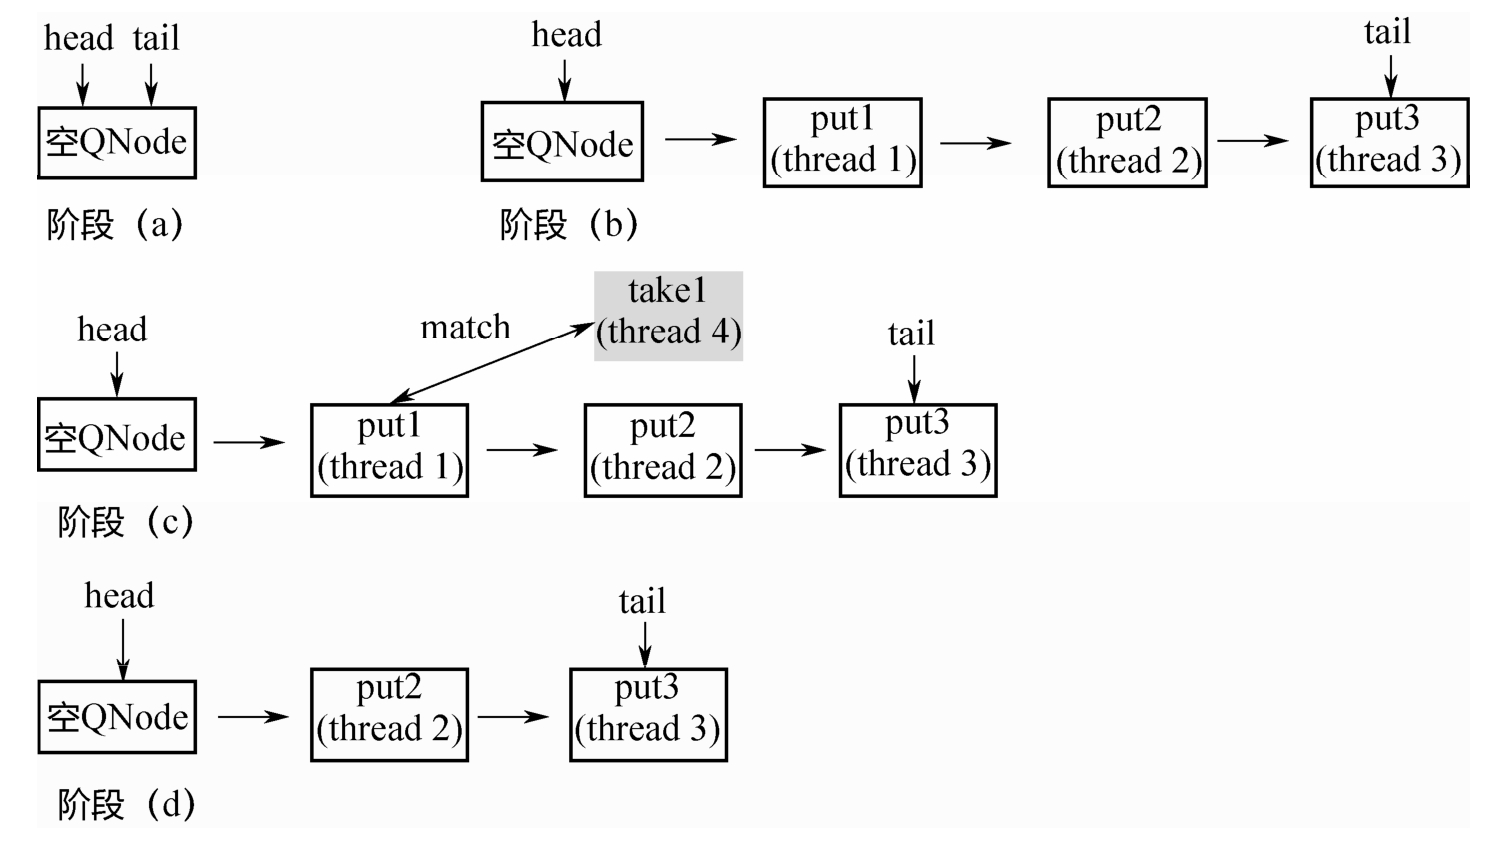
这里有一个关键点:put节点和take节点一旦相遇,就会配对出队列,所以在队列中不可能同时存在put节点和take节点,要么所有节点都是put节点,要么所有节点都是take节点。
@SuppressWarnings("unchecked")E transfer(E e, boolean timed, long nanos) {/* Basic algorithm is to loop trying to take either of* two actions:** 1. If queue apparently empty or holding same-mode nodes,* try to add node to queue of waiters, wait to be* fulfilled (or cancelled) and return matching item.** 2. If queue apparently contains waiting items, and this* call is of complementary mode, try to fulfill by CAS'ing* item field of waiting node and dequeuing it, and then* returning matching item.** In each case, along the way, check for and try to help* advance head and tail on behalf of other stalled/slow* threads.** The loop starts off with a null check guarding against* seeing uninitialized head or tail values. This never* happens in current SynchronousQueue, but could if* callers held non-volatile/final ref to the* transferer. The check is here anyway because it places* null checks at top of loop, which is usually faster* than having them implicitly interspersed.*/QNode s = null; // constructed/reused as neededboolean isData = (e != null);for (;;) {QNode t = tail;QNode h = head; //队列还未初始化,自旋等待if (t == null || h == null) // saw uninitialized valuecontinue; // spin//队列为空或者当前线程和队列中元素为同一种模式if (h == t || t.isData == isData) { // empty or same-modeQNode tn = t.next;//不一致读 重新执行for循环if (t != tail) // inconsistent readcontinue;if (tn != null) { // lagging tailadvanceTail(t, tn);continue;}if (timed && nanos <= 0L) // can't waitreturn null;if (s == null)s = new QNode(e, isData); //新建一个节点//加入尾部if (!t.casNext(null, s)) // failed to link incontinue;//后移tail指针advanceTail(t, s); // swing tail and waitObject x = awaitFulfill(s, e, timed, nanos); //进入阻塞状态if (x == s) { // wait was cancelledclean(t, s);return null;}//从阻塞中唤醒,确定已经处于队列中的第一个元素if (!s.isOffList()) { // not already unlinkedadvanceHead(t, s); // unlink if headif (x != null) // and forget fieldss.item = s;s.waiter = null;}return (x != null) ? (E)x : e;} else { // complementary-mode 当前线程可以和队列中第一个元素进行配对QNode m = h.next; // node to fulfill 取队列中第一个元素if (t != tail || m == null || h != head)continue; // inconsistent read 不一致读,重新执行for循环Object x = m.item;if (isData == (x != null) || // m already fulfilled 已经配对x == m || // m cancelled!m.casItem(x, e)) { // lost CAS 尝试配对advanceHead(h, m); // dequeue and retry 已经配对,直接出队列continue;}advanceHead(h, m); // successfully fulfilled 配对成功 出队列LockSupport.unpark(m.waiter); // 唤醒队列中与第一个元素对应的线程return (x != null) ? (E)x : e;}}}
整个 for 循环有两个大的 if-else 分支,如果当前线程和队列中的元素是同一种模式(都是put节点或者take节点),则与当前线程对应的节点被加入队列尾部并且阻塞;如果不是同一种模式,则选取队列头部的第1个元素进行配对。
这里的配对就是m.casItem(x,e),把自己的item x换成对方的item e,如果CAS操作成功,则配对成功。如果是put节点,则isData=true,item!=null;如果是take节点,则isData=false,item=null。如果CAS操作不成功,则isData和item之间将不一致,也就是isData!=(x!=null),通过这个条件可以判断节点是否已经被匹配过了。
TransferStack
TransferStack的定义如下所示,首先,它也是一个单向链表。不同于队列,只需要head指针就能实现入栈和出栈操作。
static final class TransferStack extends Transferer {static final int REQUEST = 0;static final int DATA = 1;static final int FULFILLING = 2;static final class SNode {volatile SNode next;// 单向链表volatile SNode match;// 配对的节点volatile Thread waiter;// 对应的阻塞线程Object item; int mode;// 三种模式//...}volatile SNode head;}
链表中的节点有三种状态,REQUEST对应take节点,DATA对应put节点,二者配对之后,会生成一个FULFILLING节点,入栈,然后FULLING节点和被配对的节点一起出栈。
阶段(a):head指向NULL。不同于TransferQueue,这里没有空的头节点。
阶段(b):3个线程调用3次put,依次入栈。
阶段(c):线程4调用take,和栈顶的第1个元素配对,生成FULLFILLING节点,入栈。
阶段(d):栈顶的2个元素同时入栈。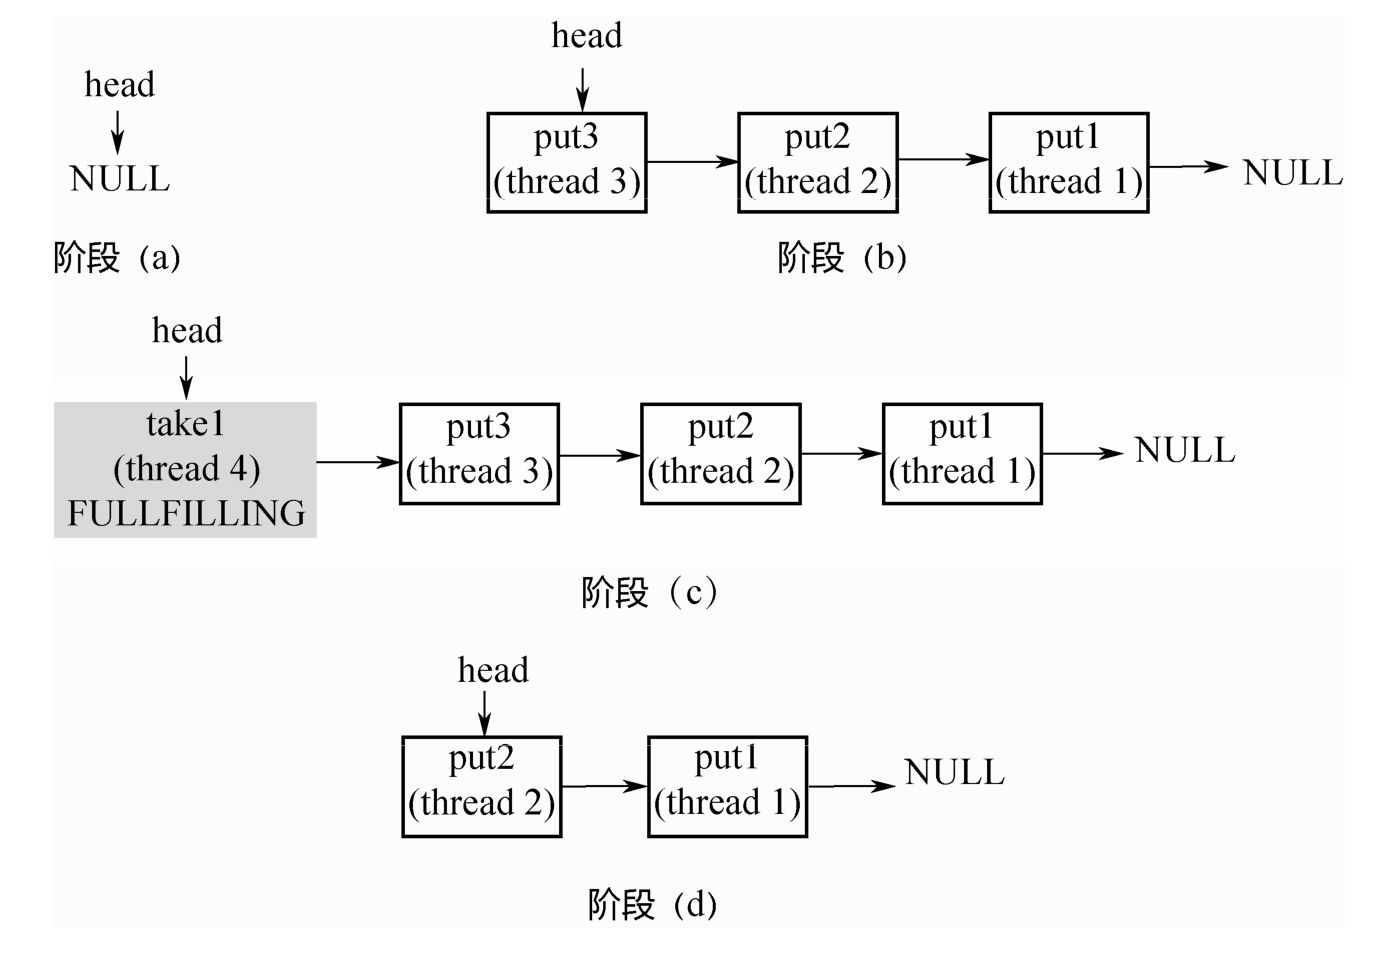
E transfer(E e, boolean timed, long nanos) {/** Basic algorithm is to loop trying one of three actions:** 1. If apparently empty or already containing nodes of same* mode, try to push node on stack and wait for a match,* returning it, or null if cancelled.** 2. If apparently containing node of complementary mode,* try to push a fulfilling node on to stack, match* with corresponding waiting node, pop both from* stack, and return matched item. The matching or* unlinking might not actually be necessary because of* other threads performing action 3:** 3. If top of stack already holds another fulfilling node,* help it out by doing its match and/or pop* operations, and then continue. The code for helping* is essentially the same as for fulfilling, except* that it doesn't return the item.*/SNode s = null; // constructed/reused as neededint mode = (e == null) ? REQUEST : DATA;for (;;) {SNode h = head;if (h == null || h.mode == mode) { // empty or same-mode 同一种模式 同是消费者或同是生产者if (timed && nanos <= 0L) { // can't waitif (h != null && h.isCancelled())casHead(h, h.next); // pop cancelled nodeelsereturn null;} else if (casHead(h, s = snode(s, e, h, mode))) {SNode m = awaitFulfill(s, timed, nanos); //入栈 阻塞等待if (m == s) { // wait was cancelledclean(s);return null;}if ((h = head) != null && h.next == s)casHead(h, s.next); // help s's fulfillerreturn (E) ((mode == REQUEST) ? m.item : s.item);}} else if (!isFulfilling(h.mode)) { // try to fulfill //非同一种模式 待匹配if (h.isCancelled()) // already cancelledcasHead(h, h.next); // pop and retryelse if (casHead(h, s=snode(s, e, h, FULFILLING|mode))) { //生成一个FULFULLING节点 入栈for (;;) { // loop until matched or waiters disappearSNode m = s.next; // m is s's matchif (m == null) { // all waiters are gonecasHead(s, null); // pop fulfill nodes = null; // use new node next timebreak; // restart main loop}SNode mn = m.next;if (m.tryMatch(s)) { //两个节点一起出栈casHead(s, mn); // pop both s and mreturn (E) ((mode == REQUEST) ? m.item : s.item);} else // lost matchs.casNext(m, mn); // help unlink}}} else { // help a fulfiller //已经匹配过了 出栈SNode m = h.next; // m is h's matchif (m == null) // waiter is gonecasHead(h, null); // pop fulfilling nodeelse {SNode mn = m.next;if (m.tryMatch(h)) // help matchcasHead(h, mn); // pop both h and m //配对 一起出栈else // lost matchh.casNext(m, mn); // help unlink}}}}
BlockingDeque 双端口阻塞队列
BlockingDeque定义了一个阻塞的双端队列接口,如下所示。
public interface BlockingDeque<E> extends BlockingQueue<E>, Deque<E> {void putFirst(E e) throws InterruptedException;void putLast(E e) throws InterruptedException;E takeFirst() throws InterruptedException;E takeLast() throws InterruptedException;// ...}
该接口继承了BlockingQueue接口,同时增加了对应的双端队列操作接口。该接口只有一个实现,就是LinkedBlockingDeque
其核心数据结构如下所示,是一个双向链表。
public class LinkedBlockingDeque<E> extends AbstractQueue<E> implements BlockingDeque<E>, java.io.Serializable {static final class Node<E> {E item; Node<E> prev;// 双向链表的NodeNode<E> next;Node(E x) {item = x;}}transient Node<E> first;// 队列的头和尾transient Node<E> last;private transient int count;// 元素个数private final int capacity;// 容量// 一把锁+两个条件 生产者和消费者互斥 在同一时间要么在生产要么在消费final ReentrantLock lock = new ReentrantLock();private final Condition notEmpty = lock.netCondition(); //非空 唤醒消费者private final Condition notFull = lock.newCondition(); //非满 唤醒生产 中断生产者阻塞// ...}
对应的实现原理,和LinkedBlockingQueue基本一样,只是LinkedBlockingQueue是单向链表,而LinkedBlockingDeque是双向链表。
take方法
public E takeFirst() throws InterruptedException {final ReentrantLock lock = this.lock;lock.lock();try {E x;while ( (x = unlinkFirst()) == null) //取第一个元素notEmpty.await(); //未取到 阻塞return x;} finally {lock.unlock();}}//取第一个元素private E unlinkFirst() {// assert lock.isHeldByCurrentThread();Node<E> f = first;if (f == null)return null;Node<E> n = f.next;E item = f.item;f.item = null;f.next = f; // help GC 自己指向自己 帮助垃圾回收器回收first = n;if (n == null) //链表没有元素last = null;elsen.prev = null;--count;notFull.signal(); //通知生产者生产return item;}//消费最后一个元素 逻辑与上面相似public E takeLast() throws InterruptedException {final ReentrantLock lock = this.lock;lock.lock();try {E x;while ( (x = unlinkLast()) == null)notEmpty.await();return x;} finally {lock.unlock();}}/*** Removes and returns last element, or null if empty.*/private E unlinkLast() {// assert lock.isHeldByCurrentThread();Node<E> l = last;if (l == null)return null;Node<E> p = l.prev;E item = l.item;l.item = null;l.prev = l; // help GClast = p;if (p == null)first = null;elsep.next = null;--count;notFull.signal();return item;}
put方法
/*** @throws NullPointerException {@inheritDoc}* @throws InterruptedException {@inheritDoc}*/public void putFirst(E e) throws InterruptedException {if (e == null) throw new NullPointerException();Node<E> node = new Node<E>(e);final ReentrantLock lock = this.lock;lock.lock();try {while (!linkFirst(node))notFull.await();} finally {lock.unlock();}}/*** Links node as first element, or returns false if full.*/private boolean linkFirst(Node<E> node) {// assert lock.isHeldByCurrentThread();if (count >= capacity)return false;Node<E> f = first;node.next = f;first = node;if (last == null)last = node;elsef.prev = node;++count;notEmpty.signal();return true;}//尾部插入元素/*** @throws NullPointerException {@inheritDoc}* @throws InterruptedException {@inheritDoc}*/public void putLast(E e) throws InterruptedException {if (e == null) throw new NullPointerException();Node<E> node = new Node<E>(e);final ReentrantLock lock = this.lock;lock.lock();try {while (!linkLast(node))notFull.await();} finally {lock.unlock();}}/*** Links node as last element, or returns false if full.*/private boolean linkLast(Node<E> node) {// assert lock.isHeldByCurrentThread();if (count >= capacity)return false;Node<E> l = last;node.prev = l;last = node;if (first == null)first = node;elsel.next = node;++count;notEmpty.signal();return true;}
CopyOnWrite
CopyOnWrite指在“写”的时候,不是直接“写”源数据,而是把数据拷贝一份进行修改,再通过悲观锁或者乐观锁的方式写回。那为什么不直接修改,而是要拷贝一份修改呢?这是为了在“读”的时候不加锁。
实现类:
CopyOnWriteArrayList
和ArrayList一样,CopyOnWriteArrayList的核心数据结构也是一个数组,代码如下:
public class CopyOnWriteArrayList<E> implements List<E>, RandomAccess, Cloneable, java.io.Serializable {// ...private volatile transient Object[] array;}
“读”方法都没有加锁,那么是如何保证“线程安全”呢?答案在“写”方法里面
public class CopyOnWriteArrayList<E> implements List<E>, RandomAccess, Cloneable, java.io.Serializable {// 锁对象final transient Object lock = new Object();public boolean add(E e) {synchronized (lock) { // 同步锁对象Object[] es = getArray();int len = es.length;es = Arrays.copyOf(es, len + 1);// CopyOnWrite,写的时候,先拷贝一 份之前的数组。es[len] = e;setArray(es);return true;}}public void add(int index, E element) {synchronized (lock) { // 同步锁对象Object[] es = getArray();int len = es.length;if (index > len || index < 0)throw new IndexOutOfBoundsException(outOfBounds(index, len));Object[] newElements;int numMoved = len - index;if (numMoved == 0)newElements = Arrays.copyOf(es, len + 1);else {newElements = new Object[len + 1];System.arraycopy(es, 0, newElements, 0, index); // CopyOnWrite,写的时候,先拷贝一份之前的数组。System.arraycopy(es, index, newElements, index + 1, numMoved);}newElements[index] = element;setArray(newElements); // 把新数组赋值给老数组}}}
CopyOnWriteArraySet
CopyOnWriteArraySet 就是用 Array 实现的一个 Set,保证所有元素都不重复。其内部是封装的一个CopyOnWriteArrayList。
public class CopyOnWriteArraySet<E> extends AbstractSet<E> implements java.io.Serializable {// 新封装的 CopyOnWriteArrayListprivate final CopyOnWriteArrayList<E> al;public CopyOnWriteArraySet() {al = new CopyOnWriteArrayList<E>();}public boolean add(E e) {return al.addIfAbsent(e); // 不重复的加进去}}
ConcurrentLinkedQueue/Deque
AQS内部的阻塞队列实现原理:基于双向链表,通过对head/tail进行CAS操作,实现入队和出队。
ConcurrentLinkedQueue
ConcurrentLinkedQueue 的实现原理和AQS 内部的阻塞队列类似:同样是基于 CAS,同样是通过head/tail指针记录队列头部和尾部,但还是有稍许差别。
它是一个单向链表,定义如下:
public class ConcurrentLinkedQueue<E> extends AbstractQueue<E> implements Queue<E>, java.io.Serializable {private static class Node<E> {volatile E item;volatile Node<E> next;//...}private transient volatile Node<E> head;private transient volatile Node<E> tail;//...}
其次,在AQS的阻塞队列中,每次入队后,tail一定后移一个位置;每次出队,head一定后移一个位置,以保证head指向队列头部,tail指向链表尾部。
但在ConcurrentLinkedQueue中,head/tail的更新可能落后于节点的入队和出队,因为它不是直接对 head/tail指针进行 CAS操作的,而是对 Node中的 item进行操作。下面进行详细分析:
初始化:
初始的时候, head 和 tail 都指向一个 null 节点。对应的代码如下
public ConcurrentLinkedQueue() {head = tail = new Node<E>(null);}
2.入队列
public boolean offer(E e) {final Node<E> newNode = new Node<E>(Objects.requireNonNull(e));for (Node<E> t = tail, p = t;;) {Node<E> q = p.next;if (q == null) {// p is last nodeif (NEXT.compareAndSet(p, null, newNode)) { //对tail的next指针而不是tail指针进行cas操作// Successful CAS is the linearization point// for e to become an element of this queue,// and for newNode to become "live".if (p != t) // hop two nodes at a time; failure is OKTAIL.weakCompareAndSet(this, t, newNode); //每入队两个节点 移动一次tail指针 失败也无所谓return true;}// Lost CAS race to another thread; re-read next}else if (p == q)// We have fallen off list. If tail is unchanged, it// will also be off-list, in which case we need to// jump to head, from which all live nodes are always// reachable. Else the new tail is a better bet.p = (t != (t = tail)) ? t : head; //已经到达尾部else// Check for tail updates after two hops.p = (p != t && t != (t = tail)) ? t : q; //后移p指针}}
上面的入队其实是每次在队尾追加2个节点时,才移动一次tail节点。如下图所示:
初始的时候,队列中有1个节点item1,tail指向该节点,假设线程1要入队item2节点:
step1:p=tail,q=p.next=NULL.
step2:对p的next执行CAS操作,追加item2,成功之后,p=tail。所以上面的casTail方法不会执行,直接返回。此时tail指针没有变化。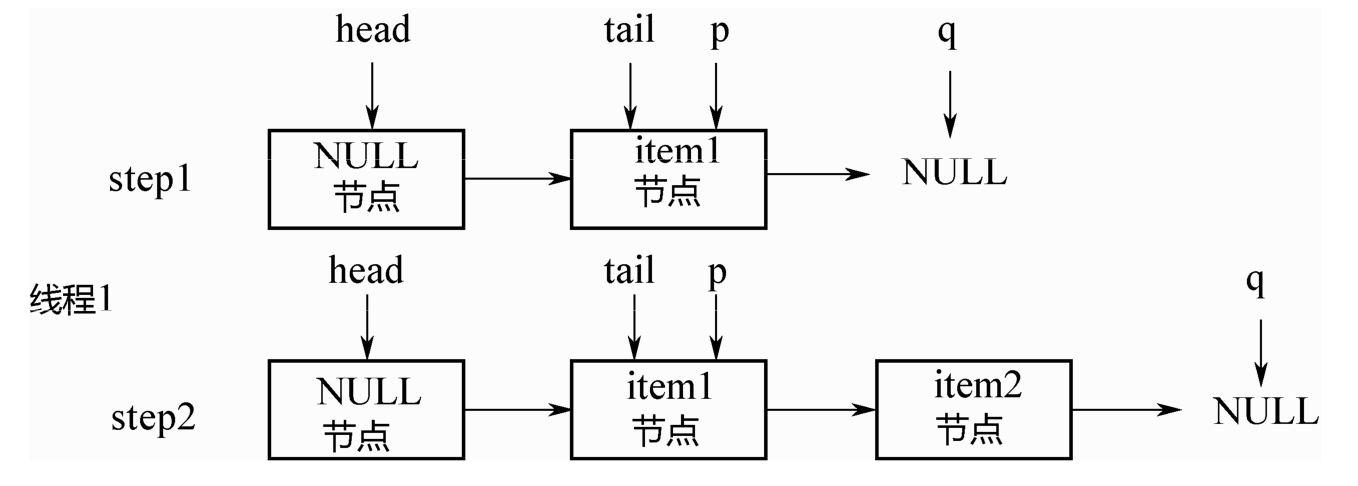
之后,假设线程2要入队item3节点,如下图所示:
step3:p=tail,q=p.next.
step4:q!=NULL,因此不会入队新节点。p,q都后移1位。
step5:q=NULL,对p的next执行CAS操作,入队item3节点。
step6:p!=t,满足条件,执行上面的casTail操作,tail后移2个位置,到达队列尾部。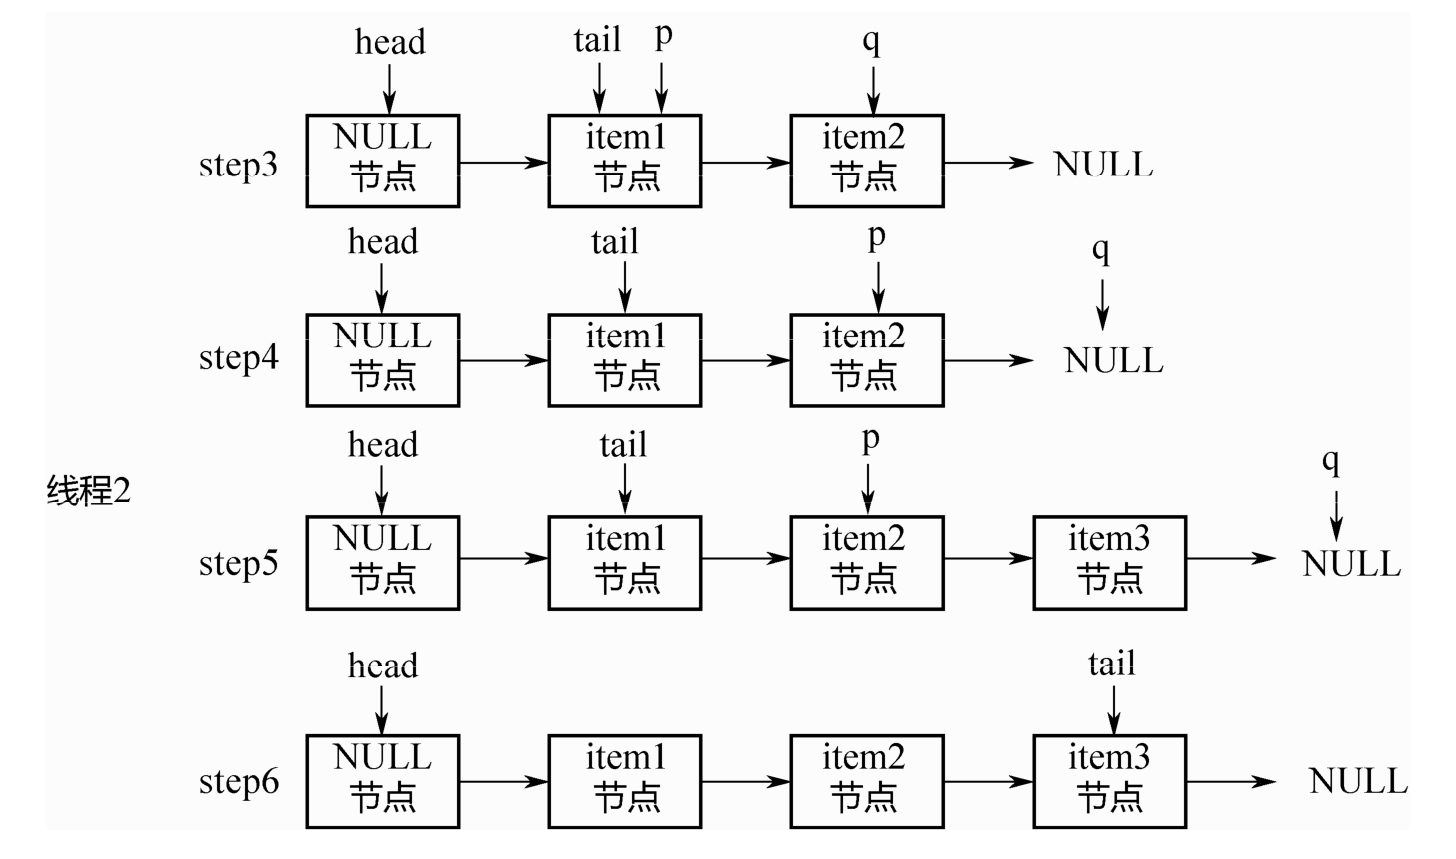
最后总结一下入队列的两个关键点:
1. 即使tail指针没有移动,只要对p的next指针成功进行CAS操作,就算成功入队列。
2. 只有当 p != tail的时候,才会后移tail指针。也就是说,每连续追加2个节点,才后移1次tail指
针。即使CAS失败也没关系,可以由下1个线程来移动tail指针。
出队列
上面说了入队列之后,tail指针不变化,那是否会出现入队列之后,要出队列却没有元素可出的情况呢?
public E poll() {restartFromHead: for (;;) {for (Node<E> h = head, p = h, q;; p = q) {final E item;if ((item = p.item) != null && p.casItem(item, null)) { //出队列时并没有移动head指针,而是把item置为null// Successful CAS is the linearization point// for item to be removed from this queue.if (p != h) // hop two nodes at a time //每产生2个NULL节点才把head指针后移2位updateHead(h, ((q = p.next) != null) ? q : p);return item;}else if ((q = p.next) == null) {updateHead(h, p);return null;}else if (p == q)continue restartFromHead;}}}
出队列的代码和入队列类似,也有p、q2个指针,整个变化过程如图5-8所示。假设初始的时候head指向空节点,队列中有item1、item2、item3 三个节点。
step1:p=head,q=p.next.p!=q.
step2:后移p指针,使得p=q。
step3:出队列。关键点:此处并没有直接删除item1节点,只是把该节点的item通过CAS操作置为了NULL。
step4:p!=head,此时队列中有了2个 NULL 节点,再前移1次head指针,对其执行updateHead操作。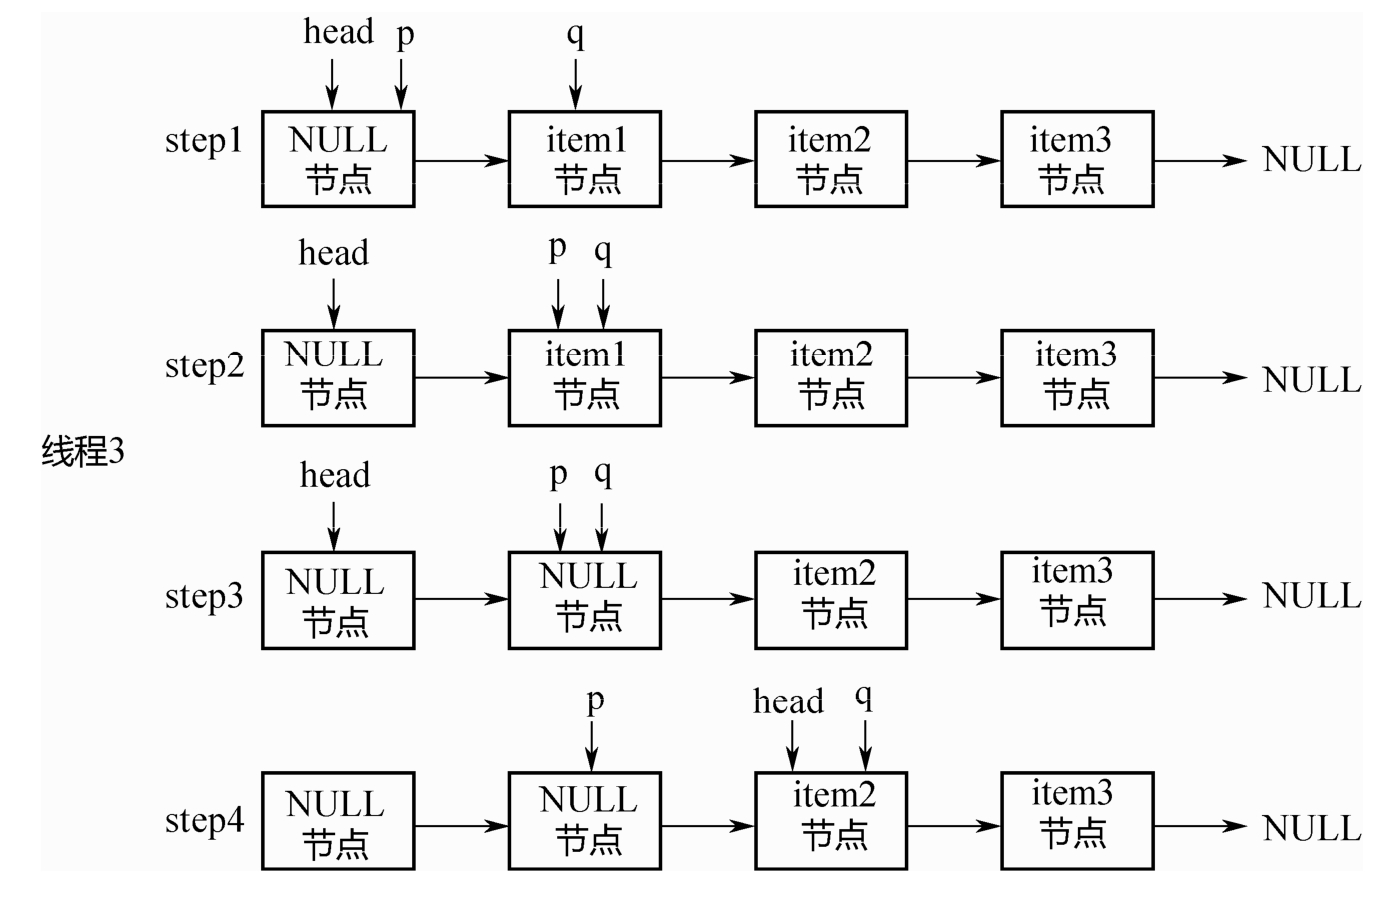
最后总结一下出队列的关键点:
1. 出队列的判断并非观察 tail 指针的位置,而是依赖于 head 指针后续的节点是否为NULL这一条件。
2. 只要对节点的item执行CAS操作,置为NULL成功,则出队列成功。即使head指针没有成功移动,也可以由下1个线程继续完成。
队列判空
因为head/tail 并不是精确地指向队列头部和尾部,所以不能简单地通过比较 head/tail 指针来判断队列是否为空,而是需要从head指针开始遍历,找第1个不为NULL的节点。如果找到,则队列不为空;如果找不到,则队列为空。代码如下所示:
public boolean isEmpty() {return first() == null; //寻找第一个不是NULL的节点}/*** Returns the first live (non-deleted) node on list, or null if none.* This is yet another variant of poll/peek; here returning the* first node, not element. We could make peek() a wrapper around* first(), but that would cost an extra volatile read of item,* and the need to add a retry loop to deal with the possibility* of losing a race to a concurrent poll().*/Node<E> first() {restartFromHead: for (;;) {for (Node<E> h = head, p = h, q;; p = q) { //从head指针开始遍历 查找第一个不是NULL的节点boolean hasItem = (p.item != null);if (hasItem || (q = p.next) == null) {updateHead(h, p);return hasItem ? p : null;}else if (p == q)continue restartFromHead;}}}
ConcurrentHashMap
HashMap通常的实现方式是“数组+链表”,这种方式被称为“拉链法”。ConcurrentHashMap在这个基本原理之上进行了各种优化。
首先是所有数据都放在一个大的HashMap中;其次是引入了红黑树。
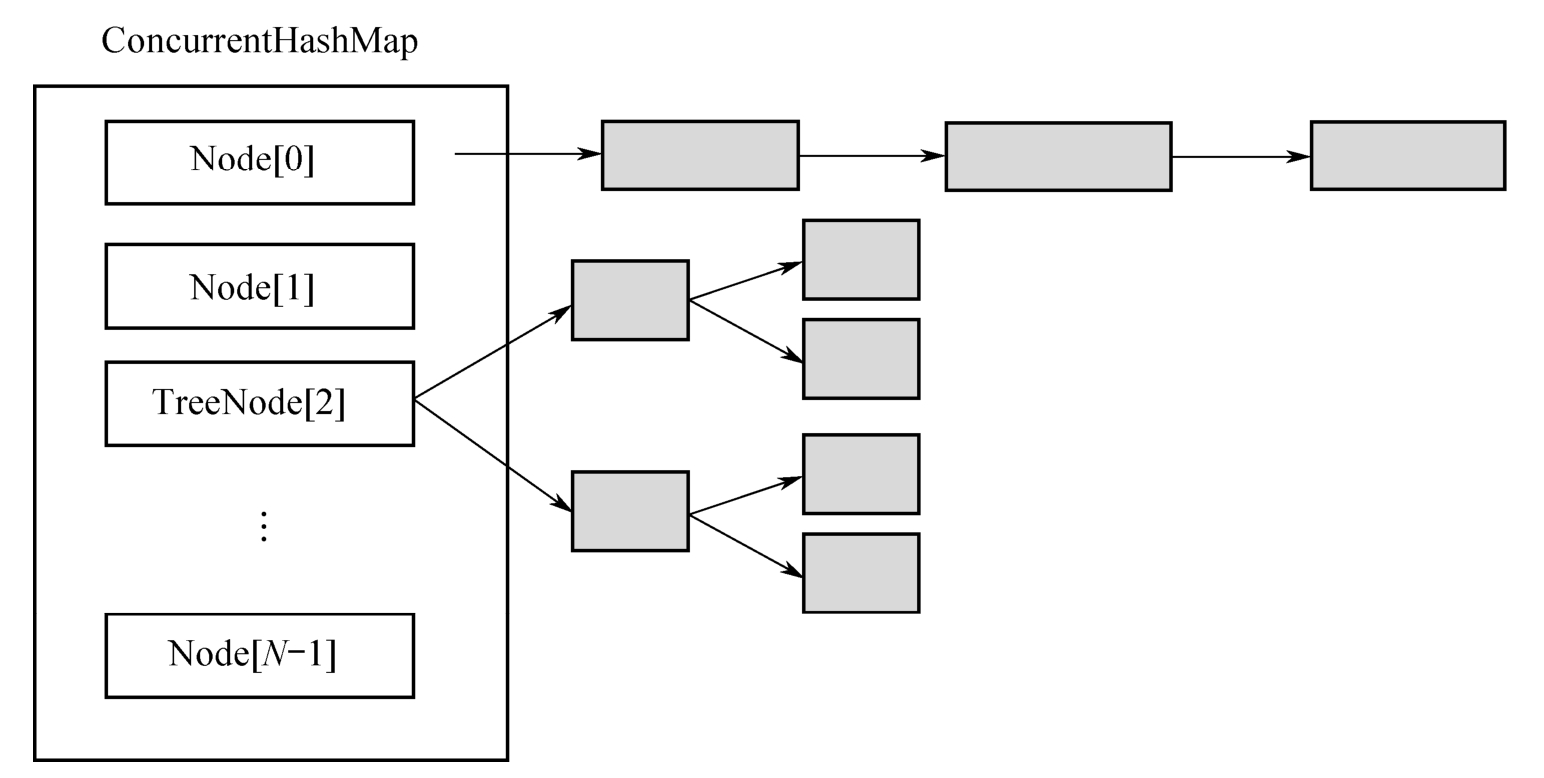
如果头节点是Node类型,则尾随它的就是一个普通的链表;如果头节点是TreeNode类型,它的后面就是一颗红黑树,TreeNode是Node的子类。
链表和红黑树之间可以相互转换:初始的时候是链表,当链表中的元素超过某个阈值时,把链表转换成红黑树;反之,当红黑树中的元素个数小于某个阈值时,再转换为链表。
那为什么要做这种设计呢?
1. 使用红黑树,当一个槽里有很多元素时,其查询和更新速度会比链表快很多,Hash冲突的问题由此得到较好的解决。
2. 加锁的粒度,并非整个ConcurrentHashMap,而是对每个头节点分别加锁,即并发度,就是Node数组的长度,初始长度为16。
3. 并发扩容,这是难度最大的。当一个线程要扩容Node数组的时候,其他线程还要读写,因此处理过程很复杂,后面会详细分析。
由上述对比可以总结出来:这种设计一方面降低了Hash冲突,另一方面也提升了并发度。
1、构造方法:
/*** The largest possible table capacity. This value must be* exactly 1<<30 to stay within Java array allocation and indexing* bounds for power of two table sizes, and is further required* because the top two bits of 32bit hash fields are used for* control purposes.*/private static final int MAXIMUM_CAPACITY = 1 << 30;/*** The default initial table capacity. Must be a power of 2* (i.e., at least 1) and at most MAXIMUM_CAPACITY.*/private static final int DEFAULT_CAPACITY = 16;/*** The largest possible (non-power of two) array size.* Needed by toArray and related methods.*/static final int MAX_ARRAY_SIZE = Integer.MAX_VALUE - 8;/*** The default concurrency level for this table. Unused but* defined for compatibility with previous versions of this class.*/private static final int DEFAULT_CONCURRENCY_LEVEL = 16;/*** The load factor for this table. Overrides of this value in* constructors affect only the initial table capacity. The* actual floating point value isn't normally used -- it is* simpler to use expressions such as {@code n - (n >>> 2)} for* the associated resizing threshold.*/private static final float LOAD_FACTOR = 0.75f;/*** The bin count threshold for using a tree rather than list for a* bin. Bins are converted to trees when adding an element to a* bin with at least this many nodes. The value must be greater* than 2, and should be at least 8 to mesh with assumptions in* tree removal about conversion back to plain bins upon* shrinkage.*/static final int TREEIFY_THRESHOLD = 8; //触发转换成红黑树操作阈值 有可能不转成红黑树而是触发扩容 需要看元素个数是否超过了MIN_TREEIFY_CAPACITY/*** The bin count threshold for untreeifying a (split) bin during a* resize operation. Should be less than TREEIFY_THRESHOLD, and at* most 6 to mesh with shrinkage detection under removal.*/static final int UNTREEIFY_THRESHOLD = 6;/*** The smallest table capacity for which bins may be treeified.* (Otherwise the table is resized if too many nodes in a bin.)* The value should be at least 4 * TREEIFY_THRESHOLD to avoid* conflicts between resizing and treeification thresholds.*/static final int MIN_TREEIFY_CAPACITY = 64; //桶元素数量 当元素量小于此数时不会转为红黑树/*** Creates a new, empty map with an initial table size based on* the given number of elements ({@code initialCapacity}), initial* table density ({@code loadFactor}), and number of concurrently* updating threads ({@code concurrencyLevel}).** @param initialCapacity the initial capacity. The implementation* performs internal sizing to accommodate this many elements,* given the specified load factor.* @param loadFactor the load factor (table density) for* establishing the initial table size* @param concurrencyLevel the estimated number of concurrently* updating threads. The implementation may use this value as* a sizing hint.* @throws IllegalArgumentException if the initial capacity is* negative or the load factor or concurrencyLevel are* nonpositive*/public ConcurrentHashMap(int initialCapacity, float loadFactor, int concurrencyLevel) {if (!(loadFactor > 0.0f) || initialCapacity < 0 || concurrencyLevel <= 0)throw new IllegalArgumentException();if (initialCapacity < concurrencyLevel) // Use at least as many binsinitialCapacity = concurrencyLevel; // as estimated threadslong size = (long)(1.0 + (long)initialCapacity / loadFactor);int cap = (size >= (long)MAXIMUM_CAPACITY) ? MAXIMUM_CAPACITY : tableSizeFor((int)size);this.sizeCtl = cap;}
在上面的代码中,变量cap就是Node数组的长度,保持为2的整数次方。tableSizeFor(…)方法是根据传入的初始容量,计算出一个合适的数组长度。具体而言:1.5倍的初始容量+1,再往上取最接近的2的整数次方,作为数组长度cap的初始值。
这里的 sizeCtl,其含义是用于控制在初始化或者并发扩容时候的线程数,只不过其初始值设置成cap
2、初始化
在上面的构造方法里只计算了数组的初始大小,并没有对数组进行初始化。当多个线程都往里面放入元素的时候,再进行初始化。这就存在一个问题:多个线程重复初始化。下面看一下是如何处理的
/*** Initializes table, using the size recorded in sizeCtl.*/private final Node<K,V>[] initTable() {Node<K,V>[] tab; int sc;while ((tab = table) == null || tab.length == 0) {if ((sc = sizeCtl) < 0)Thread.yield(); // lost initialization race; just spin 自旋等待else if (U.compareAndSetInt(this, SIZECTL, sc, -1)) { //重点: 将sizeCtl设置为-1 哪个线程抢到-1 则执行下面逻辑try {if ((tab = table) == null || tab.length == 0) {int n = (sc > 0) ? sc : DEFAULT_CAPACITY;@SuppressWarnings("unchecked")Node<K,V>[] nt = (Node<K,V>[])new Node<?,?>[n]; //初始化table = tab = nt;// sizeCtl不是数组长度,因此初始化成功后,就不再等于数组长度// 而是n-(n>>>2)=0.75n,表示下一次扩容的阈值:n-n/4sc = n - (n >>> 2);}} finally {sizeCtl = sc; // 设置sizeCtl的值为sc。}break;}}return tab;}
多个线程的竞争是通过对sizeCtl进行CAS操作实现的。如果某个线程成功地把 sizeCtl 设置为-1,它就拥有了初始化的权利,进入初始化的代码模块,等到初始化完成,再把sizeCtl设置回去;其他线程则一直执行while循环,自旋等待,直到数组不为null,即当初始化结束时,退出整个方法。
因为初始化的工作量很小,所以此处选择的策略是让其他线程一直等待,而没有帮助其初始化。
3.put(..)实现分析
/*** Maps the specified key to the specified value in this table.* Neither the key nor the value can be null.** <p>The value can be retrieved by calling the {@code get} method* with a key that is equal to the original key.** @param key key with which the specified value is to be associated* @param value value to be associated with the specified key* @return the previous value associated with {@code key}, or* {@code null} if there was no mapping for {@code key}* @throws NullPointerException if the specified key or value is null*/public V put(K key, V value) {return putVal(key, value, false);}/** Implementation for put and putIfAbsent */final V putVal(K key, V value, boolean onlyIfAbsent) {if (key == null || value == null) throw new NullPointerException();int hash = spread(key.hashCode());int binCount = 0;for (Node<K,V>[] tab = table;;) {Node<K,V> f; int n, i, fh; K fk; V fv;// 分支1:整个数组初始化if (tab == null || (n = tab.length) == 0)tab = initTable();// 分支2:第i个元素初始化else if ((f = tabAt(tab, i = (n - 1) & hash)) == null) {if (casTabAt(tab, i, null, new Node<K,V>(hash, key, value)))break; // no lock when adding to empty bin}// 分支3:扩容else if ((fh = f.hash) == MOVED)tab = helpTransfer(tab, f);else if (onlyIfAbsent // check first node without acquiring lock&& fh == hash&& ((fk = f.key) == key || (fk != null && key.equals(fk)))&& (fv = f.val) != null)return fv;// 分支4:放入元素else {V oldVal = null;// 重点:加锁synchronized (f) {// 链表if (tabAt(tab, i) == f) {if (fh >= 0) {binCount = 1;for (Node<K,V> e = f;; ++binCount) {K ek;if (e.hash == hash &&((ek = e.key) == key ||(ek != null && key.equals(ek)))) {oldVal = e.val;if (!onlyIfAbsent)e.val = value;break;}Node<K,V> pred = e;if ((e = e.next) == null) {pred.next = new Node<K,V>(hash, key, value);break;}}}else if (f instanceof TreeBin) { //红黑树Node<K,V> p;binCount = 2;if ((p = ((TreeBin<K,V>)f).putTreeVal(hash, key,value)) != null) {oldVal = p.val;if (!onlyIfAbsent)p.val = value;}}else if (f instanceof ReservationNode)throw new IllegalStateException("Recursive update");}}// 如果是链表,上面的binCount会一直累加if (binCount != 0) {if (binCount >= TREEIFY_THRESHOLD) //超出阈值 转换为红黑树treeifyBin(tab, i);if (oldVal != null)return oldVal;break;}}}addCount(1L, binCount); // 总元素个数累加1return null;}
上面的for循环有4个大的分支:
第1个分支,是整个数组的初始化,前面已讲;
第2个分支,是所在的槽为空,说明该元素是该槽的第一个元素,直接新建一个头节点,然后返回;
第3个分支,说明该槽正在进行扩容,帮助其扩容;
第4个分支,就是把元素放入槽内。槽内可能是一个链表,也可能是一棵红黑树,通过头节点的类型可以判断是哪一种。第4个分支是包裹在synchronized (f)里面的,f对应的数组下标位置的头节点,意味着每个数组元素有一把锁,并发度等于数组的长度。
上面的binCount表示链表的元素个数,当这个数目超过TREEIFY_THRESHOLD=8时,把链表转换成红黑树,也就是 treeifyBin(tab,i)方法。但在这个方法内部,不一定需要进行红黑树转换,可能只做扩容操作,所以接下来从扩容讲起。
4.扩容
扩容的实现是最复杂的,下面从treeifyBin(Node
/*** Replaces all linked nodes in bin at given index unless table is* too small, in which case resizes instead.*/private final void treeifyBin(Node<K,V>[] tab, int index) {Node<K,V> b; int n;if (tab != null) {if ((n = tab.length) < MIN_TREEIFY_CAPACITY)// 数组长度小于阈值64,不做红黑树转换,直接扩容tryPresize(n << 1);else if ((b = tabAt(tab, index)) != null && b.hash >= 0) {// 链表转换为红黑树synchronized (b) {if (tabAt(tab, index) == b) {TreeNode<K,V> hd = null, tl = null;// 遍历链表,初始化红黑树for (Node<K,V> e = b; e != null; e = e.next) {TreeNode<K,V> p =new TreeNode<K,V>(e.hash, e.key, e.val,null, null);if ((p.prev = tl) == null)hd = p;elsetl.next = p;tl = p;}setTabAt(tab, index, new TreeBin<K,V>(hd));}}}}}
在上面的代码中,MIN_TREEIFY_CAPACITY=64,意味着当数组的长度没有超过64的时候,数组的每个节点里都是链表,只会扩容,不会转换成红黑树。只有当数组长度大于或等于64时,才考虑把链表转换成红黑树。
在 tryPresize(int size)内部调用了一个核心方法 transfer(Node<K,V>[] tab,Node<K,V >[] nextTab),先从这个方法的分析说起。
/*** Tries to presize table to accommodate the given number of elements.** @param size number of elements (doesn't need to be perfectly accurate)*/private final void tryPresize(int size) {int c = (size >= (MAXIMUM_CAPACITY >>> 1)) ? MAXIMUM_CAPACITY :tableSizeFor(size + (size >>> 1) + 1);int sc;while ((sc = sizeCtl) >= 0) {Node<K,V>[] tab = table; int n;if (tab == null || (n = tab.length) == 0) {n = (sc > c) ? sc : c;if (U.compareAndSetInt(this, SIZECTL, sc, -1)) {try {if (table == tab) {@SuppressWarnings("unchecked")Node<K,V>[] nt = (Node<K,V>[])new Node<?,?>[n];table = nt;sc = n - (n >>> 2);}} finally {sizeCtl = sc;}}}else if (c <= sc || n >= MAXIMUM_CAPACITY)break;else if (tab == table) {int rs = resizeStamp(n);if (U.compareAndSetInt(this, SIZECTL, sc,(rs << RESIZE_STAMP_SHIFT) + 2))transfer(tab, null);}}}/*** Moves and/or copies the nodes in each bin to new table. See* above for explanation.*/private final void transfer(Node<K,V>[] tab, Node<K,V>[] nextTab) {int n = tab.length, stride;if ((stride = (NCPU > 1) ? (n >>> 3) / NCPU : n) < MIN_TRANSFER_STRIDE)stride = MIN_TRANSFER_STRIDE; // subdivide range // 计算步长if (nextTab == null) { // 初始化新的HashMaptry {@SuppressWarnings("unchecked")Node<K,V>[] nt = (Node<K,V>[])new Node<?,?>[n << 1]; // 扩容两倍nextTab = nt;} catch (Throwable ex) { // try to cope with OOMEsizeCtl = Integer.MAX_VALUE;return;}nextTable = nextTab;// 初始的transferIndex为旧HashMap的数组长度transferIndex = n;}int nextn = nextTab.length;ForwardingNode<K,V> fwd = new ForwardingNode<K,V>(nextTab);boolean advance = true;boolean finishing = false; // to ensure sweep before committing nextTab// 此处,i为遍历下标,bound为边界。// 如果成功获取一个任务,则i=nextIndex-1// bound=nextIndex-stride;// 如果获取不到,则i=0,bound=0for (int i = 0, bound = 0;;) {Node<K,V> f; int fh;// advance表示在从i=transferIndex-1遍历到bound位置的过程中,是否一直继续while (advance) {int nextIndex, nextBound;// 以下是哪个分支中的advance都是false,表示如果三个分支都不执行,才可以一 直while循环// 目的在于当对transferIndex执行CAS操作不成功的时候,需要自旋,以期获取 一个stride的迁移任务。if (--i >= bound || finishing)// 对数组遍历,通过这里的--i进行。如果成功执行了--i,就不需要继续 while循环了,因为advance只能进一步。advance = false;else if ((nextIndex = transferIndex) <= 0) {// transferIndex <= 0,整个HashMap完成i = -1;advance = false;}// 对transferIndex执行CAS操作,即为当前线程分配1个stride。// CAS操作成功,线程成功获取到一个stride的迁移任务;// CAS操作不成功,线程没有抢到任务,会继续执行while循环,自旋。else if (U.compareAndSetInt(this, TRANSFERINDEX, nextIndex,nextBound = (nextIndex > stride ?nextIndex - stride : 0))) {bound = nextBound;i = nextIndex - 1;advance = false;}}// i越界,整个HashMap遍历完成if (i < 0 || i >= n || i + n >= nextn) {int sc;// finishing表示整个HashMap扩容完成if (finishing) {nextTable = null;// 将nextTab赋值给当前tabletable = nextTab;sizeCtl = (n << 1) - (n >>> 1);return;}if (U.compareAndSetInt(this, SIZECTL, sc = sizeCtl, sc - 1)) {if ((sc - 2) != resizeStamp(n) << RESIZE_STAMP_SHIFT)return;finishing = advance = true;i = n; // recheck before commit}}// tab[i]迁移完毕,赋值一个ForwardingNodeelse if ((f = tabAt(tab, i)) == null)advance = casTabAt(tab, i, null, fwd);else if ((fh = f.hash) == MOVED) // tab[i]的位置已经在迁移过程中advance = true; // already processedelse {// 对tab[i]进行迁移操作,tab[i]可能是一个链表或者红黑树synchronized (f) {if (tabAt(tab, i) == f) {Node<K,V> ln, hn;// 链表if (fh >= 0) {int runBit = fh & n;Node<K,V> lastRun = f;for (Node<K,V> p = f.next; p != null; p = p.next) {int b = p.hash & n;if (b != runBit) {runBit = b;// 表示lastRun之后的所有元素,hash值都是一样的// 记录下这个最后的位置lastRun = p;}}if (runBit == 0) {// 链表迁移的优化做法ln = lastRun;hn = null;}else {hn = lastRun;ln = null;}for (Node<K,V> p = f; p != lastRun; p = p.next) {int ph = p.hash; K pk = p.key; V pv = p.val;if ((ph & n) == 0)ln = new Node<K,V>(ph, pk, pv, ln);elsehn = new Node<K,V>(ph, pk, pv, hn);}setTabAt(nextTab, i, ln);setTabAt(nextTab, i + n, hn);setTabAt(tab, i, fwd);advance = true;}// 红黑树,迁移做法和链表类似else if (f instanceof TreeBin) {TreeBin<K,V> t = (TreeBin<K,V>)f;TreeNode<K,V> lo = null, loTail = null;TreeNode<K,V> hi = null, hiTail = null;int lc = 0, hc = 0;for (Node<K,V> e = t.first; e != null; e = e.next) {int h = e.hash;TreeNode<K,V> p = new TreeNode<K,V>(h, e.key, e.val, null, null);if ((h & n) == 0) {if ((p.prev = loTail) == null)lo = p;elseloTail.next = p;loTail = p;++lc;}else {if ((p.prev = hiTail) == null)hi = p;elsehiTail.next = p;hiTail = p;++hc;}}ln = (lc <= UNTREEIFY_THRESHOLD) ? untreeify(lo) :(hc != 0) ? new TreeBin<K,V>(lo) : t;hn = (hc <= UNTREEIFY_THRESHOLD) ? untreeify(hi) :(lc != 0) ? new TreeBin<K,V>(hi) : t;setTabAt(nextTab, i, ln);setTabAt(nextTab, i + n, hn);setTabAt(tab, i, fwd);advance = true;}}}}}}
该方法非常复杂,下面一步步分析:
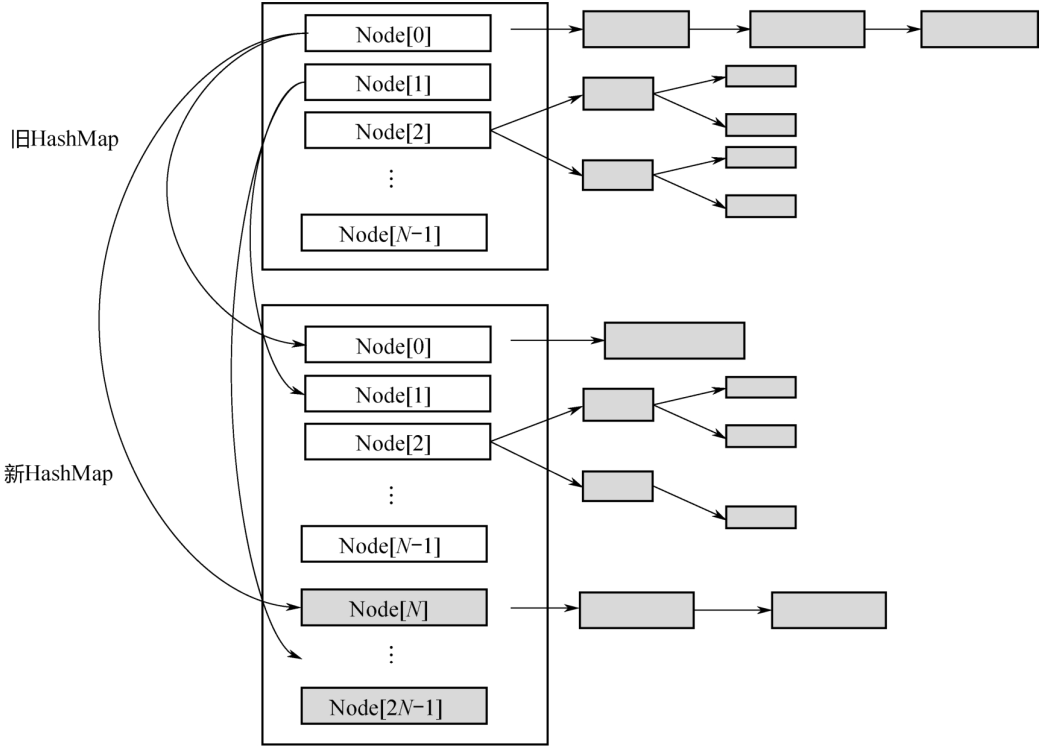
1. 扩容的基本原理如下图,首先建一个新的HashMap,其数组长度是旧数组长度的2倍,然后把旧的元素逐个迁移过来。所以,上面的方法参数有2个,第1个参数tab是扩容之前的HashMap,第2个参数nextTab是扩容之后的HashMap。当nextTab=null的时候,方法最初会对nextTab进行初始化。这里有一个关键点要说明:该方法会被多个线程调用,所以每个线程只是扩容旧的HashMap部分,这就涉及如何划分任务的问题。
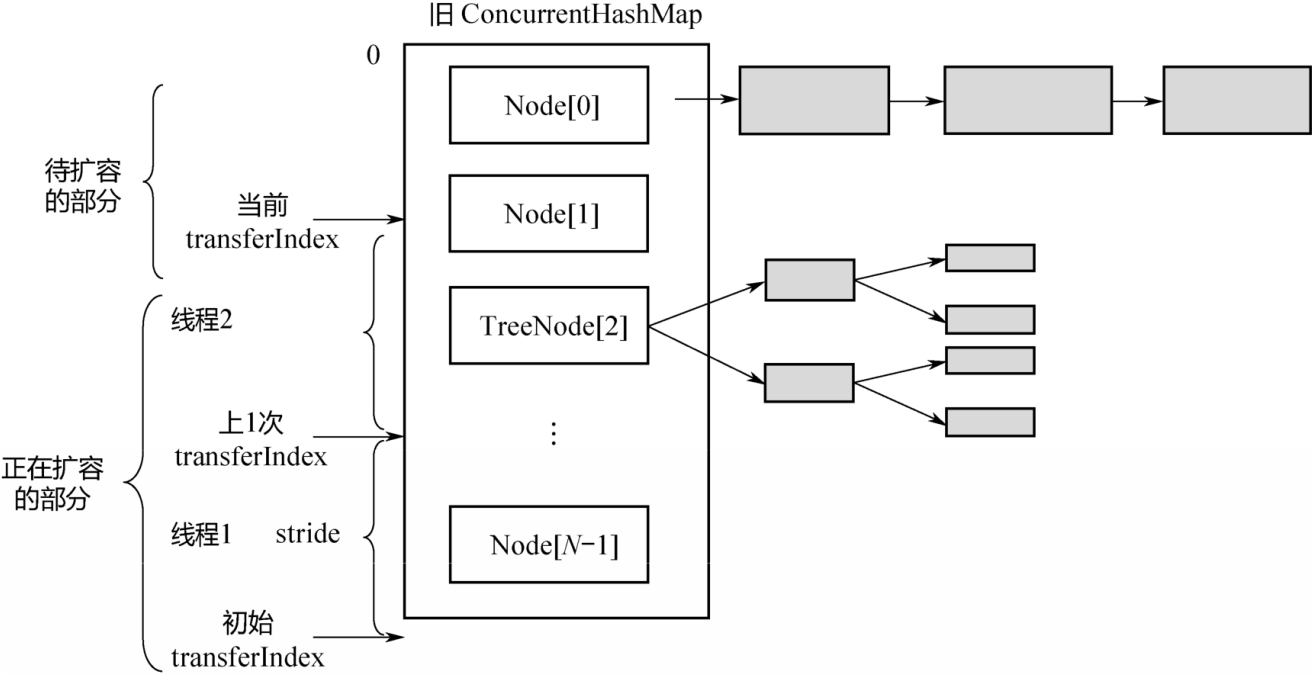
2. 上图为多个线程并行扩容-任务划分示意图。旧数组的长度是N,每个线程扩容一段,一段的长度用变量stride(步长)来表示,transferIndex表示了整个数组扩容的进度。stride的计算公式如上面的代码所示,即:在单核模式下直接等于n,因为在单核模式下没有办法多个线程并行扩容,只需要1个线程来扩容整个数组;在多核模式下为 (n>>>3)/NCPU,并且保证步长的最小值是 16。显然,需要的线程个数约为n/stride。
transferIndex是ConcurrentHashMap的一个成员变量,记录了扩容的进度。初始值为n,从大到小扩容,每次减stride个位置,最终减至n<=0,表示整个扩容完成。因此,从[0,transferIndex-1]的位置表示还没有分配到线程扩容的部分,从[transfexIndex,n-1]的位置表示已经分配给某个线程进行扩容,当前正在扩容中,或者已经扩容成功。
因为transferIndex会被多个线程并发修改,每次减stride,所以需要通过CAS进行操作,如下面的代码所示。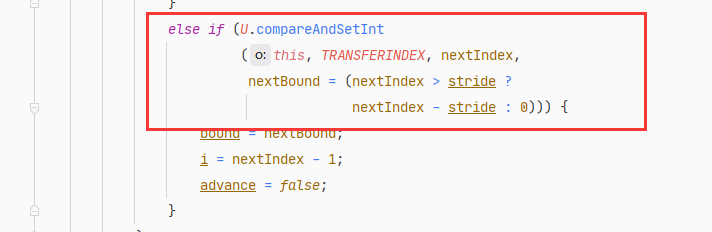
3. 在扩容未完成之前,有的数组下标对应的槽已经迁移到了新的HashMap里面,有的还在旧的HashMap 里面。这个时候,所有调用 get(k,v)的线程还是会访问旧 HashMap,怎么处理呢?
下图为扩容过程中的转发示意图:当Node[0]已经迁移成功,而其他Node还在迁移过程中时,如果有线程要读取Node[0]的数据,就会访问失败。为此,新建一个ForwardingNode,即转发节点,在这个节点里面记录的是新的 ConcurrentHashMap 的引用。这样,当线程访问到ForwardingNode之后,会去查询新的ConcurrentHashMap。
4. 因为数组的长度 tab.length 是2的整数次方,每次扩容又是2倍。而 Hash 函数是hashCode%tab.length,等价于hashCode&(tab.length-1)。这意味着:处于第i个位置的元素,在新的Hash表的数组中一定处于第i个或者第i+n个位置,如下图所示。
举个简单的例子:假设数组长度是8,扩容之后是16:
若hashCode=5,5%8=0,扩容后,5%16=0,位置保持不变;
若hashCode=24,24%8=0,扩容后,24%16=8,后移8个位置;
若hashCode=25,25%8=1,扩容后,25%16=9,后移8个位置;
若hashCode=39,39%8=7,扩容后,39%8=7,位置保持不变;
……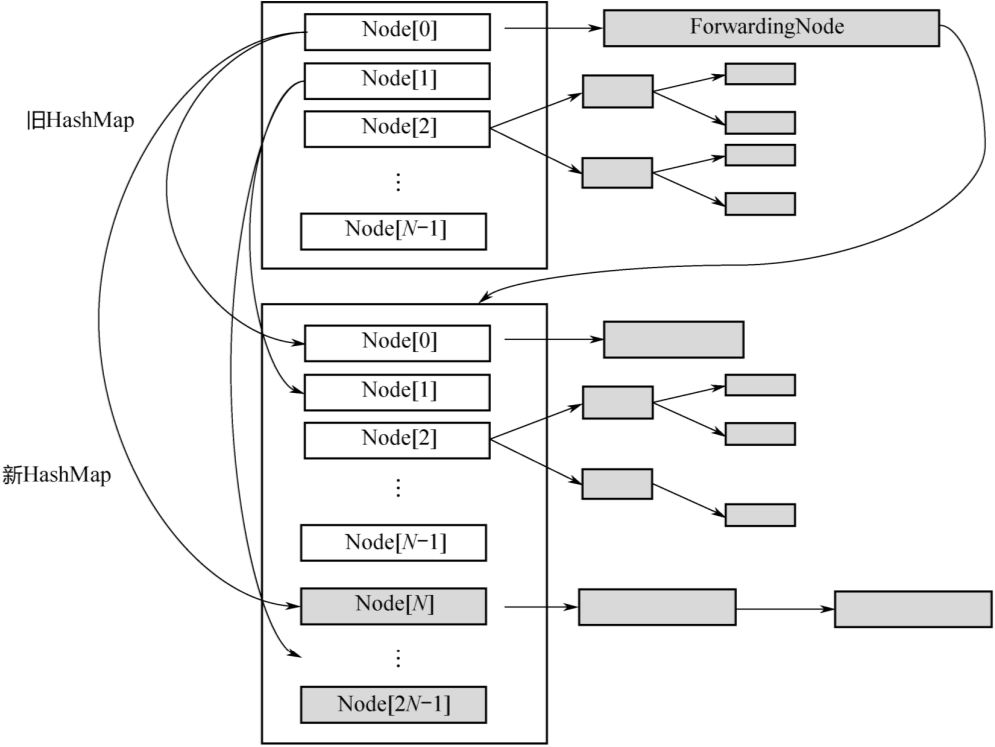
正因为有这样的规律,所以如下有代码: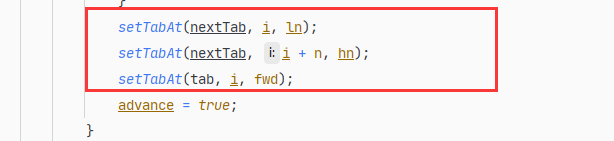
也就是把tab[i]位置的链表或红黑树重新组装成两部分,一部分链接到nextTab[i]的位置,一部分链接到nextTab[i+n]的位置,如上图所示。然后把tab[i]的位置指向一个ForwardingNode节点。
同时,当tab[i]后面是链表时,使用类似于JDK 7中在扩容时的优化方法,从lastRun往后的所有节点,不需依次拷贝,而是直接链接到新的链表头部。从lastRun往前的所有节点,需要依次拷贝。
了解了核心的迁移函数transfer(tab,nextTab),再回头看tryPresize(int size)函数。这个函数的输入是整个Hash表的元素个数,在函数里面,根据需要对整个Hash表进行扩容。想要看明白这个函数,需要透彻地理解sizeCtl变量,下面这段注释摘自源码。
/*** Table initialization and resizing control. When negative, the* table is being initialized or resized: -1 for initialization,* else -(1 + the number of active resizing threads). Otherwise,* when table is null, holds the initial table size to use upon* creation, or 0 for default. After initialization, holds the* next element count value upon which to resize the table.*/private transient volatile int sizeCtl;
当sizeCtl=-1时,表示整个HashMap正在初始化;
当sizeCtl=某个其他负数时,表示多个线程在对HashMap做并发扩容;
当sizeCtl=cap时,tab=null,表示未初始之前的初始容量(如上面的构造函数所示);
扩容成功之后,sizeCtl存储的是下一次要扩容的阈值,即上面初始化代码中的n-(n>>>2)=0.75n。
所以,sizeCtl变量在Hash表处于不同状态时,表达不同的含义。明白了这个道理,再来看上面的tryPresize(int size)函数。
/*** Tries to presize table to accommodate the given number of elements.** @param size number of elements (doesn't need to be perfectly accurate)*/private final void tryPresize(int size) {int c = (size >= (MAXIMUM_CAPACITY >>> 1)) ? MAXIMUM_CAPACITY :tableSizeFor(size + (size >>> 1) + 1);int sc;while ((sc = sizeCtl) >= 0) {Node<K,V>[] tab = table; int n;if (tab == null || (n = tab.length) == 0) {n = (sc > c) ? sc : c;if (U.compareAndSetInt(this, SIZECTL, sc, -1)) {try {if (table == tab) {@SuppressWarnings("unchecked")Node<K,V>[] nt = (Node<K,V>[])new Node<?,?>[n];table = nt;sc = n - (n >>> 2);}} finally {sizeCtl = sc;}}}else if (c <= sc || n >= MAXIMUM_CAPACITY)break;else if (tab == table) {int rs = resizeStamp(n);if (U.compareAndSetInt(this, SIZECTL, sc,(rs << RESIZE_STAMP_SHIFT) + 2))transfer(tab, null);}}}
tryPresize(int size)是根据期望的元素个数对整个Hash表进行扩容,核心是调用transfer函数。在第一次扩容的时候,sizeCtl会被设置成一个很大的负数
U.compareAndSwapInt(this,SIZECTL,sc,(rs << RESIZE_STAMP_SHIFT)+2);之后每一个线程扩容的时候,sizeCtl 就加 1,U.compareAndSwapInt(this,SIZECTL,sc,sc+1),待扩容完成之后,sizeCtl减1。
ConcurrentSkipListMap/Set
ConcurrentHashMap 是一种 key 无序的 HashMap,ConcurrentSkipListMap则是 key 有序的,实现了NavigableMap接口,此接口又继承了SortedMap接口。
1.为什么要使用SkipList实现Map?
在Java的util包中,有一个非线程安全的HashMap,也就是TreeMap,是key有序的,基于红黑树实现。
而在Concurrent包中,提供的key有序的HashMap,也就是ConcurrentSkipListMap,是基于SkipList(跳查表)来实现的。这里为什么不用红黑树,而用跳查表来实现呢?
借用Doug Lea的原话:
The reason is that there are no known efficient lock0free insertion and deletion algorithms for search trees.
也就是目前计算机领域还未找到一种高效的、作用在树上的、无锁的、增加和删除节点的办法。那为什么SkipList可以无锁地实现节点的增加、删除呢?这要从无锁链表的实现说起。
2.无锁链表
在前面讲解AQS时,曾反复用到无锁队列,其实现也是链表。究竟二者的区别在哪呢?
前面讲的无锁队列、栈,都是只在队头、队尾进行CAS操作,通常不会有问题。如果在链表的中间进行插入或删除操作,按照通常的CAS做法,就会出现问题!
关于这个问题,Doug Lea的论文中有清晰的论述,此处引用如下:
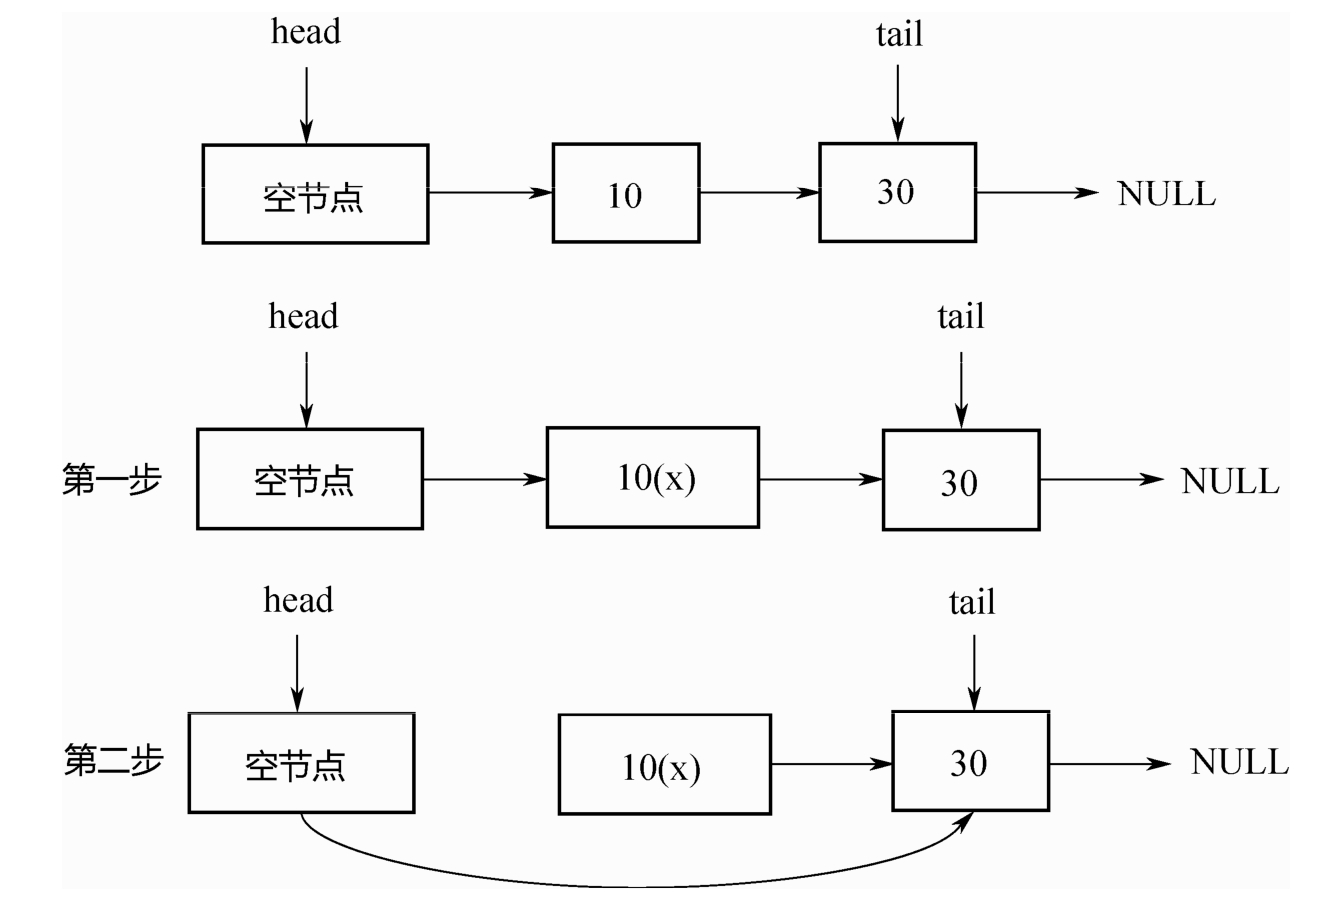
操作1:在节点10后面插入节点20。如下图所示,首先把节点20的next指针指向节点30,然后对节点10的next指针执行CAS操作,使其指向节点20即可。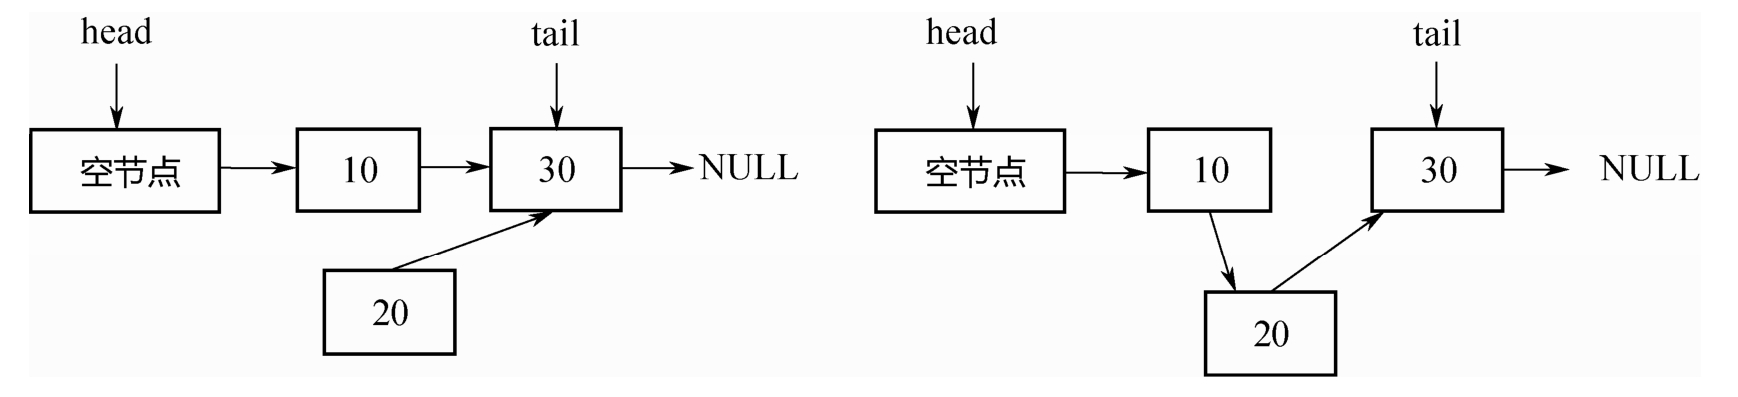
操作2:删除节点10。如下图所示,只需把头节点的next指针,进行CAS操作到节点30即可
但是,如果两个线程同时操作,一个删除节点10,一个要在节点10后面插入节点20。并且这两个操作都各自是CAS的,此时就会出现问题。如下图所示,删除节点10,会同时把新插入的节点20也删除掉!这个问题超出了CAS的解决范围。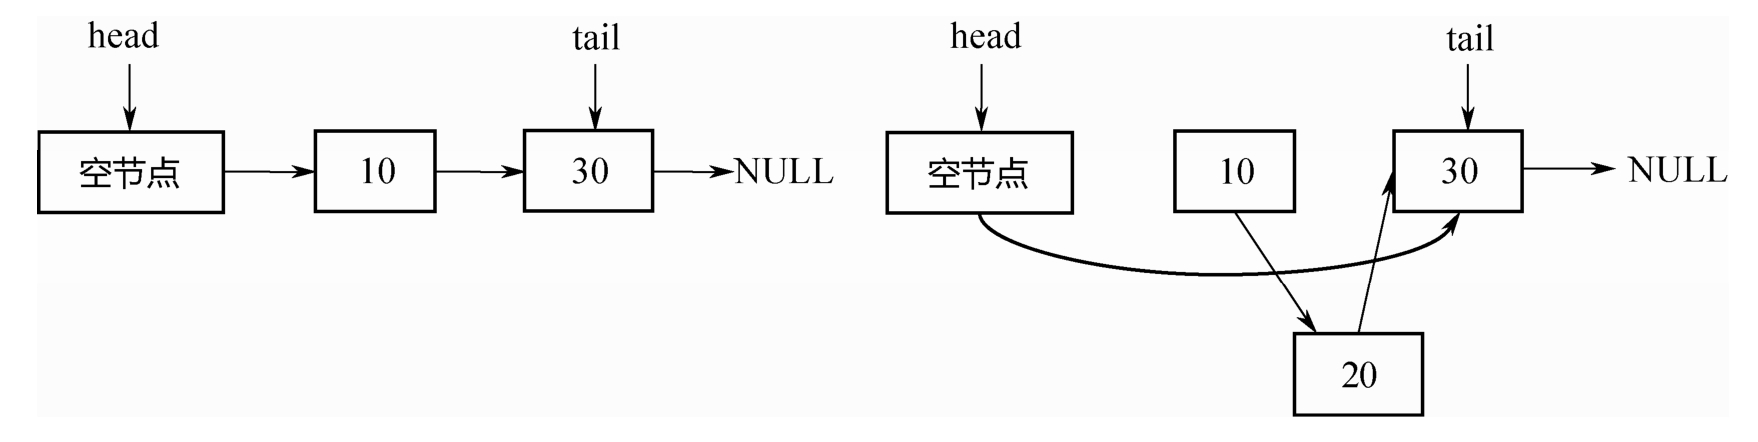
为什么会出现这个问题呢?
究其原因:在删除节点10的时候,实际受到操作的是节点10的前驱,也就是头节点。节点10本身没有任何变化。故而,再往节点10后插入节点20的线程,并不知道节点10已经被删除了!
针对这个问题,在论文中提出了如下的解决办法,如下图所示,把节点 10 的删除分为两2步:
第一步,把节点10的next指针,mark成删除,即软删除;
第二步,找机会,物理删除。
做标记之后,当线程再往节点10后面插入节点20的时候,便可以先进行判断,节点10是否已经被删除,从而避免在一个删除的节点10后面插入节点20。这个解决方法有一个关键点:“把节点10的next指
针指向节点20(插入操作)”和“判断节点10本身是否已经删除(判断操作)”,必须是原子的,必须在1 个CAS操作里面完成!
具体的实现有两个办法:
办法一:AtomicMarkableReference
保证每个 next 是 AtomicMarkableReference 类型。但这个办法不够高效,Doug Lea 在ConcurrentSkipListMap的实现中用了另一种办法。
办法2:Mark节点
我们的目的是标记节点10已经删除,也就是标记它的next字段。那么可以新造一个marker节点,使节点10的next指针指向该Marker节点。这样,当向节点10的后面插入节点20的时候,就可以在插入的同时判断节点10的next指针是否指向了一个Marker节点,这两个操作可以在一个CAS操作里面完成。
3.跳查表
解决了无锁链表的插入或删除问题,也就解决了跳查表的一个关键问题。因为跳查表就是多层链表叠起来的。
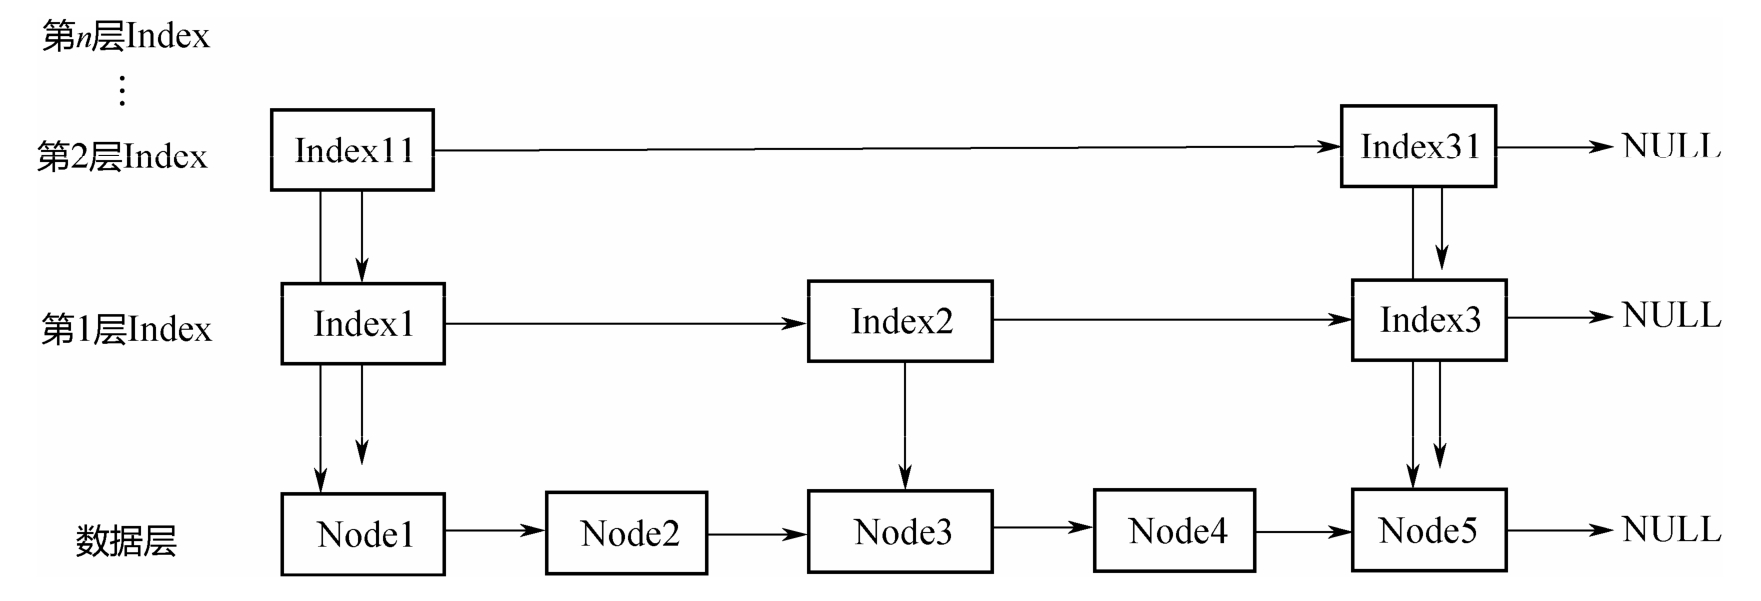
下面先看一下跳查表的数据结构(下面所用代码都引用自JDK 7,JDK 8中的代码略有差异,但不影响下面的原理分析)。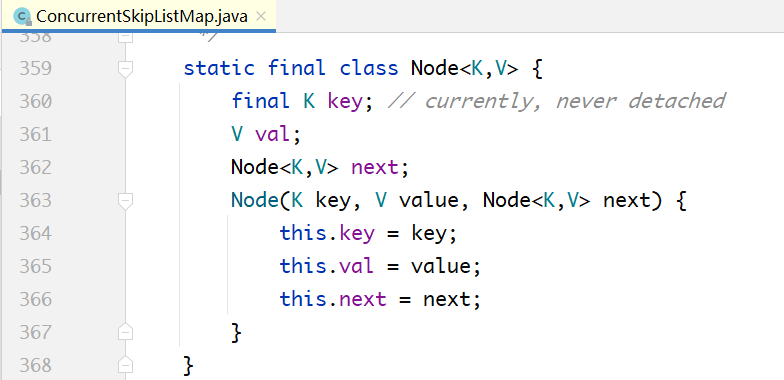
上图中的Node就是跳查表底层节点类型。所有的
上面的Index层的节点: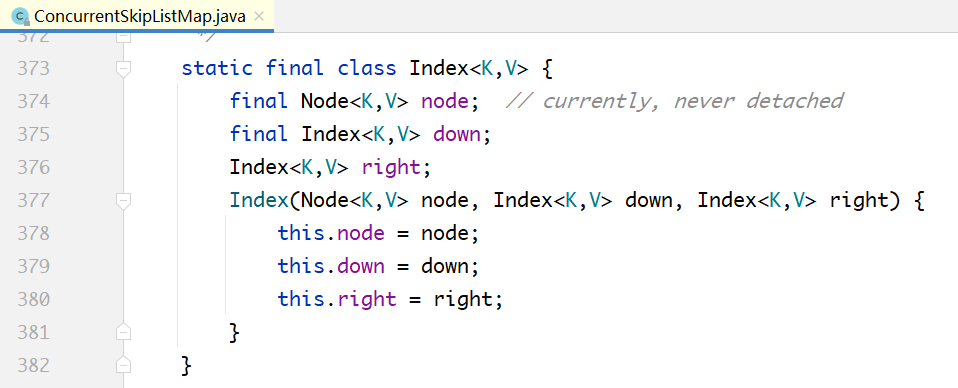
上图中的node属性不存储实际数据,指向Node节点。
down属性:每个Index节点,必须有一个指针,指向其下一个Level对应的节点。
right属性:Index也组成单向链表。
整个ConcurrentSkipListMap就只需要记录顶层的head节点即可:
public class ConcurrentSkipListMap<K,V> extends AbstractMap<K,V> implements ConcurrentNavigableMap<K,V>, Cloneable, Serializable {// ...private transient Index<K,V> head;// ...}
下面详细分析如何从跳查表上查找、插入和删除元素
put实现分析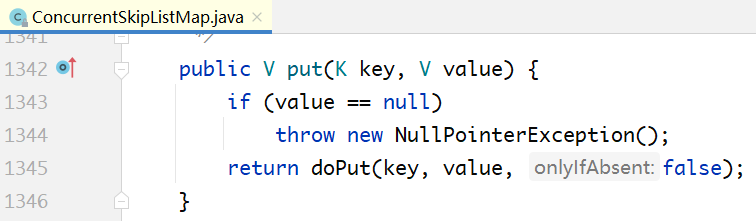
/*** Main insertion method. Adds element if not present, or* replaces value if present and onlyIfAbsent is false.** @param key the key* @param value the value that must be associated with key* @param onlyIfAbsent if should not insert if already present* @return the old value, or null if newly inserted*/private V doPut(K key, V value, boolean onlyIfAbsent) {if (key == null)throw new NullPointerException();Comparator<? super K> cmp = comparator;for (;;) {Index<K,V> h; Node<K,V> b;VarHandle.acquireFence();int levels = 0; // number of levels descendedif ((h = head) == null) { // try to initializeNode<K,V> base = new Node<K,V>(null, null, null);h = new Index<K,V>(base, null, null);b = (HEAD.compareAndSet(this, null, h)) ? base : null;}else {for (Index<K,V> q = h, r, d;;) { // count while descendingwhile ((r = q.right) != null) {Node<K,V> p; K k;if ((p = r.node) == null || (k = p.key) == null ||p.val == null)RIGHT.compareAndSet(q, r, r.right);else if (cpr(cmp, key, k) > 0)q = r;elsebreak;}if ((d = q.down) != null) {++levels;q = d;}else {b = q.node;break;}}}if (b != null) {Node<K,V> z = null; // new node, if insertedfor (;;) { // find insertion pointNode<K,V> n, p; K k; V v; int c;if ((n = b.next) == null) {if (b.key == null) // if empty, type check key nowcpr(cmp, key, key);c = -1;}else if ((k = n.key) == null)break; // can't append; restartelse if ((v = n.val) == null) {unlinkNode(b, n);c = 1;}else if ((c = cpr(cmp, key, k)) > 0)b = n;else if (c == 0 &&(onlyIfAbsent || VAL.compareAndSet(n, v, value)))return v;if (c < 0 &&NEXT.compareAndSet(b, n,p = new Node<K,V>(key, value, n))) {z = p;break;}}if (z != null) {int lr = ThreadLocalRandom.nextSecondarySeed();if ((lr & 0x3) == 0) { // add indices with 1/4 probint hr = ThreadLocalRandom.nextSecondarySeed();long rnd = ((long)hr << 32) | ((long)lr & 0xffffffffL);int skips = levels; // levels to descend before addIndex<K,V> x = null;for (;;) { // create at most 62 indicesx = new Index<K,V>(z, x, null);if (rnd >= 0L || --skips < 0)break;elsernd <<= 1;}if (addIndices(h, skips, x, cmp) && skips < 0 &&head == h) { // try to add new levelIndex<K,V> hx = new Index<K,V>(z, x, null);Index<K,V> nh = new Index<K,V>(h.node, h, hx);HEAD.compareAndSet(this, h, nh);}if (z.val == null) // deleted while adding indicesfindPredecessor(key, cmp); // clean}addCount(1L);return null;}}}}
在底层,节点按照从小到大的顺序排列,上面的index层间隔地串在一起,因为从小到大排列。查找的时候,从顶层index开始,自左往右、自上往下,形成图示的遍历曲线。假设要查找的元素是32,遍历过程如下:
先遍历第2层Index,发现在21的后面;
从21下降到第1层Index,从21往后遍历,发现在21和35之间;
从21下降到底层,从21往后遍历,最终发现在29和35之间。
在整个的查找过程中,范围不断缩小,最终定位到底层的两个元素之间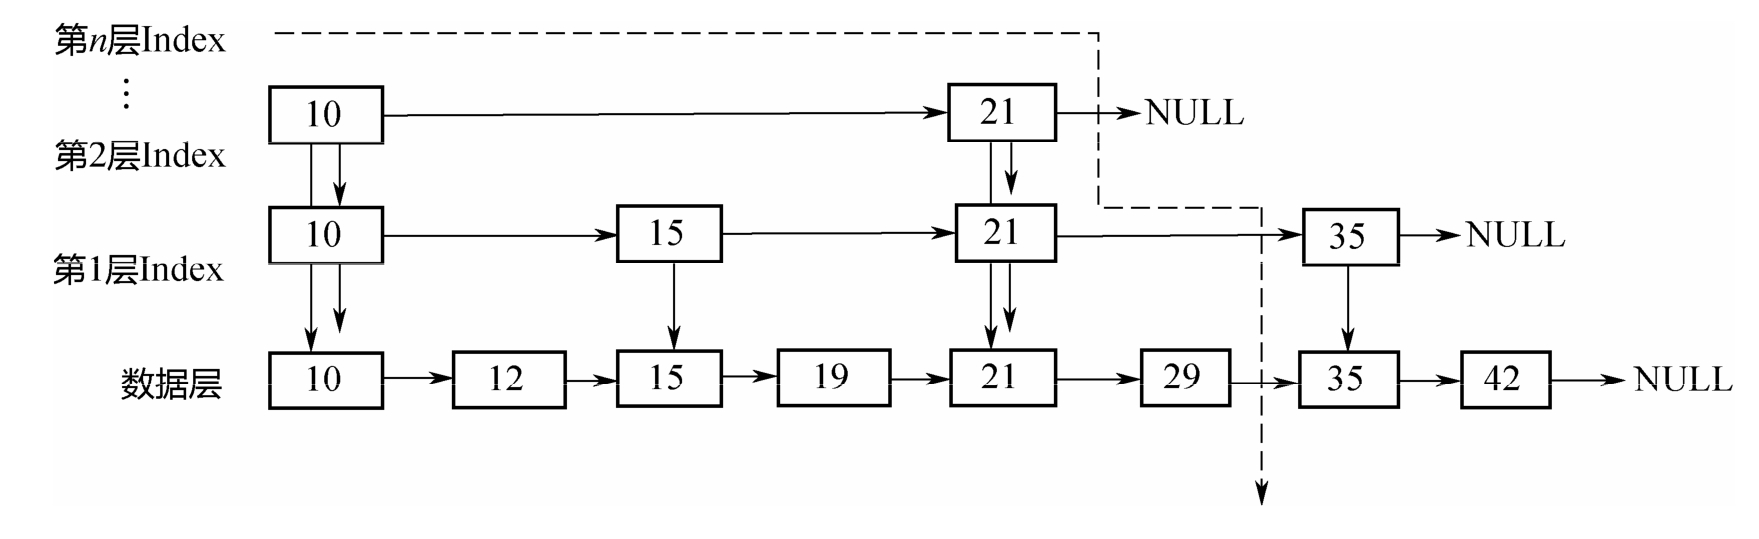
关于上面的put(…)方法,有一个关键点需要说明:在通过findPredecessor找到了待插入的元素在[b,n]之间之后,并不能马上插入。因为其他线程也在操作这个链表,b、n都有可能被删除,所以在插入之前执行了一系列的检查逻辑,而这也正是无锁链表的复杂之处。
remove(…)分析
/*** Main deletion method. Locates node, nulls value, appends a* deletion marker, unlinks predecessor, removes associated index* nodes, and possibly reduces head index level.** @param key the key* @param value if non-null, the value that must be* associated with key* @return the node, or null if not found*/// 若找到了(key, value)就删除,并返回value;找不到就返回nullfinal V doRemove(Object key, Object value) {if (key == null)throw new NullPointerException();Comparator<? super K> cmp = comparator;V result = null;Node<K,V> b;outer: while ((b = findPredecessor(key, cmp)) != null &&result == null) {for (;;) {Node<K,V> n; K k; V v; int c;if ((n = b.next) == null)break outer;else if ((k = n.key) == null)break;else if ((v = n.val) == null)unlinkNode(b, n);else if ((c = cpr(cmp, key, k)) > 0)b = n;else if (c < 0)break outer;else if (value != null && !value.equals(v))break outer;else if (VAL.compareAndSet(n, v, null)) {result = v;unlinkNode(b, n);break; // loop to clean up}}}if (result != null) {tryReduceLevel();addCount(-1L);}return result;}
上面的删除方法和插入方法的逻辑非常类似,因为无论是插入,还是删除,都要先找到元素的前驱,也就是定位到元素所在的区间[b,n]。在定位之后,执行下面几个步骤:
1. 如果发现b、n已经被删除了,则执行对应的删除清理逻辑;
2. 否则,如果没有找到待删除的(k, v),返回null;
3. 如果找到了待删除的元素,也就是节点n,则把n的value置为null,同时在n的后面加上Marker节点,同时检查是否需要降低Index的层次。
无论是插入、删除,还是查找,都有相似的逻辑,都需要先定位到元素位置[b,n],然后判断b、n是否已经被删除,如果是,则需要执行相应的删除清理逻辑。这也正是无锁链表复杂的地方。
ConcurrentSkipListSet只是对ConcurrentSkipListMap的简单封装,每次插入数据前检验元素是否存在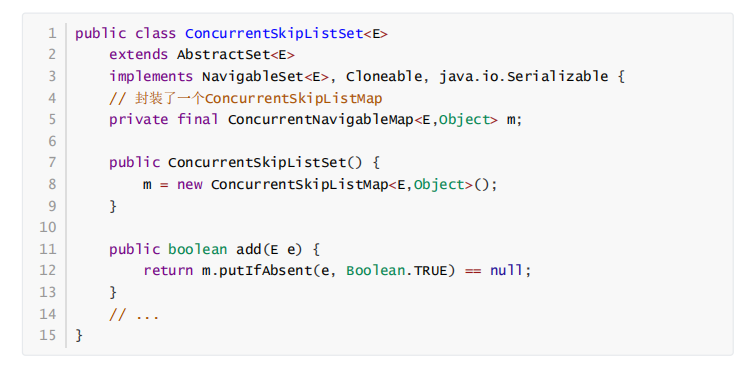

若有收获,就点个赞吧
0 人点赞
