总结:
首先要学会区分用户态与内核态:
- 用户态:
- 都是在进程的内存空间里面进行
- 函数栈:ESP、EBP
- 内核态:【内核栈】
- 每个task都会有一个内核栈【不管是进程还是线程】
thread_info -> 内核栈->pg_regs**pt_regs描述了在执行该系统调用时,用户态下的CPU寄存器在核心态的栈中的保存情况[也就是在内核态知道用户态的情况]。
- 通过 tast_struct 找到 内核栈
- 通过内核找到 tast_struct
当系统调用从用户态到内核态的时候,首先要做的第一件事情,就是将用户态运行过程中的 CPU 上下文保存起来,其实主要就是保存在这个结构的寄存器变量里。这样当从内核系统调用返回的时候,才能让进程在刚才的地方接着运行下去。
如何将用户态的执行和内核态的执行串起来呢?
这就需要以下两个重要的成员变量:
struct thread_info thread_info;void *stack;
用户态函数栈
【**都是在进程的内存空间里面进行的**】
函数的调用过程,用栈保存这些最合适。
在进程的内存空间里面,栈是一个从高地址到低地址,往下增长的结构,也就是上面是栈底,下面是栈顶,入栈和出栈的操作都是从下面的栈顶开始的。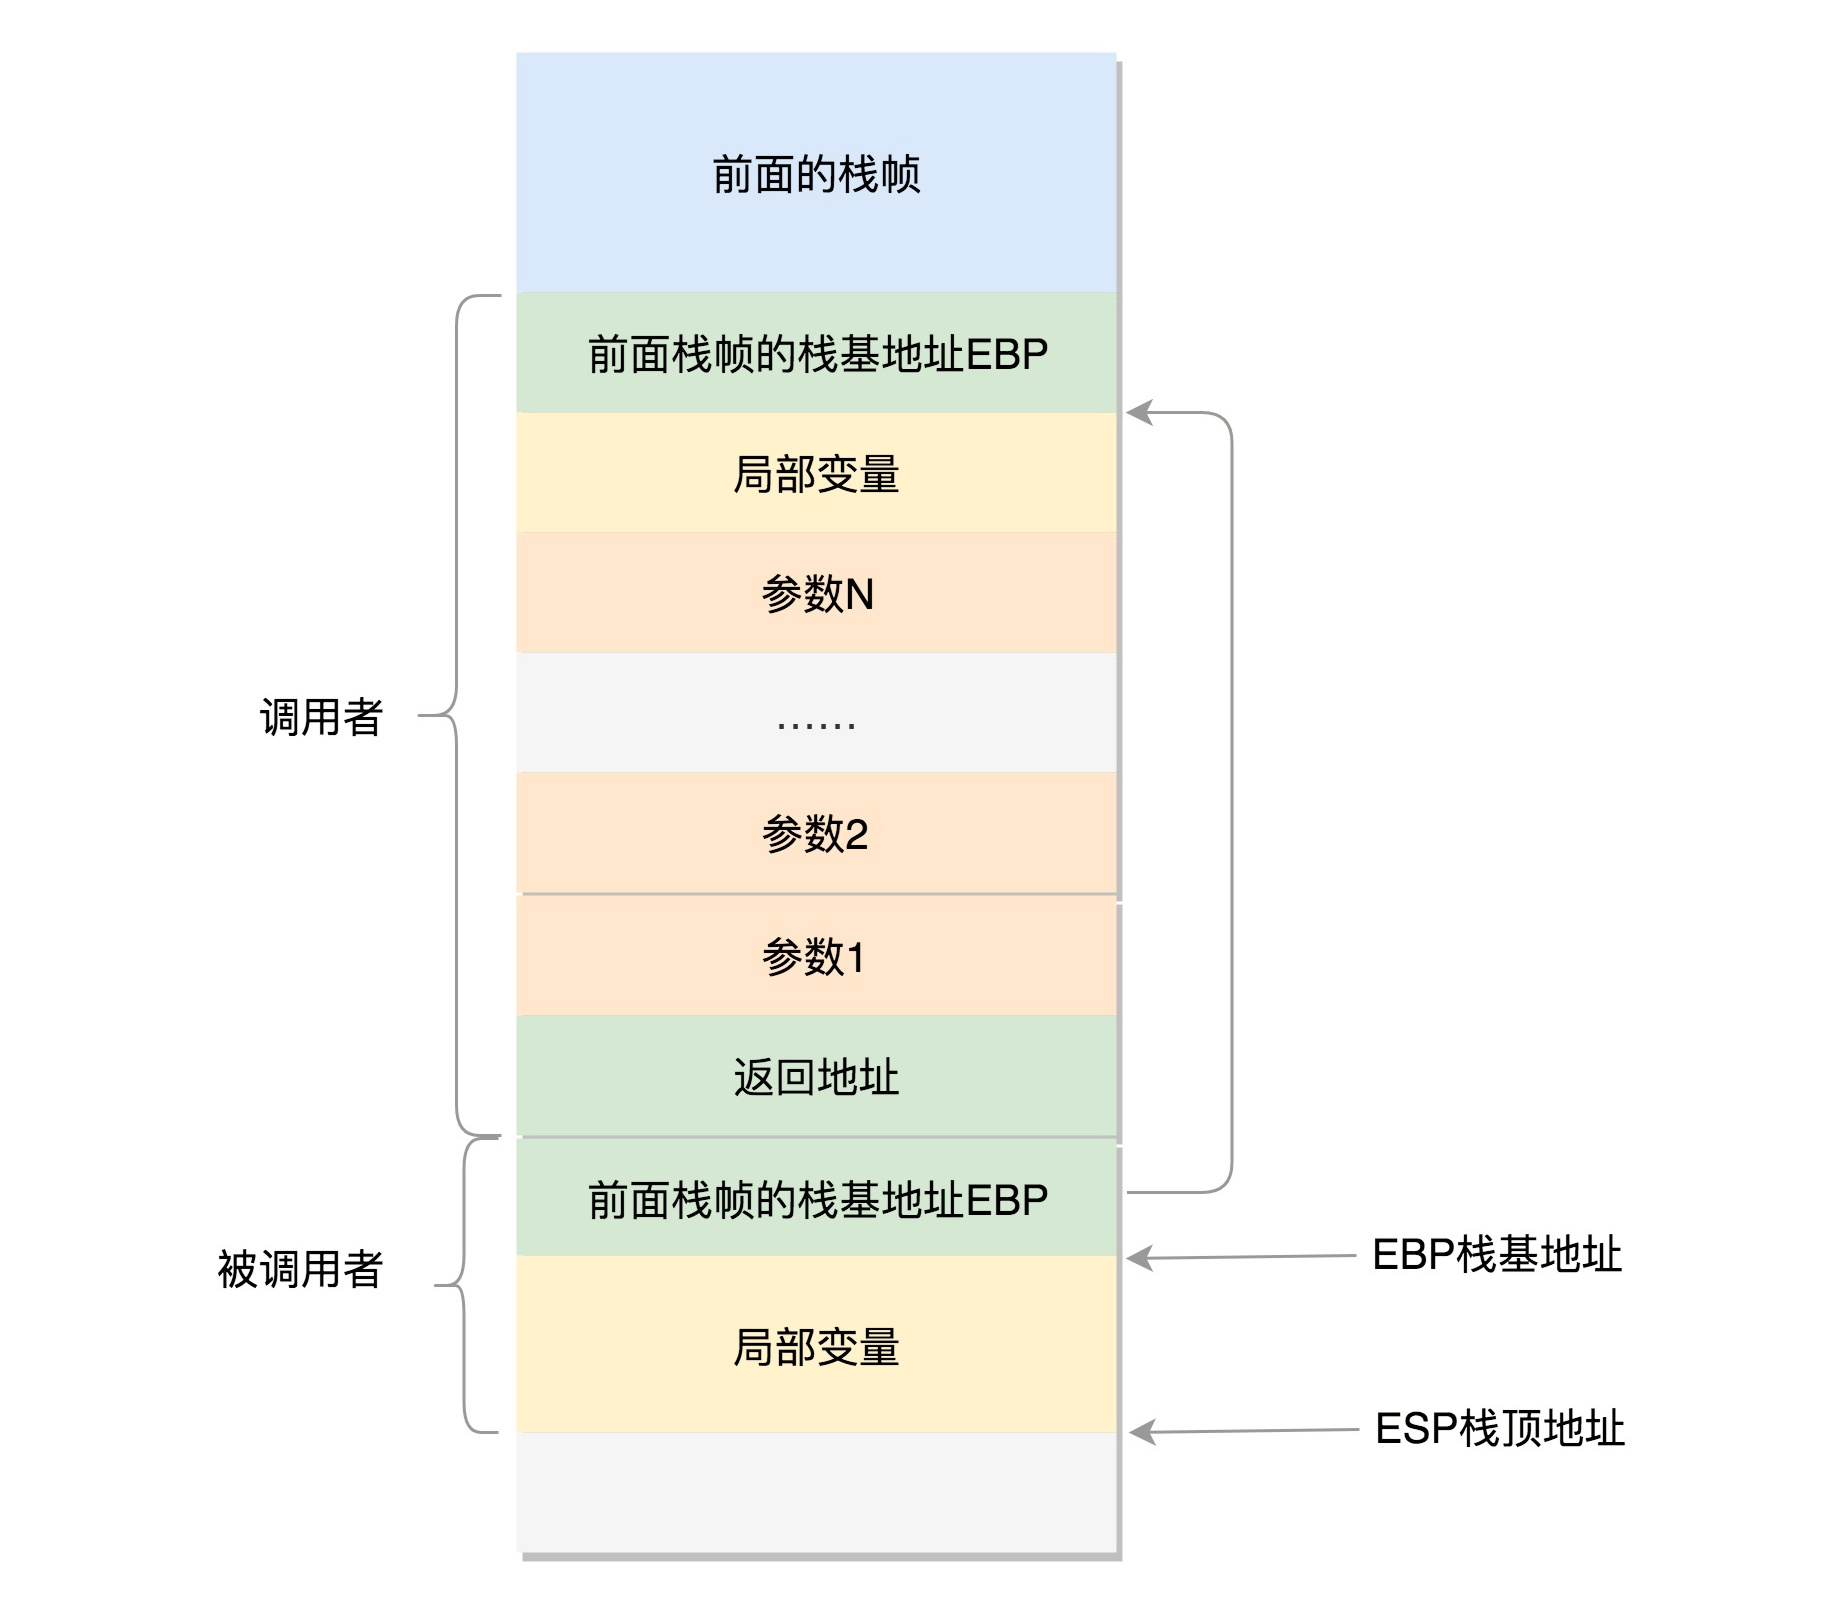
32 位操作系统的情况。在 CPU 里,ESP(Extended Stack Pointer)是栈顶指针寄存器,入栈操作 Push 和出栈操作 Pop 指令,会自动调整 ESP 的值。另外有一个寄存器EBP(Extended Base Pointer),是栈基地址指针寄存器,指向当前栈帧的最底部。
例如,A 调用 B,A 的栈里面包含 A 函数的局部变量,然后是调用 B 的时候要传给它的参数,然后返回 A 的地址,这个地址也应该入栈,这就形成了 A 的栈帧。接下来就是 B 的栈帧部分了,因为在 B 函数里面获取 A 传进来的参数,就是通过这个指针获取的,接下来保存的是 B 的局部变量等等。
当 B 返回的时候,返回值会保存在 EAX 寄存器中,从栈中弹出返回地址,将指令跳转回去,参数也从栈中弹出,然后继续执行 A。
对于 64 位操作系统,模式多少有些不一样。因为 64 位操作系统的寄存器数目比较多。rax 用于保存函数调用的返回结果。栈顶指针寄存器变成了 rsp,指向栈顶位置。堆栈的 Pop 和 Push 操作会自动调整 rsp,栈基指针寄存器变成了 rbp,指向当前栈帧的起始位置。
改变比较多的是参数传递。rdi、rsi、rdx、rcx、r8、r9 这 6 个寄存器,用于传递存储函数调用时的 6 个参数。如果超过 6 的时候,还是需要放到栈里面。
然而,前 6 个参数有时候需要进行寻址,但是如果在寄存器里面,是没有地址的,因而还是会放到栈里面,只不过放到栈里面的操作是被调用函数做的。
内核态函数栈
通过系统调用,从进程的内存空间到内核中了。内核中也有各种各样的函数调用来调用去的,也需要这样一个机制,这该怎么办呢?
这时候,上面的成员变量 stack,也就是内核栈,就派上了用场。
Linux 给每个 task 都分配了内核栈。在 32 位系统上 arch/x86/include/asm/page_32_types.h,是这样定义的:一个 **PAGE_SIZE【也就是Linux内存分页】 是 4K,左移一位就是乘以 2,也就是 8K。**
#define THREAD_SIZE_ORDER 1#define THREAD_SIZE (PAGE_SIZE << THREAD_SIZE_ORDER)
内核栈在 64 位系统上 arch/x86/include/asm/page_64_types.h,是这样定义的:在 PAGE_SIZE 的基础上左移两位,也即 16K,并且要求起始地址必须是 8192 的整数倍。
#ifdef CONFIG_KASAN#define KASAN_STACK_ORDER 1#else#define KASAN_STACK_ORDER 0#endif#define THREAD_SIZE_ORDER (2 + KASAN_STACK_ORDER)#define THREAD_SIZE (PAGE_SIZE << THREAD_SIZE_ORDER)
内核栈是一个非常特殊的结构,如下图所示:
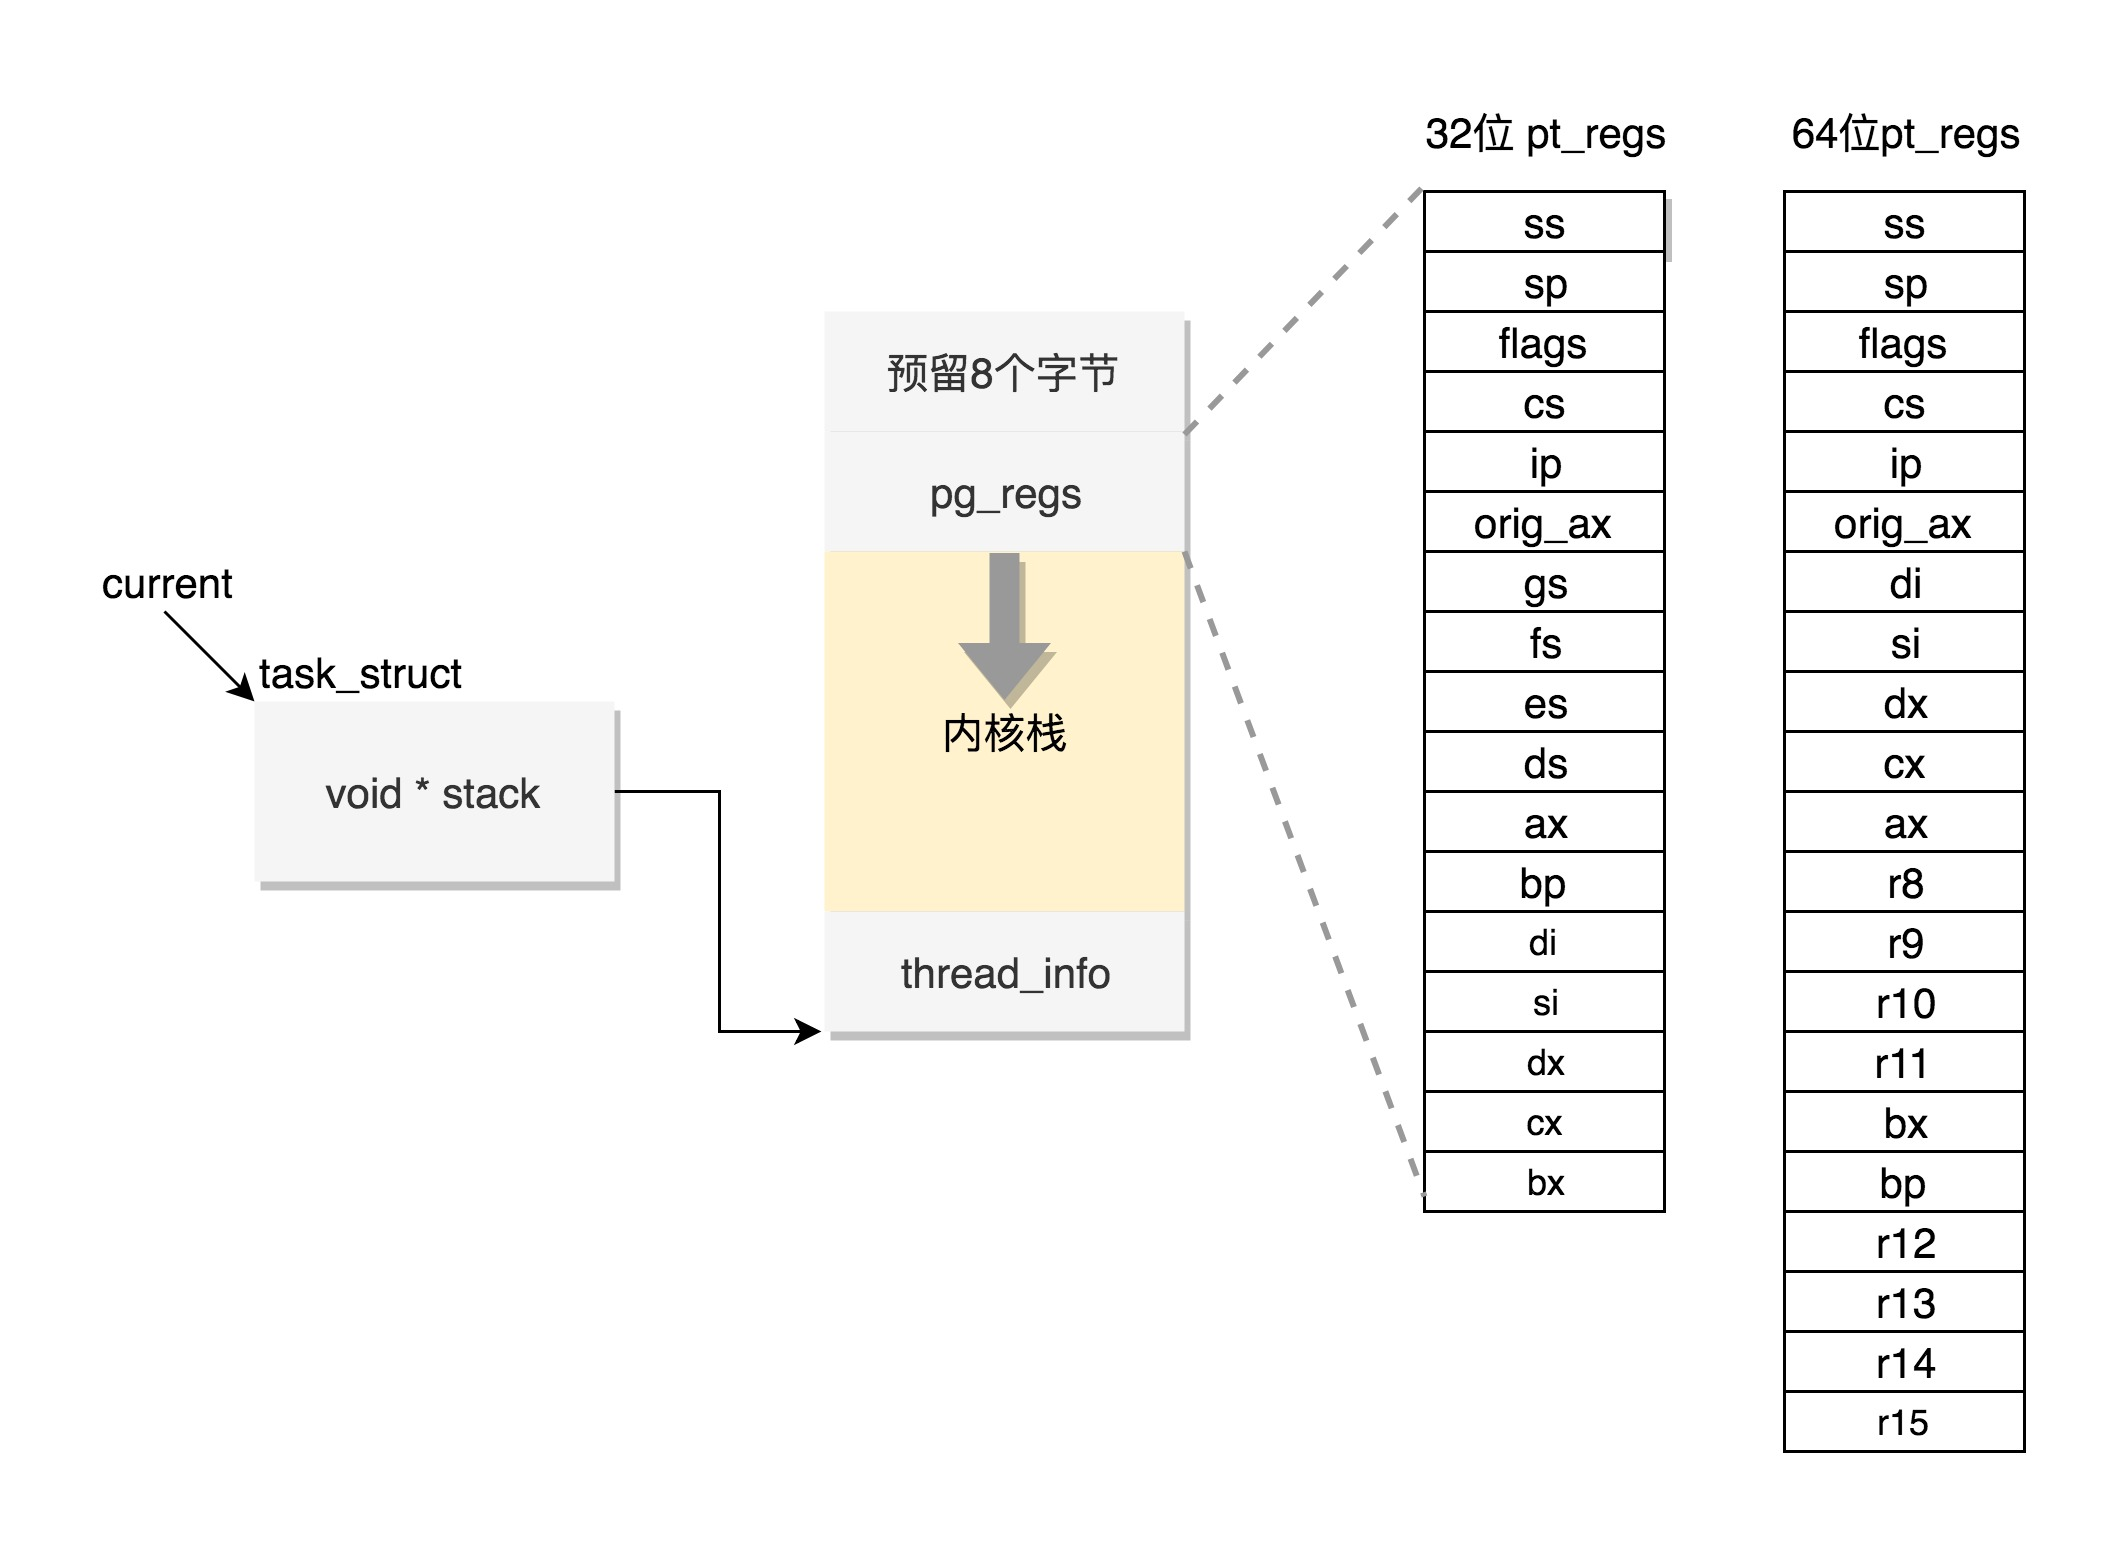
这段空间的最低位置,是一个 thread_info 结构。这个结构是对 task_struct 结构的补充。因为 task_struct 结构庞大但是通用,不同的体系结构就需要保存不同的东西,所以往往与体系结构有关的,都放在 thread_info 里面。
在内核代码里面有这样一个 union,将 thread_info 和 stack 放在一起,在 include/linux/sched.h 文件中就有。
union thread_union {#ifndef CONFIG_THREAD_INFO_IN_TASKstruct thread_info thread_info;#endifunsigned long stack[THREAD_SIZE/sizeof(long)];};
这个 union 就是这样定义的,开头是 thread_info,后面是 stack。
在内核栈的最高地址端,存放的是另一个结构 pt_regs,定义如下。其中,32 位和 64 位的定义不一样。
#ifdef __i386__struct pt_regs {unsigned long bx;unsigned long cx;unsigned long dx;unsigned long si;unsigned long di;unsigned long bp;unsigned long ax;unsigned long ds;unsigned long es;unsigned long fs;unsigned long gs;unsigned long orig_ax;unsigned long ip;unsigned long cs;unsigned long flags;unsigned long sp;unsigned long ss;};#elsestruct pt_regs {unsigned long r15;unsigned long r14;unsigned long r13;unsigned long r12;unsigned long bp;unsigned long bx;unsigned long r11;unsigned long r10;unsigned long r9;unsigned long r8;unsigned long ax;unsigned long cx;unsigned long dx;unsigned long si;unsigned long di;unsigned long orig_ax;unsigned long ip;unsigned long cs;unsigned long flags;unsigned long sp;unsigned long ss;/* top of stack page */};#endif
pt_regs**描述了在执行该系统调用时,用户态下的CPU寄存器在核心态的栈中的保存情况。**
当系统调用从用户态到内核态的时候,首先要做的第一件事情,就是将用户态运行过程中的 CPU 上下文保存起来,其实主要就是保存在这个结构的寄存器变量里。这样当从内核系统调用返回的时候,才能让进程在刚才的地方接着运行下去。
如果我们对比系统调用那一节的内容,你会发现系统调用的时候,压栈的值的顺序和 struct pt_regs 中寄存器定义的顺序是一样的。
在内核中,CPU 的寄存器 ESP 或者 RSP,已经指向内核栈的栈顶,在内核态里的调用都有和用户态相似的过程。
通过 task_struct 找内核栈
如果有一个 task_struct 的 stack 指针在手,你可以通过下面的函数找到这个线程内核栈:
static inline void *task_stack_page(const struct task_struct *task){return task->stack;}
从 task_struct 如何得到相应的 pt_regs 呢?我们可以通过下面的函数:
/** TOP_OF_KERNEL_STACK_PADDING reserves 8 bytes on top of the ring0 stack.* This is necessary to guarantee that the entire "struct pt_regs"* is accessible even if the CPU haven't stored the SS/ESP registers* on the stack (interrupt gate does not save these registers* when switching to the same priv ring).* Therefore beware: accessing the ss/esp fields of the* "struct pt_regs" is possible, but they may contain the* completely wrong values.*/#define task_pt_regs(task) \({ \unsigned long __ptr = (unsigned long)task_stack_page(task); \__ptr += THREAD_SIZE - TOP_OF_KERNEL_STACK_PADDING; \((struct pt_regs *)__ptr) - 1; \})
你会发现,这是先从 task_struct 找到内核栈的开始位置。然后这个位置加上 THREAD_SIZE 就到了最后的位置,然后转换为 struct pt_regs,再减一,就相当于减少了一个 pt_regs 的位置,就到了这个结构的首地址。
这里面有一个 TOP_OF_KERNEL_STACK_PADDING,这个的定义如下:
#ifdef CONFIG_X86_32# ifdef CONFIG_VM86# define TOP_OF_KERNEL_STACK_PADDING 16# else# define TOP_OF_KERNEL_STACK_PADDING 8# endif#else# define TOP_OF_KERNEL_STACK_PADDING 0#endif
也就是说,32 位机器上是 8,其他是 0。这是为什么呢?因为压栈 pt_regs 有两种情况。我们知道,CPU 用 ring 来区分权限,从而 Linux 可以区分内核态和用户态。
因此,第一种情况,我们拿涉及从用户态到内核态的变化的系统调用来说。因为涉及权限的改变,会压栈保存 SS、ESP 寄存器的,这两个寄存器共占用 8 个 byte。
另一种情况是,不涉及权限的变化,就不会压栈这 8 个 byte。这样就会使得两种情况不兼容。如果没有压栈还访问,就会报错,所以还不如预留在这里,保证安全。在 64 位上,修改了这个问题,变成了定长的。
好了,现在如果你 task_struct 在手,就能够轻松得到内核栈和内核寄存器。
通过内核栈找 task_struct
那如果一个当前在某个 CPU 上执行的进程,想知道自己的 task_struct 在哪里,又该怎么办呢?
这个艰巨的任务要交给 thread_info 这个结构。
struct thread_info {struct task_struct *task; /* main task structure */__u32 flags; /* low level flags */__u32 status; /* thread synchronous flags */__u32 cpu; /* current CPU */mm_segment_t addr_limit;unsigned int sig_on_uaccess_error:1;unsigned int uaccess_err:1; /* uaccess failed */};
这里面有个成员变量 task 指向 task_struct,所以我们常用 current_thread_info()->task 来获取 task_struct。
static inline struct thread_info *current_thread_info(void){return (struct thread_info *)(current_top_of_stack() - THREAD_SIZE);}
而 thread_info 的位置就是内核栈的最高位置,减去 THREAD_SIZE,就到了 thread_info 的起始地址。
但是现在变成这样了,只剩下一个 flags。
struct thread_info {unsigned long flags; /* low level flags */};
那这时候怎么获取当前运行中的 task_struct 呢?current_thread_info 有了新的实现方式。
在 include/linux/thread_info.h 中定义了 current_thread_info。
#include <asm/current.h>#define current_thread_info() ((struct thread_info *)current)#endif
那 current 又是什么呢?在 arch/x86/include/asm/current.h中定义了。
struct task_struct;DECLARE_PER_CPU(struct task_struct *, current_task);static __always_inline struct task_struct *get_current(void){return this_cpu_read_stable(current_task);}#define current get_current
到这里,你会发现,新的机制里面,每个 CPU 运行的 task_struct 不通过 thread_info 获取了,而是直接放在 Per CPU 变量里面了。
多核情况下,CPU 是同时运行的,但是它们共同使用其他的硬件资源的时候,我们需要解决多个 CPU 之间的同步问题。
Per CPU 变量是内核中一种重要的同步机制。顾名思义,Per CPU 变量就是为每个 CPU 构造一个变量的副本,这样多个 CPU 各自操作自己的副本,互不干涉。比如,当前进程的变量 current_task 就被声明为 Per CPU 变量。
要使用 Per CPU 变量,首先要声明这个变量,在arch/x86/include/asm/current.h 中有:
DECLARE_PER_CPU(struct task_struct *, current_task);
然后是定义这个变量,在 arch/x86/kernel/cpu/common.c 中有:
DEFINE_PER_CPU(struct task_struct *, current_task) = &init_task;
也就是说,系统刚刚初始化的时候,current_task 都指向 init_task。
当某个 CPU 上的进程进行切换的时候,current_task 被修改为将要切换到的目标进程。例如,进程切换函数 __switch_to 就会改变 current_task。
__visible __notrace_funcgraph struct task_struct *__switch_to(struct task_struct *prev_p, struct task_struct *next_p){......this_cpu_write(current_task, next_p);......return prev_p;}
当要获取当前的运行中的 task_struct 的时候,就需要调用 this_cpu_read_stable 进行读取。
#define this_cpu_read_stable(var) percpu_stable_op("mov", var)
好了,现在如果你是一个进程,正在某个 CPU 上运行,就能够轻松得到 task_struct 了。


若有收获,就点个赞吧
0 人点赞
