总结时刻
这一节我们讲了 namespace 相关的技术,有六种类型,分别是 UTS、User、Mount、Pid、Network 和 IPC。
还有两个常用的命令 nsenter 和 unshare,主要用于操作 Namespace,有三个常用的函数 clone、setns 和 unshare。
在内核里面,对于任何一个进程 task_struct 来讲,里面都会有一个成员 struct nsproxy,用于保存 namespace 相关信息,里面有 struct uts_namespace、struct ipc_namespace、struct mnt_namespace、struct pid_namespace、struct net net_ns 和 struct cgroup_namespace cgroup_ns。
创建 namespace 的时候,我们在内核中会调用 copy_namespaces,调用顺序依次是 copy_mnt_ns、copy_utsname、copy_ipcs、copy_pid_ns、copy_cgroup_ns 和 copy_net_ns,来复制 namespace。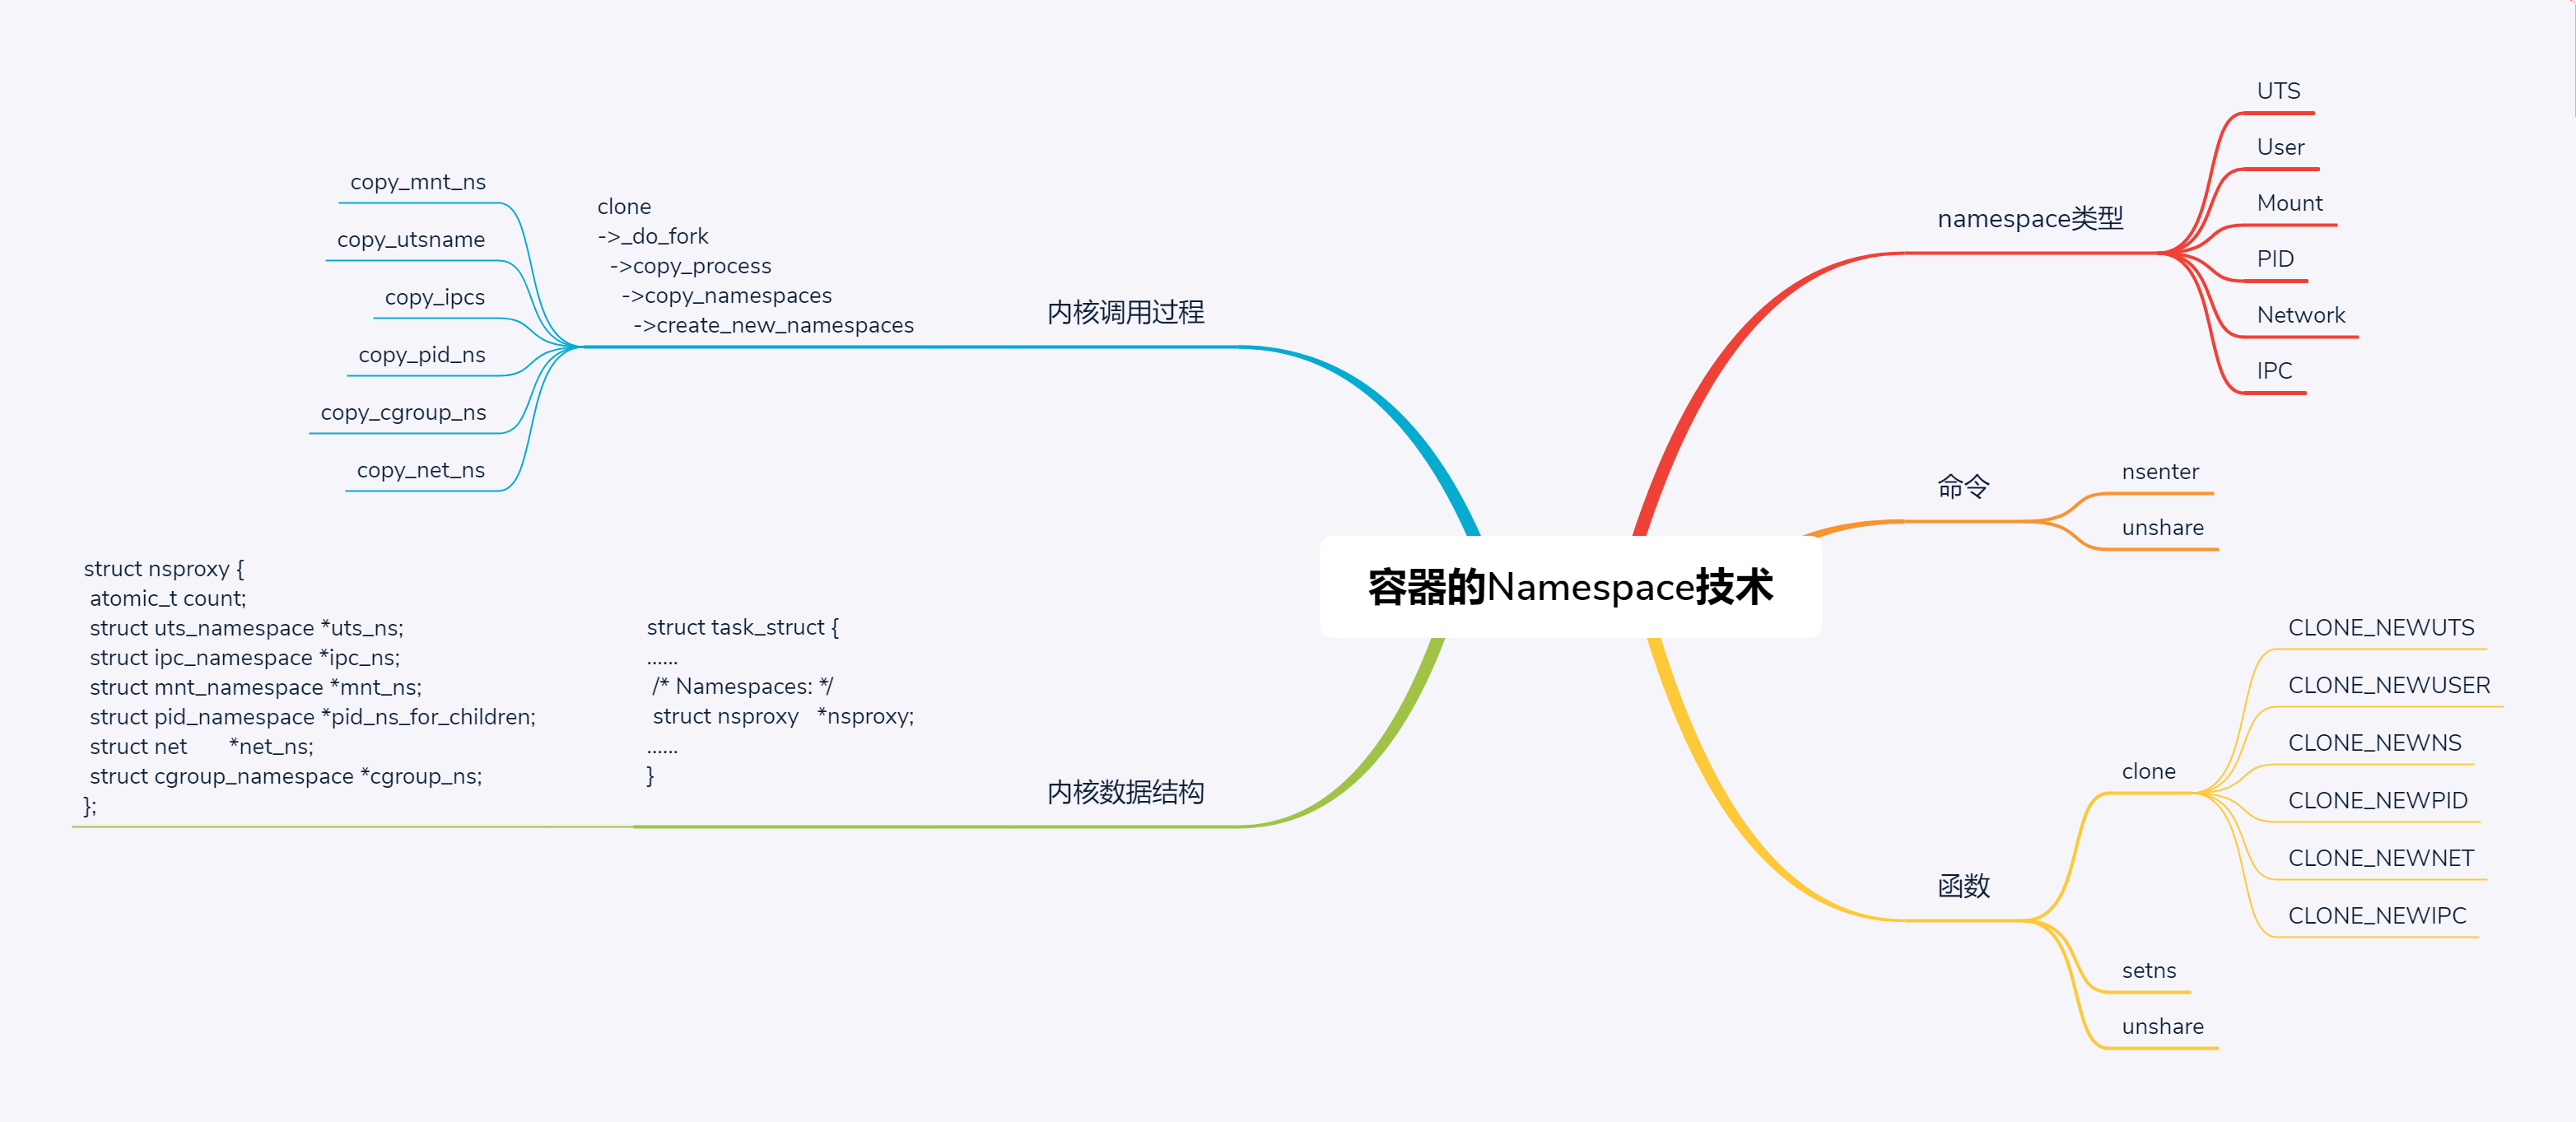
为了隔离不同类型的资源,Linux 内核里面实现了以下几种不同类型的 namespace。
- UTS,对应的宏为 CLONE_NEWUTS,表示不同的 namespace 可以配置不同的 hostname。
- User,对应的宏为 CLONE_NEWUSER,表示不同的 namespace 可以配置不同的用户和组。
- Mount,对应的宏为 CLONE_NEWNS,表示不同的 namespace 的文件系统挂载点是隔离的
- PID,对应的宏为 CLONE_NEWPID,表示不同的 namespace 有完全独立的 pid,也即一个 namespace 的进程和另一个 namespace 的进程,pid 可以是一样的,但是代表不同的进程。
- Network,对应的宏为 CLONE_NEWNET,表示不同的 namespace 有独立的网络协议栈。
还记得咱们启动的那个容器吗?
# docker psCONTAINER ID IMAGE COMMAND CREATED STATUS PORTS NAMESf604f0e34bc2 testnginx:1 "/bin/sh -c 'nginx -…" 17 hours ago Up 17 hours 0.0.0.0:8081->80/tcp youthful_torvalds
我们可以看这个容器对应的 entrypoint 的 pid。通过 docker inspect 命令,可以看到,进程号为 58212。
[root@deployer ~]# docker inspect f604f0e34bc2[{"Id": "f604f0e34bc263bc32ba683d97a1db2a65de42ab052da16df3c7811ad07f0dc3","Created": "2019-07-15T17:43:44.158300531Z","Path": "/bin/sh","Args": ["-c","nginx -g \"daemon off;\""],"State": {"Status": "running","Running": true,"Pid": 58212,"ExitCode": 0,"StartedAt": "2019-07-15T17:43:44.651756682Z","FinishedAt": "0001-01-01T00:00:00Z"},......"Name": "/youthful_torvalds","RestartCount": 0,"Driver": "overlay2","Platform": "linux","HostConfig": {"NetworkMode": "default","PortBindings": {"80/tcp": [{"HostIp": "","HostPort": "8081"}]},......},"Config": {"Hostname": "f604f0e34bc2","ExposedPorts": {"80/tcp": {}},"Image": "testnginx:1","Entrypoint": ["/bin/sh","-c","nginx -g \"daemon off;\""],},"NetworkSettings": {"Bridge": "","SandboxID": "7fd3eb469578903b66687090e512958658ae28d17bce1a7cee2da3148d1dfad4","Ports": {"80/tcp": [{"HostIp": "0.0.0.0","HostPort": "8081"}]},"Gateway": "172.17.0.1","IPAddress": "172.17.0.3","IPPrefixLen": 16,"MacAddress": "02:42:ac:11:00:03","Networks": {"bridge": {"NetworkID": "c8eef1603afb399bf17af154be202fd1e543d3772cc83ef4a1ca3f97b8bd6eda","EndpointID": "8d9bb18ca57889112e758ede193d2cfb45cbf794c9d952819763c08f8545da46","Gateway": "172.17.0.1","IPAddress": "172.17.0.3","IPPrefixLen": 16,"MacAddress": "02:42:ac:11:00:03",}}}}]
如果我们用 ps 查看机器上的 nginx 进程,可以看到 master 和 worker,worker 的父进程是 master。
# ps -ef |grep nginxroot 58212 58195 0 01:43 ? 00:00:00 /bin/sh -c nginx -g "daemon off;"root 58244 58212 0 01:43 ? 00:00:00 nginx: master process nginx -g daemon off;33 58250 58244 0 01:43 ? 00:00:00 nginx: worker process33 58251 58244 0 01:43 ? 00:00:05 nginx: worker process33 58252 58244 0 01:43 ? 00:00:05 nginx: worker process33 58253 58244 0 01:43 ? 00:00:05 nginx: worker process复制代码
在 /proc/pid/ns 里面,我们能够看到这个进程所属于的 6 种 namespace。我们拿出两个进程来,应该可以看出来,它们属于同一个 namespace。
# ls -l /proc/58212/ns
lrwxrwxrwx 1 root root 0 Jul 16 19:19 ipc -> ipc:[4026532278]
lrwxrwxrwx 1 root root 0 Jul 16 19:19 mnt -> mnt:[4026532276]
lrwxrwxrwx 1 root root 0 Jul 16 01:43 net -> net:[4026532281]
lrwxrwxrwx 1 root root 0 Jul 16 19:19 pid -> pid:[4026532279]
lrwxrwxrwx 1 root root 0 Jul 16 19:19 user -> user:[4026531837]
lrwxrwxrwx 1 root root 0 Jul 16 19:19 uts -> uts:[4026532277]
# ls -l /proc/58253/ns
lrwxrwxrwx 1 33 tape 0 Jul 16 19:20 ipc -> ipc:[4026532278]
lrwxrwxrwx 1 33 tape 0 Jul 16 19:20 mnt -> mnt:[4026532276]
lrwxrwxrwx 1 33 tape 0 Jul 16 19:20 net -> net:[4026532281]
lrwxrwxrwx 1 33 tape 0 Jul 16 19:20 pid -> pid:[4026532279]
lrwxrwxrwx 1 33 tape 0 Jul 16 19:20 user -> user:[4026531837]
lrwxrwxrwx 1 33 tape 0 Jul 16 19:20 uts -> uts:[4026532277]
复制代码
接下来,我们来看,如何操作 namespace。这里我们重点关注 pid 和 network。
操作 namespace 的常用指令nsenter,可以用来运行一个进程,进入指定的 namespace。例如,通过下面的命令,我们可以运行 /bin/bash,并且进入 nginx 所在容器的 namespace。
# nsenter --target 58212 --mount --uts --ipc --net --pid -- env --ignore-environment -- /bin/bash
root@f604f0e34bc2:/# ip addr
1: lo: <LOOPBACK,UP,LOWER_UP> mtu 65536 qdisc noqueue state UNKNOWN group default qlen 1000
link/loopback 00:00:00:00:00:00 brd 00:00:00:00:00:00
inet 127.0.0.1/8 scope host lo
valid_lft forever preferred_lft forever
23: eth0@if24: <BROADCAST,MULTICAST,UP,LOWER_UP> mtu 1500 qdisc noqueue state UP group default
link/ether 02:42:ac:11:00:03 brd ff:ff:ff:ff:ff:ff
inet 172.17.0.3/16 brd 172.17.255.255 scope global eth0
valid_lft forever preferred_lft forever
复制代码
另一个命令是unshare,它会离开当前的 namespace,创建且加入新的 namespace,然后执行参数中指定的命令。
例如,运行下面这行命令之后,pid 和 net 都进入了新的 namespace。
unshare --mount --ipc --pid --net --mount-proc=/proc --fork /bin/bash
复制代码
如果从 shell 上运行上面这行命令的话,好像没有什么变化,但是因为 pid 和 net 都进入了新的 namespace,所以我们查看进程列表和 ip 地址的时候应该会发现有所不同。
# ip addr
1: lo: <LOOPBACK> mtu 65536 qdisc noop state DOWN group default qlen 1000
link/loopback 00:00:00:00:00:00 brd 00:00:00:00:00:00
# ps aux
USER PID %CPU %MEM VSZ RSS TTY STAT START TIME COMMAND
root 1 0.0 0.0 115568 2136 pts/0 S 22:55 0:00 /bin/bash
root 13 0.0 0.0 155360 1872 pts/0 R+ 22:55 0:00 ps aux
复制代码
果真,我们看不到宿主机上的 IP 地址和网卡了,也看不到宿主机上的所有进程了。
另外,我们还可以通过函数操作 namespace。
第一个函数是clone,也就是创建一个新的进程,并把它放到新的 namespace 中。
int clone(int (*fn)(void *), void *child_stack, int flags, void *arg);
复制代码
clone 函数我们原来介绍过。这里面有一个参数 flags,原来我们没有注意它。其实它可以设置为 CLONE_NEWUTS、CLONE_NEWUSER、CLONE_NEWNS、CLONE_NEWPID。CLONE_NEWNET 会将 clone 出来的新进程放到新的 namespace 中。
第二个函数是setns,用于将当前进程加入到已有的 namespace 中。
int setns(int fd, int nstype);
复制代码
其中,fd 指向 /proc/[pid]/ns/ 目录里相应 namespace 对应的文件,表示要加入哪个 namespace。nstype 用来指定 namespace 的类型,可以设置为 CLONE_NEWUTS、CLONE_NEWUSER、CLONE_NEWNS、CLONE_NEWPID 和 CLONE_NEWNET。
第三个函数是unshare,它可以使当前进程退出当前的 namespace,并加入到新创建的 namespace。
int unshare(int flags);
复制代码
其中,flags 用于指定一个或者多个上面的 CLONE_NEWUTS、CLONE_NEWUSER、CLONE_NEWNS、CLONE_NEWPID 和 CLONE_NEWNET。
clone 和 unshare 的区别是,unshare 是使当前进程加入新的 namespace;clone 是创建一个新的子进程,然后让子进程加入新的 namespace,而当前进程保持不变。
这里我们尝试一下,通过 clone 函数来进入一个 namespace。
#define _GNU_SOURCE
#include <sys/wait.h>
#include <sys/utsname.h>
#include <sched.h>
#include <string.h>
#include <stdio.h>
#include <stdlib.h>
#include <unistd.h>
#define STACK_SIZE (1024 * 1024)
static int childFunc(void *arg)
{
    printf("In child process.\n");
    execlp("bash", "bash", (char *) NULL);
    return 0;
}
int main(int argc, char *argv[])
{
    char *stack;
    char *stackTop;
    pid_t pid;
    stack = malloc(STACK_SIZE);
    if (stack == NULL)
    {
        perror("malloc");
        exit(1);
    }
    stackTop = stack + STACK_SIZE;
    pid = clone(childFunc, stackTop, CLONE_NEWNS|CLONE_NEWPID|CLONE_NEWNET|SIGCHLD, NULL);
    if (pid == -1)
    {
        perror("clone");
        exit(1);
    }
    printf("clone() returned %ld\n", (long) pid);
    sleep(1);
    if (waitpid(pid, NULL, 0) == -1)
    {
        perror("waitpid");
        exit(1);
    }
    printf("child has terminated\n");
    exit(0);
}
在上面的代码中,我们调用 clone 的时候,给的参数是 CLONE_NEWNS|CLONE_NEWPID|CLONE_NEWNET,也就是说,我们会进入一个新的 pid、network,以及 mount 的 namespace。
如果我们编译运行它,可以得到下面的结果。
# echo $$
64267
# ps aux | grep bash | grep -v grep
root 64267 0.0 0.0 115572 2176 pts/0 Ss 16:53 0:00 -bash
# ./a.out
clone() returned 64360
In child process.
# echo $$
1
# ip addr
1: lo: <LOOPBACK> mtu 65536 qdisc noop state DOWN group default qlen 1000
link/loopback 00:00:00:00:00:00 brd 00:00:00:00:00:00
# exit
exit
child has terminated
# echo $$
64267
复制代码
通过 echo $$,我们可以得到当前 bash 的进程号。一旦运行了上面的程序,我们就会进入一个新的 pid 的 namespace。
当我们再次 echo的时候,就会发现当前bash的进程号变成了1。上面的程序运行了一个新的bash,它在一个独立的pidnamespace里面,自己是1号进程。如果运行ipaddr,可以看到,宿主机的网卡都找不到了,因为新的bash也在一个独立的networknamespace里面,等退出了,再次echo的时候,就可以得到原来进程号。
clone 系统调用我们在进程的创建那一节解析过,当时我们没有看关于 namespace 的代码,现在我们就来看一看,namespace 在内核做了哪些事情。
在内核里面,clone 会调用 _do_fork->copy_process->copy_namespaces,也就是说,在创建子进程的时候,有一个机会可以复制和设置 namespace。
namespace 是在哪里定义的呢?在每一个进程的 task_struct 里面,有一个指向 namespace 结构体的指针 nsproxy。
struct task_struct {
......
/* Namespaces: */
struct nsproxy *nsproxy;
......
}
/*
* A structure to contain pointers to all per-process
* namespaces - fs (mount), uts, network, sysvipc, etc.
*
* The pid namespace is an exception -- it's accessed using
* task_active_pid_ns. The pid namespace here is the
* namespace that children will use.
*/
struct nsproxy {
atomic_t count;
struct uts_namespace *uts_ns;
struct ipc_namespace *ipc_ns;
struct mnt_namespace *mnt_ns;
struct pid_namespace *pid_ns_for_children;
struct net *net_ns;
struct cgroup_namespace *cgroup_ns;
};
复制代码
我们可以看到在 struct nsproxy 结构里面,有我们上面讲过的各种 namespace。
在系统初始化的时候,有一个默认的 init_nsproxy。
struct nsproxy init_nsproxy = {
.count = ATOMIC_INIT(1),
.uts_ns = &init_uts_ns,
#if defined(CONFIG_POSIX_MQUEUE) || defined(CONFIG_SYSVIPC)
.ipc_ns = &init_ipc_ns,
#endif
.mnt_ns = NULL,
.pid_ns_for_children = &init_pid_ns,
#ifdef CONFIG_NET
.net_ns = &init_net,
#endif
#ifdef CONFIG_CGROUPS
.cgroup_ns = &init_cgroup_ns,
#endif
};
复制代码
下面,我们来看 copy_namespaces 的实现。
/*
* called from clone. This now handles copy for nsproxy and all
* namespaces therein.
*/
int copy_namespaces(unsigned long flags, struct task_struct *tsk)
{
struct nsproxy *old_ns = tsk->nsproxy;
struct user_namespace *user_ns = task_cred_xxx(tsk, user_ns);
struct nsproxy *new_ns;
if (likely(!(flags & (CLONE_NEWNS | CLONE_NEWUTS | CLONE_NEWIPC |
CLONE_NEWPID | CLONE_NEWNET |
CLONE_NEWCGROUP)))) {
get_nsproxy(old_ns);
return 0;
}
if (!ns_capable(user_ns, CAP_SYS_ADMIN))
return -EPERM;
......
new_ns = create_new_namespaces(flags, tsk, user_ns, tsk->fs);
tsk->nsproxy = new_ns;
return 0;
}
复制代码
如果 clone 的参数里面没有 CLONE_NEWNS | CLONE_NEWUTS | CLONE_NEWIPC | CLONE_NEWPID | CLONE_NEWNET | CLONE_NEWCGROUP,就返回原来的 namespace,调用 get_nsproxy。
接着,我们调用 create_new_namespaces。
/*
* Create new nsproxy and all of its the associated namespaces.
* Return the newly created nsproxy. Do not attach this to the task,
* leave it to the caller to do proper locking and attach it to task.
*/
static struct nsproxy *create_new_namespaces(unsigned long flags,
struct task_struct *tsk, struct user_namespace *user_ns,
struct fs_struct *new_fs)
{
struct nsproxy *new_nsp;
new_nsp = create_nsproxy();
......
new_nsp->mnt_ns = copy_mnt_ns(flags, tsk->nsproxy->mnt_ns, user_ns, new_fs);
......
new_nsp->uts_ns = copy_utsname(flags, user_ns, tsk->nsproxy->uts_ns);
......
new_nsp->ipc_ns = copy_ipcs(flags, user_ns, tsk->nsproxy->ipc_ns);
......
new_nsp->pid_ns_for_children =
copy_pid_ns(flags, user_ns, tsk->nsproxy->pid_ns_for_children);
......
new_nsp->cgroup_ns = copy_cgroup_ns(flags, user_ns,
tsk->nsproxy->cgroup_ns);
......
new_nsp->net_ns = copy_net_ns(flags, user_ns, tsk->nsproxy->net_ns);
......
return new_nsp;
......
}
复制代码
在 create_new_namespaces 中,我们可以看到对于各种 namespace 的复制。
我们来看 copy_pid_ns 对于 pid namespace 的复制。
struct pid_namespace *copy_pid_ns(unsigned long flags,
struct user_namespace *user_ns, struct pid_namespace *old_ns)
{
if (!(flags & CLONE_NEWPID))
return get_pid_ns(old_ns);
if (task_active_pid_ns(current) != old_ns)
return ERR_PTR(-EINVAL);
return create_pid_namespace(user_ns, old_ns);
}
复制代码
在 copy_pid_ns 中,如果没有设置 CLONE_NEWPID,则返回老的 pid namespace;如果设置了,就调用 create_pid_namespace,创建新的 pid namespace.
我们再来看 copy_net_ns 对于 network namespace 的复制。
struct net *copy_net_ns(unsigned long flags,
struct user_namespace *user_ns, struct net *old_net)
{
struct ucounts *ucounts;
struct net *net;
int rv;
if (!(flags & CLONE_NEWNET))
return get_net(old_net);
ucounts = inc_net_namespaces(user_ns);
......
net = net_alloc();
......
get_user_ns(user_ns);
net->ucounts = ucounts;
rv = setup_net(net, user_ns);
......
return net;
}
复制代码
在这里面,我们需要判断,如果 flags 中不包含 CLONE_NEWNET,也就是不会创建一个新的 network namespace,则返回 old_net;否则需要新建一个 network namespace。
然后,copy_net_ns 会调用 net = net_alloc(),分配一个新的 struct net 结构,然后调用 setup_net 对新分配的 net 结构进行初始化,之后调用 list_add_tail_rcu,将新建的 network namespace,添加到全局的 network namespace 列表 net_namespace_list 中。
我们来看一下 setup_net 的实现。
/*
* setup_net runs the initializers for the network namespace object.
*/
static __net_init int setup_net(struct net *net, struct user_namespace *user_ns)
{
/* Must be called with net_mutex held */
const struct pernet_operations *ops, *saved_ops;
LIST_HEAD(net_exit_list);
atomic_set(&net->count, 1);
refcount_set(&net->passive, 1);
net->dev_base_seq = 1;
net->user_ns = user_ns;
idr_init(&net->netns_ids);
spin_lock_init(&net->nsid_lock);
list_for_each_entry(ops, &pernet_list, list) {
error = ops_init(ops, net);
......
}
......
}
复制代码
在 setup_net 中,这里面有一个循环 list_for_each_entry,对于 pernet_list 的每一项 struct pernet_operations,运行 ops_init,也就是调用 pernet_operations 的 init 函数。
这个 pernet_list 是怎么来的呢?在网络设备初始化的时候,我们要调用 net_dev_init 函数,这里面有下面的代码。
register_pernet_device(&loopback_net_ops)
int register_pernet_device(struct pernet_operations *ops)
{
int error;
mutex_lock(&net_mutex);
error = register_pernet_operations(&pernet_list, ops);
if (!error && (first_device == &pernet_list))
first_device = &ops->list;
mutex_unlock(&net_mutex);
return error;
}
struct pernet_operations __net_initdata loopback_net_ops = {
.init = loopback_net_init,
};
复制代码
register_pernet_device 函数注册了一个 loopback_net_ops,在这里面,把 init 函数设置为 loopback_net_init.
static __net_init int loopback_net_init(struct net *net)
{
struct net_device *dev;
dev = alloc_netdev(0, "lo", NET_NAME_UNKNOWN, loopback_setup);
......
dev_net_set(dev, net);
err = register_netdev(dev);
......
net->loopback_dev = dev;
return 0;
......
}
复制代码
在 loopback_net_init 函数中,我们会创建并且注册一个名字为”lo”的 struct net_device。注册完之后,在这个 namespace 里面就会出现一个这样的网络设备,称为 loopback 网络设备。
这就是为什么上面的实验中,创建出的新的 network namespace 里面有一个 lo 网络设备。

若有收获,就点个赞吧
0 人点赞
