KubernetesDocker
DNS简介
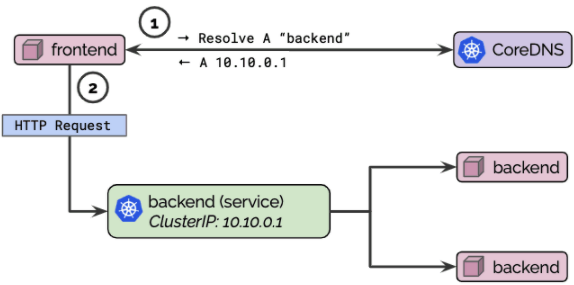
DNS服务是域名系统的缩写, 英文全称:Domain Name System,将域名和IP地址相互映射。在容器环境中,DNS至关重要,例如在Kubernetes集群中,通常一组Pod由一个Service负载,但是Service的IP地址有可能需要变动,那么就可以让Pod通过域名的方式去访问Service,Pod无需理会IP地址的变化。
Docker DNS
Docker link
Docker link是一个遗留的特性,在新版本的Docker中,一般不推荐使用。简单来说Docker link就是把两个容器连接起来,容器可以使用容器名进行通信,而不需要依赖ip地址(其实就是在容器的/etc/hosts文件添加了host记录,原本容器之间的IP就是通的,只是增加了host记录,可以不用IP去访问)
创建容器centos-1:
[root@host1 ~]# docker run -itd --name centos-1 registry.cn-shanghai.aliyuncs.com/public-namespace/cr7-centos7-tool:v2
创建容器centos-2,使用—link name:alias,name就是要访问的目标机器,alias就是自定义的别名。
[root@host1 ~]# docker run -itd --name centos-2 --link centos-1:centos-1-alias registry.cn-shanghai.aliyuncs.com/public-namespace/cr7-centos7-tool:v2
查看容器centos-2的/etc/hosts文件:
[root@host1 ~]# docker exec centos-2 cat /etc/hosts127.0.0.1 localhost::1 localhost ip6-localhost ip6-loopbackfe00::0 ip6-localnetff00::0 ip6-mcastprefixff02::1 ip6-allnodesff02::2 ip6-allrouters172.18.0.2 centos-1-alias 9dde6339057a centos-1 #容器centos-1的host记录172.18.0.3 f1a7e5fa3d96 #容器centos-2自身的host记录
意味着centos-2可以用centos-1-alias,9dde6339057a,centos-1来访问原先创建的容器。centos-1是不可以通过hostname访问centos-2的。
[root@host1 ~]# docker exec centos-2 ping centos-1-aliasPING centos-1-alias (172.18.0.2) 56(84) bytes of data.64 bytes from centos-1-alias (172.18.0.2): icmp_seq=1 ttl=64 time=0.174 ms^C[root@host1 ~]# docker exec centos-2 ping centos-1PING centos-1-alias (172.18.0.2) 56(84) bytes of data.64 bytes from centos-1-alias (172.18.0.2): icmp_seq=1 ttl=64 time=1.37 ms64 bytes from centos-1-alias (172.18.0.2): icmp_seq=2 ttl=64 time=0.523 ms^C[root@host1 ~]# docker exec centos-2 ping 9dde6339057aPING centos-1-alias (172.18.0.2) 56(84) bytes of data.64 bytes from centos-1-alias (172.18.0.2): icmp_seq=1 ttl=64 time=2.59 ms64 bytes from centos-1-alias (172.18.0.2): icmp_seq=2 ttl=64 time=3.75 ms
Embedded DNS
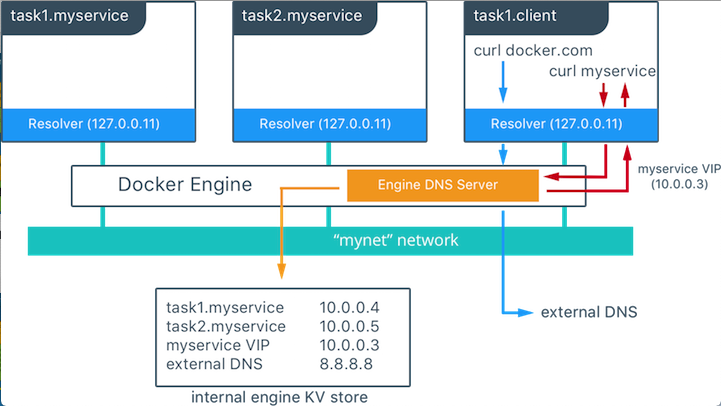
从Docker 1.10开始,Docker提供了一个内置的DNS服务器,当创建的容器属于自定义网络时,容器的/etc/resolv.conf会使用内置的DNS服务器(地址永远是127.0.0.11)来解析相同自定义网络内的其他容器。

为了向后兼容,default bridge网络的DNS配置没有改变,默认的docker网络使用的是宿主机的/etc/resolv.conf的配置。
创建一个自定义网络:
[root@host1 ~]# docker network create my-network#bridge,host,none为docker默认创建的网络[root@host1 ~]# docker network lsNETWORK ID NAME DRIVER SCOPE2115f17cd9d0 bridge bridge local19accfa096cf host host locala23c8b371c7f my-network bridge local0a33edc20fae none null local
分别创建两个容器属于自定义网络my-network中:
[root@host1 ~]# docker run -itd --name centos-3 --net my-network registry.cn-shanghai.aliyuncs.com/public-namespace/cr7-centos7-tool:v2 [root@host1 ~]# docker run -itd --name centos-4 --net my-network registry.cn-shanghai.aliyuncs.com/public-namespace/cr7-centos7-tool:v2
查看容器centos-4的/etc/hosts和/etc/resolv.conf,可以看到nameserver添加的IP为127.0.0.11的Embedded DNS:
#/etc/hosts中没有配置对方的host记录[root@host1 ~]# docker exec centos-4 cat /etc/hosts127.0.0.1 localhost::1 localhost ip6-localhost ip6-loopbackfe00::0 ip6-localnetff00::0 ip6-mcastprefixff02::1 ip6-allnodesff02::2 ip6-allrouters172.19.0.3 555281f37ea3#/etc/resolv.conf配置了dns服务器127.0.0.11[root@host1 ~]# docker exec centos-4 cat /etc/resolv.confnameserver 127.0.0.11options ndots:0
此时centos-3和centos-4可以互相解析:
[root@host1 ~]# docker exec centos-4 ping centos-3PING centos-3 (172.19.0.2) 56(84) bytes of data.64 bytes from centos-3.my-network (172.19.0.2): icmp_seq=1 ttl=64 time=0.128 ms64 bytes from centos-3.my-network (172.19.0.2): icmp_seq=2 ttl=64 time=0.078 ms64 bytes from centos-3.my-network (172.19.0.2): icmp_seq=3 ttl=64 time=0.103 ms^C[root@host1 ~]# docker exec centos-3 ping centos-4PING centos-4 (172.19.0.3) 56(84) bytes of data.64 bytes from centos-4.my-network (172.19.0.3): icmp_seq=1 ttl=64 time=0.087 ms64 bytes from centos-4.my-network (172.19.0.3): icmp_seq=2 ttl=64 time=0.101 ms64 bytes from centos-4.my-network (172.19.0.3): icmp_seq=3 ttl=64 time=0.076 ms^C
Docker DNS配置
方式一:docker run (针对单个容器)
| Flag |
Description |
| —dns |
指定DNS服务器地址,如果容器不能访问指定的所有ip地址,则会使用8.8.8.8作为DNS服务器地址(Docker默认定义的) |
| —dns-search |
当容器访问一个不包括完全域名的主机名时,在该主机名后面添加dns-search指定的域名后缀,例如容器访问centos-1,dns-search配置的是example.com,则会解析成centos-1.example.com |
| —dns-opt |
options ndots:5的含义是当查询的域名字符串内的点字符数量大于等于ndots值(5)时,则认为是完整域名,直接解析,不会走 search 域 |
| —hostname |
指定容器hostname |
方式二:daemon.json
nameserver只针对docker默认网络所有容器,dns-search和dns-opts针对所有网络容器。
{ "dns": ["114.114.114.114","223.5.5.5"], "dns-opts":["ndots:5"], "dns-search":["example.com"]}
Kubernetes DNS

在kubernetes中,有以下4中DNS策略,可以通过dnsPolicy指定:
**<font style="color:black;">Default</font>**:Pod从运行所在的节点继承名称解析配置,就是该 Pod 的 DNS 配置会跟宿主机完全一致。。Default 不是默认的 DNS 策略。如果未明确指定dnsPolicy,则使用 ClusterFirst。**<font style="color:black;">ClusterFirst</font>**:它会预先把 kube-dns(或 CoreDNS)的信息当作预设参数写入到该 Pod 内的 DNS 配置。不过ClusterFirst 还有一个冲突,如果你的 Pod 设置了 <font style="color:rgb(1, 1, 1);">HostNetwork=true</font>,则 <font style="color:rgb(1, 1, 1);">ClusterFirst</font> 就会被强制转换成 Default。**<font style="color:black;">ClusterFirstWithHostNet</font>**:对于与 hostNetwork(网络接口使用的是宿主机的) 一起运行的 Pod,应显式设置其DNS策略 <font style="color:rgb(1, 1, 1);">ClusterFirstWithHostNet</font>,他将同时解决default和<font style="color:rgb(1, 1, 1);">ClusterFirst</font>的DNS解析。如果不加上<font style="color:rgb(239, 112, 96);">dnsPolicy: ClusterFirstWithHostNet</font> ,Pod默认使用所在宿主主机使用的DNS,这样也会导致容器内不能通过service name 访问k8s集群中其他Pod。- None:表示会清除 Pod 预设的 DNS 配置,当 dnsPolicy 设置成这个值之后,Kubernetes 不会为 Pod 预先载入任何自身逻辑判断得到的 DNS 配置。因此若要将 dnsPolicy 的值设为 None,为了避免 Pod 里面没有配置任何 DNS参数,至少需要在dnsConfig中设置nameservers的参数。
在 Kubernetes 1.11 及其以后版本中,推荐使用 CoreDNS, kubeadm 默认会安装 CoreDNS。当Pod向CoreDNS发起DNS解析请求时,CoreDNS先会自己尝试解析,如果无法解析该域名,会将DNS请求交给CoreDNS的Pod所在的宿主机,让宿主机尝试解析。
本次实验kubernetes集群中coredns service的地址是10.247.3.10。
❯ kubectl get svc -n kube-systemNAME TYPE CLUSTER-IP EXTERNAL-IP PORT(S) AGEcoredns ClusterIP 10.247.3.10 <none> 53/UDP,53/TCP,8080/TCP 13d
宿主机的/etc/resolv.conf文件如下:
[root@cr7-k8s-85091-ydy99 ~]# cat /etc/resolv.conf# Generated by NetworkManagersearch openstacklocalnameserver 100.125.1.250nameserver 100.125.64.250options single-request-reopen
CluterFirst
CluterFirst是kubernetes集群中默认的DNS策略,这里是一个普通的Pod yaml文件,没有指定dnsPolicy。
apiVersion: v1kind: Podmetadata: name: busybox namespace: defaultspec: containers: - image: busybox:1.28 command: - sleep - "3600" imagePullPolicy: IfNotPresent name: busybox restartPolicy: Always
创建Pod后,进入该Pod查看/etc/resolv.conf配置,可以看到nameserver为CoreDNS的service的地址。
/ # cat /etc/resolv.confnameserver 10.247.3.10search default.svc.cluster.local svc.cluster.local cluster.local openstacklocaloptions single-request-reopen timeout:2 ndots:5
如果在Pod的yaml文件中指定了DNS参数,会和默认的ClusterFirst的配置叠加:
apiVersion: v1kind: Podmetadata: name: busybox namespace: defaultspec: containers: - image: busybox:1.28 command: - sleep - "3600" imagePullPolicy: IfNotPresent name: busybox restartPolicy: Always dnsConfig: nameservers: - 1.2.3.4 searches: - ns1.svc.cluster-domain.example - my.dns.search.suffix options: - name: ndots value: "2" - name: edns0
/ # cat /etc/resolv.confnameserver 10.247.3.10nameserver 1.2.3.4search default.svc.cluster.local svc.cluster.local cluster.local openstacklocal ns1.svc.cluster-domain.example my.dns.search.suffixoptions timeout:2 ndots:2 edns0 single-request-reopen
Default
dnsPolicy为Default模式时,Pod使用的是宿主机的DNS配置:
apiVersion: v1kind: Podmetadata: name: busybox namespace: defaultspec: containers: - image: busybox:1.28 command: - sleep - "3600" imagePullPolicy: IfNotPresent name: busybox restartPolicy: Always dnsPolicy: Default
/ # cat /etc/resolv.confnameserver 100.125.1.250nameserver 100.125.64.250search openstacklocaloptions single-request-reopen timeout:2
<font style="color:rgb(0, 0, 0);">ClusterFirstWithHostNet</font>
当Pod使用了hostNetwork模式时,Pod使用的是宿主机的网卡:
#进入pod后查看/ # ifconfig......eth0 Link encap:Ethernet HWaddr FA:16:3E:6D:14:9B inet addr:192.168.0.8 Bcast:192.168.0.255 Mask:255.255.255.0 inet6 addr: fe80::f816:3eff:fe6d:149b/64 Scope:Link UP BROADCAST RUNNING MULTICAST MTU:1500 Metric:1 RX packets:44239432 errors:0 dropped:0 overruns:0 frame:0 TX packets:47841007 errors:0 dropped:0 overruns:0 carrier:0 collisions:0 txqueuelen:1000 RX bytes:19884749467 (18.5 GiB) TX bytes:34713001649 (32.3 GiB)......
当Pod使用<font style="color:rgb(0, 0, 0);">hostNetwork</font>模式,并且未指定<font style="color:rgb(0, 0, 0);">dnsPolicy</font>为<font style="color:rgb(0, 0, 0);">ClusterFirstWithHostNet</font>时,Pod会使用的宿主机的DNS:
apiVersion: v1kind: Podmetadata: name: busybox namespace: defaultspec: containers: - image: busybox:1.28 command: - sleep - "3600" imagePullPolicy: IfNotPresent name: busybox restartPolicy: Always hostNetwork: true
此时Pod无法通过域名访问Kubernetes集群内部:
#hostNetwork模式如果不指定dnsPolicy则使用default模式,使用的宿主机的DNS/ # cat /etc/resolv.confnameserver 100.125.1.250nameserver 100.125.64.250search openstacklocaloptions single-request-reopen timeout:2#pod可以通过域名访问外网,但是无法通过域名访问kubernetes集群内部/ # ping baidu.comPING baidu.com (39.156.69.79): 56 data bytes64 bytes from 39.156.69.79: seq=0 ttl=49 time=29.193 ms64 bytes from 39.156.69.79: seq=1 ttl=49 time=29.104 ms^C--- baidu.com ping statistics ---2 packets transmitted, 2 packets received, 0% packet lossround-trip min/avg/max = 29.104/29.148/29.193 ms/ # ping nginxping: bad address 'nginx'
如果Pod在hostNetwork模式下要通过域名的方式访问kubernetes集群内的服务,需要指定<font style="color:rgb(0, 0, 0);">dnsPolicy</font>为<font style="color:rgb(0, 0, 0);">ClusterFirstWithHostNet</font>:
apiVersion: v1kind: Podmetadata: name: busybox namespace: defaultspec: containers: - image: busybox:1.28 command: - sleep - "3600" imagePullPolicy: IfNotPresent name: busybox restartPolicy: Always hostNetwork: true dnsPolicy: ClusterFirstWithHostNet
此时查看Pod的DNS配置,可以看到nameserver使用的是CoreDNS:
#ClusterFirstWithHostNet模式DNS使用的是coredns的地址,/ # cat /etc/resolv.confnameserver 10.247.3.10search default.svc.cluster.local svc.cluster.local cluster.local openstacklocaloptions single-request-reopen timeout:2 ndots:5#可以通过域名访问外网,也通过域名访问集群内部/ # nslookup baidu.comServer: 10.247.3.10Address 1: 10.247.3.10 coredns.kube-system.svc.cluster.localName: baidu.comAddress 1: 39.156.69.79Address 2: 220.181.38.148/ #/ # nslookup nginxServer: 10.247.3.10Address 1: 10.247.3.10 coredns.kube-system.svc.cluster.localName: nginxAddress 1: 10.247.60.222 nginx.default.svc.cluster.local/ #
None
当设置dnsPolicy为None时,不会使用Kubernetes集群和宿主机的 DNS 策略,但是必须自己配置dnsConfig。
apiVersion: v1kind: Podmetadata: name: busybox namespace: defaultspec: containers: - image: busybox:1.28 command: - sleep - "3600" imagePullPolicy: IfNotPresent name: busybox restartPolicy: Always dnsPolicy: None dnsConfig: nameservers: - 1.2.3.4
/ # cat /etc/resolv.confnameserver 1.2.3.4options single-request-reopen timeout:2
StatefulSet 和 Service
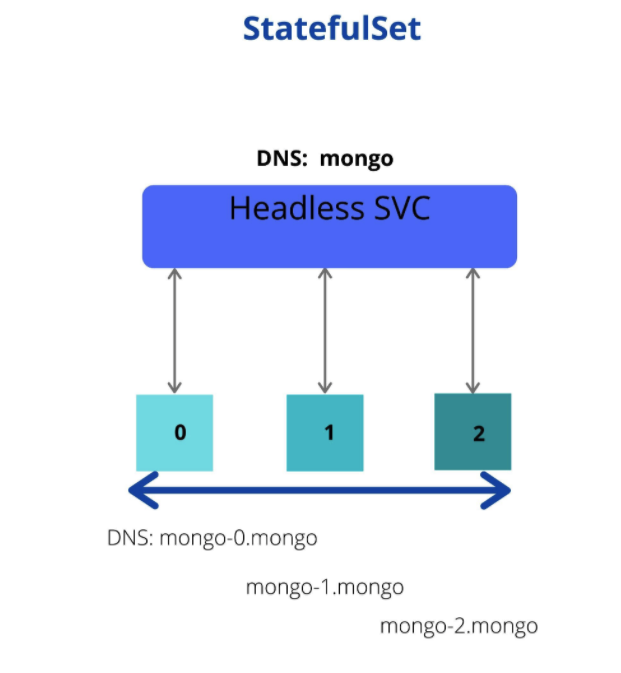
- StatefulSet Pod 具有唯一的标识,该标识包括顺序标识、稳定的网络标识和稳定的存储。该标识和 Pod 是绑定的,不管它被调度在哪个节点上。
- StatefulSet 中的每个 Pod 根据 StatefulSet 的名称和 Pod 的序号派生出它的主机名。组合主机名的格式为
<font style="color:rgb(239, 112, 96);">$(StatefulSet 名称)-$(序号)</font>。下例将会创建三个名称分别为 web-0、web-1、web-2 的 Pod。StatefulSet 可以使用 Headless Service(无头服务)控制它的 Pod 的网络域。管理域的这个服务的格式为: <font style="color:rgb(239, 112, 96);">$(服务名称).$(命名空间).svc.cluster.local</font>,其中 cluster.local 是集群域。一旦每个 Pod 创建成功,就会得到一个匹配的 DNS 子域,格式为:$(pod 名称).$(所属服务的 DNS 域名),其中所属服务由 StatefulSet 的 serviceName 域来设定。

- 通过域名去访问Headless Service负载的Pod是不走iptables的,通过域名去访问ClusterIP负载的Pod要走Iptables。
- 下面给出一些选择集群域、服务名、StatefulSet 名、及其怎样影响 StatefulSet 的 Pod 上的 DNS 名称的示例:
| Cluster Domain |
Service (ns/name) |
StatefulSet (ns/name) |
StatefulSet Domain |
Pod DNS |
Pod Hostname |
| cluster.local |
default/nginx |
default/web |
nginx.default.svc.cluster.local |
web-{0..N-1}.nginx.default.svc.cluster.local |
web-{0..N-1} |
| cluster.local |
foo/nginx |
foo/web |
nginx.foo.svc.cluster.local |
web-{0..N-1}.nginx.foo.svc.cluster.local |
web-{0..N-1} |
| kube.local |
foo/nginx |
foo/web |
nginx.foo.svc.kube.local |
web-{0..N-1}.nginx.foo.svc.kube.local |
web-{0..N-1} |
Headless Service
首先我们将StatefulSet和Headless Service结合使用,(通常情况下是这么做的):
apiVersion: v1kind: Servicemetadata: name: headless-nginx labels: app: nginxspec: ports: - port: 80 name: web clusterIP: None selector: app: nginx---apiVersion: apps/v1kind: StatefulSetmetadata: name: webspec: selector: matchLabels: app: nginx serviceName: headless-nginx replicas: 3 template: metadata: labels: app: nginx spec: containers: - name: nginx image: nginx:1.7.9 ports: - containerPort: 80 name: web
查看创建的StatefulSet的Pod,命名是有规律的按照0,1,2的顺序递增。
root@master01:~/yaml/service# kubectl get pod -o wideNAME READY STATUS RESTARTS AGE IP NODE NOMINATED NODE READINESS GATESweb-0 1/1 Running 0 6s 192.168.5.59 worker01 <none> <none>web-1 1/1 Running 0 5s 192.168.30.117 worker02 <none> <none>web-2 1/1 Running 0 3s 192.168.5.58 worker01 <none> <none>
查看创建的Headless Service,可以看到ClusterIP为None:
root@master01:~/yaml/service# kubectl get svcNAME TYPE CLUSTER-IP EXTERNAL-IP PORT(S) AGEheadless-nginx ClusterIP None <none> 80/TCP 15m
找一个相同namespace的Pod来解析该Headless Service:
root@master01:~/yaml/service# kubectl exec busybox1 -- nslookup headless-nginxServer: 10.96.0.10Address 1: 10.96.0.10 kube-dns.kube-system.svc.cluster.local#解析出来的ip地址为3个StatefulSet的pod的ipName: headless-nginxAddress 1: 192.168.30.117 web-1.headless-nginx.default.svc.cluster.localAddress 2: 192.168.5.59 web-0.headless-nginx.default.svc.cluster.localAddress 3: 192.168.5.58 web-2.headless-nginx.default.svc.cluster.local
查看default命名空间下的Pod的/etc/resolv.conf配置:
root@master01:~/yaml/service# kubectl exec busybox1 -- cat /etc/resolv.conf nameserver 10.96.0.10search default.svc.cluster.local svc.cluster.local cluster.localoptions ndots:5
在不同的 namespace 下的 Pod 通过 Service 访问的时候,需要在 Service name 后面加上 <font style="color:rgb(0, 0, 0);">.<namespace名字></font>。
root@master01:~/yaml/service# kubectl exec busybox2 -n kube-system -- nslookup headless-nginx.default Server: 10.96.0.10Address 1: 10.96.0.10 kube-dns.kube-system.svc.cluster.localName: headless-nginx.default.svc.cluster.localAddress 1: 192.168.5.58 web-2.headless-nginx.default.svc.cluster.localAddress 2: 192.168.5.59 web-0.headless-nginx.default.svc.cluster.localAddress 3: 192.168.30.117 web-1.headless-nginx.default.svc.cluster.local
查看kube-system命名空间下的Pod的/etc/resolv.conf配置:
root@master01:~/yaml/service# kubectl exec busybox2 -n kube-system -- cat /etc/resolv.conf nameserver 10.96.0.10search kube-system.svc.cluster.local svc.cluster.local cluster.local options ndots:5
ClusterIP Service
现在我们将StatefulSet和ClusterIP Service结合使用:
apiVersion: v1kind: Servicemetadata: name: clusterip-nginx labels: app: nginx#ClusterIP不为None则表示该Service有ClusterIP spec: ports: - port: 80 name: web selector: app: nginx
查看创建的Service:
root@master01:~/yaml/service# kubectl get svcNAME TYPE CLUSTER-IP EXTERNAL-IP PORT(S) AGEclusterip-nginx ClusterIP 10.110.176.201 <none> 80/TCP 13s
此时用Pod解析域名只能得到ClusterIP地址,无法得到Pod的IP地址:
root@master01:~/yaml/service# kubectl exec busybox1 -- nslookup clusterip-nginxServer: 10.96.0.10Address 1: 10.96.0.10 kube-dns.kube-system.svc.cluster.localName: clusterip-nginxAddress 1: 10.110.176.201 clusterip-nginx.default.svc.cluster.local
Pod 的 hostname 与 subdomain
在 Kubernetes 中,如果不指定 Pod 的 hostname,其默认为 <font style="color:rgb(0, 0, 0);">pod.metadata.name</font>,通过 <font style="color:rgb(0, 0, 0);">spec.hostname</font> 字段可以自定义;另外还可以给 Pod 设置 subdomain,通过 <font style="color:rgb(0, 0, 0);">spec.subdomain</font> 字段。比如下面这个例子:
创建一个Nginx Pod,指定Pod的hostname和subdomain:
apiVersion: v1kind: Podmetadata: name: nginx labels: name: nginxspec: hostname: domain-test subdomain: subdomain-test containers: - image: nginx name: nginx---apiVersion: v1kind: Servicemetadata: name: subdomain-testspec: selector: name: nginx ports: - port: 80 targetPort: 80 protocol: TCP
可以查看这个 Pod 的 hostname 和 hosts 文件:
[root@localhost ~]# kubectl get po -o wideNAME READY STATUS RESTARTS AGE IP NODE NOMINATED NODE READINESS GATESbusybox-5bbb5d7ff7-dh68j 1/1 Running 0 112m 10.244.1.246 172-16-105-2 <none> <none>nginx 1/1 Running 0 2m 10.244.1.253 172-16-105-2 <none> <none>[root@localhost ~]# kubectl exec -it nginx bashroot@domain-test:/# cat /etc/hosts# Kubernetes-managed hosts file.127.0.0.1 localhost::1 localhost ip6-localhost ip6-loopbackfe00::0 ip6-localnetfe00::0 ip6-mcastprefixfe00::1 ip6-allnodesfe00::2 ip6-allrouters10.244.1.253 domain-test.subdomain-test.default.svc.cluster.local domain-testroot@domain-test:/#
在 busybox 容器中通过域名访问这个Pod:
[root@localhost ~]# kubectl exec -it busybox-5bbb5d7ff7-dh68j sh/ # wget domain-test.subdomain-testConnecting to domain-test.subdomain-test (10.244.1.253:80)saving to 'index.html'index.html 100% |*****************************************************| 612 0:00:00 ETA'index.html' saved


