Istio
Istio 的安装
学习的最好方式就是亲自动手实践,要想学 Istio ,就先把 Istio 给装起来!安装方式的选择
Istio 提供了多种可选的安装方式:| 安装方式 | 说明 | 推荐度 | 源码位置 |
|---|---|---|---|
| Istioctl | Istio 提供的命令行工具 | ⭐⭐⭐⭐⭐ | istio/istioctl |
| Istio Operator | Istio 提供的 Operator 控制器 | ⭐⭐ 直接使用 Operator 进行安装可能存在安全隐患,并且官方不会优先为其考虑新特性了 | istio/operator |
| Helm | Kubernetes 的包管理器 | ⭐⭐⭐ 此特性目前(2022-02-03)仍处于 alpha 阶段 | istio/manifests/charts |
<font style="color:rgb(30, 107, 184);">istioctl install</font> 命令时,操作运行于管理员用户的安全上下文中;而直接使用 Operator 时,操作运行于集群内 pod 自己的安全上下文中。 为了避免此漏洞,需要确保 Operator 自身部署的足够安全,所以一般不建议直接使用 Operator 。
而不论是使用 Helm chart ,或是 Istioctl 、 Operator 安装 Istio 时,它们使用的底层 chart 都是相同的。
接下来将使用 Istioctl 来进行 Istio 的安装。
开始安装
首先需要将 Istioctl 工具下载到服务器,可以自行到 Istio release 页面下载对应的平台版本。 也有个简单的办法,直接使用 Istio 提供的 downloadIstio 脚本一键下载:不过该方式默认下载的是最新版本,推荐大家指定一下具体版本,以 1.12.1 为例,可以通过传递 ISTIO_VERSION 参数:
$ curl -L https://istio.io/downloadIstio | sh -
执行完成后会在当前位置生成 istio-1.12.1 目录,其中包括以下内容(具体版本可能存在差异):
$ curl -L https://istio.io/downloadIstio | ISTIO_VERSION=1.12.1 sh -

- bin : 存放 istioctl 二进制文件
- manifests : istio 的内置 chart 目录,默认使用这些内置 chart 生成安装清单,安装过程也可以自行设置 —manifests=other_manifests/ 参数来指定外部 chart
- samples : istio 提供的一些示例应用程序
- tools : 一些工具,如 certs 用于生成证书
检查一下 istio 环境以及版本信息:
$ export PATH=$PWD/bin:$PATH
到这,istioctl 的安装就完成了,还要继续借助 istioctl 来完成 Istio 的安装,这才是最终目的。 在继续安装 Istio 之前,先要了解下 Istio 提供的几个内置的配置文件,这些配置文件提供了对 Istio 控制平面和 Istio 数据平面 Sidecar 的定制内容。 要想知道有哪几个内置的配置文件,可以运行以下命令:
$ istioctl versionno running Istio pods in "istio-system"1.12.1
其中几个主要的配置文件:
$ istioctl profile listIstio configuration profiles:defaultdemoemptyexternalminimalopenshiftpreviewremote
| 配置文件 | 核心组件 | 说明 |
|---|---|---|
| default | istio-ingressgateway、istiod | 根据 IstioOperator API 的默认设置启动组件。可用于生产部署。 |
| demo | istio-egressgateway、istio-ingressgateway、istiod | 旨在展示 Istio 的功能,启用了高级别的追踪和访问日志(需要具有适度的资源),适合学习使用。 |
| minimal | istiod | 与默认配置文件相同,但只安装了控制平面组件。 |
| remote | - | 配置 Multicluster Mesh 的 Remote Cluster。 |
| empty | - | 不部署任何东西。可以作为自定义配置的基本配置文件。 |
| preview | istio-ingressgateway、istiod | 实验性。用于探索 Istio 的新功能。不确保稳定性、安全性和性能。 |
开始使用 demo 配置文件进行 Istio 安装,有两种方式: 1、直接通过在命令行传递配置名称
$ istioctl profile dump demoapiVersion: install.istio.io/v1alpha1kind: IstioOperatorspec:components:base:enabled: truecni:enabled: falseegressGateways:- enabled: truek8s:resources:requests:cpu: 10mmemory: 40Miname: istio-egressgatewayingressGateways:- enabled: true......
2、通过
$ istioctl install --set profile=demo
<font style="color:rgb(30, 107, 184);">-f</font> 传递配置文件(推荐方式)
完整的 API 记录可以参考 IstioOperator API 文档。 耐心等待,出现如下结果:
$ vi my-demo-config.yamlapiVersion: install.istio.io/v1alpha1kind: IstioOperatorspec:profile: demo$ istioctl install -f my-demo-config.yaml
到此,Istio 的安装就完成了。 再次检查一下 istio 环境以及版本信息:
This will install the Istio 1.12.1 demo profile with ["Istio core" "Istiod" "Ingress gateways" "Egress gateways"] components into the cluster. Proceed? (y/N) y✔ Istio core installed✔ Istiod installed✔ Egress gateways installed✔ Ingress gateways installed✔ Installation completeMaking this installation the default for injection and validation.Thank you for installing Istio 1.12. Please take a few minutes to tell us about your install/upgrade experience! https://forms.gle/xxx
也可以对其进行验证:
$ istioctl versionclient version: 1.12.1control plane version: 1.12.1data plane version: 1.12.1 (2 proxies)
查看 Istio 在 Kubernetes 部署了什么:
$ istioctl verify-install -f my-demo-config.yaml......Checked 14 custom resource definitionsChecked 3 Istio Deployments✔ Istio is installed and verified successfully
为了下面示例项目的演示,先准备一个命名空间 istio-app,为其添加标签,指示在此命名空间部署应用时,Istio 自动给 Pod 注入 Envoy 边车代理:
$ kubectl -n istio-system get deployNAME READY UP-TO-DATE AVAILABLE AGEistio-egressgateway 1/1 1 1 9m49sistio-ingressgateway 1/1 1 1 9m49sistiod 1/1 1 1 10m
最后,如果不需要 Istio ,可以卸载掉(希望不会执行到这一步 😅):
$ kubectl create ns istio-appnamespace/istio-app created$ kubectl label ns istio-app istio-injection=enablednamespace/istio-app labeled
$ istioctl manifest generate -f my-demo-config.yaml | kubectl delete --ignore-not-found=true -f -$ kubectl delete ns istio-system$ kubectl label ns istio-app istio-injection-$ kubectl delete ns istio-app
微服务示例项目
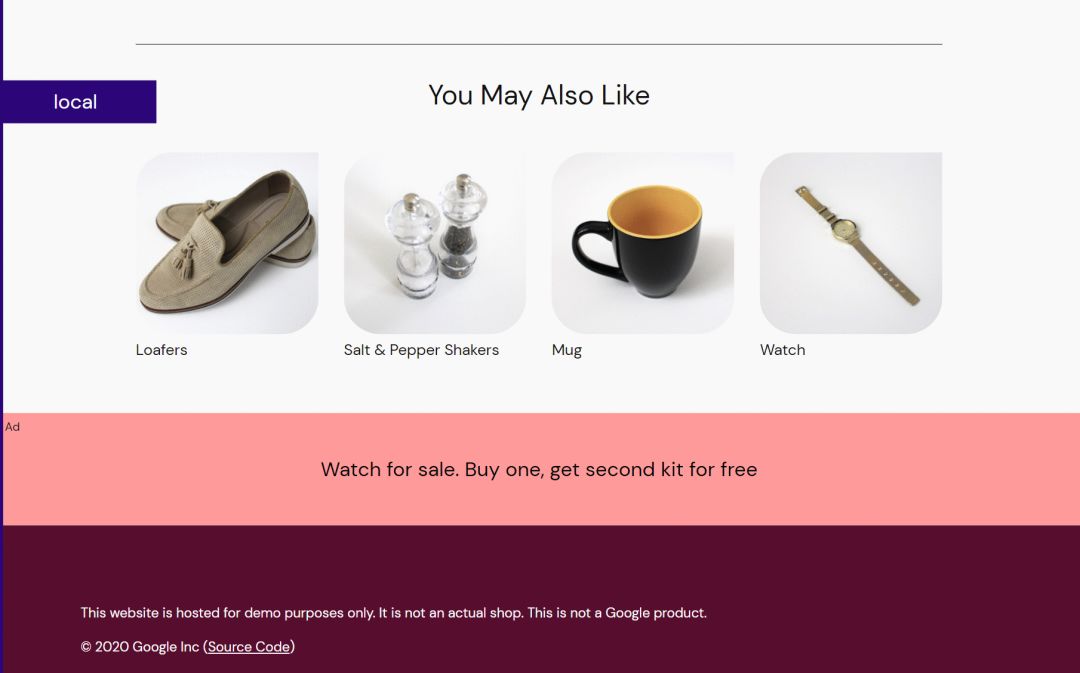
本篇文章的微服务示例项目将选用:Online Boutique 这是一个基于云原生微服务架构的 web 商城应用,由 11 个用不同语言编写的微服务组成,服务间通过 gRPC 相互通信。用户可以在其中进行浏览商品、添加购物车并购买等操作。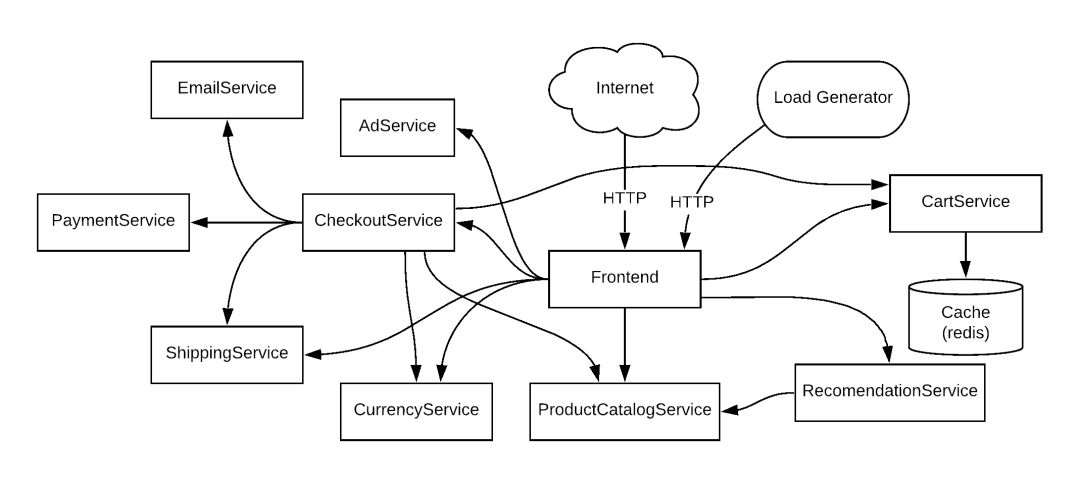
| 服务 | 语言 | 说明 |
|---|---|---|
| frontend | Go | 提供一个 HTTP 服务。实现不需要注册/登录并自动为所有用户生成会话 ID |
| cartservice | C# | 将用户购物车中的商品存储在 Redis 中并进行检索 |
| productcatalogservice | Go | 产品列表(来自 JSON 文件)、搜索产品以及获取单个产品 |
| currencyservice | Node.js | 将一种货币金额转换为另一种货币。 使用从欧洲中央银行获取的真实值。 这是最高的 QPS 服务 |
| paymentservice | Node.js | 用给定的金额向给定的信用卡信息(模拟)收取费用并返回交易 ID |
| shippingservice | Go | 根据购物车提供运费估算。 将物品运送到给定地址(模拟) |
| emailservice | Python | 向用户发送订单确认电子邮件(模拟) |
| checkoutservice | Go | 检索用户购物车、准备订单并协调付款、运输和电子邮件通知 |
| recommendationservice | Python | 根据购物车中给出的内容推荐其他产品 |
| adservice | Java | 根据给定的上下文词提供文字广告 |
| loadgenerator | Python/Locust | 不断向前端发送模仿真实用户购物流程的请求 |
使用 Kubernetes 部署
Online Boutique 的 Kubernetes 部署配置位于:https://raw.githubusercontent.com/GoogleCloudPlatform/microservices-demo/main/release/kubernetes-manifests.yaml 建议先自行下载到本地,其中使用到的 gcr.io 镜像如果无法拉取,可以参考: 先为 Online Boutique 应用创建一个命名空间:开始部署 Online Boutique 应用:
$ kubectl create ns microservices-demonamespace/microservices-demo created
等待所有 POD 启动完成:
$ kubectl apply -n microservices-demo -f kubernetes-manifests.yamldeployment.apps/emailservice createdservice/emailservice createddeployment.apps/checkoutservice createdservice/checkoutservice createddeployment.apps/recommendationservice createdservice/recommendationservice createddeployment.apps/frontend createdservice/frontend createdservice/frontend-external createddeployment.apps/paymentservice createdservice/paymentservice createddeployment.apps/productcatalogservice createdservice/productcatalogservice createddeployment.apps/cartservice createdservice/cartservice createddeployment.apps/loadgenerator createddeployment.apps/currencyservice createdservice/currencyservice createddeployment.apps/shippingservice createdservice/shippingservice createddeployment.apps/redis-cart createdservice/redis-cart createddeployment.apps/adservice createdservice/adservice created
查看 Service :
$ kubectl get pod -n microservices-demoNAME READY STATUS RESTARTS AGEadservice-78c76f67d7-ssk2d 1/1 Running 0 68scartservice-7fb7c7bbcf-hcjvb 1/1 Running 0 69scheckoutservice-7dc67d866f-fqx6g 1/1 Running 0 69scurrencyservice-86cbc887cf-9cs89 1/1 Running 0 69semailservice-5d4d698877-sg5rq 1/1 Running 0 69sfrontend-78756cdbb9-szdsg 1/1 Running 0 69sloadgenerator-7ddcddf799-6bjr9 1/1 Running 0 69spaymentservice-66697f866c-b7vjv 1/1 Running 0 69sproductcatalogservice-78b45fdb9f-58rq6 1/1 Running 0 69srecommendationservice-58956f7f99-k9bgq 1/1 Running 0 69sredis-cart-5b569cd47-96knk 1/1 Running 0 68sshippingservice-5cbc5b7c4c-t2x79 1/1 Running 0 68s
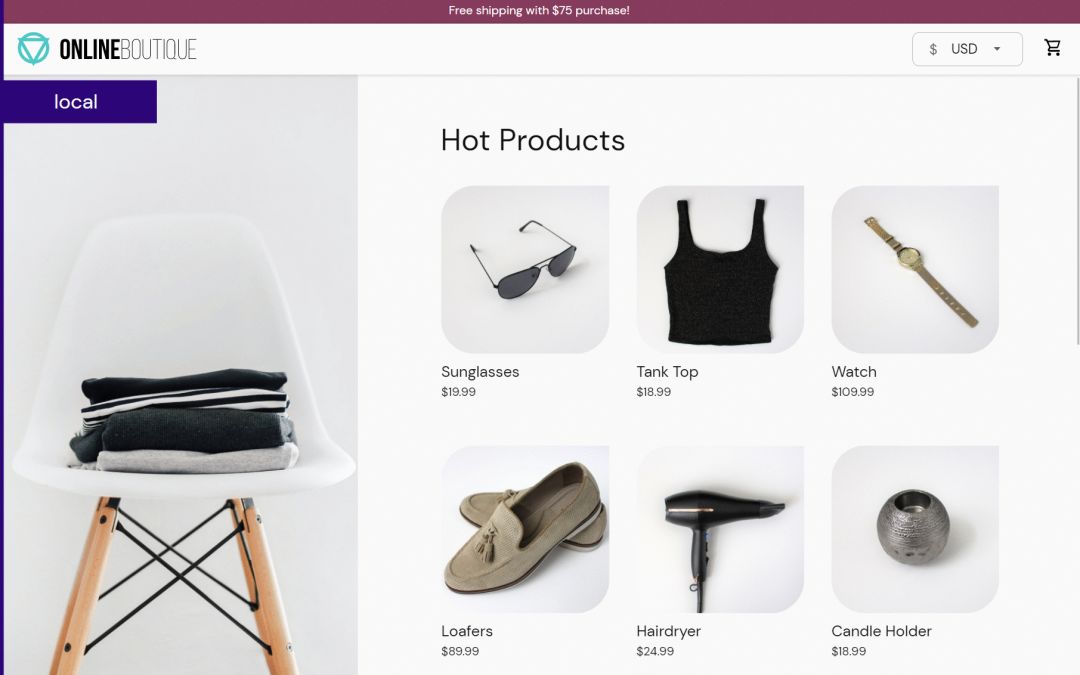
浏览器访问 frontend-external 服务,这是 Online Boutique 暴露的 LoadBalancer 前端服务。
$ kubectl get svc -n microservices-demoNAME TYPE CLUSTER-IP EXTERNAL-IP PORT(S) AGEadservice ClusterIP 10.104.91.120 <none> 9555/TCP 110scartservice ClusterIP 10.100.229.227 <none> 7070/TCP 110scheckoutservice ClusterIP 10.97.11.220 <none> 5050/TCP 110scurrencyservice ClusterIP 10.99.197.174 <none> 7000/TCP 110semailservice ClusterIP 10.104.16.76 <none> 5000/TCP 110sfrontend ClusterIP 10.105.83.87 <none> 80/TCP 110sfrontend-external LoadBalancer 10.101.227.191 localhost 80:31057/TCP 110spaymentservice ClusterIP 10.105.219.247 <none> 50051/TCP 110sproductcatalogservice ClusterIP 10.98.241.58 <none> 3550/TCP 110srecommendationservice ClusterIP 10.96.153.244 <none> 8080/TCP 110sredis-cart ClusterIP 10.107.73.80 <none> 6379/TCP 110sshippingservice ClusterIP 10.100.207.175 <none> 50051/TCP 110s
为微服务启用 Istio
部署在 microservices-demo 命名空间中的 Online Boutique 是一个简单的基于 Kubernetes 的微服务架构应用,而在一些细化管理的需求上,如熔断、限流、监控、认证、授权、安全、负载均衡等,无法很好的得到满足。 所以,将为其升级到服务网格架构,为微服务启用 Istio 支持。 要启用 Istio 支持,只要为 POD 额外注入一个 SideCar 应用。 可以手动注入,也可以为整个命名空间添加 istio-injection=enabled 标签实现自动注入。 在安装 Istio 时,已经预先创建了一个 istio-app 命名空间并为其添加了 Istio 自动注入 SideCar 的标签。 重新在 istio-app 命名空间部署 Online Boutique 应用:同样的,等待所有 POD 启动完成:
$ kubectl apply -n istio-app -f kubernetes-manifests.yamldeployment.apps/emailservice createdservice/emailservice createddeployment.apps/checkoutservice createdservice/checkoutservice createddeployment.apps/recommendationservice createdservice/recommendationservice createddeployment.apps/frontend createdservice/frontend createdservice/frontend-external createddeployment.apps/paymentservice createdservice/paymentservice createddeployment.apps/productcatalogservice createdservice/productcatalogservice createddeployment.apps/cartservice createdservice/cartservice createddeployment.apps/loadgenerator createddeployment.apps/currencyservice createdservice/currencyservice createddeployment.apps/shippingservice createdservice/shippingservice createddeployment.apps/redis-cart createdservice/redis-cart createddeployment.apps/adservice createdservice/adservice created
每个 POD 中都额外多了一个容器,即 SideCar 代理。 和之前不同的是,应该使用 Istio 的入口网关来访问应用,不再需要 frontend-external 服务了,可以把它删掉:
$ kubectl get pod -n istio-appNAME READY STATUS RESTARTS AGEadservice-78c76f67d7-vgc8d 2/2 Running 0 59scartservice-7fb7c7bbcf-7xklw 2/2 Running 0 60scheckoutservice-7dc67d866f-jh9vm 2/2 Running 0 60scurrencyservice-86cbc887cf-29v9n 2/2 Running 0 60semailservice-5d4d698877-vgvc8 2/2 Running 0 60sfrontend-78756cdbb9-xzm95 2/2 Running 0 60sloadgenerator-7ddcddf799-9hrkj 2/2 Running 0 60spaymentservice-66697f866c-k5qnj 2/2 Running 0 60sproductcatalogservice-78b45fdb9f-t7t8x 2/2 Running 0 60srecommendationservice-58956f7f99-fxk6s 2/2 Running 0 60sredis-cart-5b569cd47-7c48x 2/2 Running 0 59sshippingservice-5cbc5b7c4c-5tb95 2/2 Running 0 59s
查看 Istio 的入口网关 istio-ingressgateway 暴露端口(80 或 443 映射的端口):
$ kubectl delete svc frontend-external -n istio-appservice "frontend-external" deleted
在访问之前,还需要为 Istio 声明一些配置,让其可以正确路由到 Online Boutique 应用:
$ kubectl get svc -n istio-systemNAME TYPE CLUSTER-IP EXTERNAL-IP PORT(S) AGEistio-egressgateway ClusterIP 10.99.177.224 <none> 80/TCP,443/TCP 25distio-ingressgateway NodePort 10.98.188.6 <none> 15021:31783/TCP,80:30776/TCP,443:32456/TCP,31400:30022/TCP,15443:30548/TCP 25distiod ClusterIP 10.96.241.180 <none> 15010/TCP,15012/TCP,443/TCP,15014/TCP 25d
关键配置说明:
$ kubectl apply -n istio-app -f https://raw.githubusercontent.com/GoogleCloudPlatform/microservices-demo/main/release/istio-manifests.yamlgateway.networking.istio.io/frontend-gateway createdvirtualservice.networking.istio.io/frontend-ingress createdserviceentry.networking.istio.io/allow-egress-googleapis createdserviceentry.networking.istio.io/allow-egress-google-metadata createdvirtualservice.networking.istio.io/frontend created$ kubectl delete serviceentry allow-egress-google-metadata -n istio-appserviceentry.networking.istio.io "allow-egress-google-metadata" deleted$ kubectl delete serviceentry allow-egress-googleapis -n istio-appserviceentry.networking.istio.io "allow-egress-googleapis" deleted
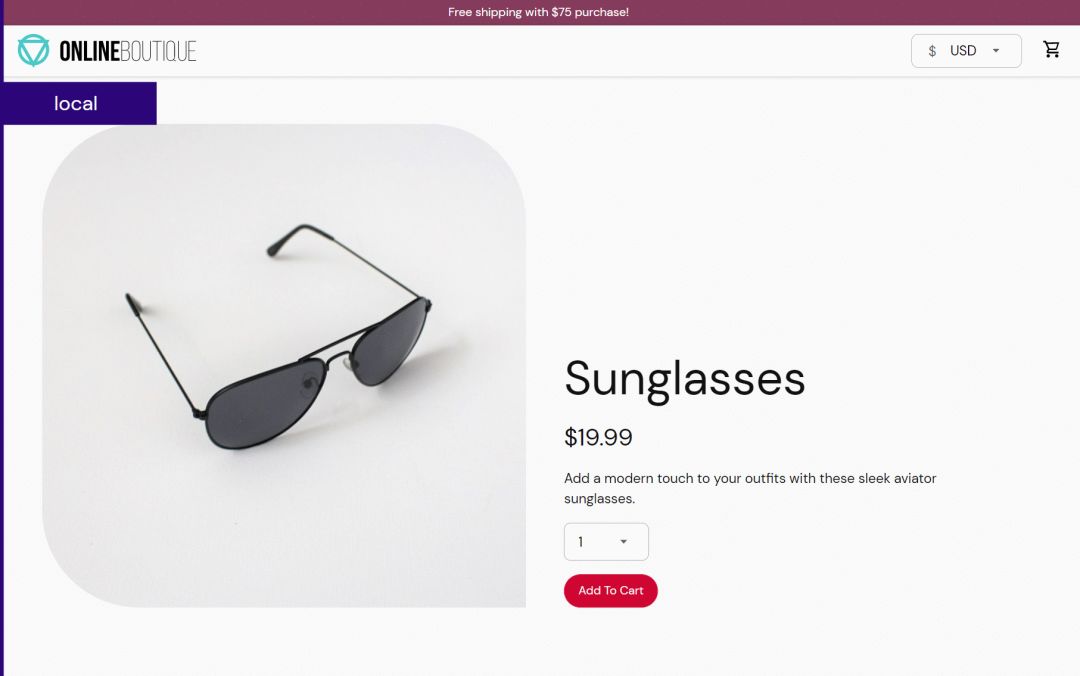
访问效果和之前一样,只是入口变成了 Istio 的网关:
# Istio Gateway 配置apiVersion: networking.istio.io/v1alpha3kind: Gatewaymetadata:name: frontend-gatewayspec:selector:istio: ingressgateway # 使用 Istio 默认网关实现servers:- port:number: 80name: httpprotocol: HTTPhosts:- "*"---# 流量路由配置apiVersion: networking.istio.io/v1alpha3kind: VirtualServicemetadata:name: frontend-ingressspec:# 流量的目标主机hosts:- "*"# 与上面的网关绑定在一起,以接受来自该网关的流量gateways:- frontend-gatewayhttp:- route:# 转发流量到实际目的地- destination:# 主机名host: frontend# 端口port:number: 80

集成遥测应用
在集成遥测应用之前,来体验一下 Istio 的金丝雀部署功能。 之前的<font style="color:rgb(30, 107, 184);">productcatalogservice</font> 服务没有指定版本,可以将其删除并指定为 V1 版本:
V1 版本:
$ kubectl delete deploy productcatalogservice -n istio-appdeployment.apps "productcatalogservice" deleted
apiVersion: apps/v1kind: Deploymentmetadata:name: productcatalogservicespec:selector:matchLabels:app: productcatalogservicetemplate:metadata:labels:app: productcatalogservice# 指定为 v1 版本version: v1spec:serviceAccountName: defaultterminationGracePeriodSeconds: 5containers:- name: serverimage: gcr.io/google-samples/microservices-demo/productcatalogservice:v0.3.5ports:- containerPort: 3550env:- name: PORTvalue: "3550"- name: DISABLE_STATSvalue: "1"- name: DISABLE_TRACINGvalue: "1"- name: DISABLE_PROFILERvalue: "1"# - name: JAEGER_SERVICE_ADDR# value: "jaeger-collector:14268"readinessProbe:exec:command: ["/bin/grpc_health_probe", "-addr=:3550"]livenessProbe:exec:command: ["/bin/grpc_health_probe", "-addr=:3550"]resources:requests:cpu: 100mmemory: 64Milimits:cpu: 200mmemory: 128Mi
V2 版本:
$ kubectl apply -n istio-app -f productcatalog-v1.yamldeployment.apps/productcatalogservice created$ kubectl get deploy productcatalogservice -n istio-appNAME READY UP-TO-DATE AVAILABLE AGEproductcatalogservice 1/1 1 1 5s
apiVersion: apps/v1kind: Deploymentmetadata:name: productcatalogservice-v2spec:selector:matchLabels:app: productcatalogservicetemplate:metadata:labels:app: productcatalogservice# 指定为 v2 版本version: v2spec:containers:- env:- name: PORTvalue: '3550'- name: EXTRA_LATENCYvalue: 3simage: gcr.io/google-samples/microservices-demo/productcatalogservice:v0.3.5livenessProbe:exec:command:- /bin/grpc_health_probe- -addr=:3550name: serverports:- containerPort: 3550readinessProbe:exec:command:- /bin/grpc_health_probe- -addr=:3550resources:limits:cpu: 200mmemory: 128Mirequests:cpu: 100mmemory: 64MiterminationGracePeriodSeconds: 5
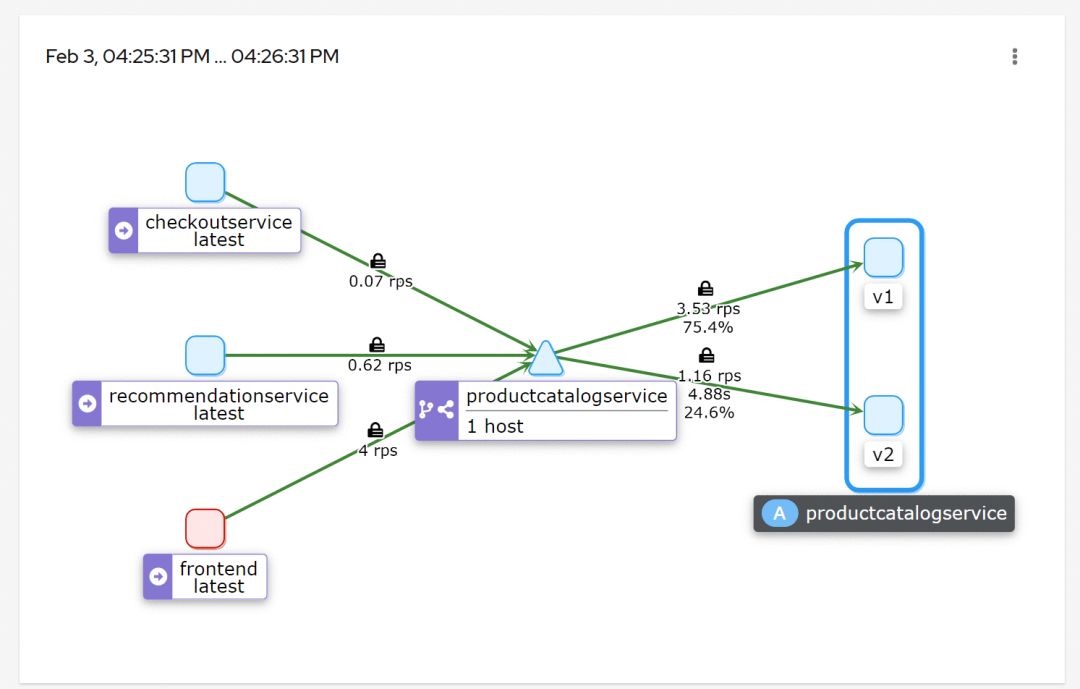
V2 版本设置了 EXTRA_LATENCY 环境变量,让接口时延延长 3 秒。(很明显,这是一个有故障的升级) 通过配置 Istio 使 75% 的流量流向 V1 , 25% 的流量流向 V2 :
$ kubectl apply -n istio-app -f productcatalog-v2.yamldeployment.apps/productcatalogservice-v2 created$ kubectl get deploy productcatalogservice-v2 -n istio-appNAME READY UP-TO-DATE AVAILABLE AGEproductcatalogservice-v2 1/1 1 1 6s
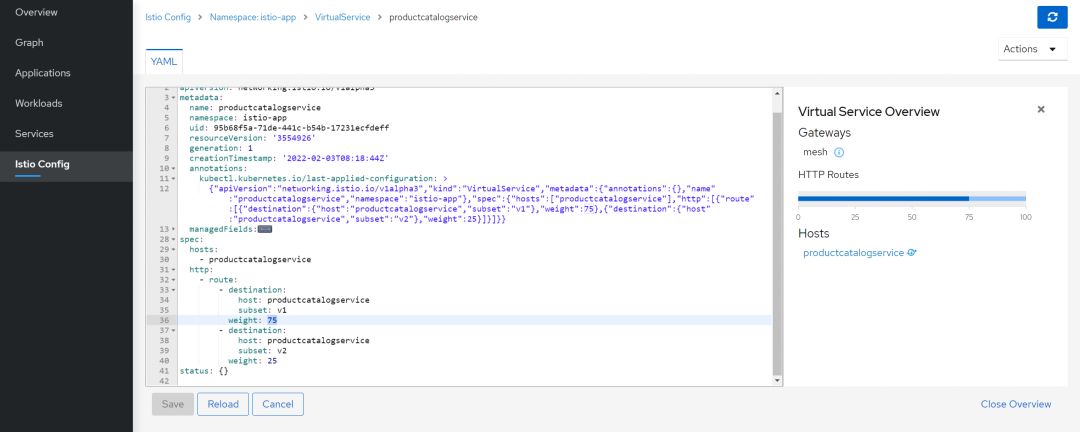
apiVersion: networking.istio.io/v1alpha3kind: VirtualServicemetadata:name: productcatalogservicespec:hosts:- productcatalogservicehttp:- route:- destination:host: productcatalogservicesubset: v1weight: 75- destination:host: productcatalogservicesubset: v2weight: 25
$ kubectl apply -n istio-app -f vs-split-traffic.yamlvirtualservice.networking.istio.io/productcatalogservice created
apiVersion: networking.istio.io/v1alpha3kind: DestinationRulemetadata:name: productcatalogservicespec:host: productcatalogservicesubsets:- labels:app: productcatalogserviceversion: v1name: v1- labels:app: productcatalogserviceversion: v2name: v2
多次刷新首页。前端加载速度应该会周期性的变较慢(3 秒)。 这个时候就可以让遥测应用上场观察了。 这些应用能够与 Istio 集成以提供额外功能。
$ kubectl apply -n istio-app -f destinationrule.yamldestinationrule.networking.istio.io/productcatalogservice created


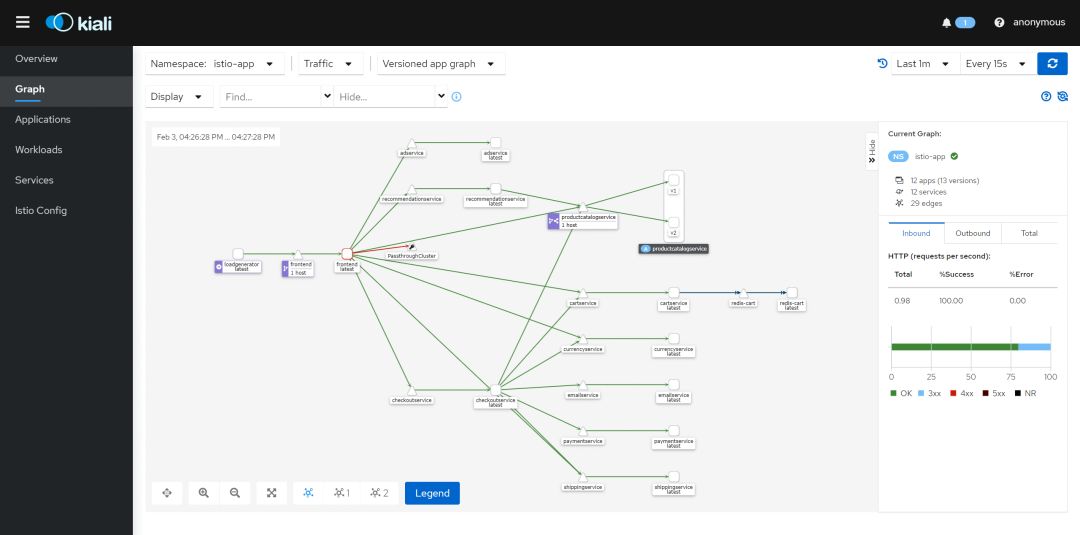
使用 istioctl 访问 Kiali:
$ kubectl apply -n istio-system -f samples/addonsserviceaccount/grafana createdconfigmap/grafana createdservice/grafana createddeployment.apps/grafana createdconfigmap/istio-grafana-dashboards createdconfigmap/istio-services-grafana-dashboards createddeployment.apps/jaeger createdservice/tracing createdservice/zipkin createdservice/jaeger-collector createdserviceaccount/kiali createdconfigmap/kiali createdclusterrole.rbac.authorization.k8s.io/kiali-viewer createdclusterrole.rbac.authorization.k8s.io/kiali createdclusterrolebinding.rbac.authorization.k8s.io/kiali createdrole.rbac.authorization.k8s.io/kiali-controlplane createdrolebinding.rbac.authorization.k8s.io/kiali-controlplane createdservice/kiali createddeployment.apps/kiali createdserviceaccount/prometheus createdconfigmap/prometheus createdclusterrole.rbac.authorization.k8s.io/prometheus createdclusterrolebinding.rbac.authorization.k8s.io/prometheus createdservice/prometheus createddeployment.apps/prometheus created
$ istioctl dashboard kiali
<font style="color:rgb(30, 107, 184);">productcatalogservice</font> 的 <font style="color:rgb(30, 107, 184);">VirtualService</font> 配置。
可以直接在 Kiali 中更改:
参考资料
istio/istioctl: https://github.com/istio/istio/tree/master/istioctl
istio/operator: https://github.com/istio/istio/tree/master/operator
istio/manifests/charts: https://github.com/istio/istio/tree/master/manifests/charts
Istio Release: https://github.com/istio/istio/releases
IstioOperator API 文档: https://istio.io/latest/zh/docs/reference/config/istio.operator.v1alpha1/
Online Boutique: https://github.com/GoogleCloudPlatform/microservices-demo
https://raw.githubusercontent.com/GoogleCloudPlatform/microservices-demo/main/release/kubernetes-manifests.yaml: https://raw.githubusercontent.com/GoogleCloudPlatform/microservices-demo/main/release/kubernetes-manifests.yaml

若有收获,就点个赞吧
0 人点赞
