原文链接:https://javascript.info/coordinates,translate with ❤️ by zhangbao.
如果要移动元素,我们必须要熟悉坐标系统。
多数 JavaScript 方法都是在处理两类坐标系统:
相对于窗口(或称“视口”)的上边沿/左边沿。
相对于文档的上边沿/左边沿。
理解两者之间的区别非常重要。
窗口坐标:getBoundingClientRect
窗口坐标的参照点是窗口左上角。
elem.getBoundingClientRect 返回元素 elem 相对于窗口的坐标信息,是一个对象,包含下列属性:
top:元素上边沿的 Y 轴坐标,bottom:元素下边沿的 Y 轴坐标,left:元素左边沿的 X 轴坐标,right:元素右边沿的 X 轴坐标。
图示如下:
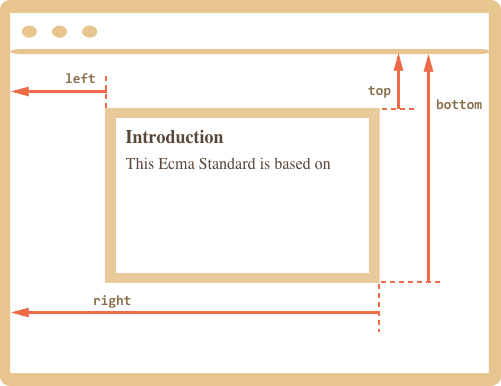
再一次说明,窗口坐标是相对于窗口左上角计算的。
也就是说,当我们滚动页面的时候,元素上升或下降,它的对应窗口坐标是一直改变的,理解这点很重要。
还需说明的是:
坐标值可能包含小数,但这丝毫不会影响将它们用在
style.positoin.left/top上。坐标值可能是负值。例如,当我们向下滚动页面,
elem就会往上去,当元素顶部超出窗口范围外时,得到的top值就是负值。一些浏览器(像 Chrome)会在
getBoundingClientRect返回的对象里,添加width和height属性。当然,计算它们也容易:height=bottom-top,width=right-left。
坐标 **right/bottom** 跟同名的 CSS 定位属性名含义不同
如果比较窗口坐标和 CSS 定位属性的话就会发现,与
position: fixed定位元素使用的属性名一样,都是相对于窗口定位的,但含义是不同的。CSS 定位属性里的
right是指元素距离窗口右边缘的距离,bottom是指元素距离窗口下边缘的距离。但窗口坐标含义就不同了——坐标值都是相对窗口左上角位置计算的。
elementFromPoint(x, y)
docuemnt.elementFromPoint(x, y) 返回距离窗口坐标点 (x, y) 最近的那个元素。
语法是:
let elem = document.elementFromPoint(x, y);
例如,下面代码高亮输出距离窗口中心点最近的那个元素:
let centerX = docuement.documentElement.clientWidth / 2;let centerY = docuement.documentElement.clientHeight / 2;let elem = document.elementFromPoint(centerX, centerY);elem.style.background = 'red';alert(elem.tagName);
因为我们使用的是窗口坐标,所以高亮的元素会根据我们实时的滚动发生改变。
针对窗口外坐标点,elementFromPoint 返回 null。
elem.elementFromPoint(x, y) 仅对可视区范围内的坐标位置是有效的。
如果坐标点之一的坐标值为负值,或者坐标点超出了窗口的宽高范围,那么 elementFromPoint 返回 null。
多数情况下这种行为不会造成问题,但我们还是要记住这个特性。
如果我们不对 elementFromPoint 返回值做检查的话,代码中可能会发生错误:
let elem = document.elementFromPoint(x, y); // 如果坐标点在窗口之外的话,得到的 elem 是 nullelem.style.background = ''; // 出错了!
使用 positinon: fixed
多数时候,我们都需要用坐标来定位元素。在 CSS 中,相对于视口定义元素我们使用 position: fixed 搭配 left/top(或者 right/bottom)。
我们可以用 getBoundingClientRect 获得元素坐标,然后在它附近显示一些东西。
例如,下面的函数 createMessageUnder(elem, html) 用来在 elem 下面显示信息:
let elem = document.getElementById('coords-show-mask');function createMessageUnder(elem, html) {// 创建消息元素let message = document.creatElement('div');// 当然,最好是用类名来赋予样式message.style.cssText = 'position: fixed; color: red;';let coords = elem.getBoudingClientRect();// 赋值坐标,不要忘记加 px!message.style.left = coords.left + 'px';message.style.right = coords.bottom + 'px';message.innerHTML = html;return message;}// 使用:// 创建消息框后,5 秒后消失let message = createMessageUnder(elem, '你好,世界!');document.body.append(message);setTimeout(() => message.remove(), 5000);
这里有一个细节需要注意,当我们滚页面的时候,消息框不会跟随 #coords-show-mask 移动。
原因很简单,因为消息元素是 position: fixed 的,相对窗口定位,所以页面滚动时,相对与窗口坐标值定位的消息框始终是固定在同一个位置的。
为了达到理想效果,我们需要基于文档坐标系统定位元素:position: absolute。
文档坐标
文档坐标系统的定位参考点(或称坐标原点),是文档的左上角。
在 CSS 中,position: fixed 元素相对于窗口坐标定位;而 position: absolute 元素则是相对于文档坐标定位。
我们用 position: absolute 搭配 top/left 将元素定位在文档中的某处。这样在页面滚动时,定位元素也会跟随页面一起滚动。当然,前提是获取到了正确坐标值。
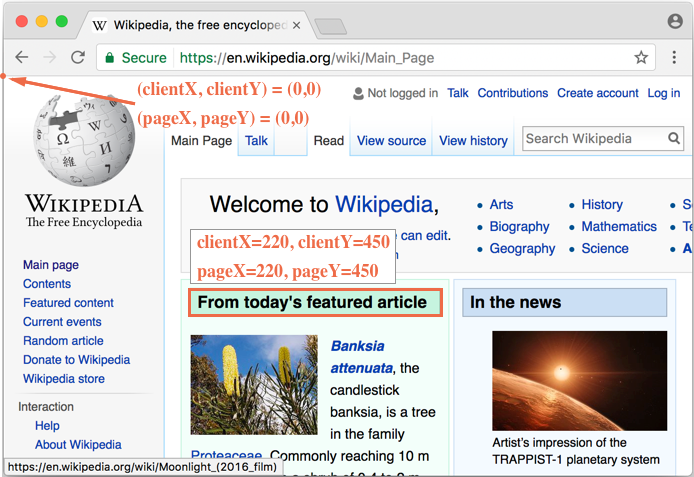
为了方便区分,我们把窗口坐标写作 (clientX, clientY),文档坐标写作 (pageX, pageY)。
当页面没有滚动时,窗口坐标和文档坐标的坐标原点重合在一处:
当滚动页面时,(clientX, clientY) 发生改变,因为此坐标是相对窗口左上角计算的,但 (pageX, pageY) 是不变的,因为元素在文档中的位置未发生改变。
还是相同的页面,这是滚动之后的样子:
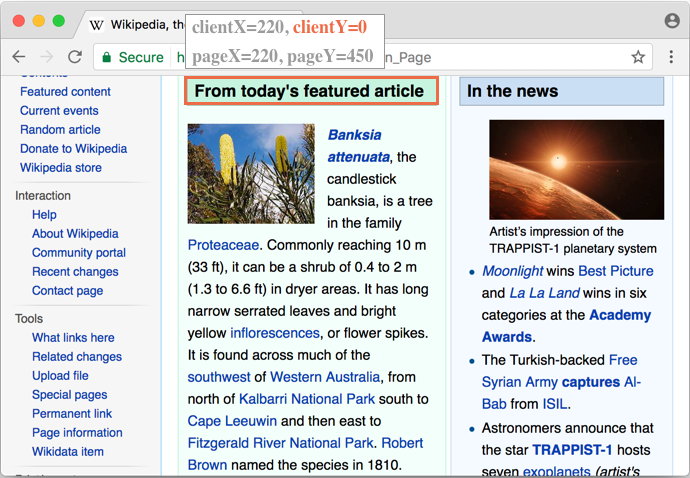
标题“From today’s featured article”的
clientY坐标值变为0,因为元素现在位于窗口顶部。clientX没有变,因为我们没有水平滚动。元素的
pageX,pageY没有变,因为反映的是元素文档坐标,而元素在文档中的位置未发生改变。
获取文档坐标
规范中并未提供获取元素文档坐标的接口,但很好实现:
两个坐标值可以通过下列公式求得:
pageX = clientX + 文档垂直滚动距离。pageY = clientY + 文档水平滚动距离。
下面实现了一个函数 getCoords(elem),提供获取元素文档坐标的功能。用到了 elem.getBoundingClientRect() 接口和页面当前滚动偏移:
function getCoords(elem) {let box = elem.getBoundingClientRect();return {top: box.top + window.pageYOffset,left: box.left + window.pageXOffset};}
总结
网页中,一个点能对应两个坐标系统下的坐标:
窗口坐标:
elem.getBoundingClientRect()。文档坐标:
elem.getBoundingClientRect()+ 当前页面滚动偏移。
position: fixed 元素相对窗口坐标定位;positon: absolute 元素相对文档坐标定位。
两种坐标都有它们各自使用场景,就像 CSS position 的 fixed 和 absolute 属性值一样。
练习题
问题
一、显示球场上点击点的窗口坐标
你可以看到下面有一个绿色“球场”。
使用 JavaScript 查找角落处用箭头标识出的窗口坐标。
为方便起见,文档中实现了一个小功能。 任何地方的点击都会显示那里的坐标。

你的代码应该使用 DOM 获取窗口坐标:
左上角外部拐角(简单)。
右下角外部拐角(也简单)。
左上角内部拐角(有点难)。
右下角的内部拐角(有几种方式,任选其一)
计算出来的坐标值应该跟鼠标点击返回的坐标值一致。
PS. 如果元素具有其他尺寸和边框宽度,代码同样能够正确计算出来,而不是始终返回固定值。
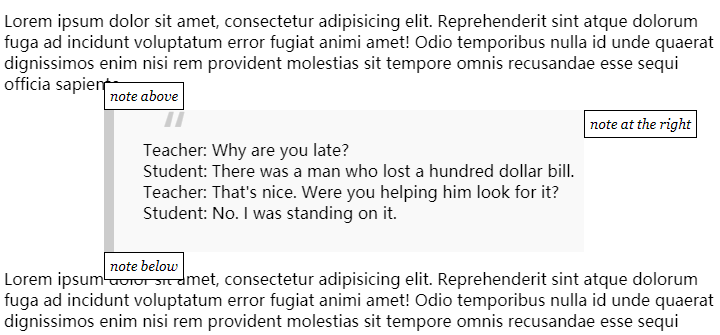
二、在元素附近显示注释
创建一个函数 positionAt(anchor, positino, elem),定位注释元素 elem,相对于锚点元素 anchor 进行定位,定位方向使用 position 参数指定,可选值为 "top"(顶部)、"right"(右部)、"bottom"(底部)。
再写一个函数 showNote(anchor, position, html) 使用指定的 html 和类名 "note" 来指定位置上显示咱们创建的注释元素。
像这样显示注释:
PS. 我们使用 position: fixed 来定位注释元素。
三、在元素附近显示注释(绝对定位版本)
修改上一个任务,注释元素使用 position: absolute 而不是 position: fixed 定位。
这样的话,就不会发生滚动页面时,注释元素不跟随的情况发生了。
为了能让页面滚动,我们先为 body 设置样式 <body style="height: 2000px;">。
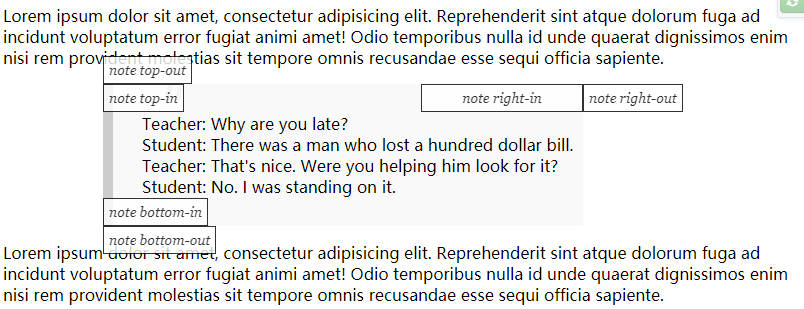
四、在内部定位注释
扩展上一个任务的功能:让函数 positionAt(anchor, position, elem) 在 anchor 内部插入 elem。
position 支持的新值包括:
top-out,right-out,bottom-out:分别对应之前的 top,out 和 bottom。
top-in,right-in,bottom-in:与上面的 *-out 对应,只不过位置是在 anchor 元素内侧。
例如:
// 在 blockquote 元素内部顶端显示注释positionAt(blockquote, "top-in", note);// 在 blockquote 上面显示注释positionAt(blockquote, "top-out", note);// 下面同理,在相应位置显示showNote(blockquote, "right-in", "note right-in");showNote(blockquote, "right-out", "note right-out");showNote(blockquote, "bottom-in", "note bottom-in");showNote(blockquote, "bottom-out", "note bottom-out");
答案
一、显示球场上点击点的窗口坐标
外部拐角
外部拐角坐标我们可以直接通过 elem.getBoundingClientRect() 获取到。
我们假设左上角的点是 answer1,右下角的那个点是 answer2:
let coords = elem.getBoundingClientRect();let answer1 = [coords.left, coords.top];let answer2 = [coords.right, coords.bottom];
左上角内部拐点
左上角内部拐点比左上角外部拐点多了一个边框的距离。可靠的方式是使用 clientLeft/Top:
let answer3 = [coords.left + field.clientLeft, coords.top + field.clientTop];
右下角内部拐点
在当前场景里,拿外部坐标减去边框尺寸得到的就是内部拐点坐标了。
使用 CSS 方式:
let answer4 = [coords.right - parseInt(getComputedStyle(field).borderRightWidth),coords.bottom - parseInt(getComputedStyle(field).borderBottomWidth)];
一个可选的方式是为外部左上角拐点坐标 ➕ clientWidth/clientHeight:
let answer4 = [coords.left + elem.clientLeft + elem.clientWidth,coords.top + elem.clientTop + elem.clientHeight];
二、在元素附近显示注释
<!DOCTYPE HTML><html><head><meta charset="utf-8"><style>.note {position: fixed; /* 注释元素使用固定定位 */z-index: 1000;padding: 5px;border: 1px solid black;background: white;text-align: center;font: italic 14px Georgia;}blockquote {background: #f9f9f9;border-left: 10px solid #ccc;margin: 0 0 0 100px;padding: .5em 10px;quotes: "\201C""\201D""\2018""\2019";display: inline-block;white-space: pre;}blockquote:before {color: #ccc;content: open-quote;font-size: 4em;line-height: .1em;margin-right: .25em;vertical-align: -.4em;}</style></head><body><p>Lorem ipsum dolor sit amet, consectetur adipisicing elit. Reprehenderit sint atque dolorum fuga ad incidunt voluptatum error fugiat animi amet! Odio temporibus nulla id unde quaerat dignissimos enim nisi rem provident molestias sit tempore omnis recusandaeesse sequi officia sapiente.</p><blockquote>Teacher: Why are you late?Student: There was a man who lost a hundred dollar bill.Teacher: That's nice. Were you helping him look for it?Student: No. I was standing on it.</blockquote><p>Lorem ipsum dolor sit amet, consectetur adipisicing elit. Reprehenderit sint atque dolorum fuga ad incidunt voluptatum error fugiat animi amet! Odio temporibus nulla id unde quaerat dignissimos enim nisi rem provident molestias sit tempore omnis recusandaeesse sequi officia sapiente.</p><script>/*** Positions elem relative to anchor as said in position.** @param {Node} anchor Anchor element for positioning* @param {string} position One of: top/right/bottom* @param {Node} elem Element to position** Both elements: elem and anchor must be in the document*/function positionAt(anchor, position, elem) {let anchorCoords = anchor.getBoundingClientRect();switch (position) {case "top":elem.style.left = anchorCoords.left + "px";elem.style.top = anchorCoords.top - elem.offsetHeight + "px";break;case "right":elem.style.left = anchorCoords.left + anchor.offsetWidth + "px";elem.style.top = anchorCoords.top + "px";break;case "bottom":elem.style.left = anchorCoords.left + "px";elem.style.top = anchorCoords.top + anchor.offsetHeight + "px";break;}}/*** Shows a note with the given html at the given position* relative to the anchor element.*/function showNote(anchor, position, html) {let note = document.createElement('div');note.className = "note";note.innerHTML = html;document.body.append(note);positionAt(anchor, position, note);}// test itlet blockquote = document.querySelector('blockquote');showNote(blockquote, "top", "note above");showNote(blockquote, "right", "note at the right");showNote(blockquote, "bottom", "note below");</script></body></html>
在线实例。
三、在元素附近显示注释(绝对定位版本)
这里只要稍微修改下任务二的代码就可以了:
CSS:
.note类使用position: absolute而非position: fixed定位。使用本章中定义的 getCoords 函数来获得元素相对文档的坐标位置。
.note {position: absolute;...}
function getCoords(elem) {let box = elem.getBoundingClientRect();return {top: box.top + pageYOffset,left: box.left + pageXOffset};}function positionAt(anchor, position, elem) {// let anchorCoords = anchor.getBoundingClientRect(); 改为let anchorCoords = getCoords(anchor);...}
在线实例。
四、在内部定位注释
其实我们只要把上一个任务中的函数 positionAt 稍微修改下就好了。完整的修改后的函数代码如下:
function positionAt(anchor, position, elem) {let anchorCoords = getCoords(anchor);switch (position) {case "top-out":elem.style.left = anchorCoords.left + "px";elem.style.top = anchorCoords.top - elem.offsetHeight + "px";break;case "right-out":elem.style.left = anchorCoords.left + anchor.offsetWidth + "px";elem.style.top = anchorCoords.top + "px";break;case "bottom-out":elem.style.left = anchorCoords.left + "px";elem.style.top = anchorCoords.top + anchor.offsetHeight + "px";break;case "top-in":elem.style.left = anchorCoords.left + "px";elem.style.top = anchorCoords.top + "px";break;case "right-in":elem.style.width = '150px';elem.style.left = anchorCoords.left + anchor.offsetWidth - elem.offsetWidth + "px";elem.style.top = anchorCoords.top + "px";break;case "bottom-in":elem.style.left = anchorCoords.left + "px";elem.style.top = anchorCoords.top + anchor.offsetHeight - elem.offsetHeight + "px";break;}}
在线实例。
(完)

若有收获,就点个赞吧
0 人点赞
