案例:通过RabbitMQ实现RPC
BY:14组开发周博文
欢迎各位老师和同学指导和指正!
本笔记已完美解决当前pika版本与视频中版本不一致导致的错误问题,祝君早日脱坑。
流程:
发布者将消息通过exchange中路由表发送至指定RoutingKey的Queue中,接受者再从queue中取出消息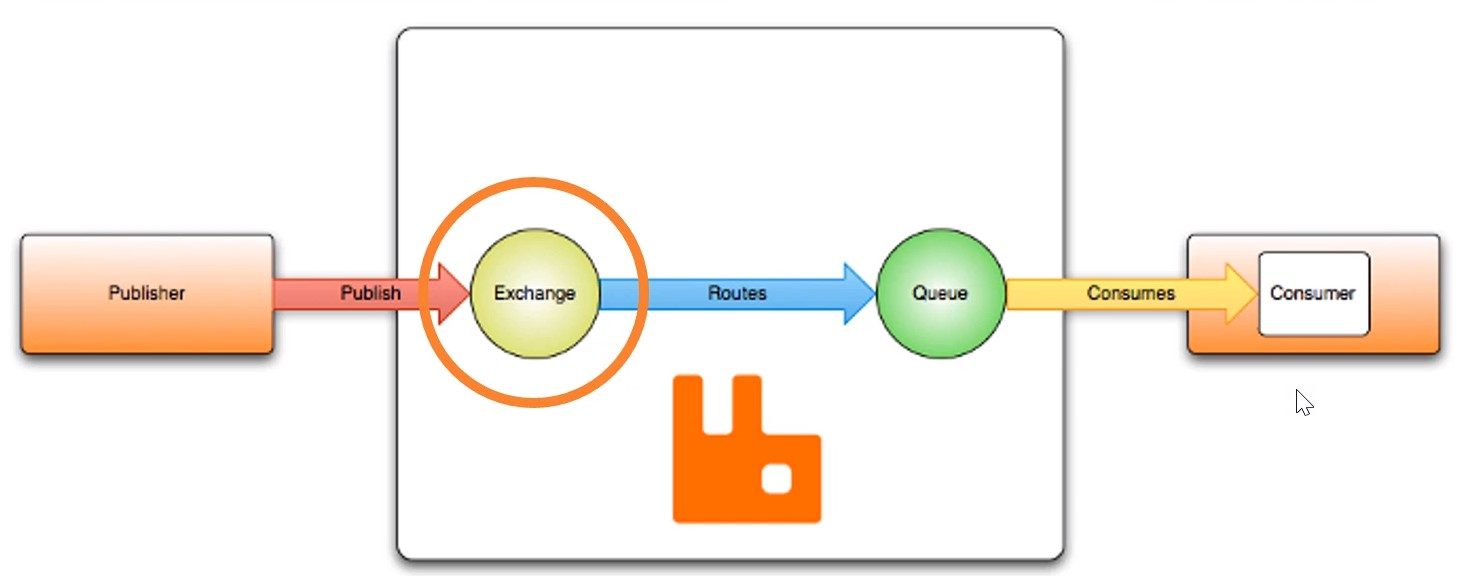
目标:
- msg消息发送
- sub pub,订阅和发布
- RPC
前提:
主机RabbitMQ服务已启用,且5672端口处于监听状态。
安装pika库:
pip install pika
当前版本:pika 1.0.1
1. msg消息发送
注意:
首次使用可能会出现连接报错,记得把主机的防火墙关闭。
当前pika版本与视频中版本不同,按照视频中的代码会报错。具体修改地方如下:
当前版本pika中basic_consume()的queue参数和callbcak回调函数的参数位置发生改变,按照视频中编写会报错。
msg_work.py:
视频中:**
channel.basic_consume(callback, queue="msg_queue") # 接收消息,此方法已更新,由于参数位置改变,所以视频中该行会报错,请使用下面参数顺序进行接收消息
修改后:
channel.basic_consume("msg_queue1", callback) # 接收消息, callback:回调函数
settings.py:**
# settings.py# rabbitmq连接参数配置参数# author: ZhouBoWenCONFIG = {"username": 'root',"password": "123456","host": "192.168.46.200","port": 5672}
msg_pub.py:
#!/usr/bin/env Python# -*- coding:utf-8 -*-# msg_pub.py# 发送消息# author: ZhouBoWenimport pika# 连接服务crdes = pika.PlainCredentials(username='root', password='123456') # 用户认证,已设置RabbitMQ的账户和密码params = pika.ConnectionParameters(host='192.168.46.200', port=5672, credentials=crdes) # 连接参数connection = pika.BlockingConnection(params) # 建立连接# 创建队列queue(通过频道)channel = connection.channel() # 创建频道channel.queue_declare(queue="msg_queue1") # 创建队列# 发送消息msg = "new message from zbw"channel.basic_publish(exchange='', routing_key='msg_queue1', body=msg) # 发送消息print(f"发送消息:{msg}")connection.close() # 关闭连接
运行结果:
发送消息:new message from zbw
msg_work.py:
#!/usr/bin/env Python# -*- coding:utf-8 -*-# msg_work.py# 接收消息,用于其他工作# author: ZhouBoWenimport pika# 连接服务crdes = pika.PlainCredentials(username='root', password='123456') # 用户认证,已设置RabbitMQ的账户和密码params = pika.ConnectionParameters(host='192.168.46.200', port=5672, credentials=crdes) # 连接参数connection = pika.BlockingConnection(params) # 建立连接# 创建队列queue(通过频道)channel = connection.channel() # 创建频道channel.queue_declare(queue="msg_queue1") # 创建队列# 接收(消费)消息def callback(channel, method, properties, body):"""回调函数,用于channel中接收消息"""print(f'收到消息:{body}')# channel.basic_consume(callback, queue="msg_queue") # 接收消息,此方法已更新,由于参数位置改变,所以视频中该行会报错,请使用下面参数顺序进行接收消息channel.basic_consume("msg_queue1", callback) # 接收消息, callback:回调函数channel.start_consuming() # 开始处于接收消息的状态中
运行结果:
收到消息:b’new message from zbw’
优化:**
- 发送消息增加命令行形式
- 消息持久化,避免消息传输过程中出现意外中断造成消息消失
- 接收消息添加确认收到通知机制(运行结果无法看出)
- 消息接收负载均衡,避免出现一个消息接收终端长期处于忙碌状态,而其他终端长期处于空闲状态,负载均衡
msg_pub2.py:
#!/usr/bin/env Python# -*- coding:utf-8 -*-# msg_pub2.py# 发送消息 优化版(命令行) 消息持久化,避免消息传输过程中出现意外中断造成消息消失# author: ZhouBoWenimport sysimport pika# 连接服务 TODO:可以将连接参数设置成配置文件config = {"username": 'root',"password": "123456","host": "192.168.46.200","port": 5672}crdes = pika.PlainCredentials(username=config['username'], password=config['password']) # 用户认证,已设置RabbitMQ的账户和密码params = pika.ConnectionParameters(host=config['host'], port=config['port'], credentials=crdes) # 连接参数connection = pika.BlockingConnection(params) # 建立连接# 创建队列queue(通过频道)channel = connection.channel() # 创建频道channel.queue_declare(queue="msg_queue2", durable=True) # 创建队列,并保证队列持久化# 发送消息msg = " ".join(sys.argv[1:]) or "new msg from zbw"channel.basic_publish(exchange='', routing_key='msg_queue2', body=msg, properties=pika.BasicProperties(delivery_mode=2)) # 发送消息 delivery_mode=2:保证消息持久化print(f"发送消息:{msg}")connection.close() # 关闭连接
运行结果(命令行):
(ZBW) I:\01-51CTO_Python\unit-04\train\cache_demo>python msg_pub2.py 新消息…! 发送消息:新消息…!
msg_work2.py:
#!/usr/bin/env Python# -*- coding:utf-8 -*-# msg_work2.py# 接收消息,用于其他工作 优化版 消息持久化,避免消息传输过程中出现意外中断造成消息消失 确认收到通知机制 消息接收负载均衡# author: ZhouBoWenafimport timeimport pika# 连接服务 TODO:可以将连接参数设置成配置文件config = {"username": 'root',"password": "123456","host": "192.168.46.200","port": 5672}crdes = pika.PlainCredentials(username=config['username'], password=config['password']) # 用户认证,已设置RabbitMQ的账户和密码params = pika.ConnectionParameters(host=config['host'], port=config['port'], credentials=crdes) # 连接参数connection = pika.BlockingConnection(params) # 建立连接# 创建队列queue(通过频道)channel = connection.channel() # 创建频道channel.queue_declare(queue="msg_queue2", durable=True) # 创建队列, 队列持久化# 接收(消费)消息def callback(channel, method, properties, body):"""回调函数,用于channel中接收消息"""print(f'收到消息:{body.decode("utf8")}')time.sleep(body.count(b'.')) # 模拟收到消息后进行处理的时间print('ok')channel.basic_ack(delivery_tag=method.delivery_tag) # 确认收到机制# 均衡任务:避免出现一个消息接收终端长期处于忙碌状态,而其他终端长期处于空闲状态,负载均衡channel.basic_qos(prefetch_count=1)# channel.basic_consume(callback, queue="msg_queue") # 接收消息,此方法已更新,由于参数位置改变,所以视频中该行会报错,请使用下面参数顺序进行接收消息channel.basic_consume("msg_queue2", callback) # 接收消息, callback:回调函数channel.start_consuming() # 开始处于接收消息的状态中
**
收到消息:新消息…! ok
当同一个routingKey打开多个接收端时,接收端会采用轮询(one by one)方式来接收发送者已发送的消息。
注意: 优化后需修改queue名称和routingkey,避免至未优化版本冲突。
优化:
- 封装成类
base_mq(基类):
#!/usr/bin/env Python# -*- coding:utf-8 -*-# base_mq.py# 消息队列类的基类# author: ZhouBoWenimport pikafrom settings import CONFIGclass ZbwMQ:def __init__(self):self.connection = self.make_connect()self.channel = self.connection.channel() # 创建频道def make_connect(self):"""创建连接"""crdes = pika.PlainCredentials(username=CONFIG['username'], password=CONFIG['password']) # 用户认证,已设置RabbitMQ的账户和密码params = pika.ConnectionParameters(host=CONFIG['host'], port=CONFIG['port'], credentials=crdes) # 连接参数connection = pika.BlockingConnection(params) # 建立连接return connectiondef make_queue(self, queue_name):"""创建队列queue(通过频道)"""self.channel.queue_declare(queue=queue_name, durable=True) # 创建队列,并保证队列持久化def publish(self, msg, exchange, routing_key):"""发送消息"""self.channel.basic_publish(exchange=exchange, routing_key=routing_key, body=msg, properties=pika.BasicProperties(delivery_mode=2)) # 发送消息 delivery_mode=2:保证消息持久化def consume(self, callback, queue_name):"""接收(消费)消息"""# 均衡任务:避免出现一个消息接收终端长期处于忙碌状态,而其他终端长期处于空闲状态,负载均衡self.channel.basic_qos(prefetch_count=1)self.channel.basic_consume(queue_name, callback) # 接收消息, callback:回调函数self.channel.start_consuming() # 开始处于接收消息的状态中def close_connect(self):"""断开连接"""self.connection.close()
msg_pub2.py:
#!/usr/bin/env Python# -*- coding:utf-8 -*-# msg_pub3.py# 发送消息,订阅、发布# author: ZhouBoWenimport sysfrom base_mq import ZbwMQdef main():msg = " ".join(sys.argv[1:]) or "new msg from zbw"mq_pub = ZbwMQ()mq_pub.make_queue(queue_name='super-queue')mq_pub.publish(msg=msg, exchange='', routing_key='super-queue')print(f"发送消息:{msg}"<br />**运行结果(命令行):**> (ZBW) I:\01-51CTO_Python\unit-04\train\cache_demo>python msg_pub3.py> 发送消息:new msg from zbw**msg_work2.py:**```python#!/usr/bin/env Python# -*- coding:utf-8 -*-# msg_work3.py# 接收消息,订阅、发布# author: ZhouBoWenafimport timefrom base_mq import ZbwMQdef callback(channel, method, properties, body):"""回调函数,用于channel中接收消息"""print(f'收到消息:{body.decode("utf8")}')time.sleep(body.count(b'.')) # 模拟收到消息后进行处理的时间print('ok')channel.basic_ack(delivery_tag=method.delivery_tag) # 确认收到机制def main():mq_con = ZbwMQ()mq_con.make_queue(queue_name='super-queue')mq_con.consume(callback, queue_name='super-queue')if __name__ == '__main__':main()<br />**运行结果:**> 收到消息:new msg from zbw> ok<a name="PIMUY"></a>## **2.sub pub,订阅和发布****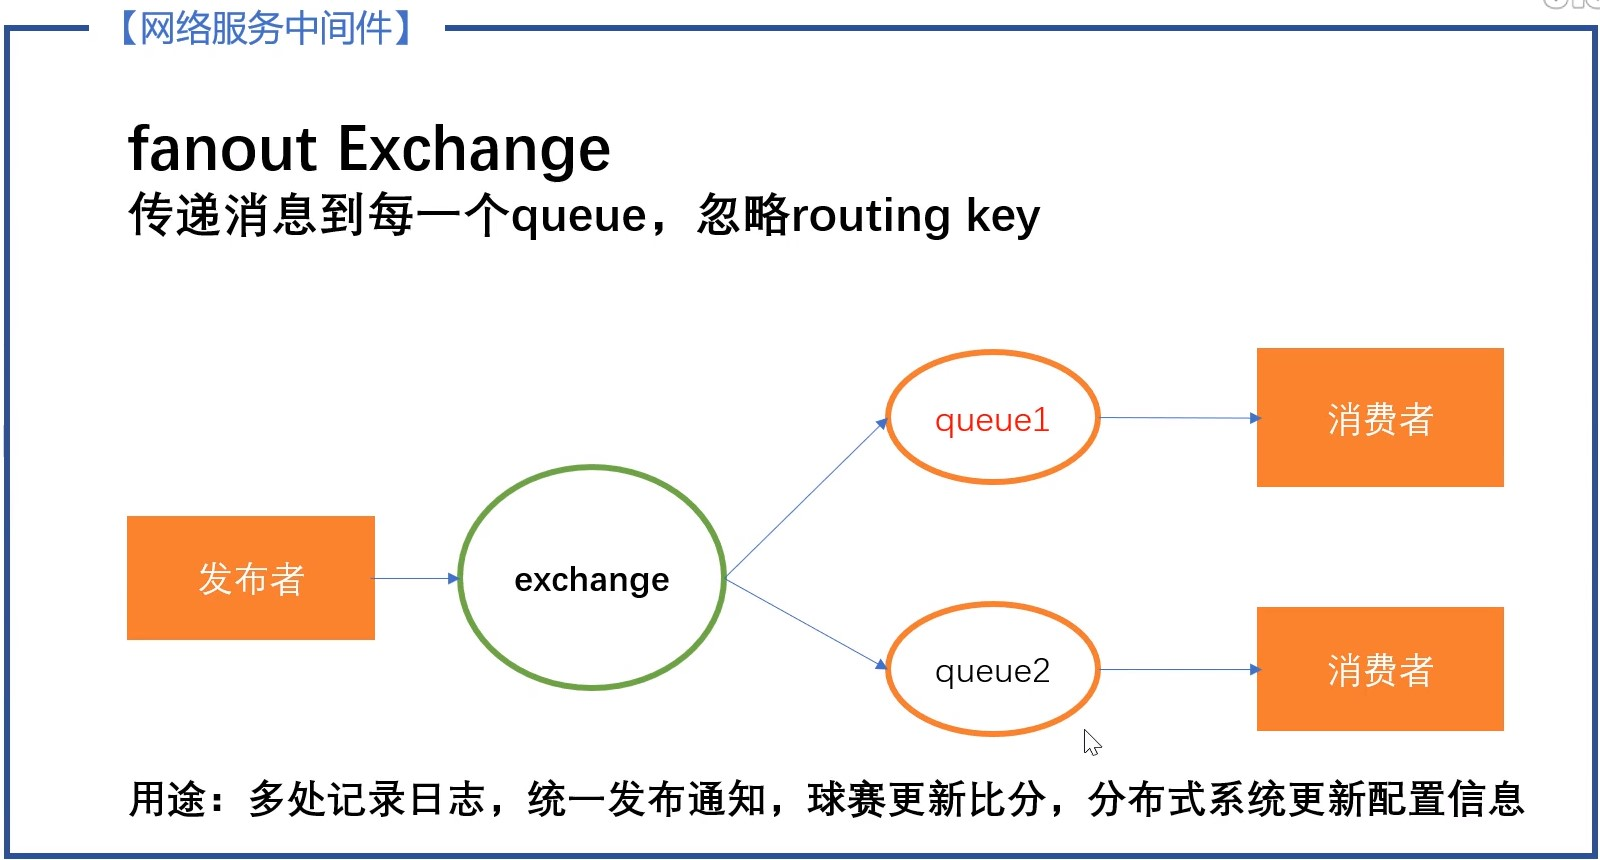**<br />**注意:**<br /> **当前pika版本与视频中版本不同,按照视频中的代码会报错。具体修改地方如下:**<br /> 当前版本pika中queue_declare()的queue参数是无默认值的位置参数,因此在basemq.py中make_random_queue()方法中需要添加queue 参数,并给定空字符串''就可以。<br />**base_mq.py**<br />**视频中:**```pythondef make_random_queue(self):"""随机创建独立的队列"""q = self.channel.queue_declare(exclusive=True) # exclusive: 随机生成唯一的queuereturn q.method.queue # 返回这个queue的名称
修改后:
def make_random_queue(self):
        """随机创建独立的队列"""
        q = self.channel.queue_declare(queue='', exclusive=True) # exclusive: 随机生成唯一的queue
        return q.method.queue # 返回这个queue的名称
base_mq.py
#!/usr/bin/env Python
# -*- coding:utf-8 -*-
# base_mq.py
# 消息队列类的基类
# author: ZhouBoWen
import pika
from settings import CONFIG
class ZbwMQ:
    def __init__(self):
        self.connection = self.make_connect()
        self.channel = self.connection.channel() # 创建频道
    def make_connect(self):
        """创建连接"""
        crdes = pika.PlainCredentials(username=CONFIG['username'], password=CONFIG['password']) # 用户认证,已设置RabbitMQ的账户和密码
        params = pika.ConnectionParameters(host=CONFIG['host'], port=CONFIG['port'], credentials=crdes) # 连接参数
        connection = pika.BlockingConnection(params) # 建立连接
        return connection
    def make_exchange(self, exchange='news', exchange_type='fanout'):
        """创建exchange,使用订阅功能时,可以理解为订阅的频道"""
        self.channel.exchange_declare(exchange=exchange, exchange_type=exchange_type)
    def make_random_queue(self):
        """随机创建独立的队列"""
        q = self.channel.queue_declare(queue='', exclusive=True) # exclusive: 随机生成唯一的queue
        return q.method.queue # 返回这个queue的名称
    def bind_queue(self, queue, exchange, routing_key=None):
        """绑定exchange和随机queue"""
        self.channel.queue_bind(queue, exchange, routing_key)
    def make_queue(self, queue_name):
        """创建队列queue(通过频道)"""
        self.channel.queue_declare(queue=queue_name, durable=True) # 创建队列,并保证队列持久化
    def publish(self, msg, exchange, routing_key=''):
        """发送消息"""
        self.channel.basic_publish(exchange=exchange, routing_key=routing_key, body=msg, properties=pika.BasicProperties(delivery_mode=2)) # 发送消息 delivery_mode=2:保证消息持久化
    def consume(self, callback, queue_name):
        """接收(消费)消息"""
        # 均衡任务:避免出现一个消息接收终端长期处于忙碌状态,而其他终端长期处于空闲状态,负载均衡
        self.channel.basic_qos(prefetch_count=1)
        self.channel.basic_consume(queue_name, callback) # 接收消息, callback:回调函数
        self.channel.start_consuming() # 开始处于接收消息的状态中
    def close_connect(self):
        """断开连接"""
        self.connection.close()
msg_pub3.py
#!/usr/bin/env Python
# -*- coding:utf-8 -*-
# msg_pub3.py
# 发送消息,订阅、发布
# author: ZhouBoWen
import sys
from base_mq import ZbwMQ
class PubMQ(ZbwMQ):
    """发布消息"""
    def __init__(self):
        super().__init__()
def main():
    msg = " ".join(sys.argv[1:]) or "new msg from zbw"
    mq_pub = PubMQ()
    mq_pub.make_exchange(exchange='news', exchange_type='fanout') # 创建exchange(订阅频道),用于向该频道发送消息
    mq_pub.publish(msg=msg, exchange='news') # 给该频道发送消息
    print(f"发送消息:{msg}")
if __name__ == '__main__':
    main()
运行结果(命令行):
(ZBW) I:\01-51CTO_Python\unit-04\train\cache_demo>python msg_pub3.py S HE music 发送消息:SHE music (ZBW) I:\01-51CTO_Python\unit-04\train\cache_demo>python msg_pub3.py SHE music2 发送消息:SHE music2
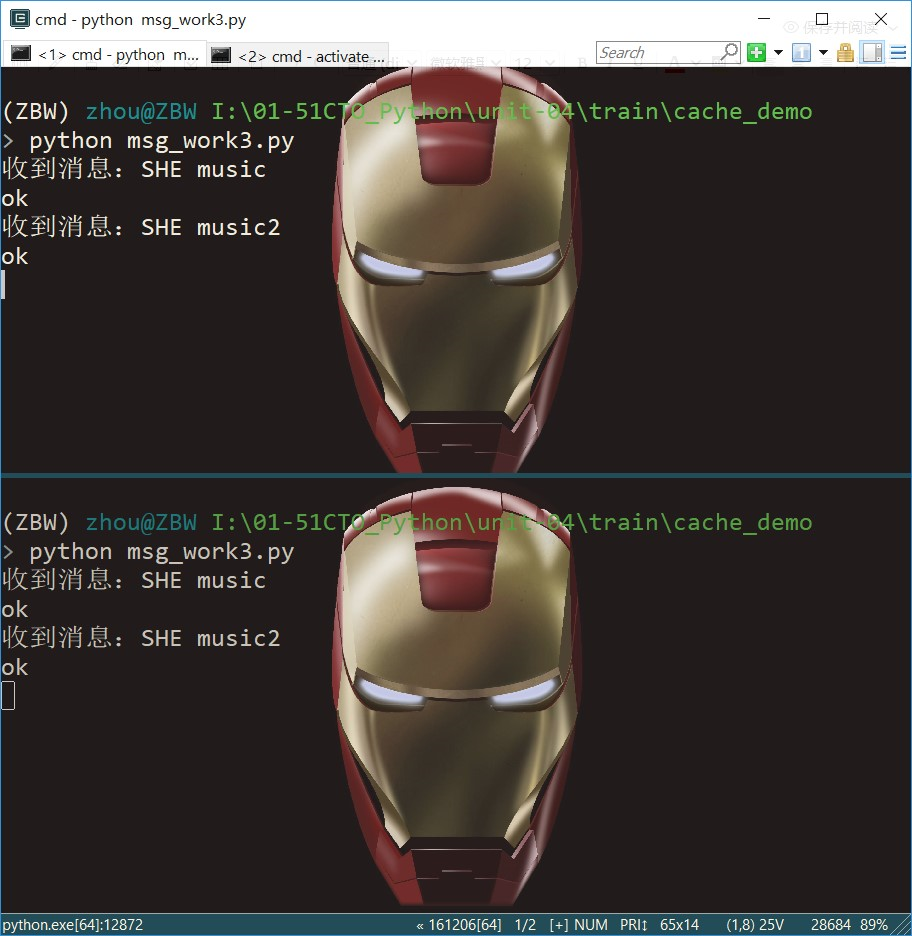
msg_work3.py
#!/usr/bin/env Python
# -*- coding:utf-8 -*-
# msg_work3.py
# 接收消息,订阅、发布
# author: ZhouBoWenaf
import time
from base_mq import ZbwMQ
class WorkerMQ(ZbwMQ):
"""订阅频道、接收消息类"""
def __init__(self):
super().__init__()
def callback(self, channel, method, properties, body):
"""回调函数,用于channel中接收消息"""
print(f'收到消息:{body.decode("utf8")}')
time.sleep(body.count(b'.')) # 模拟收到消息后进行处理的时间
print('ok')
channel.basic_ack(delivery_tag=method.delivery_tag) # 确认收到机制
def main():
mq_con = WorkerMQ()
mq_con.make_exchange(exchange='news', exchange_type='fanout') # 创建exchange(订阅频道),用于接收该频道的消息
q_name = mq_con.make_random_queue() # 创建唯一的queue,用来接收订阅频道的消息
mq_con.bind_queue(q_name, exchange='news') # 将订阅频道和queue绑定
mq_con.consume(mq_con.callback, queue_name=q_name)
if __name__ == '__main__':
main()<br />**运行结果(同时接收):**
<a name="2FSKi"></a>
## **3.RPC**
**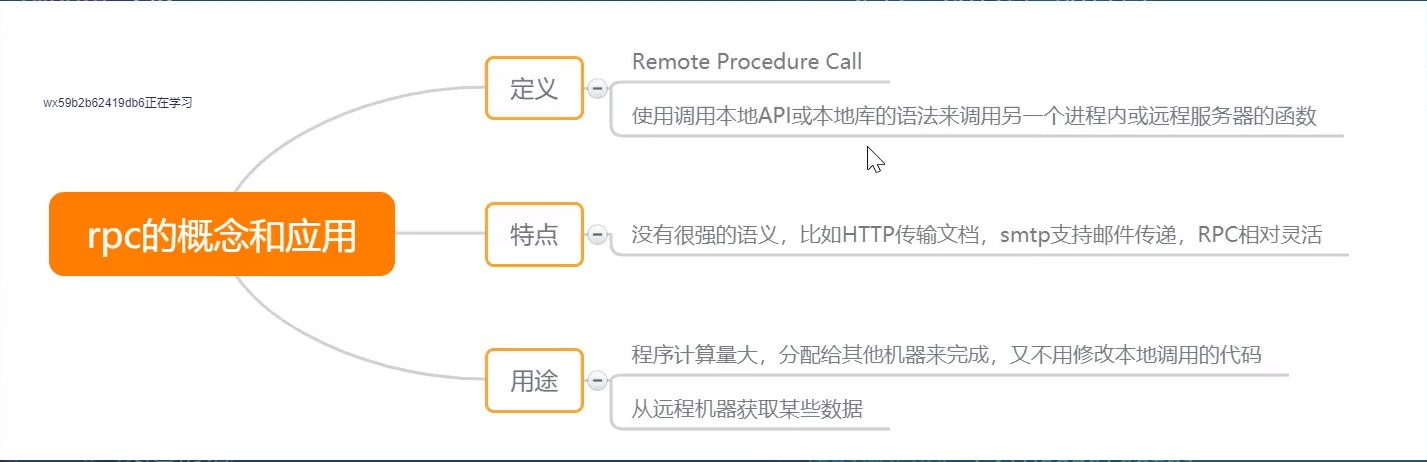**<br />**流程:**<br />Client(P) -> q(data/ reply_id) -> Server(C) ->[run](计算。。。) -> result ->P[reply_id -> q] -> P(Client)<br />client发布包含reply_id字段的数据至队列中,server从该队列取出数据并计算,计算完成后,将代有reply_id的结果发布至新的队列中,<br />client再从该队列取出计算结果<br />******base_mq.py******
```python
#!/usr/bin/env Python
# -*- coding:utf-8 -*-
# base_mq.py
# 消息队列类的基类
# author: ZhouBoWen
import pika
from settings import CONFIG
class ZbwMQ:
def __init__(self):
self.connection = self.make_connect()
self.channel = self.connection.channel() # 创建频道
def make_connect(self):
"""创建连接"""
crdes = pika.PlainCredentials(username=CONFIG['username'], password=CONFIG['password']) # 用户认证,已设置RabbitMQ的账户和密码
params = pika.ConnectionParameters(host=CONFIG['host'], port=CONFIG['port'], credentials=crdes) # 连接参数
connection = pika.BlockingConnection(params) # 建立连接
return connection
def make_exchange(self, exchange='news', exchange_type='fanout'):
"""创建exchange,使用订阅功能时,可以理解为订阅的频道"""
self.channel.exchange_declare(exchange=exchange, exchange_type=exchange_type)
def make_random_queue(self):
"""随机创建独立的队列"""
q = self.channel.queue_declare(queue='', exclusive=True) # exclusive: 随机生成唯一的queue
return q.method.queue # 返回这个queue的名称
def bind_queue(self, queue, exchange, routing_key=None):
"""绑定exchange和随机queue"""
self.channel.queue_bind(queue, exchange, routing_key)
def make_queue(self, queue_name):
"""创建队列queue(通过频道)"""
self.channel.queue_declare(queue=queue_name, durable=True) # 创建队列,并保证队列持久化
def publish(self, msg, exchange, routing_key=''):
"""发送消息"""
self.channel.basic_publish(exchange=exchange, routing_key=routing_key, body=msg, properties=pika.BasicProperties(delivery_mode=2)) # 发送消息 delivery_mode=2:保证消息持久化
def consume(self, callback, queue_name):
"""接收(消费)消息"""
# 均衡任务:避免出现一个消息接收终端长期处于忙碌状态,而其他终端长期处于空闲状态,负载均衡
self.channel.basic_qos(prefetch_count=1)
self.channel.basic_consume(queue_name, callback) # 接收消息, callback:回调函数
self.channel.start_consuming() # 开始处于接收消息的状态中
def close_connect(self):
"""断开连接"""
self.connection.close()
rpc_client.py
#!/usr/bin/env Python
# -*- coding:utf-8 -*-
# rpc_client.py
# rpc客户端
# author: ZhouBoWen
import sys
import uuid
import pika
from base_mq import ZbwMQ
"""
P -> exchange [data, msg] -> queue -> C
---RPC---
Client(P) -> q(data) -> Server(C)  ->[run](计算。。。) -> result -> P(Client) ?
Client(P) -> q(data/ reply_id) -> Server(C)  ->[run](计算。。。) -> result ->P[reply_id -> q]  -> P(Client)
client发布包含reply_id字段的数据至队列中,server从该队列取出数据并计算,计算完成后,将代有reply_id的结果发布至新的队列中,
client再从该队列取出计算结果
"""
class RPCclient(ZbwMQ):
    """发布消息"""
    def __init__(self):
        super().__init__()
        self.result = None
        self.q_name = self.make_random_queue()  # 生成随机并独立的queue,用于接收端接收数据和计算完成之后服务端接收返回的计算结果
        self.corr_id = str(uuid.uuid4())  # 生成一个不重复的数,用于保证每次发送动作都是不一样的(reply_id)
        self.channel.basic_consume(queue=self.q_name, on_message_callback=self.callback)  # 接收消息
    def callback(self, channel, method, properties, body):
        """回调函数,用于channel中接收消息"""
        if self.corr_id == properties.correlation_id:  # 如果发送的ID与返回的ID相同,则取出该次计算结果
            self.result = body
    def call(self, r):
        """远程调用函数,计算圆形面积"""
        # 发送半径r,并指定用于返回计算结果的queue,并指定一个ID,用于保证每次发送动作都是不一样的
        self.channel.basic_publish(exchange='', routing_key="rpc", body=str(r), properties=pika.BasicProperties(reply_to=self.q_name, correlation_id=self.corr_id))
        while self.result is None:  # 当返回计算结果为空时,则一直进行运行计算
            print('等待RPC server计算中...')
            self.connection.process_data_events(time_limit=10)
        return self.result
def main():
    mq_pub = RPCclient()
    r = sys.argv[1] or 5
    print(f'开始计算半径{r}的面积...')
    result = mq_pub.call(int(r))
    print(f"计算成功:{result}")
if __name__ == '__main__':
    main()
**
(zbw) F:\01-51CTO_Python\unit-04\train\cache_demo>python prc_client.py 5 开始计算半径5的面积… 等待RPC server计算中… 计算成功:b’78.53981633974483’ (zbw) F:\01-51CTO_Python\unit-04\train\cache_demo>python prc_client.py 6 开始计算半径6的面积… 等待RPC server计算中… 计算成功:b’113.09733552923255’
rpc_server.py
#!/usr/bin/env Python
# -*- coding:utf-8 -*-
# rpc_server.py
# rpc服务端
# author: ZhouBoWenaf
import math
import pika
from base_mq import ZbwMQ
class RPCserver(ZbwMQ):
    """订阅频道、接收消息类"""
    def __init__(self):
        super().__init__()
    def calc_area(self, r):
        """计算圆形面积"""
        return math.pi * r * r
    def callback(self, channel, method, properties, body):
        """回调函数,用于channel中接收消息"""
        print(f'收到半径:{body.decode("utf8")}')
        r = float(body)
        result = self.calc_area(r) # 计算
        print(f'半径为{r}的面积为:{result}')
        channel.basic_publish(exchange="",
                            routing_key=properties.reply_to,
                            properties=pika.BasicProperties(
                                correlation_id=properties.correlation_id
                            ),
                            body=str(result)) # routing_key 等于接收数据时客户端peoperties传入的reply_to,correlation_id等于客户端传入的correlation_id
        channel.basic_ack(delivery_tag=method.delivery_tag) # 确认发送机制
def main():
    # 收到消息计算并返回结果
    print('RPC server is running! waiting for data from client...')
    server = RPCserver()
    server.make_queue('rpc') # 创建队列
    server.consume(callback=server.callback, queue_name='rpc') # 获取客户端传入的数据
if __name__ == '__main__':
    main()
运行结果:
RPC server is running! waiting for data from client… 收到半径:5 半径为5.0的面积为:78.53981633974483 收到半径:6 半径为6.0的面积为:113.09733552923255

若有收获,就点个赞吧
0 人点赞
