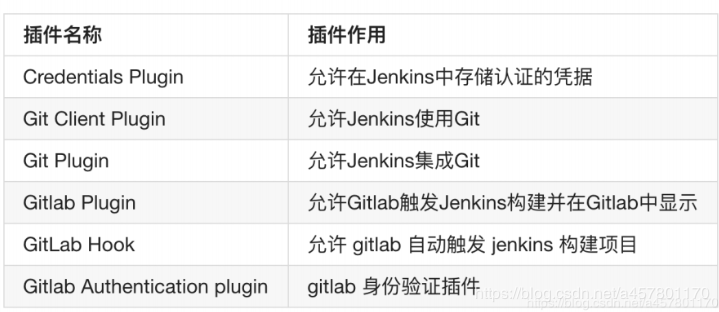
- 1. jenkins
- 2.jenkins安装
- 3. jenkins如何拉取gitlab上项目的代码:
- 4. 发布的模式
- web节点配置
[root @web01 ~]#cat /etc/nginx/conf.d/monitor.xxx.com.conf - lb配置:
[root @lb01 ~]#cat /etc/nginx/conf.d/proxy_monitor.xxxx.com.conf - 推送现有⽂件夹内容
- 注意,需要将你windows的公钥添加到gitlab服务器中对该项⽬有权限的⽤户下。
- 克隆项⽬
- 推送到各个节点:
- 创建软连接(相对⾼级⼀点,这样后期有问题还能回退)
- 1.开发修改代码,提交代码
- 2.使⽤过git pull拉取最新代码
- 3.重新推送⼀个新的版本⾄web集群节点
- 4.更新软连接。
- 5.如果想退回,很简单。(因为我做了版本的管理⽅式)
1. jenkins
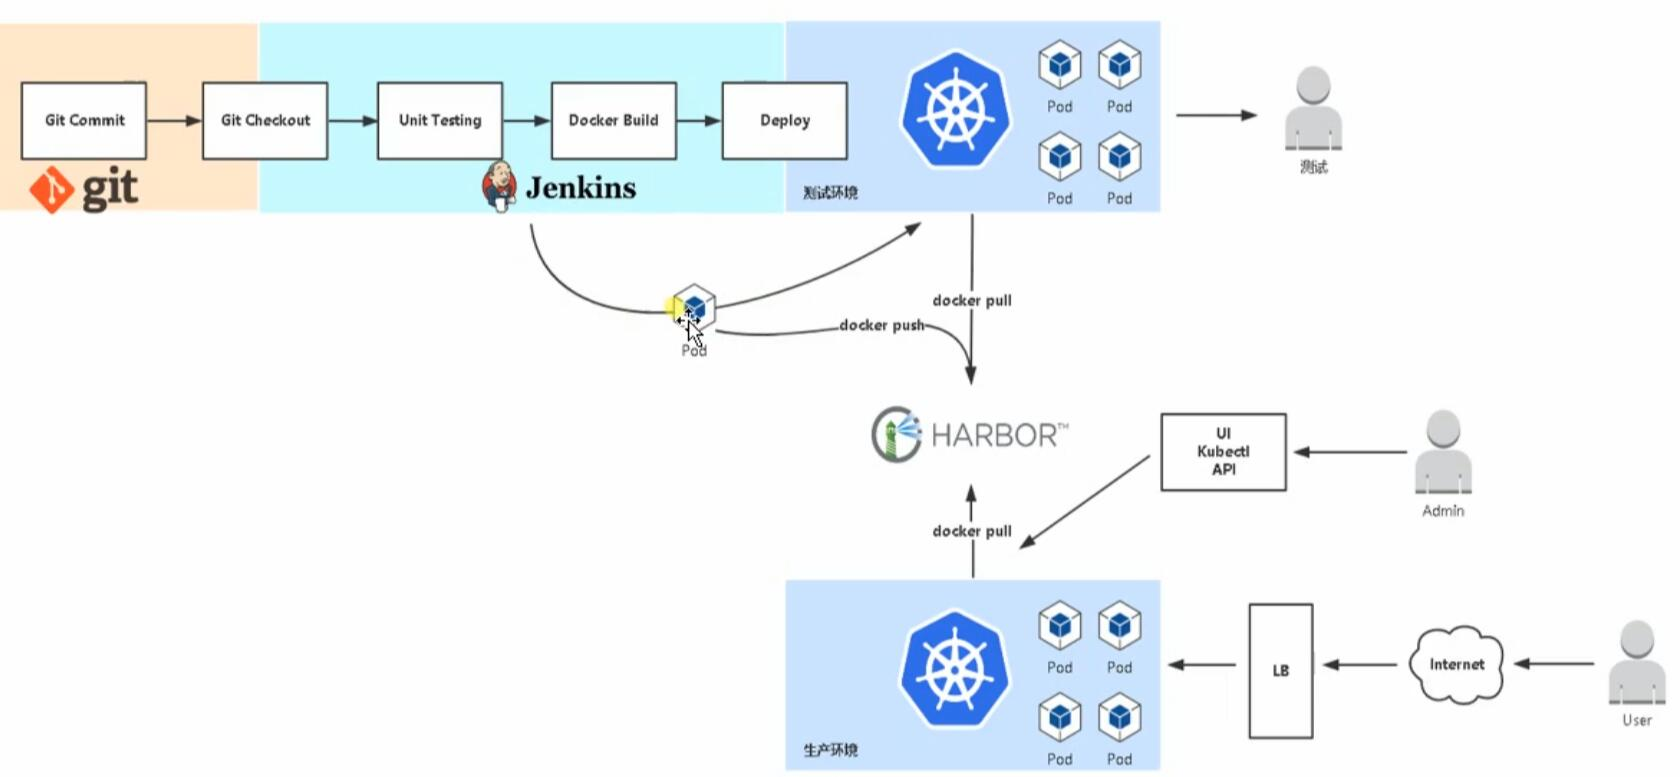
- 什么是jenkins
Jenkins是一个开源软件项目,是基于Java开发的一种持续集成工具,用于监控持续重复的工作,旨在提供一个开放易用的软件平台,使软件的持续集成变成可能。
2.jenkins安装
java环境、插件的安装:
- 安装
[root@jenkins ~]#yum install java -y
[root@jenkins ~]#yum localinstall -y jenkins-2.176.1-1.1.noarch.rpm
[root@jenkins ~]#systemctl start jenkins
[root@jenkins ~]#systemctl enable jenkins
跳过插件安装后: 直接就登陆了jenkins系统了。 默认⽤户名是admin、
密码是 cat/var/lib/jenkins/secrets/initialAdminPassword
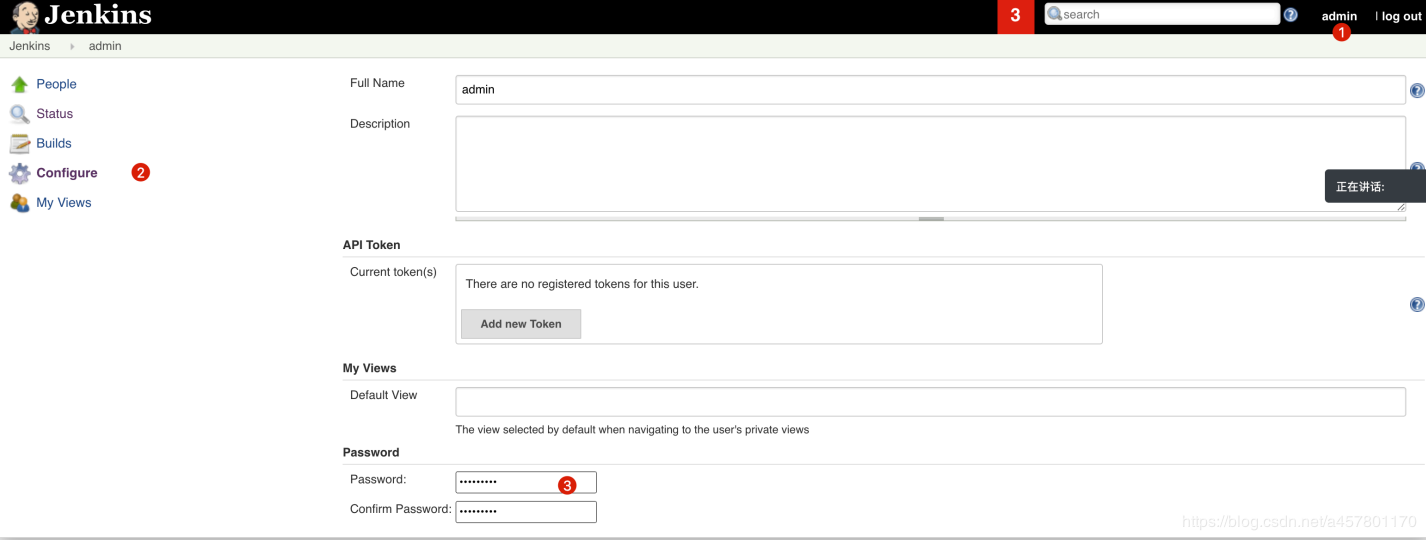
进入第一件事修改密码:
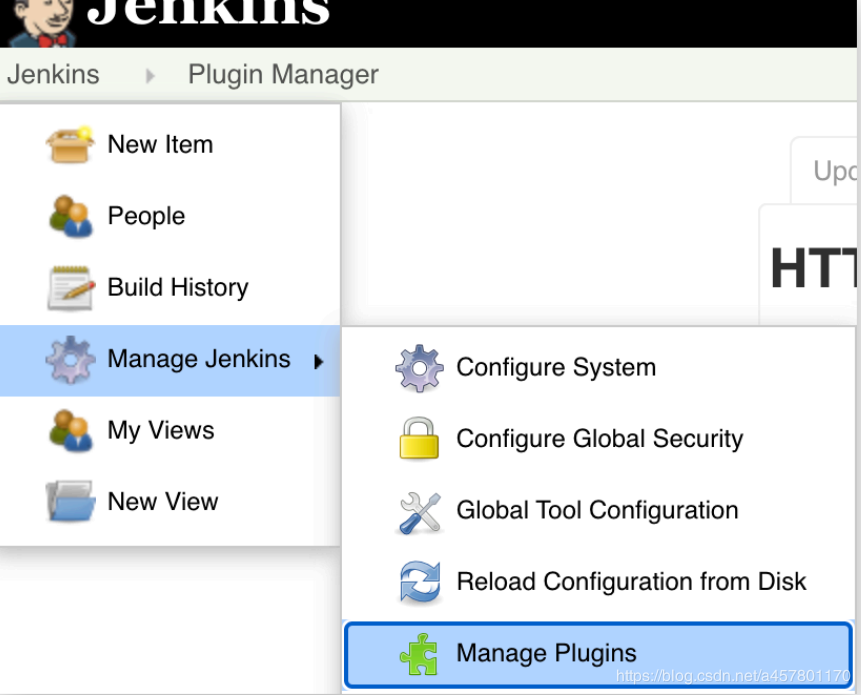
- 插件:
插件安装有的几种方式:
- 直接搜索插件名称,通过jenkins的web界面安装。
- 可以直接上⽹上下载插件,然后web界面上传.hpi的⽂件,进⾏插件安装。
(https://mirror.tuna.tsinghua.edu.cn/jenkins/plugins/) - 直接将插件导⼊到 对应jenkins存储插件的⽬录。
[root@jenkins ~]#tar xf jenkins_plugins_new.tar.gz
[root@jenkins ~]#mv plugins/* /var/lib/jenkins/plugins/
[root@jenkins ~]#chown -R jenkins.jenkins /var/lib/jenkins/plugins/
[root@jenkins ~]#systemctl restart jenkins
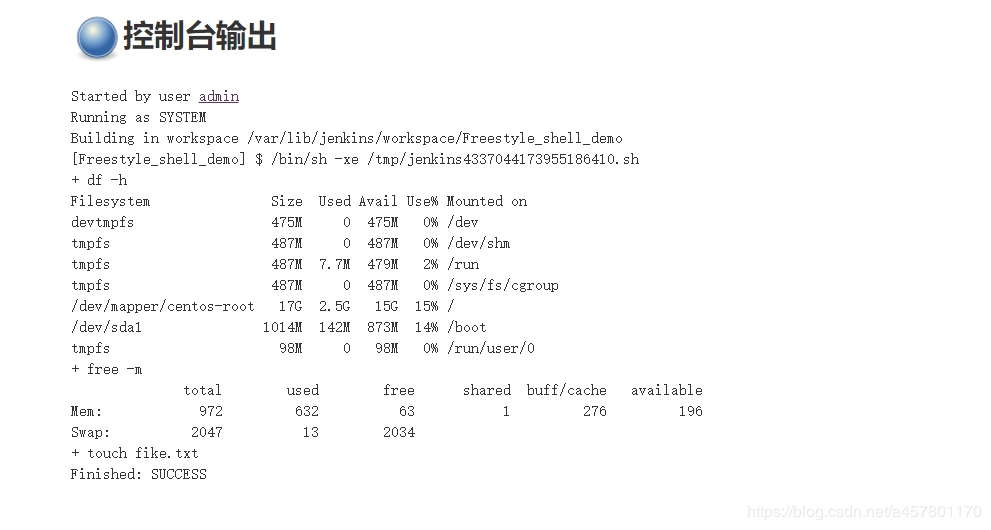
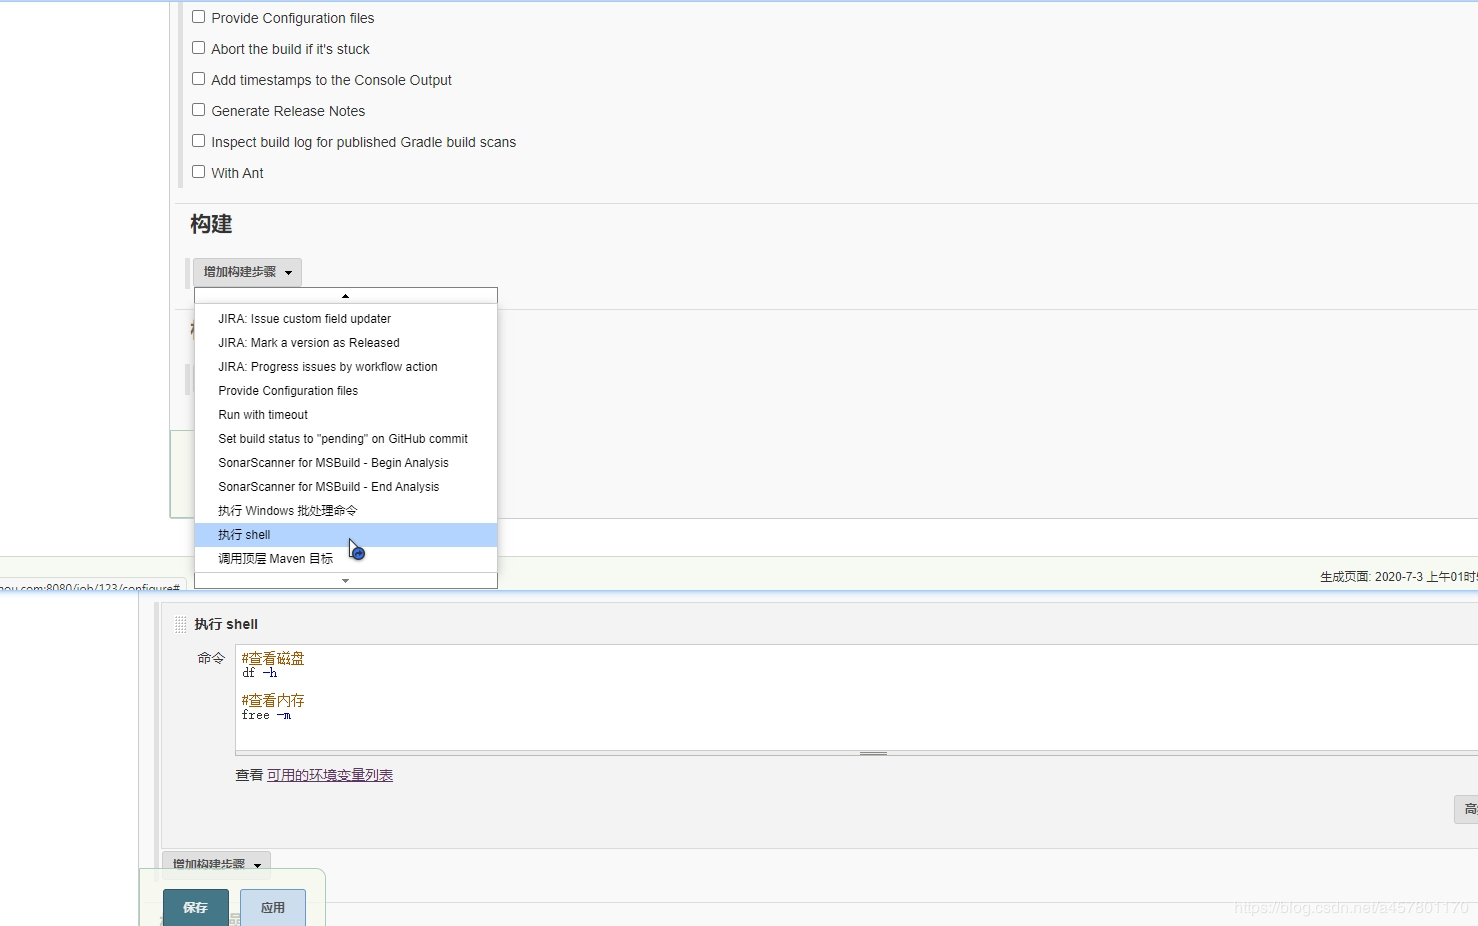
简单操作:可以使用jenkins调⽤下Shell命令:
磁盘的空间、内存的整体信息、等等 (服务器的账号和密码。)
3. jenkins如何拉取gitlab上项目的代码:
- gitlab上需要先有⼀个项⽬ ( TreeNB )
- 添加⼀个插件,默认jenkins⽆法拉取gitlab上的代码,需要依赖插件完成。
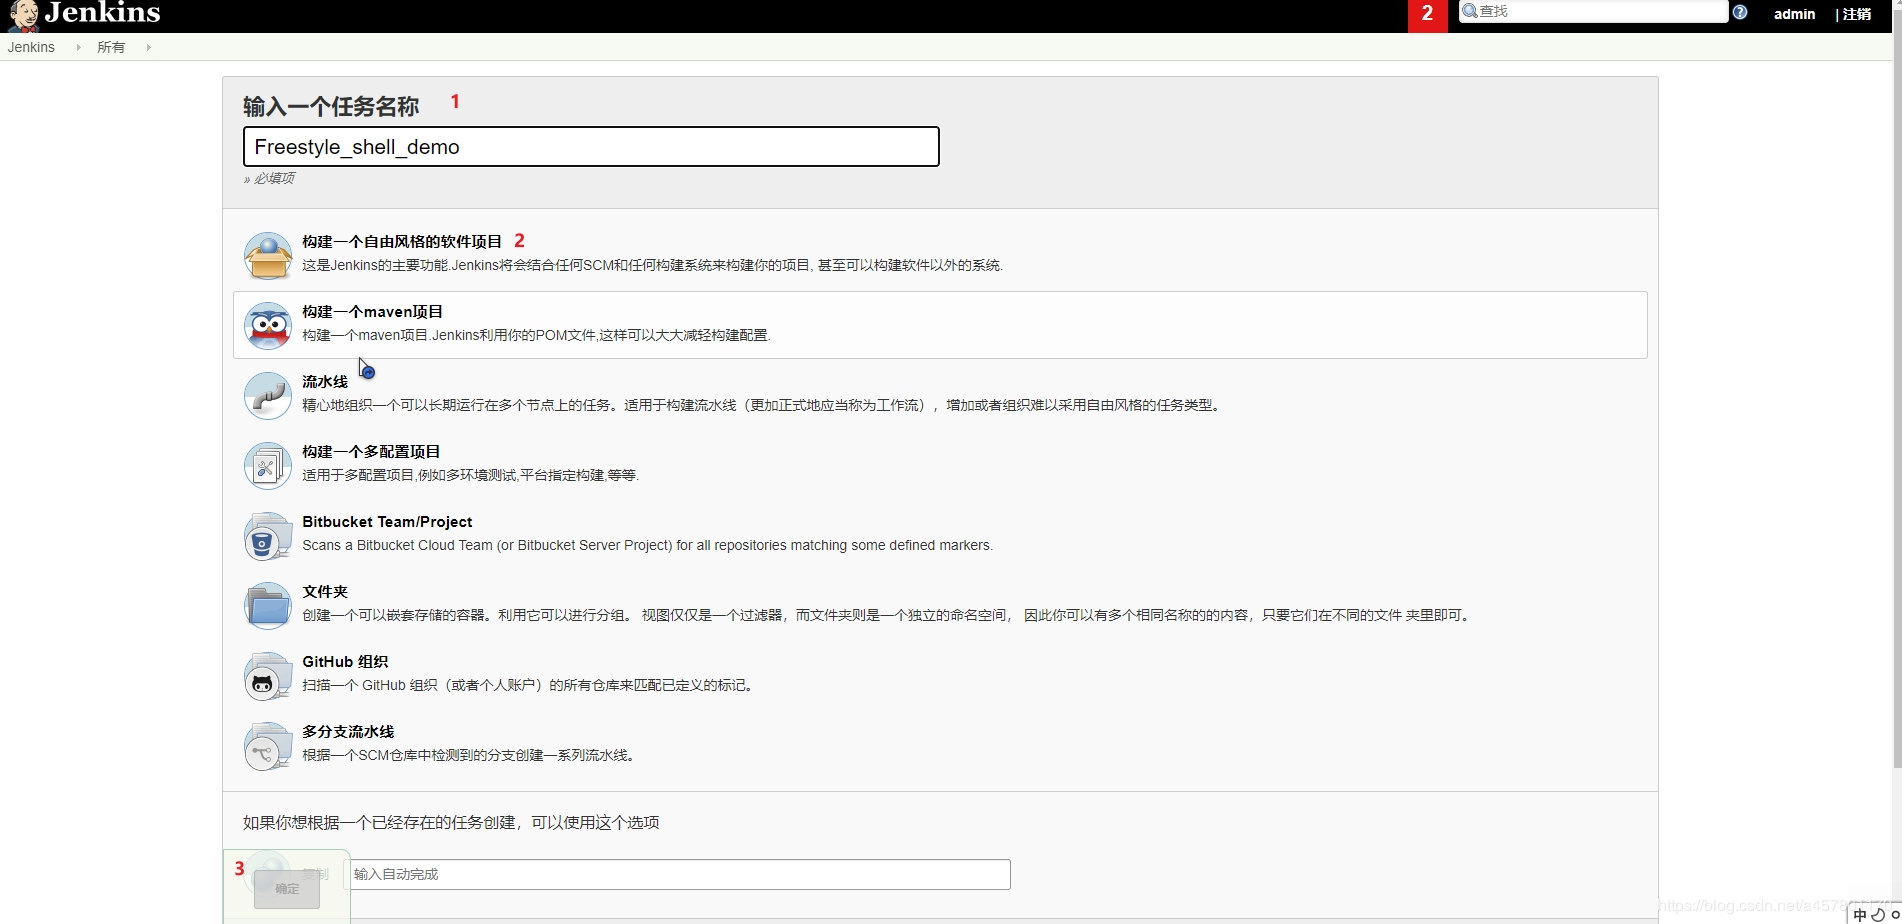
- 在jenkins创建⼀个freestyle的项⽬.
jenkins免密拉取——gitlab代码:
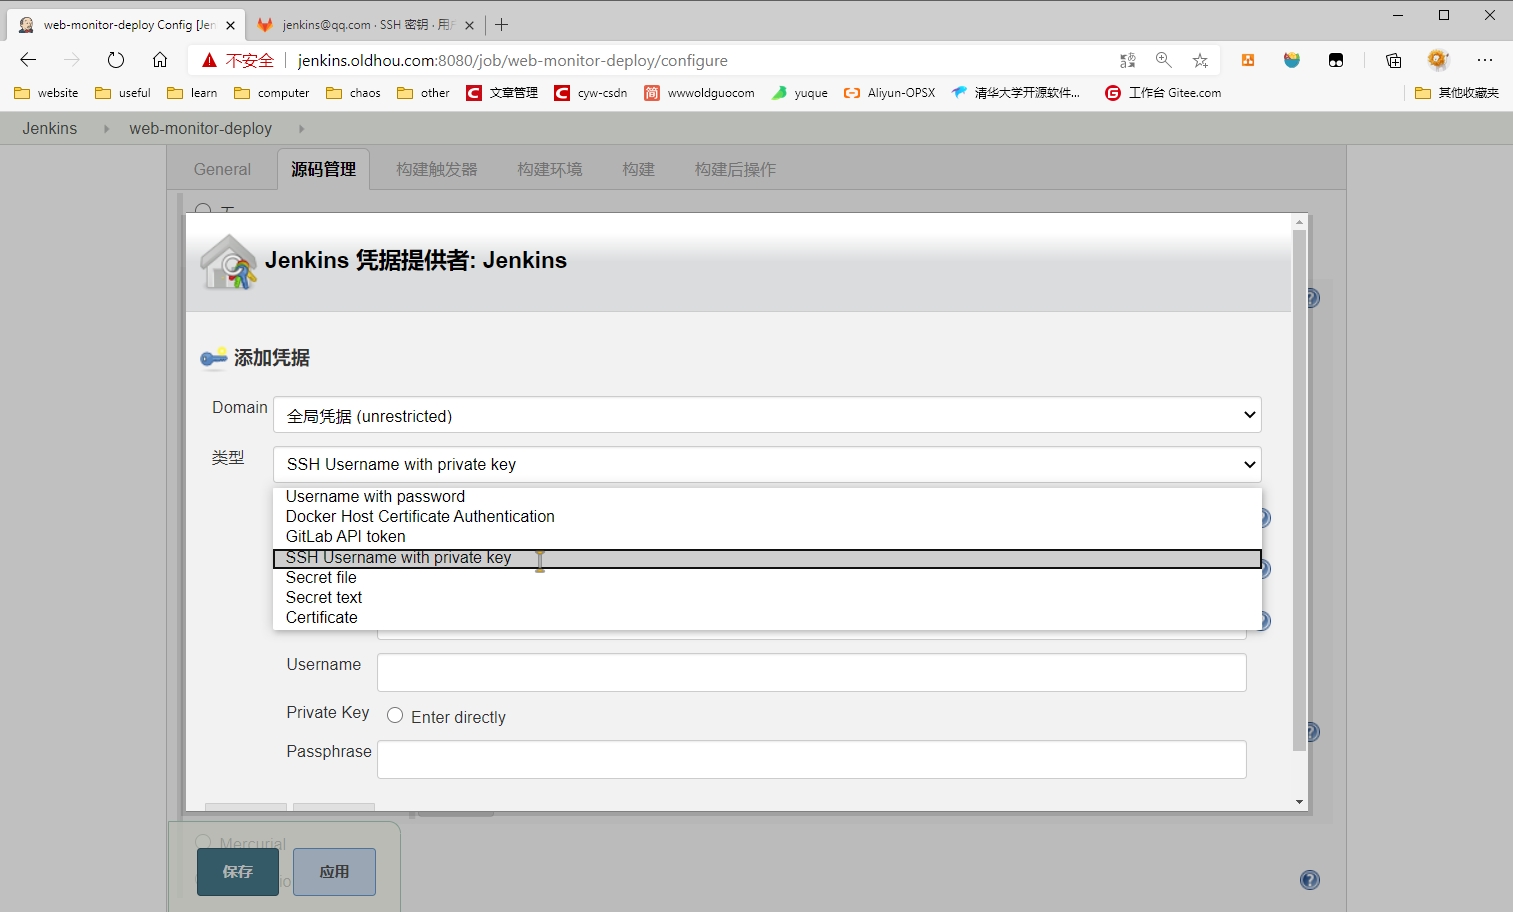
3.1: 填写需要拉取的项⽬地址(ssh⽅式) 3.1:在jenkins上⽣成⼀对秘钥 3.2:将公钥存储⾄gitlab服务器的某个⽤户下,这个⽤户必须对这个项⽬有拉取权限。 3.3:在jenkins上配置Credentials,将jenkins服务器root的私钥添加上来。 3.4: 在jenkins上配置gitlab的域名劫持。 10.0.0.110 gitlab.oldxu.com
4. 发布的模式
手动—-》半自动—》全自动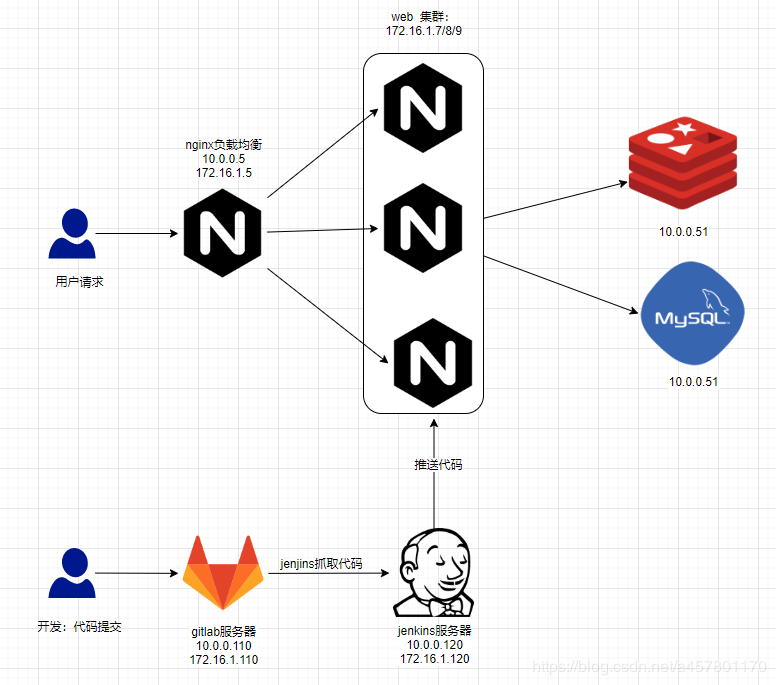
4.1手动代码上线过程:
搭建web服务了解代码上线的过程 ( ⼿动 | ansible )
web节点配置
[root@web01 ~]# cat /etc/nginx/conf.d/monitor.xxx.com.conf
server {listen 80;server_name monitor.xxxx.com;root /code/monitor;location / {index index.html;}}
lb配置:
[root@lb01 ~]# cat /etc/nginx/conf.d/proxy_monitor.xxxx.com.conf
upstream monitor {server 172.16.1.7:80;server 172.16.1.8:80;}server {listen 80;server_name monitor.xxxx.com; location / {proxy_pass http://monitor;include proxy_params;}}
[root@lb01 ~]# nginx -t
nginx: the configuration file /etc/nginx/nginx.conf syntax is ok
nginx: configuration file /etc/nginx/nginx.conf test is successful
[root@lb01 ~]# systemctl reload nginx
1.在gitlab上创建⼀个项⽬。 2.模拟开发提交代码⾄gitlab服务器
推送现有⽂件夹内容
git remote remove origincd existing_foldergit initgit remote add origin git@gitlab.oldxu.com:dev/web-monitor.gitgit add .git commit -m "Initial commit"git push -u origin master
注意,需要将你windows的公钥添加到gitlab服务器中对该项⽬有权限的⽤户下。
3.⼿动去拉取代码,并使⽤scp推送到各个web节点。 随便登陆⼀个机器,⼿动执⾏git pull 拉取代码,然后推送各个节点。 [root@lb01 ~]#
echo "10.0.0.110 gitlab.oldxu.com" >> /etc/hosts克隆项⽬
[root@lb01 ~]#
git clone [http://gitlab.oldxu.com/dev/web-monitor.git](http://gitlab.oldxu.com/dev/web-monitor.git)正克隆到 ‘web-monitor’… Username for ‘http://gitlab.oldxu.com‘: root Password for ‘http://root@gitlab.oldxu.com‘: remote: Enumerating objects: 435, done. remote: Counting objects: 100% (435/435), done. remote: Compressing objects: 100% (372/372), done. remote: Total 435 (delta 53), reused 435 (delta 53), pack-reused 0 接收对象中: 100% (435/435), 8.78 MiB | 10.41 MiB/s, done. 处理 delta 中: 100% (53/53), done.推送到各个节点:
[root@lb01 ~]#
scp -rp web-monitor root@172.16.1.7:/code/monitor-v1[root@lb01 ~]#scp -rp web-monitor root@172.16.1.8:/code/monitor-v1创建软连接(相对⾼级⼀点,这样后期有问题还能回退)
[root@lb01 ~]#
ssh root@172.16.1.7 'ln -s /code/monitor-v1 /code/monitor'root@172.16.1.7‘s password: [root@lb01 ~]#ssh root@172.16.1.8 'ln -s /code/monitor-v1 /code/monitor'root@172.16.1.8‘s password:4.配置域名劫持,保证模拟环境可以访问
10.0.0.5 monitor.oldxu.com5.现在开发要对项⽬更新了?接下来该如何操作了?
1.开发修改代码,提交代码
xudeMacBook-Pro:monitor xuliangwei$
vim index.htmlxudeMacBook-Pro:monitor xuliangwei$git statusxudeMacBook-Pro:monitor xuliangwei$git add .xudeMacBook-Pro:monitor xuliangwei$git commit -m "变更index.html⽂件"xudeMacBook-Pro:monitor xuliangwei$git push origin master2.使⽤过git pull拉取最新代码
[root@lb01 ~]#
cd web-monitor/[root@lb01 web-monitor]#git pull origin masterUsername for ‘http://gitlab.oldxu.com‘: root Password for ‘http://root@gitlab.oldxu.com‘:3.重新推送⼀个新的版本⾄web集群节点
[root@lb01 ~]#
cd web-monitor/[root@lb01web-monitor]# cd ..[root@lb01 ~]#scp -rp web-monitor root@172.16.1.7:/code/monitor-v2[root@lb01 ~]#scp -rp web-monitor root@172.16.1.8:/code/monitor-v24.更新软连接。
[root@lb01 ~]#
ssh root@172.16.1.7 'rm -f /code/monitor && ln -s /code/monitor-v2 /code/monitor'root@172.16.1.7‘s password: [root@lb01 ~]#ssh root@172.16.1.8 'rm -f /code/monitor && ln -s /code/monitor-v2 /code/monitor'root@172.16.1.8‘s password:5.如果想退回,很简单。(因为我做了版本的管理⽅式)
[root@lb01 ~]#
ssh root@172.16.1.7 'rm -f /code/monitor && ln -s /code/monitor-v1 /code/monitor'[root@lb01 ~]#ssh root@172.16.1.8 'rm -f /code/monitor && ln -s /code/monitor-v1 /code/monitor'
4.2 进化⼀下(半自动):freestyle构建
完成以下步骤:
1.模拟开发提交代码———-》gitlab服务器。 2.集群环境的搭建。站点的⽬录指定。(⼿动) 3.通过jenkins拉取代码,然后由jenkins调⽤shell脚本将代码部署⾄各个节点。(点⼀下)
错误处理:
- 权限不够:jenkins是由jenkins⽤户运⾏。
[root@jenkins ~]#vim /etc/sysconfig/jenkins# 修改jenkins进程运⾏的身份为root
JENKINS_USER=”root”- jenkins的root⽤户没有与web集群的节点进⾏免密,所以失败。
[root@jenkins ~]# ssh-copy-id -i ~/.ssh/id_rsa.pub root@172.16.1.8
[root@jenkins ~]# ssh-copy-id -i ~/.ssh/id_rsa.pub root@172.16.1.7
4.3 再进化⼀下:全自动(webhook)
(全⾃动,开发修改代码,提交代码⾄gitlab仓库,⾃动触发jenkins发布。适⽤于在我们的测
试环境 ):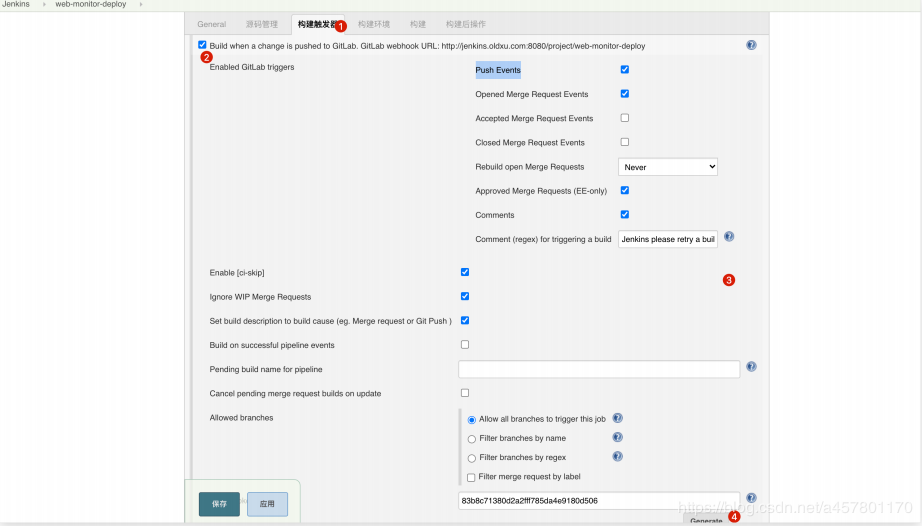
webhook(钩⼦)
开发—>gitlab产⽣⼀个事件(push event ) —-> 通知jenkins触发构建操作。
83b8c71380d2a2fff785da4e9180d506
http://jenkins.oldxu.com:8080/project/web-monitor-deploy
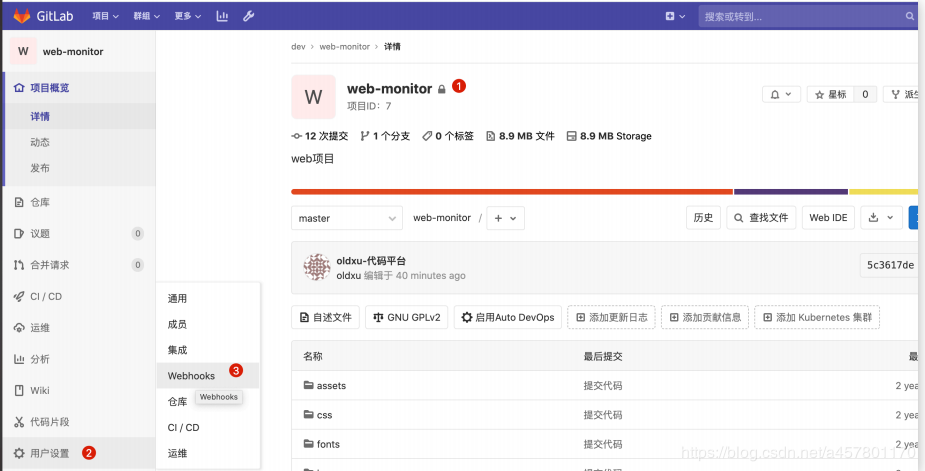

解决 Url is blocked: Requests to the local network are not allowed
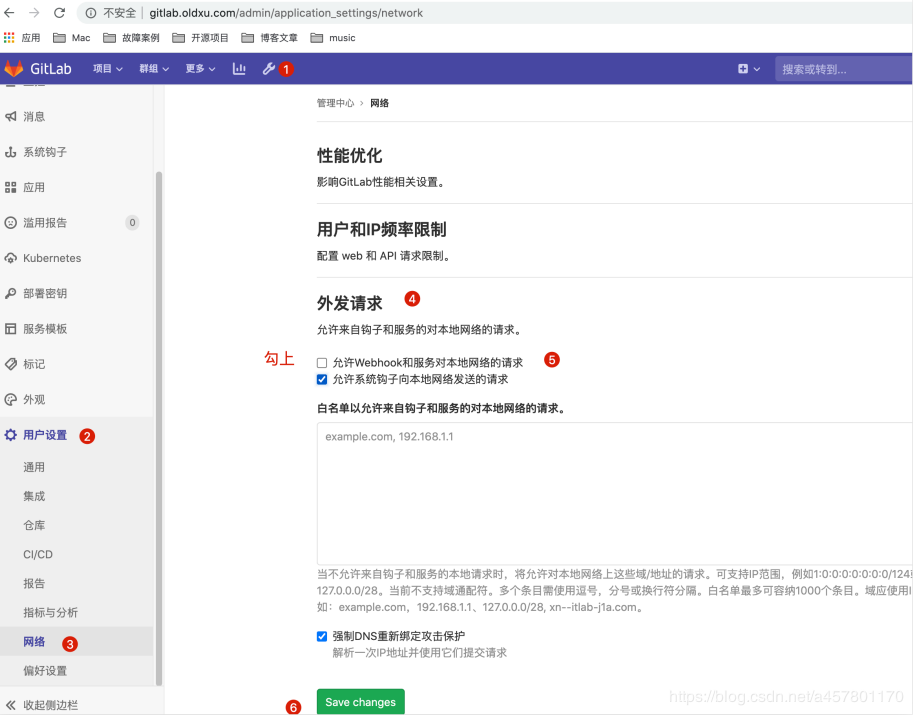
再进化⼀下:参数构建( 基于git tag方式部署)
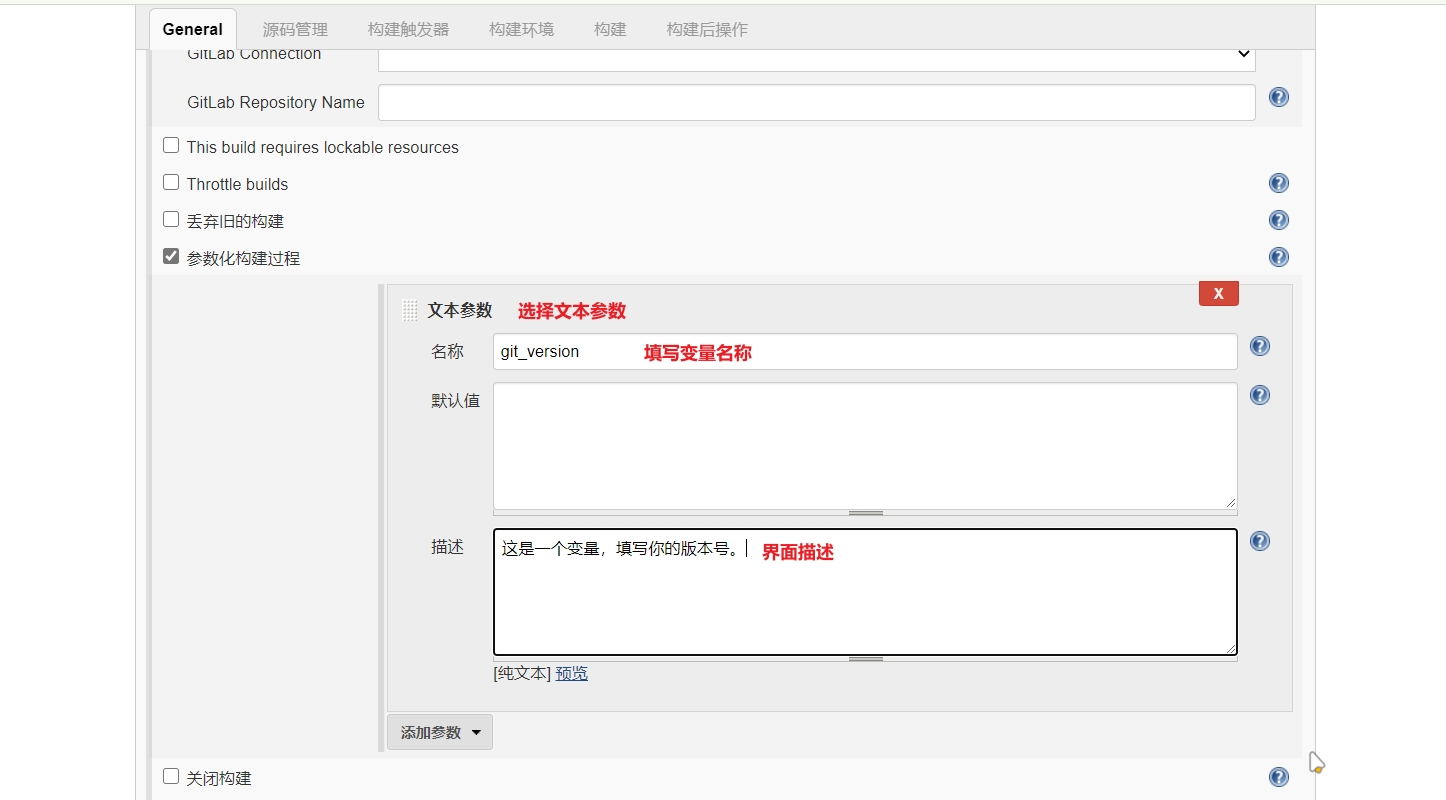
如果我们使⽤tag管理的⽅式,⽐如第⼀部署时打⼀个标签v1.1 .运维在部署时给站点⽬录手动加⼀个v1.1的
名称在后⾯。
问题:开发每次都要打标签,如何将我们 git 打好的版本标签变成菜单? v1.2\v1.3 … 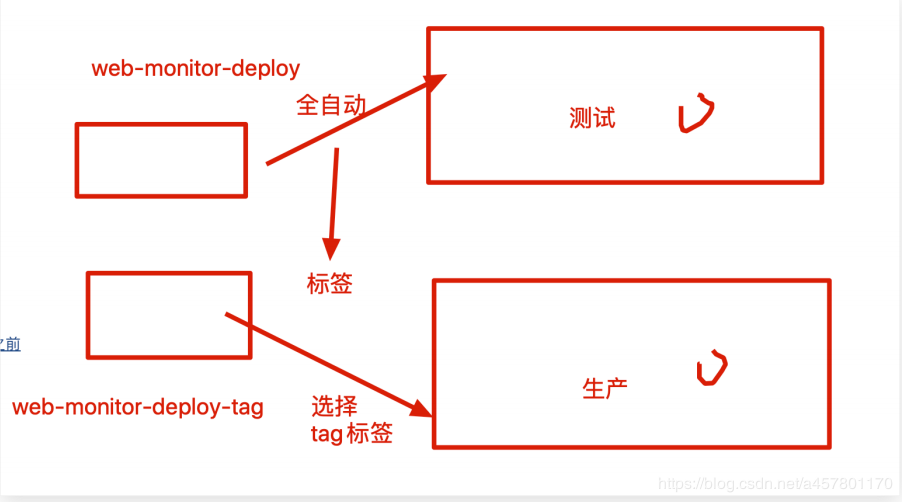
参数化构建原始版
升级版本实现结果:
如何实现:添加一个 git parameter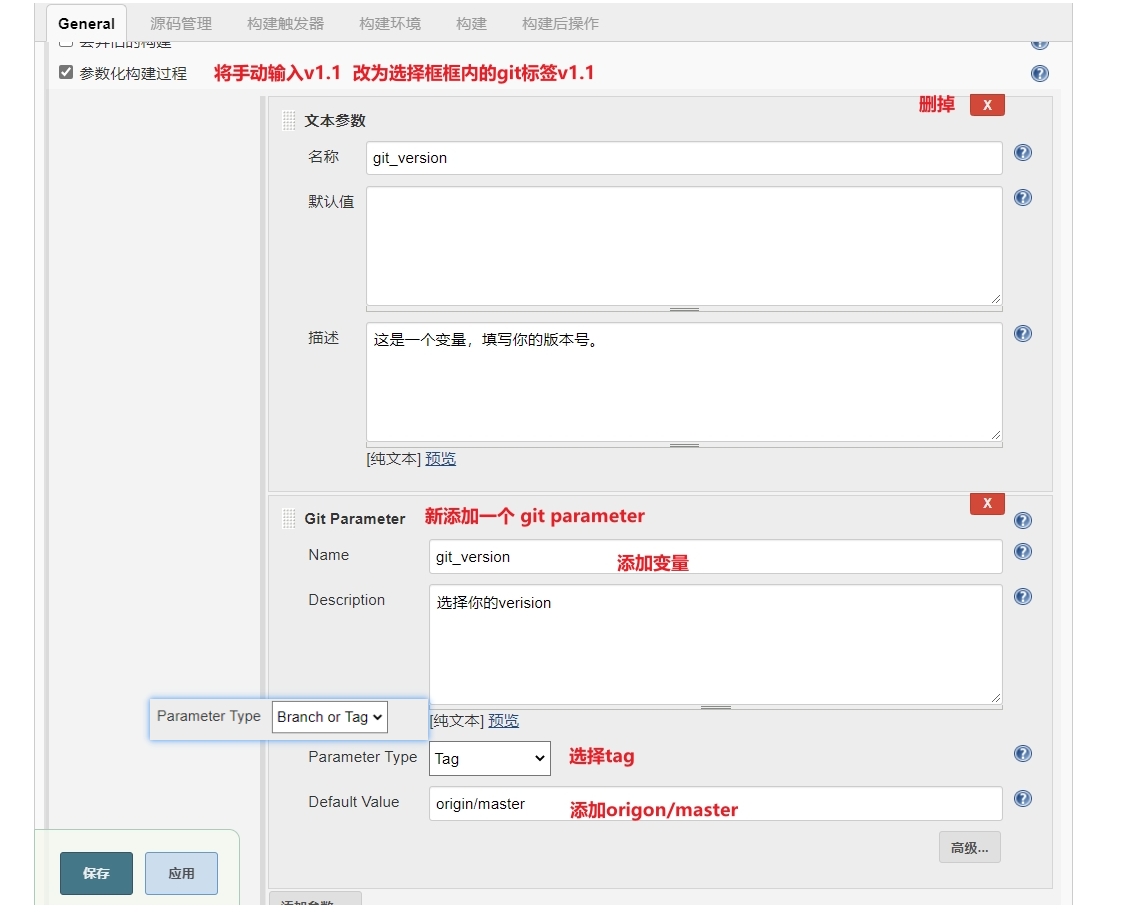

[root@jenkins scripts]# cat /scripts/html_deploy_tag.sh
#!/usr/bin/bashDate=$(date +%F-%H-%M)Web_Server="172.16.1.7 172.16.1.8"Web_Name=web_monitor-${Date}-${git_version}Web_Dir=/opt#1.从jenkins构建的目录下打包tar_code() {cd ${WORKSPACE} && \tar czf ${Web_Dir}/${Web_Name}.tar.gz ./*}#2.推送到web集群节点scp_code() {for ip in ${Web_Server}do#推送数据包scp -rp ${Web_Dir}/${Web_Name}.tar.gz root@$ip:/opt#登陆集群节点解压ssh root@${ip} "cd ${Web_Dir} && \mkdir -p ${Web_Name} && \tar xf ${Web_Name}.tar.gz -C ${Web_Name} && \rm -f ${Web_Name}.tar.gz && \rm -f /code/monitor && \ln -s ${Web_Dir}/${Web_Name} /code/monitor"done}deploy () {tar_codescp_code}deploy
进化⼀下( 实现代码回退。)
⽅案1:直接通过参数传递 v1.1 重新部署⼀次就回退了。
java项⽬:
- 获取源代码—>maven编译—>产⽣war包—>推送部署到集群节点。
- 回退 获取源代码—>—代码检测—>maven编译—>产⽣war包—>推送部署到集群节点v1.1 v1.2 v1.3 通过shell直接改变软件的指向。 传递⼀个v1.1 rm -f /code/monitor && ln -s /opt/xxxx-v1.1 /code/monitor
———>
- 创建⼀个项⽬ web-monitor-rollback (不⽤配置git、使⽤的频次很低。)
- 执⾏构建时需要传递git tag版本
- 直接调⽤Shell脚本
#!/usr/bin/bashDate=$(date +%F-%H-%M)Web_Server="172.16.1.7 172.16.1.8"Web_Name=web_monitor-${Date}Web_Dir=/optfor ip in ${Web_Server}dossh root@${ip} "[ -d ${Web_Dir}/web_monitor-*-${git_version} ] && \rm -f /code/monitor && \ln -s ${Web_Dir}/web_monitor-*-${git_version} /code/monitor"done
