1. zabbix-proxy
1.1 zabbix-proxy安装
#创库create database zabbix character set utf8 collate utf8_bin;grant all on zabbix.* to zabbix@localhost identified by '123456';#安装proxyrpm -ivh https://mirrors.tuna.tsinghua.edu.cn/zabbix/zabbix/5.0/rhel/7/x86_64/zabbix-release-5.0-1.el7.noarch.rpmsed -i 's#http://repo.zabbix.com#https://mirrors.tuna.tsinghua.edu.cn/zabbix#g' /etc/yum.repos.d/zabbix.repoyum install zabbix-proxy-mysql -y#导入表结构zcat /usr/share/doc/zabbix-proxy-mysql-5.0.8/schema.sql.gz |mysql -uzabbix -p123456 zabbix#配置vim /etc/zabbix/zabbix_proxy.confServer=10.0.0.71ServerPort=10051Hostname=tj_proxy....DBHost=localhostDBName=zabbixDBUser=zabbixDBPassword=123456#启动systemctl start zabbix-proxy.servicesystemctl enable zabbix-proxy.service#检测[root@web01 ~]# netstat -lntup|grep 10051tcp 0 0 0.0.0.0:10051 0.0.0.0:* LISTEN 96337/zabbix_proxytcp6 0 0 :::10051 :::* LISTEN 96337/zabbix_proxy
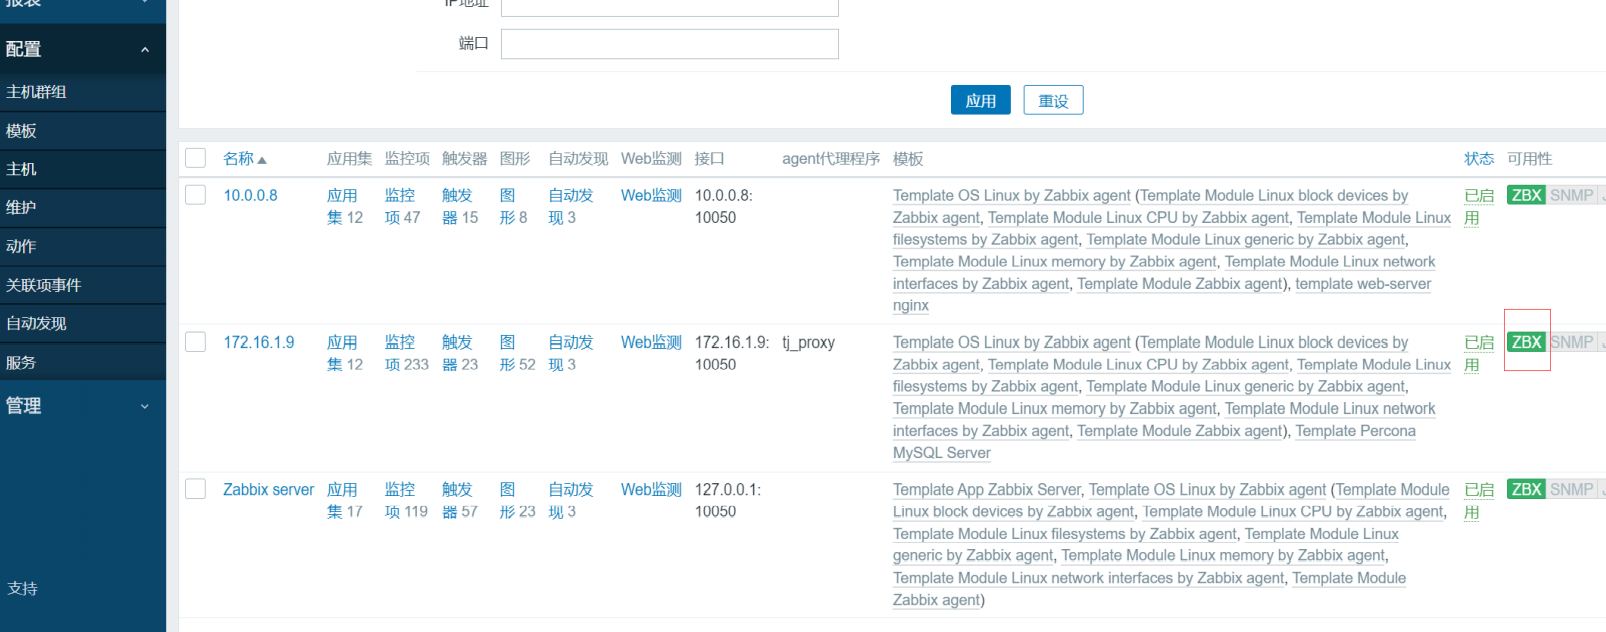
1.2 使用proxy监控主机
创建代理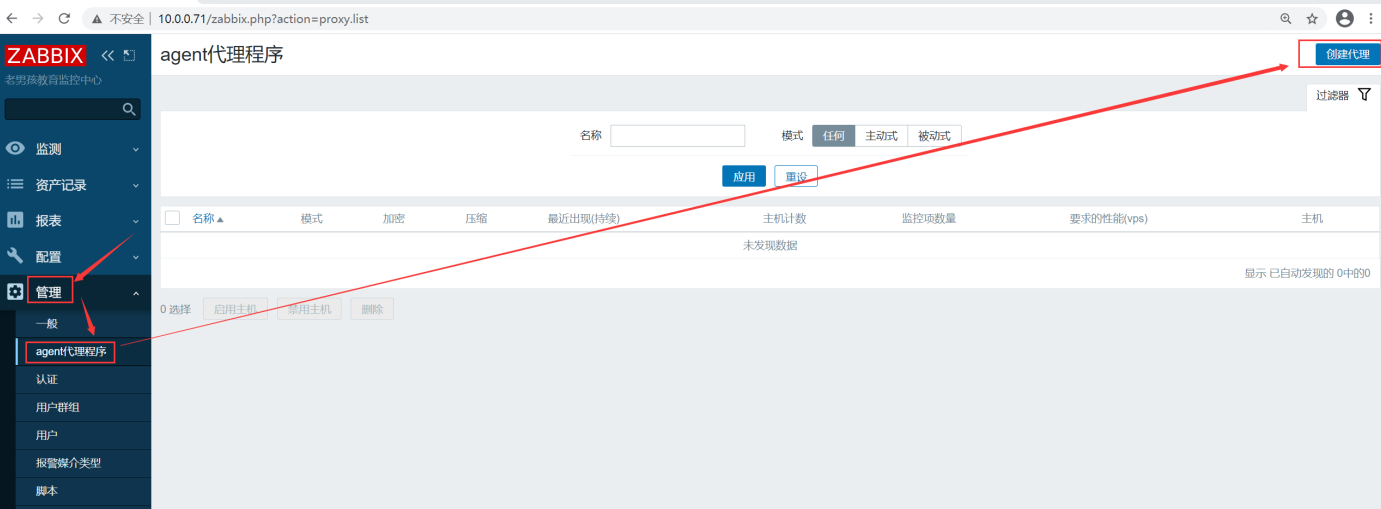
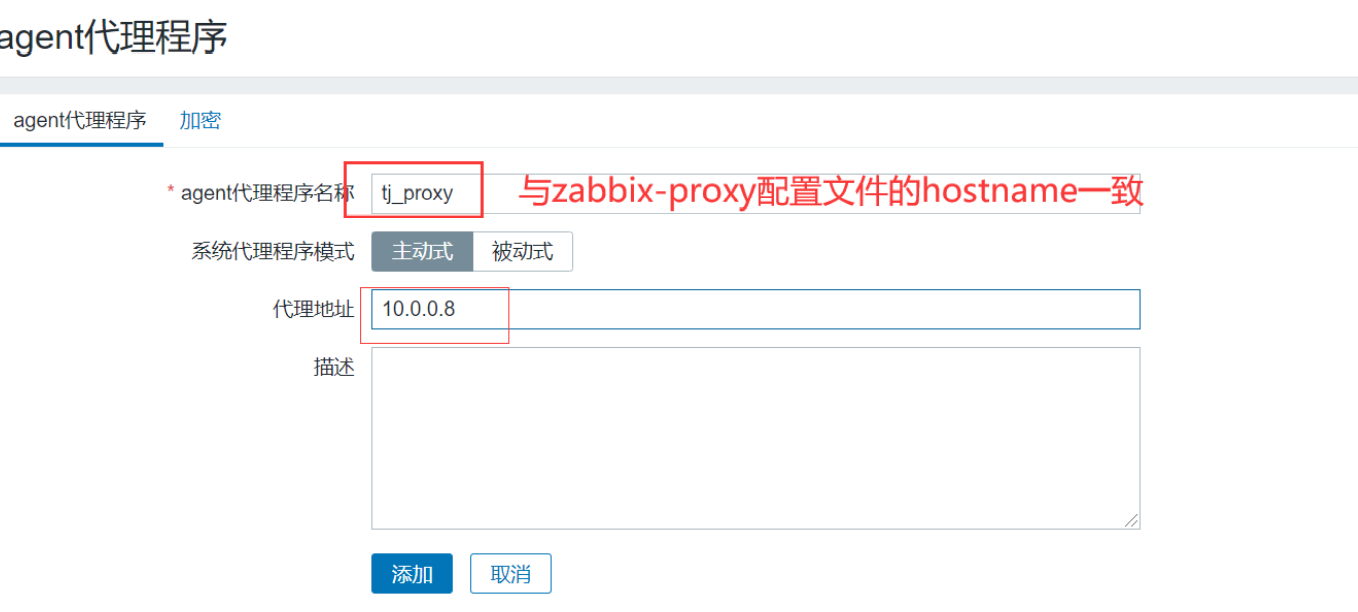
调通
agent配置
vim /etc/zabbix/zabbix_agentd.confServer=172.16.1.8ServerActive=172.16.1.8Hostname=172.16.1.9systemctl restart zabbix-agent.service

2. 使用zabbix监控jvm
tomcat weblogic jboss resin
tomcat:
开启监控接口
#安装tomcatrpm -ivh jdk-8u102-linux-x64.rpmmkdir /apptar xf apache-tomcat-8.0.27.tar.gz -C /app//app/apache-tomcat-8.0.27/bin/startup.sh#增加一行vim /app/apache-tomcat-8.0.27/bin/catalina.shCATALINA_OPTS="$CATALINA_OPTS -Dcom.sun.management.jmxremote -Djava.rmi.server.hostname=10.0.0.8 -Dcom.sun.management.jmxremote.port=12345 -Dcom.sun.management.jmxremote.ssl=false -Dcom.sun.management.jmxremote.authenticate=false"#重启生效/app/apache-tomcat-8.0.27/bin/shutdown.sh/app/apache-tomcat-8.0.27/bin/startup.sh#检验[root@web01 opt]# netstat -lntup|grep 12345tcp6 0 0 :::12345 :::* LISTEN 100141/java
安装zabbix-java-gateway来监控jvm
yum install zabbix-java-gateway.x86_64 -ysystemctl start zabbix-java-gateway.servicesystemctl enable zabbix-java-gateway.service
修改zabbix-server的配置文件
vim /etc/zabbix/zabbix_server.confJavaGateway=127.0.0.1JavaGatewayPort=10052StartJavaPollers=3systemctl restart zabbix-server.service
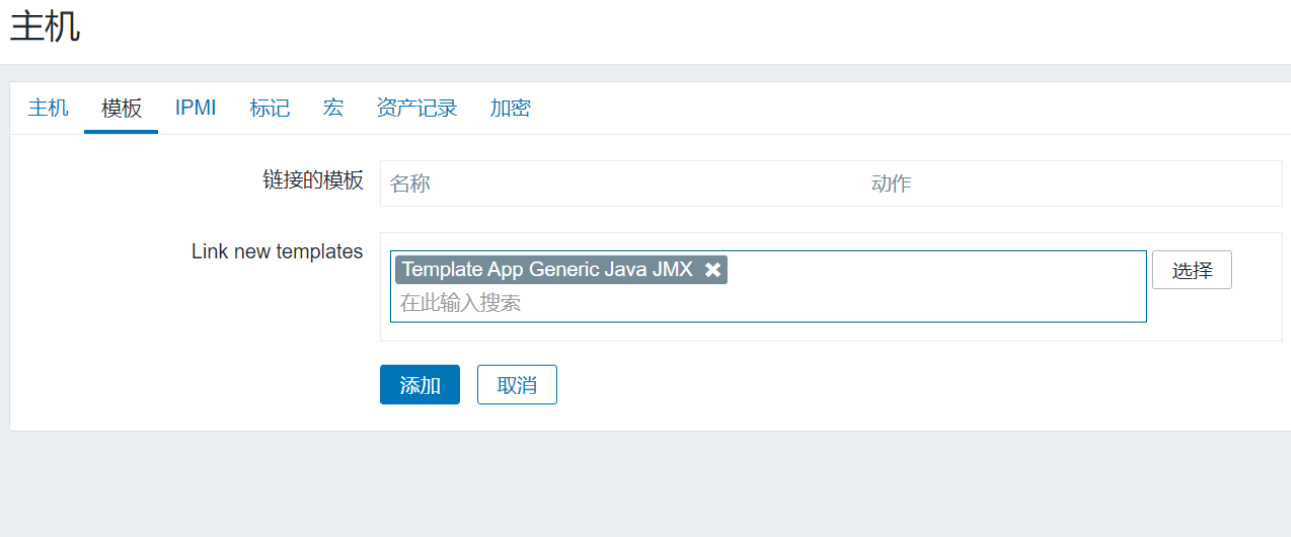
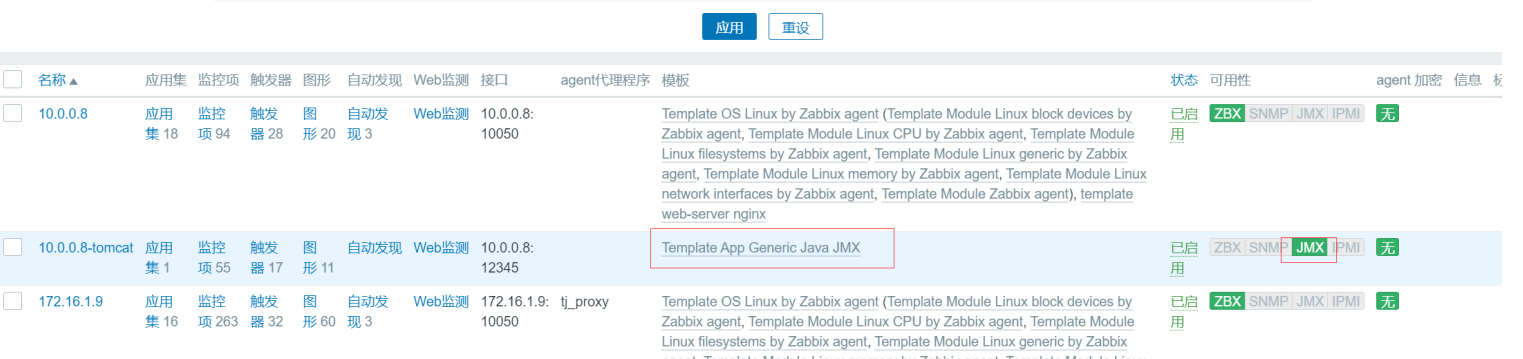
添加监控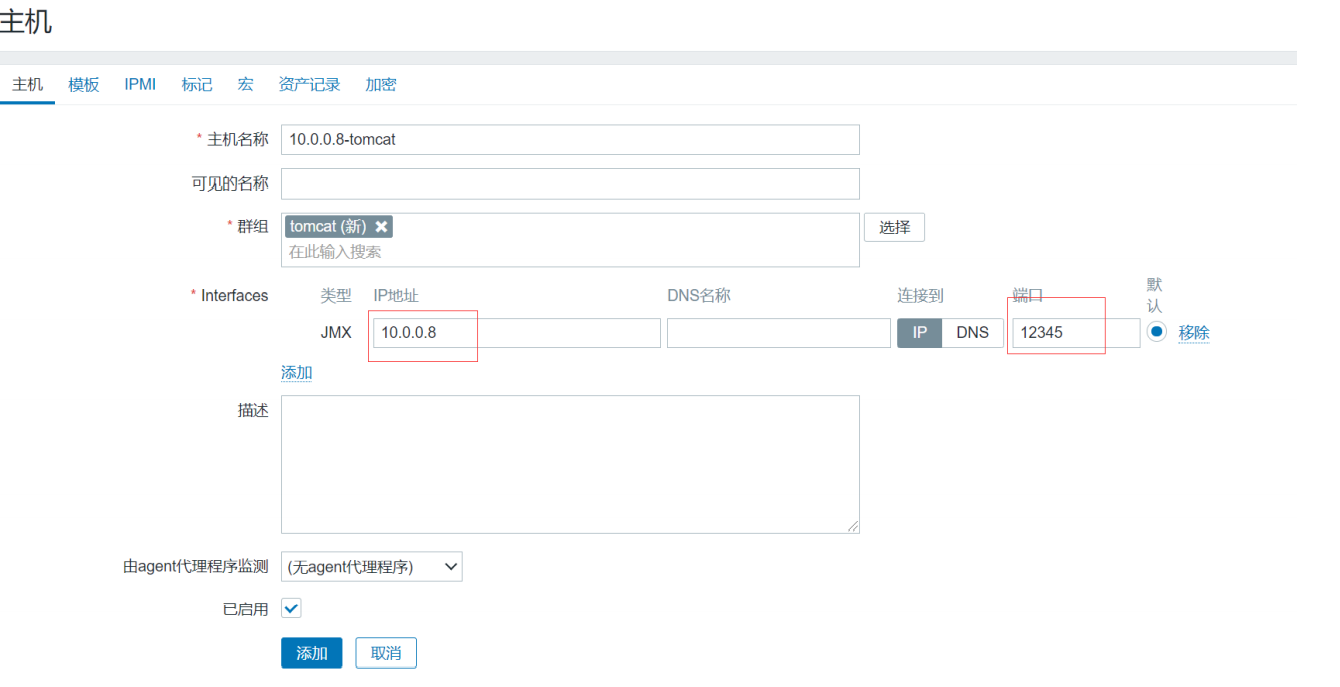
3.zabbix性能调优
性能不足的时候:经常出现误报,断图,还有其他报警
优化:
数据库优化:业务类型 写多读少
存储引擎:innodb --> tokudb版本 mariadb 5.5 --> mysql 5.7存储:机械硬盘--->固态硬盘去掉无用的监控项增加取值间隔,建议60s减少数据的保留周期,重要监控项保留90d,其他的一律3dmysql的分区和分表
zabbix-server服务优化
进程数缓存大小
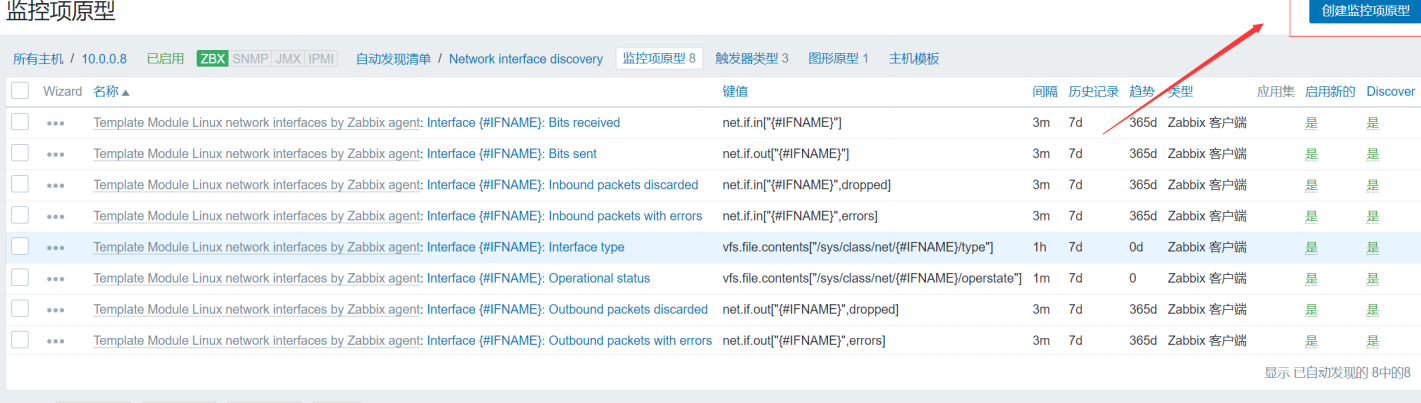
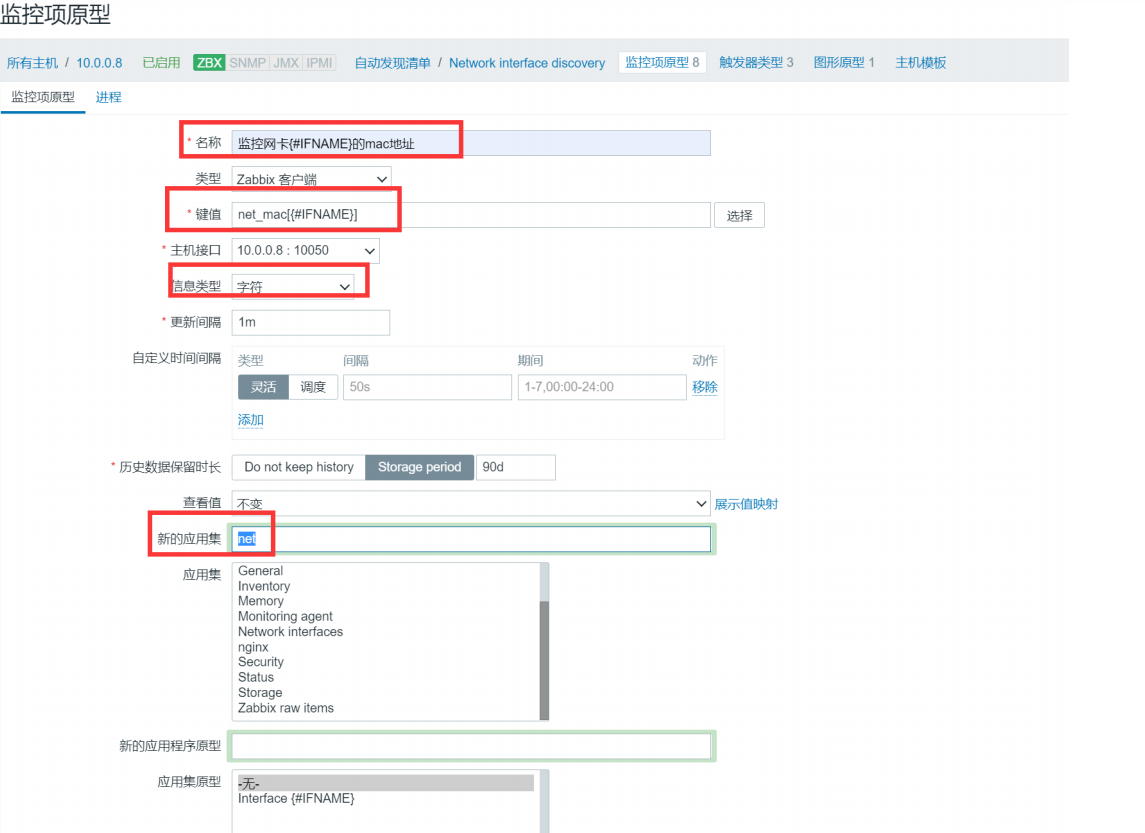
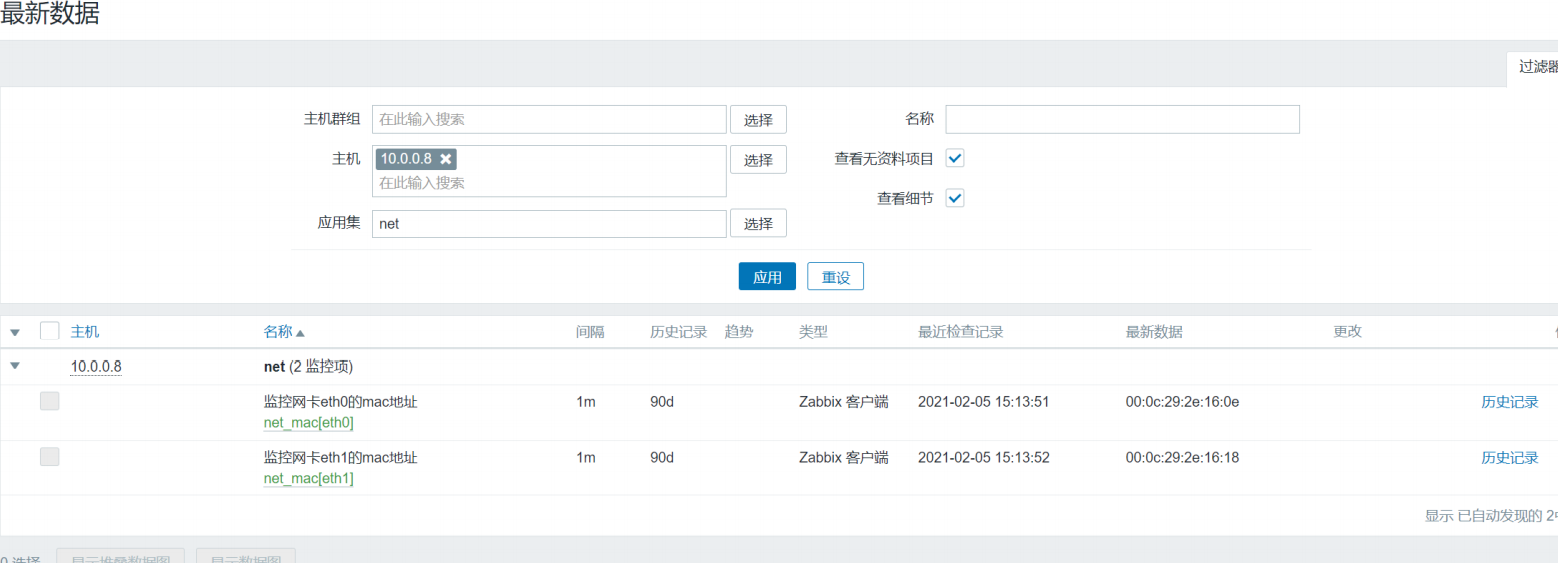
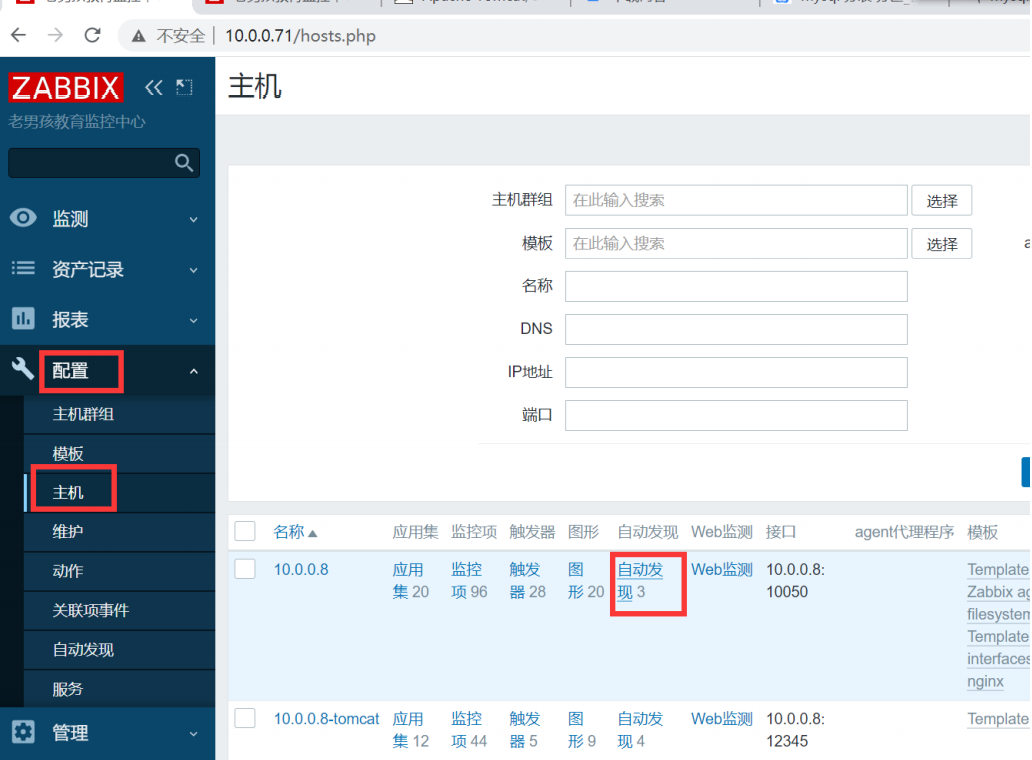
4.低级自动发现
新增一个监控项原型增加一个UserParameter=xxxx[*],cmd $1监控每块网卡的mac地址[root@web01 zabbix_agent2.d]# cat zbx_net.confUserParameter=net_mac[*],ifconfig $1|awk '/ether /{print $$2}'[root@zabbix-server ~]# zabbix_get -s 10.0.0.8 -k net_mac[eth1]00:0c:29:2e:16:18
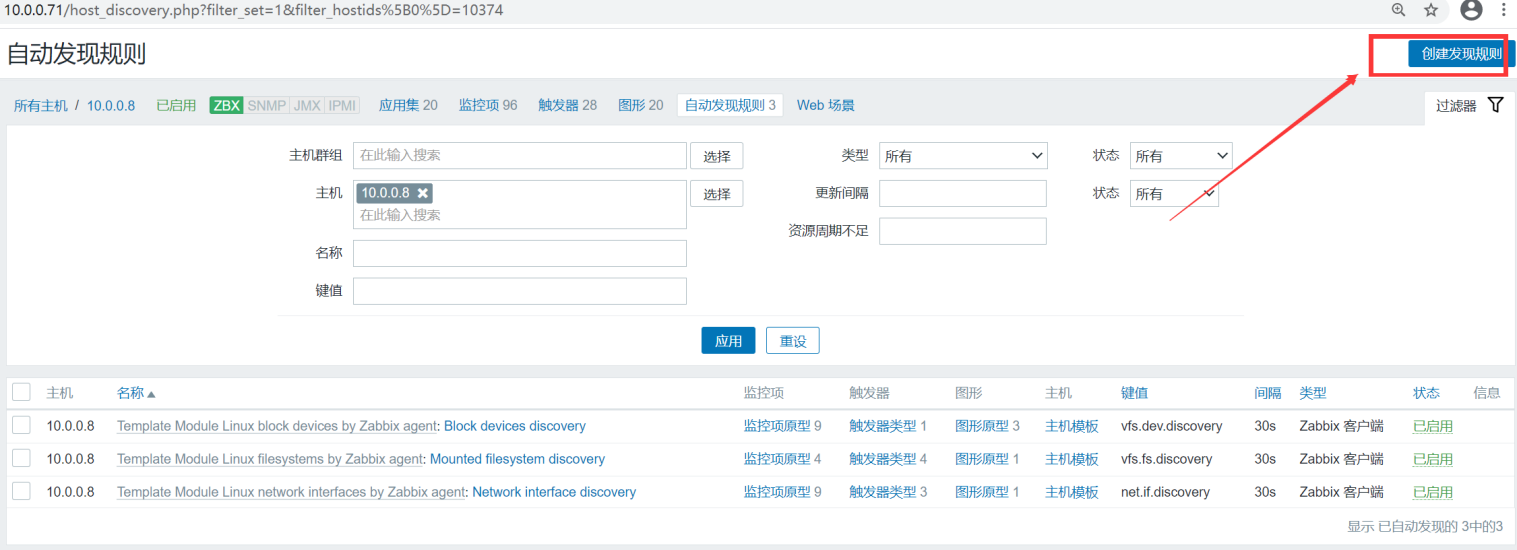
低级自动发现规则: 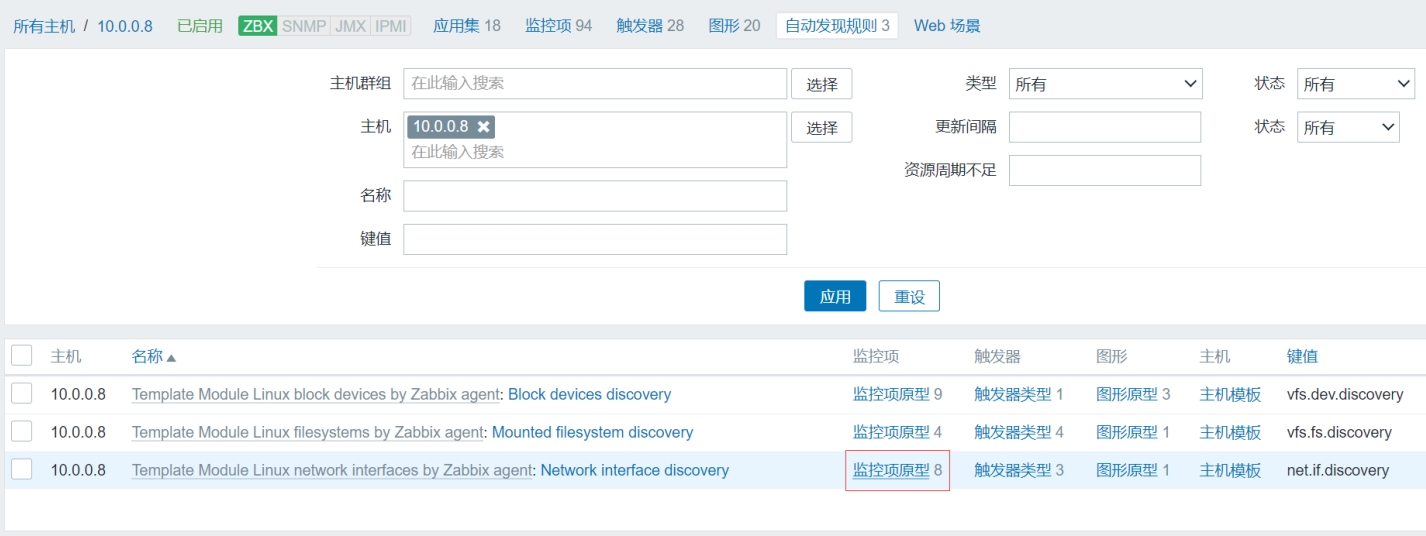

4.1通过低级自动发现监控mysql多实例
准备环境mysql多实例
cp /etc/my.cnf /etc/my3307.cnfvim /etc/my3307.cnf[mysqld]datadir=/data/3307/socket=/data/3307/mysql.sockport=3307user=mysqlsymbolic-links=0[mysqld_safe]log-error=/data/3307/mysqld.logpid-file=/data/3307/mysqld.pidsed '/^$/d' /etc/my3307.cnfsed -i '/^$/d' /etc/my3307.cnfcp /etc/my3307.cnf /etc/my3308.cnfsed -i 's#3307#3308#g' /etc/my3308.cnfcat /etc/my3308.cnfmysql_install_db --user=mysql --defaults-file=/etc/my3307.cnfmysql_install_db --user=mysql --defaults-file=/etc/my3308.cnfmysqld_safe --defaults-file=/etc/my3307.cnf &mysqld_safe --defaults-file=/etc/my3308.cnf &mysqladmin -uroot -h 127.0.0.1 -P 3307 password '123456'mysql -uroot -p123456 -h 127.0.0.1 -P 3307mysqladmin -uroot -h 127.0.0.1 -P 3308 password '123456'mysql -uroot -p123456 -h 127.0.0.1 -P 3308
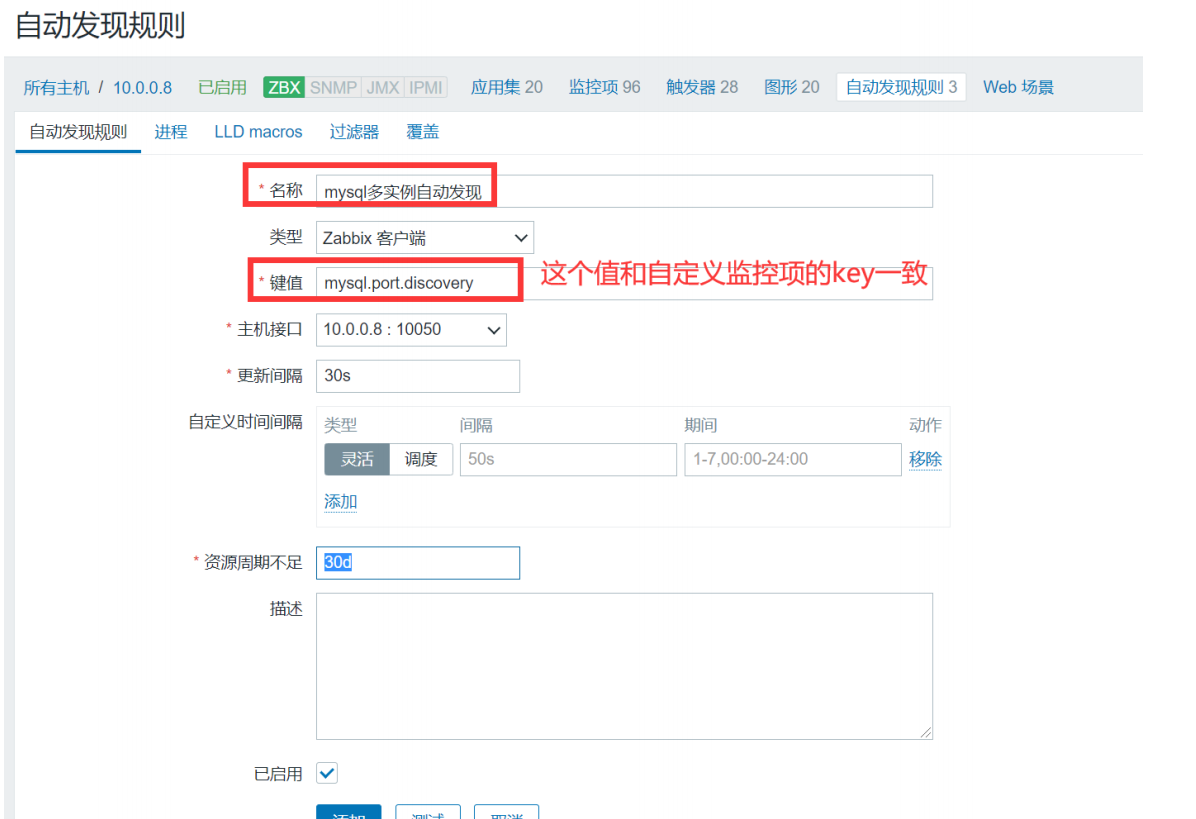
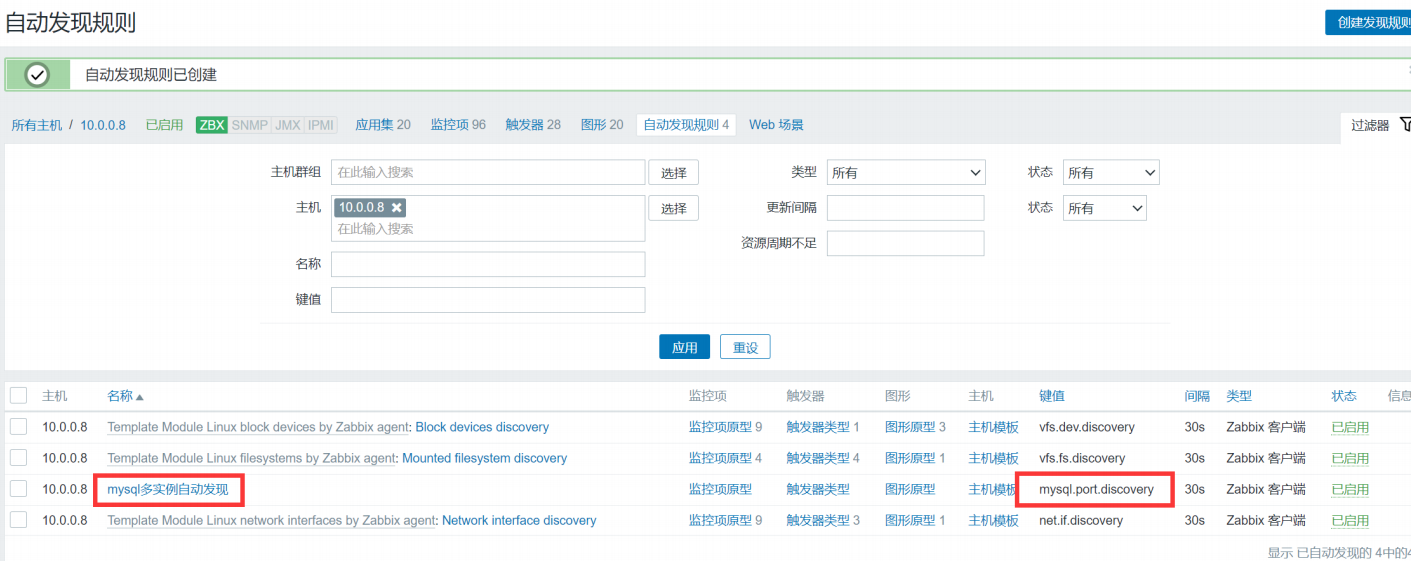
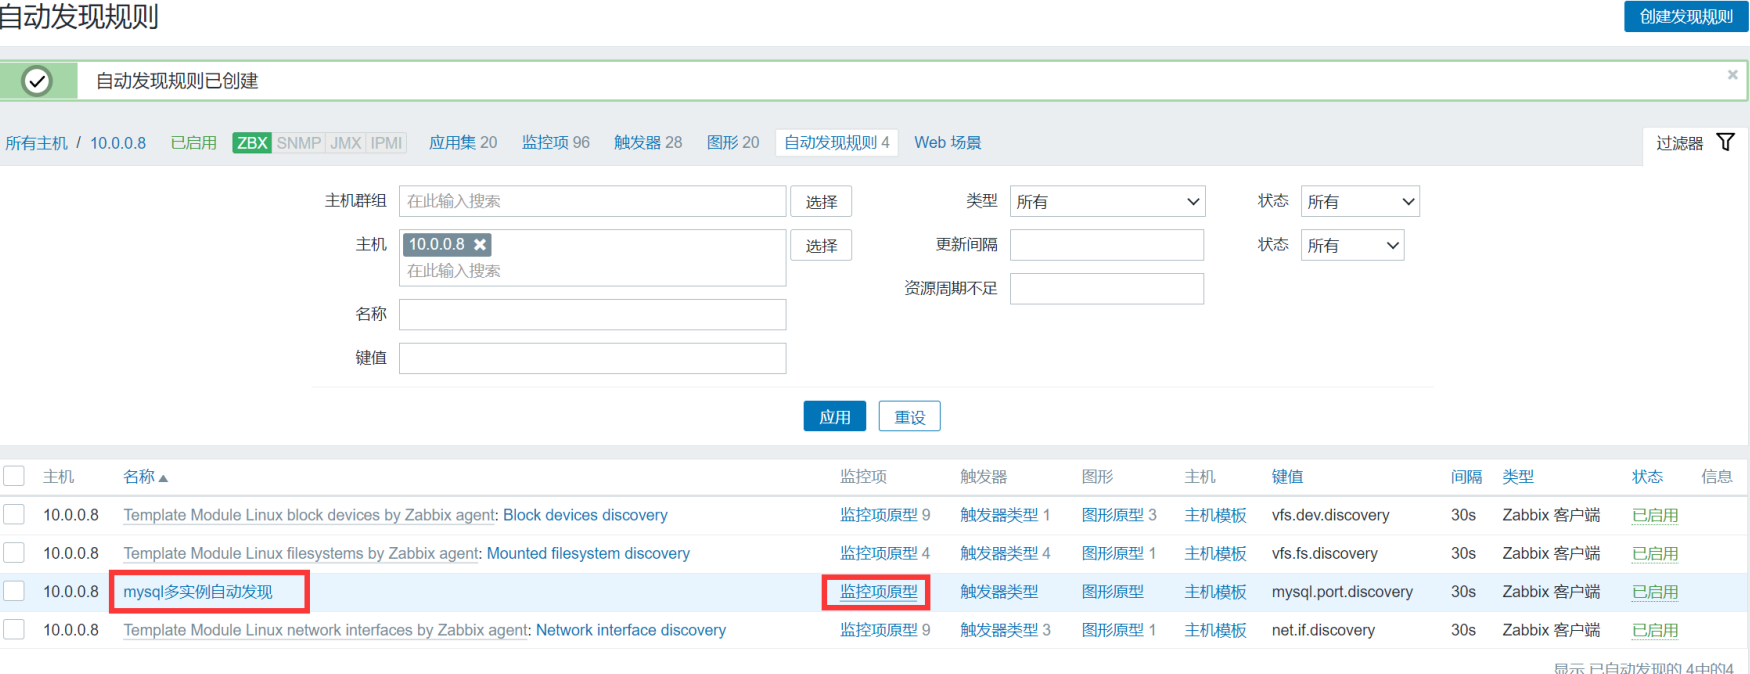
创建低级自动发现规则
#自定义规则的监控项vim /etc/zabbix/zabbix_agent2.d/zbx_mysql.confUserParameter=mysql.port.discovery,/bin/bash /server/scripts/mysql_port_discovery.sh#脚本vim /server/scripts/mysql_port_discovery.sh#!/bin/bash#mysql low-level discoveryres=`netstat -lntp|awk -F "[ :\t]+" '/mysqld/{print$5}'`port=($res)printf '['for key in ${!port[@]}doif [[ "${#port[@]}" -gt 1 && "${key}" -ne "$((${#port[@]}-1))" ]];thenprintf '{'printf "\"{#MYSQLPORT}\":\"${port[${key}]}\"},"else [[ "${key}" -eq "((${#port[@]}-1))" ]]printf '{'printf "\"{#MYSQLPORT}\":\"${port[${key}]}\"}"fidoneprintf ']\n'#重启systemctl restart zabbix-agent2.service#测试[root@zabbix-server ~]# zabbix_get -s 10.0.0.8 -k mysql.port.discovery[{"{#MYSQLPORT}":"3306"},{"{#MYSQLPORT}":"3307"},{"{#MYSQLPORT}":"3308"}]
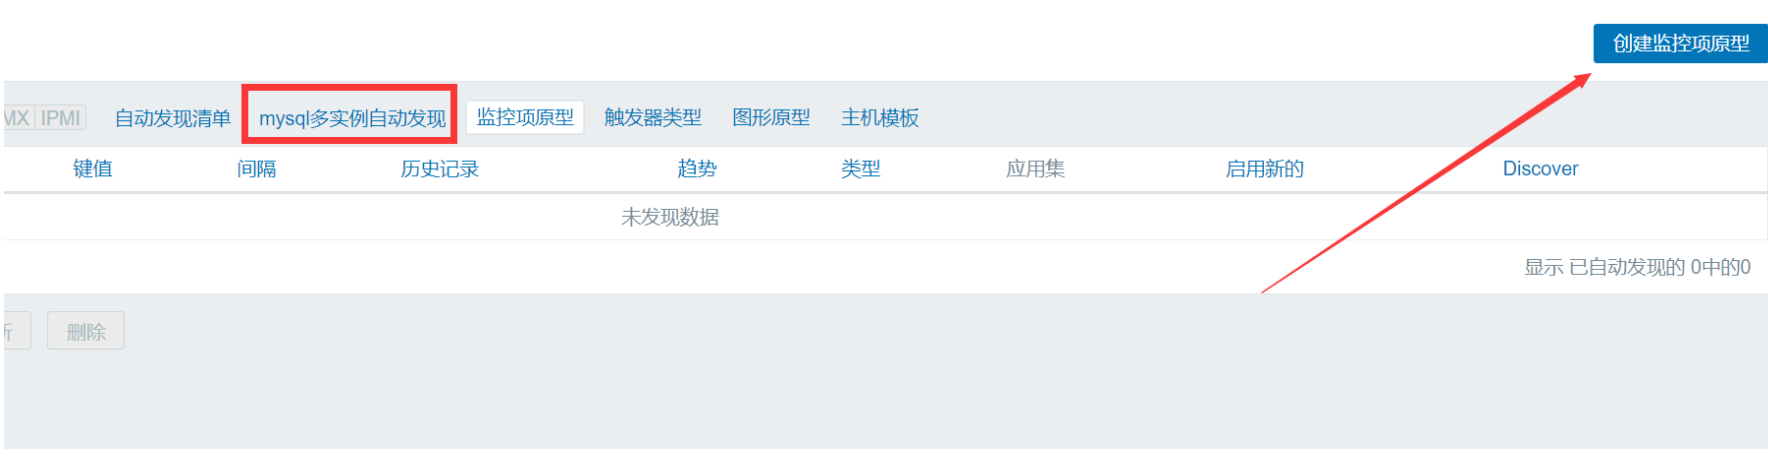
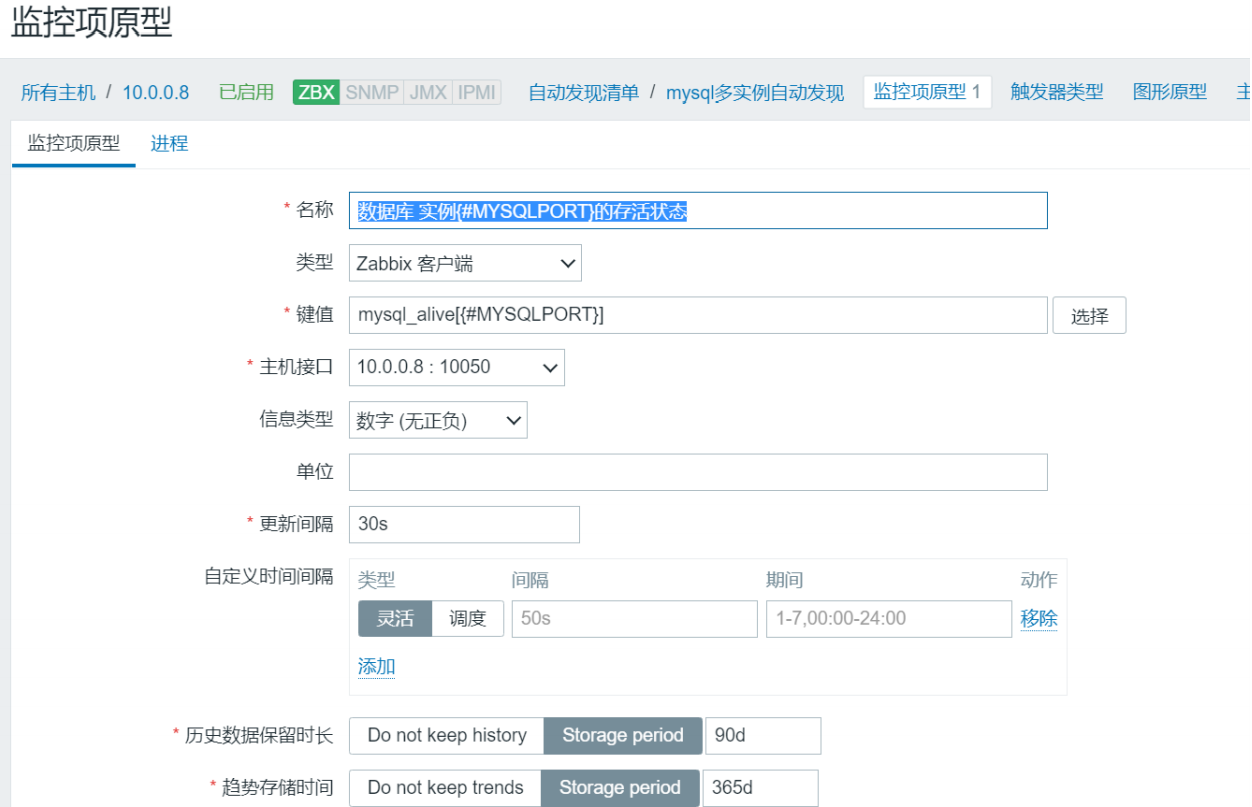
创建监控项原型
vim zbx_mysql.conf
UserParameter=mysql_alive[*],mysqladmin -uroot -p123456 -h 127.0.0.1 -P $1 ping 2>/dev/null|grep -c alive
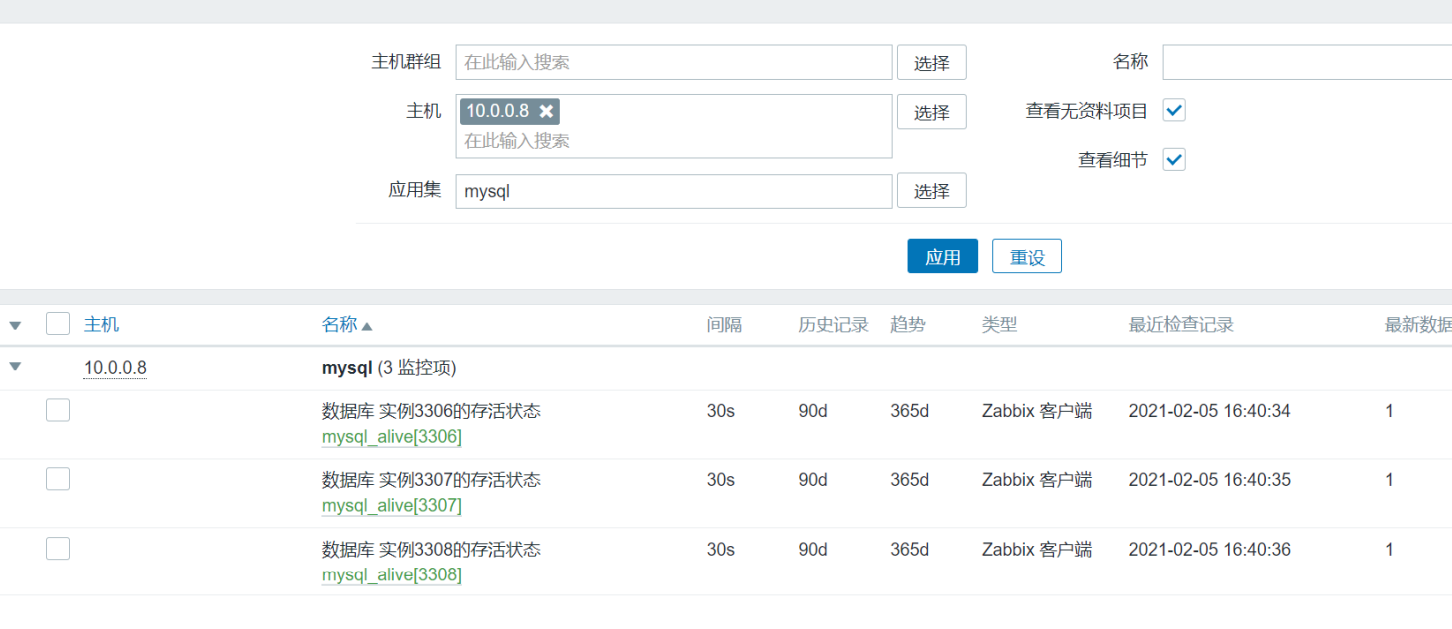
#测试
[root@zabbix-server ~]# zabbix_get -s 10.0.0.8 -k mysql_alive[3307]
1

5、zabbix的api讲解
api:应用程序接口

什么是调用api

怎么调用api,发起一个http请求
curl "http://apis.juhe.cn/simpleWeather/query?city=昌平&key=3dae6629acd8689e9b12f8bb4f"
{"reason":"查询成功!","result":{"city":"昌平","realtime":{"temperature":"13","humidity":"15","info":"晴","wid":"00","direct":"西风","power":"2级","aqi":"67"},"future":[{"date":"2021-02-05","temperature":"1\/13℃","weather":"晴","wid":{"day":"00","night":"00"},"direct":"西风转西北风"},{"date":"2021-02-06","temperature":"-3\/13℃","weather":"多云","wid":{"day":"01","night":"01"},"direct":"西北风转南风"},{"date":"2021-02-07","temperature":"-5\/5℃","weather":"晴","wid":{"day":"00","night":"00"},"direct":"东南风转北风"},{"date":"2021-02-08","temperature":"-5\/5℃","weather":"多云转晴","wid":{"day":"01","night":"00"},"direct":"东南风转西北风"},{"date":"2021-02-09","temperature":"-3\/9℃","weather":"多云转晴","wid":{"day":"01","night":"00"},"direct":"东南风转西北风"}]},"error_code":0}
调用zabbix-api
获取token
curl -X POST -H 'Content-Type:application/json-rpc' -d '
{
    "jsonrpc": "2.0",
    "method": "user.login",
    "params": {
        "user": "Admin",
        "password": "zabbix"
    },
    "id": 1,
    "auth": null
}'  http://10.0.0.71/api_jsonrpc.php
返回结果;
{"jsonrpc":"2.0","result":"6d33c0a88b0d55d7860eea70005c5b5b","id":1}
token='6d33c0a88b0d55d7860eea70005c5b5b'
删除主机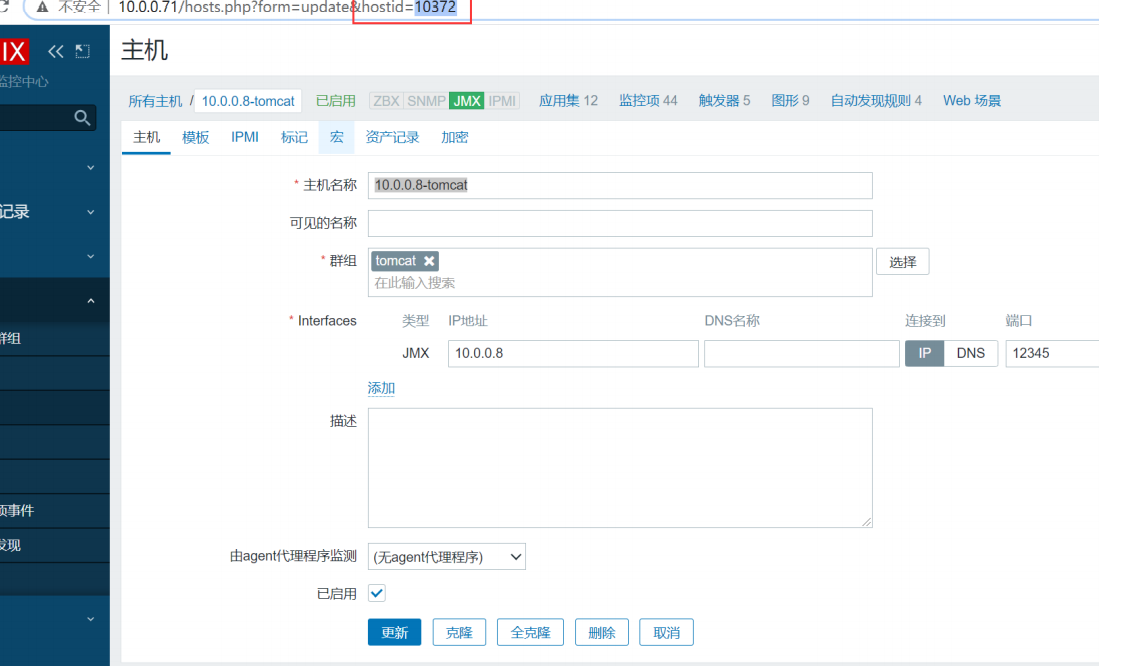
curl -X POST -H 'Content-Type:application/json-rpc' -d '
{
    "jsonrpc": "2.0",
    "method": "host.delete",
    "params": [
        10372
    ],
    "auth": "'$token'",
    "id": 1
}'  http://10.0.0.71/api_jsonrpc.php
返回结果
{"jsonrpc":"2.0","result":{"hostids":[10372]},"id":1}
创建主机
curl -X POST -H 'Content-Type:application/json-rpc' -d '
{
    "jsonrpc": "2.0",
    "method": "host.create",
    "params": {
        "host": "10.0.0.8",
        "interfaces": [
            {
                "type": 1,
                "main": 1,
                "useip": 1,
                "ip": "10.0.0.8",
                "dns": "",
                "port": "10050"
            }
        ],
        "groups": [
            {
                "groupid": "17"
            }
        ],
        "templates": [
            {
                "templateid": "10357"
            }
        ]
    },
    "auth": "'$token'",
    "id": 1
}'  http://10.0.0.71/api_jsonrpc.php
返回结果:
{"jsonrpc":"2.0","result":{"hostids":["10377"]},"id":1}
批量创建主机
[root@web01 ~]# cat piliang_create_host.sh
#!/bin/bash

token='6d33c0a88b0d55d7860eea70005c5b5b'
for n in `echo 10.0.0.{50..100}`
do
curl -X POST -H 'Content-Type:application/json-rpc' -d '
{
    "jsonrpc": "2.0",
    "method": "host.create",
    "params": {
        "host": "'$n'",
        "interfaces": [
            {
                "type": 1,
                "main": 1,
                "useip": 1,
                "ip": "10.0.0.8",
                "dns": "",
                "port": "10050"
            }
        ],
        "groups": [
            {
                "groupid": "17"
            }
        ],
        "templates": [
            {
                "templateid": "10357"
            }
        ]
    },
    "auth": "'$token'",
    "id": 1
}'  http://10.0.0.71/api_jsonrpc.php
done

若有收获,就点个赞吧
0 人点赞
