Filebeat介绍(轻量型日志采集工具):
一、filebeat是什么filebeat和beats的关系首先filebeat是Beats中的一员。#Beats是一个轻量级日志采集器,其实Beats家族有6个成员,早期的ELK架构中使用Logstash收集、解析日志,但是Logstash对内存、cpu、io等资源消耗比较高。相比Logstash,Beats所占系统的CPU和内存几乎可以忽略不计。目前Beats包含六种工具:-Packetbeat:网络数据(收集网络流量数据)-Metricbeat:指标(收集系统、进程和文件系统级别的CPU和内存使用情况等数据)-Filebeat:日志文件(收集文件数据)-Winlogbeat:windows事件日志(收集Windows事件日志数据)-Auditbeat:审计数据(收集审计日志)-Heartbeat:运行时间监控(收集系统运行时的数据
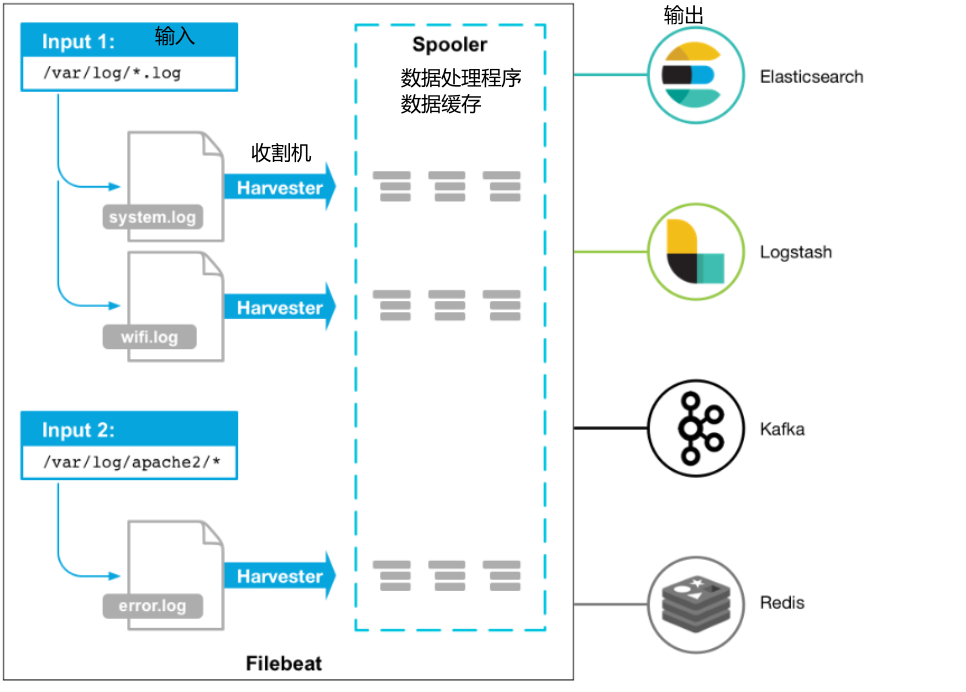
1. 工作的流程图如下:

*Filebeat包含两个主要组件:输入和收割机,这些组件协同工作将文件尾部最新事件数据发送到指定的输出
  1.输入(Input):             #输入负责管理收割机从哪个路径查找所有可读取的资源。
  2.收割机(Harvester):  #负责逐行读取单个文件的内容,然后将内容发送到输出。*

  3.输出(output):            #将数据转发到指定的服务端(ES|Logstash|Redis|Kafka)
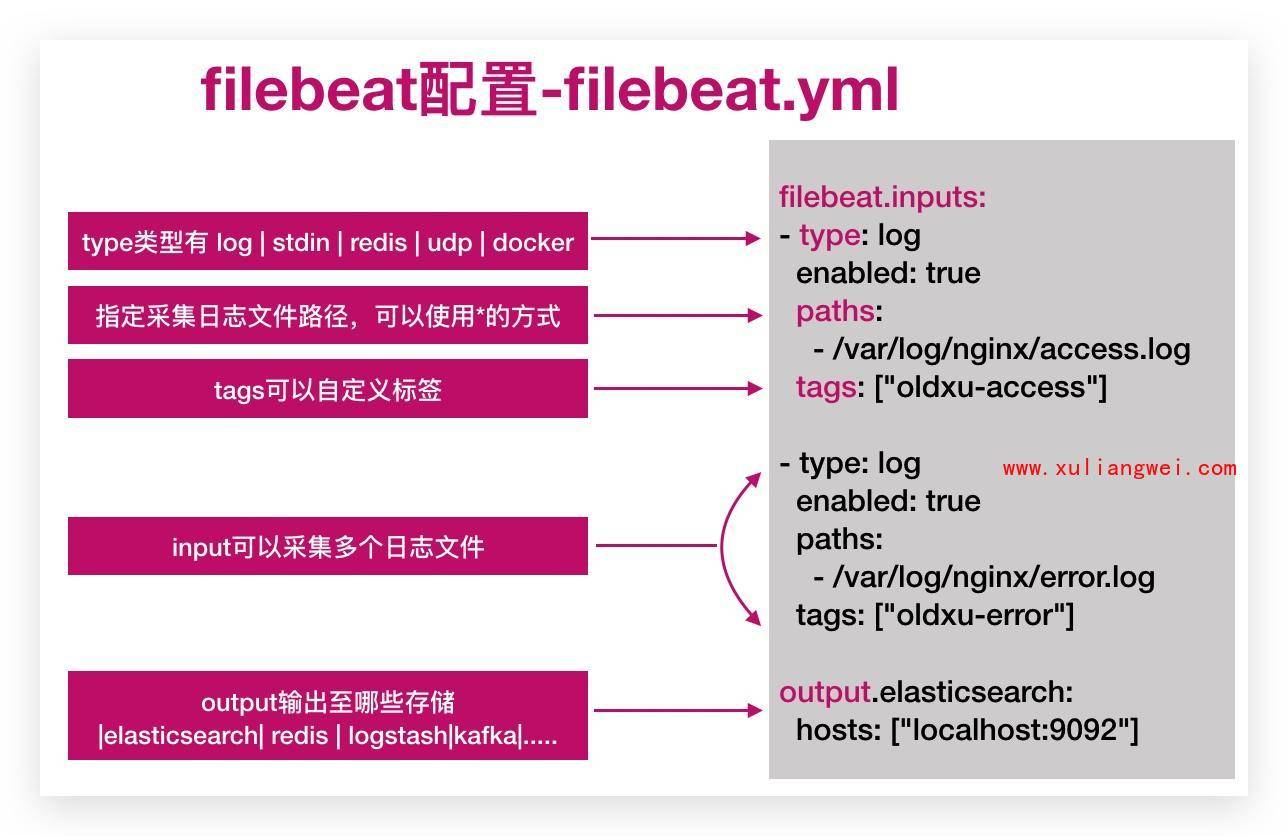
2. filebeat配置文件说明:
3.FIlebeat基本使用
- filebeat安装在业务系统。跟ES集群无关。
- filebeat ==> ES ( 索引 ) <—- Kibana读取
安装
#安装filebeat
[root@web01 ~]# yum localinstall filebeat-7.4.0-x86_64.rpm -y

#配置
#实验:从标准输入到标准输出
[root@web01 filebeat]# cat inpit_file_output_console.yml
filebeat.inputs:
- type: log
  enabled: true
  paths: /var/log/messages

output.console:
  pretty: true
  enable: true
检验
#stdin 模式 手动输入abc,输出到ES

abc
{
  "@timestamp": "2021-01-19T02:10:08.629Z",
  "@metadata": {
    "beat": "filebeat",
    "type": "_doc",
    "version": "7.4.0"
  },
  "ecs": {
    "version": "1.1.0"
  },
  "host": {
    "name": "web01"
  },
  "agent": {
    "version": "7.4.0",
    "type": "filebeat",
    "ephemeral_id": "02cda35d-674a-44bd-bf16-69b32fd4304b",
    "hostname": "web01",
    "id": "157e5811-8e6e-41f8-804c-8805668ffd0e"
  },
  "log": {
    "offset": 0,
    "file": {
      "path": ""
    }
  },
  "message": "abc",
  "input": {
    "type": "stdin"
  }
}
1.配置filebeat:
[root@web01 ~]# cat /etc/filebeat/filebeat.yml
filebeat.inputs:
- type: log
  enabled: true
  paths:
    - /var/log/messages
output.elasticsearch:
  hosts: ["10.0.0.161:9200","10.0.0.162:9200","10.0.0.163:9200"]
2.检查Cerebro中是否存在索引:
3.登录Kibana,查看索引;
索引模式—>创建索引—>匹配索引对应的名称—>添加—>timestamp 
>>> 报错处理: Kibana discover发现失败(ntpdate 1.aliyun.com)
- 配置rsyslog日志收集程序
```javascript
[root@web01 ~]# yum install rsyslog -y #安装
[root@web01 ~]# vim /etc/rsyslog.conf #配置
Provides UDP syslog reception
$ModLoad imudp $UDPServerRun 514 . /var/log/hsping.log
[root@web01 ~]# systemctl restart rsyslog #启动 [root@web01 ~]# logger “rsyslog test from hsping” #测试
修改filebeat的配置文件:
[root@web01 ~]# cat /etc/filebeat/filebeat.yml filebeat.inputs:
- type: log
enabled: true
paths:
- /var/log/hsping.log
output.elasticsearch:
hosts: [“10.0.0.161:9200”,”10.0.0.162:9200”,”10.0.0.163:9200”]
```
- /var/log/hsping.log
output.elasticsearch:
hosts: [“10.0.0.161:9200”,”10.0.0.162:9200”,”10.0.0.163:9200”]
```
3.1 filebeat仅包含需要的内容;
----> 清楚索引:
1.删除kibana匹配es索引的模式;    ( 不能看数据,不代表索引被删除; )
2.删除es的索引;                   ( 删除索引,数据页没了; )

3.配置filebeat
[root@web01 ~]# cat  /etc/filebeat/filebeat.yml
filebeat.inputs:
- type: log
  enabled: true
  paths:
    - /var/log/oldxu.log
  #仅包含,错误信息,警告信息,sshd的相关配置,其他的都会过滤掉
  include_lines: ['^ERR', '^WARN', 'sshd']

output.elasticsearch:
  hosts: ["10.0.0.161:9200","10.0.0.162:9200","10.0.0.163:9200"]

4. 重启
[root@web01 ~]# systemctl restart filebeat
1.自定义索引名称;
[root@web01 ~]# cat /etc/filebeat/filebeat.yml
filebeat.inputs:
- type: log
  enabled: true
  paths:
    - /var/log/oldxu.log

  # 仅包含,错误信息,警告信息,sshd的相关配置,其他的都会过滤掉
  include_lines: ['^ERR', '^WARN', 'sshd']

output.elasticsearch:
  hosts: ["10.0.0.161:9200","10.0.0.162:9200","10.0.0.163:9200"]
  index: "system-%{[agent.version]}-%{+yyyy.MM.dd}"

setup.ilm.enabled: false
setup.template.name: "system"       #定义模板名称
setup.template.pattern: "system-*"  #定义模板的匹配索引名称
2.自定义分片和副本数量;
[root@web01 ~]# cat /etc/filebeat/filebeat.yml
 ...

setup.template.settings:
  index.number_of_shards: 3
  index.number_of_replicas: 1
注意: 如果先配置了自定义名称,后期无法修改,分片,因为模板固定分片
- 解决方法: 删除模板,删除索引, (生产已经规划好,请勿随便删除)
- 然后重启filebeat,产生新的数据;
3.2 问题:收集多个web节点相同的日志;是不是应该写入同一个索引中;如果是;如何区分数据是哪个节点产生的;
解决思路:
2.1 安装filebeat
2.2 将环境修改为一致, rsyslog
2.2 拷贝配置文件
4.实践案例:
1. Nginx:
#日志取样:
message: 10.0.0.7 - - [19/Jan/2021:14:42:28 +0800] "GET / HTTP/1.1" 200 8 "-" "curl/7.29.0" "-"

#需求:
    Client: 10.0.0.7
    Request:
    http_version:  HTTP/1.1
    status: 200
    bytes: 8

#2中方法完成需求:
    1.修改Nginx日志为json;
    2.filebeat--> Logstash数据解析和转换;
示例: ```javascript [root@web01 ~]# vim /etc/nginx/nginx.conf http { …… log_format json ‘{ “time_local”: “$time_local”, ‘
                        '"remote_addr": "$remote_addr", '
                        '"referer": "$http_referer", '
                        '"request": "$request", '
                        '"status": $status, '
                        '"bytes": $body_bytes_sent, '
                        '"agent": "$http_user_agent", '
                        '"x_forwarded": "$http_x_forwarded_for", '
                        '"up_addr": "$upstream_addr",'
                        '"up_host": "$upstream_http_host",'
                        '"upstream_time": "$upstream_response_time",'
                        '"request_time": "$request_time"'
  '}';
access_log /var/log/nginx/access.log json; #调用json format的日志 ……
server { listen 80; server_name blog.hsping.com; root /code/blog;
location / {
index index.html;} } } mkdir /code/blog echo “blog..” > /code/blog/index.html
[root@web01 ~]# > /var/log/nginx/access.log [root@web01 ~]# systemctl restart nginx #重启nginx [root@web01 ~]# curl -HHost:elk.hsping.com http://10.0.0.7 #生成日志
- Filebeat配置 **(采集json格式日志,同时按照自定的key-value)**
```javascript
[root@web01 ~]# cat /etc/filebeat/filebeat.yml
filebeat.inputs:
- type: log
  enabled: true
  paths:
    - /var/log/nginx/access.log
  json.keys_under_root: true  ### Flase会将json解析的格式存储至messages,改为true则不存储至message
  json.overwrite_keys: true   ### 覆盖默认message字段,使用自定义json格式的key

output.elasticsearch:
  hosts: ["10.0.0.161:9200","10.0.0.162:9200","10.0.0.163:9200"]
  index: "nginx-access-%{[agent.version]}-%{+yyyy.MM.dd}"

setup.ilm.enabled: false
setup.template.name: "nginx"       #定义模板名称
setup.template.pattern: "nginx-*"  #定义模板的匹配索引名称
[root@web01 ~]# systemctl restart filebeat

#删除之前Nginx的索引;
需求1: 同时收集Nginx访问日志,Nginx错误日志(tag方式)
- 访问日志: json
错误日志: 文本
[root@web01 ~]# cat /etc/filebeat/filebeat.yml ```yaml filebeat.inputs:type: log enabled: true paths:
- /var/log/nginx/access.log json.keys_under_root: true #Flase会将json解析的格式存储至messages,改为true则不存储至message json.overwrite_keys: true #覆盖默认message字段,使用自定义json格式的key tags: nginx-access
type: log enabled: true paths:
- /var/log/nginx/error.log tags: nginx-error output.elasticsearch: hosts: [“10.0.0.161:9200”,”10.0.0.162:9200”,”10.0.0.163:9200”] indices:
- index: “nginx-access-%{[agent.version]}-%{+yyyy.MM.dd}” when.contains: tags: “nginx-access” #—- tags为access的日志存储至nginx-access-* 索引
- index: “nginx-error-%{[agent.version]}-%{+yyyy.MM.dd}” when.contains: tags: “nginx-error” #—- tags为error的日志存储至nginx-error-* 索引
setup.ilm.enabled: false setup.template.name: “nginx” #定义模板名称 setup.template.pattern: “nginx-*” #定义模板的匹配索引名称
- 测试:

[root@web01 ~]# curl -HHost:elk.hsping.com [http://10.0.0.7/dadsadsa](http://10.0.0.7/dadsadsa)


<a name="8Eai4"></a>
#### 需求2:  多个虚拟主机的日志收集
    blog ---> /var/log/nginx/blog.oldxu.com.log<br />    edu ---> /var/log/nginx/edu.oldxu.com.log

- 环境准备:  [多虚拟主机日志生成.txt](https://www.yuque.com/attachments/yuque/0/2021/txt/1581532/1611055274964-7bcf189c-816b-4a36-811a-7262347b5762.txt?_lake_card=%7B%22uid%22%3A%221611055274653-0%22%2C%22src%22%3A%22https%3A%2F%2Fwww.yuque.com%2Fattachments%2Fyuque%2F0%2F2021%2Ftxt%2F1581532%2F1611055274964-7bcf189c-816b-4a36-811a-7262347b5762.txt%22%2C%22name%22%3A%22%E5%A4%9A%E8%99%9A%E6%8B%9F%E4%B8%BB%E6%9C%BA%E6%97%A5%E5%BF%97%E7%94%9F%E6%88%90.txt%22%2C%22size%22%3A635%2C%22type%22%3A%22text%2Fplain%22%2C%22ext%22%3A%22txt%22%2C%22progress%22%3A%7B%22percent%22%3A99%7D%2C%22status%22%3A%22done%22%2C%22percent%22%3A0%2C%22id%22%3A%22jKT4b%22%2C%22card%22%3A%22file%22%7D)
```javascript
[root@web01 conf.d]# cat /etc/filebeat/filebeat.yml
filebeat.inputs:
- type: log
  enabled: true
  paths:
    - /var/log/nginx/access.log
  json.keys_under_root: true  #Flase会将json解析的格式存储至messages,改为true则不存储至message
  json.overwrite_keys: true   #覆盖默认message字段,使用自定义json格式的key
  tags: nginx-access

- type: log
  enabled: true
  paths:
    - /var/log/nginx/blog.log
  json.keys_under_root: true  #Flase会将json解析的格式存储至messages,改为true则不存储至message
  json.overwrite_keys: true   #覆盖默认message字段,使用自定义json格式的key
  tags: nginx-blog

- type: log
  enabled: true
  paths:
    - /var/log/nginx/edu.log
  json.keys_under_root: true  #Flase会将json解析的格式存储至messages,改为true则不存储至message
  json.overwrite_keys: true   #覆盖默认message字段,使用自定义json格式的key
  tags: nginx-edu

- type: log
  enabled: true
  paths:
    - /var/log/nginx/error.log
  tags: nginx-error


output.elasticsearch:
  hosts: ["10.0.0.161:9200","10.0.0.162:9200","10.0.0.163:9200"]
  indices:
    - index: "nginx-access-%{[agent.version]}-%{+yyyy.MM.dd}"
      when.contains:
        tags: "nginx-access"  #tags为access的日志存储至nginx-access-* 索引
    - index: "nginx-blog-%{[agent.version]}-%{+yyyy.MM.dd}"
      when.contains:
        tags: "nginx-blog"   #tags为error的日志存储至nginx-error-* 索引
    - index: "nginx-edu-%{[agent.version]}-%{+yyyy.MM.dd}"
      when.contains:
        tags: "nginx-edu"   #tags为error的日志存储至nginx-error-* 索引
    - index: "nginx-error-%{[agent.version]}-%{+yyyy.MM.dd}"
      when.contains:
        tags: "nginx-error"   #tags为error的日志存储至nginx-error-* 索引


setup.ilm.enabled: false
setup.template.name: "nginx"       #定义模板名称
setup.template.pattern: "nginx-*"  #定义模板的匹配索引名称
2. tomcat:
访问日志:
改成json就完事;
---> 日志修改为json格式代码 ..... <Host name="elk.tomcat.com" appBase="webapps" unpackWARs="true" autoDeploy="true"> <Valve className="org.apache.catalina.valves.AccessLogValve" directory="logs" prefix="elk.tomcat_access_log" suffix=".txt" pattern="{"clientip":"%h","ClientUser":"%l","authenticated":"%u","AccessTime":"%t","method":"%r","status":"%s","SendBytes":"%b","Query?string":"%q","partner":"%{Referer}i","AgentVersion":"%{User-Agent}i"}" /> .....错误日志✨
多行合并为1行; ```javascript [root@web01 filebeat]# cat /etc/filebeat/filebeat.yml filebeat.inputs:
- type: log
enabled: true
paths:
- /soft/tomcat/logs/elk.tomcat_access_log.*.txt json.keys_under_root: true #Flase会将json解析的格式存储至messages,改为true则不存储至message json.overwrite_keys: true #覆盖默认message字段,使用自定义json格式的key tags: tomcat-access
- type: log
enabled: true
paths:
- /soft/tomcat/logs/catalina.out tags: tomcat-error multiline.pattern: ‘^\d{2}’ multiline.negate: true multiline.match: after multiline.max_lines: 1000
output.elasticsearch: hosts: [“10.0.0.161:9200”,”10.0.0.162:9200”,”10.0.0.163:9200”] indices:
- index: "tomcat-access-%{[agent.version]}-%{+yyyy.MM.dd}"
  when.contains:
    tags: "tomcat-access"  #tags为access的日志存储至nginx-access-* 索引
- index: "tomcat-error-%{[agent.version]}-%{+yyyy.MM.dd}"
  when.contains:
    tags: "tomcat-error"
setup.ilm.enabled: false setup.template.name: “tomcat” #定义模板名称 setup.template.pattern: “tomcat-*” #定义模板的匹配索引名称 ```
- 预: logstash的高级功能:


