一、Spring事务
编程式事务:也支持程序员手动的commit、rollback
声明式事务:通过AOP自动给对应的方法添加事务
1.1 Spring配置文件
<!-- 二、配置事务管理 --><!-- 1.配置切面 --><aop:config><!-- 1.1.切点 --><aop:pointcut expression="execution(* com.woniuxy.service.impl.GoodsServiceImpl.updatePrice(..))"id="pc"/><!-- 1.2.配置事务通知 --><aop:advisor advice-ref="txAdvice" pointcut-ref="pc"/></aop:config><!-- 2.配置事务通知 --><tx:advice id="txAdvice" transaction-manager="transactionManager"><tx:attributes><tx:method name="*"/></tx:attributes></tx:advice><!-- 3.配置事务管理器:负责管理事务 --><bean id="transactionManager" class="org.springframework.jdbc.datasource.DataSourceTransactionManager"><!-- 指定管理哪个数据 --><property name="dataSource" ref="dataSource"></property></bean>
切入点表达式、txAdvice与transactionManager三者的关系
- 通过切入点表达式找到需要添加事务的方法
- 通过txAdvice为不同的方法指定不同的事务处理方式
- transactionManager就会根据txAdvice的设置对切入点表达式找到的方法进行事务处理,处理的方式是由txAdvice指定
1.2 Service实现类
制造异常,通过测试观察事务是否配置成功
    @Override
    public int updatePrice(int id, BigDecimal salesprice) {
        goodsMapper.updatePrice(id, salesprice);
        // 手动制造异常,配置事务管理后,出现异常自动回滚
        System.out.println(1/0);
        return 0;
    }
1.3 测试类
public class SpringTest {
    @Test
    public void test() {
        ApplicationContext context =
                new ClassPathXmlApplicationContext("spring-context.xml");
        GoodsService goodsService = context.getBean(GoodsService.class);
//        System.out.println(goodsService.findGoodsByPage(2, 5));
        goodsService.updatePrice(2, new BigDecimal(77));
    }
}
- 执行测试类进行测试
- 然后去掉GoodServiceImpl中的异常代码再次进行测试
二、事务的传播特性、隔离级别
2.1 Spring配置文件
<tx:advice id="txAdvice" transaction-manager="transactionManager">
       <tx:attributes>
                    <tx:method name="update*" propagation="REQUIRED" isolation="DEFAULT"/>
                    <tx:method name="add*" propagation="REQUIRES_NEW"/>
       </tx:attributes>
</tx:advice>
spring为事务管理设计了不同的管理方式,程序员可以通过tx:method进行偏好设置,每个方法事务处理方式可以不同。此处tx:method name=”*”表示通过切入点表达式找到的所有方法都按照默认方式进行事务处理
1. propagation:事务传播特性,在同一个业务中如果存在多个事务,事务之间应该如何处理(是单独执行还是合成一个)
REQUIRED:如果当前新开启的事务已经在一个事务中了,就直接加入该事务中(加入前一个事务),合并两个事务成为一个事务
REQUIRED_NEW:不管是否已经在事务中,都新建一个事务独立执行
NEVER:永远不能在事务中执行,如果在事务中就报错
2. isolation:事务隔离级别,当多个线程同时访问数据库数据时,可能存在线程安全问题,可以通过设置事务隔离级别来避免数据出现问题
事务隔离级别的具体含义是指通过什么样的锁机制确保数据安全
DEFAULT 默认
READ_UNCOMMITTED 读未提交
READ_COMMITTED 读已提交
REPEATABLE_READ 不可重复读
SERIALIZABLE 序列化
3. no-rollback-for:不会因为指定的异常回滚事务
2.2 事务传播特性
spring使用动态代理来为某个方法自动添加事务,而代理应该给哪个方法增加事务行为,是有传播机制决定的。下面看有哪些属性:
1)REQUIRED
默认的,假如当前正要执行的事务不在另外一个事务里,那么就起一个新的事务。
比如说,ServiceB.methodB的事务级别定义为PROPAGATION_REQUIRED,那么由于执行ServiceA.methodA的时候,ServiceA.methodA已经起了事务,这时调用ServiceB.methodB,ServiceB.methodB看到自己已经运行在ServiceA.methodA的事务内部,就不再起新的事务。而加入 ServiceA.methodA运行的时候发现自己没有在事务中,他就会为自己分配一个事务。这样,在ServiceA.methodA或者在ServiceB.methodB内的任何地方出现异常,事务都会被回滚。即使ServiceB.methodB的事务已经被提交,但是ServiceA.methodA在接下来fail要回滚,ServiceB.methodB也要回滚。
2)SUPPORTS
如果当前在事务中,即以事务的形式运行,如果当前不再一个事务中,那么就以非事务的形式运行。
3)MANDATORY
必须在一个事务中运行,如果没有就抛出异常。也就是说,他只能被一个父事务调用。否则,他就要抛出异常。
4)REQUIRES_NEW
这个就比较绕口了。
比如我们设计ServiceA.methodA的事务级别为PROPAGATION_REQUIRED,ServiceB.methodB的事务级别为PROPAGATION_REQUIRES_NEW,那么当执行到ServiceB.methodB的时候,ServiceA.methodA所在的事务就会挂起,ServiceB.methodB会起一个新的事务,等待ServiceB.methodB的事务完成以后,他才继续执行。他与PROPAGATION_REQUIRED 的事务区别在于事务的回滚程度了。因为ServiceB.methodB是新起一个事务,那么就是存在两个不同的事务。如果ServiceB.methodB已经提交,那么ServiceA.methodA失败回滚,ServiceB.methodB是不会回滚的。如果ServiceB.methodB失败回滚,如果他抛出的异常被ServiceA.methodA捕获,ServiceA.methodA事务仍然可能提交。
5)NOT_SUPPORTED
当前不支持事务,以非事务方式执行操作,如果当前存在事务,就把当前事务挂起。比如ServiceA.methodA的事务级别是PROPAGATION_REQUIRED,而ServiceB.methodB的事务级别是PROPAGATION_NOT_SUPPORTED,那么当执行到ServiceB.methodB时,ServiceA.methodA的事务挂起,而他以非事务的状态运行完,再继续ServiceA.methodA的事务。
6)NEVER
不能在事务中运行,如果当前存在事务,则抛出异常。假设ServiceA.methodA的事务级别是PROPAGATION_REQUIRED,而ServiceB.methodB的事务级别是PROPAGATION_NEVER ,那么ServiceA.methodA中调用ServiceB.methodB时就要抛出异常了。
7)NESTED
理解Nested的关键是savepoint。他与PROPAGATION_REQUIRES_NEW的区别是,PROPAGATION_REQUIRES_NEW另起一个事务,将会与他的父事务相互独立,而Nested的事务和他的父事务是相依的,他的提交是要等和他的父事务一块提交的。也就是说,如果父事务最后回滚,他也要回滚的。
而Nested事务的好处是他有一个savepoint。也就是说ServiceB.methodB失败回滚,那么ServiceA.methodA也会回滚到savepoint点上,ServiceA.methodA可以选择另外一个分支,比如ServiceC.methodC,继续执行,来尝试完成自己的事务。 但是这个事务并没有在EJB标准中定义。
2.3 事务隔离级别
如果数据库数据不进行加锁操作可能引发3个错误2个问题
3个错误:脏读、不可重复读、幻读
2个问题:第一类丢失更新、第二类丢失更新
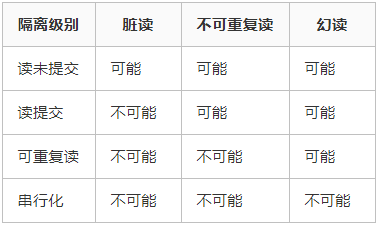
2.3.1 脏读
A事务读取B事务尚未提交的更改数据,并在这个数据的基础上进行操作,这时候如果事务B回滚,那么A事务读到的数据是不被承认的。例如常见的取款事务和转账事务: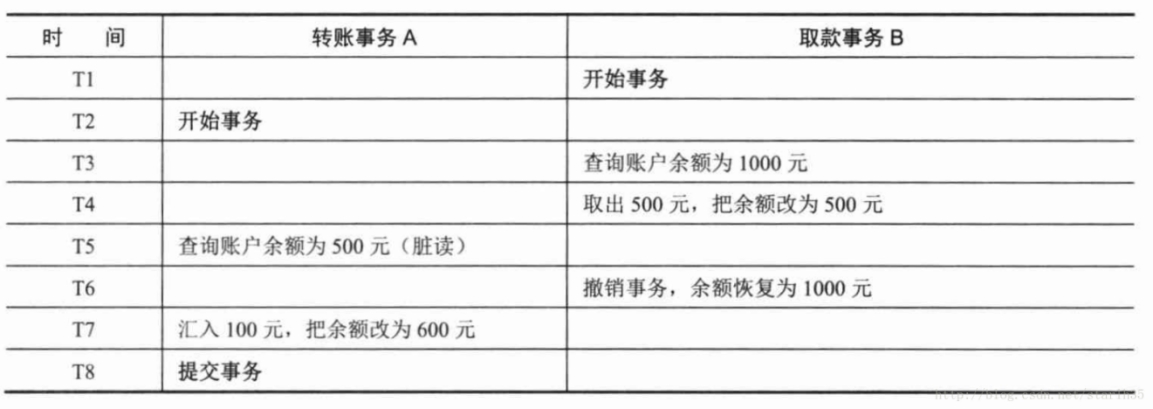
2.3.2 不可重复读
不可重复读是指A事务读取了B事务已经提交的更改数据。当事务A第一次读取数据之后,在这个过程中事务B对事务A读取到的数据进行了修改,事务A再次读取的数据和第一次读取的数据不一致。这个过程叫做不可重复读。
2.3.3 幻读
A事务读取B事务提交的新增数据,会引发幻读问题。幻读一般发生在计算统计(聚合函数)数据的事务中,例如银行系统在同一个事务中两次统计存款账户的总金额,在两次统计中,刚好新增了一个存款账户,存入了100,这时候两次统计的总金额不一致。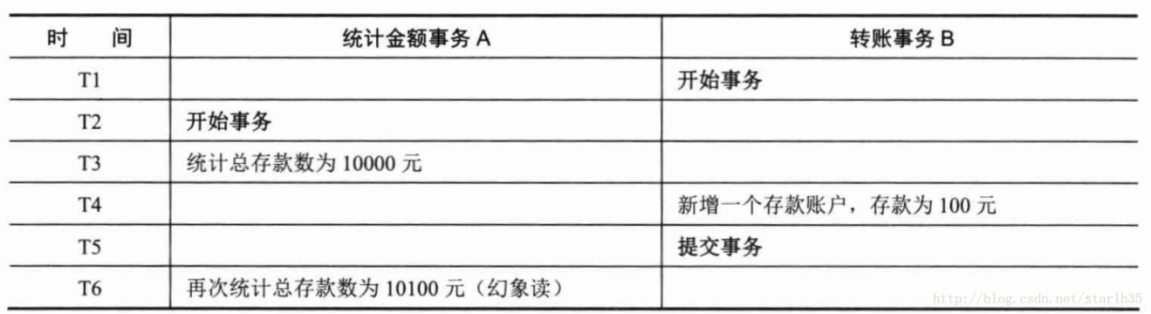
注意:不可重复读和幻读的区别是:前者是指读到了已经提交的事务的更改数据(修改或删除),后者是指读到了其他已经提交事务的新增数据。对于这两种问题解决采用不同的办法,防止读到更改数据,只需对操作的数据添加行级锁,防止操作中的数据发生变化;二防止读到新增数据,往往需要添加表级锁,将整张表锁定,防止新增数据(oracle采用多版本数据的方式实现)。
2.3.4 第一类丢失更新
A事务撤销(回滚)时,把已经提交的B事务的更新数据覆盖了。例如: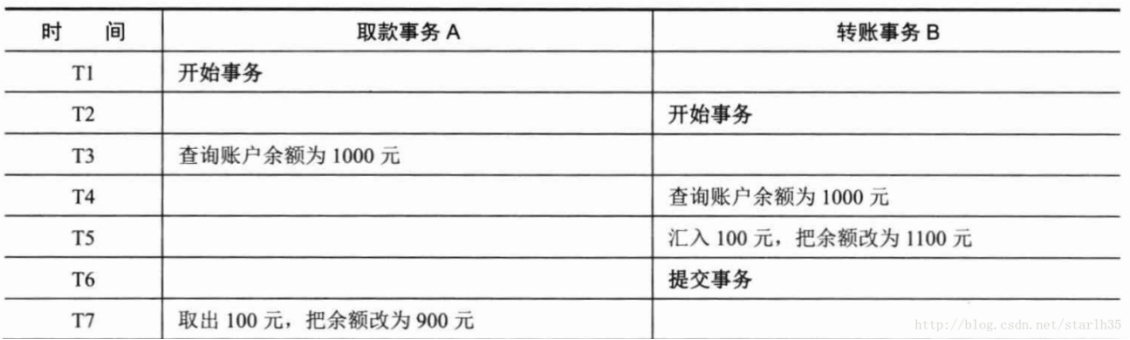
这时候取款事务A撤销事务,余额恢复为1000,这就丢失了更新。
2.3.5 第二类丢失更新
A事务提交时覆盖B事务已经提交的数据,造成B事务所做的操作丢失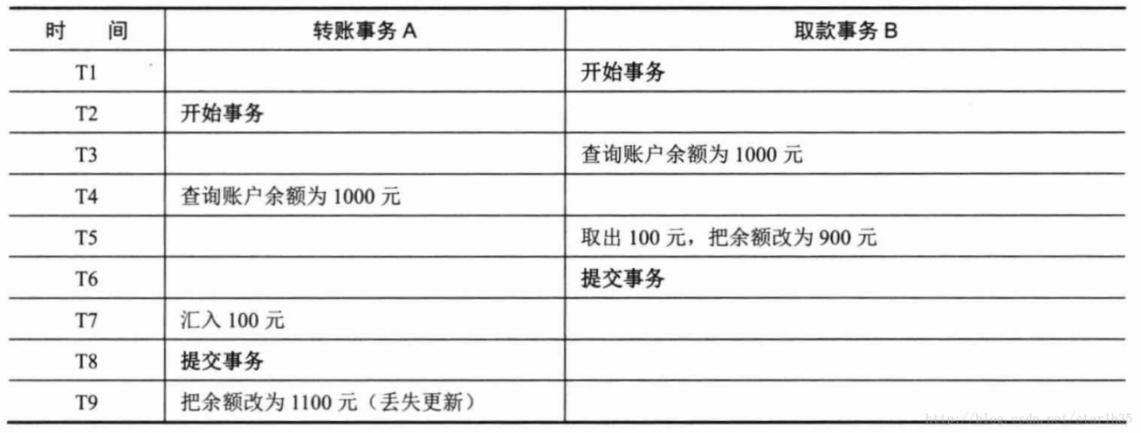
三、Spring的注解开发
SM注解方式
- 删除spring配置文件中的service配置
-
3.1 Spring配置文件
<?xml version="1.0" encoding="UTF-8"?>
<beans xmlns="http://www.springframework.org/schema/beans"
      xmlns:context="http://www.springframework.org/schema/context"
      xmlns:aop="http://www.springframework.org/schema/aop"
      xmlns:tx="http://www.springframework.org/schema/tx"
  xmlns:xsi="http://www.w3.org/2001/XMLSchema-instance"
  xsi:schemaLocation="http://www.springframework.org/schema/beans
                    http://www.springframework.org/schema/beans/spring-beans.xsd
                    http://www.springframework.org/schema/context
                    http://www.springframework.org/schema/context/spring-context.xsd
                    http://www.springframework.org/schema/aop
                    http://www.springframework.org/schema/aop/spring-aop.xsd
                    http://www.springframework.org/schema/tx
                    http://www.springframework.org/schema/tx/spring-tx.xsd">

  <!-- 一、Spring和Mybatis基础整合 -->
  <!-- 1.导入数据库配置文件 -->
  <context:property-placeholder location="db.properties"/>

  <!-- 2.配置数据源 -->
  <bean id="dataSource" class="org.springframework.jdbc.datasource.DriverManagerDataSource">
      <property name="driverClassName" value="${jdbc.driver}"></property>
      <property name="url" value="${jdbc.url}"></property>
      <property name="username" value="${jdbc.username}"></property>
      <property name="password" value="${jdbc.password}"></property>
  </bean>

  <!-- 3.创建工厂 -->
  <bean id="sqlSessionFactory" class="org.mybatis.spring.SqlSessionFactoryBean">
      <!-- 设置数据源 -->
      <property name="dataSource" ref="dataSource"></property>
      <!-- 加载mybatis配置文件:项目中就不用单独加载mybatis的配置文件了-->
      <property name="configLocation" value="mybatis-config.xml"></property>

      <!-- 取别名 -->
      <property name="typeAliasesPackage" value="com.woniuxy.entity"></property>

      <!-- 分页插件 -->
      <property name="plugins" ref="pageInterceptor"></property>
  </bean>

  <!-- 分页插件 -->
  <bean id="pageInterceptor" class="com.github.pagehelper.PageInterceptor"></bean>

  <!-- 4.扫描mapper -->
  <bean class="org.mybatis.spring.mapper.MapperScannerConfigurer">
      <!-- 指定扫描哪个包 -->
      <property name="basePackage" value="com.woniuxy.mapper"></property>
      <!-- 关联工厂 -->
      <property name="sqlSessionFactoryBeanName" value="sqlSessionFactory"></property>
  </bean>

  <!-- 开启注解扫描 -->
  <context:component-scan base-package="com.woniuxy"></context:component-scan>

  <!-- 3.配置事务管理器:负责管理事务 -->
  <bean id="transactionManager" class="org.springframework.jdbc.datasource.DataSourceTransactionManager">
      <!-- 指定管理哪个数据库 -->
      <property name="dataSource" ref="dataSource"></property>
  </bean>
  <!-- 开启事务注解 -->
  <tx:annotation-driven transaction-manager="transactionManager"/>
</beans>
3.2 Service实现类
```java @Data @Service public class GoodsLogServiceImpl implements GoodsLogService{
@Autowired private GoodsLogMapper goodsLogMapper;
@Override @Transactional(
      propagation=Propagation.REQUIRED,
      isolation=Isolation.DEFAULT)
public int add(GoodsLog log) {
return goodsLogMapper.add(log);}
}
```java
@Data
@Service
public class GoodsServiceImpl implements GoodsService{

    @Autowired
    private GoodsMapper goodsMapper;

    // 日志service
    @Autowired
    private GoodsLogService goodsLogService;

    @Override
    public List<Goods> findGoodsByPage(int page, int size) {
        Page<Goods> pageHelper = PageHelper.startPage(page, size);
        List<Goods> goods = goodsMapper.findAll();
        return goods;
    }

    @Override
    public Goods findById(int id) {
        return goodsMapper.findById(id);
    }

    @Override
    @Transactional
    public int updatePrice(int id, BigDecimal salesprice) {
        goodsMapper.updatePrice(id, salesprice);
        //记录日志
        goodsLogService.add(new GoodsLog().setMsg("修改了价格"));
        // 手动制造异常,配置事务管理后,出现异常自动回滚
//        System.out.println(1/0);
        return 0;
    }
}

若有收获,就点个赞吧
0 人点赞
