一、SpringBoot
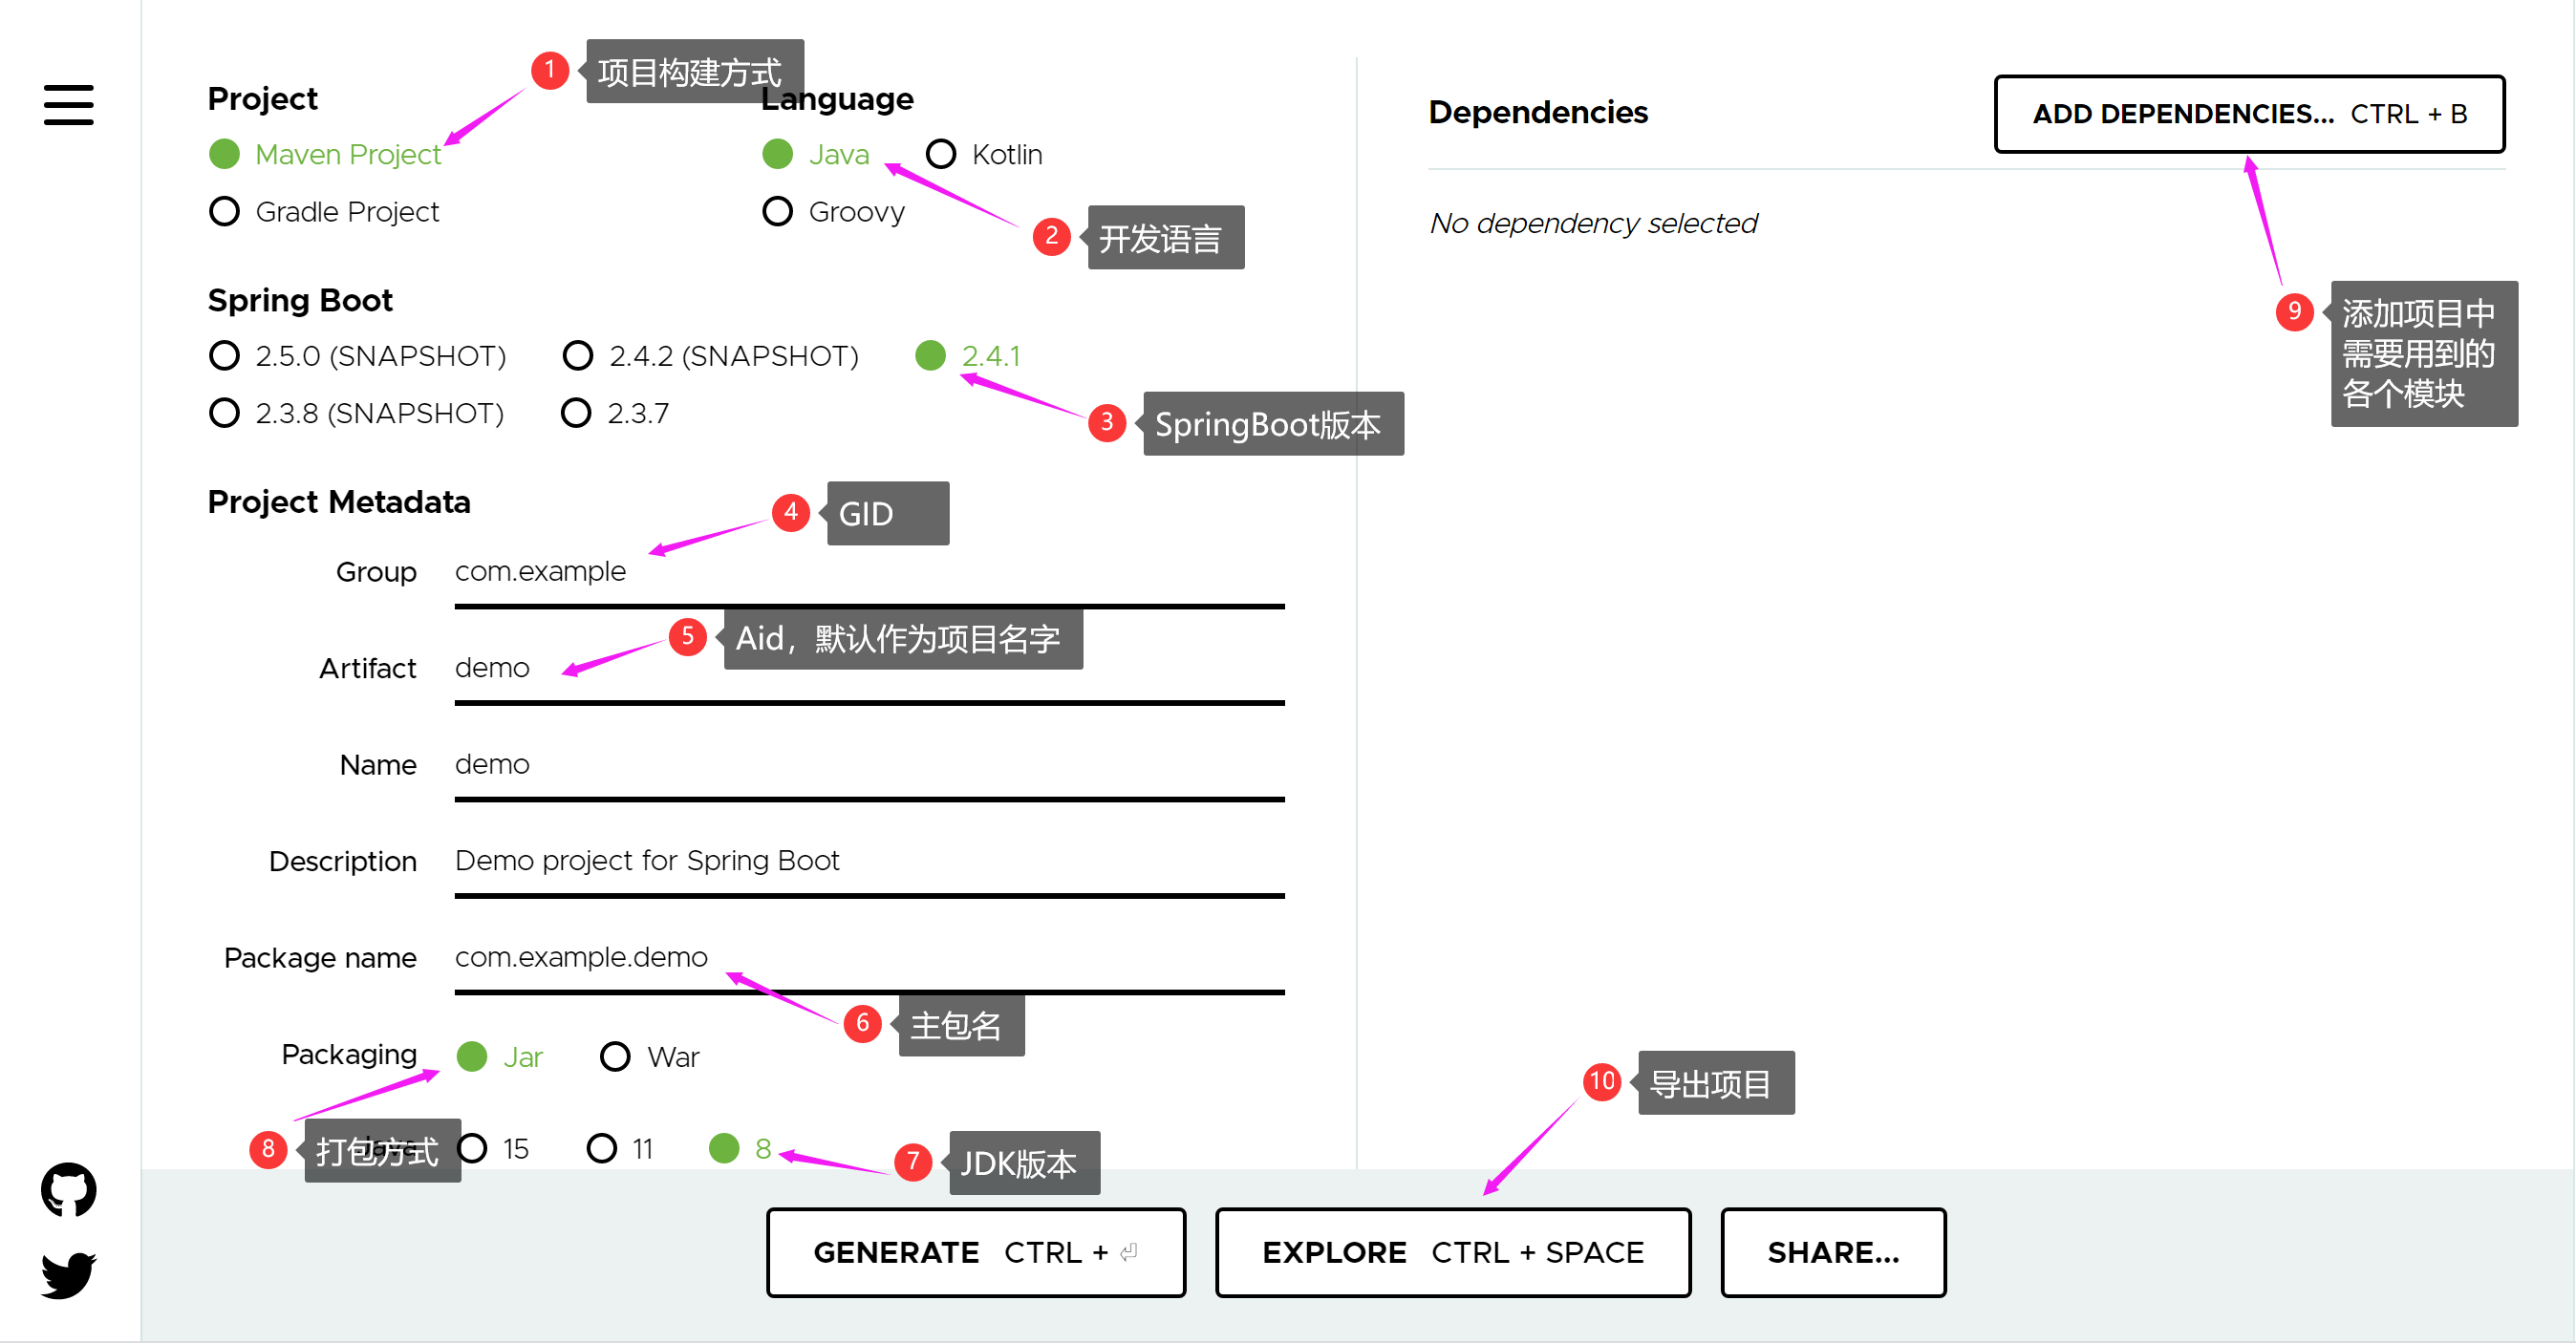
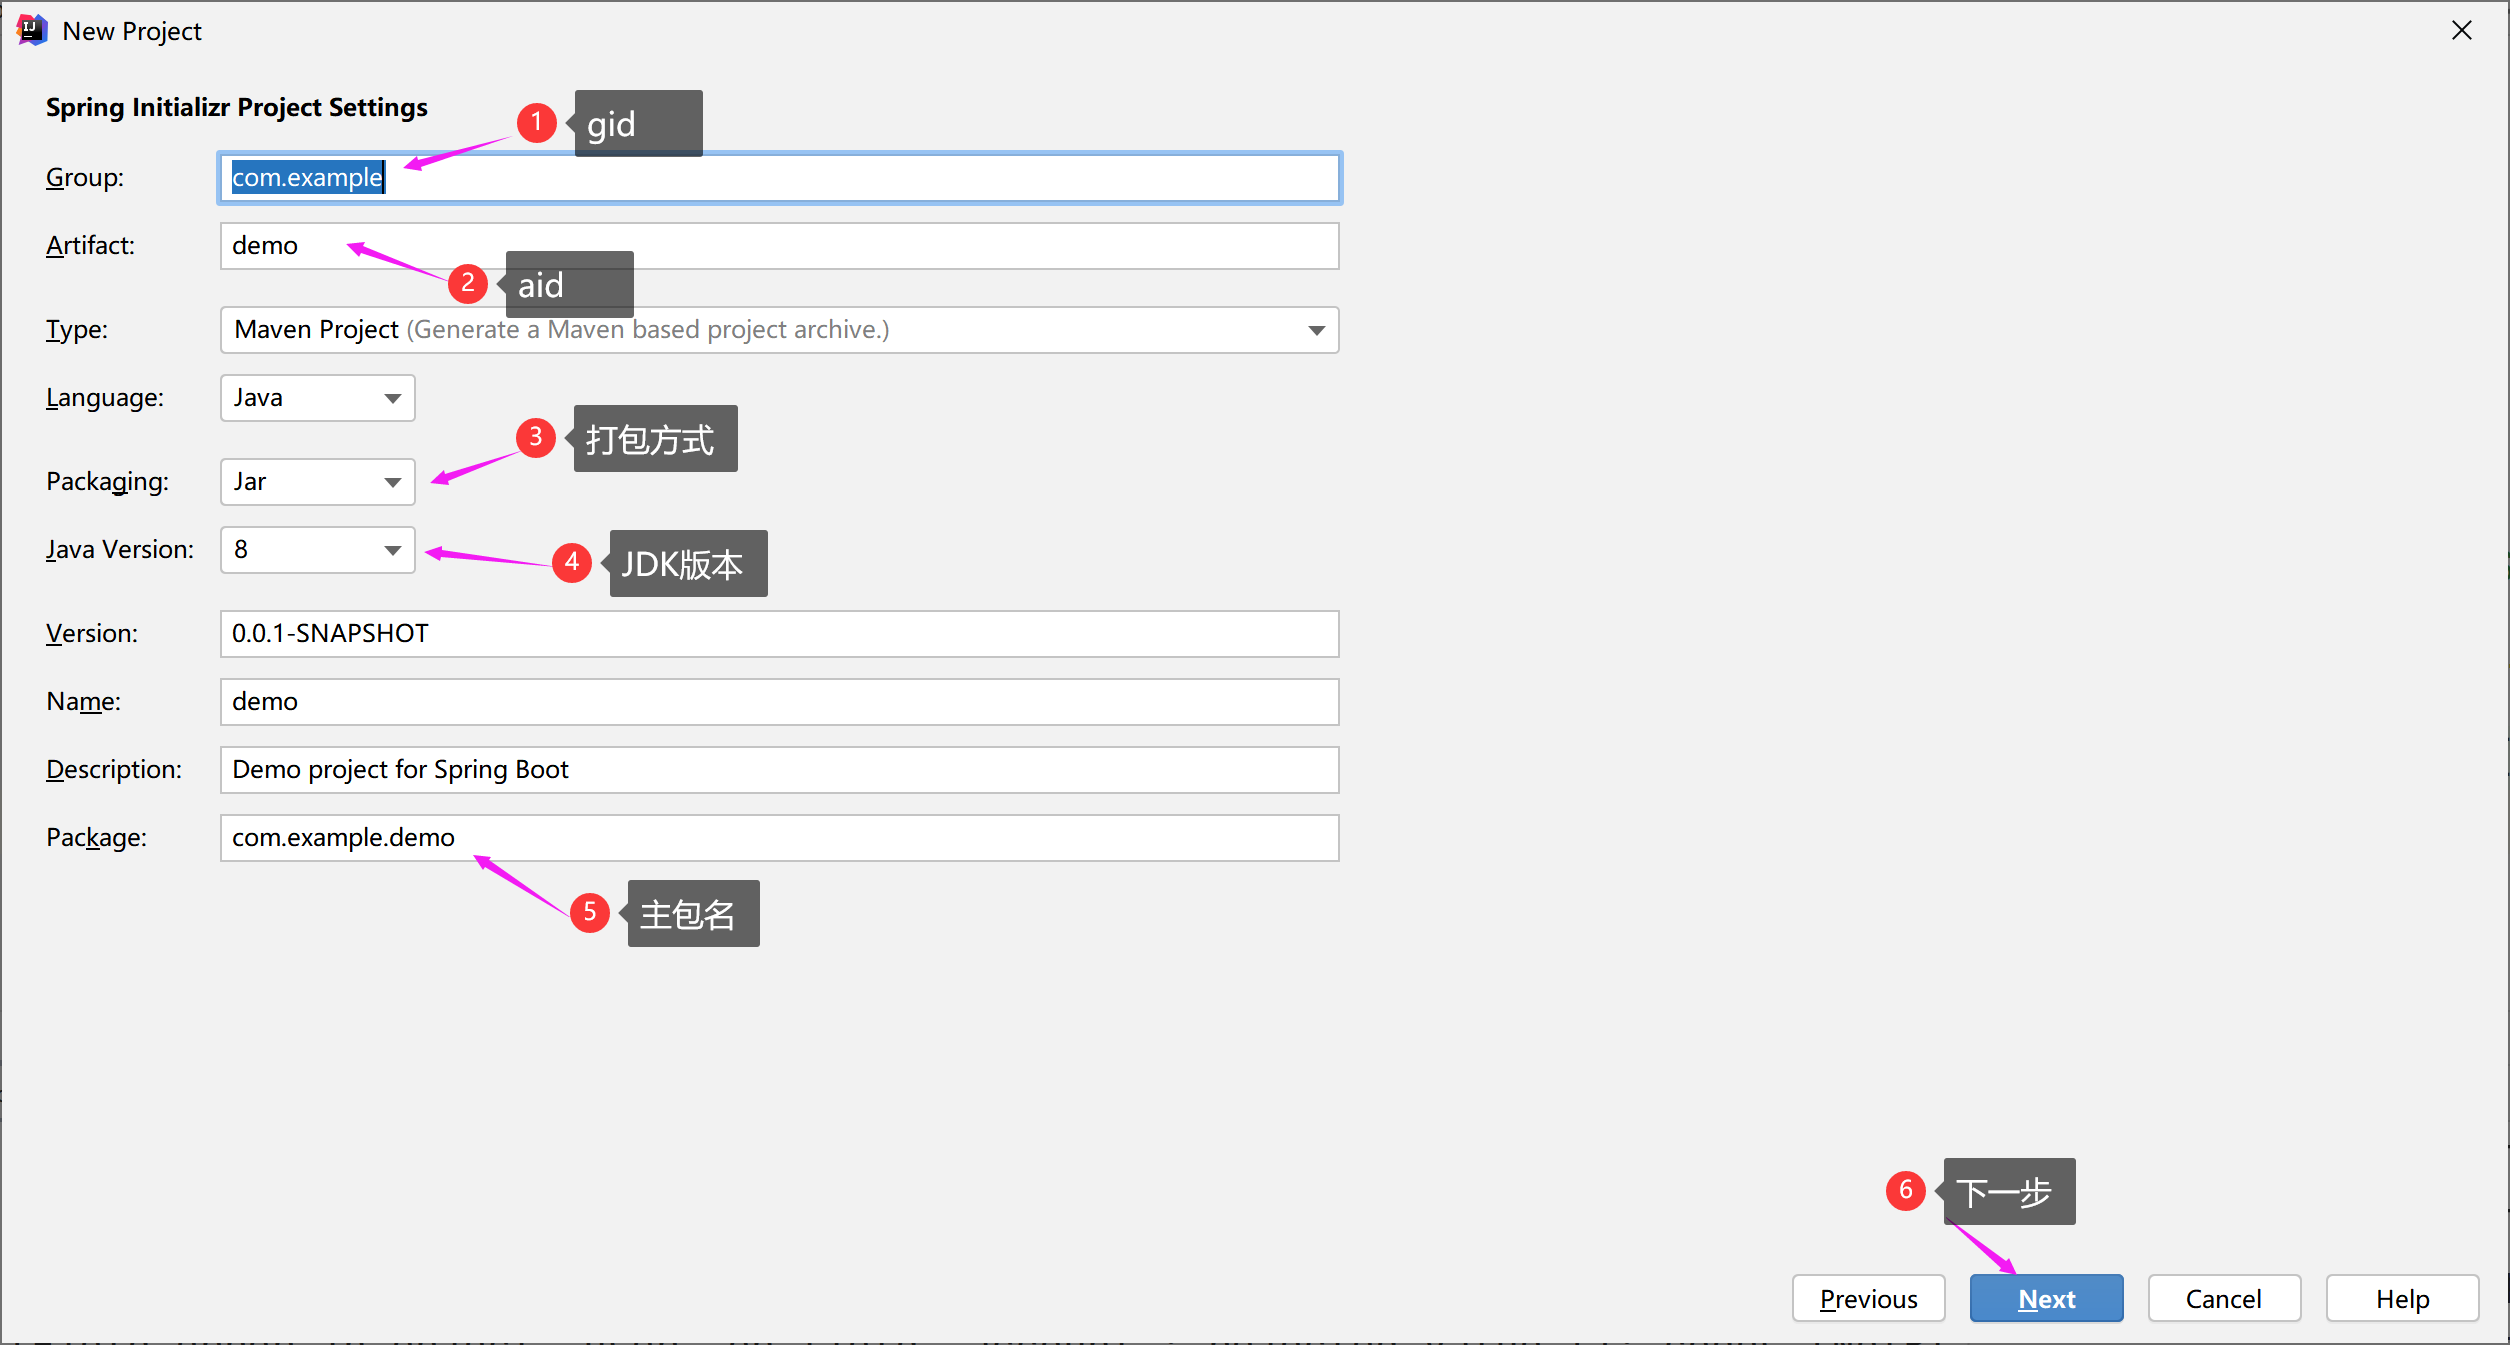
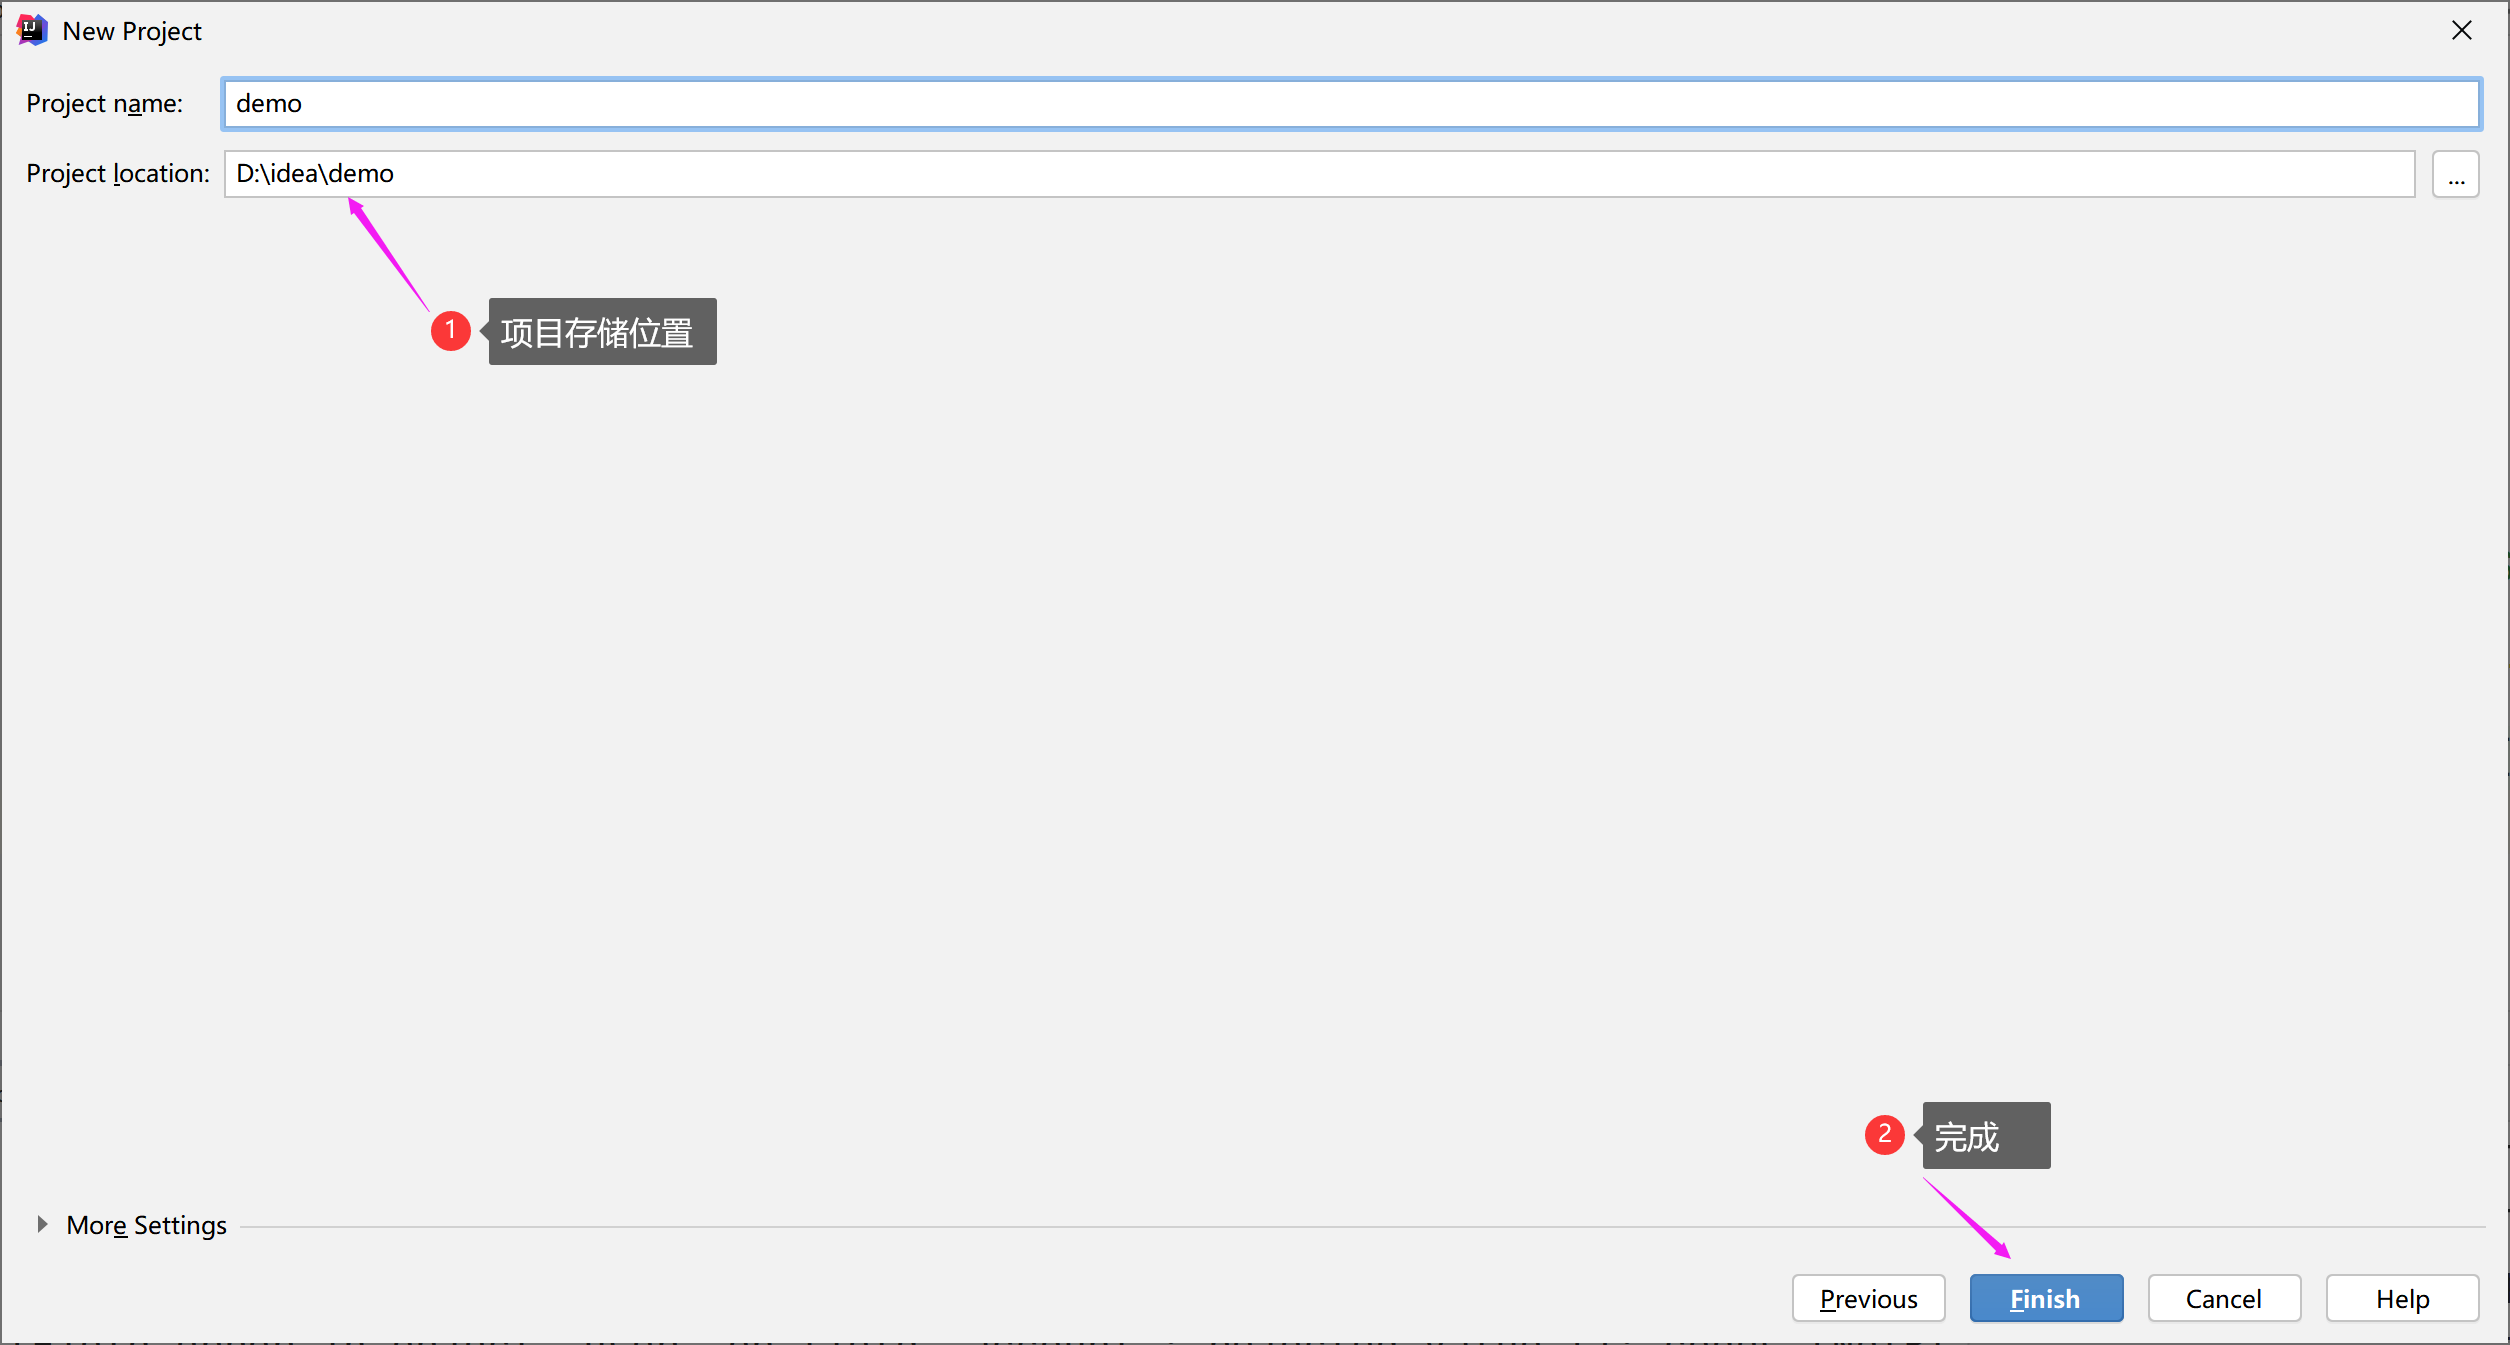
1.1 创建方式
方式一:通过官方网站创建项目、下载导入到开发工具中
阿里链接:https://start.aliyun.com/bootstrap.html?spm=a2ck6.17690074.0.0.503c5bb4WGesvy
官方创建示例:
下载到本地

方式二:通过IDEA开发工具创建
File->new Project


1.2 项目主启动类
- SpringBoot项目都有一个默认的主启动类,此类不能够删除
- @SpringBootApplication注解表示当前类为主启动类,而且会自动扫描当前主类所在的包及其子包,因此我们自定义的包、代码都应该放在该包下,这样就不用我们自己去扫描对应的包
@SpringBootApplicationpublic class EducationApplication {public static void main(String[] args) {SpringApplication.run(EducationApplication.class, args);}}
如果自定义的包、代码不在主启动类所在包下,也可以在主启动类上通过@ComponentScan扫描指定的包
@SpringBootApplication@ComponentScan("com.controller")public class EducationApplication {public static void main(String[] args) {SpringApplication.run(EducationApplication.class, args);}}
1.3 整合mybatis
1、在pom.xml引入依赖
<dependency><groupId>org.mybatis.spring.boot</groupId><artifactId>mybatis-spring-boot-starter</artifactId><version>2.1.4</version></dependency><dependency><groupId>mysql</groupId><artifactId>mysql-connector-java</artifactId><version>8.0.15</version></dependency>
2、在application.properties文件中配置mybatis需要的参数
# 加载mybatis主配置文件
mybatis.config-location=classpath:mybatis/mybatis-config.xml
# 加载mapper.xml文件
mybatis.mapper-locations=classpath:mybatis/mappers/*.xml
# 取别名
mybatis.type-aliases-package=com.woniuxy.entity

# 链接数据库的基本参数
spring.datasource.driver-class-name=com.mysql.cj.jdbc.Driver
spring.datasource.url=jdbc:mysql://localhost:3306/k15?useUnicode=true&characterEncoding=utf8&serverTimezone=UTC
spring.datasource.username=root
spring.datasource.password=123456
3、在项目的resources目录(相当于web项目中的src)下创建mybatis目录,将mybatis-config.xml文件放在该目录下,并且在该目录下创建mappers目录,项目中使用到的所有mapper文件都放在该目录下面。
4、在Mapper接口上添加@Mapper注解,表明当前接口是一个mapper
@Mapper //来自mybatis  表示当前接口是一个mapper
public interface MenuMapper {
    @Select("select rid from user_role where account = #{account}") //accout rid
    public List<Integer> findRidAccount(String account);

    @SelectProvider(type=MenuMapperProvider.class,method="findMenuid")
    public List<Integer> findMenuIdByRids(List<Integer> rids); //动态SQL

    @SelectProvider(type=MenuMapperProvider.class,method="findMenuByMids")
    public List<Menu> findMenuByMids(List<Integer> mids);
}
5、由于@Mapper注解是mybatis的注解,因此通过主启动类扫描时并不能够识别该注解,需要我们自己在主启动类上通过@MapperScan注解进行扫描
@SpringBootApplication
@MapperScan("com.woniuxy.mapper")  //扫描mapper
public class Education2Application {

    public static void main(String[] args) {
        //运行项目,将项目部署到内置Tomcat中
        SpringApplication.run(Education2Application.class, args);
    }

}
6、测试:运行项目发送请求
1.4 关于application主配置文件
application主配置文件有两种格式:properties和yml,yml相对于properties更加简洁直观,springboot项目也可以使用yml文件作为主配置文件。
将application.properties文件改名为application.yml,重新编写配置内容
mybatis:
 config-location: classpath:mybatis/mybatis-config.xml
 mapper-locations: classpath:mybatis/mappers/*.xml
 type-aliases-package: com.woniuxy.entity

spring:
 datasource:
  driver-class-name: com.mysql.cj.jdbc.Driver
  url: jdbc:mysql://localhost:3306/k15?useUnicode=true&characterEncoding=utf8&serverTimezone=UTC
  username: root
  password: 123456
注意:冒号后面需要一个”空格”,每行缩进不要使用tab键,应该使用空格进行缩进
1.5 数据校验
在项目中为了保证系统安全,经常需要对用户填写的数据进行校验,校验分为前端校验和后端校验,而前端校验一般的作用是校验数据在填写是是否合法,但是此种方式并不能保证系统的安全性,因此在后端进行数据校验是必需的。
步骤:
1、在需要进行数据校验的Entity实体类上添加相关校验注解
@Data
public class User {
    @NotBlank(message = "账号不能为空")  //不能为null和""
    private String account;
    @Size(min = 6,max = 10,message = "密码必须在6-10位之间")
    private String pwd;
    @Email(regexp = "^\\s*\\w+(?:\\.{0,1}[\\w-]+)*@[a-zA-Z0-9]+(?:[-.][a-zA-Z0-9]+)*\\.[a-zA-Z]+\\s*$"
            ,message = "邮箱格式不正确")
    private String email;
    @Pattern(regexp = "^((13[0-9])|(14[0,1,4-9])|(15[0-3,5-9])|(16[2,5,6,7])|(17[0-8])|(18[0-9])|(19[0-3,5-9]))\\d{8}$",
            message = "手机格式不正确")
    private String telPhone;
}
说明:
- @NotBlank 不为null和””
- message 格式不对时的提示消息
- @Size指定字符串的长度
- min 最小长度
- max 最大长度
- @Email 校验是否为email
- regexp 进行校验的正则表达式
- @Pattern 自定义正则校验,通常用来校验比较复杂的字符串
2、在需要进行数据校验的controller方法的参数前添加@Validated注解,并添加BindingResult参数
@Controller
@RequestMapping("/user")
public class UserController {

    @RequestMapping("/regist")
    @ResponseBody
    public String regist(@Validated User user, BindingResult result){
        //当请求到该方法时,标准了@Validated注解,那么springboot就会对user对象进行数据校验
        //校验规则在User实体类的属性上指定,校验完毕之后会将结果封装到BindingResult对象中,然后
        //以参数方式传入到该方法中
        //判断
        if (result.hasErrors()){
            List<FieldError> errors = result.getFieldErrors();//获取到所有的错误信息
            System.out.println(errors);
            for (FieldError error : errors) {
                System.out.println(error.getDefaultMessage());//获取错误信息
            }
            //如果有错误信息,向前端返回错误信息  JSON数据
        }
        return "success";
    }
}
运行原理:只要请求到regist方法,程序看到参数user前有@Validated注解,那么就会自动根据User类中指定的校验规则对提交的数据进行校验,然后将校验的结果封装到BindingResult对象中,并将该对象以参数的方式传入regist方法,因此可以在该方法中通过判断是否有错误信息得到对应的校验结果。
二、WebSocket
2.1 WebSocket简介
WebSocket 是 HTML5 开始提供的一种在单个 TCP 连接上进行全双工通讯的协议,可以在html页面直接使用。
WebSocket 使得客户端和服务器之间的数据交换变得更加简单,允许服务端主动向客户端推送数据。在 WebSocket API 中,浏览器和服务器只需要完成一次握手,两者之间就直接可以创建持久性的连接,并进行双向数据传输。
在 WebSocket API 中,浏览器和服务器只需要做一个握手的动作,然后,浏览器和服务器之间就形成了一条快速通道。两者之间就直接可以数据互相传送。
过去,很多网站为了实现推送技术,所用的技术都是 Ajax 轮询。轮询是在特定的的时间间隔(如每1秒),由浏览器对服务器发出HTTP请求,然后由服务器返回最新的数据给客户端的浏览器。这种传统的模式带来很明显的缺点,即浏览器需要不断的向服务器发出请求,然而HTTP请求可能包含较长的头部,其中真正有效的数据可能只是很小的一部分,显然这样会浪费很多的带宽等资源。
HTML5 定义的 WebSocket 协议,能更好的节省服务器资源和带宽,并且能够更实时地进行通讯。
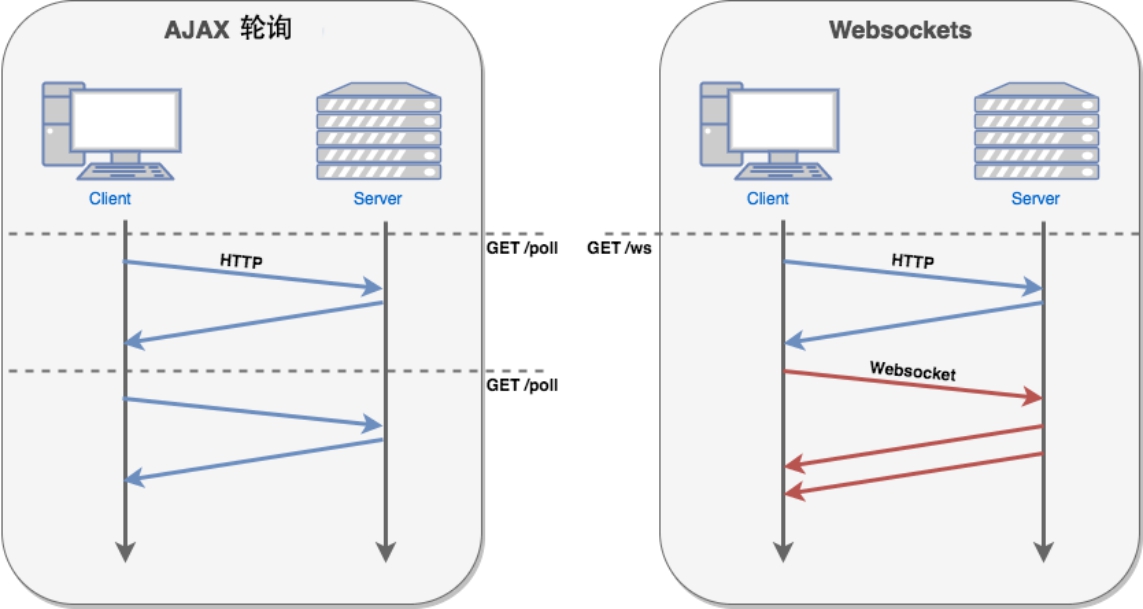
浏览器通过 JavaScript 向服务器发出建立 WebSocket 连接的请求,连接建立以后,客户端和服务器端就可以通过TCP连接直接交换数据。
当获取WebSocket连接后,可以通过 send() 方法来向服务器发送数据,并通过 onmessage 事件来接收服务器返回的数据。
WebSocket在传输的过程中不再使用http协议,而是Stomp协议
STOMP
STOMP即Simple (or Streaming) Text Orientated Messaging Protocol,简单(流)文本定向消息协议,它提供了一个可互操作的连接格式,允许STOMP客户端与任意STOMP消息代理(Broker)进行交互。STOMP协议由于设计简单,易于开发客户端,因此在多种语言和多种平台上得到广泛地应用。
STOMP协议的前身是TTMP协议(一个简单的基于文本的协议),专为消息中间件设计。
STOMP是一个非常简单和容易实现的协议,其设计灵感源自于HTTP的简单性。尽管STOMP协议在服务器端的实现可能有一定的难度,但客户端的实现却很容易。例如,可以使用Telnet登录到任何的STOMP代理,并与STOMP代理进行交互。
2.2 WebSocket 事件
以下是 WebSocket 对象的相关事件。
| 事件 | 事件处理程序 | 描述 |
|---|---|---|
| open | Socket.onopen | 连接建立时触发 |
| message | Socket.onmessage | 客户端接收服务端数据时触发 |
| error | Socket.onerror | 通信发生错误时触发 |
| close | Socket.onclose | 连接关闭时触发 |
2.3 WebSocket 方法
以下是 WebSocket 对象的相关方法。
| 方法 | 描述 |
|---|---|
| Socket.send() | 使用连接发送数据 |
| Socket.close() | 关闭连接 |
2.4 WebSocket 开发步骤
1、在pom.xml中引入websocket相关包
<dependency>
    <groupId>org.springframework.boot</groupId>
    <artifactId>spring-boot-starter-websocket</artifactId>
</dependency>
2、在static目录下创建index.html
<!DOCTYPE html>
<html>
<head>
<meta charset="UTF-8">
<title>Insert title here</title>
<link rel="stylesheet" type="text/css" href="css/index.css">
<script type="text/javascript" src="js/jquery.min.js"></script>
<script type="text/javascript">
$(document).ready(function(){
var url = "ws://localhost:8080/WebSocketHandler/";
var ws = null;
//连接服务器
$("#join").click(function(){
var userName = $("#userName").val();
url = url + userName; //传递用户名
console.info(url);
//创建对象,连接服务器
ws = new WebSocket(url); //html5中提供了
//给open事件绑定方法
ws.onopen = function(){
console.info("连接成功");
}
//接收到数据
ws.onmessage = function(result){
var textarea = document.getElementById('message');
textarea.append(result.data+"\n");
//将文本域的滚动条滚动到最后
textarea.scrollTop = textarea.scrollHeight;
}
//关闭连接
ws.onclose = function(){
$("#message").append("用户:"+userName+"离开聊天室"+"\n");
console.info("关闭连接");
}
});
//发送消息
$("#send").click(function(){
//将输入框中的消息发送给服务器,并且显示到消息框中
var messageInput = $("#textarea");
var message = messageInput.val();
if(ws!=null){
ws.send(message); //发送消息
messageInput.val("");
}
});
//断开连接
$("#out").click(function(){
if(ws!=null){
ws.close();
}
});
})
</script>
</head>
<body>
<div id="box">
<p>聊天室</p>
<textarea rows="10" cols="50" disabled="disabled" id="textarea"></textarea><br>
<div class="infoBox">
用户名:<input type="text" id="userName"><br><br>
<button style="color: green;" id="join">加入聊天室</button>
<button style="color: red;" id="out">离开聊天室</button>
</div>
<br><br>
<div class="infoBox">
消 息:<input type="text" id="message"><br><br>
<button id="send">发送消息</button>
</div>
<br>
</div>
</body>
</html>
3、在static下创建css目录,并在该目录下创建index.css
#box{
    width: 500px;
    background: pink;
    text-align: center;
}
.infoBox{
    text-align:left;
    position: relative;
    left: 62px;
}
#message{
    width: 322px;
}
#send{
    position:relative;
    left:50px;
    height:30px;
    width: 326px;
}
4、创建WebSocketUtil工具类用于向浏览器发送消息
import java.io.IOException;
import java.util.Map;
import java.util.concurrent.ConcurrentHashMap;

import javax.websocket.Session;
import javax.websocket.RemoteEndpoint.Basic;
public class WebSocketUtil {
    //HashMap:不支持多线程,并发情况下线程不安全
    public static final Map<String, Session> MESSAGEMAP = new ConcurrentHashMap<>();

    //发送消息给客户端
    public static void sendMessage(Session session,String message) {
        if (session!=null) {
            final RemoteEndpoint.Basic basic = session.getBasicRemote();
            if (basic!=null) {
                try {
                    basic.sendText(message);//发送消息回客户端
                } catch (IOException e) {
                    e.printStackTrace();
                }
            }
        }
    }

    //将消息给所有聊天室的人
    //循环发送
    public static void sendMessageToAll(String message) {
        MESSAGEMAP.forEach((sessionId,session)->sendMessage(session, message));
    }
}
5、创建用于接受前台消息的handler
import java.io.IOException;
import javax.websocket.OnClose;
import javax.websocket.OnError;
import javax.websocket.OnMessage;
import javax.websocket.OnOpen;
import javax.websocket.Session;
import javax.websocket.server.PathParam;
import javax.websocket.server.ServerEndpoint;
import org.springframework.web.bind.annotation.RestController;
import com.my.utils.WebSocketUtil;

@RestController
@ServerEndpoint("/WebSocketHandler/{userName}")        //表示接受的是STOMP协议提交的数据
public class WebSocketHandler {

    //建立连接
    @OnOpen
    public void openSession(@PathParam("userName")String userName,Session session) {
        //消息
        String message = "欢迎:"+userName+"加入群聊";
        //加入聊天室
        WebSocketUtil.MESSAGEMAP.put(userName, session);
        //发送消息
        WebSocketUtil.sendMessageToAll(message);
    }

    @OnMessage
    public void onMessage(@PathParam("userName")String userName,String message) {
        message = userName+":"+message;
        WebSocketUtil.sendMessageToAll(message);
    }

    //离开聊天室
    @OnClose
    public void onClose(@PathParam("userName")String userName,Session session) {
        //将当前用户从map中移除 注销
        WebSocketUtil.MESSAGEMAP.remove(userName);
        //群发消息
        WebSocketUtil.sendMessageToAll("用户:"+userName+"离开聊天室");
        //关闭session
        try {
            session.close();
        } catch (IOException e) {
            e.printStackTrace();
        }
    }

    //连接异常
    @OnError
    public void onError(Session session,Throwable throwable) {
        try {
            session.close();
        } catch (IOException e) {
            e.printStackTrace();
        }
    }
}
6、在SpringBoot主启动类上开启websocket,并配置发送消息时需要的bean
@SpringBootApplication
@EnableWebSocket    //启用websocket
public class SpringBootApplication {

    public static void main(String[] args) {
        SpringApplication.run(SpringBootTest2Application.class, args);
    }

    @Bean    //在容器中创建bean对象,在WebSocketUtil中需要用到的RemoteEndpoint对象
    public ServerEndpointExporter serverEndpointExporter() {
        return new ServerEndpointExporter();
    }
}
7、运行项目测试

若有收获,就点个赞吧
0 人点赞
