一、前后端分离
1.1 前后端分离开发方式
前后端分开开发:前端的代码中不可能出现后台的代码,而后台的代码也是不可能出现前端的代码(不出现后端页面跳转),前端需要的数据都由后台程序员提供,只需要提供对外的接口(servlet)。<br /> 动静分离:动态资源(servlet)与静态资源(html、css、js等)分离,将动态资源与静态资源部署到不同的服务器上,Apache是一个服务器,而 Tomcat是它的一个插件,Tomcat主要的优势使用来处理动态资源(servlet),但是处理静态资源的能力很差,第三阶段会将静态资源部署到nginx服务器上。<br />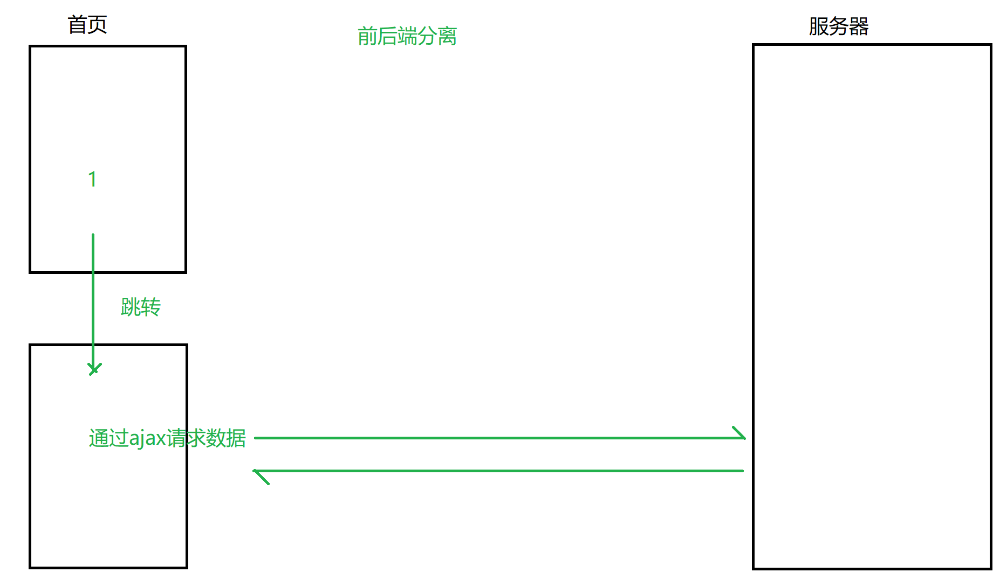
1.2 前后端不分离开发方式
前端代码中需要编写后台的代码,最典型的技术JSP,模板引擎(freemarker、thymeleaf等),利用后台的代码生成前端的页面,而且是经常出现后端跳转页面<br />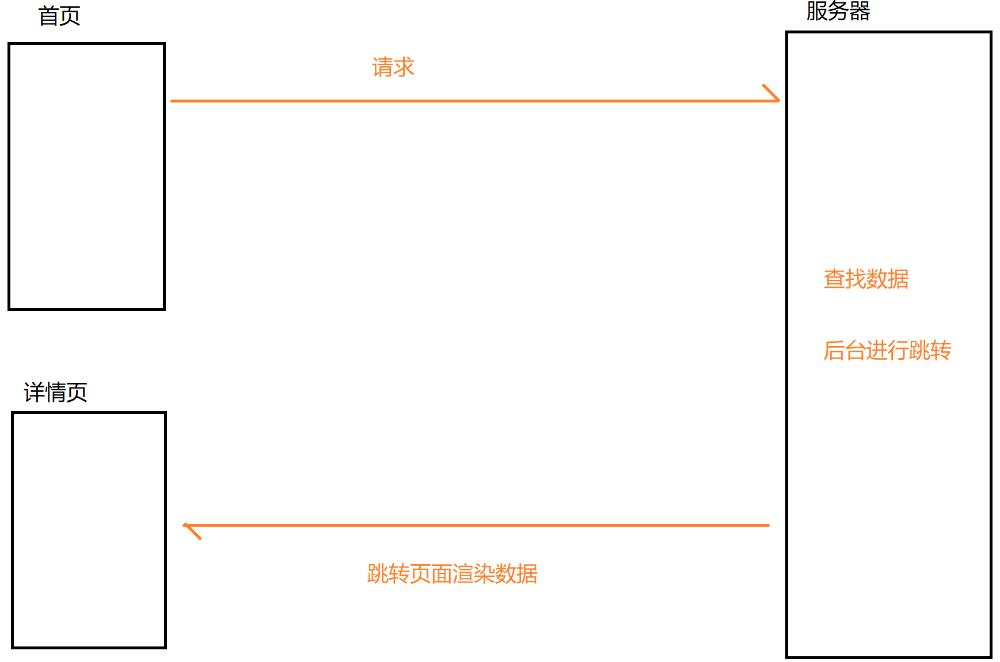
二、请求转发、重定向
2.1 请求转发
跳转之后页面的url还是上一次请求的url,URL不会变<br /> 将请求转发给另外一个程序,例如当前servlet接收到一个请求但是它自己处理不了,这个时候可以将该请求转发给其他人(servlet)处理<br /> 请求转发只有一个请求<br />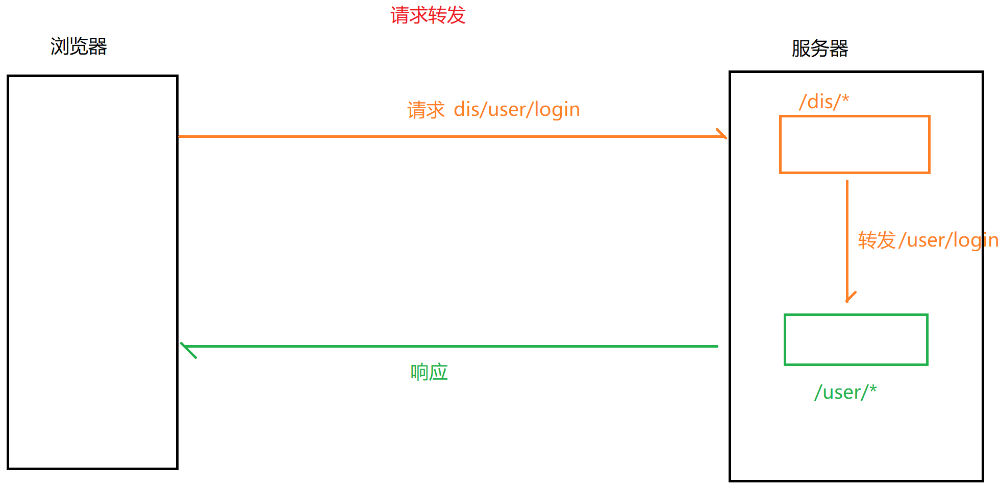
2.2 重定向
重定向:第一次发送请求后,服务器会返还响应给浏览器,浏览器根据响应信息重新定向发送请求,请求会有两次,url会变(因为第二次会发送请求)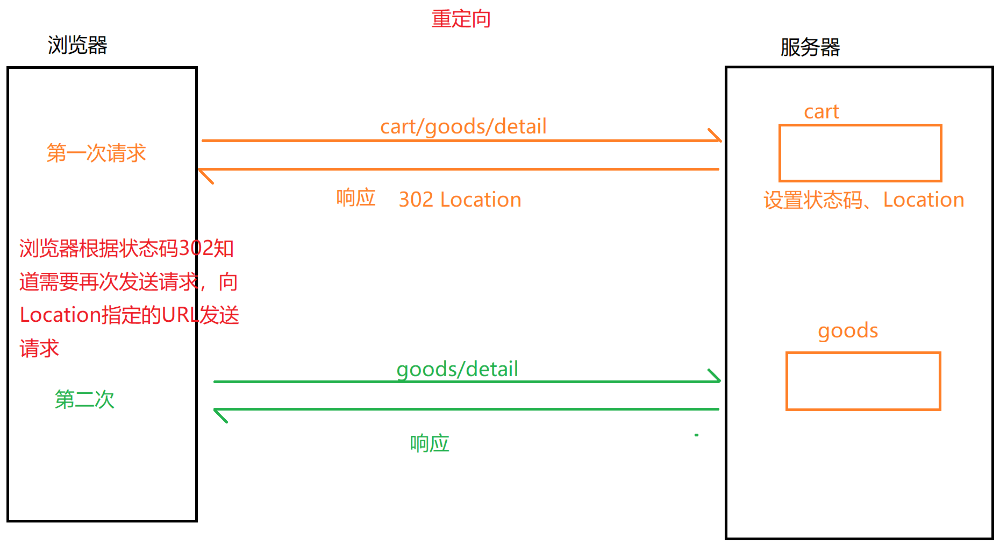
2.3 转发请求与重定向的区别
不同点:
1.请求转发可以共享请求参数
重定向不能共享请求参数
2.请求转发跳转到目标页面,地址栏地址不发生改变
重定向跳转到目标页面,地址栏地址会发生改变
3.请求转发不支持跨域访问,但可以访问WEB-INFO下的资源包括HTML
重定向可以跨域访问
相同点:
AServlet跳转到BServlet为例,两种方法都只会响应B页面的数据,不会响应A页面的数据
三、监听器
监听对象创建、属性变化,在servlet主要用来对域对象进行监听,request、session、context对象进行监听
在servlet中监听器总共分为3种8类
代码举例:
Context监听器:
@WebListener
public class MyContextListener implements ServletContextAttributeListener {

    public MyContextListener() {
    }

    public void attributeAdded(ServletContextAttributeEvent event)  {
        System.out.println("context添加了数据");
        System.out.println(event.getName() + ":" + event.getValue());
    }

    public void attributeRemoved(ServletContextAttributeEvent event)  {
        System.out.println("context移除了数据");
        System.out.println(event.getName() + ":" + event.getValue());

    }

    public void attributeReplaced(ServletContextAttributeEvent event)  {
        System.out.println("context修改了数据");
        System.out.println(event.getName() + ":" + event.getValue());
        System.out.println(event.getSource());
    }

}
@WebListener
public class MyContextLifecycleListener implements ServletContextListener {

    public MyContextLifecycleListener() {
    }

    // context销毁时,项目停止时
    public void contextDestroyed(ServletContextEvent arg0)  {
        System.out.println("保存数据");
    }

    // context初始化完毕,项目启动成功
    public void contextInitialized(ServletContextEvent arg0)  {
        //在后台开启一些守护线程做一些底层的操作
        System.out.println("项目启动成功");
    }

}
四、thymeleaf
4.1 页面静态化
将动态的页面转换成静态的页面,意义:加速项目响应速度、优化搜索搜索引擎的命中率
SpringBoot官方推荐的模板引擎:thymeleaf
4.2 thymeleaf
模板页面:
HTML标签中引入thymeleaf模板标签库 ](http://www.thymeleaf.org%22%3E/)
取值:
文本
或者[[${time}]]
4.2.1 基本使用
前端代码:
<!DOCTYPE html>
<!-- 引入thymeleaf的标签库 -->
<html xmlns:th="http://www.thymeleaf.org">
<head>
<meta charset="UTF-8">
<title>Insert title here</title>
</head>
<body>
    <!--
        th:text用来给标签的text设置文本
        th:href
    -->
    <p th:text="${time}">文本</p>
</body>
</html>
后端代码:
public static void main(String[] args) throws IOException {

        //通过模板引擎生成一个静态页面

        //1.创建模板引擎:去用来生成静态页面
        TemplateEngine templateEngine = new TemplateEngine();

        //2.创建文件模板解析器:读取模板文件,分析文件
        FileTemplateResolver resolver = new FileTemplateResolver();

        //3.设置字符编码:汉字乱码问题
        resolver.setCharacterEncoding("UTF-8");

        //4.设置模板参数
        resolver.setPrefix("");//前缀:模板文件所在的位置,在javaSE环境下""代表当前项目下
        resolver.setSuffix(".html");//后缀,表示模板的文件格式

        //5.将文件解析器设置到模板引擎上
        templateEngine.setTemplateResolver(resolver);

        //6.创建context用来存放页面上需要使用到的数据
        Context context = new Context();
        SimpleDateFormat dateFormat = new SimpleDateFormat("yyyy年MM月dd日");
        context.setVariable("time", dateFormat.format(new Date()));

        //7.生成静态的HTML页面
        //参数1:模板的名字
        //参数2:存放数据对象
        //参数3:流对象,用来生成静态页面
        templateEngine.process("goods", context, new FileWriter("index.html"));

    }
4.2.2 存放对象
前端代码:
<!DOCTYPE html>
<html xmlns:th="http://www.thymeleaf.org">
<head>
<meta charset="UTF-8">
<title>Insert title here</title>
</head>
<body>
    <!-- 内联取值:不推荐 -->
    <p>[[${goods.id}]]</p>
    <p th:text="${goods.name}">商品名字</p>
    <p th:text="${goods.price}">商品价格</p>
</body>
</html>
后端需要修改代码:
        //6.创建context用来存放页面上需要使用到的数据
        Context context = new Context();

        Goods goods = new Goods(1001,"我的校园生活",250);
        context.setVariable("goods", goods);

        //7.生成静态的HTML页面
        //参数1:模板名字
        //参数2:存放数据对象
        //参数3:流对象,用来生成静态页面
        templateEngine.process("goods2", context,new FileWriter("index2.html"));
4.2.3 if判断是否展示数据
前端代码:
<!DOCTYPE html>
<html xmlns:th="http://www.thymeleaf.org">
<head>
<meta charset="UTF-8">
<title>Insert title here</title>
</head>
<body>
    <!-- th:if判断是否为true,为true才能看见 -->
    <p th:if="${isMan}">男生能看到的</p>
    <p th:if="${isWomen}">女生能看到的</p>
    <!-- th:unless判断是否为false,为false才能看见 -->
    <p th:unless="${isVip}">不是会员能看到的</p>
    <p th:unless="${isVip} == false">会员看到的</p>
</body>
</html>
后端需要修改代码:
        //6.创建context用来存放页面上需要使用到的数据
        Context context = new Context();
        context.setVariable("isMan", true);
        context.setVariable("isWomen", false);
        context.setVariable("isVip", true);

        //7.生成静态的HTML页面
        //参数1:模板名字
        //参数2:存放数据对象
        //参数3:流对象,用来生成静态页面
        templateEngine.process("if", context,new FileWriter("index3.html"));
4.2.4 each循环展示数据
前端代码:
<!DOCTYPE html>
<html xmlns:th="http://www.thymeleaf.org">
<head>
<meta charset="UTF-8">
<title>Insert title here</title>
</head>
<body>
    <!-- 有几个商品对象,就会生成几个div -->
    <div th:each="goods:${goodsList}">
        <p th:text="${goods.id}" style="color: red;">id</p>
        <p th:text="${goods.name}">name</p>
        <p th:text="${goods.price}">price</p>
    </div>
</body>
</html>
后端需要修改代码:
        //6.创建context用来存放页面上需要使用到的数据
        Context context = new Context();
        Goods g1 = new Goods(1001,"Java入门1",50);
        Goods g2 = new Goods(1002,"Java入门2",60);
        Goods g3 = new Goods(1003,"Java入门3",70);
        Goods g4 = new Goods(1004,"Java入门4",80);

        List<Goods> goodsList = Arrays.asList(g1,g2,g3,g4);

        context.setVariable("goodsList", goodsList);

        //7.生成静态的HTML页面
        //参数1:模板名字
        //参数2:存放数据对象
        //参数3:流对象,用来生成静态页面
        templateEngine.process("each", context,new FileWriter("each2.html"));
4.2.5 url
前端代码:
<!DOCTYPE html>
<html xmlns:th="http://www.thymeleaf.org">
<head>
<meta charset="UTF-8">
<title>Insert title here</title>
</head>
<body>
    <a href="http://www.baidu.com">百度</a><br>
    <a th:href="@{http://sina.com/goods/findById(id=${goods.id})}">商品详情</a>
    <a th:href="@{http://sina.com/goods/{id}/findById(id=${goods.id})}">商品详情</a>

</body>
</html>
后端需要修改代码:
        //6.创建context用来存放页面上需要使用到的数据
        Context context = new Context();
        Goods g1 = new Goods(1001,"Java入门1",50);

        context.setVariable("goods",g1);

        //7.生成静态的HTML页面
        //参数1:模板名字
        //参数2:存放数据对象
        //参数3:流对象,用来生成静态页面
        templateEngine.process("url", context,new FileWriter("url2.html"));

若有收获,就点个赞吧
0 人点赞
