一、Mybatis Plus简介
Mybatis Plus官网
MyBatis-Plus (opens new window)(简称 MP)是一个 MyBatis (opens new window)的增强工具,在 MyBatis 的基础上只做增强不做改变,为简化开发、提高效率而生

特性
- 无侵入:只做增强不做改变,引入它不会对现有工程产生影响,如丝般顺滑
- 损耗小:启动即会自动注入基本 CURD,性能基本无损耗,直接面向对象操作
- 强大的 CRUD 操作:内置通用 Mapper、通用 Service,仅仅通过少量配置即可实现单表大部分 CRUD 操作,更有强大的条件构造器,满足各类使用需求
- 支持 Lambda 形式调用:通过 Lambda 表达式,方便的编写各类查询条件,无需再担心字段写错
- 支持主键自动生成:支持多达 4 种主键策略(内含分布式唯一 ID 生成器 - Sequence),可自由配置,完美解决主键问题
- 支持 ActiveRecord 模式:支持 ActiveRecord 形式调用,实体类只需继承 Model 类即可进行强大的 CRUD 操作
- 支持自定义全局通用操作:支持全局通用方法注入( Write once, use anywhere )
- 内置代码生成器:采用代码或者 Maven 插件可快速生成 Mapper 、 Model 、 Service 、 Controller 层代码,支持模板引擎,更有超多自定义配置等您来使用
- 内置分页插件:基于 MyBatis 物理分页,开发者无需关心具体操作,配置好插件之后,写分页等同于普通 List 查询
- 分页插件支持多种数据库:支持 MySQL、MariaDB、Oracle、DB2、H2、HSQL、SQLite、Postgre、SQLServer 等多种数据库
- 内置性能分析插件:可输出 Sql 语句以及其执行时间,建议开发测试时启用该功能,能快速揪出慢查询
- 内置全局拦截插件:提供全表 delete 、 update 操作智能分析阻断,也可自定义拦截规则,预防误操作
简介
MyBatis-Plus (opens new window)(简称 MP)是一个 MyBatis (opens new window)的增强工具,在 MyBatis 的基础上只做增强不做改变,为简化开发、提高效率而生。
愿景
我们的愿景是成为 MyBatis 最好的搭档,就像 魂斗罗 中的 1P、2P,基友搭配,效率翻倍。

特性
- 无侵入:只做增强不做改变,引入它不会对现有工程产生影响,如丝般顺滑
- 损耗小:启动即会自动注入基本 CURD,性能基本无损耗,直接面向对象操作
- 强大的 CRUD 操作:内置通用 Mapper、通用 Service,仅仅通过少量配置即可实现单表大部分 CRUD 操作,更有强大的条件构造器,满足各类使用需求
- 支持 Lambda 形式调用:通过 Lambda 表达式,方便的编写各类查询条件,无需再担心字段写错
- 支持主键自动生成:支持多达 4 种主键策略(内含分布式唯一 ID 生成器 - Sequence),可自由配置,完美解决主键问题
- 支持 ActiveRecord 模式:支持 ActiveRecord 形式调用,实体类只需继承 Model 类即可进行强大的 CRUD 操作
- 支持自定义全局通用操作:支持全局通用方法注入( Write once, use anywhere )
- 内置代码生成器:采用代码或者 Maven 插件可快速生成 Mapper 、 Model 、 Service 、 Controller 层代码,支持模板引擎,更有超多自定义配置等您来使用
- 内置分页插件:基于 MyBatis 物理分页,开发者无需关心具体操作,配置好插件之后,写分页等同于普通 List 查询
- 分页插件支持多种数据库:支持 MySQL、MariaDB、Oracle、DB2、H2、HSQL、SQLite、Postgre、SQLServer 等多种数据库
- 内置性能分析插件:可输出 Sql 语句以及其执行时间,建议开发测试时启用该功能,能快速揪出慢查询
- 内置全局拦截插件:提供全表 delete 、 update 操作智能分析阻断,也可自定义拦截规则,预防误操作
支持数据库
任何能使用
mybatis进行 crud, 并且支持标准 sql 的数据库
框架结构
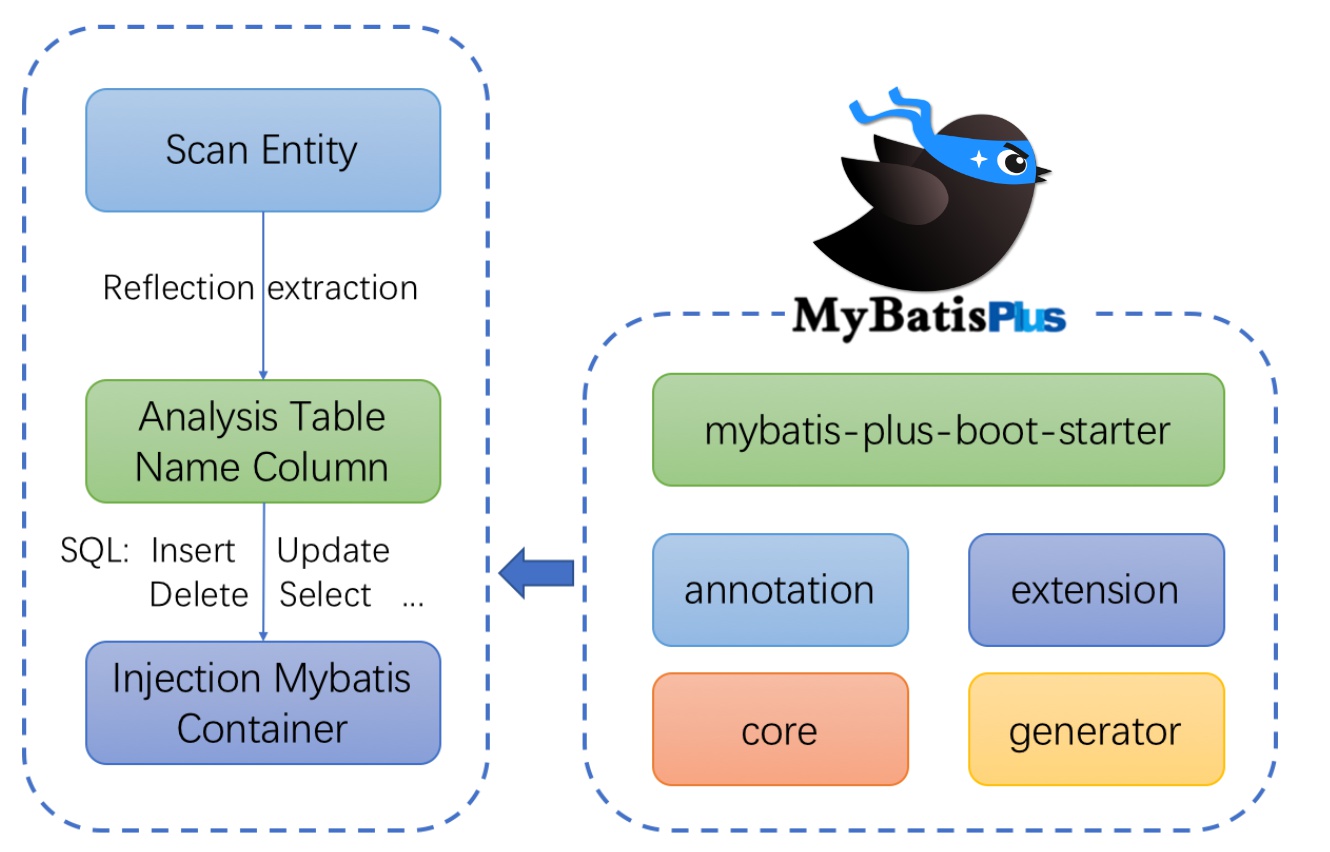
二、快速入门
我们将通过一个简单的 Demo 来阐述 MyBatis-Plus 的强大功能,在此之前,我们假设您已经:
- 拥有 Java 开发环境以及相应 IDE
- 熟悉 Spring Boot
- 熟悉 Maven
现有一张 User 表,其表结构如下:
| id | name | age | |
|---|---|---|---|
| 1 | Jone | 18 | test1@baomidou.com |
| 2 | Jack | 20 | test2@baomidou.com |
| 3 | Tom | 28 | test3@baomidou.com |
| 4 | Sandy | 21 | test4@baomidou.com |
| 5 | Billie | 24 | test5@baomidou.com |
其对应的数据库 Schema 脚本如下:
DROP TABLE IF EXISTS user;
CREATE TABLE user
(
    id BIGINT(20) NOT NULL COMMENT '主键ID',
    name VARCHAR(30) NULL DEFAULT NULL COMMENT '姓名',
    age INT(11) NULL DEFAULT NULL COMMENT '年龄',
    email VARCHAR(50) NULL DEFAULT NULL COMMENT '邮箱',
    PRIMARY KEY (id)
);
-- 真实开发中,version(乐观锁),deleted(逻辑删除)、gmt_create、gem_mo
其对应的数据库 Data 脚本如下:
DELETE FROM user;
INSERT INTO user (id, name, age, email) VALUES
(1, 'Jone', 18, 'test1@baomidou.com'),
(2, 'Jack', 20, 'test2@baomidou.com'),
(3, 'Tom', 28, 'test3@baomidou.com'),
(4, 'Sandy', 21, 'test4@baomidou.com'),
(5, 'Billie', 24, 'test5@baomidou.com');
使用SpringBoot初始化项目
1. 导入对应依赖
<dependencies>
    <dependency>
        <groupId>org.springframework.boot</groupId>
        <artifactId>spring-boot-starter</artifactId>
    </dependency>
    <dependency>
        <groupId>org.springframework.boot</groupId>
        <artifactId>spring-boot-devtools</artifactId>
        <scope>runtime</scope>
        <optional>true</optional>
    </dependency>
    <!--数据库驱动-->
    <dependency>
        <groupId>mysql</groupId>
        <artifactId>mysql-connector-java</artifactId>
        <scope>runtime</scope>
    </dependency>
    <dependency>
        <groupId>org.projectlombok</groupId>
        <artifactId>lombok</artifactId>
        <optional>true</optional>
    </dependency>
    <!--Mybatis-plus-->
    <dependency>
        <groupId>com.baomidou</groupId>
        <artifactId>mybatis-plus-boot-starter</artifactId>
        <version>3.4.2</version>
    </dependency>
    <dependency>
        <groupId>com.alibaba</groupId>
        <artifactId>druid-spring-boot-starter</artifactId>
        <version>1.2.3</version>
    </dependency>
    <dependency>
        <groupId>org.springframework.boot</groupId>
        <artifactId>spring-boot-starter-test</artifactId>
        <scope>test</scope>
    </dependency>
</dependencies>
注意:尽量不要同时导入Mybatis和Mybatis-Plus,避免出现版本差异导致的问题
2. 配置
在 application.yaml 配置文件中添加 Mysql 数据库的相关配置:
#数据库配置
spring:
  datasource:
    password: root
    username: root
    url:jdbc:mysql://localhost:3306/test?serverTimezone=UTC
    type: com.alibaba.druid.pool.DruidDataSource
    driver-class-name: com.mysql.cj.jdbc.Driver
3. 编写代码
User.java
@Data
@AllArgsConstructor
@NoArgsConstructor
public class User {
  private Integer id;
  private String name;
  private Integer age;
  private String email;
}
UserMapper.java ```java import com.baomidou.mybatisplus.core.mapper.BaseMapper; import com.gmf.pojo.User; import org.springframework.stereotype.Repository;
/**
- @className: UserMapper
- @description UserMapper接口上继承了BaseMapper
,其内置了许多基础的CRUD操作方法 */ @Repository public interface UserMapper extends BaseMapper { } ```
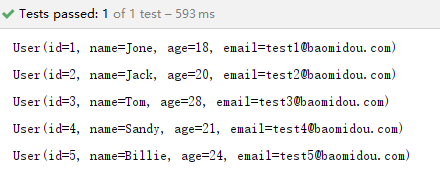
Test
@SpringBootTest
class MybatisPlusApplicationTests {

  @Autowired
  private UserMapper userMapper;

  @Test
  void contextLoads() {
      //查询所有用户
      //selectList()方法参数需要传递一个Wrapper(条件构造器)
      List<User> users = userMapper.selectList(null);
      users.forEach(System.out::println);
  }
}
@MapperScan 启动类开启扫描Mapper ```java //扫描指定路径下的Mapper @MapperScan(“com.gmf.mapper”) @SpringBootApplication public class MybatisPlusApplication {
public static void main(String[] args) {
SpringApplication.run(MybatisPlusApplication.class, args);}
}
- **测试结果**
<a name="OCaXJ"></a>
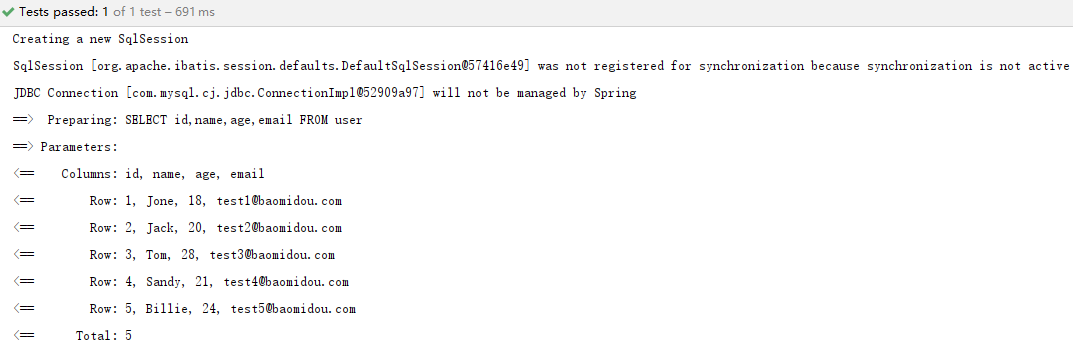
### 4. 配置日志
我们所用的sql现在是不可见的,我们希望知道他是怎么执行的,所以我们必须要查看日志!
```yaml
#配置日志
mybatis-plus:
configuration:
log-impl: org.apache.ibatis.logging.stdout.StdOutImpl
三、CRUD拓展
1. Insert插入
For Example
BaseWapper
public interface BaseMapper<T> extends Mapper<T> {

    /**
     * 插入一条记录
     *
     * @param entity 实体对象
     */
    int insert(T entity);

    ...
}
参数说明
| 类型 | 参数名 | 描述 |
|---|---|---|
| T | entity | 实体对象 |
测试代码
/**
 * @param
 * @return void
 * @description 不指定实体ID插入数据
 */
@Test
void insertUser(){
    User user = new User();
    user.setName("GMF");
    user.setAge(17);
    user.setEmail("2373271519@qq.com");
    //当我们未指定ID时,Mybatis会自动帮我们生成ID
    //insert:受影响的行数
    int insert = userMapper.insert(user);
    System.out.println(insert);
    //发现ID会自动回填到实体对象中
    System.out.println(user);
}
测试结果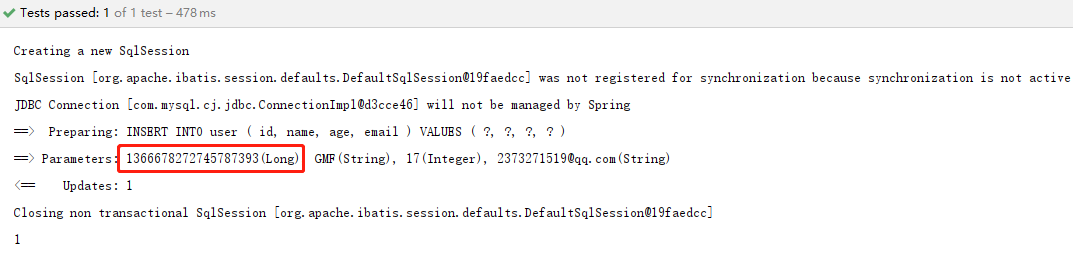
主键生成策略
分布式系统唯一id生成 雪花算法
SnowFlake 算法,是 Twitter 开源的分布式 id 生成算法。其核心思想就是:使用一个 64 bit 的 long 型的数字作为全局唯一 id。在分布式系统中的应用十分广泛,且ID 引入了时间戳,基本上保持自增的。
这 64 个 bit 中,其中 1 个 bit 是不用的,然后用其中的 41 bit 作为毫秒数,用 10 bit 作为工作机器 id,12 bit 作为序列号。
雪花算法详解
实现主键自增策略
- 在实体主键字段上添加
@TableId(type = IdType.AUTO)public class User { //添加@TableId(type = IdType.AUTO)注解实现主键自增 @TableId(type = IdType.AUTO) private Long id; private String name; private Integer age; private String email; }
注意:数据库的字段必须是自动增长
IdType.java
@Getter
public enum IdType {
    /**
     * 数据库ID自增
     * <p>该类型请确保数据库设置了 ID自增 否则无效</p>
     */
    AUTO(0),
    /**
     * 该类型为未设置主键类型(注解里等于跟随全局,全局里约等于 INPUT)
     */
    NONE(1),
    /**
     * 用户输入ID
     * <p>该类型可以通过自己注册自动填充插件进行填充</p>
     */
    INPUT(2),

    /* 以下3种类型、只有当插入对象ID 为空,才自动填充。 */
    /**
     * 分配ID (主键类型为number或string),
     * 默认实现类 {@link com.baomidou.mybatisplus.core.incrementer.DefaultIdentifierGenerator}(雪花算法)
     *
     * @since 3.3.0
     */
    ASSIGN_ID(3),
    /**
     * 分配UUID (主键类型为 string)
     * 默认实现类 {@link com.baomidou.mybatisplus.core.incrementer.DefaultIdentifierGenerator}(UUID.replace("-",""))
     */
    ASSIGN_UUID(4),
    /**
     * @deprecated 3.3.0 please use {@link #ASSIGN_ID}
     */
    @Deprecated
    ID_WORKER(3),
    /**
     * @deprecated 3.3.0 please use {@link #ASSIGN_ID}
     */
    @Deprecated
    ID_WORKER_STR(3),
    /**
     * @deprecated 3.3.0 please use {@link #ASSIGN_UUID}
     */
    @Deprecated
    UUID(4);

    private final int key;

    IdType(int key) {
        this.key = key;
    }
}
测试结果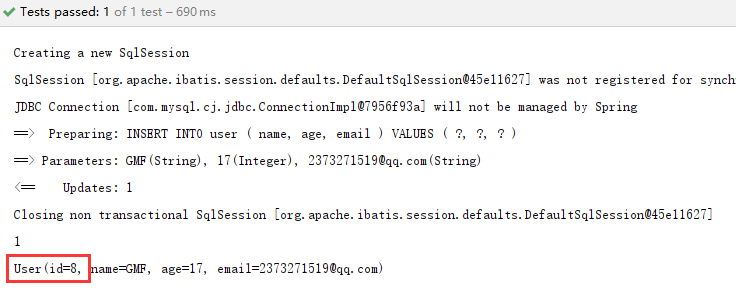
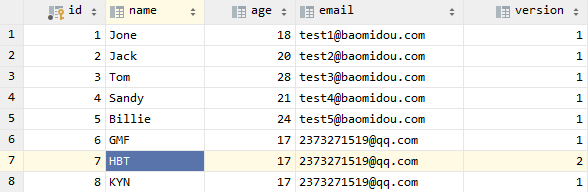
2. update更新
// 根据 whereEntity 条件,更新记录
int update(@Param(Constants.ENTITY) T entity, @Param(Constants.WRAPPER) Wrapper<T> updateWrapper);
// 根据 ID 修改
int updateById(@Param(Constants.ENTITY) T entity);
参数说明
| 类型 | 参数名 | 描述 |
|---|---|---|
| T | entity | 实体对象 (set 条件值,可为 null) |
| Wrapper | updateWrapper | 实体对象封装操作类(可以为 null,里面的 entity 用于生成 where 语句) |
For Example
/**
 * @param
 * @return void
 * @description 测试使用MybatisPlus执行update
 */
@Test
void testUpdate(){
    User user = new User();
    user.setId(8L);
    user.setName("KYN");
    //底层使用动态Sql
    int i = userMapper.updateById(user);
    System.out.println(i);
}
自动填充
创建时间、修改时间!这些个操作一遍都是自动化完成,我们不希望手动更新!
阿里巴巴开发手册:所有的数据库表:gmt_create\gmt_modified几乎所有的表都要配置上!而且需要自动化
通过两种方式来实现自动填充:
方式一:数据库级别(工作中不允许修改数据库)
在表中新增字段 create_time 、update_time (默认值为CURRENT_TIMESTAMP)
方式二:代码级别
- 删除数据库上的默认值,更新操作

- 实体类上的属性需要增加注解
@TableField```java //使用@TableField注解标记为填充字段 //创建时间 @TableField(fill = FieldFill.INSERT) private Date createTime;
//更新时间 @TableField(fill = FieldFill.INSERT_UPDATE) private Date updateTime;
- 自定义实现类 `MyMetaObjectHandler`
```java
@Slf4j
@Component
public class MyMetaObjectHandler implements MetaObjectHandler {
    @Override
    public void insertFill(MetaObject metaObject) {
        log.info("start insert fill ....");
        this.strictInsertFill(metaObject, "createTime", LocalDateTime.class, LocalDateTime.now()); // 起始版本 3.3.0(推荐使用)
        // 或者
        this.strictUpdateFill(metaObject, "createTime", () -> LocalDateTime.now(), LocalDateTime.class); // 起始版本 3.3.3(推荐)
        // 或者
        //this.fillStrategy(metaObject, "updateTime", LocalDateTime.now()); // 该方式3.4.2报错
    }
    @Override
    public void updateFill(MetaObject metaObject) {
        log.info("start update fill ....");
        this.strictUpdateFill(metaObject, "updateTime", LocalDateTime.class, LocalDateTime.now()); // 起始版本 3.3.0(推荐)
        // 或者
        this.strictUpdateFill(metaObject, "updateTime", () -> LocalDateTime.now(), LocalDateTime.class); // 起始版本 3.3.3(推荐)
        // 或者
        //this.fillStrategy(metaObject, "updateTime", LocalDateTime.now()); // 该方式3.4.2报错
    }
}
3. 乐观锁
面试中经常会问到乐观锁,悲观锁
乐观锁:顾名思义十分乐观,它总是被认为不会出现问题,无论干什么都不去上锁!如果出现了问题,再次更新测试 悲观锁:顾名思义十分悲观,它总是出现问题,无论干什么都会上锁!再去操作!
OptimisticLockerInnerInterceptor 乐观锁
当要更新一条记录的时候,希望这条记录没有被别人更新 乐观锁实现方式:
- 取出记录时,获取当前version
- 更新时,带上这个version
- 执行更新时, set version = newVersion where version = oldVersion
- 如果version不对,就更新失败
乐观锁: 1、先查询,获得版本号 version=1
--A
update user set name ="shuishui" ,version =version+1
where id =2 and version=1

--B 如果线程抢先完成,这个时候version=2,会导致A修改失败
update user set name ="shuishui" ,version =version+1
where id =2 and version=1
测试乐观锁
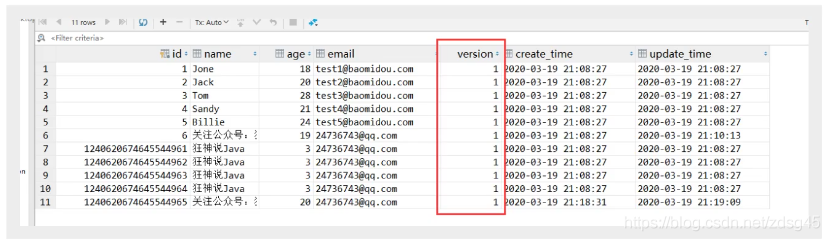
- 表中创建乐观锁字段
version默认值为1
同步实体类
@Version //乐观锁Version注解
private Integer version;
Configuration中注册组件
/**
* @className: MybatisPlusConfiguration
* @description 关于MybatisPlus的组件配置类
* @author GMF
* @date 2021/3/2
* @time 22:46
*/
//扫描指定路径下的Mapper
@MapperScan("com.gmf.mapper")
@Configuration
@EnableTransactionManagement
public class MybatisPlusConfiguration {
 /**
  * @param
  * @return com.baomidou.mybatisplus.extension.plugins.MybatisPlusInterceptor
  * @description 注册乐观锁插件到容器中
  */
 @Bean
 public MybatisPlusInterceptor mybatisPlusInterceptor(){
     MybatisPlusInterceptor interceptor = new MybatisPlusInterceptor();
     interceptor.addInnerInterceptor(new OptimisticLockerInnerInterceptor());
     return interceptor;
 }
}
测试代码
/**
 * @param
 * @return void
 * @description 测试乐观锁
 */
@Test
void testOptimisticLocker(){
    //模拟线程1
    User user1 = userMapper.selectById(7L);
    user1.setName("ZTL");

    //模拟线程2
    User user2 = userMapper.selectById(7L);
    user2.setName("HBT");

    //线程2抢先执行update
    userMapper.updateById(user2);
    //当线程1尝试执行update语句是,乐观锁version无法匹配,导致update失败
    userMapper.updateById(user1);
}
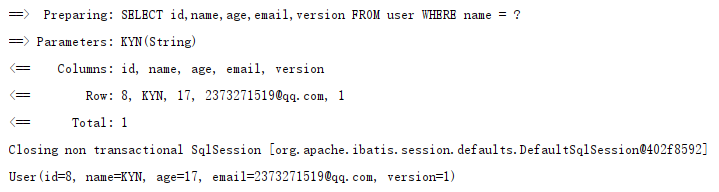
测试结果
查看测试结果发现:当线程2执行update操作后,会更改version信息,于是线程1执行update时,乐观锁version无法匹配,导致update失败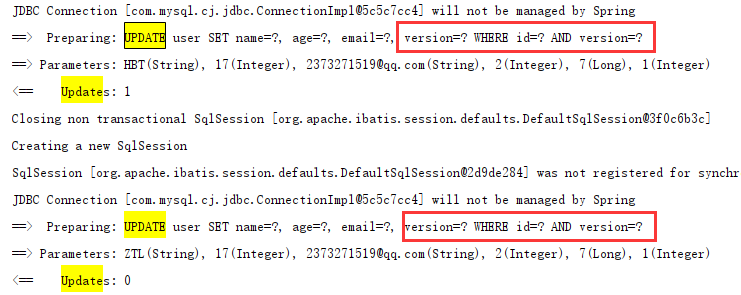
注意:
- 支持的数据类型只有:int,Integer,long,Long,Date,Timestamp,LocalDateTime
- 整数类型下
newVersion = oldVersion + 1 newVersion会回写到entity中- 仅支持
updateById(id)与update(entity, wrapper)方法 - 在
**update(entity, wrapper)**方法下,**wrapper**不能复用!!!
4. select查询
1. 基本使用
// 根据 ID 查询
T selectById(Serializable id);
// 根据 entity 条件,查询一条记录
T selectOne(@Param(Constants.WRAPPER) Wrapper<T> queryWrapper);

// 查询(根据ID 批量查询)
List<T> selectBatchIds(@Param(Constants.COLLECTION) Collection<? extends Serializable> idList);
// 根据 entity 条件,查询全部记录
List<T> selectList(@Param(Constants.WRAPPER) Wrapper<T> queryWrapper);
// 查询(根据 columnMap 条件)
List<T> selectByMap(@Param(Constants.COLUMN_MAP) Map<String, Object> columnMap);
// 根据 Wrapper 条件,查询全部记录
List<Map<String, Object>> selectMaps(@Param(Constants.WRAPPER) Wrapper<T> queryWrapper);
// 根据 Wrapper 条件,查询全部记录。注意: 只返回第一个字段的值
List<Object> selectObjs(@Param(Constants.WRAPPER) Wrapper<T> queryWrapper);

// 根据 entity 条件,查询全部记录(并翻页)
IPage<T> selectPage(IPage<T> page, @Param(Constants.WRAPPER) Wrapper<T> queryWrapper);
// 根据 Wrapper 条件,查询全部记录(并翻页)
IPage<Map<String, Object>> selectMapsPage(IPage<T> page, @Param(Constants.WRAPPER) Wrapper<T> queryWrapper);
// 根据 Wrapper 条件,查询总记录数
Integer selectCount(@Param(Constants.WRAPPER) Wrapper<T> queryWrapper);
参数说明
| 类型 | 参数名 | 描述 |
|---|---|---|
| Serializable | id | 主键ID |
| Wrapper | queryWrapper | 实体对象封装操作类(可以为 null) |
| Collection<? extends Serializable> | idList | 主键ID列表(不能为 null 以及 empty) |
| Map |
columnMap | 表字段 map 对象 |
| IPage | page | 分页查询条件(可以为 RowBounds.DEFAULT) |
For Example
/**
 * @param
 * @return void
 * @description List<T> selectBatchIds(@Param(Constants.COLLECTION) Collection<? extends Serializable> idList):批量查询
 */
@Test
void testSelectBatchIds() {
    List<User> users = userMapper.selectBatchIds(List.of(1, 8, 3));
    users.forEach(System.out::println);
}

/**
 * @param
 * @return void
 * @description List<T> selectByMap(@Param(Constants.COLUMN_MAP) Map<String, Object> columnMap):使用Map集合做条件查询
 */
@Test
void test2(){
    Map<String, Object> params = new HashMap<>();
    params.put("name","KYN");
    List<User> users = userMapper.selectByMap(params);
    users.forEach(System.out::println);
}
2. 分页查询
首先将分页插件注册到容器中
@MapperScan("com.gmf.mapper")
@Configuration
@EnableTransactionManagement
public class MybatisPlusConfiguration {
  /**
   * @param
   * @return com.baomidou.mybatisplus.extension.plugins.MybatisPlusInterceptor
   * @description 通过拦截器注册插件到容器中
   */
  @Bean
  public MybatisPlusInterceptor mybatisPlusInterceptor(){
      MybatisPlusInterceptor interceptor = new MybatisPlusInterceptor();
      //分页拦截器
      PaginationInnerInterceptor paginationInnerInterceptor = new PaginationInnerInterceptor(DbType.MYSQL);
      // 设置请求的页面大于最大页后操作, true调回到首页,false 继续请求  默认false
      paginationInnerInterceptor.setOverflow(false);
      // 设置最大单页限制数量,默认 500 条,-1 不受限制
      paginationInnerInterceptor.setMaxLimit(500L);
      //将自定义拦截器添加进Spring内部拦截器中
      interceptor.addInnerInterceptor(paginationInnerInterceptor);
      return interceptor;
  }
}
For Example
/** * @param * @return void * @description 测试使用MybatisPlus内置分页插件进行分页查询 */ @Test void testPageQuery(){ Page<User> page = new Page<>(); page.setCurrent(1); page.setSize(3); userMapper.selectPage(page, null); page.getRecords().forEach(System.out::println); System.out.println(page.getTotal()); }Page类内置了非常多分页数据的属性
3. 分页插件与自定义SQL的结合使用
在mapper中调用
public interface UserMapper{//可以继承或者不继承BaseMapper
  /**
   * <p>
   * 查询 : 根据state状态查询用户列表,分页显示
   * 注意!!: 如果入参是有多个,需要加注解指定参数名才能在xml中取值
   * </p>
   *
   * @param page 分页对象,xml中可以从里面进行取值,传递参数 Page 即自动分页,必须放在第一位(你可以继承Page实现自己的分页对象)
   * @param state 状态
   * @return 分页对象
   */
  IPage<User> selectPageVo(Page page, @Param("state") Integer state);
}
UserMapper.xml等同于编写一个普通 list 查询,mybatis-plus 自动替你分页
<select id="selectPageVo" resultType="com.baomidou.cloud.entity.UserVo">
  SELECT id,name FROM user WHERE state=#{state}
</select>
UserServiceImpl.java 调用分页方法
public IPage<User> selectUserPage(Page<User> page, Integer state) {
  // 不进行 count sql 优化,解决 MP 无法自动优化 SQL 问题,这时候你需要自己查询 count 部分
  // page.setOptimizeCountSql(false);
  // 当 total 为小于 0 或者设置 setSearchCount(false) 分页插件不会进行 count 查询
  // 要点!! 分页返回的对象与传入的对象是同一个
  return userMapper.selectPageVo(page, state);
}
5. delete删除
// 根据 entity 条件,删除记录
int delete(@Param(Constants.WRAPPER) Wrapper<T> wrapper);
// 删除(根据ID 批量删除)
int deleteBatchIds(@Param(Constants.COLLECTION) Collection<? extends Serializable> idList);
// 根据 ID 删除
int deleteById(Serializable id);
// 根据 columnMap 条件,删除记录
int deleteByMap(@Param(Constants.COLUMN_MAP) Map<String, Object> columnMap);
参数说明
| 类型 | 参数名 | 描述 |
|---|---|---|
| Wrapper |
wrapper | 实体对象封装操作类(可以为 null) |
| Collection<? extends Serializable> | idList | 主键ID列表(不能为 null 以及 empty) |
| Serializable | id | 主键ID |
| Map |
columnMap | 表字段 map 对象 |
测试删除:
@Test
public void testDeleteById(){
    userMapper.deleteById(1);
}
//批量删除
@Test
public void testDeleteBatchId(){
    userMapper.deleteBatchIds(Arrays.asList(1,2));
}
//条件删除
@Test
public void testDeleteMap(){
    HashMap<String,Object> map = new HashMap<>();
    map.put("name","shuishui");
    userMapper.deleteByMap(Map);
}
逻辑删除
物理删除 :从数据库中直接移出 逻辑删除:在数据库中没有被移出,而是通过一个变量来让他失效!deleted=0 ==>deleted =1(失效)
SpringBoot 配置方式:
application.yml 加入配置(如果你的默认值和mp默认的一样,该配置可无):
mybatis-plus:
global-config:
  db-config:
    logic-delete-field: flag  #全局逻辑删除字段值 3.3.0开始支持,详情看下面
    logic-delete-value: 1 # 逻辑已删除值(默认为 1)
    logic-not-delete-value: 0 # 逻辑未删除值(默认为 0)
注册 Bean(3.1.1开始不再需要这一步):
import com.baomidou.mybatisplus.core.injector.ISqlInjector;
import com.baomidou.mybatisplus.extension.injector.LogicSqlInjector;
import org.springframework.context.annotation.Bean;
import org.springframework.context.annotation.Configuration;
@Configuration
public class MyBatisPlusConfiguration {
  @Bean
  public ISqlInjector sqlInjector() {
      return new LogicSqlInjector();
  }
}
实体类字段上加上
@TableLogic注解@TableLogic private Integer deleted;效果: 使用mp自带方法删除和查找都会附带逻辑删除功能 (自己写的xml不会)
删除时 update user set deleted=1 where id =1 and deleted=0
查找时 select * from user where deleted=0
全局逻辑删除: 3.3.0开始支持
如果公司代码比较规范,比如统一了全局都是flag为逻辑删除字段。
使用此配置则不需要在实体类上添加 @TableLogic。
但如果实体类上有 @TableLogic 则以实体上的为准,忽略全局。 即先查找注解再查找全局,都没有则此表没有逻辑删除。
mybatis-plus:
  global-config:
    db-config:
      logic-delete-field: flag  #全局逻辑删除字段值
附件说明
- 逻辑删除是为了方便数据恢复和保护数据本身价值等等的一种方案,但实际就是删除。
- 如果你需要再查出来就不应使用逻辑删除,而是以一个状态去表示。
如: 员工离职,账号被锁定等都应该是一个状态字段,此种场景不应使用逻辑删除。
- 若确需查找删除数据,如老板需要查看历史所有数据的统计汇总信息,请单独手写sql
四、执行SQL分析打印
p6spy 依赖引入
<dependency>
<groupId>p6spy</groupId>
<artifactId>p6spy</artifactId>
<version>最新版本</version>
</dependency>
application.yml 配置:
spring:
datasource:
  driver-class-name: com.p6spy.engine.spy.P6SpyDriver
  url: jdbc:p6spy:jdbc:mysql://localhost:3306/database?serverTimezone=UTC
  ...
spy.properties 配置:
#3.2.1以上使用
modulelist=com.baomidou.mybatisplus.extension.p6spy.MybatisPlusLogFactory,com.p6spy.engine.outage.P6OutageFactory
#3.2.1以下使用或者不配置
#modulelist=com.p6spy.engine.logging.P6LogFactory,com.p6spy.engine.outage.P6OutageFactory
# 自定义日志打印
logMessageFormat=com.baomidou.mybatisplus.extension.p6spy.P6SpyLogger
#日志输出到控制台
appender=com.baomidou.mybatisplus.extension.p6spy.StdoutLogger
# 使用日志系统记录 sql
#appender=com.p6spy.engine.spy.appender.Slf4JLogger
# 设置 p6spy driver 代理
deregisterdrivers=true
# 取消JDBC URL前缀
useprefix=true
# 配置记录 Log 例外,可去掉的结果集有error,info,batch,debug,statement,commit,rollback,result,resultset.
excludecategories=info,debug,result,commit,resultset
# 日期格式
dateformat=yyyy-MM-dd HH:mm:ss
# 实际驱动可多个
#driverlist=org.h2.Driver
# 是否开启慢SQL记录
outagedetection=true
# 慢SQL记录标准 2 秒
outagedetectioninterval=2
注意!
- driver-class-name 为 p6spy 提供的驱动类
- url 前缀为 jdbc:p6spy 跟着冒号为对应数据库连接地址
- 打印出sql为null,在excludecategories增加commit
- 批量操作不打印sql,去除excludecategories中的batch
- 批量操作打印重复的问题请使用MybatisPlusLogFactory (3.2.1新增)
- 该插件有性能损耗,不建议生产环境使用。
五、条件构造器
1. 基本使用
需要通过它来完成复杂SQL的执行
官方文档——条件构造器
QueryWrapper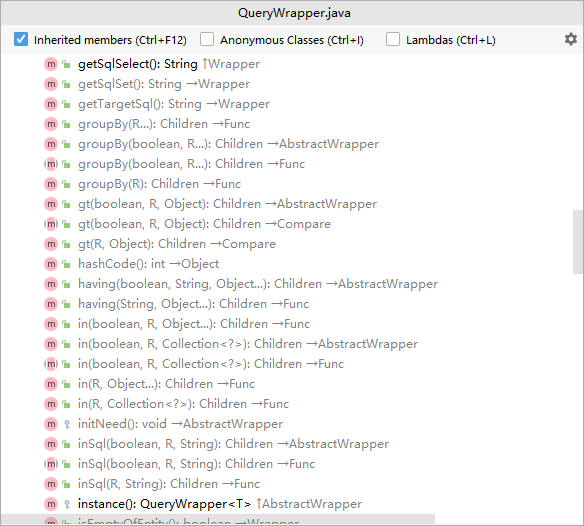
使用QueryWrapper测试
@Test
void contextLoads(){
    // 查询name不为null的用户,并且邮箱不为null的永不,年龄大于等于20的用户
    QueryWrapper<User> wrapper = new QueryWrapper<>();
    wrapper.isNotNull("name");
    wrapper.isNotNull("email");
    wrapper.ge("age",12);
    userMapper.selectList(wrapper).forEach(System.out::println);
}

@Test
void test2(){
    // 查询name为shuishui的用户
    QueryWrapper<User> wrapper = new QueryWrapper<>();
    wrapper.eq("name","shuishui");
    User user=userMapper.selectList(wrapper)
    System.out.println(user);
}

@Test
void test3(){
    // 查询年龄在20~30岁之间的用户
    QueryWrapper<User> wrapper =new QueryWrapper<>();
    wrapper.between("age",20,30);
    Integer count =userMapper.selectCount(wrapper);//查询结果数
    System.out.println(count);
}

//模糊查询
@Test
void test4(){
    QueryWrapper<User> wrapper =new QueryWrapper<>();

    wrapper.notLike("name",“s”);//相当于NOT LIKE '%s%'
    wrapper.likeRight("email",“s”);//相当于LIKE 's%'
    List<Map<String,Object>>maps =userMapper.selectMaps(wrapper);//查询结果数
    maps.forEach(System.out::println);
}

@Test
void test5(){
    QueryWrapper<User> wrapper =new QueryWrapper<>();
    //子查询
    wrapper.insql("id","select id from user where id<3");
    List<Object> objects =userMapper.selectobjs(wrapper);/
    objects.forEach(System.out::println);

@Test
void test6(){
    QueryWrapper<User> wrapper =new QueryWrapper<>();
    //通过id进行排序
    wrapper.orderByAsc("id");
    List<User> users =userMapper.selectList(wrapper);/
    objects.forEach(System.out::println);
}
更多的方法查看官方文档学习
2. 使用 Wrapper 自定义SQL
注意事项: 需要
mybatis-plus版本 >=3.0.7param 参数名要么叫ew,要么加上注解@Param(Constants.WRAPPER)使用${ew.customSqlSegment}不支持Wrapper内的entity生成where语句
用注解
@Repository
public interface UserMapper extends BaseMapper<User> {
    @Select("select * from user ${ew.customSqlSegment}")
    List<User> getAll(@Param(Constants.WRAPPER) Wrapper wrapper);
}
用XML
List<MysqlData> getAll(Wrapper ew);
<select id="getAll" resultType="MysqlData">
    SELECT * FROM mysql_data ${ew.customSqlSegment}
</select>
For Example
@Test
@DisplayName("测试Wrapper自定义SQL")
void test05(){
    List<User> users = userMapper.getAll(new QueryWrapper<User>().le("age", 20));
    users.forEach(System.out::println);
}
3. Lambda表达式在MybatisPlus中的使用
and的使用
QueryWrapper<Student> queryWrapper = new QueryWrapper<>();
queryWrapper.lambda()
      .and(obj ->
              obj.eq(Student::getName, "冯文议")
                  .eq(Student::getAge, 26));
or的使用
QueryWrapper<Student> queryWrapper = new QueryWrapper<>();
queryWrapper.lambda()
      .or(obj1 -> obj1.eq(Student::getName, "冯文议"))
      .or(obj2 -> obj2.eq(Student::getName, "1"));
六、多数据源
特性
- 支持 数据源分组 ,适用于多种场景 纯粹多库 读写分离 一主多从 混合模式。
- 支持数据库敏感配置信息 加密 ENC()。
- 支持每个数据库独立初始化表结构schema和数据库database。
- 支持无数据源启动,支持懒加载数据源(需要的时候再创建连接)。
- 支持 自定义注解 ,需继承DS(3.2.0+)。
- 提供并简化对Druid,HikariCp,BeeCp,Dbcp2的快速集成。
- 提供对Mybatis-Plus,Quartz,ShardingJdbc,P6sy,Jndi等组件的集成方案。
- 提供 自定义数据源来源 方案(如全从数据库加载)。
- 提供项目启动后 动态增加移除数据源 方案。
- 提供Mybatis环境下的 纯读写分离 方案。
- 提供使用 spel动态参数 解析数据源方案。内置spel,session,header,支持自定义。
- 支持 多层数据源嵌套切换 。(ServiceA >>> ServiceB >>> ServiceC)。
- 提供 **基于seata的分布式事务方案。
- 提供 本地多数据源事务方案。‘
约定
- 本框架只做 切换数据源 这件核心的事情,并不限制你的具体操作,切换了数据源可以做任何CRUD。
- 配置文件所有以下划线
_分割的数据源 首部 即为组的名称,相同组名称的数据源会放在一个组下。 - 切换数据源可以是组名,也可以是具体数据源名称。组名则切换时采用负载均衡算法切换。
- 默认的数据源名称为 master ,你可以通过
spring.datasource.dynamic.primary修改。 - 方法上的注解优先于类上注解。
- DS支持继承抽象类上的DS,暂不支持继承接口上的DS。
使用方法
1. 引入dynamic-datasource-spring-boot-starter
<dependency>
  <groupId>com.baomidou</groupId>
  <artifactId>dynamic-datasource-spring-boot-starter</artifactId>
  <version>${version}</version>
</dependency>
2. 配置数据源
spring:
  datasource:
    dynamic:
      primary: master #设置默认的数据源或者数据源组,默认值即为master
      strict: false #严格匹配数据源,默认false. true未匹配到指定数据源时抛异常,false使用默认数据源
      datasource:
        master:
          url: jdbc:mysql://xx.xx.xx.xx:3306/dynamic
          username: root
          password: 123456
          driver-class-name: com.mysql.jdbc.Driver # 3.2.0开始支持SPI可省略此配置
        slave_1:
          url: jdbc:mysql://xx.xx.xx.xx:3307/dynamic
          username: root
          password: 123456
          driver-class-name: com.mysql.jdbc.Driver
        slave_2:
          url: ENC(xxxxx) # 内置加密,使用请查看详细文档
          username: ENC(xxxxx)
          password: ENC(xxxxx)
          driver-class-name: com.mysql.jdbc.Driver
       #......省略
       #以上会配置一个默认库master,一个组slave下有两个子库slave_1,slave_2
# 多主多从                      纯粹多库(记得设置primary)                   混合配置
spring:                               spring:                               spring:
  datasource:                           datasource:                           datasource:
    dynamic:                              dynamic:                              dynamic:
      datasource:                           datasource:                           datasource:
        master_1:                             mysql:                                master:
        master_2:                             oracle:                               slave_1:
        slave_1:                              sqlserver:                            slave_2:
        slave_2:                              postgresql:                           oracle_1:
        slave_3:                              h2:                                   oracle_2:
3. 使用 @DS 切换数据源
@DS 可以注解在Service的方法上或类上,同时存在就近原则 方法上注解 优先于 类上注解。
| 注解 | 结果 |
|---|---|
| 没有@DS | 默认数据源 |
| @DS(“dsName”) | dsName可以为组名也可以为具体某个库的名称 |
@Service
@DS("slave")
public class UserServiceImpl implements UserService {
  @Autowired
  private JdbcTemplate jdbcTemplate;
  public List selectAll() {
    return  jdbcTemplate.queryForList("select * from user");
  }

  @Override
  @DS("slave_1")
  public List selectByCondition() {
    return  jdbcTemplate.queryForList("select * from user where age >10");
  }
}
七、代码自动生成器
AutoGenerator 是 MyBatis-Plus 的代码生成器,通过 AutoGenerator 可以快速生成 Entity、Mapper、Mapper XML、Service、Controller 等各个模块的代码,极大的提升了开发效率。
特别说明:
自定义模板有哪些可用参数?Github (opens new window)AbstractTemplateEngine 类中方法 getObjectMap 返回 objectMap 的所有值都可用。
实例演示
演示效果图:
// 演示例子,执行 main 方法控制台输入模块表名回车自动生成对应项目目录中
public class CodeGenerator {
    /**
     * <p>
     * 读取控制台内容
     * </p>
     */
    public static String scanner(String tip) {
        Scanner scanner = new Scanner(System.in);
        StringBuilder help = new StringBuilder();
        help.append("请输入" + tip + ":");
        System.out.println(help.toString());
        if (scanner.hasNext()) {
            String ipt = scanner.next();
            if (StringUtils.isNotBlank(ipt)) {
                return ipt;
            }
        }
        throw new MybatisPlusException("请输入正确的" + tip + "!");
    }

    public static void main(String[] args) {
        // 代码生成器
        AutoGenerator mpg = new AutoGenerator();

        // 全局配置
        GlobalConfig gc = new GlobalConfig();
        String projectPath = System.getProperty("user.dir");
        gc.setOutputDir(projectPath + "/src/main/java");
        gc.setAuthor("jobob");
        gc.setOpen(false);
        // gc.setSwagger2(true); 实体属性 Swagger2 注解
        mpg.setGlobalConfig(gc);

        // 数据源配置
        DataSourceConfig dsc = new DataSourceConfig();
        dsc.setUrl("jdbc:mysql://localhost:3306/ant?useUnicode=true&useSSL=false&characterEncoding=utf8");
        // dsc.setSchemaName("public");
        dsc.setDriverName("com.mysql.jdbc.Driver");
        dsc.setUsername("root");
        dsc.setPassword("密码");
        mpg.setDataSource(dsc);

        // 包配置
        PackageConfig pc = new PackageConfig();
        pc.setModuleName(scanner("模块名"));
        pc.setParent("com.baomidou.ant");
        mpg.setPackageInfo(pc);

        // 自定义配置
        InjectionConfig cfg = new InjectionConfig() {
            @Override
            public void initMap() {
                // to do nothing
            }
        };
        // 如果模板引擎是 freemarker
        String templatePath = "/templates/mapper.xml.ftl";
        // 如果模板引擎是 velocity
        // String templatePath = "/templates/mapper.xml.vm";
        // 自定义输出配置
        List<FileOutConfig> focList = new ArrayList<>();
        // 自定义配置会被优先输出
        focList.add(new FileOutConfig(templatePath) {
            @Override
            public String outputFile(TableInfo tableInfo) {
                // 自定义输出文件名 , 如果你 Entity 设置了前后缀、此处注意 xml 的名称会跟着发生变化!!
                return projectPath + "/src/main/resources/mapper/" + pc.getModuleName() + "/" + tableInfo.getEntityName() + "Mapper" + StringPool.DOT_XML;
            }
        });
        /*
        cfg.setFileCreate(new IFileCreate() {
            @Override
            public boolean isCreate(ConfigBuilder configBuilder, FileType fileType, String filePath) {
                // 判断自定义文件夹是否需要创建
                checkDir("调用默认方法创建的目录,自定义目录用");
                if (fileType == FileType.MAPPER) {
                    // 已经生成 mapper 文件判断存在,不想重新生成返回 false
                    return !new File(filePath).exists();
                }
                // 允许生成模板文件
                return true;
            }
        });
        */
        cfg.setFileOutConfigList(focList);
        mpg.setCfg(cfg);
        // 配置模板
        TemplateConfig templateConfig = new TemplateConfig();
        // 配置自定义输出模板
        //指定自定义模板路径,注意不要带上.ftl/.vm, 会根据使用的模板引擎自动识别
        // templateConfig.setEntity("templates/entity2.java");
        // templateConfig.setService();
        // templateConfig.setController();
        templateConfig.setXml(null);
        mpg.setTemplate(templateConfig);
        // 策略配置
        StrategyConfig strategy = new StrategyConfig();
        strategy.setNaming(NamingStrategy.underline_to_camel);
        strategy.setColumnNaming(NamingStrategy.underline_to_camel);
        strategy.setSuperEntityClass("你自己的父类实体,没有就不用设置!");
        strategy.setEntityLombokModel(true);
        strategy.setRestControllerStyle(true);
        // 公共父类
        strategy.setSuperControllerClass("你自己的父类控制器,没有就不用设置!");
        // 写于父类中的公共字段
        strategy.setSuperEntityColumns("id");
        strategy.setInclude(scanner("表名,多个英文逗号分割").split(","));
        strategy.setControllerMappingHyphenStyle(true);
        strategy.setTablePrefix(pc.getModuleName() + "_");
        mpg.setStrategy(strategy);
        mpg.setTemplateEngine(new FreemarkerTemplateEngine());
        mpg.execute();
    }
}
更多详细配置,请参考代码生成器配置一文。
使用教程
添加依赖
MyBatis-Plus 从 3.0.3 之后移除了代码生成器与模板引擎的默认依赖,需要手动添加相关依赖:
添加 代码生成器 依赖
<dependency>
  <groupId>com.baomidou</groupId>
  <artifactId>mybatis-plus-generator</artifactId>
  <version>3.4.2</version>
</dependency>
添加 模板引擎 依赖,MyBatis-Plus 支持 Velocity(默认)、Freemarker、Beetl,用户可以选择自己熟悉的模板引擎,如果都不满足您的要求,可以采用自定义模板引擎。
Velocity(默认):<dependency> <groupId>org.apache.velocity</groupId> <artifactId>velocity-engine-core</artifactId> <version>2.2</version> </dependency>Freemarker:
<dependency>
  <groupId>org.freemarker</groupId>
  <artifactId>freemarker</artifactId>
  <version>2.3.31</version>
</dependency>
Beetl:
<dependency>
  <groupId>com.ibeetl</groupId>
  <artifactId>beetl</artifactId>
  <version>3.3.2.RELEASE</version>
</dependency>
注意!如果您选择了非默认引擎,需要在 AutoGenerator 中 设置模板引擎。
AutoGenerator generator = new AutoGenerator();
// set freemarker engine
generator.setTemplateEngine(new FreemarkerTemplateEngine());
// set beetl engine
generator.setTemplateEngine(new BeetlTemplateEngine());
// set custom engine (reference class is your custom engine class)
generator.setTemplateEngine(new CustomTemplateEngine());
// other config
...
编写配置
MyBatis-Plus 的代码生成器提供了大量的自定义参数供用户选择,能够满足绝大部分人的使用需求。
配置 GlobalConfig
GlobalConfig globalConfig = new GlobalConfig();
globalConfig.setOutputDir(System.getProperty("user.dir") + "/src/main/java");
globalConfig.setAuthor("jobob");
globalConfig.setOpen(false);
配置 DataSourceConfig
DataSourceConfig dataSourceConfig = new DataSourceConfig();
dataSourceConfig.setUrl("jdbc:mysql://localhost:3306/ant?useUnicode=true&useSSL=false&characterEncoding=utf8");
dataSourceConfig.setDriverName("com.mysql.jdbc.Driver");
dataSourceConfig.setUsername("root");
dataSourceConfig.setPassword("password");
定制化配置
自定义模板引擎
请继承类 com.baomidou.mybatisplus.generator.engine.AbstractTemplateEngine
自定义代码模板
//指定自定义模板路径, 位置:/resources/templates/entity2.java.ftl(或者是.vm)
//注意不要带上.ftl(或者是.vm), 会根据使用的模板引擎自动识别
TemplateConfig templateConfig = new TemplateConfig()
    .setEntity("templates/entity2.java");
AutoGenerator mpg = new AutoGenerator();
//配置自定义模板
mpg.setTemplate(templateConfig);
自定义属性注入
InjectionConfig injectionConfig = new InjectionConfig() {
    //自定义属性注入:abc
    //在.ftl(或者是.vm)模板中,通过${cfg.abc}获取属性
    @Override
    public void initMap() {
        Map<String, Object> map = new HashMap<>();
        map.put("abc", this.getConfig().getGlobalConfig().getAuthor() + "-mp");
        this.setMap(map);
    }
};
AutoGenerator mpg = new AutoGenerator();
//配置自定义属性注入
mpg.setCfg(injectionConfig);
entity2.java.ftl
自定义属性注入abc=${cfg.abc}
entity2.java.vm
自定义属性注入abc=$!{cfg.abc}
字段其他信息查询注入
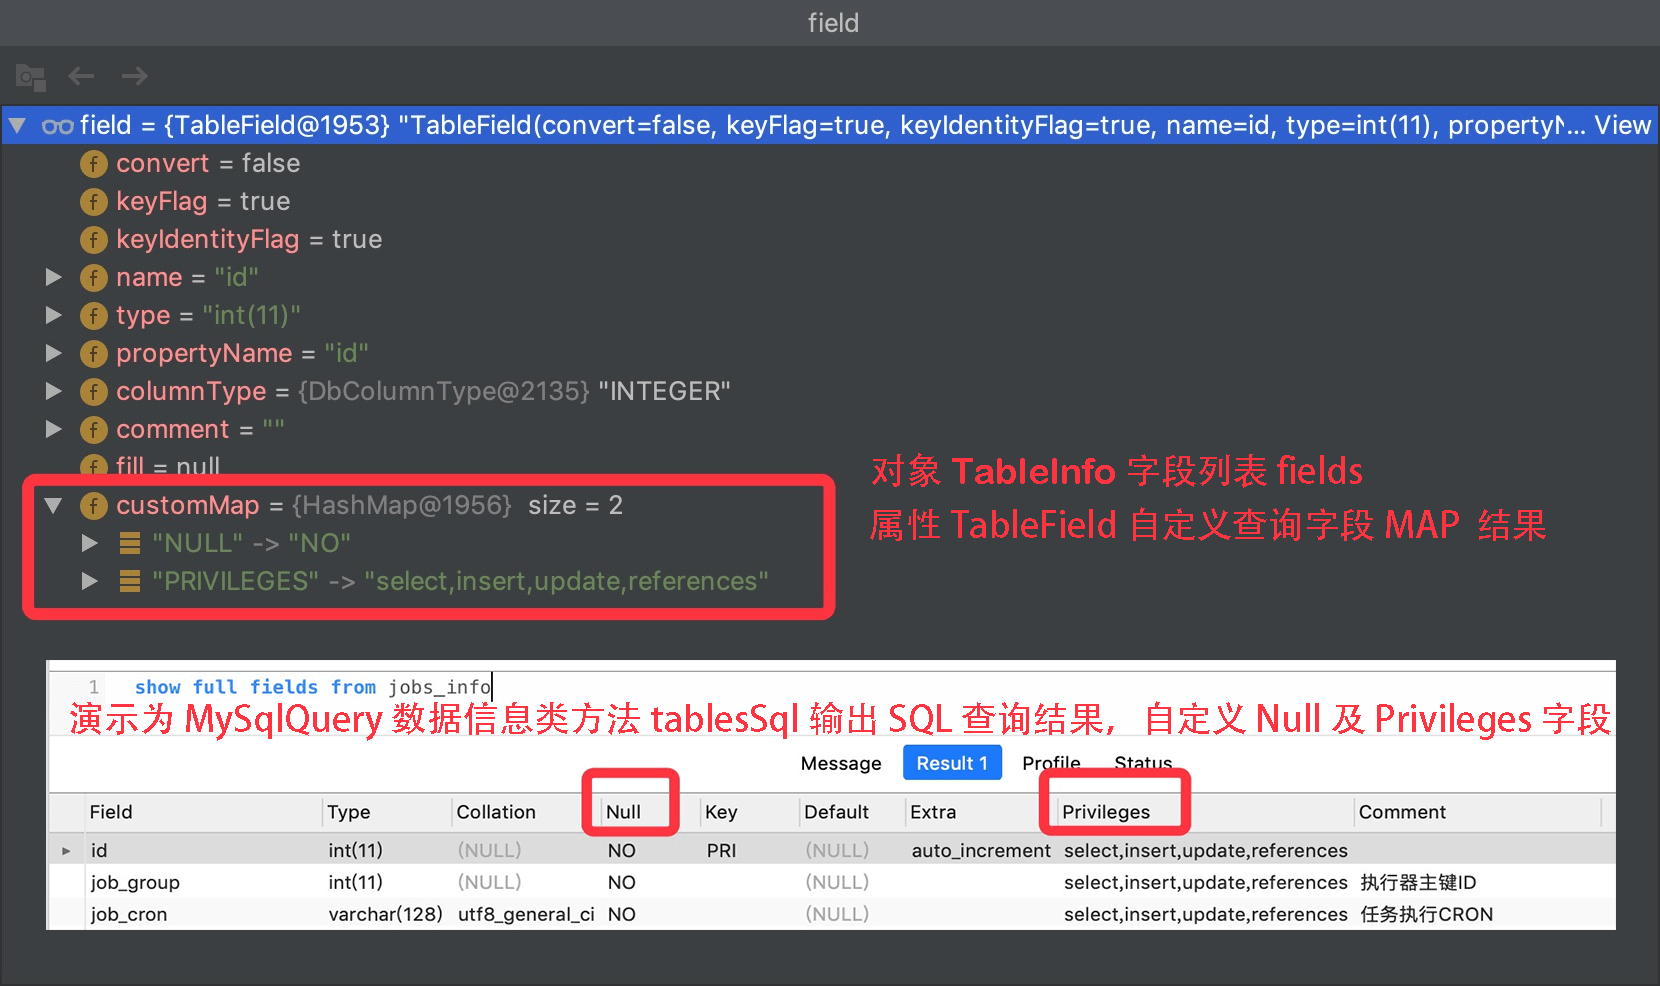
new DataSourceConfig().setDbQuery(new MySqlQuery() {
    /**
     * 重写父类预留查询自定义字段<br>
     * 这里查询的 SQL 对应父类 tableFieldsSql 的查询字段,默认不能满足你的需求请重写它<br>
     * 模板中调用:  table.fields 获取所有字段信息,
     * 然后循环字段获取 field.customMap 从 MAP 中获取注入字段如下  NULL 或者 PRIVILEGES
     */
    @Override
    public String[] fieldCustom() {
        return new String[]{"NULL", "PRIVILEGES"};
    }
})
代码测试
数据库SQL
DROP TABLE IF EXISTS person;
CREATE TABLE person (
    id BIGINT(20) NOT NULL COMMENT '主键ID',
    NAME VARCHAR(30) NULL DEFAULT NULL COMMENT '姓名',
    age INT(11) NULL DEFAULT NULL COMMENT '年龄',
    email VARCHAR(50) NULL DEFAULT NULL COMMENT '邮箱',
    createTime DATETIME NULL COMMENT '创建时间',
    updateTime DATETIME NULL COMMENT '修改时间',
    deleted INT NOT NULL DEFAULT 1 COMMENT '逻辑删除',
    PRIMARY KEY (id)
)
import com.baomidou.mybatisplus.annotation.DbType;
import com.baomidou.mybatisplus.annotation.FieldFill;
import com.baomidou.mybatisplus.annotation.IdType;
import com.baomidou.mybatisplus.generator.AutoGenerator;
import com.baomidou.mybatisplus.generator.config.DataSourceConfig;
import com.baomidou.mybatisplus.generator.config.GlobalConfig;
import com.baomidou.mybatisplus.generator.config.PackageConfig;
import com.baomidou.mybatisplus.generator.config.StrategyConfig;
import com.baomidou.mybatisplus.generator.config.po.TableFill;
import com.baomidou.mybatisplus.generator.config.rules.DateType;
import com.baomidou.mybatisplus.generator.config.rules.NamingStrategy;

import java.util.List;

/**
 * @className: CodeGenerator
 * @description 自动代码生成器:执行 main 方法控制台输入模块表名回车自动生成对应项目目录中
 * @author GMF
 * @date 2021/3/3
 * @time 16:33
*/
public class CodeGenerator {
    public static void main(String[] args) {
        //1.创建代码生成器
        AutoGenerator generator = new AutoGenerator();

        //2.全局配置
        //注意是com.baomidou.mybatisplus.generator.config.GlobalConfig
        GlobalConfig globalConfig = new GlobalConfig();
        String projectName = System.getProperty("user.dir");
        globalConfig.setOutputDir(projectName+"/src/main/java");
        //设置作者
        globalConfig.setAuthor("GMF");
        //设置是否打开输出目录
        globalConfig.setOpen(false);
        globalConfig.setIdType(IdType.AUTO);
        //设置Service的名称模板(%s会替换为UserService的User)
        globalConfig.setServiceName("%sService");
        globalConfig.setDateType(DateType.ONLY_DATE);

        //3.数据源配置
        DataSourceConfig dataSourceConfig = new DataSourceConfig();
        dataSourceConfig.setUrl("jdbc:mysql://localhost:3306/mybatisplus?serverTimezone=UTC")
                .setDriverName("com.mysql.cj.jdbc.Driver")
                .setUsername("root")
                .setPassword("root")
                .setDbType(DbType.MYSQL);

        //4.包配置
        PackageConfig packageConfig = new PackageConfig();
        //设置包路径已经模块名称
        packageConfig.setModuleName("generator")
                .setParent("com.gmf")
                .setEntity("entity")
                .setController("controller")
                .setMapper("mapper");

        //5.设置策略配置
        StrategyConfig strategyConfig = new StrategyConfig();
        //设置需要映射生成的表名
        strategyConfig.setInclude("person")
                .setNaming(NamingStrategy.underline_to_camel)
                .setColumnNaming(NamingStrategy.underline_to_camel)
                .setEntityLombokModel(true)  //设置自动Lombok
                .setLogicDeleteFieldName("deleted");  //设置逻辑删除
        //设置自动填充
        TableFill tableFillInsert = new TableFill("createTime", FieldFill.INSERT);
        TableFill tableFillUpdate = new TableFill("updateTime", FieldFill.INSERT);
        strategyConfig.setTableFillList(List.of(tableFillInsert,tableFillInsert));


        //6.将配置信息设置到AutoGenerator中(链式编程)
        generator.setGlobalConfig(globalConfig)
                .setDataSource(dataSourceConfig)
                .setPackageInfo(packageConfig)
                .setStrategy(strategyConfig);

        //7.执行自动生成
        generator.execute();
    }
}
查看执行后的目录结构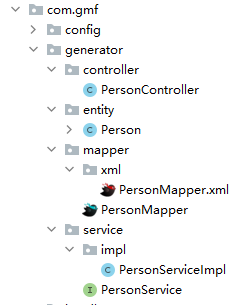

若有收获,就点个赞吧
0 人点赞
