七、指标监控
1. SpringBoot Actuator与Endpoint
简介
未来每一个微服务在云上部署以后,我们都需要对其进行监控、追踪、审计、控制等。SpringBoot就抽取了Actuator场景,使得我们每个微服务快速引用即可获得生产级别的应用监控、审计等功能。
官方文档 - Spring Boot Actuator: Production-ready Features
1.x与2.x的不同: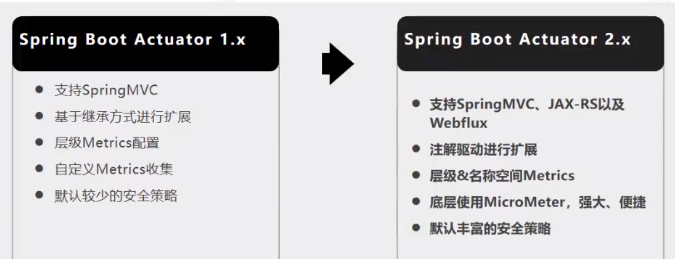
如何使用
添加依赖:
<dependency><groupId>org.springframework.boot</groupId><artifactId>spring-boot-starter-actuator</artifactId></dependency>

访问 http://localhost:8080/actuator/**(大部分断点是默认开启的,不过仅仅支持JMX平台,需要手动开启Web平台端点)
- 暴露所有监控信息为HTTP
#management是所有actuator的配置management:endpoints:enabled-by-default: true #暴露所有端点信息web:exposure:include: '*' #以web方式暴露
- 测试例子
actuator 英 [ˈæktjʊeɪtə] 美 [ˈæktjuˌeɪtər] n. 致动(促动,激励,调节)器;传动(装置,机构);拖动装置;马达;操作机构;执行机构(元件);(电磁铁)螺线管;操纵装置(阀门);调速控制器;往复运动油(气)缸;作动筒
metric 英 [ˈmetrɪk] 美 [ˈmetrɪk] adj. 米制的;公制的;按公制制作的;用公制测量的 n. 度量标准;[数学]度量;诗体;韵文;诗韵
2. 常使用的端点及开启与禁用
常使用的端点
| ID | 描述 |
|---|---|
auditevents |
暴露当前应用程序的审核事件信息。需要一个AuditEventRepository组件。 |
beans |
显示应用程序中所有Spring Bean的完整列表。 |
caches |
暴露可用的缓存。 |
conditions |
显示自动配置的所有条件信息,包括匹配或不匹配的原因。 |
configprops |
显示所有@ConfigurationProperties。 |
env |
暴露Spring的属性ConfigurableEnvironment |
flyway |
显示已应用的所有Flyway数据库迁移。 需要一个或多个Flyway组件。 |
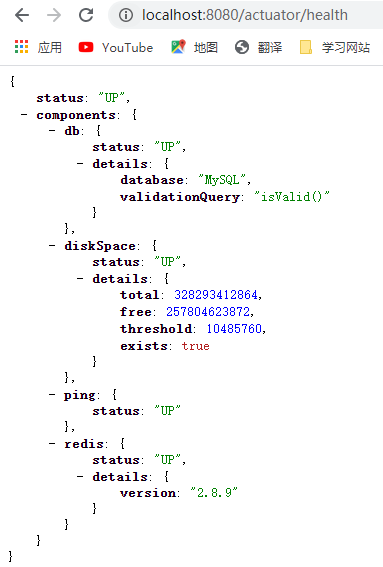
health |
显示应用程序运行状况信息。 |
httptrace |
显示HTTP跟踪信息(默认情况下,最近100个HTTP请求-响应)。需要一个HttpTraceRepository组件。 |
info |
显示应用程序信息。 |
integrationgraph |
显示Spring integrationgraph 。需要依赖spring-integration-core。 |
loggers |
显示和修改应用程序中日志的配置。 |
liquibase |
显示已应用的所有Liquibase数据库迁移。需要一个或多个Liquibase组件。 |
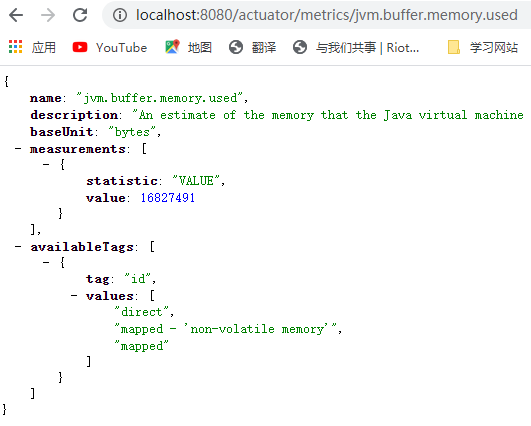
metrics |
显示当前应用程序的“指标”信息。 |
mappings |
显示所有@RequestMapping路径列表。 |
scheduledtasks |
显示应用程序中的计划任务。 |
sessions |
允许从Spring Session支持的会话存储中检索和删除用户会话。需要使用Spring Session的基于Servlet的Web应用程序。 |
shutdown |
使应用程序正常关闭。默认禁用。 |
startup |
显示由ApplicationStartup收集的启动步骤数据。需要使用SpringApplication进行配置BufferingApplicationStartup。 |
threaddump |
执行线程转储。 |
如果您的应用程序是Web应用程序(Spring MVC,Spring WebFlux或Jersey),则可以使用以下附加端点:
| ID | 描述 |
|---|---|
heapdump |
返回hprof堆转储文件。 |
jolokia |
通过HTTP暴露JMX bean(需要引入Jolokia,不适用于WebFlux)。需要引入依赖jolokia-core。 |
logfile |
返回日志文件的内容(如果已设置logging.file.name或logging.file.path属性)。支持使用HTTPRange标头来检索部分日志文件的内容。 |
prometheus |
以Prometheus服务器可以抓取的格式公开指标。需要依赖micrometer-registry-prometheus。 |
其中最常用的Endpoint:
- Health:监控状况
- Metrics:运行时指标
- Loggers:日志记录
Health Endpoint
健康检查端点,我们一般用于在云平台,平台会定时的检查应用的健康状况,我们就需要Health Endpoint可以为平台返回当前应用的一系列组件健康状况的集合。
重要的几点:
- health endpoint返回的结果,应该是一系列健康检查后的一个汇总报告。
- 很多的健康检查默认已经自动配置好了,比如:数据库、redis等。
- 可以很容易的添加自定义的健康检查机制。
可以对某一个端点进行具体的配置
For Example health:
#management是所有actuator的配置management:endpoints:enabled-by-default: trueweb:exposure:include: '*'#management.endpoint.端点名称.xxxx:对某个端点的具体配置endpoint:health:show-details: always
Metrics Endpoint
提供详细的、层级的、空间指标信息,这些信息可以被pull(主动推送)或者push(被动获取)方式得到:
- 通过Metrics对接多种监控系统。
- 简化核心Metrics开发。
- 添加自定义Metrics或者扩展已有Metrics。
开启与禁用Endpoints
- 默认所有的Endpoint除过shutdown都是开启的。
需要开启或者禁用某个Endpoint。配置模式为 management.endpoint.
.enabled = true management:endpoint:beans:enabled: true
或者禁用所有的Endpoint然后手动开启指定的Endpoint。
management:endpoints:enabled-by-default: falseendpoint:beans:enabled: truehealth:enabled: true
暴露Endpoints
支持的暴露方式
- HTTP:默认只暴露health和info。
- JMX:默认暴露所有Endpoint。
- 除过health和info,剩下的Endpoint都应该进行保护访问。如果引入Spring Security,则会默认配置安全访问规则。
| ID | JMX | Web |
| —- | —- | —- |
|
auditevents| Yes | No | |beans| Yes | No | |caches| Yes | No | |conditions| Yes | No | |configprops| Yes | No | |env| Yes | No | |flyway| Yes | No | |health| Yes | Yes | |heapdump| N/A | No | |httptrace| Yes | No | |info| Yes | Yes | |integrationgraph| Yes | No | |jolokia| N/A | No | |logfile| N/A | No | |loggers| Yes | No | |liquibase| Yes | No | |metrics| Yes | No | |mappings| Yes | No | |prometheus| N/A | No | |scheduledtasks| Yes | No | |sessions| Yes | No | |shutdown| Yes | No | |startup| Yes | No | |threaddump| Yes | No |
若要更改公开的Endpoint,请配置以下的包含和排除属性:
| Property | Default |
|---|---|
management.endpoints.jmx.exposure.exclude |
|
management.endpoints.jmx.exposure.include |
* |
management.endpoints.web.exposure.exclude |
|
management.endpoints.web.exposure.include |
info, health |
3. 定制Endpoint
定制 Health 信息
通过实现 HealthIndicator 接口,或继承 AbstractHealthIndicator 类
注意:类名一定要以 xxxHealthIndicator 格式命名,HealthIndicator结尾,xxx的部分作为组件名
import org.springframework.boot.actuate.health.Health;import org.springframework.boot.actuate.health.HealthIndicator;import org.springframework.stereotype.Component;@Componentpublic class MyHealthIndicator implements HealthIndicator {@Overridepublic Health health() {int errorCode = check(); // perform some specific health checkif (errorCode != 0) {return Health.down().withDetail("Error Code", errorCode).build();}return Health.up().build();}}/*构建HealthHealth build = Health.down().withDetail("msg", "error service").withDetail("code", "500").withException(new RuntimeException()).build();*/
@Component
public class MyComHealthIndicator extends AbstractHealthIndicator {
    /**
     * 真实的检查方法
     * @param builder
     * @throws Exception
     */
    @Override
    protected void doHealthCheck(Health.Builder builder) throws Exception {
        //mongodb。  获取连接进行测试
        Map<String,Object> map = new HashMap<>();
        // 检查完成
        if(1 == 2){
//            builder.up(); //健康
            builder.status(Status.UP);
            map.put("count",1);
            map.put("ms",100);
        }else {
//            builder.down();
            builder.status(Status.OUT_OF_SERVICE);
            map.put("err","连接超时");
            map.put("ms",3000);
        }
        builder.withDetail("code",100)
                .withDetails(map);
    }
}
定制info信息
常用两种方式:
编写配置文件
info:
appName: boot-admin
version: 2.0.1
mavenProjectName: @project.artifactId@  #使用@@可以获取maven的pom文件值
mavenProjectVersion: @project.version@
编写InfoContributor
import java.util.Collections;
import org.springframework.boot.actuate.info.Info;
import org.springframework.boot.actuate.info.InfoContributor;
import org.springframework.stereotype.Component;
@Component
public class ExampleInfoContributor implements InfoContributor {
  @Override
  public void contribute(Info.Builder builder) {
      builder.withDetail("example", Collections.singletonMap("key", "value"));
  }
}
http://localhost:8080/actuator/info 会输出以上方式返回的所有info信息
定制Metrics信息
Spring Boot支持的metrics
增加定制Metrics:
class MyService{
    //计数器对象
    Counter counter;

    //构造方法参数传递测量注册器
    public MyService(MeterRegistry meterRegistry){
        //通过测量注册器获取一个计数器,并指定该测量的名称
        counter = meterRegistry.counter("myservice.method.running.counter");
    }

    public void hello() {
        //每当调用该方法时,计数器+1
        counter.increment();
    }
}
//也可以使用下面的方式
@Bean
MeterBinder queueSize(Queue queue) {
    return (registry) -> Gauge.builder("queueSize", queue::size).register(registry);
}
定制Endpoint
@Component
@Endpoint(id = "container")
public class DockerEndpoint {

    //返回值自定义,不能带有参数
    @ReadOperation
    public Map getDockerInfo(){
        return Collections.singletonMap("info","docker started...");
    }

    @WriteOperation
    private void restartDocker(){
        System.out.println("docker restarted....");
    }
}
场景:
- 开发ReadinessEndpoint来管理程序是否就绪。
- 开发LivenessEndpoint来管理程序是否存活。
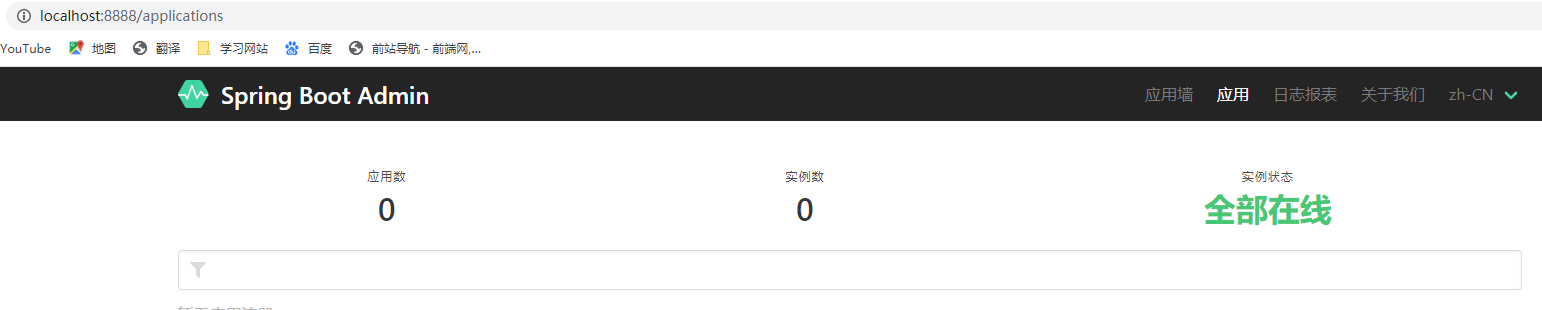
4. Boot Admin Server
What is Spring Boot Admin? codecentric’s Spring Boot Admin is a community project to manage and monitor your Spring Boot ® applications. The applications register with our Spring Boot Admin Client (via HTTP) or are discovered using Spring Cloud ® (e.g. Eureka, Consul). The UI is just a Vue.js application on top of the Spring Boot Actuator endpoints.
在提供监控服务的项目中导入相关依赖
<dependency>
    <groupId>de.codecentric</groupId>
    <artifactId>spring-boot-admin-starter-server</artifactId>
    <version>2.3.1</version>
</dependency>
主程序开启监控服务
@SpringBootApplication
@EnableAdminServer  //开启监控服务
public class AdminServerApplication {

    public static void main(String[] args) {
        SpringApplication.run(AdminServerApplication.class, args);
    }

}
本机测试时注意端口冲突
#修改端口号
server:
  port: 8888
在需要监控的项目中添加如下依赖
<dependency>
    <groupId>de.codecentric</groupId>
    <artifactId>spring-boot-admin-starter-client</artifactId>
    <version>2.3.1</version>
</dependency>
绑定提供监控服务的url
#配置监控服务的url
spring:
  boot:
    admin:
      client:
        url: http://localhost:8888
        instance:
          prefer-ip: true  #设置IP地址为服务名称
  application:
    name: adminServer
八、高级特性
1. Profile环境切换
为了方便多环境适配,Spring Boot简化了profile功能。
- 默认配置文件 application.yaml 任何时候都会加载。
- 指定环境配置文件 application-{env}.yaml,env 通常替代为 test/prod
- 激活指定环境
- 配置文件激活:spring.profiles.active=prod
- 命令行激活:java -jar xxx.jar —spring.profiles.active=prod —person.name=haha(修改配置文件的任意值,命令行优先)
- 默认配置与环境配置同时生效
- 同名配置项,profile配置优先
@Profile条件装配功能
@Data
@Component
@ConfigurationProperties("person")//在配置文件中配置
public class Person{
    private String name;
    private Integer age;
}
application.properties
person:
  name: lun
  age: 8
public interface Person {
   String getName();
   Integer getAge();
}

@Profile("test")//加载application-test.yaml里的
@Component
@ConfigurationProperties("person")
@Data
public class Worker implements Person {
    private String name;
    private Integer age;
}

@Profile(value = {"prod","default"})//加载application-prod.yaml里的
@Component
@ConfigurationProperties("person")
@Data
public class Boss implements Person {
    private String name;
    private Integer age;
}
application-test.yaml
person:
  name: test-张三
server:
  port: 7000
application-prod.yaml
person:
  name: prod-张三
server:
  port: 8000
application.properties
# 激活prod配置文件
spring.profiles.active=prod
@Autowired
private Person person;
@GetMapping("/")
public String hello(){
    //激活了prod,则返回Boss;激活了test,则返回Worker
    return person.getClass().toString();
}
@Profile还可以修饰在方法上:
class Color {
}
@Configuration
public class MyConfig {

    @Profile("prod")
    @Bean
    public Color red(){
        return new Color();
    }

    @Profile("test")
    @Bean
    public Color green(){
        return new Color();
    }
}
可以激活一组:
spring.profiles.active=production
spring.profiles.group.production[0]=proddb
spring.profiles.group.production[1]=prodmq
2. 配置加载优先级
外部化配置
官方文档 - Externalized Configuration
Spring Boot uses a very particular PropertySource order that is designed to allow sensible overriding of values. Properties are considered in the following order (with values from lower items overriding earlier ones)(1优先级最低,14优先级最高):
- Default properties (specified by setting SpringApplication.setDefaultProperties).
- @PropertySource annotations on your @Configuration classes. Please note that such property sources are not added to the Environment until the application context is being refreshed. This is too late to configure certain properties such as logging. and spring.main. which are read before refresh begins.
- Config data (such as application.properties files)
- A RandomValuePropertySource that has properties only in random.*
- OS environment variables.
- Java System properties (System.getProperties()).
- JNDI attributes from java:comp/env
- ServletContext init parameters.
- ServletConfig init parameters.
- Properties from SPRING_APPLICATION_JSON (inline JSON embedded in an environment variable or system property).
- Command line arguments.
- properties attribute on your tests. Available on @SpringBootTest and the test annotations for testing a particular slice of your application.
@TestPropertySourceannotations on your tests.- Devtools global settings properties in the $HOME/.config/spring-boot directory when devtools is active.
import org.springframework.stereotype.*;
import org.springframework.beans.factory.annotation.*;
@Component
public class MyBean {
    @Value("${name}")//以这种方式可以获得配置值
    private String name;
    // ...
}
- 外部配置源
- Java属性文件。
- YAML文件。
- 环境变量。
- 命令行参数。
- 配置文件查找位置
- classpath 根路径。
- classpath 根路径下config目录。
- jar包当前目录。
- jar包当前目录的config目录。
- /config子目录的直接子目录。
- 配置文件加载顺序:
- 当前jar包内部的 application.properties 和 application.yml
- 当前jar包内部的 application-{profile}.properties 和 application-{profile}.yml
- 引用的外部jar包的 application.properties 和 application.yml
- 引用的外部jar包的 application-{profile}.properties 和 application-{profile}.yml
指定环境优先,外部优先,后面的可以覆盖前面的同名配置项
**
3. 自定义starter细节
starter启动原理
- starter的pom.xml引入autoconfigure依赖

- autoconfigure包中配置使用 META-INF/spring.factories 中 EnableAutoConfiguration 的值,使得项目启动加载指定的自动配置类
- 编写自动配置类 xxxAutoConfiguration -> xxxxProperties
- @Configuration
- @Conditional
- @EnableConfigurationProperties
- @Bean
- …
- 引入starter — xxxAutoConfiguration — 容器中放入组件 —— 绑定xxxProperties —— 配置项
自定义starter
- 目标:创建 HelloService 的自定义starter。
- 创建两个工程,分别命名为 hello-spring-boot-starter(普通Maven工程),hello-spring-boot-starter-autoconfigure(需用用到Spring Initializr创建的Maven工程)。
hello-spring-boot-starter 无需编写什么代码,只需让该工程引入 hello-spring-boot-starter-autoconfigure 依赖:
<?xml version="1.0" encoding="UTF-8"?>
<project xmlns="http://maven.apache.org/POM/4.0.0"
       xmlns:xsi="http://www.w3.org/2001/XMLSchema-instance"
       xsi:schemaLocation="http://maven.apache.org/POM/4.0.0 http://maven.apache.org/xsd/maven-4.0.0.xsd">
  <modelVersion>4.0.0</modelVersion>
  <groupId>com.lun</groupId>
  <artifactId>hello-spring-boot-starter</artifactId>
  <version>1.0.0-SNAPSHOT</version>
  <dependencies>
      <dependency>
          <groupId>com.lun</groupId>
          <artifactId>hello-spring-boot-starter-autoconfigure</artifactId>
          <version>1.0.0-SNAPSHOT</version>
      </dependency>
  </dependencies>
</project>
hello-spring-boot-starter-autoconfigure 的pom.xml如下:
<?xml version="1.0" encoding="UTF-8"?>
<project xmlns="http://maven.apache.org/POM/4.0.0" xmlns:xsi="http://www.w3.org/2001/XMLSchema-instance"
  xsi:schemaLocation="http://maven.apache.org/POM/4.0.0 https://maven.apache.org/xsd/maven-4.0.0.xsd">
  <modelVersion>4.0.0</modelVersion>
  <parent>
      <groupId>org.springframework.boot</groupId>
      <artifactId>spring-boot-starter-parent</artifactId>
      <version>2.4.2</version>
      <relativePath/> <!-- lookup parent from repository -->
  </parent>
  <groupId>com.lun</groupId>
  <artifactId>hello-spring-boot-starter-autoconfigure</artifactId>
  <version>1.0.0-SNAPSHOT</version>
  <name>hello-spring-boot-starter-autoconfigure</name>
  <description>Demo project for Spring Boot</description>
  <properties>
      <java.version>1.8</java.version>
  </properties>

  <dependencies>
      <dependency>
          <groupId>org.springframework.boot</groupId>
          <artifactId>spring-boot-starter</artifactId>
      </dependency>
  </dependencies>
</project>
创建4个文件:
- com/lun/hello/auto/HelloServiceAutoConfiguration.java
- com/lun/hello/bean/HelloProperties.java
- com/lun/hello/service/HelloService.java
- src/main/resources/META-INF/spring.factories ```java import com.lun.hello.bean.HelloProperties; import com.lun.hello.service.HelloService; import org.springframework.boot.autoconfigure.condition.ConditionalOnMissingBean; import org.springframework.boot.context.properties.EnableConfigurationProperties; import org.springframework.context.annotation.Bean; import org.springframework.context.annotation.Configuration;
@Configuration @ConditionalOnMissingBean(HelloService.class) @EnableConfigurationProperties(HelloProperties.class)//默认HelloProperties放在容器中 public class HelloServiceAutoConfiguration { @Bean public HelloService helloService(){ return new HelloService(); } }
```java
import org.springframework.boot.context.properties.ConfigurationProperties;

@ConfigurationProperties("hello")
public class HelloProperties {
    private String prefix;
    private String suffix;

    public String getPrefix() {
        return prefix;
    }

    public void setPrefix(String prefix) {
        this.prefix = prefix;
    }

    public String getSuffix() {
        return suffix;
    }

    public void setSuffix(String suffix) {
        this.suffix = suffix;
    }
}
import com.lun.hello.bean.HelloProperties;
import org.springframework.beans.factory.annotation.Autowired;


/**
 * 默认不要放在容器中
 */
public class HelloService {

    @Autowired
    private HelloProperties helloProperties;

    public String sayHello(String userName){
        return helloProperties.getPrefix() + ": " + userName + " > " + helloProperties.getSuffix();
    }
}
# Auto Configure  指定加载哪些自动配置类
org.springframework.boot.autoconfigure.EnableAutoConfiguration=\
com.lun.hello.auto.HelloServiceAutoConfiguration
- 用maven插件,将两工程install到本地仓库。
接下来,测试使用自定义starter,用Spring Initializr创建名为 hello-spring-boot-starter-test 工程,引入 hello-spring-boot-starter 依赖,其pom.xml如下:
<?xml version="1.0" encoding="UTF-8"?>
<project xmlns="http://maven.apache.org/POM/4.0.0" xmlns:xsi="http://www.w3.org/2001/XMLSchema-instance"
       xsi:schemaLocation="http://maven.apache.org/POM/4.0.0 https://maven.apache.org/xsd/maven-4.0.0.xsd">
  <modelVersion>4.0.0</modelVersion>
  <parent>
      <groupId>org.springframework.boot</groupId>
      <artifactId>spring-boot-starter-parent</artifactId>
      <version>2.4.2</version>
      <relativePath/> <!-- lookup parent from repository -->
  </parent>
  <groupId>com.lun</groupId>
  <artifactId>hello-spring-boot-starter-test</artifactId>
  <version>1.0.0-SNAPSHOT</version>
  <name>hello-spring-boot-starter-test</name>
  <description>Demo project for Spring Boot</description>
  <properties>
      <java.version>1.8</java.version>
  </properties>

  <dependencies>
      <dependency>
          <groupId>org.springframework.boot</groupId>
          <artifactId>spring-boot-starter</artifactId>
      </dependency>
      <dependency>
          <groupId>org.springframework.boot</groupId>
          <artifactId>spring-boot-starter-test</artifactId>
          <scope>test</scope>
      </dependency>
      <!-- 引入`hello-spring-boot-starter`依赖 -->
      <dependency>
          <groupId>com.lun</groupId>
          <artifactId>hello-spring-boot-starter</artifactId>
          <version>1.0.0-SNAPSHOT</version>
      </dependency>
  </dependencies>

  <build>
      <plugins>
          <plugin>
              <groupId>org.springframework.boot</groupId>
              <artifactId>spring-boot-maven-plugin</artifactId>
          </plugin>
      </plugins>
  </build>
</project>
添加配置文件 application.properties:
hello.prefix=hello
hello.suffix=666
添加单元测试类: ```java import com.lun.hello.service.HelloService; //来自自定义starter import org.junit.jupiter.api.Assertions; import org.junit.jupiter.api.Test; import org.springframework.beans.factory.annotation.Autowired; import org.springframework.boot.test.context.SpringBootTest;
@SpringBootTest class HelloSpringBootStarterTestApplicationTests { @Autowired private HelloService helloService; @Test void contextLoads() { // System.out.println(helloService.sayHello(“lun”)); Assertions.assertEquals(“hello: lun > 666”, helloService.sayHello(“lun”)); } }
<a name="DA527"></a>
# 九、原理解析
<a name="oyy3H"></a>
## 1. SpringApplication创建初始化流程
**SpringBoot启动过程**
- **创建SpringApplication**
- 保存一些信息。
- 判定当前应用的类型。ClassUtils。Servlet
- **bootstrappers****:初始启动引导器**(List<Bootstrapper>) : 去`spring.factories`文件中找`org.springframework.boot.Bootstrapper`
- 找**ApplicationContextInitializer**,去`spring.factories`找ApplicationContextlnitializerm List<ApplicationContextInitializer<?>>Initializers
- 找**ApplicationListener**:**应用监听器**。去`spring.factories`找ApplicationListenerm List<ApplicationListener<?>> listeners
<br />**
Spring Boot应用的启动类:
```java
import org.springframework.boot.SpringApplication;
import org.springframework.boot.autoconfigure.SpringBootApplication;
@SpringBootApplication
public class AdminServerApplication {
public static void main(String[] args) {
SpringApplication.run(AdminServerApplication.class, args);
}
}
运行Spring应用:
public class SpringApplication {

    ...

    public static ConfigurableApplicationContext run(Class<?> primarySource, String... args) {
        return run(new Class<?>[] { primarySource }, args);
    }

    public static ConfigurableApplicationContext run(Class<?>[] primarySources, String[] args) {
        return new SpringApplication(primarySources).run(args);
    }

    //先看看new SpringApplication(primarySources),下一节再看看run()
    public SpringApplication(Class<?>... primarySources) {
        this(null, primarySources);
    }

    public SpringApplication(ResourceLoader resourceLoader, Class<?>... primarySources) {
        this.resourceLoader = resourceLoader;
        Assert.notNull(primarySources, "PrimarySources must not be null");
        this.primarySources = new LinkedHashSet<>(Arrays.asList(primarySources));
        //WebApplicationType是枚举类,有NONE,SERVLET,REACTIVE,下行webApplicationType是SERVLET
        this.webApplicationType = WebApplicationType.deduceFromClasspath();

        //初始启动引导器,去spring.factories文件中找org.springframework.boot.Bootstrapper,但我找不到实现Bootstrapper接口的类
        this.bootstrappers = new ArrayList<>(getSpringFactoriesInstances(Bootstrapper.class));

        //去spring.factories找 ApplicationContextInitializer
        setInitializers((Collection) getSpringFactoriesInstances(ApplicationContextInitializer.class));

        //去spring.factories找 ApplicationListener
        setListeners((Collection) getSpringFactoriesInstances(ApplicationListener.class));

        //查询可执行的main方法
        this.mainApplicationClass = deduceMainApplicationClass();
    }

    private Class<?> deduceMainApplicationClass() {
        try {
            StackTraceElement[] stackTrace = new RuntimeException().getStackTrace();
            for (StackTraceElement stackTraceElement : stackTrace) {
                if ("main".equals(stackTraceElement.getMethodName())) {
                    return Class.forName(stackTraceElement.getClassName());
                }
            }
        }
        catch (ClassNotFoundException ex) {
            // Swallow and continue
        }
        return null;
    }

    ...

}
spring.factories:
...
# Application Context Initializers
org.springframework.context.ApplicationContextInitializer=\
org.springframework.boot.context.ConfigurationWarningsApplicationContextInitializer,\
org.springframework.boot.context.ContextIdApplicationContextInitializer,\
org.springframework.boot.context.config.DelegatingApplicationContextInitializer,\
org.springframework.boot.rsocket.context.RSocketPortInfoApplicationContextInitializer,\
org.springframework.boot.web.context.ServerPortInfoApplicationContextInitializer
# Application Listeners
org.springframework.context.ApplicationListener=\
org.springframework.boot.ClearCachesApplicationListener,\
org.springframework.boot.builder.ParentContextCloserApplicationListener,\
org.springframework.boot.context.FileEncodingApplicationListener,\
org.springframework.boot.context.config.AnsiOutputApplicationListener,\
org.springframework.boot.context.config.DelegatingApplicationListener,\
org.springframework.boot.context.logging.LoggingApplicationListener,\
org.springframework.boot.env.EnvironmentPostProcessorApplicationListener,\
org.springframework.boot.liquibase.LiquibaseServiceLocatorApplicationListener
...
2. SpringBoot完整启动过程
- 运行SpringApplication
- stopWatch
- 记录应用启动时间
- 创建引导上下文
- 获取到之前所有的 bootstrappers 挨个执行,
intitialize()方法来完成对引导启动器的上下文配置 - 让当前应用进入
headless模式。java.awt.headless - 获取所有 RunListener (运行监听器)【为了方便所有Listener进行事件感知】
getSpringFactoriesInstances()去spring.factories找 SpringApplicationRunListener**.**
- 遍历 SpringApplicationRunListener 调用
starting()- 相当于通知所有感兴趣系统正在启动过程的人,项目正在starting().
- 保存命令行参数;ApplicationArguments
- 准备环境
prepareEnvironment()方法:- 返回或者创建基础环境信息对象,StandardServletEnvironment
- 配置环境信息对象。
- 读取所有的配置源的配置属性值。
- 绑定环境信息
- 监听器调用
listener.environmentPrepared()通知所有的监听器当前环境准备完成
- 打印Banner
- 创建IOC容器
createApplicationContext()- 根据项目类型 (Servlet) 创建容器
- 当前会创建 AnnotationConfigServletWebServerApplicationContext
- 准备ApplicationContext IOC容器的基本信息,
prepareContext()- 保存环境信息
- IOC容器的后置处理流程
- 应用初始化器
applyInitializers()- 遍历所有的 ApplicationContextInitializer。调用
initialize()。来对ioc容器进行初始化扩展功能 - 遍历所有的 listener 调用
contextPrepared()。(EventPublishRunListenr;通知所有的监听器 contextPrepared)
- 遍历所有的 ApplicationContextInitializer。调用
- 通知所有的监听器调用
contextLoaded()
- 刷新IOC容器
refreshContext()- 核心:创建容器中所有的组件
- 容器刷新完成后工作?
afterRefresh() - 所有监听器调用
listeners.started(context)通知所有的监听器started - 调用所有runners
callRunnerso()- 获取容器中的ApplicationRunner
- 获取容器中的CommandLineRunner
- 合并所有runner并且按照@Order进行排序
- 遍历所有的runner。调用
run()
- 如果以上有异常,
- 调用Listener 的
failed()
- 调用Listener 的
- 调用所有监听器的running方法 listeners.running(context);通知所有的监听器running
- running如果有问题。继续通知failed。调用所有Listener的 failed;通知所有的监听器 failed
- 获取到之前所有的 bootstrappers 挨个执行,
继续上一节,接着讨论 return new SpringApplication(primarySources).run(args) 的 run 方法
public class SpringApplication {

    ...

    public ConfigurableApplicationContext run(String... args) {
        StopWatch stopWatch = new StopWatch();//开始计时器
        stopWatch.start();//开始计时

        //1.
        //创建引导上下文(Context环境)createBootstrapContext()
        //获取到所有之前的 bootstrappers 挨个执行 intitialize() 来完成对引导启动器上下文环境设置
        DefaultBootstrapContext bootstrapContext = createBootstrapContext();

        //2.到最后该方法会返回这context
        ConfigurableApplicationContext context = null;

        //3.让当前应用进入headless模式
        configureHeadlessProperty();

        //4.获取所有 RunListener(运行监听器),为了方便所有Listener进行事件感知
        SpringApplicationRunListeners listeners = getRunListeners(args);

        //5. 遍历 SpringApplicationRunListener 调用 starting 方法;
        // 相当于通知所有感兴趣系统正在启动过程的人,项目正在 starting。
        listeners.starting(bootstrapContext, this.mainApplicationClass);
        try {
            //6.保存命令行参数 ApplicationArguments
            ApplicationArguments applicationArguments = new DefaultApplicationArguments(args);

            //7.准备环境
            ConfigurableEnvironment environment = prepareEnvironment(listeners, bootstrapContext, applicationArguments);
            configureIgnoreBeanInfo(environment);

            /*打印标志
              .   ____          _            __ _ _
             /\\ / ___'_ __ _ _(_)_ __  __ _ \ \ \ \
            ( ( )\___ | '_ | '_| | '_ \/ _` | \ \ \ \
             \\/  ___)| |_)| | | | | || (_| |  ) ) ) )
              '  |____| .__|_| |_|_| |_\__, | / / / /
             =========|_|==============|___/=/_/_/_/
             :: Spring Boot ::                (v2.4.2)
            */
            Banner printedBanner = printBanner(environment);

            // 创建IOC容器(createApplicationContext())
            // 根据项目类型webApplicationType(NONE,SERVLET,REACTIVE)创建容器,
            // 当前会创建 AnnotationConfigServletWebServerApplicationContext
            context = createApplicationContext();
            context.setApplicationStartup(this.applicationStartup);

            //8.准备ApplicationContext IOC容器的基本信息
            prepareContext(bootstrapContext, context, environment, listeners, applicationArguments, printedBanner);
            //9.刷新IOC容器,创建容器中的所有组件,Spring框架的内容
            refreshContext(context);
            //该方法没内容,大概为将来填入
            afterRefresh(context, applicationArguments);
            stopWatch.stop();//停止计时
            if (this.logStartupInfo) {//this.logStartupInfo默认是true
                new StartupInfoLogger(this.mainApplicationClass).logStarted(getApplicationLog(), stopWatch);
            }
            //10.
            listeners.started(context);

            //11.调用所有runners
            callRunners(context, applicationArguments);
        }
        catch (Throwable ex) {
            //13.
            handleRunFailure(context, ex, listeners);
            throw new IllegalStateException(ex);
        }
        try {
            //12.
            listeners.running(context);
        }
        catch (Throwable ex) {
            //13.
            handleRunFailure(context, ex, null);
            throw new IllegalStateException(ex);
        }
        return context;
    }

    ---------------------------------------------------------------------

    //1.
    private DefaultBootstrapContext createBootstrapContext() {
        DefaultBootstrapContext bootstrapContext = new DefaultBootstrapContext();
        this.bootstrappers.forEach((initializer) -> initializer.intitialize(bootstrapContext));
        return bootstrapContext;
    }

    //3.
       private void configureHeadlessProperty() {
        //this.headless默认为true
        System.setProperty(SYSTEM_PROPERTY_JAVA_AWT_HEADLESS, System.getProperty(SYSTEM_PROPERTY_JAVA_AWT_HEADLESS, Boolean.toString(this.headless)));
    }

    private static final String SYSTEM_PROPERTY_JAVA_AWT_HEADLESS = "java.awt.headless";

    //4.
    private SpringApplicationRunListeners getRunListeners(String[] args) {
        Class<?>[] types = new Class<?>[] { SpringApplication.class, String[].class };
        //getSpringFactoriesInstances 去 spring.factories 找 SpringApplicationRunListener
        return new SpringApplicationRunListeners(logger, getSpringFactoriesInstances(SpringApplicationRunListener.class, types, this, args),
                this.applicationStartup);
    }

    //7.准备环境
    private ConfigurableEnvironment prepareEnvironment(SpringApplicationRunListeners listeners,
            DefaultBootstrapContext bootstrapContext, ApplicationArguments applicationArguments) {
        // Create and configure the environment
        //返回或者创建基础环境信息对象,如:StandardServletEnvironment, StandardReactiveWebEnvironment
        ConfigurableEnvironment environment = getOrCreateEnvironment();
        //配置环境信息对象,读取所有的配置源的配置属性值。
        configureEnvironment(environment, applicationArguments.getSourceArgs());
        //绑定环境信息
        ConfigurationPropertySources.attach(environment);
        //7.1 通知所有的监听器当前环境准备完成
        listeners.environmentPrepared(bootstrapContext, environment);
        DefaultPropertiesPropertySource.moveToEnd(environment);
        configureAdditionalProfiles(environment);
        bindToSpringApplication(environment);
        if (!this.isCustomEnvironment) {
            environment = new EnvironmentConverter(getClassLoader()).convertEnvironmentIfNecessary(environment,
                    deduceEnvironmentClass());
        }
        ConfigurationPropertySources.attach(environment);
        return environment;
    }

    //8.
    private void prepareContext(DefaultBootstrapContext bootstrapContext, ConfigurableApplicationContext context,
            ConfigurableEnvironment environment, SpringApplicationRunListeners listeners,
            ApplicationArguments applicationArguments, Banner printedBanner) {
        //保存环境信息
        context.setEnvironment(environment);
        //IOC容器的后置处理流程
        postProcessApplicationContext(context);
        //应用初始化器
        applyInitializers(context);
        //8.1 遍历所有的 listener 调用 contextPrepared
        //EventPublishRunListenr通知所有的监听器contextPrepared
        listeners.contextPrepared(context);
        bootstrapContext.close(context);
        if (this.logStartupInfo) {
            logStartupInfo(context.getParent() == null);
            logStartupProfileInfo(context);
        }
        // Add boot specific singleton beans
        ConfigurableListableBeanFactory beanFactory = context.getBeanFactory();
        beanFactory.registerSingleton("springApplicationArguments", applicationArguments);
        if (printedBanner != null) {
            beanFactory.registerSingleton("springBootBanner", printedBanner);
        }
        if (beanFactory instanceof DefaultListableBeanFactory) {
            ((DefaultListableBeanFactory) beanFactory)
                    .setAllowBeanDefinitionOverriding(this.allowBeanDefinitionOverriding);
        }
        if (this.lazyInitialization) {
            context.addBeanFactoryPostProcessor(new LazyInitializationBeanFactoryPostProcessor());
        }
        // Load the sources
        Set<Object> sources = getAllSources();
        Assert.notEmpty(sources, "Sources must not be empty");
        load(context, sources.toArray(new Object[0]));
        //8.2
        listeners.contextLoaded(context);
    }

    //9.深入查看到该方法,通过该方法注册了IOC容器中的对象
    @Override
    public void refresh() throws BeansException, IllegalStateException {
        synchronized (this.startupShutdownMonitor) {
            StartupStep contextRefresh = this.applicationStartup.start("spring.context.refresh");

            // Prepare this context for refreshing.
            prepareRefresh();

            // Tell the subclass to refresh the internal bean factory.
            ConfigurableListableBeanFactory beanFactory = obtainFreshBeanFactory();

            // Prepare the bean factory for use in this context.
            prepareBeanFactory(beanFactory);

            try {
                // Allows post-processing of the bean factory in context subclasses.
                postProcessBeanFactory(beanFactory);

                StartupStep beanPostProcess = this.applicationStartup.start("spring.context.beans.post-process");
                // Invoke factory processors registered as beans in the context.
                invokeBeanFactoryPostProcessors(beanFactory);

                // Register bean processors that intercept bean creation.
                registerBeanPostProcessors(beanFactory);
                beanPostProcess.end();

                // Initialize message source for this context.
                initMessageSource();

                // Initialize event multicaster for this context.
                initApplicationEventMulticaster();

                // Initialize other special beans in specific context subclasses.
                onRefresh();

                // Check for listener beans and register them.
                registerListeners();

                // Instantiate all remaining (non-lazy-init) singletons.
                //核心步骤:创建容器中的所有组件
                finishBeanFactoryInitialization(beanFactory);

                // Last step: publish corresponding event.
                finishRefresh();
            }

            catch (BeansException ex) {
                if (logger.isWarnEnabled()) {
                    logger.warn("Exception encountered during context initialization - " +
                            "cancelling refresh attempt: " + ex);
                }

                // Destroy already created singletons to avoid dangling resources.
                destroyBeans();

                // Reset 'active' flag.
                cancelRefresh(ex);

                // Propagate exception to caller.
                throw ex;
            }

            finally {
                // Reset common introspection caches in Spring's core, since we
                // might not ever need metadata for singleton beans anymore...
                resetCommonCaches();
                contextRefresh.end();
            }
        }
    }

    //11.调用所有runners
    private void callRunners(ApplicationContext context, ApplicationArguments args) {
        List<Object> runners = new ArrayList<>();

        //获取容器中的 ApplicationRunner
        runners.addAll(context.getBeansOfType(ApplicationRunner.class).values());
        //获取容器中的  CommandLineRunner
        runners.addAll(context.getBeansOfType(CommandLineRunner.class).values());
        //合并所有runner并且按照@Order进行排序
        AnnotationAwareOrderComparator.sort(runners);
        //遍历所有的runner。调用 run 方法
        for (Object runner : new LinkedHashSet<>(runners)) {
            if (runner instanceof ApplicationRunner) {
                callRunner((ApplicationRunner) runner, args);
            }
            if (runner instanceof CommandLineRunner) {
                callRunner((CommandLineRunner) runner, args);
            }
        }
    }

    //13.
    private void handleRunFailure(ConfigurableApplicationContext context, Throwable exception,
            SpringApplicationRunListeners listeners) {
        try {
            try {
                handleExitCode(context, exception);
                if (listeners != null) {
                    //14.
                    listeners.failed(context, exception);
                }
            }
            finally {
                reportFailure(getExceptionReporters(context), exception);
                if (context != null) {
                    context.close();
                }
            }
        }
        catch (Exception ex) {
            logger.warn("Unable to close ApplicationContext", ex);
        }
        ReflectionUtils.rethrowRuntimeException(exception);
    }

    ...
}
//2. new SpringApplication(primarySources).run(args) 最后返回的接口类型
public interface ConfigurableApplicationContext extends ApplicationContext, Lifecycle, Closeable {
    String CONFIG_LOCATION_DELIMITERS = ",; \t\n";
    String CONVERSION_SERVICE_BEAN_NAME = "conversionService";
    String LOAD_TIME_WEAVER_BEAN_NAME = "loadTimeWeaver";
    String ENVIRONMENT_BEAN_NAME = "environment";
    String SYSTEM_PROPERTIES_BEAN_NAME = "systemProperties";
    String SYSTEM_ENVIRONMENT_BEAN_NAME = "systemEnvironment";
    String APPLICATION_STARTUP_BEAN_NAME = "applicationStartup";
    String SHUTDOWN_HOOK_THREAD_NAME = "SpringContextShutdownHook";

    void setId(String var1);

    void setParent(@Nullable ApplicationContext var1);

    void setEnvironment(ConfigurableEnvironment var1);

    ConfigurableEnvironment getEnvironment();

    void setApplicationStartup(ApplicationStartup var1);

    ApplicationStartup getApplicationStartup();

    void addBeanFactoryPostProcessor(BeanFactoryPostProcessor var1);

    void addApplicationListener(ApplicationListener<?> var1);

    void setClassLoader(ClassLoader var1);

    void addProtocolResolver(ProtocolResolver var1);

    void refresh() throws BeansException, IllegalStateException;

    void registerShutdownHook();

    void close();

    boolean isActive();

    ConfigurableListableBeanFactory getBeanFactory() throws IllegalStateException;
}
#4.
#spring.factories
# Run Listeners
org.springframework.boot.SpringApplicationRunListener=\
org.springframework.boot.context.event.EventPublishingRunListener
class SpringApplicationRunListeners {
    private final Log log;
    private final List<SpringApplicationRunListener> listeners;
    private final ApplicationStartup applicationStartup;
    SpringApplicationRunListeners(Log log, Collection<? extends SpringApplicationRunListener> listeners,
            ApplicationStartup applicationStartup) {
        this.log = log;
        this.listeners = new ArrayList<>(listeners);
        this.applicationStartup = applicationStartup;
    }
    //5.遍历 SpringApplicationRunListener 调用 starting 方法;
    //相当于通知所有感兴趣系统正在启动过程的人,项目正在 starting。
    void starting(ConfigurableBootstrapContext bootstrapContext, Class<?> mainApplicationClass) {
        doWithListeners("spring.boot.application.starting", (listener) -> listener.starting(bootstrapContext),
                (step) -> {
                    if (mainApplicationClass != null) {
                        step.tag("mainApplicationClass", mainApplicationClass.getName());
                    }
                });
    }

    //7.1
    void environmentPrepared(ConfigurableBootstrapContext bootstrapContext, ConfigurableEnvironment environment) {
        doWithListeners("spring.boot.application.environment-prepared",
                (listener) -> listener.environmentPrepared(bootstrapContext, environment));
    }

    //8.1
    void contextPrepared(ConfigurableApplicationContext context) {
        doWithListeners("spring.boot.application.context-prepared", (listener) -> listener.contextPrepared(context));
    }

    //8.2
    void contextLoaded(ConfigurableApplicationContext context) {
        doWithListeners("spring.boot.application.context-loaded", (listener) -> listener.contextLoaded(context));
    }

    //10.
    void started(ConfigurableApplicationContext context) {
        doWithListeners("spring.boot.application.started", (listener) -> listener.started(context));
    }

    //12.
    void running(ConfigurableApplicationContext context) {
        doWithListeners("spring.boot.application.running", (listener) -> listener.running(context));
    }

    //14.
    void failed(ConfigurableApplicationContext context, Throwable exception) {
        doWithListeners("spring.boot.application.failed",
                (listener) -> callFailedListener(listener, context, exception), (step) -> {
                    step.tag("exception", exception.getClass().toString());
                    step.tag("message", exception.getMessage());
                });
    }

    private void doWithListeners(String stepName, Consumer<SpringApplicationRunListener> listenerAction,
            Consumer<StartupStep> stepAction) {
        StartupStep step = this.applicationStartup.start(stepName);
        this.listeners.forEach(listenerAction);
        if (stepAction != null) {
            stepAction.accept(step);
        }
        step.end();
    }

    ...

}
3. 自定义事件监听组件
添加自定义的监听组件
MyApplicationContextInitializer.java
import org.springframework.context.ApplicationContextInitializer;
import org.springframework.context.ConfigurableApplicationContext;

/**
 * @className: MyApplicationContextInitializer
 * @description 自定义的容器初始化器
 * @author GMF
 * @date 2021/3/1
 * @time 14:51
*/
public class MyApplicationContextInitializer implements ApplicationContextInitializer {
    @Override
    public void initialize(ConfigurableApplicationContext applicationContext) {
        System.out.println("MyApplicationContextInitializer...initialize...invoke");
    }
}
MyApplicationListener.java
import org.springframework.context.ApplicationEvent;
import org.springframework.context.ApplicationListener;

/**
 * @className: MyApplicationListener
 * @description 自定义的应用监听器
 * @author GMF
 * @date 2021/3/1
 * @time 14:52
*/
public class MyApplicationListener implements ApplicationListener {
    @Override
    public void onApplicationEvent(ApplicationEvent event) {
        System.out.println("MyApplicationListener...onApplicationEvent...invoke");
    }
}
MyApplicationRunListener.java
import org.springframework.boot.ConfigurableBootstrapContext;
import org.springframework.boot.SpringApplication;
import org.springframework.boot.SpringApplicationRunListener;
import org.springframework.context.ConfigurableApplicationContext;
import org.springframework.core.env.ConfigurableEnvironment;
import static java.lang.System.out;

public class MyApplicationRunListener implements SpringApplicationRunListener {

    private final String className = "MyApplicationRunListener...";

    private final SpringApplication application;

    private final String[] args;

    public MyApplicationRunListener(SpringApplication application, String[] args) {
        out.println("MyApplicationRunListener...有参构造");
        this.application = application;
        this.args = args;
    }

    @Override
    public void starting(ConfigurableBootstrapContext bootstrapContext) {
        out.println(className+"starting...");
    }

    @Override
    public void environmentPrepared(ConfigurableBootstrapContext bootstrapContext, ConfigurableEnvironment environment) {
        out.println(className+"environmentPrepared...");
    }

    @Override
    public void contextPrepared(ConfigurableApplicationContext context) {
        out.println(className+"contextPrepared...");
    }

    @Override
    public void contextLoaded(ConfigurableApplicationContext context) {
        out.println(className+"contextLoaded...");
    }

    @Override
    public void started(ConfigurableApplicationContext context) {
        out.println(className+"started...");
    }

    @Override
    public void running(ConfigurableApplicationContext context) {
        out.println(className+"running...");
    }

    @Override
    public void failed(ConfigurableApplicationContext context, Throwable exception) {
        out.println(className+"failed...");
    }
}
MyApplicationRunListener.java
import org.springframework.boot.ApplicationArguments;
import org.springframework.boot.ApplicationRunner;
import org.springframework.core.annotation.Order;
import org.springframework.stereotype.Component;

/**
 * @className: MyApplicationRunner
 * @description 应用启动调用事件,执行任务
 * @author GMF
 * @date 2021/3/1
 * @time 15:35
*/
@Order(1)  //指定执行顺序,数字越小越先执行
@Component
public class MyApplicationRunner implements ApplicationRunner {
    @Override
    public void run(ApplicationArguments args) throws Exception {
        System.out.println("MyApplicationRunner...run...invoke");
    }
}
MyApplicationRunListener.java
import org.springframework.boot.CommandLineRunner;
import org.springframework.core.annotation.Order;
import org.springframework.stereotype.Component;

@Order(2)
@Component
public class MyCommandLineRunner implements CommandLineRunner {
    @Override
    public void run(String... args) throws Exception {
        System.out.println("MyCommandLineRunner...run...invoke");
    }
}
MyApplicationRunListener、MyApplicationRunListener 需要注册到容器中
注册 MyApplicationContextInitializer,MyApplicationListener,MyApplicationRunListener 到spring.factories配置文件中:
resources/META-INF/spring.factories:
# Application Context Initializers
org.springframework.context.ApplicationContextInitializer=\
com.gmf.listener.MyApplicationContextInitializer

# Application Listeners
org.springframework.context.ApplicationListener=\
com.gmf.listener.MyApplicationListener

# Run Listeners
org.springframework.boot.SpringApplicationRunListener=\
com.gmf.listener.MyApplicationRunListener

若有收获,就点个赞吧
0 人点赞
