一. SpringSecurity 框架简介
SpringSecurity官网
SpringSecurity中文文档
概要
Spring 是非常流行和成功的 Java 应用开发框架,Spring Security 正是 Spring 家族中的成员。Spring Security 基于 Spring 框架,提供了一套 Web 应用安全性的完整解决方案。 正如你可能知道的关于安全方面的两个主要区域是“认证”和“授权”(或者访问控制),一般来说,Web 应用的安全性包括用户认证(Authentication)和用户授权 (Authorization)两个部分,这两点也是 Spring Security 重要核心功能。
- 用户认证指的是:验证某个用户是否为系统中的合法主体,也就是说用户能否访问该系统。用户认证一般要求用户提供用户名和密码。系统通过校验用户名和密码来完成认 证过程。通俗点说就是系统认为用户是否能登录
- 用户授权指的是验证某个用户是否有权限执行某个操作。在一个系统中,不同用户所具有的权限是不同的。比如对一个文件来说,有的用户只能进行读取,而有的用户可以 进行修改。一般来说,系统会为不同的用户分配不同的角色,而每个角色则对应一系列的权限。通俗点讲就是系统判断用户是否有权限去做某些事情。
同款产品对比
1. Spring Security
SpringSecurity 特点:
- 和 Spring 无缝整合。
- 全面的权限控制。
- 专门为 Web 开发而设计
- 旧版本不能脱离 Web 环境使用。
- 新版本对整个框架进行了分层抽取,分成了核心模块和 Web 模块。单独引入核心模块就可以脱离 Web 环境。
- 重量级
2. Shiro
Apache 旗下的轻量级权限控制框架
Shiro 特点:
- 轻量级。Shiro 主张的理念是把复杂的事情变简单。针对对性能有更高要求的互联网应用有更好表现。
- 通用性。
- 好处:不局限于 Web 环境,可以脱离 Web 环境使用。
- 缺陷:在 Web 环境下一些特定的需求需要手动编写代码定制。
Spring Security 是 Spring 家族中的一个安全管理框架,实际上,在 Spring Boot 出现之前,Spring Security 就已经发展了多年了,但是使用的并不多,安全管理这个领域,一直是 Shiro 的天下。
相对于 Shiro,在 SSM/SSH 中整合 Spring Security 都是比较麻烦的操作,所以,Spring Security 虽然功能比 Shiro 强大,但是使用反而没有 Shiro 多(Shiro 虽然功能没有 Spring Security 多,但是对于大部分项目而言,Shiro 也够用了)。
自从有了 Spring Boot 之后,Spring Boot 对于 Spring Security 提供了 自动化配置方案,可以零配置使用 Spring Security。
因此,一般来说,常见的安全管理技术栈的组合是这样的:
- SSM + Shiro
- Spring Boot/Spring Cloud + Spring Security
注意,这只是一个推荐的组合而已,如果单纯从技术上来说,无论怎么组合,都是可以运行的
权限管理中的相关概念
1. 主体
英文单词:principal
使用系统的用户或设备或从其他系统远程登录的用户等等。简单说就是谁使用系 统谁就是主体。
2. 认证
authentication UK /ɔːˌθen.tɪˈkeɪ.ʃən/ US /ɑːˌθen.t̬əˈkeɪ.ʃən/
the process of proving that something is real, true, or what people say it is: password/biometric authentication A technique for identifying the age of wood can be used for authentication of violins.
权限管理系统确认一个主体的身份,允许主体进入系统。简单说就是“主体”证明自己是谁。
3. 授权
authorization (UK usually authorisation)UK /ˌɔː.θər.aɪˈzeɪ.ʃən/ US /ˌɑː.θɚ.əˈzeɪ.ʃən/
official permission for something to happen, or the act of giving someone official permission to do something
将操作系统的“权力”“授予”“主体”,这样主体就具备了操作系统中特定功能的能力。
记住几个类:
WebSecurityConfiguration:自定义Security策略AuthenticationConfiguration:自定义认证策略@EnableWebSecurity:开启WebSecurity模式
二、快速入门
入门案例
导入Maven依赖
<dependency><groupId>org.springframework.boot</groupId><artifactId>spring-boot-starter-security</artifactId></dependency>
我们创建一个 HelloController:
@RestController
@RequestMapping("/test")
public class TestController {

    @GetMapping("/hello")
    public String hello(){
        return "hello security";
    }
}
访问 /hello ,需要登录之后才能访问
当用户从浏览器发送请求访问 /hello 接口时,服务端会返回 302 响应码,让客户端重定向到 /login 页面,用户在 /login 页面登录,登陆成功之后,就会自动跳转到 /hello 接口
用户名默认user,密码在项目启动的时候在控制台会打印,注意每次启动的时候密码都会发生变化!
SpringSecurity基本原理
SpringSecurity 本质是一个过滤器链
代码底层流程:重点看三个过滤器:
**FilterSecurityInterceptor**:是一个方法级的权限过滤器, 基本位于过滤链的最底部public class FilterSecurityInterceptor extends AbstractSecurityInterceptor implements Filter { public void invoke(FilterInvocation filterInvocation) throws IOException, ServletException { if (isApplied(filterInvocation) && this.observeOncePerRequest) { // filter already applied to this request and user wants us to observe // once-per-request handling, so don't re-do security checking filterInvocation.getChain().doFilter(filterInvocation.getRequest(), filterInvocation.getResponse()); return; } // first time this request being called, so perform security checking if (filterInvocation.getRequest() != null && this.observeOncePerRequest) { filterInvocation.getRequest().setAttribute(FILTER_APPLIED, Boolean.TRUE); } InterceptorStatusToken token = super.beforeInvocation(filterInvocation); try { filterInvocation.getChain().doFilter(filterInvocation.getRequest(), filterInvocation.getResponse()); } finally { super.finallyInvocation(token); } super.afterInvocation(token, null); } ... }super.beforeInvocation(filterInvocation)表示查看之前的 filter 是否通过。filterInvocation.getChain().doFilter(filterInvocation.getRequest(), filterInvocation.getResponse())表示真正的调用后台的服务**ExceptionTranslationFilter**是一个异常处理器,用来处理在认证授权过程中抛出的异常public class ExceptionTranslationFilter extends GenericFilterBean { ... private void doFilter(HttpServletRequest request, HttpServletResponse response, FilterChain chain) throws IOException, ServletException { try { chain.doFilter(request, response); } catch (IOException ex) { throw ex; } catch (Exception ex) { // Try to extract a SpringSecurityException from the stacktrace Throwable[] causeChain = this.throwableAnalyzer.determineCauseChain(ex); RuntimeException securityException = (AuthenticationException) this.throwableAnalyzer .getFirstThrowableOfType(AuthenticationException.class, causeChain); if (securityException == null) { securityException = (AccessDeniedException) this.throwableAnalyzer .getFirstThrowableOfType(AccessDeniedException.class, causeChain); } if (securityException == null) { rethrow(ex); } if (response.isCommitted()) { throw new ServletException("Unable to handle the Spring Security Exception " + "because the response is already committed.", ex); } handleSpringSecurityException(request, response, chain, securityException); } } ... }**UsernamePasswordAuthenticationFilter **:对/login 的 POST 请求做拦截,校验表单中用户名,密码public class UsernamePasswordAuthenticationFilter extends AbstractAuthenticationProcessingFilter { ... public static final String SPRING_SECURITY_FORM_USERNAME_KEY = "username"; public static final String SPRING_SECURITY_FORM_PASSWORD_KEY = "password"; @Override public Authentication attemptAuthentication(HttpServletRequest request, HttpServletResponse response) throws AuthenticationException { if (this.postOnly && !request.getMethod().equals("POST")) { throw new AuthenticationServiceException("Authentication method not supported: " + request.getMethod()); } //获取username认证参数 String username = obtainUsername(request); username = (username != null) ? username : ""; username = username.trim(); //获取password认证参数 String password = obtainPassword(request); password = (password != null) ? password : ""; //对登陆用户进行判断 UsernamePasswordAuthenticationToken authRequest = new UsernamePasswordAuthenticationToken(username, password); // Allow subclasses to set the "details" property setDetails(request, authRequest); return this.getAuthenticationManager().authenticate(authRequest); } @Nullable protected String obtainUsername(HttpServletRequest request) { return request.getParameter(this.usernameParameter); } @Nullable protected String obtainPassword(HttpServletRequest request) { return request.getParameter(this.passwordParameter); } ... }
过滤器是如何加载的
- 在
DelegatingFilterProxy的doFilter()方法中调用了initDelegate()方法initDelegate()方法从容器中获取到FilterChainProxy对象
- 查看
FilterChainProxy的doFilter方法,其中调用了doFilterInternal方法- 在
doFilterInternal方法内部加载并获取到了所有的Security过滤器(过滤链)
- 在
public class DelegatingFilterProxy extends GenericFilterBean {
    ...

    @Override
    public void doFilter(ServletRequest request, ServletResponse response, FilterChain filterChain) throws ServletException, IOException {
        // Lazily initialize the delegate if necessary.
        Filter delegateToUse = this.delegate;
        if (delegateToUse == null) {
            synchronized (this.delegateMonitor) {
                delegateToUse = this.delegate;
                if (delegateToUse == null) {
                    WebApplicationContext wac = findWebApplicationContext();
                    if (wac == null) {
                        throw new IllegalStateException("No WebApplicationContext found: " + "no ContextLoaderListener or DispatcherServlet registered?");
                    }
                    //initDelegate(wac)方法中获取到一个Filter对象
                    delegateToUse = initDelegate(wac);
                }
                this.delegate = delegateToUse;
            }
        }

        // Let the delegate perform the actual doFilter operation.
        invokeDelegate(delegateToUse, request, response, filterChain);
    }

    protected Filter initDelegate(WebApplicationContext wac) throws ServletException {
        String targetBeanName = getTargetBeanName();  //FilterChainProxy
        Assert.state(targetBeanName != null, "No target bean name set");
        //获取到一个FilterChainProxy对象
        Filter delegate = wac.getBean(targetBeanName, Filter.class);
        if (isTargetFilterLifecycle()) {
            delegate.init(getFilterConfig());
        }
        return delegate;
    }
}
public class FilterChainProxy extends GenericFilterBean {

    //在doFilter方法中调用该方法
    private void doFilterInternal(ServletRequest request, ServletResponse response, FilterChain chain) throws IOException, ServletException {
        FirewalledRequest firewallRequest = this.firewall.getFirewalledRequest((HttpServletRequest) request);
        HttpServletResponse firewallResponse = this.firewall.getFirewalledResponse((HttpServletResponse) response);
        //获取所有的过滤器
        List<Filter> filters = getFilters(firewallRequest);
        if (filters == null || filters.size() == 0) {
            if (logger.isTraceEnabled()) {
                logger.trace(LogMessage.of(() -> "No security for " + requestLine(firewallRequest)));
            }
            firewallRequest.reset();
            chain.doFilter(firewallRequest, firewallResponse);
            return;
        }
        if (logger.isDebugEnabled()) {
            logger.debug(LogMessage.of(() -> "Securing " + requestLine(firewallRequest)));
        }
        VirtualFilterChain virtualFilterChain = new VirtualFilterChain(firewallRequest, chain, filters);
        virtualFilterChain.doFilter(firewallRequest, firewallResponse);
    }

    ...
}
Security中重要接口讲解
1. UserDetailsService 接口
当什么也没有配置的时候,账号和密码是由 Spring Security 定义生成的。而在实际项目中账号和密码都是从数据库中查询出来的。 所以我们要通过自定义逻辑控制认证逻辑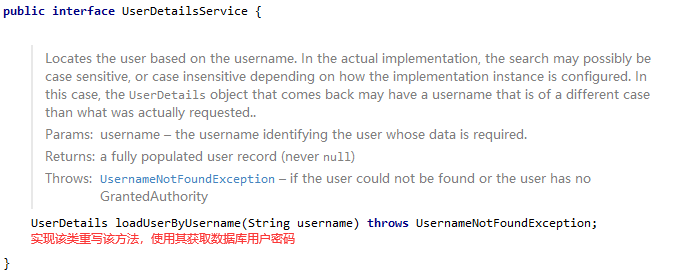
返回值 UserDetails:这个类是系统默认的用户“主体”
Security自带User类,该类用作登陆校验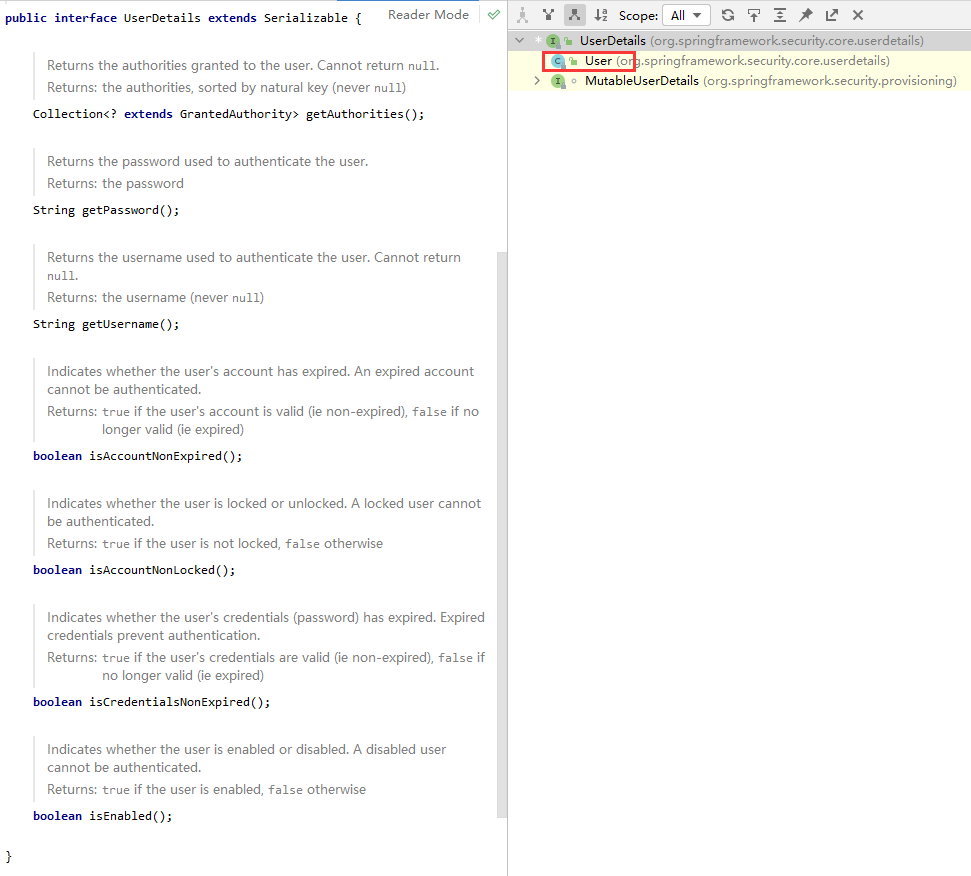
以后我们只需要使用 User 这个实体类即可
方法参数 username:表示用户名。此值是客户端表单传递过来的数据。默认情况下必须叫 username,否则无法接收。
2. PasswordEncoder 接口讲解
public interface PasswordEncoder {
    //表示把参数按照特定的解析规则进行解析
    String encode(CharSequence var1);

    //表示验证从存储中获取的编码密码与编码后提交的原始密码是否匹配。如果密码匹配,则返回true;如果不匹配,则返回false。第一个参数表示需要被解析的密码;第二个
参数表示存储的密码
    boolean matches(CharSequence var1, String var2);

    //表示如果解析的密码能够再次进行解析且达到更安全的结果则返回 true,否则返回false。默认返回 false
    default boolean upgradeEncoding(String encodedPassword) {
        return false;
    }
}
接口实现类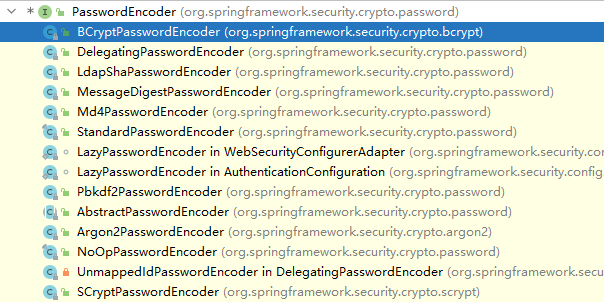
BCryptPasswordEncoder 是 Spring Security 官方推荐的密码解析器,平时多使用这个解析器。 BCryptPasswordEncoder 是对 bcrypt 强散列方法的具体实现。是基于 Hash 算法实现的单向加密。可以通过 strength 控制加密强度,默认 10.
三、Web 权限方案
1. 设置登录系统的账号、密码
方式一:在 application.yaml配置文件中设置
spring:
  security:
    user:
      name: gmf
      password: 237327  #设置登陆认证用户名密码
方式二:编写配置类,注册用户信息
@Configuration
public class SecurityConfig {
    /**
     * @param
     * @return org.springframework.security.config.annotation.web.configuration.WebSecurityConfigurerAdapter
     * @description 注册WebSecurityConfigurerAdapter到容器中,重写其中的configure方法,设置用户名以及密码
     */
    @Bean
    public WebSecurityConfigurerAdapter webSecurityConfigurerAdapter(){
        return new WebSecurityConfigurerAdapter() {
            @Override
            protected void configure(AuthenticationManagerBuilder auth) throws Exception {
                //为密码加密
                String encodePwd = passwordEncoder().encode("123123");
                //设置用户名以及密码以及所属角色
                auth.inMemoryAuthentication().withUser("kyn").password(encodePwd).roles("admin");
            }
        };
    }

    /**
     * @param
     * @return org.springframework.security.crypto.password.PasswordEncoder
     * @description 注册PasswordEncoder到容器中,Security使用其为密码加密
     */
    @Bean
    public PasswordEncoder passwordEncoder(){
        return new BCryptPasswordEncoder();
    }
}
注意:使用 BCryptPasswordEncoder 为密码加密,需要注册该类到容器中
方式三:通过实现UserDetailsService进行用户认证
配置类
/**
 * @className: SecurityConfigTest
 * @description 登陆认证配置
 * @author GMF
 * @date 2021/3/5
 * @time 11:29
*/
@Configuration
public class SecurityConfigTest extends WebSecurityConfigurerAdapter {
    @Autowired
    UserDetailsService userDetailsService;  //存储了用户认证信息

    @Override
    protected void configure(AuthenticationManagerBuilder auth) throws Exception {
        //设置用户认证信息以及密码编码器
        auth.userDetailsService(userDetailsService).passwordEncoder(passwordEncoder());
    }

    @Bean
    PasswordEncoder passwordEncoder(){
        return new BCryptPasswordEncoder();
    }
}
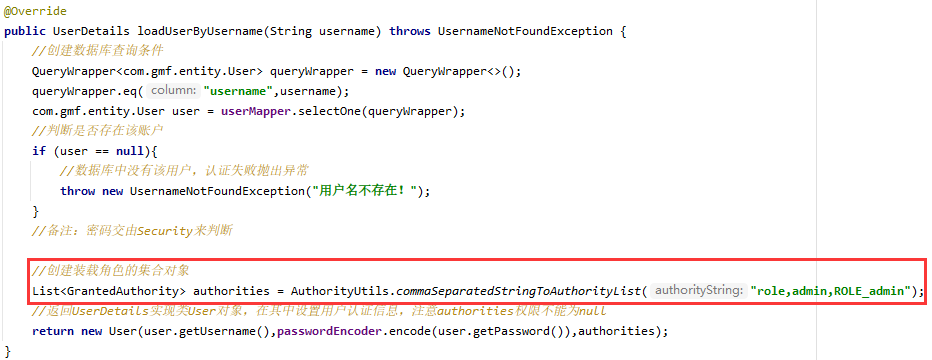
UserDetailService实现类
@Service("userDetailsService")  //设置组件名称,消除AutoWired警告提示(默认使用byType注入)
public class MyUserDetailService implements UserDetailsService {
    @Autowired
    PasswordEncoder passwordEncoder;

    @Override
    public UserDetails loadUserByUsername(String username) throws UsernameNotFoundException {
        //创建装载角色的集合对象
        List<GrantedAuthority> authorities = AuthorityUtils.commaSeparatedStringToAuthorityList("role");
        //返回UserDetails实现类User对象,在其中设置用户认证信息,注意authorities权限不能为null
        //应从数据库中获取的用户名密码
        return new User("gmf",passwordEncoder.encode("123"),authorities);
    }
}
2. 实现数据库认证来完成用户登录
引入数据库相关依赖
<dependency>
  <groupId>com.baomidou</groupId>
  <artifactId>mybatis-plus-boot-starter</artifactId>
  <version>3.4.2</version>
</dependency>
<dependency>
  <groupId>com.alibaba</groupId>
  <artifactId>druid-spring-boot-starter</artifactId>
  <version>1.2.3</version>
</dependency>
<dependency>
  <groupId>mysql</groupId>
  <artifactId>mysql-connector-java</artifactId>
</dependency>
创建数据库以及相关表
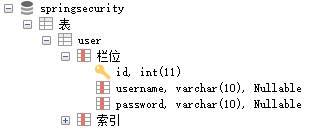
创建User表以及对应实体
@Data
public class User {
  private Integer id;
  private String username;
  private String password;
}
application.yaml中配置数据源
spring:
datasource:
  url: jdbc:mysql://localhost:3306/springsecurity?serverTimezone=UTC
  username: root
  password: root
  type: com.alibaba.druid.pool.DruidDataSource
  driver-class-name: com.mysql.cj.jdbc.Driver
创建UserMapper,并注册扫描 ```java import com.baomidou.mybatisplus.core.mapper.BaseMapper; import com.gmf.entity.User; import org.springframework.stereotype.Repository;
@Repository
public interface UserMapper extends BaseMapper
}
================================================================
@SpringBootApplication @MapperScan(“com.gmf.mapper”) public class SpringsecurityApplication { public static void main(String[] args) { SpringApplication.run(SpringsecurityApplication.class, args); } }
- **修改MyUserDetailService**
```java
@Service("userDetailsService")  //设置组件名称,消除AutoWired警告提示(默认使用byType注入)
public class MyUserDetailService implements UserDetailsService {
    @Autowired
    PasswordEncoder passwordEncoder;

    @Autowired
    UserMapper userMapper;

    @Override
    public UserDetails loadUserByUsername(String username) throws UsernameNotFoundException {
        //创建数据库查询条件
        QueryWrapper<com.gmf.entity.User> queryWrapper = new QueryWrapper<>();
        queryWrapper.eq("username",username);
        com.gmf.entity.User user = userMapper.selectOne(queryWrapper);
        //判断是否存在该账户
        if (user == null){
            //数据库中没有该用户,认证失败抛出异常
            throw new UsernameNotFoundException("用户名不存在!");
        }
        //备注:密码交由Security来判断

        //创建装载角色的集合对象
        List<GrantedAuthority> authorities = AuthorityUtils.commaSeparatedStringToAuthorityList("role");
        //返回UserDetails实现类User对象,在其中设置用户认证信息,注意authorities权限不能为null
        return new User(user.getUsername(),passwordEncoder.encode(user.getPassword()),authorities);
    }
}
- 测试代码
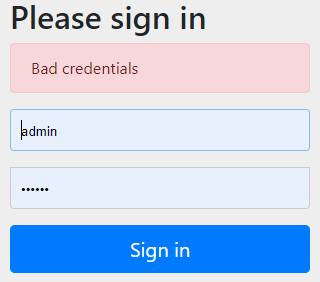
不存在用户测试认证:
输入不存在的用户
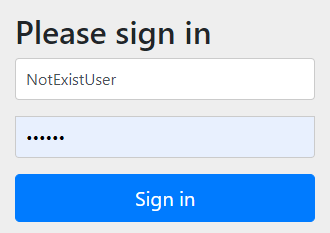
数据库查询用户为Null,认证失败
存在用户测试
输入存在的用户信息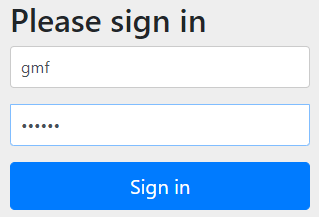
数据库查询到认证用户数据,Security判断密码是否正确,认证成功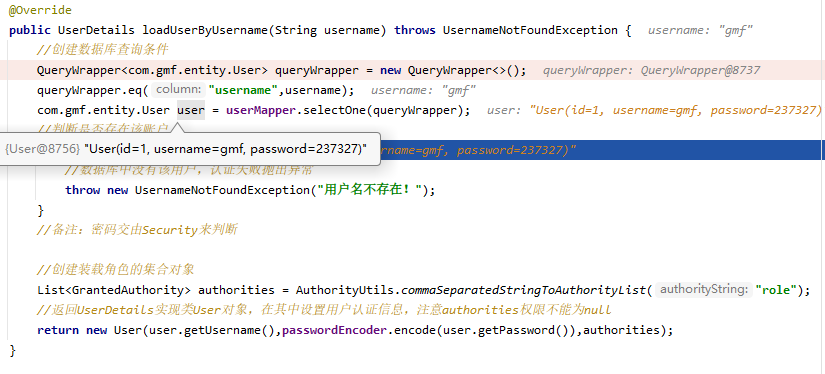
3. 认证页面相关设置
如果需要使用自定义的认证页面,或者阻止Security拦截某些请求,那么可以配置如下内容
SecurityConfigTest.java
@Configuration
public class SecurityConfigTest extends WebSecurityConfigurerAdapter {
/**
* @param http
* @return void
* @description 关于认证页面的设置
*/
@Override
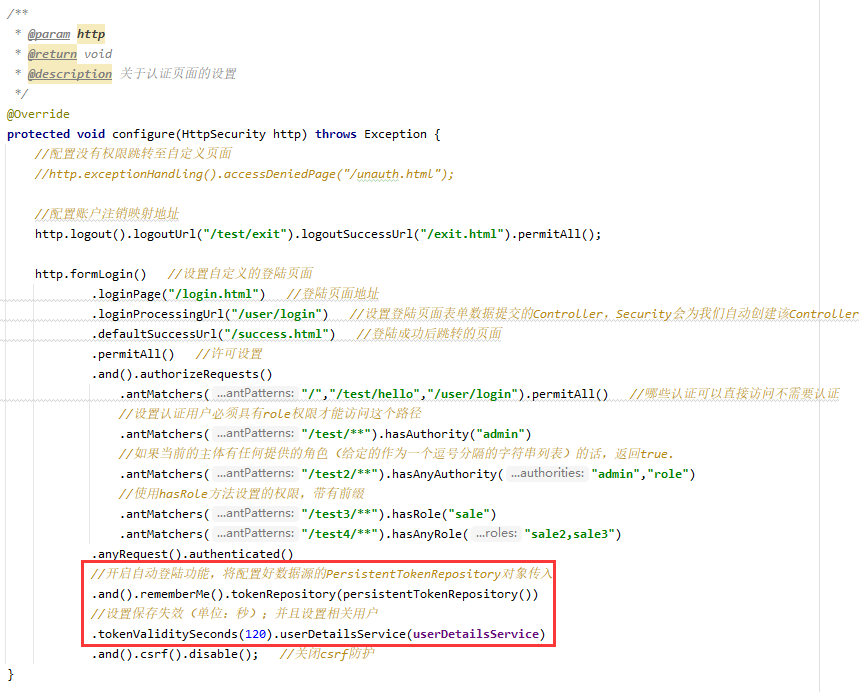
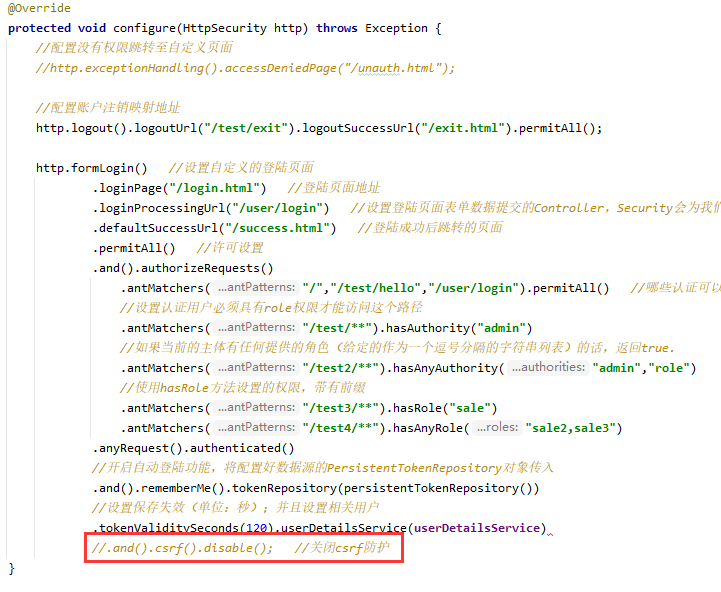
protected void configure(HttpSecurity http) throws Exception {
http.formLogin() //设置自定义的登陆页面
.loginPage("/login.html") //登陆页面地址
.loginProcessingUrl("/user/login") //设置登陆页面表单数据提交的Controller,Security会为我们自动创建该Controller
.defaultSuccessUrl("/success.html") //登陆成功后跳转的页面
.permitAll() //许可设置
.and().authorizeRequests()
.antMatchers("/","/test/hello","/user/login").permitAll() //哪些认证可以直接访问不需要认证
.anyRequest().authenticated()
.and().csrf().disable(); //关闭csrf防护
}
}
Controller
@GetMapping("/index")
public String index(){
    return "hello index";
}
login.html
<!DOCTYPE html>
<html lang="en">
<head>
    <meta charset="UTF-8">
    <title>Login</title>
</head>
<body>
    <form action="/user/login" method="post">
          <!--用户名必须为username密码必须为password-->
        用户名:<input type="text" name="username"><br>
        密码:<input type="password" name="password"><br>
        <input type="submit" value="login">
    </form>
</body>
</html>
4. 基于角色或权限进行访问控制
4.1 hasAuthority方法
如果当前的主体具有指定的权限,则返回 true,否则返回 false
底层源码
private static String hasAuthority(String authority) {
    return "hasAuthority('" + authority + "')";
}
修改配置类,为不同访问路径设置不同权限
@Configuration
public class SecurityConfigTest extends WebSecurityConfigurerAdapter {
  /**
   * @param http
   * @return void
   * @description 关于认证页面的设置
   */
  @Override
  protected void configure(HttpSecurity http) throws Exception {
      http.formLogin()   //设置自定义的登陆页面
              .loginPage("/login.html")   //登陆页面地址
              .loginProcessingUrl("/user/login")   //设置登陆页面表单数据提交的Controller,Security会为我们自动创建该Controller
              .defaultSuccessUrl("/success.html")   //登陆成功后跳转的页面
              .permitAll()   //许可设置
              .and().authorizeRequests()
                  .antMatchers("/","/test/hello","/user/login").permitAll()   //哪些认证可以直接访问不需要认证
                  .antMatchers("/test/**").hasAuthority("role")   //设置认证用户必须具有role权限才能访问这个路径 <--关注点
              .anyRequest().authenticated()
              .and().csrf().disable();   //关闭csrf防护
  }
}
给用户认证主体设置权限
@Service("userDetailsService")  //设置组件名称,消除AutoWired警告提示(默认使用byType注入)
public class MyUserDetailService implements UserDetailsService {
  @Autowired
  PasswordEncoder passwordEncoder;

  @Autowired
  UserMapper userMapper;

  @Override
  public UserDetails loadUserByUsername(String username) throws UsernameNotFoundException {
      //判断用户是否存在代码
      //备注:密码交由Security来判断

      //创建装载角色的集合对象 <--关注点
      List<GrantedAuthority> authorities = AuthorityUtils.commaSeparatedStringToAuthorityList("role,admin");
      //返回UserDetails实现类User对象,在其中设置用户认证信息,注意authorities权限不能为null
      return new User(user.getUsername(),passwordEncoder.encode(user.getPassword()),authorities);
  }
}
如果没有用户没有权限访问该路径则会响应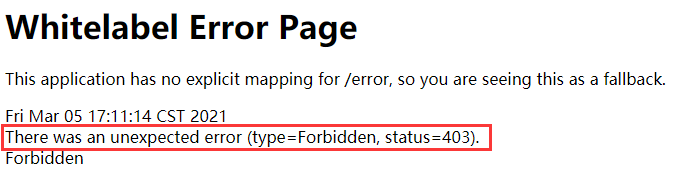
4.2 hasAnyAuthority方法
如果当前的主体有任何提供的权限(给定的作为一个逗号分隔的字符串列表)的话,返回true.
底层源码
private static String hasAnyAuthority(String... authorities) {
    //以逗号分割
    String anyAuthorities = StringUtils.arrayToDelimitedString(authorities, "','");
    return "hasAnyAuthority('" + anyAuthorities + "')";
}
修改配置类,为访问路径提供多个访问权限
@Configuration
public class SecurityConfigTest extends WebSecurityConfigurerAdapter {
  /**
   * @param http
   * @return void
   * @description 关于认证页面的设置
   */
  @Override
  protected void configure(HttpSecurity http) throws Exception {
      http.formLogin()   //设置自定义的登陆页面
              .loginPage("/login.html")   //登陆页面地址
              .loginProcessingUrl("/user/login")   //设置登陆页面表单数据提交的Controller,Security会为我们自动创建该Controller
              .defaultSuccessUrl("/test/index")   //登陆成功后跳转的页面
              .permitAll()   //许可设置
              .and().authorizeRequests()
                  .antMatchers("/","/test/hello","/user/login").permitAll()   //哪些认证可以直接访问不需要认证
                  //设置认证用户必须具有role权限才能访问这个路径
                  .antMatchers("/test/**").hasAuthority("admin")
                  //如果当前的主体有任何提供的角色(给定的作为一个逗号分隔的字符串列表)的话,返回true.  <--关注点
                  .antMatchers("/temp/**").hasAnyAuthority("admin","role")
              .anyRequest().authenticated()
              .and().csrf().disable();   //关闭csrf防护
  }
}
给用户认证主体设置权限
@Service("userDetailsService")  //设置组件名称,消除AutoWired警告提示(默认使用byType注入)
public class MyUserDetailService implements UserDetailsService {
  @Autowired
  PasswordEncoder passwordEncoder;

  @Autowired
  UserMapper userMapper;

  @Override
  public UserDetails loadUserByUsername(String username) throws UsernameNotFoundException {
      //判断用户是否存在代码
      //备注:密码交由Security来判断

      //创建装载角色的集合对象 <--关注点
      List<GrantedAuthority> authorities = AuthorityUtils.commaSeparatedStringToAuthorityList("role,admin");
      //返回UserDetails实现类User对象,在其中设置用户认证信息,注意authorities权限不能为null
      return new User(user.getUsername(),passwordEncoder.encode(user.getPassword()),authorities);
  }
}
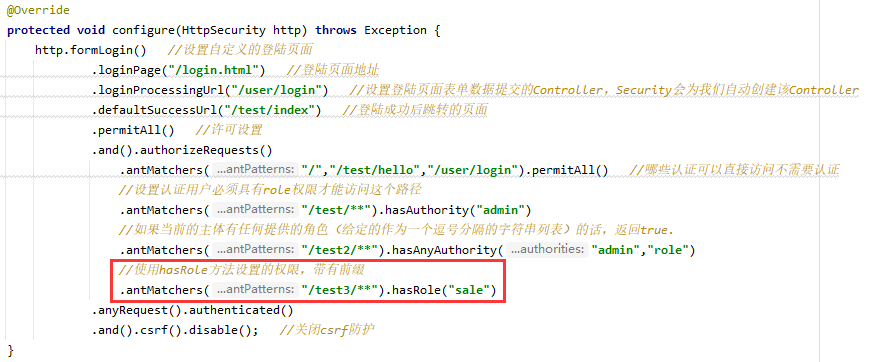
4.3 hasAnyRole方法
如果用户具备给定角色就允许访问,否则出现 403
如果当前主体具有指定的角色,则返回 true
底层源码
在设置的权限名前添加ROLE_前缀
- 修改配置类
注意配置文件中不需要添加”ROLE_“,因为上述的底层代码会自动添加与之进行匹配
为用户添加角色权限
4.4 hasAnyRole方法
表示用户具备任何一个条件都可以访问
- 修改配置文件
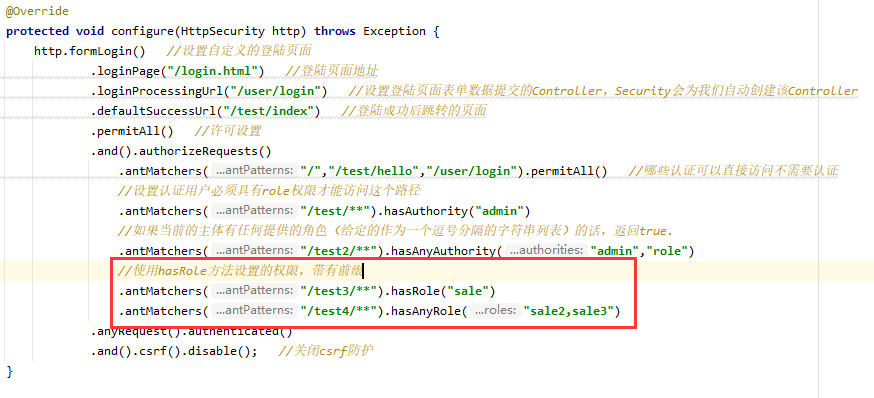
为用户添加角色权限

5. 自定义无权限提示页面
默认无权限显示403错误页面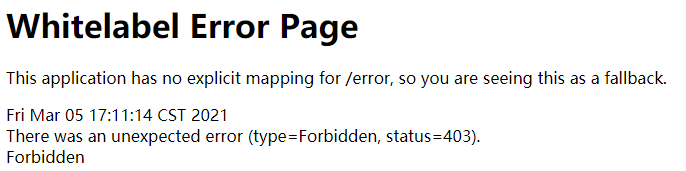
如果想要修改错误提示页面
方式一:在配置类中配置
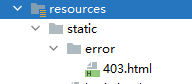
@Configuration
public class SecurityConfigTest extends WebSecurityConfigurerAdapter {
  @Override
  protected void configure(HttpSecurity http) throws Exception {
      //配置没有权限跳转至自定义页面
      http.exceptionHandling().accessDeniedPage("/unauth.html");
  }
}
方式二:使用SpringBoot默认的错误处理机制,/error下的自定义错误页面
6. 认证授权注解使用
6.1 @Secured
标注的Controller访问时会判断是否具有角色,另外需要注意的是这里匹配的字符串需要添加前缀“ROLE_“
使用注解先要在启动类开启注解功能!
@EnableGlobalMethodSecurity(securedEnabled=true)@SpringBootApplication @MapperScan("com.gmf.mapper") @EnableGlobalMethodSecurity(securedEnabled = true) //开启Security权限注解功能 public class SpringsecurityApplication { public static void main(String[] args) { SpringApplication.run(SpringsecurityApplication.class, args); } }在控制器方法上添加注解
@GetMapping("/update")
@Secured({"ROLE_admin1","ROLE_admin2"})  //为该请求设置访问角色权限
public String update(){
  return "hello update";
}
为用户添加角色权限
6.2 @PreAuthorize
@PreAuthorize:注解适合进入方法前的权限验证, @PreAuthorize 可以将登录用户的 roles/permissions 参数传到方法中
- 先开启注解功能:
@EnableGlobalMethodSecurity(securedEnabled = true, prePostEnabled = true) - 在Controller方法上面添加注解
@PreAuthorize("hasAnyAuthority('admin')")
public String preAuthorize(){
  return "hello PreAuthorize";
}
6.3 @PostAuthorize
@PostAuthorize 注解使用并不多,在方法执行后再进行权限验证,适合验证带有返回值的权限.
- 先开启注解功能:
@EnableGlobalMethodSecurity(securedEnabled = true, prePostEnabled = true) - 在Controller方法上面添加注解
@PostAuthorize("hasAnyAuthority('admin')")
public String postAuthorize(){
  System.out.println("方法执行后进行校验角色权限,没有权限访问依然执行该方法");
  return "hello postAuthorize";
}
6.4 @PostFilter
@PostFilter :权限验证之后对数据(返回值)进行过滤
For Example:
留下用户名是 admin1 的数据
@GetMapping("getAll")
@PostAuthorize("hasAnyAuthority('admin')")
@PostFilter("filterObject.username == 'admin1'")  //表达式中的 filterObject 引用的是方法返回值 List 中的某一个元素
public List<User> getAllUser(){
    List<User> list = new ArrayList<>();
    list.add(new User(1,"admin1","6666"));
    list.add(new User(2,"admin2","888"));
    System.out.println(list);
    return list;
}
6.5 @PreFilter
@PreFilter: 进入控制器之前对数据进行过滤
@GetMapping("getTestPreFilter")
@PostAuthorize("hasAnyAuthority('admin')")
@PreFilter(value = "filterObject.id%2==0")  //更加id条件过滤参数数据
public List<User> getTestPreFilter(@RequestBody List<User> list){
    list.forEach(t->{
        System.out.println(t.getId()+"\t"+t.getUsername());
    });
    return list;
}
四、用户注销
在配置类中设置注销登陆的访问路径以及退出成功后跳转的页面
@Configuration
public class SecurityConfigTest extends WebSecurityConfigurerAdapter {
  @Override
  protected void configure(HttpSecurity http) throws Exception {
      //配置账户注销映射地址
      http.logout().logoutUrl("/test/exit").logoutSuccessUrl("/exit.html").permitAll();

      ...
  }
}
编写注销账户按钮
<a href="/test/exit">退出</a>测试
五、Security基于数据库的自动登陆
1.实现原理
第一步:
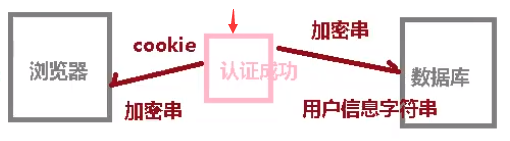2
第二步:再次访问,获取到Cookie的加密信息,再通过其去数据库对比,如果查询到对应的信息,则认证成功,可以登陆
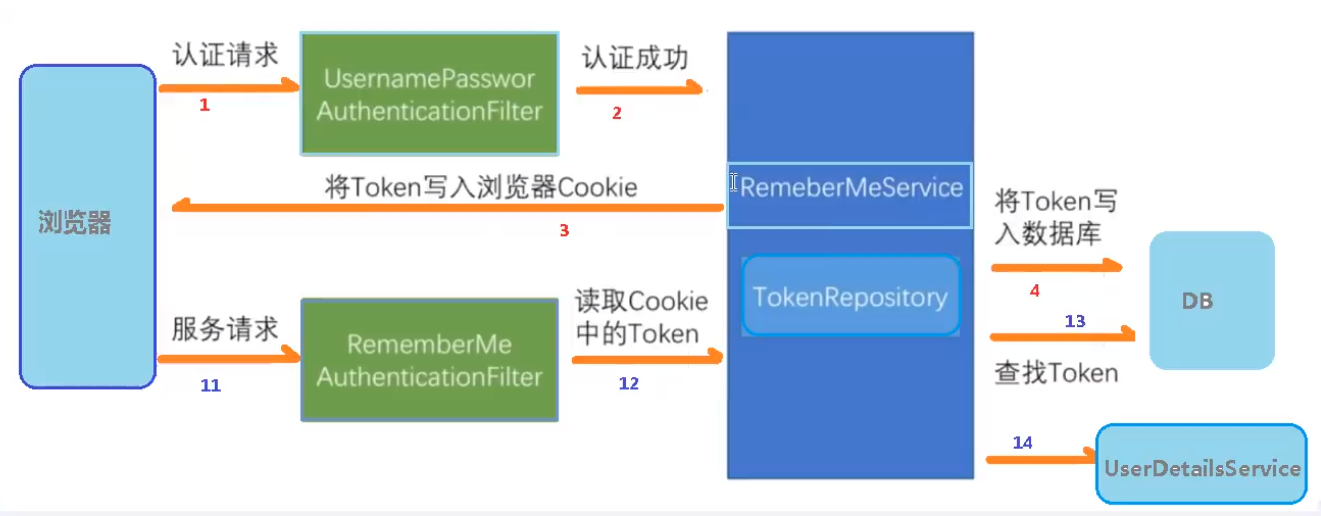
步骤详细分析
查看UsernamePasswordAuthenticationFilter父类AbstractAuthenticationProcessingFilter中的
successfulAuthentication()方法在其中调用RememberMeServices实现类AbstractRememberMeServices的
onLoginSuccess()方法- 再该
onLoginSuccess()方法中会创建属于保存用户的Token数据,并将其保存至数据库中,同时也会将Token数据保存至Cookie内- 使用了JdbcTokenRepositoryImpl实现类中的
createNewToken()方法 ```java public abstract class AbstractAuthenticationProcessingFilter extends GenericFilterBean implements ApplicationEventPublisherAware, MessageSourceAware { …
- 使用了JdbcTokenRepositoryImpl实现类中的
protected void successfulAuthentication(HttpServletRequest request, HttpServletResponse response, FilterChain chain, Authentication authResult) throws IOException, ServletException { SecurityContextHolder.getContext().setAuthentication(authResult); if (this.logger.isDebugEnabled()) {
this.logger.debug(LogMessage.format("Set SecurityContextHolder to %s", authResult));} //调用AbstractRememberMeServices类中的方法,查看方法内部代码 this.rememberMeServices.loginSuccess(request, response, authResult); if (this.eventPublisher != null) {
this.eventPublisher.publishEvent(new InteractiveAuthenticationSuccessEvent(authResult, this.getClass()));} this.successHandler.onAuthenticationSuccess(request, response, authResult); } }
```java
public abstract class AbstractRememberMeServices implements RememberMeServices, InitializingBean, LogoutHandler {
@Override
public final void loginSuccess(HttpServletRequest request, HttpServletResponse response,
       Authentication successfulAuthentication) {
   if (!rememberMeRequested(request, this.parameter)) {
       this.logger.debug("Remember-me login not requested.");
       return;
   }
   //继续调用
   onLoginSuccess(request, response, successfulAuthentication);
}

...

//PersistentTokenBasedRememberMeServices类中的方法
@Override
protected void onLoginSuccess(HttpServletRequest request, HttpServletResponse response,
       Authentication successfulAuthentication) {
   String username = successfulAuthentication.getName();
   this.logger.debug(LogMessage.format("Creating new persistent login for user %s", username));
   PersistentRememberMeToken persistentToken = new PersistentRememberMeToken(username, generateSeriesData(), generateTokenData(), new Date());
   try {
       //使用JdbcTokenRepositoryImpl实现类创建属于保存账户的加密Token数据,并将该数据添加至数据库中
       this.tokenRepository.createNewToken(persistentToken);
       //将Token数据添加至Cookie中
       addCookie(persistentToken, request, response);
   }
   catch (Exception ex) {
       this.logger.error("Failed to save persistent token ", ex);
   }
}
}
//在这个类中有操作自动登陆表的语句,包括创建 public class JdbcTokenRepositoryImpl extends JdbcDaoSupport implements PersistentTokenRepository { /** Default SQL for creating the database table to store the tokens */ public static final String CREATE_TABLE_SQL = "create table persistent_logins (username varchar(64) not null, series varchar(64) primary key, " + "token varchar(64) not null, last_used timestamp not null)"; /** The default SQL used by the <tt>getTokenBySeries</tt> query */ public static final String DEF_TOKEN_BY_SERIES_SQL = "select username,series,token,last_used from persistent_logins where series = ?"; /** The default SQL used by <tt>createNewToken</tt> */ public static final String DEF_INSERT_TOKEN_SQL = "insert into persistent_logins (username, series, token, last_used) values(?,?,?,?)"; /** The default SQL used by <tt>updateToken</tt> */ public static final String DEF_UPDATE_TOKEN_SQL = "update persistent_logins set token = ?, last_used = ? where series = ?"; /** The default SQL used by <tt>removeUserTokens</tt> */ public static final String DEF_REMOVE_USER_TOKENS_SQL = "delete from persistent_logins where username = ?"; private String tokensBySeriesSql = DEF_TOKEN_BY_SERIES_SQL; private String insertTokenSql = DEF_INSERT_TOKEN_SQL; private String updateTokenSql = DEF_UPDATE_TOKEN_SQL; private String removeUserTokensSql = DEF_REMOVE_USER_TOKENS_SQL; private boolean createTableOnStartup; @Override protected void initDao() { if (this.createTableOnStartup) { getJdbcTemplate().execute(CREATE_TABLE_SQL); } } @Override public void createNewToken(PersistentRememberMeToken token) { getJdbcTemplate().update(this.insertTokenSql, token.getUsername(), token.getSeries(), token.getTokenValue(), token.getDate()); } @Override public void updateToken(String series, String tokenValue, Date lastUsed) { getJdbcTemplate().update(this.updateTokenSql, tokenValue, lastUsed, series); } @Override public void removeUserTokens(String username) { getJdbcTemplate().update(this.removeUserTokensSql, username); } /** * Intended for convenience in debugging. Will create the persistent_tokens database * table when the class is initialized during the initDao method. * @param createTableOnStartup set to true to execute the */ public void setCreateTableOnStartup(boolean createTableOnStartup) { this.createTableOnStartup = createTableOnStartup; } ... }- 再该
当再次发送访问时,RememberMeAuthenticationFilter会读取Cookie中的Token
再
doFilter()方法内调用RememberMeServices中的autoLogin()方法在其中获取到请求的Token数据,如果不为Null则将其解码,拿到数据库中做比对,如果相同则代表自动登陆成功
public class RememberMeAuthenticationFilter extends GenericFilterBean implements ApplicationEventPublisherAware {
private void doFilter(HttpServletRequest request, HttpServletResponse response, FilterChain chain)
    throws IOException, ServletException {
if (SecurityContextHolder.getContext().getAuthentication() != null) {
    this.logger.debug(LogMessage
            .of(() -> "SecurityContextHolder not populated with remember-me token, as it already contained: '"
                    + SecurityContextHolder.getContext().getAuthentication() + "'"));
    chain.doFilter(request, response);
    return;
}

//调用RememberMeServices中的autoLogin方法
Authentication rememberMeAuth = this.rememberMeServices.autoLogin(request, response);
if (rememberMeAuth != null) {
    // Attempt authenticaton via AuthenticationManager
    try {
        rememberMeAuth = this.authenticationManager.authenticate(rememberMeAuth);
        // Store to SecurityContextHolder
        SecurityContextHolder.getContext().setAuthentication(rememberMeAuth);
        onSuccessfulAuthentication(request, response, rememberMeAuth);
        this.logger.debug(LogMessage.of(() -> "SecurityContextHolder populated with remember-me token: '"
                + SecurityContextHolder.getContext().getAuthentication() + "'"));
        if (this.eventPublisher != null) {
            this.eventPublisher.publishEvent(new InteractiveAuthenticationSuccessEvent(
                    SecurityContextHolder.getContext().getAuthentication(), this.getClass()));
        }
        if (this.successHandler != null) {
            this.successHandler.onAuthenticationSuccess(request, response, rememberMeAuth);
            return;
        }
    }
    catch (AuthenticationException ex) {
        this.logger.debug(LogMessage
                .format("SecurityContextHolder not populated with remember-me token, as AuthenticationManager "
                        + "rejected Authentication returned by RememberMeServices: '%s'; "
                        + "invalidating remember-me token", rememberMeAuth),
                ex);
        this.rememberMeServices.loginFail(request, response);
        onUnsuccessfulAuthentication(request, response, ex);
    }
}
chain.doFilter(request, response);
}
}
```java //RememberMeServices实现类 public abstract class AbstractRememberMeServices implements RememberMeServices, InitializingBean, LogoutHandler { @Override public final Authentication autoLogin(HttpServletRequest request, HttpServletResponse response) { //获取请求中的Cookie String rememberMeCookie = extractRememberMeCookie(request); if (rememberMeCookie == null) {
return null;} this.logger.debug(“Remember-me cookie detected”); if (rememberMeCookie.length() == 0) {
this.logger.debug("Cookie was empty");
cancelCookie(request, response);
return null;
} try {
//如果Token数据不为null,则将其解码
String[] cookieTokens = decodeCookie(rememberMeCookie);
UserDetails user = processAutoLoginCookie(cookieTokens, request, response);
//将请求中的Token数据拿去与数据库做比对,如果相同则自动登陆成功
this.userDetailsChecker.check(user);
this.logger.debug("Remember-me cookie accepted");
return createSuccessfulAuthentication(request, user);
} catch (CookieTheftException ex) {
cancelCookie(request, response);
throw ex;
} catch (UsernameNotFoundException ex) {
this.logger.debug("Remember-me login was valid but corresponding user not found.", ex);} catch (InvalidCookieException ex) {
this.logger.debug("Invalid remember-me cookie: " + ex.getMessage());} catch (AccountStatusException ex) {
this.logger.debug("Invalid UserDetails: " + ex.getMessage());} catch (RememberMeAuthenticationException ex) {
this.logger.debug(ex.getMessage());} cancelCookie(request, response); return null; }
… } ```
2. 具体实现
2.1 创建表
CREATE TABLE `persistent_logins` (
 `username` varchar(64) NOT NULL,
 `series` varchar(64) NOT NULL,
 `token` varchar(64) NOT NULL,
 `last_used` timestamp NOT NULL DEFAULT CURRENT_TIMESTAMP ON UPDATE CURRENT_TIMESTAMP,PRIMARY KEY (`series`)
) ENGINE=InnoDB DEFAULT CHARSET=utf8;
2.2 修改配置类
1. 配置类中注入数据源,配置操作数据库自动登陆的对象
@Configuration
public class SecurityConfigTest extends WebSecurityConfigurerAdapter {
    @Autowired
    DataSource dataSource;  //注入数据源

    /**
     * @param
     * @return org.springframework.security.web.authentication.rememberme.PersistentTokenRepository
     * @description 为PersistentTokenRepository配置数据源,用于操作数据库实现自动登陆
     */
    @Bean
    public PersistentTokenRepository persistentTokenRepository(){
        JdbcTokenRepositoryImpl jdbcTokenRepository = new JdbcTokenRepositoryImpl();
        //绑定数据库
        jdbcTokenRepository.setDataSource(dataSource);
        //设置自动创建表
        //jdbcTokenRepository.setCreateTableOnStartup(true);
        return jdbcTokenRepository;
    }
}
2. 配置自动登陆
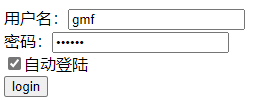
2.3 登陆页面添加自动登陆复选框
<form action="/user/login" method="post">
    <!--用户名必须为username密码必须为password-->
    用户名:<input type="text" name="username"><br>
    密码:<input type="password" name="password"><br>
    <!--自动登陆选项的名称必须为"remember-me"-->
    <input type="checkbox" name="remember-me">自动登陆<br>
    <input type="submit" value="login">
</form>
注意:自动登陆复选框的 name 属性必须为 “remember-me”
2.4 测试
第一次发起访问,填写用户信息并设置自动登陆
登陆成功后查看数据库,发现数据库中属于登陆的用户Token信息

- 当关闭浏览器或者重启服务后,发现不再需要手动登陆,并在浏览器的Cookie中发现了Token信息

、
六、CSRF理解
跨站请求伪造(英语:Cross-site request forgery),也被称为 one-clickattack 或者 session riding,通常缩写为 CSRF 或者 XSRF, 是一种挟制用户在当前已登录的 Web 应用程序上执行非本意的操作的攻击方法。跟跨网站脚本(XSS)相比,XSS 利用的是用户对指定网站的信任,CSRF 利用的是网站对用户网页浏览器的信任。
跨站请求攻击,简单地说,是攻击者通过一些技术手段欺骗用户的浏览器去访问一个自己曾经认证过的网站并运行一些操作(如发邮件,发消息,甚至财产操作如转账和购买商品)。由于浏览器曾经认证过,所以被访问的网站会认为是真正的用户操作而去运行。 这利用了 web 中用户身份验证的一个漏洞:简单的身份验证只能保证请求发自某个用户的 浏览器,却不能保证请求本身是用户自愿发出的。
从 Spring Security 4.0 开始,默认情况下会启用 CSRF 保护,以防止 CSRF 攻击应用程序,Spring Security CSRF 会针对 PATCH,POST,PUT 和 DELETE 方法进行防护。
1. 实现方法
在登录页面添加一个隐藏域
<form action="/user/login" method="post">

  <!--添加隐藏域,用作于Security CSRF防护验证-->
  <input type="hidden" th:if="${_csrf}!=null" th:value="${_csrf.token}" name="_csrf"/>

  <!--用户名必须为username密码必须为password-->
  用户名:<input type="text" name="username"><br>
  密码:<input type="password" name="password"><br>
  <!--自动登陆选项的名称必须为"remember-me"-->
  <input type="checkbox" name="remember-me">自动登陆<br>
  <input type="submit" value="login">
</form>
开启CSRF防护
2. SpringSecurity实现CSRF的原理
客户端在认证的过程中生成Token存在Session和Cookie中,当再次访问时需要带着Token信息与Session中的Token做对比,如果相同才能成功访问
- 查看CsrfFilter过滤器的
doFilterInternal()方法- 在该方法中调用tokenRepository对象的
loadToken()方法获取Token并将其保存到Request与Session中 - 在该方法中还会获取请求参数中的Token,将其与Session中做比较,判断是否相同,如果相同则成功访问
- 在其中有一个DefaultRequiresCsrfMatcher内部类,其中的属性规定了某些请求无法进行CSRF防护
- 在该方法中调用tokenRepository对象的
public final class CsrfFilter extends OncePerRequestFilter {
    @Override
    protected void doFilterInternal(HttpServletRequest request, HttpServletResponse response, FilterChain filterChain)
            throws ServletException, IOException {
        request.setAttribute(HttpServletResponse.class.getName(), response);
        //生成Token,并将其存在Session与Cookie中
        CsrfToken csrfToken = this.tokenRepository.loadToken(request);
        boolean missingToken = (csrfToken == null);
        if (missingToken) {
            csrfToken = this.tokenRepository.generateToken(request);
            this.tokenRepository.saveToken(csrfToken, request, response);
        }

        //获取请求参数中的Token
        request.setAttribute(CsrfToken.class.getName(), csrfToken);
        request.setAttribute(csrfToken.getParameterName(), csrfToken);
        //判断Session中的Token与请求参数中的Token是否相同
        if (!this.requireCsrfProtectionMatcher.matches(request)) {
            if (this.logger.isTraceEnabled()) {
                this.logger.trace("Did not protect against CSRF since request did not match "
                        + this.requireCsrfProtectionMatcher);
            }
            filterChain.doFilter(request, response);
            return;
        }
        String actualToken = request.getHeader(csrfToken.getHeaderName());
        if (actualToken == null) {
            actualToken = request.getParameter(csrfToken.getParameterName());
        }
        if (!equalsConstantTime(csrfToken.getToken(), actualToken)) {
            this.logger.debug(
                    LogMessage.of(() -> "Invalid CSRF token found for " + UrlUtils.buildFullRequestUrl(request)));
            AccessDeniedException exception = (!missingToken) ? new InvalidCsrfTokenException(csrfToken, actualToken)
                    : new MissingCsrfTokenException(actualToken);
            this.accessDeniedHandler.handle(request, response, exception);
            return;
        }
        filterChain.doFilter(request, response);
    }

    private static final class DefaultRequiresCsrfMatcher implements RequestMatcher {

        private final HashSet<String> allowedMethods = new HashSet<>(Arrays.asList("GET", "HEAD", "TRACE", "OPTIONS"));

        @Override
        public boolean matches(HttpServletRequest request) {
            return !this.allowedMethods.contains(request.getMethod());
        }

        @Override
        public String toString() {
            return "CsrfNotRequired " + this.allowedMethods;
        }

    }

    ...
}

若有收获,就点个赞吧
0 人点赞
