 |
|---|
| © Karobben |
由於語法渲染問題而影響閱讀體驗, 請移步博客閱讀~
本文GitPage地址
Main
I tried very hard to find a script which was able to stitch images. Other scripts were either too old to works on python3 or the functions are out of data. I final find a one in the post made by Adrian Rosebrock, 2018. Thanks Adrian Rosebrock, this script works very well and I’d like to note and share it here.
Origin Contributor: Adrian Rosebrock, 2018
Please reading the post from the original sites. It would be a great help.
pic_stitch.py
#!/usr/bin/env python3'''https://www.pyimagesearch.com/2018/12/17/image-stitching-with-opencv-and-python/'''from imutils import pathsimport numpy as npimport argparseimport imutilsimport cv2# construct the argument parser and parse the argumentsap = argparse.ArgumentParser()ap.add_argument("-i", "--input", type=str, required=True,help="path to input directory of input to stitch")ap.add_argument("-o", "--output", type=str, required=True,help="path to the output image")ap.add_argument("-c", "--crop", type=int, default=0,help="whether to crop out largest rectangular region")ap.add_argument("-t", "--type", type=str, default="d",help="type of the input, 'd' is directory, 'v' is video")args = vars(ap.parse_args())# grab the paths to the input images and initialize our images listimages = []if args["type"] == "d":print("[INFO] loading images...")imagePaths = sorted(list(paths.list_images(args["input"])))# loop over the image paths, load each one, and add them to our# images to stich listfor imagePath in imagePaths:image = cv2.imread(imagePath)images.append(image)# initialize OpenCV's image sticher object and then perform the image# stitchingprint("[INFO] stitching images...")elif args["type"] =="v":cap=cv2.VideoCapture(args["input"])Num = 0while Num < cap.get(cv2.CAP_PROP_FRAME_COUNT):Num += 1if Num % 1 == 0:ret,frame=cap.read()images.append(frame)stitcher = cv2.createStitcher() if imutils.is_cv3() else cv2.Stitcher_create()(status, stitched) = stitcher.stitch(images)# if the status is '0', then OpenCV successfully performed image# stitchingif status == 0:# check to see if we supposed to crop out the largest rectangular# region from the stitched imageif args["crop"] > 0:# create a 10 pixel border surrounding the stitched imageprint("[INFO] cropping...")stitched = cv2.copyMakeBorder(stitched, 10, 10, 10, 10,cv2.BORDER_CONSTANT, (0, 0, 0))# convert the stitched image to grayscale and threshold it# such that all pixels greater than zero are set to 255# (foreground) while all others remain 0 (background)gray = cv2.cvtColor(stitched, cv2.COLOR_BGR2GRAY)thresh = cv2.threshold(gray, 0, 255, cv2.THRESH_BINARY)[1]# find all external contours in the threshold image then find# the *largest* contour which will be the contour/outline of# the stitched imagecnts = cv2.findContours(thresh.copy(), cv2.RETR_EXTERNAL,cv2.CHAIN_APPROX_SIMPLE)cnts = imutils.grab_contours(cnts)c = max(cnts, key=cv2.contourArea)# allocate memory for the mask which will contain the# rectangular bounding box of the stitched image regionmask = np.zeros(thresh.shape, dtype="uint8")(x, y, w, h) = cv2.boundingRect(c)cv2.rectangle(mask, (x, y), (x + w, y + h), 255, -1)# create two copies of the mask: one to serve as our actual# minimum rectangular region and another to serve as a counter# for how many pixels need to be removed to form the minimum# rectangular regionminRect = mask.copy()sub = mask.copy()# keep looping until there are no non-zero pixels left in the# subtracted imagewhile cv2.countNonZero(sub) > 0:# erode the minimum rectangular mask and then subtract# the thresholded image from the minimum rectangular mask# so we can count if there are any non-zero pixels leftminRect = cv2.erode(minRect, None)sub = cv2.subtract(minRect, thresh)# find contours in the minimum rectangular mask and then# extract the bounding box (x, y)-coordinatescnts = cv2.findContours(minRect.copy(), cv2.RETR_EXTERNAL,cv2.CHAIN_APPROX_SIMPLE)cnts = imutils.grab_contours(cnts)c = max(cnts, key=cv2.contourArea)(x, y, w, h) = cv2.boundingRect(c)# use the bounding box coordinates to extract the our final# stitched imagestitched = stitched[y:y + h, x:x + w]# write the output stitched image to diskcv2.imwrite(args["output"], stitched)# display the output stitched image to our screencv2.imshow("Stitched", stitched)cv2.waitKey(0)# otherwise the stitching failed, likely due to not enough keypoints)# being detectedelse:print("[INFO] image stitching failed ({})".format(status))
How to use it
tree test
test├── IMG_20210421_143828.jpg├── IMG_20210421_143832.jpg└── IMG_20210421_143834.jpg
python3 pic_stitch.py -i test -o result.png
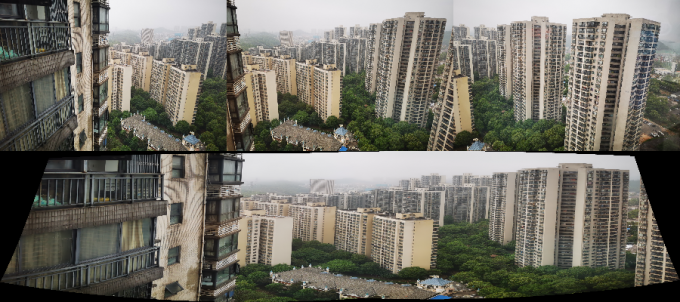
Result:
 |
|---|
The Simplified Script
import numpy as npimport cv2from cv2 import Stitcherif __name__ == "__main__":img1 = cv2.imread('/home/ken/Desktop/test/IMG_20210421_143834.jpg')img2 = cv2.imread('/home/ken/Desktop/IMG_20210421_143832.jpg')#stitcher = cv2.createStitcher(False)stitcher = cv2.Stitcher.create(cv2.Stitcher_PANORAMA)# , 根据不同的OpenCV版本来调用(_result, pano) = stitcher.stitch((img1, img2))cv2.imshow('pano',pano)cv2.waitKey(0)
Stick A video
No work so well
import numpy as npimport cv2, sys, timefrom cv2 import Stitcherdef progress_bar(i):print("\r", end="")print("Progress: {}%: ".format(i), "▋" * (int(i) // 2), end="")sys.stdout.flush()time.sleep(0.05)cap=cv2.VideoCapture("stitch.mp4")fps_c = cap.get(cv2.CAP_PROP_FRAME_COUNT)stitcher = cv2.Stitcher.create(cv2.Stitcher_PANORAMA)# , 根据不同的OpenCV版本来调用Num = 0ret,Result =cap.read()while Num <= fps_c:Num += 1ret,frame=cap.read()_result = 1if Num % 1 == 0:(_result, Result_tmp) = stitcher.stitch((Result, frame))progress_bar(100 * Num/fps_c )if _result == 0:Result = Result_tmpRatio = [len(Result[0])/1080*2,len(Result)/1920*2]Ratio.sort()Ratio = Ratio[-1]test = cv2.resize(Result, (int(len(Result[0])/Ratio),int(len(Result)/Ratio)), interpolation = cv2.INTER_AREA)cv2.imshow("Stitched", test)if cv2.waitKey(1) & 0xFF == ord('q'):cv2.destroyAllWindows()break
Enjoy~
由於語法渲染問題而影響閱讀體驗, 請移步博客閱讀~
本文GitPage地址
GitHub: Karobben
Blog:Karobben
BiliBili:史上最不正經的生物狗

若有收获,就点个赞吧
0 人点赞
