先看效果
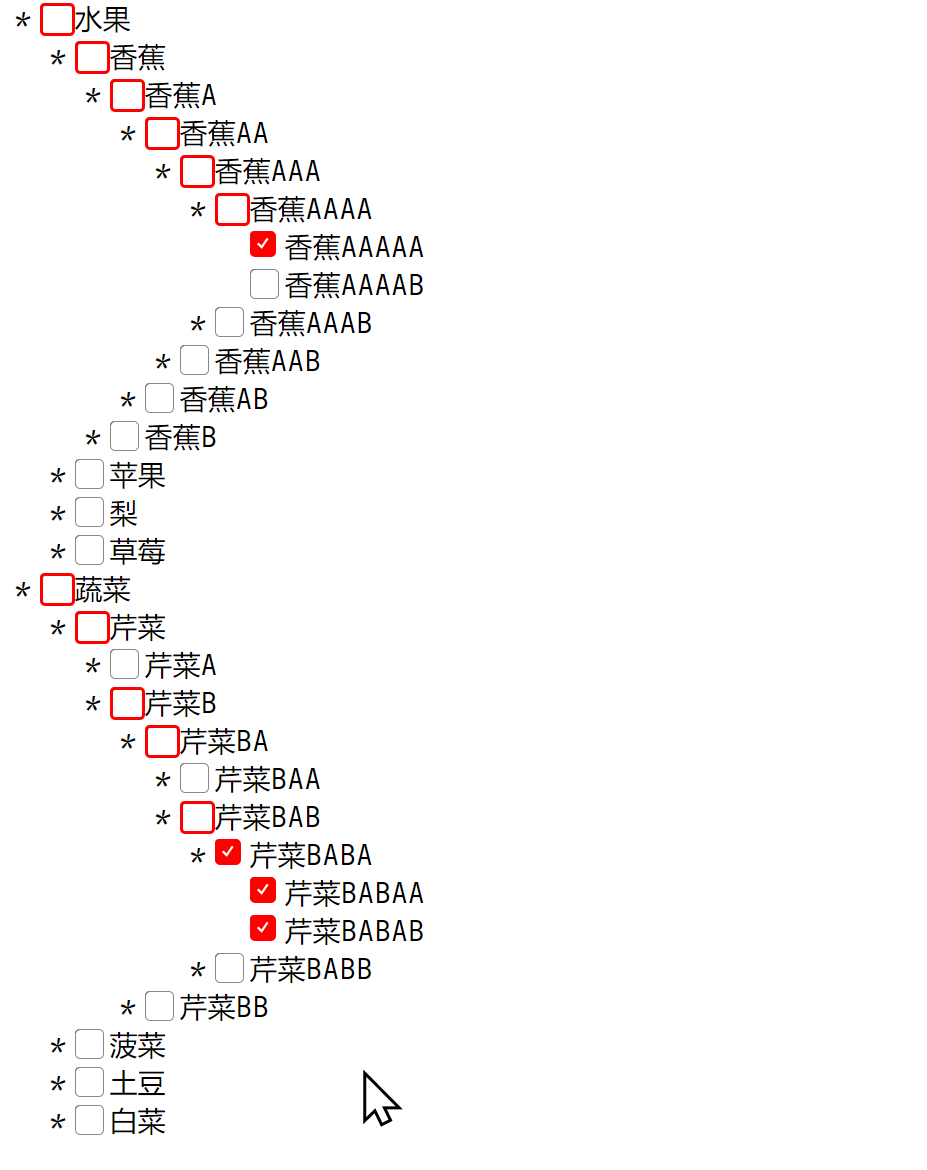
任意树形数据均可直接展示
主要代码片段
注意:最好是去看示例的完整实现,这个非常重要,下面只是稍微提了下主要方法和思路。
思路:使用栈来深度优先遍历,将除根节点外所有节点都找到它的父节点,并添加到节点上。为后续选中子节点判断和修改父节点状态做准备。
树形结构结构如下:
[{"title": "水果","children": [{"title": "香蕉","children": [{"title": "香蕉A","children": [{"title": "香蕉AA"},{"title": "香蕉BB"}]},{"title": "香蕉B"}]},{"title": "苹果"},{"title": "梨"},{"title": "草莓"}]},{"title": "蔬菜","children": [{"title": "芹菜"},{"title": "菠菜"},{"title": "土豆"},{"title": "白菜"}]}]
添加父节点方法
transform() {console.log("transform")let stack = [...this.list]let childCount = 0let parent = nullwhile (stack.length) {let top = stack.pop()// console.log(top)if (top.children) {if (childCount) {stack.push(top)let length = stack.lengthwhile (childCount) {stack[length - 1].parent = parentchildCount--length--}stack.pop()}childCount = top.children.lengthparent = topstack.push(... top.children)} else {if (childCount) {top.parent = parentchildCount--}}}console.log(this.list)}
组件递归
app.component('boxs', {name: "boxs",data() {return {isShow: false}},props: ["child", 'list'],methods: {check(child) { // console.log(this)console.log("check")this.$emit('my-parent', child)},getAllchildren(child) {if (!child.children)return []let all = []let stack = [...child.children]while (stack.length) {let top = stack.pop()all.push(top)if (top.children) {stack.push(... top.children)}}return all},judgeParent(child) { // parentlet parent = child // 选中节点也要判断父亲情况while (parent) {let all = this.getAllchildren(parent) // 获取所有孩子let checkes = all.filter(item => item.checked) // 判断孩子的勾选状态if (checkes.length === 0) { // 如果孩子的勾选成功个数为0,则置空父亲状态parent.status = null} else { // 如果孩子的勾选成功个数不为0if (checkes.length === all.length) { // 如果孩子的勾选成功个数为所有孩子个数,父亲勾选状态置为成功,且置父亲状态位空parent.checked = trueparent.status = null} else { // 如果孩子的勾选成功个数不为所有孩子个数,父亲勾选状态置为失败,且置父亲状态为半成功parent.checked = falseparent.status = "half"}} parent = parent.parent // 更新父亲}},oks(child) {console.log("boxs")console.log(child)// 判断选中节点有没有childif (child.children) { // 如果有孩子let checked = !child.checked// 本身勾选取反// 下面是遍历所有孩子let stack = [child]while (stack.length) {let top = stack.pop()top.checked = checked // 孩子勾选取反if (top.children) {stack.push(... top.children)}}// 判断父亲this.judgeParent(child)} else { // 如果没有孩子child.checked = !child.checked // 本身勾选取反this.judgeParent(child) // 判断父亲}}},template: `<div><i style="cursor: pointer;user-select: none;" v-if="child.children" @click="isShow=!isShow">*</i><i v-else style="visibility: hidden;">*</i><span><!-- <i v-if="child.status === 'half'">half</i> --><input :class="{'half': child.status === 'half'}" @click="check(child)" :checked="child.checked" type="checkbox" :id="child.title"><label :for="child.title">{{child.title}}</label></span><div v-show="isShow" style="padding-left: 20px;" v-if="child.children"><boxs :list="list" v-for="item in child.children" :child="item" @my-parent="oks"></boxs></div></div>`})
判断孩子和父亲是否被选中
在示例代码中
完整示例
https://github.com/liulinboyi/tree
在线示例

若有收获,就点个赞吧
0 人点赞
