2011年,一位名叫Erich Gamma的瑞士计算机科学家加入微软。他最出名的是 “四人帮 “的作者之一,他们编写了颇具影响力的《设计模式》一书。在微软,伽马领导着一个位于瑞士苏黎世的小型开发实验室。2015年4月,该团队发布了Visual Studio Code的初始版本。我鼓励你观看第九频道(https://channel9.msdn.com/events/Build/2015/C9-05)对Erich Gamma的这个非常有趣的Visual Studio Code发布访谈。
Visual Studio Code是一个轻量级的多平台IDE(集成开发环境),它允许用户添加各种各样的扩展(在其他IDE中通常称为插件)。它是基于Electron开源框架的。
Visual Studio Code开始迅速流行起来,并在四年内成为开发者中最受欢迎的IDE。为什么它在这么短的时间内变得如此受欢迎?根据Visual Studio Code团队的说法,他们在开发的很早阶段就开始了狗粮。现在,100%的Visual Studio Code都是在Visual Studio Code中自己编写的。
“Dogfooding “是微软创造的一个术语,意思是在开发的早期阶段就使用你自己的产品。
但是你怎么能把它和它的 “老大哥 “微软Visual Studio相比呢?除了名字和相似的图标外,它们没有什么共同之处。首先,Visual Studio Code在所有主要平台上都是免费提供的。Windows、macOS和Linux。
与Visual Studio相比,Visual Studio Code的主要优势在于其可扩展性。它尤其包括能够将任何编程语言引入其中,为任何语言创建语法高亮,以及为任何语言创建调试器。
当然,Visual Studio Code并不能取代Visual Studio;仍有一些事情是Visual Studio在比Visual Studio Code更深的层次上做的。例如,你不能在Visual Studio Code中编写跨平台的Xamarin移动应用程序(至少在写这篇文章的时候不能)。如果你的目标是Windows GUI开发,你也会选择Visual Studio。但这在未来可能会改变。
Visual Studio Code的主要目的是支持开发者的生命周期(或者说,是一个循环)。编码(使用富语言服务) > 调试 > 检查你的代码(使用Git源代码控制集成)。
在这篇文章中,我将谈论添加一些富语言服务,关于REPL语言解释,以及关于调试。
作为添加到Visual Studio Code(为了简洁起见,我在本文中称之为VS Code)的语言的例子,我将使用CSCS(C#中的自定义脚本)。这是一种开源的轻型脚本语言,我在以前为CODE杂志写的文章中介绍过(https://www.codemag.com/article/1607081 和 https://www.codemag.com/article/1711081)。
为Visual Studio代码增加语言支持
将富语言服务添加到IDE有几个层次。
- 第一个层次是基本的语言支持(例如,语法高亮、括号匹配、自动缩进)。
- 第二层是IntelliSense支持(代码完成,参数信息,内容辅助,以及其他一些)。
- 第三层次是代码重构。
所有的富语言服务都由VS代码支持。
在这篇文章中,我将只介绍第一层。
你将在TypeScript语言中开发一个VS Code扩展。TypeScript是一种类型安全的JavaScript超集。你可以在这篇来自Sahil Malik(https://www.codemag.com/article/1511051)的CODE杂志的文章中阅读对它的介绍。
添加语法高亮和基本语言支持
下载并安装VS Code后,安装Node.js(https://nodejs.org/en/)。为了能够发布扩展,你还必须创建一个Visual Studio Team Services账户(编辑:VSTS现在是Azure DevOps)。注册后,你会收到发布者的名字,在下面生成扩展时,你会需要这个名字。
我将向你展示如何在第一层添加新的语言支持,包括。
- 语法高亮
- 括号匹配
- 自动缩进
VS Code最酷的地方在于,你根本不需要任何编码来添加这些功能!所有的东西都可以通过配置来实现。一切都可以通过配置来实现。让我们开始吧。
转到命令行,首先通过运行Yeoman Extension Generator来安装。
npm install -g yo generator-code
如果你是在macOS或Linux上,而你没有权限运行上述命令,可以尝试在上述命令前加上 “sudo”。
安装 “yo “工具后,你可以像这样运行扩展生成器。
yo code
作为一种扩展类型,选择新的语言支持选项(见图1)。

图1:运行 “Yo “代码
然后回答与图2类似的问题。
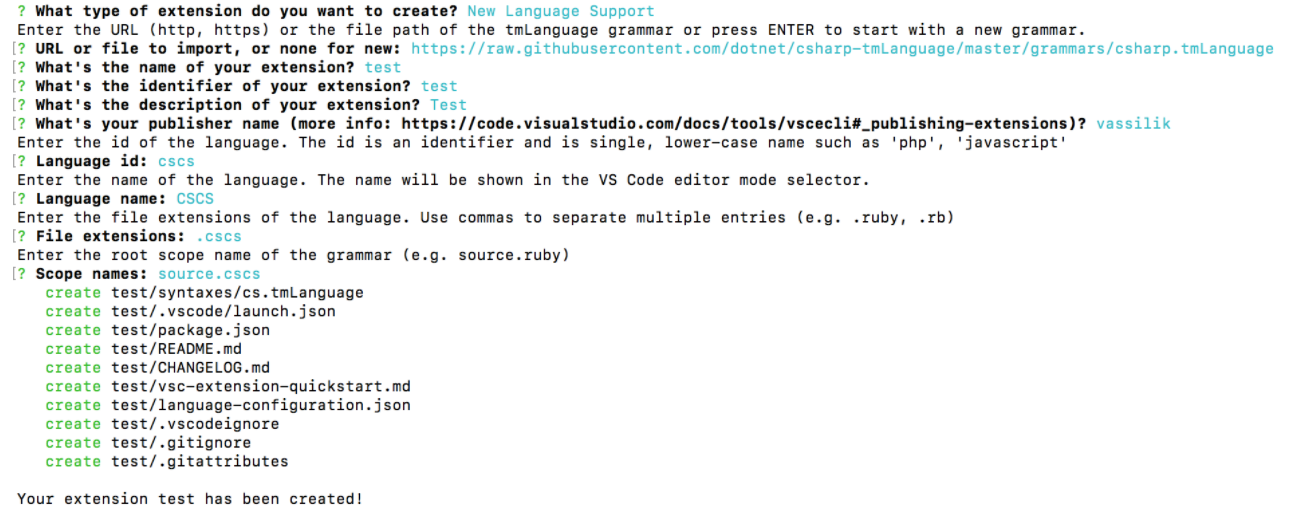
图2:添加新的语言支持
对于发布者的名字,选择你在创建Visual Studio Team Services帐户时使用的名字。对于语言支持,Visual Studio Code使用TextMate语言语法(见https://manual.macromates.com/en/language_grammars)。定义语法的文件的扩展名是.tmLanguage。这种语法也被用于语法高亮。从头开始写这样一个文件是一个相当大的练习。因为从语法上讲,CSCS与C#相似,我只是取了一个定义C#语法的文件(https://raw.githubusercontent.com/dotnet/csharp-tmLanguage/master/grammars/csharp.tmLanguage),并在创建语言支持扩展时提供了它(见图2)。
一旦语言支持被创建,cs.tmLanguage文件将被复制到syntaxes子文件夹中。为了使它适用于CSCS,你必须在那里做一些改变。首先,将cs.tmLanguage文件名重命名为cscs.tmLanguage。然后在VS Code中打开这个文件,把出现的.cs替换成.cscs。
因为CSCS与C#不完全相同,所以还有一些其他的变化你应该做。例如,CSCS有elif关键字,这在C#中并不存在。要在语言语法中加入这个关键词,最简单的方法是找到else的做法,然后 “借用 “相应的代码即可。详见清单1。
清单1:对cscs.tmLanguage文件的补充
<dict><key>include</key><string>#elif-part</string></dict><key>elif-part</key><dict><key>begin</key><string>(?<!\.)\b(elif)\b</string><key>beginCaptures</key><dict><key>1</key><dict><key>name</key><string>keyword.control.conditional.elif.cscs</string></dict></dict><key>end</key><string>(?<=\})|(?=;)</string><key>patterns</key><array><dict><key>include</key><string>#statement</string></dict></array></dict>
你还需要在package.json文件中添加新的语言定义(这个文件是由扩展生成器生成的)。你把CSCS语言定义添加到package.json的贡献部分。
"contributes": {"languages": [{"id": "cscs","aliases": ["CSCS", "cscs"],"extensions": [".cscs"],"configuration": "./language-configuration.json"}],"grammars": [{"language": "cscs","scopeName": "source.cscs","path": "./syntaxes/cscs.tmLanguage"}],
language-configuration.json文件也是由扩展生成器生成的。基本上,它包含了开括号和闭括号、大括号、引号、注释等的定义。例如,这就是语言注释和括号的定义方式。
"comments": {"lineComment": "//","blockComment": [ "/*", "*/" ]},"brackets": [["{", "}"],["[", "]"],["(", ")"]],
如果你想引入一个新的注释或括号类型,language-configuration.json是用来做这个的文件。
这就是了! 仅仅是这几个配置上的改变,你就已经拥有了一个支持语法高亮的扩展了
如果你想看看新创建的扩展的运行情况,通过点击VS Code左侧面板上的调试图标切换到调试视图,然后按齿轮图标。一个新的VS Code实例被打开。这个新的实例现在已经知道了扩展名,新的语法高亮应该显示在所有扩展名为.cscs的文件上。
要查看新创建的扩展的运行情况,请点击VS Code左侧面板上的调试图标并按下齿轮图标。
发布一个只支持语法高亮的扩展可能没有什么意义,因为你还会开发一些其他的语言功能,你可以把语法高亮和其他功能一起包括进去。
添加一个REPL扩展
REPL(读取评估打印循环)是一种交互式计算机环境,允许评估简单的用户输入并返回结果。通常情况下,用户选择代码的某些部分并将其送去评估。如果没有选择任何内容,整行都会被送去评估。REPL最酷的地方是,你甚至可以选择一个被注释过的语句并将其送去进行评估
在本节中,你将为CSCS语言开发一个REPL扩展。你将看到它很容易调整为你选择的任何其他语言。
首先,你再次使用你在上一节中使用的哟扩展生成工具。这一次,你选择扩展类型New Extension(TypeScript)(这是默认的扩展类型)。然后,你把上一节中生成的语言文件(syntaxes\cscs.tmLanguage和language-configuration.json)复制到新的扩展文件夹中。现在你可以在VS Code中打开新生成的扩展文件夹。
第一个任务是创建一个新的命令,它将发送REPL请求进行评估。这些类型的任务大多位于package.json文件的contributes部分下。
让我们把REPL命令称为extension.cscs.rep(名字真的不重要),并给它分配一个键,在Windows和Linux上为Control + 9,在macOS上为Command ? 在macOS上则为Control +9。这可以在package.json文件的贡献部分完成,如下所示。
"commands": [{"command": "extension.cscs.repl","title": "CSCS REPL"}],"keybindings": [{"command": "extension.cscs.repl","key": "ctrl+9","mac": "cmd+9","when": "editorTextFocus"}],
你还必须告诉VS Code何时激活该扩展。这在package.json的activationEvents部分完成。
"activationEvents": ["onCommand:extension.cscs.repl"],
这意味着,只要用户按下Cmd+9/Ctrl+9键,该扩展就会被激活。
package.json文件的一个非常重要的部分是devDependencies部分,它包含了你的扩展所使用的所有包和它们的最小版本。
"devDependencies": {"typescript": "^2.6.1","vscode": "^1.1.6","tslint": "^5.8.0","@types/node": "^7.0.43","@types/mocha": "^2.2.42"}
你在该部分添加新的包,在任何改变之后,你必须在项目文件夹目录下运行npm安装命令。
看一下清单2中package.json文件的全部内容。
清单 2: REPL项目package.json文件的一个片断
{"name": "cscs-repl","displayName": "CSCS REPL","version": "0.1.4","publisher": "vassilik","engines": {"vscode": "^1.24.0"},"categories": ["Programming Languages","Other"],"keywords": ["CSCS", "repl", "scripting", "interpreter", "C#"],"activationEvents": ["onCommand:extension.cscs.repl"],"icon": "images/cscs128.png", "repository": {"type": "git","url": "https://github.com/vassilych/cscs-repl.git"},"license": "MIT","main": "./out/extension","contributes": {"commands": [{"command": "extension.cscs.repl","title": "CSCS REPL"}],"keybindings": [{"command": "extension.cscs.repl","key": "ctrl+9","mac": "cmd+9","when": "editorTextFocus"}],"configuration": {"type": "object","title": "CSCS REPL configuration","properties": {"cscs.connectType": {"type": "string","default": "sockets"},"cscs.serverPort": {"type": "number","default": 13337},"cscs.serverHost": {"type": "string","default": "127.0.0.1}}},"languages": [{"id": "cscs","aliases": ["CSCS", "cscs"],"extensions": [".cscs"],"configuration": "./language-configuration.json"}],"grammars": [{"language": "cscs","scopeName": "source.cscs","path": "./syntaxes/cscs.tmLanguage"}]},"devDependencies": {"typescript": "^2.6.1","vscode": "^1.1.6","tslint": "^5.8.0","@types/node": "^7.0.43","@types/mocha": "^2.2.42"}}
你选择的扩展的编程语言是TypeScript。VS Code扩展的好处是,实际的功能实现可以用任何语言。扩展的TypeScript代码与VS Code框架进行通信,并从它那里接收用户命令。然后,它将这些命令发送给REPL评估器,后者将进行实际工作,并将结果反馈给扩展。
我决定通过套接字实现扩展和REPL评估器之间的通信。REPL评估器将在Visual Studio Xamarin中启动(正如我之前提到的,在VS Code中不支持运行和调试跨平台的移动应用程序,至少现在不支持)。
REPL评估器的实现
为了收集来自REPL客户端的所有请求,使用一个队列,以System.Collections.Concurrent命名空间的BlockingCollection类来实现。这个类的主要优点是,它提供了一种线程安全的方式,将项目排队到指定的队列中,并从那里排队,这样我们就不必专注于这些低层次的细节。
REPL评估器服务器必须支持不同的情况。
- 如果服务器正在运行一个Xamarin移动应用程序,代码必须在主GUI线程上进行评估。具体做法如下。
在iOS系统中:
UIApplication.SharedApplication.InvokeOnMainThread(() => {// This code is run on the main thread.});
在Android系统中:
Activity.RunOnUiThread(()=> {// This code is run on the main thread.});
如果评估器运行在Unity上,就不需要在主线程上安排运行代码,因为Unity每一帧都在主线程上调用Update()方法。在Update()结束时,你可以处理所有排队的请求。
如果是一个控制台应用程序,或者当评估器不需要在主线程上运行时,你可以在同一个线程上处理所有的请求。
在Xamarin移动应用程序的情况下,代码必须在主GUI线程上进行评估。
我实现了上述三种情况。显然,还有很多需要在主线程上运行代码的场景,你可能想加入。例如,如果你想在Windows Phone主线程上评估代码,你可以按以下方式安排调用。
CoreApplication.MainView.CoreWindow.Dispatcher.RunAsync(CoreDispatcherPriority.High, () => {// This code is run on the main thread.});
DebuggerServer类在清单3中实现。我很快就会审查它。
清单3:DebuggerServer C#类的一个片段
public class DebuggerServer{public static Action<Debugger, string> OnRequest;public static bool DebuggerAttached { set; get; }static Debugger m_debuggerstatic TcpClient m_client;static NetworkStream m_stream;static BlockingCollection<string> m_queue = new BlockingCollection<string>();public static void StartServer(int port = 13337){ThreadPool.QueueUserWorkItem(StartServerBlocked, port);}public static void StartServerBlocked(Object threadContext){int port = (int)threadContext;IPAddress localAddr = IPAddress.Parse("127.0.0.1");TcpListener server = new TcpListener(localAddr, port);server.Start();DebuggerAttached = true;while (true) {// Perform a blocking call to accept requests.m_client = server.AcceptTcpClient();m_stream = m_client.GetStream();ThreadPool.QueueUserWorkItem(RunClient);}}static void RunClient(){Byte[] bytes = new Byte[1024];string data = null;int i;ThreadPool.QueueUserWorkItem(StartProcessing, null);m_debugger = new Debugger();Debugger.OnResult += SendBack;try {while((i = m_stream.Read(bytes, 0, bytes.Length)) != 0) {data = System.Text.Encoding.UTF8.GetString(bytes, 0, i);m_queue.Add(data);}} catch(Exception exc) {Console.Write ("Client disconnected: {0}", exc.Message);}Debugger.OnResult -= SendBack;m_client.Close();}static void StartProcessing(Object threadContext){#if UNITY_EDITOR// ProcessQueue will be called directly from Unity Update()# elsetry {ProcessQueue();} catch(Exception exc) {Console.Write("Connection is over: {0}", exc.Message);}#endif}public static void ProcessQueue(){string data;#if UNITY_EDITORwhile(m_queue.TryTake(out data)) {#elsewhile (true){// A blocking calldata = m_queue.Take();#endifif (OnRequest != null) {OnRequest?.Invoke(m_debugger, data);} else {m_debugger.ProcessClientCommands(data);}}}static void SendBack(string str){byte[] msg = System.Text.Encoding.UTF8.GetBytes(str);try {m_stream.Write(msg, 0, msg.Length);m_stream.Flush();} catch(Exception exc) {Console.Write("Client disconnected: {0}", exc.Message);return;}}}
服务器通过调用StartServer()异步启动,或者以StartServerBlocked()阻塞调用的方式启动。服务器在配置的端口上初始化服务器套接字(默认为13337),并开始监听进入的连接。
IPAddress localAddr = IPAddress.Parse("127.0.0.1");TcpListener server = new TcpListener(localAddr, port);server.Start();DebuggerAttached = true;while (true) {m_client = server.AcceptTcpClient();m_stream = m_client.GetStream();ThreadPool.QueueUserWorkItem(RunClient);}
对于每个被接受的连接,服务器运行RunClient()方法,它将在一个新的池线程中启动。
一方面,RunClient()方法开始监听客户端的请求,将它们全部加入BlockingCollection m_queue。
while((i = m_stream.Read(bytes, 0, bytes.Length)) != 0) {data = Encoding.UTF8.GetString(bytes, 0, i);m_queue.Add(data);}
另一方面,它启动另一个线程,在ProcessQueue()方法中消耗这个队列。这个方法可以直接从Unity中调用;如果队列是空的,它不会做任何事情,否则它会处理队列。在Unity的情况下,OnRequest事件处理程序是空的,所以这是在主线程上调用的Unity Update()方法中执行的代码。
while(m_queue.TryTake(out data)) {m_debugger.ProcessClientCommands(data);}
ProcessClientCommands()方法是进行实际处理的地方;你将在后面看到它。在其他情况下,你会执行对队列m_queue.Take()的调用,它会阻塞直到队列不空。
while(true) { // A blocking call.data = m_queue.Take();if (OnRequest != null) { // iOS/Android caseOnRequest?.Invoke(m_debugger, data);} else { // Direct call casem_debugger.ProcessClientCommands(data);}}
在Xamarin(iOS/Android应用程序)的情况下,一个事件处理程序被触发了。该事件处理程序确保处理是在主线程上完成的。在其他情况下,你在同一个线程上开始处理队列(在控制台应用程序中,你可能并不关心在哪个线程上进行处理)。
现在让我们看看如何让CSCS Xamarin应用程序知道它们必须知道客户端在主线程上等待REPL的评估。你首先向CSCS解析器注册一个CSCS函数。
ParserFunction.RegisterFunction("StartDebugger", new DebuggerFunction());
这意味着调用CSCS函数StartDebugger在幕后调用DebuggerFunction.Evaluate()方法,如清单4所示。
清单4:DebuggerFunction C#类的实现
class DebuggerFunction : ParserFunction{ protected override Variable Evaluate(ParsingScript script){List<Variable> args = script.GetFunctionArgs();int port = Utils.GetSafeInt(args, 0, 13337);DebuggerServer.StartServer(port);DebuggerServer.OnRequest += ProcessRequest;return Variable.EmptyInstance;}public void ProcessRequest(Debugger debugger, string request){#if __ANDROID__MainActivity.TheView.RunOnUiThread(() => {debugger.ProcessClientCommands(request);});#elif __IOS__UIApplication.SharedApplication.InvokeOnMainThread(() => {debugger.ProcessClientCommands(request);});Elsedebugger.ProcessClientCommands(request);#endif}}
该方法启动REPL服务器并订阅传入的客户端请求。
DebuggerServer.StartServer(port);DebuggerServer.OnRequest += ProcessRequest;.
当ProcessRequest()方法被触发时,它确保每个请求在主线程上被处理。
public void ProcessRequest(Debugger debugger, string request) {#if __ANDROID__MainActivity.TheView.RunOnUiThread(() => {debugger.ProcessClientCommands(request);});#elif __IOS__UIApplication.SharedApplication.InvokeOnMainThread( () => {debugger.ProcessClientCommands(request);});}
在ProcessRequest()方法中,你可能想添加你需要的其他场景(Windows Phone、WPF等)。
Unity是一个特殊的例子。因为Update()方法是在主线程上调用的,所以只要在Update()方法的末尾放上以下语句就可以了(见清单3中ProcessQueue()方法的实现)。
if (DebuggerServer.DebuggerAttached) {DebuggerServer.ProcessQueue();}
Unity是一个特殊情况,因为Update()方法已经在主线程上被调用了。
现在是时候看看实际处理了。因为服务器可能同时收到来自客户端的几个请求(它们可以被排队,正如你以后在TypeScript中开发客户端时看到的),你必须一个一个地处理这些请求。这里的假设是,一个请求不包含一个新行—你将确保客户端会处理这个问题。
请注意,在数据请求中没有新行不会有问题,因为新行在CSCS中不扮演任何角色,与Python不同。在CSCS中,表达式由分号分隔,就像在C#中一样。
public void ProcessClientCommands(string data){string [] commands = data.Split(new char [] {'\n'});foreach (string dataCmd in commands) {if (!string.IsNullOrWhiteSpace(dataCmd)) {ProcessClientCommand(dataCmd);}}}
这是你如何处理每个请求的一个片段(片段是因为你在开发调试器时要扩展这个方法)。
void ProcessClientCommand(string data) {string [] parts = data.Split(new char [] {'|'});string cmd = parts[0].ToLower();string result = "N/A";if (cmd == "repl") {result = ProcessRepl(data.Substring(cmd.Length+1));SendBack(result);return;}}
正如你所看到的,服务器期望来自客户端的请求是以下格式:命令|请求数据。特别是,对于REPL来说,它期望repl|string来处理。
SendBack()方法是一个较低级别的函数,用于发送回结果。
static void SendBack(string str) {byte [] msg = Encoding.UTF8.GetBytes(str);try {m_stream.Write(msg, 0, msg.Length);m_stream.Flush();} catch (Exception exc) {Console.Write("Client gone: {0}", exc.Message);return;}}
ProcessRepl()方法进行实际的CSCS处理。它的实现在清单5中显示。在这里,你可以定制REPL处理,并使用你选择的任何其他语言。
清单5:ProcessRepl() C#方法
string ProcessRepl(string repl){Dictionary<int, int> char2Line;string script = Utils.ConvertToScript(repl, out char2Line);ParsingScript tempScript = new ParsingScript(script, 0);tempScript.Debugger = this;Variable result = null;try {while (tempScript.Pointer < script.Length) {result = tempScript.ExecuteTo();tempScript.GoToNextStatement();}} catch (Exception exc) {return "Exception thrown: " + exc.Message;}string stringRes = Output + "\n";stringRes += result == null ? "" : result.AsString();return stringRes;}
REPL客户端的实现
你将使用TypeScript实现REPL客户端(当你使用yo工具创建扩展时,扩展语言只有两个选项:JavaScript和TypeScript)。
VS Code扩展的入口是extension.ts文件的activation()方法。它的实现在清单6中显示。
清单6:extension.ts的activate()方法
import * as vscode from 'vscode';import { CscsRepl } from './cscsRepl';export function activate(context: vscode.ExtensionContext) {const config = vscode.workspace.getConfiguration('cscs');let connectTypeConfig = config.get('connectType');let hostConfig = config.get('serverHost');let portConfig = config.get('serverPort');let connectType = connectTypeConfig ? connectTypeConfig.toString() : '';let host = hostConfig ? hostConfig.toString() : '';let port = portConfig ? parseInt(portConfig.toString()) : 0;let cscsRepl = new CscsRepl();cscsRepl.start(connectType, host, port);let outputChannel = vscode.window.createOutputChannel('CSCS');cscsRepl.on('onInfoMessage', (msg : string) => {vscode.window.showInformationMessage('REPL: ' + msg);});cscsRepl.on('onReplMessage', (data : string) => {outputChannel.append('REPL> ');let lines = data.toString().split('\n');let counter = 0;for (let i = 0; i < lines.length; i++) {let line = lines[i].trim();outputChannel.appendLine(line);counter++;}});const getCode = () => {let textEditor = vscode.window.activeTextEditor;if (!textEditor) {return "";}let selection = textEditor.selection;let text = textEditor.document.getText(selection);if (textEditor.selection.start.line === textEditor.selection.end.line &&textEditor.selection.start.character === textEditor.selection.end.character) {text = textEditor.document.lineAt(textEditor.selection.start.line).text;}return text;};let disposable = vscode.commands.registerCommand('extension.cscs.repl', () => {let code = getCode();if (code === '') {return;}cscsRepl.sendToServer('repl', code);});context.subscriptions.push(disposable);}
首先,它读取你在package.json文件中定义的配置,即。
"properties": {"cscs.connectType": {"type": "string","default": "sockets"},"cscs.serverPort": {"type": "number","default": 13337},"cscs.serverHost": {"type": "string","default": "127.0.0.1"}}
读取配置后,你连接到你在上一节实现的调试器。通过套接字实现连接的代码在CscsRepl类中,在cscsRepl.ts中实现。它显示在清单7中。
清单7:在Typescript中连接到调试器
const Net = require("net");private _debugger = new Net.Socket();private _queuedCommands = new Array<string>();public start(connectType: string, host: string, port: number) {if (this._init) {return;}this._init = true;this._connectType = connectType;this._host = host;this._port = port;this.connectToDebugger();}public connectToDebugger() : void {this._connected = false;if (this._connectType === "sockets") {console.log('Connecting to ' + this._port + " on " + this._host + "...");this._debugger.connect(this._port, this._host, () => {this._connected = true;this.printInfoMsg('Connected to the server at ' + this._host + ":" + this._port);for (let i = 0; i < this._queuedCommands.length; i++) {this.sendToServer(this._queuedCommands[i]);}this._queuedCommands.length = 0;});this._debugger.on('data', (data : string) => {this.processFromDebugger(data.toString().trim());});this._debugger.on('close', () => {if (!this._connected) {this.printErrorMsg("Couldn't connect to " + this._host + ":" + this._port);}this._connected = false;});}}
请注意,你订阅了来自CscsRepl的信息,并使用此代码像弹出窗口一样显示它们。
cscsRepl.on('onInfoMessage', (msg : string) => {vscode.window.showInformationMessage('REPL: ' + msg);});
在CscsRepl中,你像这样把信息传递给订阅者。
public printInfoMsg(msg : string) {this.sendEvent('onInfoMessage', msg);}protected processFromDebugger(data : string) {this.sendEvent('onReplMessage', msg);}
调试器的实际输出显示在你在本语句中创建的名为CSCS的额外输出窗口中。
let outputChannel = vscode.window.createOutputChannel('CSCS');
extension.ts activate()方法的主要部分是extension.cscs.rep命令的实现,你之前在package.json中定义了这个命令。
let disposable=vscode.commands.registerCommand('extension.cscs.repl', () => {let code = getCode();if (code === '') {return;}cscsRepl.sendToServer('repl', code);});
每次用户执行extension.cscs.rep命令时,你会得到她在编辑器中选择的内容(使用getCode()方法,如清单8所示),然后将她的选择发送到服务器(见清单9)。所有来自服务器的回复都显示在cscsRepl.on(‘onReplMessage’)方法中,也在清单8中显示。
清单 8: 在 Typescript 中将 REPL 发送给调试器
public sendToServer(cmd : string, data = "") {if (this._finished) {return;}let lines = data.split('\n');let load = "";for (let i = 0; i < lines.length; i++) {let lineData = lines[i].trim();if (lineData === "") {continue;}let lines2 = lineData.split('\r');load = load + lines2[0];}if (load !== "" || !cmd.includes('|')) {cmd = cmd + "|" + load;}if (!this._connected) {this._queuedCommands.push(cmd);return;}this._debugger.write(cmd + "\n");}
清单9:CSCS调试器项目package.json文件的一个片段
"name": "cscs-debugger","displayName": "CSCS Debugger","activationEvents": ["onDebug"],"contributes": {"languages": [{"id": "cscs","aliases": ["CSCS", "cscs"],"extensions": [".cscs"],"configuration": "./language-configuration.json"}],"breakpoints": [{"language": "cscs"}],"debuggers": [{"type": "cscs","label": "CSCS Debug","program": "./out/debugAdapter.js","runtime": "node","configurationAttributes": {"launch": { "required": ["program"] },"properties": {"program": {"type": "string","description": "Absolute path to a text file.","default": "${workspaceFolder}/${command:AskForProgramName}"},"serverPort": {"type": "number","description": "Number of the server port to connect to.","default": 13337},}}}
就这样吧! 你看到了客户端和服务器的实现,现在是时候看看REPL在现实生活中是如何工作的。
REPL客户端的操作
让我们看看如何在iOS调试中使用REPL评估器。从https://github.com/vassilych/mobile 下载CSCS Xamarin项目。VS Code CSCS REPL扩展可以从https://marketplace.visualstudio.com/items?itemName=vassilik.cscs-repl。
start.cscs脚本是开始处理CSCS的地方。你可以在这里只放一条语句。
StartDebugger();
这条语句将开始监听默认端口13337上的传入连接(你可以提供任何其他端口号作为StartDebugger()函数的参数)。然后开始在调试模式下运行Xamarin项目,选择一个模拟器或一个真实设备。Xamarin用一个空屏幕启动一个iOS应用程序。
使用REPL VS Code扩展,你可以在飞行中向iOS应用程序添加小部件。
现在你可以使用VS Code中的REPL评估器,开始向iOS应用中添加小部件。一些例子见图3。你还可以删除小部件,改变标签,引入新的动作,等等。使用 REPL 评估器是获得你所需要的布局的最快方式,而无需重新启动调试器。这不是很酷吗?
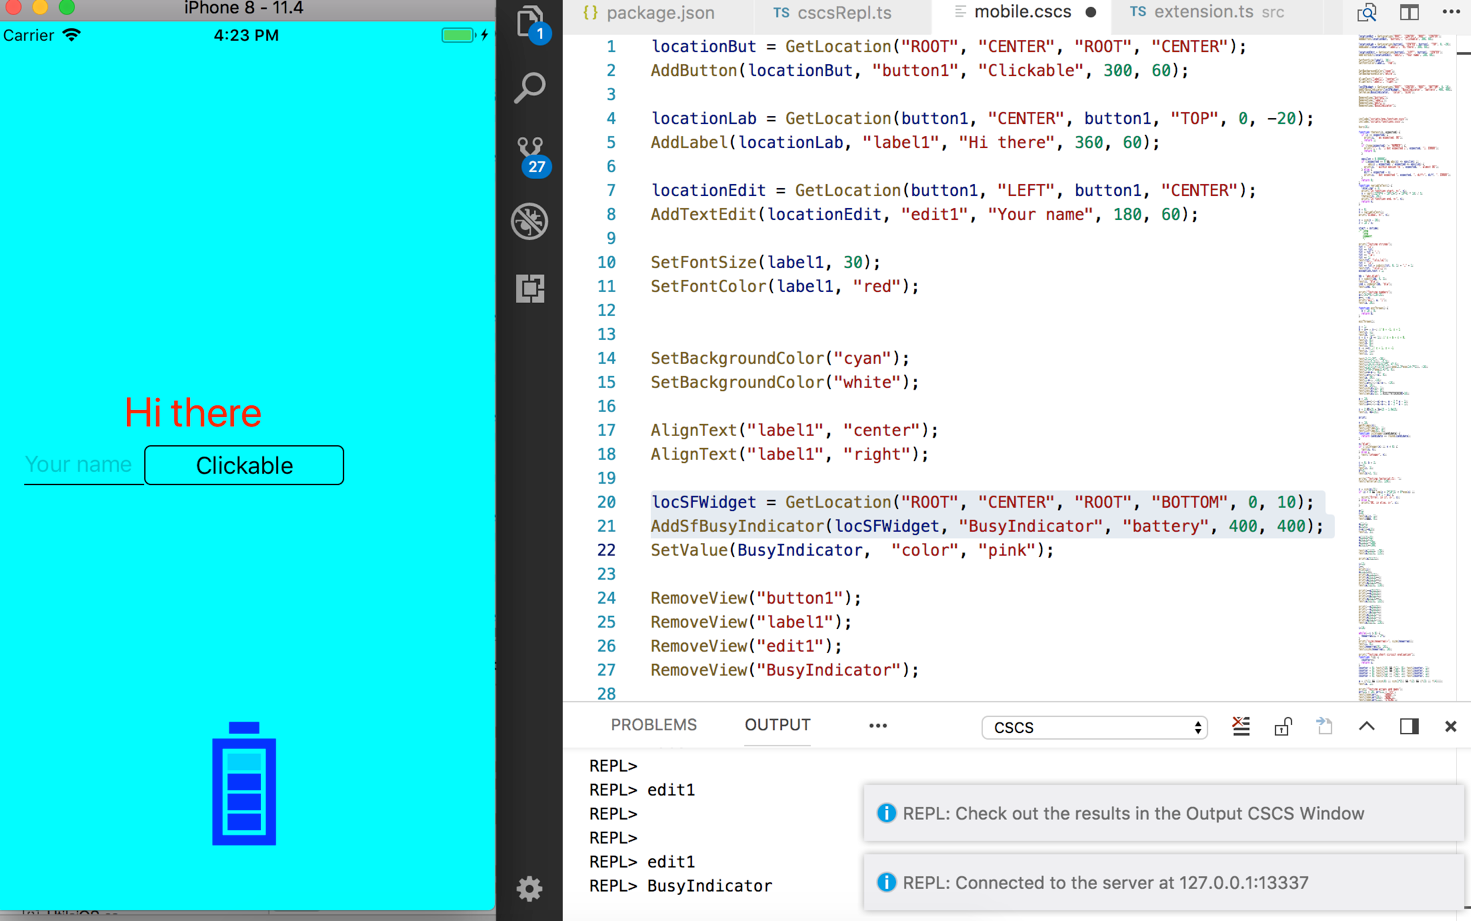
图3:在iPhone上玩REPL。
在Visual Studio代码中添加调试器
在VS Code中实现一个调试器比实现一个REPL解释器要复杂一些。我建议你阅读微软的介绍(https://code.visualstudio.com/docs/extensions/example-debuggers),关于为模拟调试器写一个VS Code扩展。那里的模拟调试器模仿的是与真正的调试器的连接。在这里你将看到调试器扩展连接到真正的调试器服务器。
首先,用之前的方法创建一个新的扩展,使用yo命令行工具。
你还需要包括更多的依赖项来实现调试器,特别是两个npm模块:vscode-debugprotocol和vscode-debugadapter。见清单9中package.json文件的内容。注意,在做了与你的扩展所使用的npm模块有关的任何修改后,你需要运行npm安装命令,它将相应的模块下载到你的项目目录下的node_modules文件夹中。
VS Code Debugger项目的结构与普通的扩展不同,比如你在上一节开发的REPL项目。
首先,主要的动作并不是由扩展的激活方法触发的。调试器本身作为一个独立的程序运行,即所谓的调试适配器。为了实现一个调试器,你必须实现调试适配器协议。你将在接下来的章节中看到如何做。
你要实现的调试器可以执行以下调试器任务。
- 设置和取消断点
- 下一步,继续,步入,和步出命令
- 保持对局部和全局变量的跟踪
- 追踪被观察的变量
- 保持对调用栈的跟踪
- 通过将鼠标悬停在变量上显示变量值
- 通过将鼠标悬停在函数名称上显示函数定义
- 处理代码异常情况
调试器客户端
在客户端,CscsDebugSession是主要的调试器类。就像在REPL的情况下,所有的客户端代码都是TypeScript的。它扩展并实现了LoginDebugSession,它扩展了DebugSession类。请看清单10中的实现片段。你可以在GitHub上看到完整的实现(链接在侧边栏提供)。
清单 10:CscsDebugger TypeScript 类的片段
export class CscsDebugSession extends LoggingDebugSession {private static THREAD_ID = 1;private _runtime: CscsRuntime;public constructor() {super("cscs-debug.txt");this.setDebuggerLinesStartAt1(false);this.setDebuggerColumnsStartAt1(false);this._runtime = new CscsRuntime();this._runtime.on('stopOnStep', () => {this.sendEvent(new StoppedEvent('step', CscsDebugSession.THREAD_ID));});this._runtime.on('stopOnBreakpoint', () => {this.sendEvent(new StoppedEvent('breakpoint', CscsDebugSession.THREAD_ID));});this._runtime.on('output', (text, filePath, line, column) => {const e: DebugProtocol.OutputEvent = new OutputEvent(`${text}\n`);e.body.source = this.createSource(filePath);e.body.line = this.convertDebuggerLineToClient(line);this.sendEvent(e);});}protected initializeRequest(response: DebugProtocol.InitializeResponse,args: DebugProtocol.InitializeRequestArguments): void {response.body = response.body || {};response.body.supportsEvaluateForHovers = true;response.body.supportsStepBack = false;response.body.supportsSetVariable = false;response.body.supportsRestartRequest = false;response.body.supportsModulesRequest = false;this.sendResponse(response);this.sendEvent(new InitializedEvent());}protected continueRequest(response: DebugProtocol.ContinueResponse,args: DebugProtocol.ContinueArguments): void {this._runtime.continue();this.sendResponse(response);}protected nextRequest(response: DebugProtocol.NextResponse,args: DebugProtocol.NextArguments): void {this._runtime.step();this.sendResponse(response);}protected evaluateRequest(response: DebugProtocol.EvaluateResponse,args: DebugProtocol.EvaluateArguments): void {let reply: string | undefined = undefined;if (args.context === 'hover') {reply = this._runtime.getHoverValue(args.expression);} else if (args.context === 'watch') {reply = this._runtime.getVariableValue(args.expression);}response.body = { result: reply ? reply : "", variablesReference: 0};this.sendResponse(response);}}
CscsDebugSession在debugAdapter.ts文件中启动,如下所示。
import { CscsDebugSession } from './cscsDebug';CscsDebugSession.run(CscsDebugSession);
在initializeRequest方法中,你可以设置调试器的一些功能。下面是我设置的一些选项。
response.body.supportsEvaluateForHovers = true;response.body.supportsSetVariable = false;response.body.supportsRestartRequest = false;response.body.supportsRestartFrame = false;response.body.supportsModulesRequest = false;
你可以在GitHub上的VS Code Debug Protocol的Capabilities部分看到所有可用的选项。(https://github.com/Microsoft/vscode/blob/master/src/vs/workbench/parts/debug/common/debugProtocol.d.ts))。
CscsDebuggerSession使用CscsRuntime来完成连接到调试服务器的实际工作,并将大部分请求委托给它。在附带的源代码下载中查看其实现。该代码与你在清单7中实现REPL评估器扩展时看到的非常相似。
CscsDebuggerSession构造函数订阅由CscsRuntime处理的事件,并将它们传播给DebugSession。
this._runtime.on('stopOnStep', () => {this.sendEvent(new StoppedEvent('step', CscsDebugSession.THREAD_ID));});this._runtime.on('stopOnBreakpoint', () => {this.sendEvent(new StoppedEvent('breakpoint',CscsDebugSession.THREAD_ID));});this._runtime.on('end', () => {this.sendEvent(new TerminatedEvent());});
connectToDebugger()方法与你之前在清单7中看到的REPL扩展中的同名方法相似,但有一些区别。首先,当你连接到调试服务器时,你要发送你要调试的初始文件。这是在这个语句中完成的。
this.sendToServer("file", this._sourceFile);
你可以假设你和调试服务器在同一台电脑上,只发送要调试的文件的路径。
第二,你把所有的断点发送到服务器上。
正如你在所附的源代码中看到的,CscsDebuggerSession类基本上是CscsRuntime类的一个包装。另一方面,CscsRuntime类将大部分任务委托给调试服务器,通过套接字与它进行通信。
添加和删除断点
一旦用户打开了要调试的文件,只要用户点击了编辑器的左侧,VS代码框架就会调用CscsDebug类中的setBreakpointRequest()方法。这个方法在两种情况下都被调用:当一个新的断点被添加或删除时。没有任何迹象表明是什么触发了对该方法的调用。相反,SetBreakPointsArguments参数包含了一个特定文件的所有断点。因此,你只需删除指定文件的所有现有断点,然后再一个一个地添加它们。下面是其中的代码片段。
protected setBreakPointsRequest(response: DebugProtocol.SetBreakpointsResponse,args: DebugProtocol.SetBreakpointsArguments): void{const path = <string>args.source.path;const clientLines = args.lines || [];this._runtime.clearBreakpoints(path);const actualBreakpoints = clientLines.map(l =>{let { verified, line, id } = this._runtime.setBreakPoint(path,this.convertClientLineToDebugger(l));
断点的注册将被委托给CscsRuntime类中的setBreakPoint()方法。在这里,你可以创建一个从源代码的行号到断点的映射。以后当你需要知道某一行是否包含断点时,就需要这样做。
下一步,步入,步出,继续
接下来,Step-in、Step-out 和 Continue 可以说是最常见的调试操作。当用户触发这四项中的任何一项时,相应的函数会在CscsDebug类上触发,因为它扩展了DebugSession类。例如,在下一个请求的情况下,这个方法会在CscsDebug中执行。
protected nextRequest(response:DebugProtocol.NextResponse, args:DebugProtocol.NextArguments): void {this._runtime.step();this.sendResponse(response);}
基本上,所有的工作都委托给了CscsRuntime。
public step(event = 'stopOnStep') {this._continue = false;if (this._init) {this.runOnce(event);} else {this.sendToServer('next');}}
sendToServer方法与REPL客户端的sendToServer方法相同(见清单8)。runOnce()方法总是在程序开始时执行(意味着你总是在要调试的文件的第一行停止)。
runOnce() 方法调用 fireEventsForLine() 方法。fireEventsForLine()方法通知debugSession接下来要做什么。有三种情况。
- 你已经碰到了一个断点。然后你验证它,如果尚未验证的话,并通知debugSession你应该在这里停止。
let bp = this.getBreakPoint(ln);if (bp) {this.sendEvent('stopOnBreakpoint');if (!bp.verified) {bp.verified = true;this.sendEvent('breakpointValidated', bp);}return true;}
- 你停在那里是因为你处于步骤事件模式,而且这一行不是空的(该事件是 “stopOnStep”)。
if (stepEvent && line.length > 0) {this.sendEvent(stepEvent);return true;}
否则就继续执行。在附带的源代码下载中查看完整的实现。
局部和全局变量
每次向调试服务器发送请求时(见清单8),在processFromDebugger()方法中异步等待回复。与回复一起,你等待的是关于所有当前局部和全局变量的信息。你也期望在每个回复中收到当前的调用堆栈信息。
在fillVars()方法中加载所有的变量,这发生在这个语句中。
if (globLoc === '1') {this._globalVariables.push(item);} else {this._localVariables.push(item);}
CscsDebugger会定期向CscsRuntime询问全局变量和局部变量。
protected variablesRequest(response:DebugProtocol.VariablesResponse, args:DebugProtocol.VariablesArguments): void {let variables = args.variablesReference === this._localScope ?this._runtime.localVariables :this._runtime.globalVariablesresponse.body = { variables: variables };this.sendResponse(response);}
variablesRequest()方法被调用两次:一次用于局部变量,一次用于全局变量。无论你返回什么,都会显示在VS代码的左侧编辑窗格中。见图4。
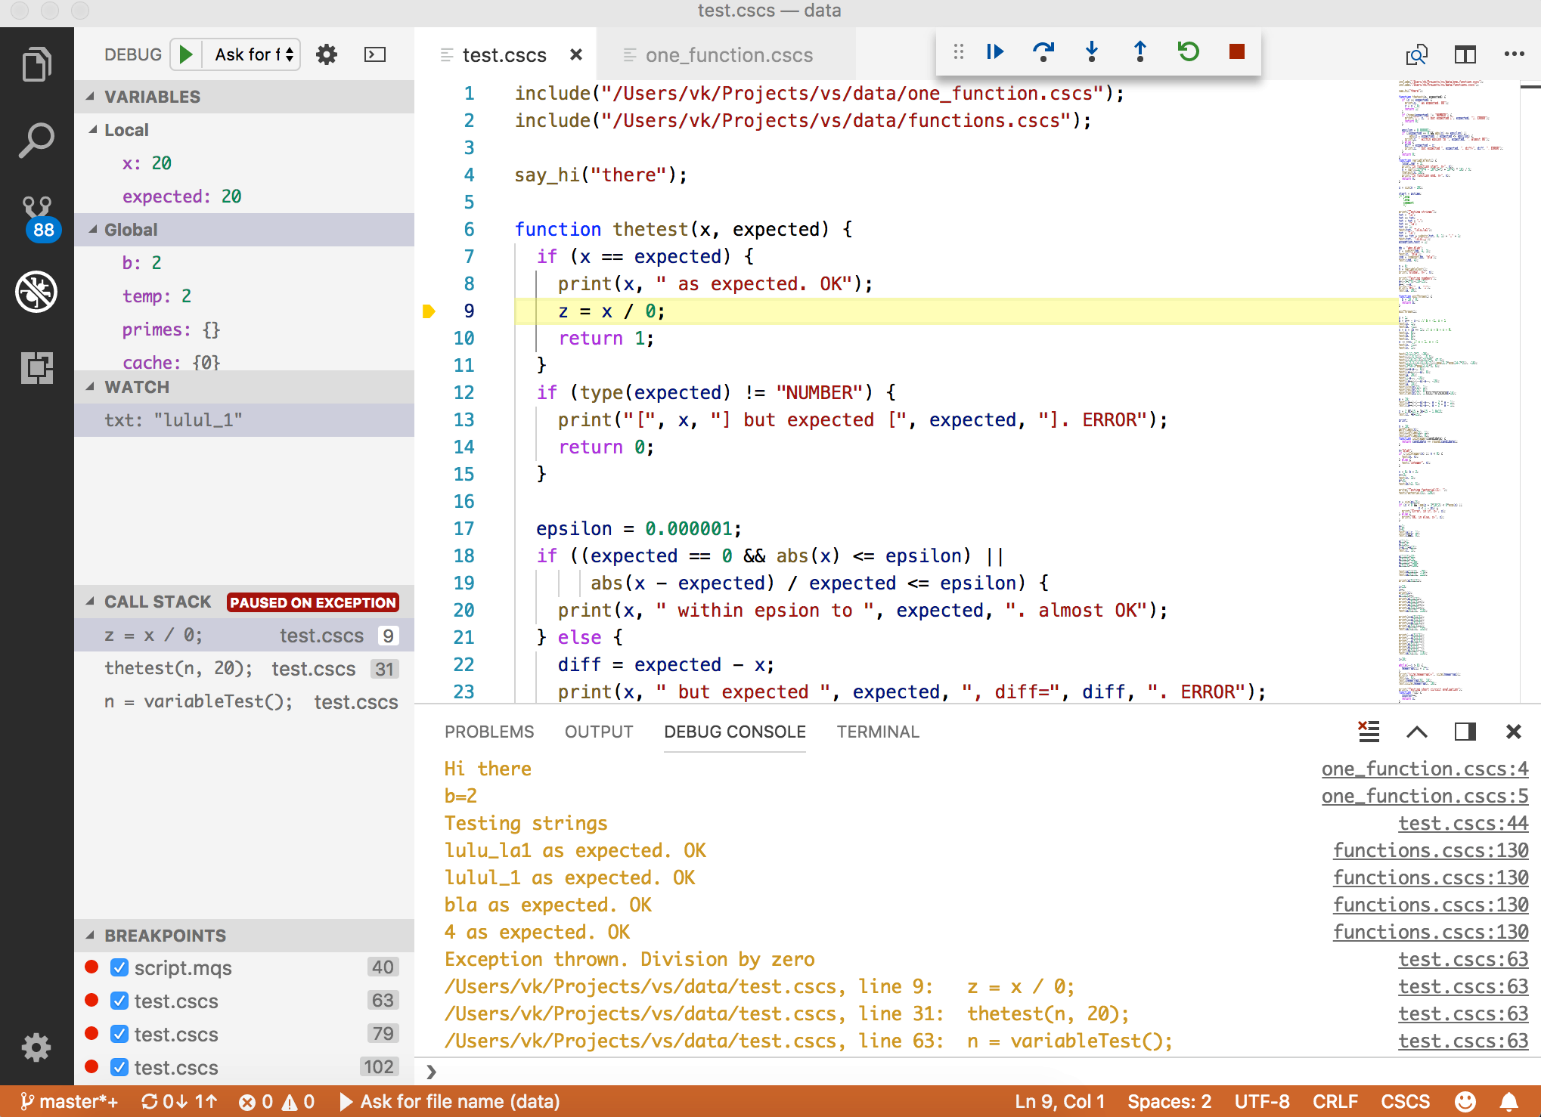
图4:VS代码调试器的运行情况
观察和悬停变量
在watch中添加变量完全是由VS Code Framework完成的。将鼠标悬停在一个变量上也是一样的,但是当VS代码框架问你时,你仍然要告诉watch和hover这两个变量的值是什么。
这是在DebugSession evaluateRequest()方法中完成的。这是CscsDebugger如何扩展这个方法的一个片段(完整代码见清单10)。
protected evaluateRequest(): void {let reply: string | undefined = undefined;if (args.context === 'hover') {reply = this._runtime.getHoverValue(args.expression);} else if (args.context === 'watch') {reply = this._runtime.getVariableValue(args.expression);}this.sendResponse(response);}
基本上,悬停和观察功能的评估被委托给了CscsRuntime类。在那里,它查找之前在调试服务器回复上存储的变量值。
public getVariableValue(key : string) : string {let val = this._variablesMap.get(key);if (val) {return val;}return "--- unknown ---";}
对于悬停请求,代码是类似的。
public getHoverValue(key : string) : string {let hover = this._hoversMap.get(key);if (hover) {return hover;}hover = this._functionsMap.get(key);if (hover) {return hover;}return key;}
_variablesMap和_hoversMap变量是在fillVars()方法中填写的。_functionsMap变量是一个特殊的静态地图,有所有的自定义语言函数定义。它可以被实现并从服务器接收,但我决定在TypeScript客户端代码中硬编码它更容易。详见清单11中的initFunctionNames()方法。
清单11:initFunctionNames()TypeScript方法的一个片段
private initFunctionNames() : void {let ifelse = "if(condition) { ... } elif (condition) {} else {}:if-elif-else control flow. Curly braces {} are mandatory!";this._functionsMap.set("if", ifelse);this._functionsMap.set("elif", ifelse);this._functionsMap.set("else", ifelse);this._functionsMap.set("while", "while(condition) { ... }:While control flow. Curly braces {} are mandatory!");this._functionsMap.set("for", "for(i : array) OR for(i=0; i<n;i++) { ... }: For control flow statements. Curly braces {} are mandatory!");this._functionsMap.set("function", "function f(arg1, arg2, ...){ ... } : CSCS custom interpreted function (use cfunction for pre-compiled functions)");this._functionsMap.set("print", "print(arg1, arg2, ...): Prints passed arguments to console");this._functionsMap.set("type", "type(arg): Returns type of the passed arg");this._functionsMap.set("include", "include(filename): includes CSCS code from the filename");this._functionsMap.set("sin", "sin(x): Returns sine of x");}
栈跟踪请求
与来自调试服务器的每个回复一起,你也希望收到本地和全局变量以及当前的调用堆栈信息。你在fillStackTrace()方法中填充堆栈。
保存堆栈跟踪信息的对象是_stackTrace。它是一个StackEntry对象的数组。每个StackEntry由文件名、行号和名称组成,也就是当前语句。
export interface StackEntry {id: number;line: number;name: string;file: string;}
这是fillStackTrace()方法的主要代码,它在来自调试服务器的回复上填充堆栈跟踪。
let ln = Number(lines[i]);let file = lines[i + 1].trim();let line = lines[i + 2].trim();const entry = <StackEntry> {id: ++id, line : ln, name : line, file: file};this._stackTrace.push(entry);
CscsDebugger定期要求CscsRuntime提供堆栈跟踪。
protected stackTraceRequest(): void {// ...const stk = this._runtime.stack(startFrame, endFrame);response.body = {stackFrames: stk.frames.map(f =>new StackFrame(f.index, f.name,this.createSource(f.file),this.convertDebuggerLineToClient(f.line))),totalFrames: stk.count};this.sendResponse(response);}
处理异常情况
如果客户端代码抛出了一个异常,调试服务器会用特殊的 exc 响应来通知你。CscsRuntime收到后,通过发送以下事件通知CscsDebug会话。
this.sendEvent('stopOnException');
然后CscsDebug会话将此事件传播给框架。
this._runtime.on('stopOnException', () => {this.sendEvent(new StoppedEvent('exception', CscsDebugSession.THREAD_ID));});
这样就可以在VS Code左侧窗格中显示异常信息和堆栈跟踪(见图4)。
在发生异常时,完整的堆栈跟踪会和异常一起从调试服务器接收。你只需要调用fillStackTrace()方法,其余的由框架来完成(详见上节)。
调试服务器的实现
你可以使用你为REPL评估器扩展实现的相同调试服务器。你只需要扩展它以处理更多的情况。需要扩展的函数是 ProcessClientCommand()。在 REPL 评估器的情况下,它只处理 repl 命令。清单 12 显示了扩展的 ProcessClientCommand() 的实现。
清单12:ProcessClientCommand() C#方法的一个片段
void ProcessClientCommand(string data){string [] parts = data.Split(new char [] { '|' });string cmd = parts[0].ToLower();string result = "N/A";SteppingIn = SteppingOut = false;SendBackResult = true;if (cmd == "file") {m_filename = data.Substring(cmd.Length + 1);string rawScript = Utils.GetFileContents(m_filename);m_script = Utils.ConvertToScript(rawScript, out m_char2Line);m_debugging = new ParsingScript (m_script, 0, m_char2Line);} else if (cmd == "setbp") {Breakpoints.Instance.AddBreakpoints(this, data);return;} else if (cmd == "repl") {result = ProcessRepl(data.Substring(cmd.Length + 1));SendBack(result);return;} else if (cmd == "continue") {Continue = true;cmd = "next";} else if (cmd == "stepin") {SteppingIn = true;cmd = "next";}if (cmd == "next") {Variable res = ProcessNext();int origLineNumber = GetCurrentLineNumber();string filename = GetCurrentFilename ();result = CreateResult(filename, origLineNumber, Output, processedStr);}result = cmd + "\n" + result;SendBack(result);}
请注意,没有具体的命令来获取本地/全局变量和执行堆栈的请求。原因是,服务器在每次请求时都会发回变量和堆栈信息。清单13显示了CreateResult()方法的实现,该方法将所有这些信息添加到要发送给客户端的响应中。
清单13:CreateResult() C#方法
string CreateResult(string filename, int lineNumber,string output, string processed = ""){int outputCount = output.Split('\n').Length;string result = filename + "\n";result += lineNumber + "\n";result += outputCount + "\n";result += output + "\n";string vars = GetVariables();int varsCount = vars.Split('\n').Length;result += varsCount + "\n";result += vars + "\n";string stack = GetStack();result += stack + "\n";return result;
调试服务器的实现是针对CSCS语言的。看看GitHub上的实现和附带的源代码下载,并根据你的语言来调整它。
结束语
可以说,Visual Studio Code是作为Eclipse集成开发环境的替代品出现的,Erich Gamma早先参与了Eclipse的开发,这并不是偶然的。事实上,越来越多的开发者正在从Eclipse转向VS Code。我发现VS Code比Eclipse更容易扩展,而且我还感觉VS Code是一个比Eclipse更轻巧的工具。
VS Code可以扩展其功能并支持新的语言。在这篇文章中,你看到了如何以两种方式扩展VS Code的功能:如何添加扩展和如何添加新的语言支持,包括语言支持的主要任务之一—调试。
我希望你喜欢使用REPL扩展动态创建移动应用程序的可能性。
你在本文中看到的所有项目的所有代码都是开源的。请看侧边栏中附带的源代码下载和GitHub链接,以获得最新的发展。
我想特别感谢微软的Stefan Landvogt为我提供了无价的技巧和建议。
参考资料
- (Visual Studio) Code Made in Switzerland: Tech Days Baden (by Erich Gamma): https://channel9.msdn.com/Events/TechDays/TechDays16Baden/Keynote-1-Visual-Studio-Code-made-in-Switzerland?ocid=player
- StackOverflow Developer Survey 2018: https://insights.stackoverflow.com/survey/2018/https://insights.stackoverflow.com/survey/2018/#technology-most-popular-development-environments
- Write Cross-Platform Apps using Electron, Code Magazine, March-April 2016: https://www.codemag.com/Article/1603041/Write-Cross-Platform-Apps-using-Electron
- REPL: https://en.wikipedia.org/wiki/Read%E2%80%93eval%E2%80%93print_loop
CSCS和VS代码扩展 源代码
- Introduction to Visual Studio Code Extensions: https://code.visualstudio.com/docs/extensions/example-hello-world
- GitHub CSCS Source Code:
- VS Code CSCS REPL Extension: https://marketplace.visualstudio.com/items?itemName=vassilik.cscs-repl
- VS Code CSCS Debugger Extension: https://marketplace.visualstudio.com/items?itemName=vassilik.cscs-debugger
文章原地址
镜像地址

若有收获,就点个赞吧
0 人点赞
