本章主要描述 MyBatis 插件模块的原理,从以下两点出发:
- MyBatis 是如何加载插件配置的?
- MyBatis 是如何实现用户使用自定义拦截器对 SQL 语句执行过程中的某一点进行拦截的?
示例准备
首先准备两个拦截器示例,代码如下。
@Intercepts({@Signature(type = Executor.class, method = "query",args = {MappedStatement.class, Object.class, RowBounds.class, ResultHandler.class}),@Signature(type = Executor.class, method = "query", args = {MappedStatement.class, Object.class, RowBounds.class,ResultHandler.class, CacheKey.class, BoundSql.class})})public class AInterceptor implements Interceptor {private static final Logger LOGGER = LoggerFactory.getLogger(AInterceptor.class);/*** 执行拦截逻辑的方法** @param invocation* @return* @throws Throwable*/@Overridepublic Object intercept(Invocation invocation) throws Throwable {LOGGER.info("--------------执行拦截器A前--------------");Object obj = invocation.proceed();LOGGER.info("--------------执行拦截器A后--------------");return obj;}/*** 决定是否触发intercept()方法** @param target* @return*/@Overridepublic Object plugin(Object target) {return Plugin.wrap(target, this);}/*** 根据配置初始化Interceptor对象** @param properties*/@Overridepublic void setProperties(Properties properties) {}}
@Intercepts({@Signature(type = Executor.class, method = "query",args = {MappedStatement.class, Object.class, RowBounds.class, ResultHandler.class}),@Signature(type = Executor.class, method = "query", args = {MappedStatement.class, Object.class, RowBounds.class,ResultHandler.class, CacheKey.class, BoundSql.class})})public class BInterceptor implements Interceptor {private static final Logger LOGGER = LoggerFactory.getLogger(BInterceptor.class);/*** 执行拦截逻辑的方法** @param invocation* @return* @throws Throwable*/@Overridepublic Object intercept(Invocation invocation) throws Throwable {LOGGER.info("--------------执行拦截器B前--------------");Object obj = invocation.proceed();LOGGER.info("--------------执行拦截器B后--------------");return obj;}/*** 决定是否触发intercept()方法** @param target* @return*/@Overridepublic Object plugin(Object target) {return Plugin.wrap(target, this);}/*** 根据配置初始化Interceptor对象** @param properties*/@Overridepublic void setProperties(Properties properties) {}}
MyBatis 配置文件 mybatis-config.xml 增加 plugin 配置。
<plugins><plugin interceptor="com.yjw.mybatis.test.mybatis.plugin.AInterceptor"/><plugin interceptor="com.yjw.mybatis.test.mybatis.plugin.BInterceptor"/></plugins>
加载插件配置
在 MyBatis 初始化时,会通过 XMLConfigBuilder#pluginElement 方法解析 mybatis-config.xml 配置文件中定义的
private void pluginElement(XNode parent) throws Exception {if (parent != null) {for (XNode child : parent.getChildren()) {String interceptor = child.getStringAttribute("interceptor");Properties properties = child.getChildrenAsProperties();// 创建Interceptor对象Interceptor interceptorInstance = (Interceptor) resolveClass(interceptor).newInstance();interceptorInstance.setProperties(properties);// 保存到Configuration.interceptorChain字段中configuration.addInterceptor(interceptorInstance);}}}public void addInterceptor(Interceptor interceptor) {interceptorChain.addInterceptor(interceptor);}
拦截过程
继续介绍 MyBatis 的拦截器如何对 Exector、StatementHandler、ParameterHandler、ResultSetHandler 进行拦截。
在 MyBatis 中使用的这四类对象,都是通过 Configuration 创建的,方法如下图所示。如果配置了自定义拦截器,则会在该系列方法中,通过 InterceptorChain.pluginAll() 方法为目标对象创建代理对象,所以通过 Configuration.new*() 系列方法得到的对象实际是一个代理对象。

以 newExecutor() 方法为例进行分析,其他方法原理类似,newExecutor() 方法的具体实现如下所示。
public Executor newExecutor(Transaction transaction, ExecutorType executorType) {executorType = executorType == null ? defaultExecutorType : executorType;executorType = executorType == null ? ExecutorType.SIMPLE : executorType;Executor executor;// 默认是SIMPLEif (ExecutorType.BATCH == executorType) {executor = new BatchExecutor(this, transaction);} else if (ExecutorType.REUSE == executorType) {executor = new ReuseExecutor(this, transaction);} else {executor = new SimpleExecutor(this, transaction);}if (cacheEnabled) {executor = new CachingExecutor(executor);}// 通过InterceptorChain.pluginAll()方法创建Exector代理对象executor = (Executor) interceptorChain.pluginAll(executor);return executor;}
在 InterceptorChain.pluginAll() 方法会遍历 interceptors 集合,并调用每个 interceptor 的 plugin() 方法创建代理对象,具体实现如下所示。
public Object pluginAll(Object target) {for (Interceptor interceptor : interceptors) {target = interceptor.plugin(target);}return target;}
一般我们自定义拦截器的 plugin 方法,会使用 MyBatis 提供的 Plugin 工具类,它实现了 InvocationHandler 接口,并提供了 wrap() 静态方法用于创建代理对象,Plugin.wrap() 方法的具体实现如下所示。
public static Object wrap(Object target, Interceptor interceptor) {// 获取用户自定义Interceptor中@Signature注解的信息// getSignatureMap()方法负责处理@Signature注解Map<Class<?>, Set<Method>> signatureMap = getSignatureMap(interceptor);// 获取目标类型Class<?> type = target.getClass();// 获取目标类型实现的接口Class<?>[] interfaces = getAllInterfaces(type, signatureMap);if (interfaces.length > 0) {// 使用JDK动态代理的方式创建代理对象return Proxy.newProxyInstance(type.getClassLoader(),interfaces,new Plugin(target, interceptor, signatureMap));}return target;}private static Class<?>[] getAllInterfaces(Class<?> type, Map<Class<?>, Set<Method>> signatureMap) {Set<Class<?>> interfaces = new HashSet<Class<?>>();while (type != null) {for (Class<?> c : type.getInterfaces()) {if (signatureMap.containsKey(c)) {interfaces.add(c);}}type = type.getSuperclass();}return interfaces.toArray(new Class<?>[interfaces.size()]);}
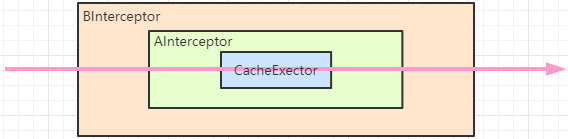
示例中 Exector 存在两个拦截器 AInterceptor 和 BInterceptor,在执行 InterceptorChain.pluginAll() 方法的时候,传给 getAllInterfaces() 方法的 type 字段第一次是 CacheExector 对象,第二次是 CacheExector 的代理对象,因为生成的代理对象也继承 Exector 接口,signatureMap.containsKey(c) 可以获得值,继续生成代理的代理对象,结构如下图所示。
在 Plugin.invoke() 方法中,会将当前调用方法与 signatureMap 集合中记录的方法信息进行比较,如果当前调用的方法是需要被拦截的方法,则调用其 intercept() 方法进行处理,如果不能被拦截则直接调用 target 的相应方法。Plugin.invoke() 方法的具体实现如下所示。
@Overridepublic Object invoke(Object proxy, Method method, Object[] args) throws Throwable {try {// 获取当前方法所在类或接口中,可被当前 Interceptor拦截的方法Set<Method> methods = signatureMap.get(method.getDeclaringClass());// 如果当前调用的方法需要被拦截,则调用interceptor.intercept()方法进行拦截处理if (methods != null && methods.contains(method)) {return interceptor.intercept(new Invocation(target, method, args));}// 如果当前调用的方法不能被拦截,则调用target对象的相应方法return method.invoke(target, args);} catch (Exception e) {throw ExceptionUtil.unwrapThrowable(e);}}
Interceptor.intercept() 方法的参数是 Invocation 对象,其中封装了目标对象、目标方法以及调用目标方法的参数,并提供了 process() 方法调用目标方法,如下所示。
public Object proceed() throws InvocationTargetException, IllegalAccessException {return method.invoke(target, args);}
需要注意的是,在 Interceptor.intercept() 方法中执行完拦截处理之后,如果需要调用目标方法,则通过 Invocation.process() 方法实现。
根据上面的分析,就不难理解示例的如下输出日志了,同时配置文件中插件的执行顺序也清楚了。
[main] DEBUG org.apache.ibatis.logging.LogFactory - Logging initialized using 'class org.apache.ibatis.logging.slf4j.Slf4jImpl' adapter.[main] DEBUG org.apache.ibatis.datasource.pooled.PooledDataSource - PooledDataSource forcefully closed/removed all connections.[main] DEBUG org.apache.ibatis.datasource.pooled.PooledDataSource - PooledDataSource forcefully closed/removed all connections.[main] DEBUG org.apache.ibatis.datasource.pooled.PooledDataSource - PooledDataSource forcefully closed/removed all connections.[main] DEBUG org.apache.ibatis.datasource.pooled.PooledDataSource - PooledDataSource forcefully closed/removed all connections.[main] INFO com.yjw.mybatis.test.mybatis.plugin.BInterceptor - --------------执行拦截器B前--------------[main] INFO com.yjw.mybatis.test.mybatis.plugin.AInterceptor - --------------执行拦截器A前--------------[main] DEBUG org.apache.ibatis.transaction.jdbc.JdbcTransaction - Opening JDBC Connection[main] DEBUG org.apache.ibatis.datasource.pooled.PooledDataSource - Created connection 360067785.[main] DEBUG com.yjw.mybatis.dao.StudentMapper.selectByPrimaryKey - ==> Preparing: select id, name, sex, selfcard_no, note from t_student where id = ?[main] DEBUG com.yjw.mybatis.dao.StudentMapper.selectByPrimaryKey - ==> Parameters: 1(Long)[main] DEBUG com.yjw.mybatis.dao.StudentMapper.selectByPrimaryKey - <== Total: 1[main] INFO com.yjw.mybatis.test.mybatis.plugin.AInterceptor - --------------执行拦截器A后--------------[main] INFO com.yjw.mybatis.test.mybatis.plugin.BInterceptor - --------------执行拦截器B后--------------Student [Hash = 550752602, id=1, name=张三, sex=1, selfcardNo=111, note=zhangsan]
作者:殷建卫 链接:https://www.yuque.com/yinjianwei/vyrvkf/ug43eu 来源:殷建卫 - 架构笔记 著作权归作者所有。商业转载请联系作者获得授权,非商业转载请注明出处。

若有收获,就点个赞吧
0 人点赞
