1. 搭建harbor镜像库
1.1 基本配置
1、使用本地 yum 仓库安装配置 contanierd.io、docker-ce、docker-ce-cli。
# 安装 containerd.io (注意:需要指定路径和版本)sudo dnf install -y http://localrepo.io:82/Docker-CE/Packages/containerd.io-1.4.12-3.1.el7.x86_64.rpm# 安装 docker-ce、docker-ce-cli# sudo dnf install -y docker-ce docker-ce-cli# 安装指定版本docker-ce、docker-ce-clisudo dnf install -y http://localrepo.io:82/Docker-CE/Packages/docker-ce-20.10.12-3.el7.x86_64.rpm http://localrepo.io:82/Docker-CE/Packages/docker-ce-cli-20.10.12-3.el7.x86_64.rpm# 创建 docker 配置文件/etc/docker/daemon.json,修改 docker cgroup Driver 为 systemdsudo sh -c 'mkdir -p /etc/docker&&cat > /etc/docker/daemon.json <<EOF{"exec-opts": ["native.cgroupdriver=systemd"],"log-driver": "json-file","log-level":"debug","debug" : true,"log-opts": {"max-size": "100m"},"storage-driver": "overlay2","storage-opts": ["overlay2.override_kernel_check=true"],"experimental" : true}EOF'# 重新加载配置sudo systemctl daemon-reload# 启动 docker 服务并配置为开机自启sudo systemctl enable --now docker# 查看 docker 服务状态sudo systemctl status docker# 将用户加入 docker 组,避免以 root 身份来使用 docker。注意:要重新登录才生效sudo usermod -aG docker $(whoami)# usermod -aG docker k8s
查看用户所在组:vi /etc/group
2、从本地共享仓库下载 docker-compose 和 harbor 软件包,并进行配置。
# 下载 docker-compose,并增加执行权限sudo curl -L http://localrepo.io:82/Harbor/docker-compose-Linux-x86_64 -o /usr/local/bin/docker-composesudo chmod +x /usr/local/bin/docker-compose# 下载 Harbor 软件包,并解压sudo curl -L http://localrepo.io:82/Harbor/harbor-offline-installer-v2.4.1.tgz -o harbor-offline-installer-v2.4.1.tgzsudo tar -zxvf harbor-offline-installer-v2.4.1.tgz
3、为 harbor 生成 CA 私钥、证书,以及服务器私钥、证书。
# 创建证书存放目录sudo mkdir -p /data/cert# 若是首次安装配置 Harbor,需要生成 CA 证书及私钥sudo openssl req -newkey rsa:2048 -nodes -sha256 -keyout /data/cert/ca.key \-x509 -days 3650 -subj "/C=CN/ST=Shanghai/L=Pudong/O=PHY/OU=Dev/CN=CA" -out /data/cert/ca.crt# 安装第 2 个及以后的 Harbor,只需要复制首次生成的 CA 证书及私钥即可# sudo scp root@harbor01.io:/data/cert/ca.* /data/cert/# 生成服务器私钥,注意根据主机名指定正确的私钥名称sudo openssl genrsa -out /data/cert/localrepo.io.key 2048# 生成服务器证书请求,注意根据主机名设置 CN 名称、私钥名称、证书名称sudo openssl req -sha256 -new \-subj "/C=CN/ST=Shanghai/L=Pudong/O=PHY/OU=Dev/CN=localrepo.io" \-key /data/cert/localrepo.io.key \-out /data/cert/localrepo.io.csr# 服务器证书扩展项,注意根据主机名设置 IP 地址、DNS 名称sudo sh -c 'cat >/data/cert/v3.ext << EOFauthorityKeyIdentifier=keyid,issuerbasicConstraints=CA:FALSEkeyUsage = digitalSignature, nonRepudiation, keyEncipherment, dataEnciphermentextendedKeyUsage = serverAuthsubjectAltName = @alt_names[alt_names]IP.1=127.0.0.1IP.2=192.168.58.11DNS.1=localhostDNS.2=localrepo.ioEOF'# 使用 CA 签发服务器证书,注意根据主机名设置文件名称sudo openssl x509 -req -sha256 -days 3650 --extfile /data/cert/v3.ext -CA /data/cert/ca.crt -CAkey /data/cert/ca.key -CAcreateserial -in /data/cert/localrepo.io.csr -out /data/cert/localrepo.io.crt# 清理过程文件sudo rm /data/cert/*.csr /data/cert/v3.ext /data/cert/ca.srl# 增加读权限sudo chmod +r /data/cert/*
4、为所有 Docker 客户端配置 CA 证书,用于验证服务器身份,有两种方式:
(1)在所有客户端上(包括 harbor 本机)创建指定目录(目录名为 Docker 仓库服务器主机名或 IP),用于存放 CA 证书。
sudo mkdir -p /etc/docker/certs.d/localrepo.iosudo scp root@localrepo.io:/data/cert/ca.crt /etc/docker/certs.d/localrepo.io/sudo systemctl restart docker
注意:若在安装配置 harbor.yml 时将 nginx 的 port 改为了非 443 端口,则需将相应的目录名改为:主机名:端口。
(2)将 CA 证书加入所有主机的证书信任链中。(这里只要一个 ca.crt 证书就够了)
sudo scp root@harbor01.io:/data/cert/ca.crt /etc/pki/ca-trust/source/anchors/sudo update-ca-trust
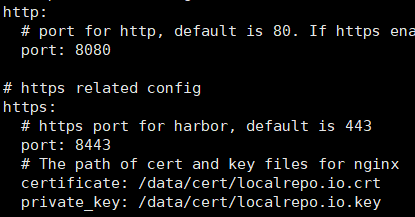
5、进入 harbor 目录,以 harbor.yml.tmpl 为模板创建 harbor.yml 文件,设置以下配置,其余保持不变,注意:hostname 要指定为主机 IP 地址,否则后续配置 Harbor 同步时会连不通!!!
cd /opt/harbor && sudo cp harbor.yml.tmpl harbor.yml && sudo vi harbor.yml# The IP address or hostname to access admin UI and registry service.hostname: 192.168.58.11http:# port for http, default is 80. If https enabled, this port will redirect to https portport: 80https:# https port for harbor, default is 443port: 443# The path of cert and key files for nginxcertificate: /data/cert/localrepo.io.crtprivate_key: /data/cert/localrepo.io.key
6、以 root 身份运行 harbor 目录中的 install.sh 脚本进行安装,根据指定的参数不同,可以有多种安装方式:
# 切换为 root 用户su root./install.sh# Installation with Clair(镜像漏洞扫描),最新版本已经弃用# ./install.sh --with-clair# Installation with Notary(镜像签名认证,For installation with Notary, you must configure Harbor to use HTTPS.)./install.sh --with-notary# Installation with Chart Repository Service(图表存储服务)./install.sh --with-chartmuseum# Installation with Notary, Clair, and Chart Repository Service# ./install.sh --with-notary --with-clair --with-chartmuseum# 查看 harbor 的状态docker-compose ps
7、Harbor 的启动、停止和重启。
docker-compose up -ddocker-compose down -vdocker-compose restart
1.2 配置Harbor服务
# 增加服务配置文件,注意指定正确的 harbor 路径sudo sh -c 'cat >/lib/systemd/system/harbor.service <<EOF[Unit]Description=HarborAfter=docker.service systemd-networkd.service systemd-resolved.serviceRequires=docker.serviceDocumentation=http://github.com/vmware/harbor[Service]Type=simpleRestart=on-failureRestartSec=5ExecStart=/usr/local/bin/docker-compose -f /opt/harbor/docker-compose.yml upExecStop=/usr/local/bin/docker-compose -f /opt/harbor/docker-compose.yml down[Install]WantedBy=multi-user.targetEOF'# 启动服务,并设置开机自启sudo systemctl enable --now harbor
1.3 验证Harbor
1、验证 harbor 及 HTTPS 配置。
(1)打开浏览器输入:https://192.168.58.106 访问 harbor,浏览器可能会提示证书不开信。这是因为我们用的是自签名证书,只要将 CA 证书导入可信证书区即可解决。默认用户名密码为 admin/Harbor12345
(2)Docker 客户端访问测试:
docker login localrepo.iodocker pull hello-worlddocker tag hello-world:latest localrepo.io/test/hello-world:latestdocker push localrepo.io/test/hello-world:latest# 或者docker login --username test --password Harbor12345 centos8-11
2、如果配置 harbor.yaml 时修改了默认端口 80 和 443,那么访问时需要加上对应的端口。使用 docker login 时也需要指定端口。
docker login localrepo.io:8443
1.4 配置扫描器
1、在 harbor 根目录下执行下列命令:
./install.sh --with-notary --with-trivy --with-chartmuseum
1.5 通过Dockerfile构建镜像
1、将 jar 包和 Dockerfile 文件放到同一个目录。
# Dockerfile文件内容如下:FROM openjdk:8-jdkCOPY target/*.jar app.jarEXPOSE 8080ENTRYPOINT ["java","-jar","app.jar"]
2、构建镜像。
# 使用命令:docker build -t 镜像别名 .docker build -t springboot_cicd .
3、运行镜像。
docker run -d -p 8080:8080 --name springboot_cicd springboot_cicd:latest
2. 搭建nexus依赖库
2.1 安装nexus
因为 nexus 支持 jdk8,所以需要先配置 JDK8。
1、将所需的安装包下载到 /opt/ 目录下。
sudo curl -L http://localrepo.io:82/Nexus/nexus-3.37.1-01-unix.tar.gz -o nexus-3.37.1-01-unix.tar.gzsudo curl -L http://localrepo.io:82/JDK/jdk-8u144-linux-x64.tar.gz -o jdk-8u144-linux-x64.tar.gz
2、配置 jdk8。
# 解压缩sudo tar -zxvf jdk-8u144-linux-x64.tar.gz# 重命名sudo mv jdk1.8.0_144/ jdk8# 配置环境变量 sudo vi /etc/profileexport JAVA_HOME=/opt/jdk8export CLASSPATH=.:$JAVA_HOME/jre/lib/rt.jar:$JAVA_HOME/lib/dt.jar:$JAVA_HOME/lib/tools.jarexport PATH=$PATH:$JAVA_HOME/bin# 环境变量生效source /etc/profile
3、配置 nexus。
# 解压缩sudo tar -zxvf nexus-3.37.1-01-unix.tar.gz
4、如果需要修改启动端口号的话,修改 /opt/nexus-3.29.2-02/etc/nexus-default.properties 文件,默认端口号 8081,我这里不做修改。
application-port=8081nexus-context-path=/
5、开放防火墙端口 8081。
# 开放防火墙端口8081sudo firewall-cmd --zone=public --add- port=8081/tcp --permanent# 配置立即生效sudo firewall-cmd --reload# 查看开放的端口列表sudo firewall-cmd --zone=public --list-ports
6、nexus 不推荐使用 root 用户启动,使用用户 k8s,然后加入到组,赋予权限。
sudo chown -R k8s:k8s /opt/nexus-3.37.1-01/sudo chown -R k8s:k8s /opt/sonatype-work/sudo chmod -R 750 /opt/nexus-3.37.1-01/sudo chmod -R 750 /opt/sonatype-work/
7、启动 nexus,浏览器访问 192.168.58.11:8081。
su nexus/opt/nexus-3.29.2-02/bin/nexus start
9、安装后检查:在 Nexus 安装首次运行后,我们还需要做一些必要的设置。
- 更改管理员密码:Nexus 安装后默认的管理用户是 admin,在系统初次启动期间会生成一个唯一的随机密码,并将其写入 $data-dir/admin.password 文件,用户必须通过从文件系统中检索初始密码来证明自己是系统所有者。登录后会有个向导提示更改密码。
- 配置匿名访问:首次登录后,向导中的另一步骤是配置是否在系统中允许匿名访问。在配置之前,系统将允许未经身份验证的用户读取存储库的内容。
- 配置 SMTP 设置:Nexus 可以发送用户名和密码恢复电子邮件。要启用此功能,您将需要配置 SMTP 主机和端口以及 Nexus 连接到邮件服务器所需的任何必要的身份验证参数。在 admin -> System -> Email Server 中可以进行配置。
2.2 配置nexus服务
1、应用程序启动时会从 /opt/nexus-3.37.1-01/bin/nexus.vmoptions 文件加载 JVM 参数。如需配置 Java 内存参数,就修改这个文件,注意-Xms 和 -Xmx 设置必须始终具有相同的值。
2、配置 Nexus 以新建的 k8s 用户来运行服务(否则将以root账号运行),编辑 Nexus 的解压安装目录下的 bin/nexus.rc 运行配置文件,指明运行 Nexus服务的用户。-Xms2703m-Xmx2703m-XX:MaxDirectMemorySize=2703m-XX:+UnlockDiagnosticVMOptions-XX:+LogVMOutput-XX:LogFile=../sonatype-work/nexus3/log/jvm.log-XX:-OmitStackTraceInFastThrow-Djava.net.preferIPv4Stack=true-Dkaraf.home=.-Dkaraf.base=.-Dkaraf.etc=etc/karaf-Djava.util.logging.config.file=etc/karaf/java.util.logging.properties-Dkaraf.data=../sonatype-work/nexus3-Dkaraf.log=../sonatype-work/nexus3/log-Djava.io.tmpdir=../sonatype-work/nexus3/tmp-Dkaraf.startLocalConsole=false-Djdk.tls.ephemeralDHKeySize=2048
3、配置 Nexus 使用的 JDK 或 JRE 路径,该配置项的参数名为 INSTALL4J_JAVA_HOME_OVERRIDE ,它就在 Nexus 的可执行文件bin/nexus 中 ,该文件非常大,先用grep命令筛选一下 ```shell# vi /opt/nexus-3.37.1-01/bin/nexus.rcrun_as_user="k8s"
查找INSTALL4J_JAVA_HOME_OVERRIDE
[k8s@localrepo opt]$ grep -i “INSTALL4J_JAVA_HOME_OVERRIDE” /opt/nexus-3.37.1-01/bin/nexusINSTALL4J_JAVA_HOME_OVERRIDE=
test_jvm “$INSTALL4J_JAVA_HOME_OVERRIDE”
进行备份
[k8s@localrepo opt]$ cp /opt/nexus-3.37.1-01/bin/nexus /opt/nexus-3.37.1-01/bin/nexus.bak
用sed替换
[k8s@localrepo opt]$ sed -i “s%# INSTALL4J_JAVA_HOME_OVERRIDE=%INSTALL4J_JAVA_HOME_OVERRIDE=/opt/jdk8%g” /opt/nexus-3.37.1-01/bin/nexus
4、将 Nexus 服务配置为操作系统 systemd 类的服务:```shell# sudo vi /etc/systemd/system/nexus.service[Unit]Description=nexus serviceAfter=network.target[Service]Type=forkingLimitNOFILE=65536ExecStart=/opt/nexus-3.37.1-01/bin/nexus startExecStop=/opt/nexus-3.37.1-01/bin/nexus stopUser=k8sRestart=on-abortTimeoutSec=600[Install]WantedBy=multi-user.target# 启动 nexux 服务,并设置为开机自启sudo systemctl daemon-reloadsudo systemctl enable nexus.servicesudo systemctl start nexus.service
2.3 配置阿里云代理
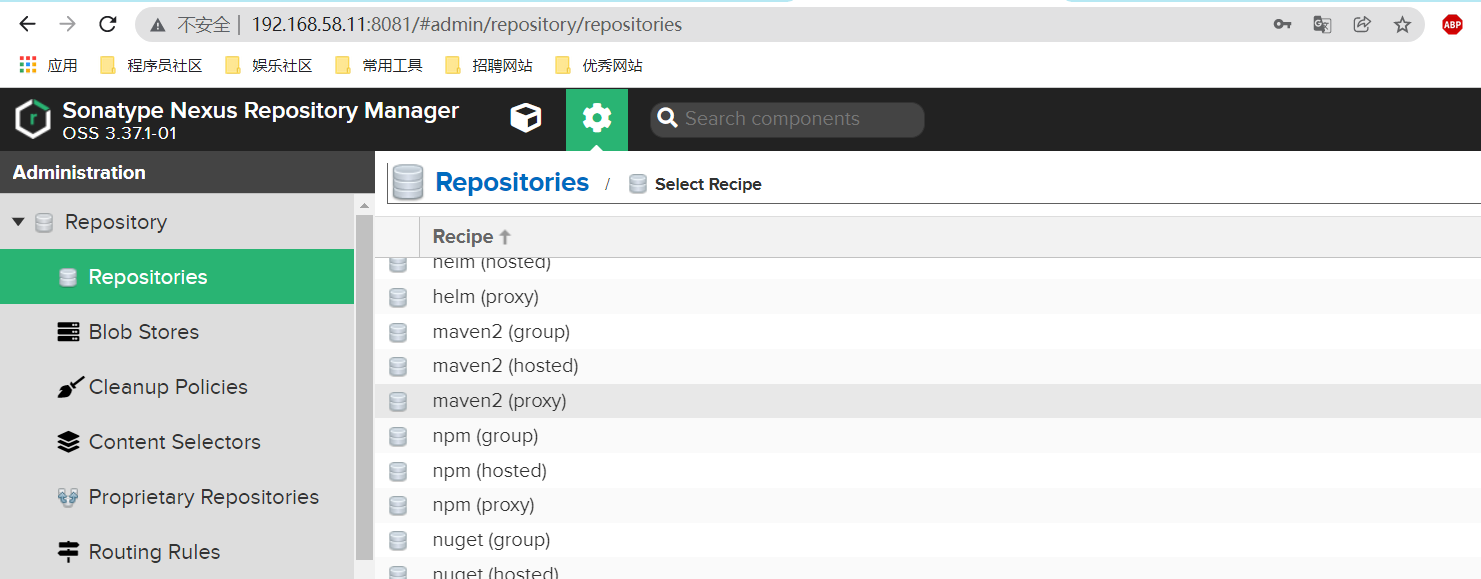
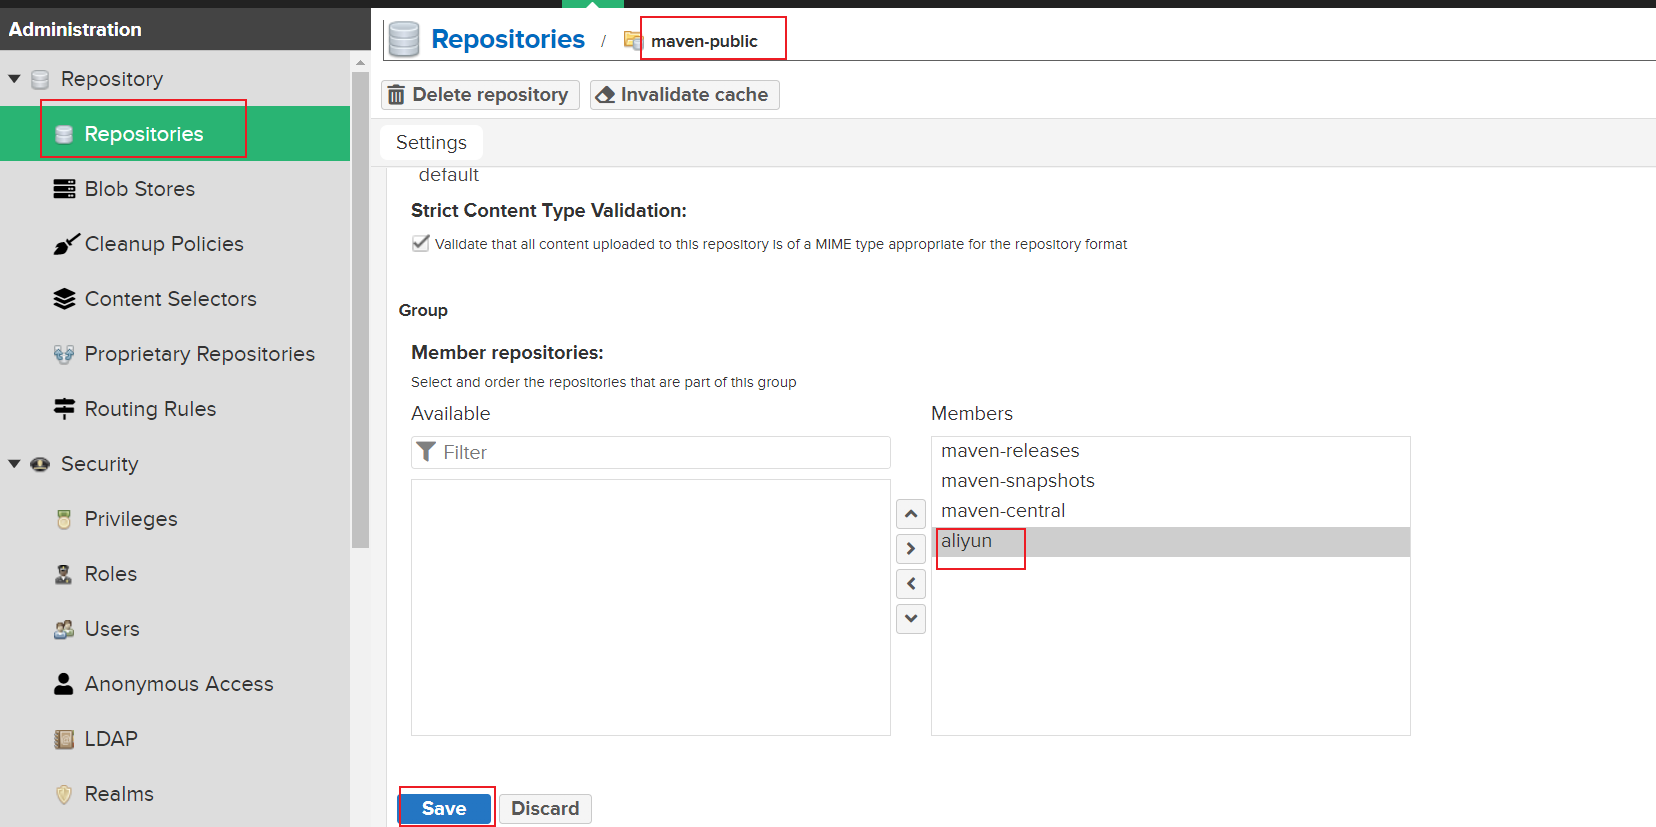
1、启动 nexus ,登录后,选择顶部菜单栏上的设置按钮 -> 左侧 Repository -> repositories > maven2(proxy) 。
2、在条件框中填写阿里云镜像地址:http://maven.aliyun.com/nexus/content/groups/public/
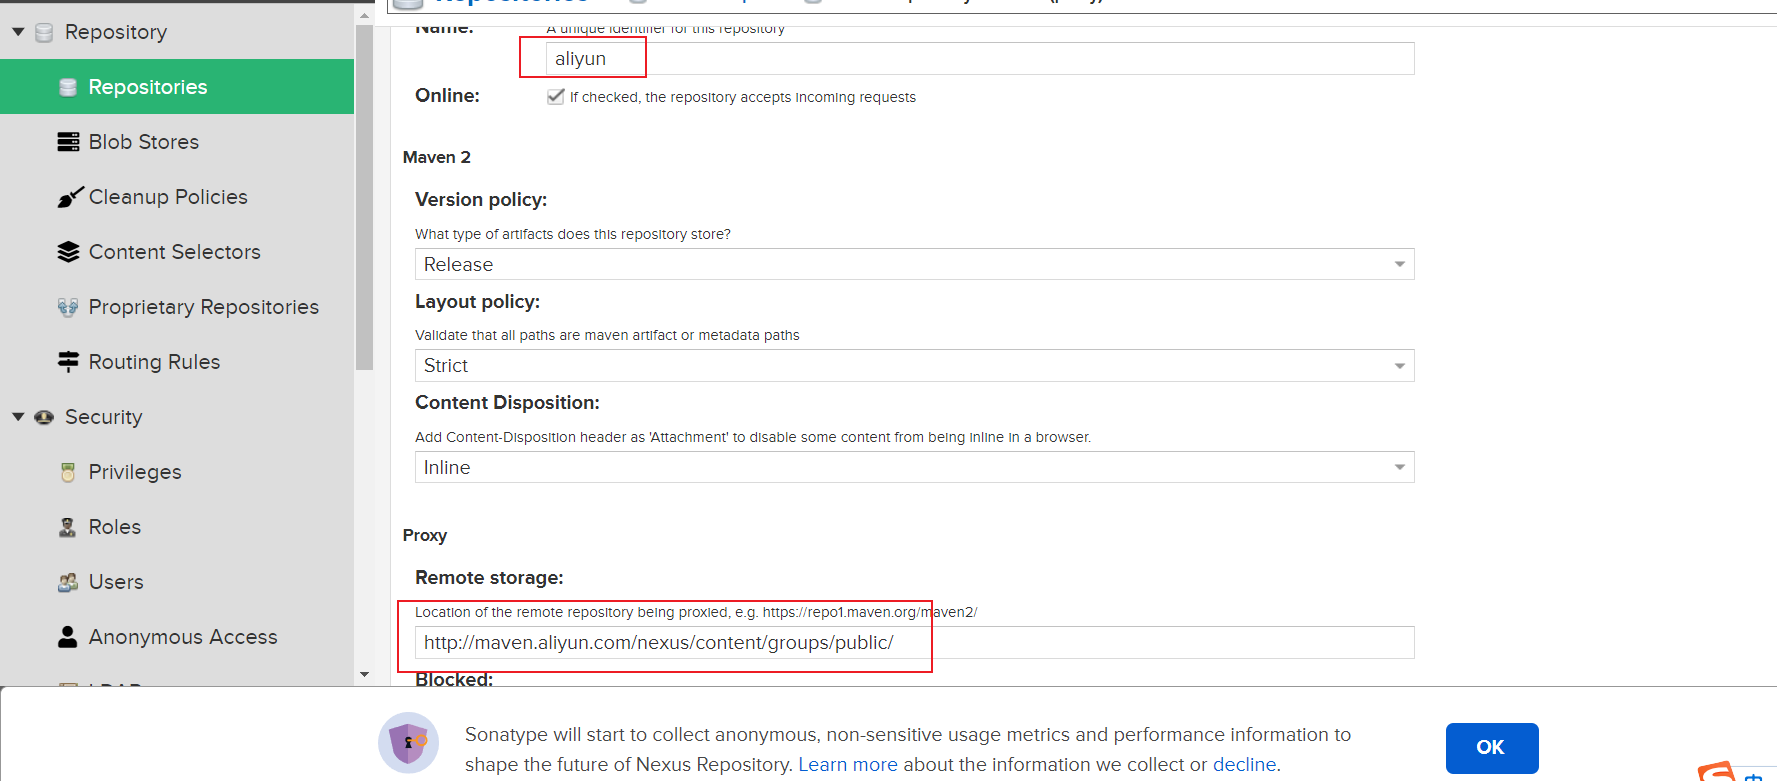
3、将阿里云镜像地址添加到 maven-public 库里。
2.4 上传jar包到nexus
我这里只会通过 IDEA 手动推送 jar 包到 nexus,只需要在 IDEA 中的 pom.xml 配置 sonar-maven-plugin 这个插件即可。
pom.xml
<build><pluginManagement><plugins><plugin><groupId>org.sonarsource.scanner.maven</groupId><artifactId>sonar-maven-plugin</artifactId><version>3.7.0.1746</version></plugin></plugins></pluginManagement></build>
3. 配置JDK11
从 yum 本地库下载所需的安装包,前提是本地已经配置 yum 本地库客户端。
说明:sonarqube8.9.1 需要 postgresql13,而 postgresql 支持的 JDK 版本为 11。
1、下载 JDK11 安装包。
# 对于docker-ce和harbor安装包,可以使用sudo dnf install -y http://localrepo.io:82/Docker-CE/Packages/containerd.io-1.4.12-3.1.el7.x86_64.rpm
# 对于其他的,使用curl
sudo curl -L http://localrepo.io:82/JDK/jdk-11.0.8_linux-x64_bin.tar.gz -o jdk-11.0.8_linux-x64_bin.tar.gz
2、解压缩并重命名。
sudo tar -zxvf jdk-11.0.8_linux-x64_bin.tar.gz
sudo mv jdk-11.0.8/ jdk11
3、配置环境变量。
#添加如下内容:
sudo vi /etc/profile

export JAVA_HOME=/opt/jdk11
export CLASSPATH=.:$JAVA_HOME/jre/lib/rt.jar:$JAVA_HOME/lib/dt.jar:$JAVA_HOME/lib/tools.jar
export PATH=$PATH:$JAVA_HOME/bin

# 环境变量生效
source /etc/profile
4. 配置Postgresql13
1、下载 postgresql13 相关 rpm 包到 /opt/ 目录下。
sudo curl -L http://localrepo.io:82/Postgresql/postgresql13/postgresql13-13.5-1PGDG.rhel8.x86_64.rpm -o postgresql13-13.5-1PGDG.rhel8.x86_64.rpm
sudo curl -L http://localrepo.io:82/Postgresql/postgresql13/postgresql13-contrib-13.5-1PGDG.rhel8.x86_64.rpm -o postgresql13-contrib-13.5-1PGDG.rhel8.x86_64.rpm
sudo curl -L http://localrepo.io:82/Postgresql/postgresql13/postgresql13-libs-13.5-1PGDG.rhel8.x86_64.rpm -o postgresql13-libs-13.5-1PGDG.rhel8.x86_64.rpm
sudo curl -L http://localrepo.io:82/Postgresql/postgresql13/postgresql13-server-13.5-1PGDG.rhel8.x86_64.rpm -o postgresql13-server-13.5-1PGDG.rhel8.x86_64.rpm
2、在 /opt/ 目录下执行安装命令。
sudo yum localinstall *.rpm -y

# 在线安装
sudo yum install -y https://download.postgresql.org/pub/repos/yum/reporpms/EL-7-x86_64/pgdg-redhat-repo-latest.noarch.rpm
sudo yum install -y postgresql13-server
3、初始化数据库,并设置开机启动。
在 PostgreSQL 安装成功之后,默认会创建一个名为 postgres 的 Linux 用户;在初始化数据库后,会创建一个 postgres 的数据库来存储数据库的基础信息; 并且会初始化一个数据库超级用户 postgres。
# 初始化数据库
sudo /usr/pgsql-13/bin/postgresql-13-setup initdb
# 设置开机启动
sudo systemctl enable --now postgresql-13
4、修改 postgres 数据库用户密码。(这是 postgres 数据库的默认用户)。
# 在root用户下操作
su - postgres
psql -c "alter user postgres with password 'postgres'"
# 使用 psql 命令测试连接,同时提供用户名和数据库名称(可选),如:psql -U <dbuser> -h <serverip> -p 5432 <dbname>
psql -U postgres -h 127.0.0.1 -p 5432 postgres
5、修改 postgres 用户密码。(这是 linux 用户)
# 在root用户下修改
passwd -d postgres
passwd postgres
6、为 SonarQube 创建数据库和账号。
# 切换到postgres用户执行下列命令:
-bash-4.2$ psql
# 创建sonar数据库
postgres=# create database sonar;
CREATE DATABASE
# 创建sonar用户
postgres=# create user sonar;
CREATE ROLE
# 设置密码
postgres=# alter user sonar with password 'postgres';
ALTER ROLE
# 给soner用户授权
postgres=# alter role sonar createdb;alter role sonar superuser;alter role sonar createrole;
ALTER ROLE
ALTER ROLE
ALTER ROLE
# 更改sonar数据库属主
postgres=# alter database sonar owner to sonar;
ALTER DATABASE
# 查看用户
postgres=# \du
                           角色列表
 角色名称 |                    属性                    | 成员属于
----------+--------------------------------------------+----------
 postgres | 超级用户, 建立角色, 建立 DB, 复制, 绕过RLS | {}
 sonar    | 超级用户, 建立角色, 建立 DB                | {}
7、设置 postgresql13 远程访问。
# 1、修改文件/var/lib/pgsql/13/data/postgresql.conf
listen_addresses = '*'

# 2、修改文件 /var/lib/pgsql/13/data/pg_hba.conf,新增内容如下:
host all all 0.0.0.0/0 trust

# 3、重启服务
systemctl restart postgresql-13.service
5. 配置GitLab
执行 GitLab 和 SonarQube 需要配置一些 Linux 参数:
1、设置 Linux 系统参数,添加如下内容。
# sudo vi /etc/sysctl.conf
vm.max_map_count=524288 # 一个进程可以拥有的 VMA(虚拟内存区域)的数量
fs.file-max=131072 # 系统级别所有进程可以打开的文件描述符的数量

# 使配置生效
sudo sysctl -p #
2、修改 limits.conf 文件,添加如下内容。
#sudo vi /etc/security/limits.conf
* - nofile 131072
* - nproc 8192

# 需要重新登录才能生效
3、安装并配置所需的依赖环境。
# policycoreutils -安全漏洞工具;openssh-server -加密远程登录工具;postfix -邮件功能
sudo dnf install curl policycoreutils openssh-server openssh-clients postfix -y

# 启用 sshd 服务
sudo systemctl enable --now sshd

# 开放 http 端口
sudo firewall-cmd --permanent --add-service=http
sudo systemctl reload firewalld

# 启用邮件服务
sudo systemctl enable --now postfix
4、执行本地安装。
# 下载包到 /opt/ 目录下
sudo curl -L http://localrepo.io:82/Gitlab/gitlab-ce-14.5.2-ce.0.el8.x86_64.rpm -o gitlab-ce-14.5.2-ce.0.el8.x86_64.rpm

# 本地安装
sudo yum install -y gitlab-ce-14.5.2-ce.0.el8.x86_64.rpm
- gitlab 主要配置文件:/etc/gitlab/gitlab.rb
- 代码仓库保存位置:/var/opt/gitlab/git-data/repositories/
- 代码仓库备份位置:/var/opt/gitlab/backups/。
- postgresql 数据及配置目录:/var/opt/gitlab/postgresql/data/
- redis 默认配置目录:/var/opt/gitlab/redis
- 各服务的日志目录:/var/log/gitlab/
5、配置服务器 ip 端口和时区,修改 /etc/gitlab/gitlab.rb 文件。
# 配置服务器ip和时区
external_url 'http://192.168.58.12' # 修改为服务器的url或ip,指的是gitlab的访问地址
gitlab_rails['time_zone'] = 'Asia/Shanghai'

# 配置邮件发送,下面的所有qq账号都只是发件人的账号,收件人账号不在这里配置。
gitlab_rails['smtp_enable'] = true
gitlab_rails['smtp_address'] = "smtp.qq.com"
gitlab_rails['smtp_port'] = 465
gitlab_rails['smtp_user_name'] = "2711845964@qq.com" # 自己的qq邮箱账号
gitlab_rails['smtp_password'] = "umnnlyikqlfjdegi" # 开通smtp时返回的授权码
gitlab_rails['smtp_domain'] = "qq.com"
gitlab_rails['smtp_authentication'] = "login"
gitlab_rails['smtp_enable_starttls_auto'] = true
gitlab_rails['smtp_tls'] = true
gitlab_rails['smtp_openssl_verify_mode'] = 'none'
gitlab_rails['gitlab_email_from'] = "2711845964@qq.com" # 指定发送邮件的邮箱地址
gitlab_rails['gitlab_email_reply_to'] = '2711845964@qq.com'
user["git_user_email"] = "2711845964@qq.com"
6、这里注意,每次修改完配置文件,都需要使用 reconfigure 命令重载配置文件。
gitlab-ctl reconfigure # 重载配置文件
gitlab-ctl start # 启动所有 gitlab 组件
gitlab-ctl stop # 停止所有 gitlab 组件
gitlab-ctl restart # 重启所有 gitlab 组件
gitlab-ctl status # 查看服务状态
gitlab-ctl tail # 查看日志
7、通过 gitlab-ctl start 启动 gitlab,浏览器访问:http://192.168.58.12,初始用户名 root,如果安装的 gitlab-ce 版本是 14+,密码保存在 /etc/gitlab/initial_root_password。
注意:gitlab 创建项目后,主分支不再是 master,而是 main。
6. 配置SonarQube
1、下载包到 /opt/ 目录下,并进行解压缩,重命名。
sudo curl -L http://localrepo.io:82/Sonarqube/sonarqube-8.9.1.zip -o sonarqube-8.9.1.zip
sudo dnf install unzip
sudo unzip sonarqube-8.9.1.zip
sudo mv sonarqube-8.9.1.44547/ sonarqube-8.9.1
2、修改配置信息。
#sudo vi /opt/sonarqube-8.9.1/conf/sonar.properties

# 设置数据库连接,下面的localhost不要改成ip
sonar.jdbc.username=sonar
sonar.jdbc.password=postgres
sonar.jdbc.url=jdbc:postgresql://localhost/sonar

# 配置Elasticsearch存储路径
sonar.path.data=/opt/sonarqube-8.9.1/data
sonar.path.temp=/opt/sonarqube-8.9.1/temp

# 修改web服务配置,说明一下,启动后访问地址:http://你的ip:9003/sonar
sonar.web.context=/
sonar.web.port=1088
3、因为 sonarqube 不能由 root 用户启动,我们这里指定 k8s 用户来启动。
sudo chown -R k8s:k8s /opt/sonarqube-8.9.1/
4、启动 sonarqube,需要使用 k8s 用户。
su k8s
/opt/sonarqube/bin/linux-x86-64/sonar.sh start
5、可以在 /logs/ 目录下查看 sonarqube 启动日志。
6、浏览器访问:http://192.168.58.12:1088 进入登录页面,初始用户名密码为 admin。
7、将 sonarqube 设置为服务,开机就启动。
# 1、设置为服务
[Unit]
Description=SonarQube Server
After=syslog.target network.target
[Service]
Type=forking
ExecStart=/opt/sonarqube-8.9.1/bin/linux-x86-64/sonar.sh start
ExecStop=/opt/sonarqube-8.9.1/bin/linux-x86-64/sonar.sh stop
LimitNOFILE=131072
LimitNPROC=8192
User=k8s
Group=k8s
Restart=on-failure
[Install]
WantedBy=multi-user.target

# 2、配置conf/wrapper.conf,设置jdk
wrapper.java.command=/opt/jdk11/bin/java

# 3、配置sonar.sh启动用户
RUN_AS_USER=ecadmin


# 启动 SonarQube 服务,并设置为开机自启
sudo systemctl daemon-reload
sudo systemctl start sonarqube.service
sudo systemctl enable --now sonarqube.service

# 查看服务状态
systemctl status sonarqube

# 如果你是在做升级,你还需要重建elasticsearch data的索引
sudo systemctl stop sonar.service
sudo rm -rf /opt/sonarqube/data/es*
sudo systemctl start sonar.service
7. 配置Maven
1、下载并解压缩 apache-maven-3.6.3 到 /opt/ 目录下。
sudo curl -L http://localrepo.io:82/Maven/apache-maven-3.6.3-bin.tar.gz -o apache-maven-3.6.3-bin.tar.gz
tar -zxvf apache-maven-3.6.3-bin.tar.gz
2、配置环境变量。
# vi /etc/profile
export M2_HOME=/opt/apache-maven-3.6.3
export PATH=$PATH:$JAVA_HOME/bin:$M2_HOME/bin

# 使环境变量生效
source /etc/profile
8. 配置Sonar-Scanner
1、下载并解压缩 sonar-scanner-4.6.2.2472-linux.zip,重命名。
sudo unzip sonar-scanner-cli-4.6.2.2472-linux.zip
sudo mv sonar-scanner-4.6.2.2472-linux/ sonar-scanner-4.6.2
2、修改配置文件,指定 sonar 服务器。
# sudo vi /opt/sonar-scanner-4.6.2/conf/sonar-scanner.properties
sonar.host.url=http://192.168.58.12:1088
sonar.sourceEncoding=UTF-8
sonar.login=admin
sonar.password=123
3、配置环境变量。
# sudo vi /etc/profile
export PATH="$PATH:/opt/sonar-scanner-4.6.2/bin"
# source /etc/profile
4、查看 sonar-scanner 版本:sonar-scanner -v。
9. 配置GitLab-Runner
1、下载安装 gitlab-runner 包,会在 /usr/bin 生成可执行文件 gitlab-runner。
sudo curl -L http://localrepo.io:82/Gitlab/gitlab-runner-14.5.2-1.x86_64.rpm -o gitlab-runner-14.5.2-1.x86_64.rpm
sudo yum install -y gitlab-runner-14.5.2-1.x86_64.rpm
2、创建软链接:sudo ln -s /usr/bin/gitlab-runner /usr/local/bin/gitlab-runner。
3、授予执行权限:sudo chmod +x /usr/local/bin/gitlab-runner。
4、查看 gitlab-runner 版本:gitlab-runner -v。

若有收获,就点个赞吧
0 人点赞
