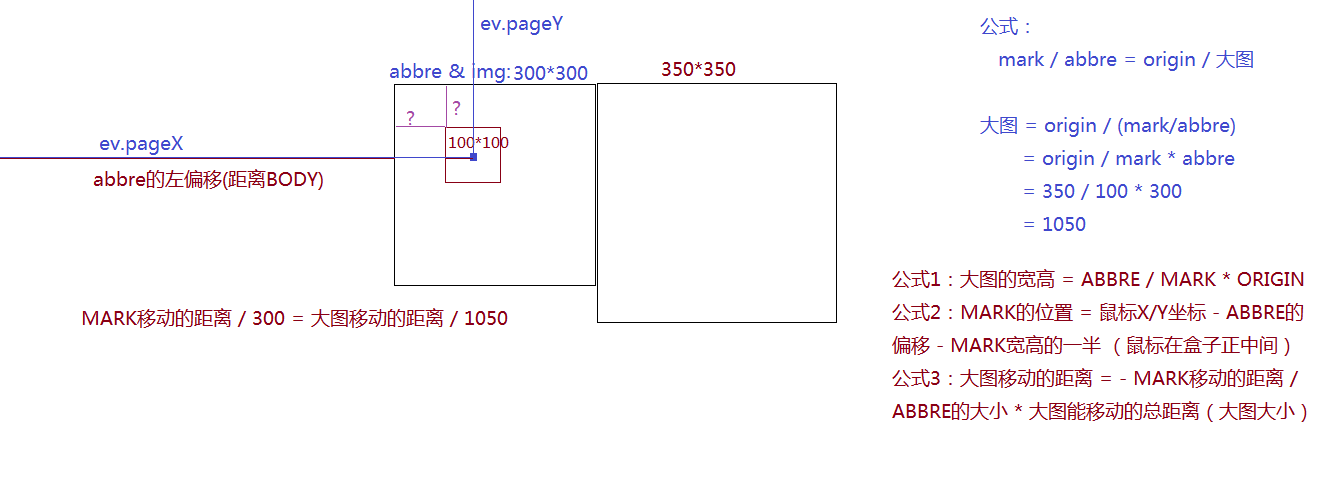
一、放大镜
1. 需求
需求:实现一个电商放大镜的效果(放大3倍);
默认展示原图
当鼠标移入原图盒子时,原图盒子中的遮罩层以及装大图的盒子都要出现;
当鼠标在原图盒子中移动时,遮罩层要跟随鼠标一起移动,但是盒子不能超出原图的盒子边界(带边界限制的鼠标跟随);
大图展示的部分正好是盖住的原图部分;
遮罩层和大图运动方向相反,遮罩层在原图盒子中移动距离x,大图需要移动-3x的距离;
当鼠标移出原图时,遮罩层和大图都要消失;
2. 思路
思路:放大镜放大3倍
有两个大盒子,一个用来装原图的 box1,另一个是用来装大图的 box2;box1 和 box2 是宽高是相等的;
box1下面有一个遮罩层 mask,这个遮罩层盖住 box1 部分和 box2 露出的大图的部分是相同的,所以有一个比例关系:mask 的宽高 / box1 的宽高 = box2 / 大图片的尺寸;
mask 要相对于 box1 绝对定位,大图片相对于 box2 绝对定位;
监听 box1 的 onmouseenter 事件,当事件触发时,设置 mask 和 box2 的 display: block;
鼠标移动时 mask 要跟随鼠标,需要监听 box1 的 onmousemove 事件,在事件函数中实现鼠标带边界的中心跟随;
在 mask 在 box1 中移动的时候,大图片 bigImg 要向相反的方向移动;如果 mask 移动 x,那么 bigImg 需要移动 -3x 的距离;
当鼠标移出 box1 的时候,mask 和 box2 消失,所以需要监听 box1 的 leave 事件,在事件函数中把 mask 和 box2 的 display 设置为 none
3. 鼠标跟随
// 实现一个鼠标跟随效果:// 页面中有一个盒子 BOX,当鼠标移动的时候,要让盒子 box 跟随鼠标,保持鼠标处于盒子的中心位置;// ?? 怎么实现??// 1. 监听 document 的 onmousemove 事件// 2. 实时获取鼠标的位置,把鼠标的位置坐标设置成元素的 left 和 toplet $ = selector => document.querySelector(selector);let box = $('.box');document.onmousemove = function (e) {// console.log(e.clientX, e.clientY);// 元素的 left 值和 top 值设置的是元素的左上角点距离 body 的左边框和上边框的距离;直接设置会导致鼠标一直处于元素的左上角// box.style.left = e.clientX + 'px';// box.style.top = e.clientY + 'px';// 为了让鼠标处于盒子的中心位置,因为元素在跟着鼠标动,鼠标的位置是不能改的,为了让鼠标在盒子中心位置,所以需要让 clientX 减去 半个盒子的宽,clientY - 半个盒子的高。let left = e.clientX - box.offsetWidth / 2;let top = e.clientY - box.offsetHeight / 2;// 把 left 和 top 设置给元素box.style.left = left + 'px';box.style.top = top + 'px';};
4. 设置边界
// 鼠标跟随,盒子不能超出浏览器的可视窗口// 边界限制的原理:用户看到的是盒子不能超过浏览器窗口;事实上是 left 和 top 不能超过某个值;// let 和 top 的最小值0;// 如何求 left 和 top 的最大值?// left 的最大值 = 浏览器可视窗口的宽 - 盒子宽// top 的最大值 = 浏览器可视窗口的高 - 盒子高function win(attr) {return document.documentElement[attr] || document.body[attr];}let $ = selector => document.querySelector(selector);let box = $('#box');// 求left和top的最大值let maxL = win('clientWidth') - box.offsetWidth;let maxT = win('clientHeight') - box.offsetHeight;// left和top的最小值let minL = 0;let minT = 0;// 监听 document 的 onmousemove 事件,在事件中实时计算盒子的 left 和 top;document.onmousemove = function (e) {// 1. 根据鼠标的位置计算盒子的 left 和 toplet left = e.clientX - box.offsetWidth / 2;let top = e.clientY - box.offsetHeight / 2;// 2. 判断是否越界,如果越界就需要修正(比最小值还小,就等于最小值;比最大值还大,就等于最大值)if (left < minL) {left = minL;}if (left > maxL) {left = maxL;}if (top < minT) {top = minT;}if (top > maxT) {top = maxT;}// 3. 把 left 和 top 设置给元素box.style.left = left + 'px';box.style.top = top + 'px';};
二、具体实现
放大镜html
<!DOCTYPE html><html lang="en"><head><meta charset="UTF-8"><title>放大镜</title><style>* {margin: 0;padding: 0;}body {overflow: hidden;/*清浮动*/}.box1, .box2 {margin: 50px;position: relative;float: left;width: 300px;height: 300px;border: 1px solid red;overflow: hidden;}.box1 img {width: 100%;height: 100%;}.mask {display: none;position: absolute;top: 0;left: 0;width: 100px;height: 100px;background: rgba(0, 0, 0, .5);/*cursor: pointer; 小手*//*cursor: not-allowed; 禁止*/cursor: move; /*十字 表示可以移动*/}.box2 {display: none;}.box2 img {position: absolute;width: 900px;height: 900px;}/*100 / 300 = 300 / 900*/</style></head><body><div class="box1" id="box1"><img src="iphone.jpg" alt=""><div class="mask"id="mask"style="width: 100px; height: 100px;left: 0;top: 0;"></div></div><div class="box2" id="box2"><img src="iphone.jpg" class="bigImg" id="bigImg"></div><script src="js/放大镜.js"></script></body></html>
放大镜js
// 1. 获取元素let $ = selector => document.querySelector(selector);let box1 = $('.box1');let mask = $('.mask');let box2 = $('.box2');let bigImg = $('.bigImg');// 2. 监听 box1 的进入和移出,让 mask 和 box2 消失隐藏box1.onmouseenter = function () {mask.style.display = box2.style.display = 'block';};box1.onmouseleave = function () {mask.style.display = box2.style.display = 'none';};// 3. 实现在 box1 中移动鼠标 mask 中心有边界跟随,并且 bigImg 相应移动// 这些都是 mask 移动边界值(left、top 的最大值和最小值)let minL = 0;let minT = 0;let maxL = box1.clientWidth - parseFloat(mask.style.width);let maxT = box1.clientHeight - parseFloat(mask.style.height);box1.onmousemove = function (e) {// 3.1 获取鼠标的位置let left = e.clientX - box1.offsetLeft - parseFloat(mask.style.width) / 2;let top = e.clientY - box1.offsetTop - parseFloat(mask.style.height) / 2;// 3.2 对鼠标位置进行修正if (left < minL) {left = minL;}if (left > maxL) {left = maxL;}if (top < minT) {top = minT;}if (top > maxT) {top = maxT;}// 3.3 把修正后的值设置给 maskmask.style.left = left + 'px';mask.style.top = top + 'px';// 3.4 按照放大比例,设置 bigImg 的 left 和 topbigImg.style.left = -3 * left + 'px';bigImg.style.top = -3 * top + 'px';};

1. 那么如果盒子不是设定好的呢?
<!DOCTYPE html><html><head><meta charset="UTF-8"><title>放大镜</title><!-- IMPORT CSS --><link rel="stylesheet" href="css/reset.min.css"><style>.magnifier {box-sizing: border-box;margin: 20px auto;width: 550px;}.magnifier .abbre,.magnifier .origin {float: left;}.magnifier .abbre {position: relative;box-sizing: border-box;width: 200px;height: 150px;}.magnifier .abbre img {width: 100%;height: 100%;}.magnifier .abbre .mark {display: none;position: absolute;top: 0;left: 0;width: 80px;height: 60px;background: rgba(255, 0, 0, .3);cursor: move;}.magnifier .origin {display: none;position: relative;box-sizing: border-box;width: 250px;height: 250px;overflow: hidden;}.magnifier .origin img {position: absolute;top: 0;left: 0;}</style></head><body><section class="magnifier clearfix"><!-- 左侧缩略图 --><div class="abbre"><img src="images/1.jpg" alt=""><div class="mark"></div></div><!-- 右侧原图(大图) --><div class="origin"><img src="images/2.jpg" alt=""></div></section><!--IMPORT JS--><script src="js/jquery.min.js"></script><script>let $abbre = $('.abbre'),$mark = $abbre.find('.mark'),$origin = $('.origin'),$originImg = $origin.find('img');//=>computedMark:计算MARK盒子的位置let abbreW = $abbre.outerWidth(),abbreH = $abbre.outerHeight(),abbreOffset = $abbre.offset(),markW = $mark.outerWidth(),markH = $mark.outerHeight(),originW = $origin.outerWidth(),originH = $origin.outerHeight(),originImgW = abbreW / markW * originW,originImgH = abbreH / markH * originH;//1.计算出大图的大小$originImg.css({width: originImgW,height: originImgH});function computedMark(ev) {//2.计算 MARK 的位置let markL = ev.pageX - abbreOffset.left - markW / 2,markT = ev.pageY - abbreOffset.top - markH / 2;let minL = 0,minT = 0,maxL = abbreW - markW,maxT = abbreH - markH;markL = markL < minL ? minL : (markL > maxL ? maxL : markL);markT = markT < minT ? minT : (markT > maxT ? maxT : markT);$mark.css({left: markL,top: markT});//3.控制大图移动移动的距离$originImg.css({left: -markL / abbreW * originImgW,top: -markT / abbreH * originImgH});}$abbre.mouseenter(function (ev) {$mark.css('display', 'block');$origin.css('display', 'block');computedMark(ev);}).mouseleave(function (ev) {$mark.css('display', 'none');$origin.css('display', 'none');}).mousemove(function (ev) {computedMark(ev);});</script></body></html>

